
I will grant that up ‘til now, the site as shown in many of the screenshots looks pretty mangy, with a gray body area, broken image links, box headings that don’t match the background, default text that means nothing in the context of the new site, and so forth. All of this needs to be changed to a professional and aesthetically pleasing interface, which will help encourage and facilitate the purchase of your goods.
Sounds easy enough, doesn’t it? Well, in a way it is and in a way it isn’t. The reason we still have designers with jobs is because by and large the average person on the street finds it difficult to produce a site that looks like it has had money invested in the design. But as much as they would tell you differently, designers (or creatives as I believe they are called) aren’t mythically endowed with superhuman senses to help them decide what does look good and what doesn’t. Anyone can do it, to varying degrees, by following the usual think before you act paradigm and applying a process to how they go about the business of designing a site.
Playing around with different combinations of color and layout is always worthwhile, and often teaches you more about the best way to do things than any process or book. You also have the luxury of having a website set up for you, which frees you to simply make changes here and there to achieve your design goals rather than develop the HTML from scratch. To some extent, this luxury actually restricts you because anything short of a total rewrite of the pages will mean your site retains some of the osCommerce flavor. But that’s not a bad thing at all!
In this chapter, we will look at the following topics:
- Language definitions
- Working with boxes and columns
- Dealing with images
- Modifying the stylesheet
- A few miscellaneous customizations
I should warn you before we continue that there is quite a lot involved with coming up with an entirely fresh, pleasing, and distinct look to a site. There are lots of fiddly little bits to play around with, so you should be prepared to spend a bit of time on this section because, after all, your site’s look and feel is really the face of your business.
Another thing to remember before we begin is that you should take some time to look at what is already out there. Many issues that you will encounter while designing your site have already been successfully dealt with all over the show—not only by osCommerce users of course. Also, don’t be scared to treat your design as an ongoing process—while it is never good to drastically change your site on a weekly basis, regular tweaking or upgrading of your interface can keep it modern and looking shiny new.
Obviously, there are quite a lot of modifications that need to be made to the default language in osCommerce. You may or may not want to change the headings of boxes, error messages, page text, and pretty much anything else that involves language on the site. In order to do this you need to edit the language of the various files presented in the Define Language section under Tools in the administration section. Navigating to this will bring up a screen with a host of different files available for editing (note that you can also do this through the File Manager section, but this will expose all the code in the file to you, which may well make it harder to do a simple language edit):
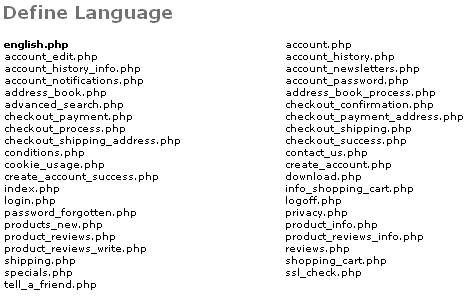
You can choose which language you want to work on by selecting it from the drop-down list at the top right of the screen. Please note that we will only deal with English in this book, since all the principles that apply to one language apply to any language. Also, Contechst Books only publishes English-language books, so it makes sense to only have the website in English.
Now, as you might have guessed, your job is to now go through each and every one of the files to modify the site to suit your needs. Editing a file is very simple: simply click on the name of the file and make the appropriate changes directly to the text. Let’s take a look at some of the more important files in this section by way of example.
Recall that Contechst Books does not have manufacturers, but would rather use the term ‘publisher’ on the site. Well, in order to make these changes, we open up english.php and change the occurrences of Manufacturer to Publisher, as shown in the following screenshot:
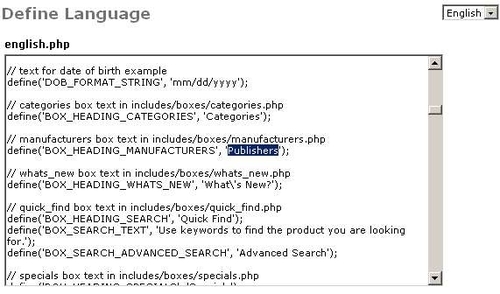
The highlighted text shows where the term Manufacturers has been changed to Publishers. Can you guess what effect this change will have on the site? Well, if you look at the line immediately above the one that was changed, which is a PHP comment line, you will see that this setting affects the includes/boxes/manufacturers.php file. This is because the english.php file actually holds information on all the generic language used on the site. Looking at it from another point of view, all expressions used only once, by one special file, should be or are in their appropriate file, and all other expressions that are used several times are in english.php.
As well as this, bear in mind that each file in the catalog folder has its partner file in the includes/languages/english folder to define the language terms there. Accordingly, rather than using the editor that is provided by osCommerce, you might want to open up the english.php file (or any other language file, for that matter) in a nice editor such as EditPlus in order to make it easier for you to edit the file. We will show the files being used from the admin tool for demonstrative purposes, but you will probably find you prefer to use a proper editor.
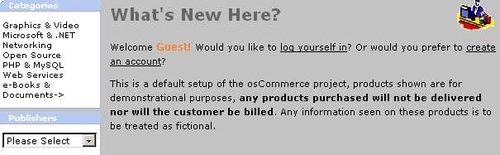
Now, look at the define statement again. It declares that the BOX_HEADING_MANUFACTURERS constant, which is used in the includes/boxes/manufacturers.php file, is the word Publishers. From this you should suspect that the heading of the manufacturers’ box, which is shown on all the pages of the site, will now be Publishers instead of Manufacturers. Taking a quick glance at the site confirms this (look at the box on the bottom left):
This, of course, is not the only occurrence of the term Manufacturer on the site! There are other candidates to replace, so we can continue searching our english.php file for the term Manufacturer. Before we do, though, make note of one very important point:
Note
These are PHP statements, which you are modifying, so you need to be aware that any changes to the actual code, such as removing a semi-colon by accident or adding in a single quote without escaping it with a backslash, will result in problems.
Take a look at the setting below the one we changed in the earlier screenshot to see an example of how a backslash escapes a quote in the text part of a define statement. As it so happens, we need only make one more replacement of the term Manufacturer, as well as converting this line:
define(‘HEADER_TITLE_MY_ACCOUNT’, ‘My Account’);
to this line:
define(‘HEADER_TITLE_MY_ACCOUNT’, ‘Your Account’);
and we are done with this file for now (the last change rewords the account login presented at the top right of the screen simply because I prefer this wording). Before we move on, though, it is useful to make note of the main files and parts of the site covered by english.php:
header.phpfooter.php- Box text
- Error messages
- Customer-information text
- Navigation text
- Image button text
- Personalized greeting text
- Footer text—you will probably want to remove this or change it to your own copyright notice. (Please read the conditions for modifying this text, given in the comment above it in the
english.phpfile.)
Remember to always check that whatever changes you make to these files don’t cause errors or unexpected results on the site. Apart from that, you simply need to implement whichever changes you require as you go along. Most of the default text is pretty standard and shouldn’t need too much attention.
When you first log on to your osCommerce site, the index page provides you with lots of helpful information about how to do things and where to go for help. This obviously needs a complete overhaul, and specifically in the case of the demo site, we don’t want to waste readers’ time with a whole lot of information. Since we are a specialist bookstore, we expect the customer who is visiting to be looking specifically for technical books, so rather than introduce ourselves and tell them what we do (because they more than likely know), we want to display our newest and upcoming products.
Accordingly, the first change we make to the file is change the first line of code to the following:
define(‘TEXT_MAIN’, ‘’);
Now remember: this may not be necessarily suitable for your store! You may wish to add some introductory information, especially if you are retailing a product that merits a bit of explanation. If this is the case, create your text based on the guidelines of good language design (there is a discussion on Search Engine Optimization in the final chapter) and insert it in between the empty quotes in the TEXT_MAIN define statement. Remember to add HTML tags where appropriate to emphasize important points and so forth, as well as escape any single quote characters with a backslash.
Apart from this change, we have also had to replace a few occurrences of Manufacturer, with Publisher on the following lines:
define(‘TABLE_HEADING_MANUFACTURER’, ‘Publisher’);
define(‘TEXT_ALL_MANUFACTURERS’, ‘All Publishers’);
Again, since we don’t wish to have the chirpy Let’s see what we have here text at the top of our product category pages, the relevant line was changed to this:
define(‘HEADING_TITLE’, ‘’);
Please bear in mind that while this means that no text will be shown because of the empty string provided in the HEADING_TITLE define statement, it doesn’t mean that the space allotted to this text disappears. If you want to remove this space completely, then you need to work with the HTML that is responsible for this section of the page directly.
A category page, in this case PHP & MySQL, after these modifications looks like this:
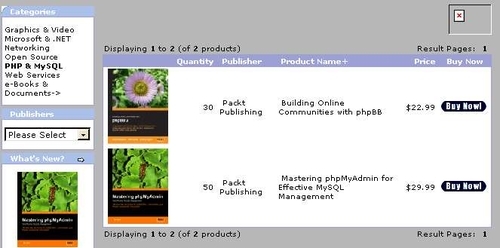
Notice that the box heading in the category listing now reads Publisher instead of Manufacturer, and that the usual Let’s see what we have here text is absent. Of course, we still have a horrid broken link at the top right of the screen, but this will be dealt with in the Dealing with Images section later in this chapter.
The rest of the files by and large deal with cosmetic touches and will not really impact on the running of your site barring one or two exceptions. For example, you will need to insert your own information into the conditions.php and privacy.php files in order to present accurate legal information about your store.
Incidentally, when you look at a product listing such as the one shown in the previous screenshot, you will notice that there is a plus sign next to the Product Name column heading. This is because, along with the other headings in the product listing, you can order the results in ascending or descending form. I leave it to you to play around with this to get the hang of it—if you don’t think that this functionality is obvious, then perhaps you could do something to ensure that your customers know it exists. A note about it on the page, or highlighting the links might work in this case.
Since we are on the topic of language, there is a useful little trick that you may as well learn here since these two files (conditions.php and privacy.php) are closely related. Often on the ‘conditions’ and ‘terms of use page’ of a site, there is a heading called ‘privacy’, with a link to a page that holds all the privacy information. This happens because, intuitively, the privacy conditions should come under the conditions heading, but there is often too much information to present on a single page and anyway it helps to distinguish the two logically. Accordingly you will need to know how to create a link from one page to the other.
The conditions and terms of use page on contechst.com uses a link to take the reader to the privacy page within the actual body of the text. This is accomplished using the HTML <a> tag, with an href attribute. The actual line in the text looks like this:
<a href=’http://localhost/catalog/privacy.php’>here.</a>
This tells the browser to render the word here as a link, which the user can click on to open up the page specified by the href attribute—in this case http://localhost/catalog/privacy.php. Notice that the single quotes that are used to delimit the URL have to be escaped with a backslash for the benefit of osCommerce.
Note
Important: While the method shown here is pretty standard, you might want to consider the fact that it is possible that this will not propagate your customer’s session ID. Make sure you check that sessions are maintained. If they aren’t, then you will need to use the tep_href_link function like so:
<a href="’.tep_href_link(FILENAME_PRIVACY, ‘’, ‘NONSSL’).’">’.’here’.’</a>.
So, we can now go from the conditions.php file as shown here (at present the formatting for the link is similar to the background color, so the here part of the sentence under Privacy doesn’t show up well):
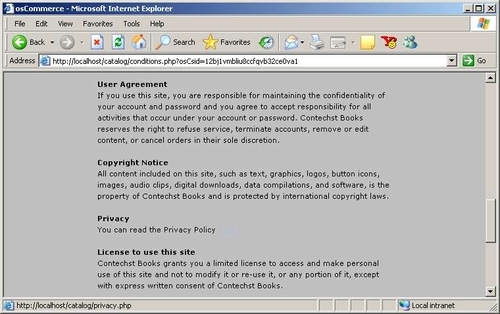
to the privacy policy page, privacy.php, which is shown here:
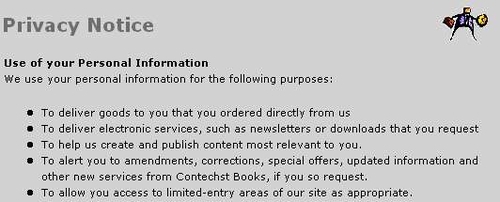
Notice that quite a lot of formatting has been done to this text using HTML. The only way you will learn how to achieve the language formatting you desire is by practicing and practicing. As a matter of interest, the HTML for the section of the Privacy Notice that is visible in the previous screenshot, is shown here:
<b>Use of your Personal Information</b>
<br />
We use your personal information for the following purposes:
<br />
<br />
<ul>
<li>To deliver goods to you that you ordered directly from us </li>
<li>To deliver electronic services, such as newsletters or downloads that you request </li>
<li>To help us create and publish content most relevant to you. </li>
<li>To alert you to amendments, corrections, special offers, updated information and other new services from Contechst Books, if you so request. </li>
<li>To allow you access to limited-entry areas of our site as appropriate. </li>
</ul>
Specifically, the bulleted list is achieved by using the <ul> tag, which renders an unordered list, and its corresponding bullet points are created using the <li> tag, which stands for list item. We don’t have time to go into a full-on tutorial on HTML, but you are certainly encouraged to play around with it enough to become proficient.