
As you will have noticed over the course of the book so far, the site consists of a central column reserved for text or product images and information, surrounded on either side by columns of boxes, which hold anything from the navigation structure to a keyword search. Naturally, you might wish to change this general structure in favor of something that suits your site better. There is really an unlimited number of possible changes, and you could quite easily alter the structure sufficiently to eradicate most if not all the evidence of the original layout.
For the first time, we are going to put down the administration tool and get involved directly with the PHP code within the site’s files, and to get the ball rolling, we will start by removing a box. You know by now that contechst.com retails only English-language books and so there is now no longer any need to have a box showing the various languages available on the site. As a result, we would like to erase this box from the right-hand column entirely because it no longer serves any function. This is about the simplest operation we can perform on the site; it involves commenting out only a single line per box removed.
Go to the includes/column_right.php file in your catalog folder and open it up using your favorite editor. This file is responsible for including all the boxes found in the right-hand column of the site’s web pages. Now, look around the file until you find the following lines:
if (substr(basename($PHP_SELF), 0, 8) != ‘checkout’) {
include(DIR_WS_BOXES . ‘languages.php’);
include(DIR_WS_BOXES . ‘currencies.php’);
}
What do you think this statement is saying? Well, if you look at the first line involving an if statement, you can read it to mean:
If the substring of the $PHP_SELF variable—that holds the pagename of the current page—from the first character to the ninth, is not equal to the checkout then include the two files written here.
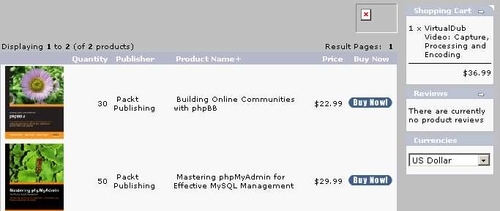
This is because, by default, the only time that you don’t want the customer to be able to change the language of the page is when you are already checking out any purchases he or she has made. At all other times, the languages box is displayed. Now, because we want to modify this behavior to never show the languages box, we simply want to prevent PHP from reading the include statement that inserts the box. We can do this with a simple comment, which will modify the statement to the following:
if (substr(basename($PHP_SELF), 0, 8) != ‘checkout’) {
// include(DIR_WS_BOXES . ‘languages.php’);
include(DIR_WS_BOXES . ‘currencies.php’);
}
Now, as always, we need to save these changes and go to the site to ensure that the modification has had the expected results. Looking at an arbitrary page that is not part of the checkout-process page (because the box is never displayed here anyway), we can see that the languages box is no longer shown down the right-hand side:
The process is really the same for removing any other box on the site. But what happens if you now want to move a box so that it appears before any other box—or even move it to the other column?
To move a box around, you simply have to move the statement that includes the box in the code. If you wanted to change columns, then you would have to move the code statement to the relevant column file—either the column_left.php or column_right.php file, depending on whether you wanted it on the left or right.
For example, let’s say you want to move Currencies to appear above the Reviews box in the right‑hand column. Copy and cut the following statement (which we have already seen):
if (substr(basename($PHP_SELF), 0, 8) != ‘checkout’) {
// include(DIR_WS_BOXES . ‘languages.php’);
include(DIR_WS_BOXES . ‘currencies.php’);
}
and paste it as shown here in the same file:
if (isset($HTTP_GET_VARS[‘products_id’])) {
if (basename($PHP_SELF) != FILENAME_TELL_A_FRIEND) include(DIR_WS_BOXES . ‘tell_a_friend.php’);
} else {
include(DIR_WS_BOXES . ‘specials.php’);
}
if (substr(basename($PHP_SELF), 0, 8) != ‘checkout’) {
// include(DIR_WS_BOXES . ‘languages.php’);
include(DIR_WS_BOXES . ‘currencies.php’);
}
require(DIR_WS_BOXES . ‘reviews.php’);
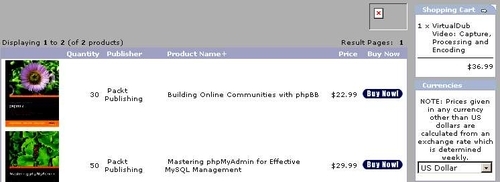
Save the changes, and view the results in an arbitrary file, once again avoiding the checkout pages. You will notice that the boxes have swapped around as intended:

It will be left to the reader to swap boxes between the left and right columns as desired. However, this should really only be an exercise because the left-hand side is already well organized as part of a tool to help customers locate the products they are searching for. What would be really nice now is if we could add a short note to the Currencies box to explain to customers that the exchange rate is not a live exchange rate, but has a lag of, say, up to two days.
There are a couple of ways to go about modifying boxes, and one is more correct that the other. "What could he possibly be on about, saying that one method is more correct than the other?" you may ask. Surely if both work then both are equally correct! This is perfectly true, but when I refer to degrees of correctness, what I mean is that the designers of osCommerce have gone about building the site in specific way, and if you modify the code in your site, you should at all times try to maintain the same conventions as the original site. If you don’t, it will be nearly impossible to guess how you made certain alterations when you come back to them in a year or so.
Sticking to the same conventions used by the osCommerce team will keep your code neat and easy to follow for anyone who has to look over it in the future. However, depending on what it is you need to do, it may not be possible to always stick to the coding convention. Because of this, I will show two methods of changing the Currencies box to insert a little note above the drop-down list of currencies—one involving the direct manipulation of code in the box file, and the other using osCommerce’s in-place convention.
The first method is more straightforward and is easier to implement. However, the second is the more correct method and is the one that is recommended.
Open up the code file that is responsible for creating the Currencies box, includes/boxes/ currencies.php. Look for the code that is used for populating the box’s content. It looks like this:
$info_box_contents[] = array(‘form’ => tep_draw_form(‘currencies’, tep_href_link(basename($PHP_SELF), ‘’, $request_type, false), ‘get’), ‘align’ => ‘center’, ‘text’ => tep_draw_pull_down_menu(‘currency’, $currencies_array, $currency, ‘onChange="this.form.submit();" style="width: 100%"’) . $hidden_get_variables . tep_hide_session_id());
Don’t worry about understanding everything here—it’s not important or relevant to you at the moment. What is important is that you can see that we have a variable called $info_box_contents, which is being filled with the information given on the right of the assignment (=) operator. From the name you should be able to deduce that this is the variable that will contain the contents of the Currencies information box.
Now, we want to add the note above the drop-down list, so we append it to the front of the text contents with the. operator and enclose it in quotes to denote that it is a string, like so:
$info_box_contents[] = array(‘form’ => tep_draw_form(‘currencies’, tep_href_link(basename($PHP_SELF), ‘’, $request_type, false), ‘get’), ‘align’ => ‘center’, ‘text’ => ‘NOTE: Prices given in any currency other than US dollars are calculated from an exchange rate which is determined weekly. <br>’ . tep_draw_pull_down_menu(‘currency’, $currencies_array, $currency, ‘onChange="this.form.submit();" style="width: 100%"’) . $hidden_get_variables . tep_hide_session_id());
Checking out the results on the site show us that we have made the changes successfully, but there is a problem in that the message doesn’t look neat because it is simply too long:
This shows that at least we can add text as we choose, but you would probably be better advised to put this type of information in your conditions.php file. However, this is fine for the purposes of this example, and so we will continue on and demonstrate the better way to perform this same change.
Delete any changes you have made to the box and return it to its original format. (Remember that you should really be making a backup of any files that you are worried you may break during the course of your work.) Now navigate to the Define Languages section of the admin tool and open up the english.php file discussed earlier in this chapter. Recall that one of the functions of english.php was to define a whole lot of text for various bits and pieces of the site. One of these bits is in fact the information boxes.
Navigate down to the section that deals with the Currencies box, as shown here:
// currencies box text in includes/boxes/currencies.php
define(‘BOX_HEADING_CURRENCIES’, ‘Currencies’);
Now, this section is reserved for defining constants that can be used by the box files. For example, the box heading, which we know to be Currencies, is defined here. What we would like to do is follow this convention by providing a constant declaration that can be used by currencies.php to output our message to the site. Add the following line like so:
// currencies box text in includes/boxes/currencies.php
define(‘BOX_HEADING_CURRENCIES’, ‘Currencies’);
define(‘BOX_CURRENCIES_TEXT’, ‘NOTE: Prices given in any currency other than US dollars are calculated from an exchange rate which is determined weekly. <br>’);
Now go back to the currencies.php file in your editor and append the constant we have just modified to the text key of the $info_box_content variable like this:
$info_box_contents[] = array(‘form’ => tep_draw_form(‘currencies’, tep_href_link(basename($PHP_SELF), ‘’, $request_type, false), ‘get’), ‘align’ => ‘center’, ‘text’ => BOX_CURRENCIES_TEXT . tep_draw_pull_down_menu(‘currency’, $currencies_array, $currency, ‘onChange="this.form.submit();" style="width: 100%"’) . $hidden_get_variables . tep_hide_session_id());
Now when you save the changes to both files and view any of the pages that include the Currencies information box, you will see the note correctly displayed. So why is this second way more correct than the first way? Take a look over the english.php file—you will notice that all the constants used in the information boxes are defined here, so this is the logical place to add that information in the future too. Otherwise you will end up having information defined all over the show and it soon becomes quite hard to keep track of everything.
What if instead of modifying the default information boxes, we need a new box?
We will demonstrate how to add a new box on our site in case you wish to add some of your own functionality at some stage. For the sake of demonstration, this box is going to be a placeholder for a live RSS feed on new technology developments that may be of interest to our customers. Don’t worry if you don’t know what an RSS feed is—we won’t be dealing with it in this book; what is important is that you learn to add new boxes.
The new box, added to the right-hand column of the site, will be called Tech Feed, and will be based on a modified version of the currencies.php file. Make a copy of the currencies.php file in your includes/boxes folder, and call it feed.php. Then go to the column_right.php file and add this file at the bottom of the code (before the closing ?> tag), like so:
require(DIR_WS_BOXES . ‘reviews.php’);
require(DIR_WS_BOXES . ‘feed.php’);
?>
Save the file and take a look at your site. You will notice that you now have two Currencies boxes. The reason for the duplication is of course that we haven’t modified feed.php to reflect the fact that it is now the Tech Feed box and not Currencies. So, to rectify this, open up feed.php in your editor and modify it so that it looks like this:
<!-- This is a custom box to house the contents of an RSS Feed. Originally created on 05/30/05 -->
<tr>
<td>
<?php
$info_box_contents = array();
$info_box_contents[] = array(‘text’ => BOX_HEADING_FEED);
new infoBoxHeading($info_box_contents, false, false);
$info_box_contents = array();
$info_box_contents[] = array(‘align’ => ‘center’, ‘text’ => BOX_FEED_TEXT);
new infoBox($info_box_contents);
?>
</td
</tr>
Of course one shouldn’t forget to use the english.php file to define the constants we are going to use for the feed box. So you will need to make the following additions to the english.php file—the best place to add this is directly after the code for the last box, as this is an intuitive place to look for it when you need to modify it in future:
// languages box text in includes/boxes/feed.php
define(‘BOX_HEADING_FEED’, ‘Tech Feed’);
define(‘BOX_FEED_TEXT’, ‘This is the future site of the RSS Web Feed!’);
Notice several things here:
The feed.php file uses the constants BOX_HEADING_FEED and BOX_FEED_TEXT, which are defined in english.php and are presented using the same convention as the rest of the files in osCommerce.
There are HTML tags before and after the PHP code in the feed.php file. This is necessary because of the way in which osCommerce handles information boxes. These tags simply tell the browser to create a new table cell within a table. The result of all this work should be much the same as the following screenshot:

Of course, this box doesn’t do anything useful yet, but as soon as you have a need for a new, out‑of‑the‑ordinary box, you know how to add one. You can do quite a lot with boxes now, and while most of the boxes presented on the site by default are pretty useful, you now at least have the option of chopping and changing things as you see fit. Of course, we don’t have to stop at modifying just boxes; we can also perform operations on the columns themselves.
Working with columns is a bit of a hassle because there is no single code file that will influence the entire site. Each change you make to the columns has to be made to every page on the site. Having a column down the left-hand side of the page is generally a good idea because users are used to navigating pages from the left of the screen. Also, many sites do not have a column down the right-hand side, preferring to let their content fill the page or even show adverts down the right-hand side in any extra space.
In order to rid yourself of the right-hand column (remember you can always add any boxes you want saved to the left-hand column or any other part of the page for that matter) you will need to go to each and every page that contains the right-hand column and look for the following code:
<!-- right_navigation //-->
<?php require(DIR_WS_INCLUDES . ‘column_right.php’); ?>
<!-- right_navigation_eof //-->
As you might well guess, the only change needed for removing the column entirely is to comment out that line like this:
<!-- right_navigation //-->
<?php
// require(DIR_WS_INCLUDES . ‘column_right.php’); ?>
<!-- right_navigation_eof //-->
This was done by way of example for the index.php file, and the results are as follows:
Of course, the right-hand column has disappeared, but the space it occupied has not. In order to close this space, you would need to modify the HTML on each page to remove the space allotted to this column, which should be shown directly above the column declaration. The line above the relevant column declaration reads:
<td width="<?php echo BOX_WIDTH; ?>" valign="top"><table border="0" width="<?php echo BOX_WIDTH; ?>" cellspacing="0" cellpadding="2">
Change it to:
<!--
<td width="<?php echo BOX_WIDTH; ?>" valign="top"><table border="0" width="<?php echo BOX_WIDTH; ?>" cellspacing="0" cellpadding="2">
-->
This will give you the following result:
You may well want to use the space given over to the old column for something else entirely, in which case you would simply modify the require statement that calls the column_right.php file so that it calls your own file, which you have placed in the same folder as the column_right.php file. So:
require(DIR_WS_INCLUDES . ‘column_right.php’);
would become something like this:
require(DIR_WS_INCLUDES . ‘custom_column.php’);
This requires that you have created the custom_column.php file, perhaps based on the code from the original column, and that it is suitable to fit into the allotted space. An in-depth discussion on the page layout will come later in this chapter under the heading Miscellaneous Customizations. For now I am certain you will be glad that we are finally going to talk about images.