Chapter 24. Managing Traffic Using Access Control Lists (ACL)
This chapter provides information and commands concerning the following topics:
![]() Applying standard ACLs to an interface
Applying standard ACLs to an interface
![]() Applying extended ACLs to an interface
Applying extended ACLs to an interface
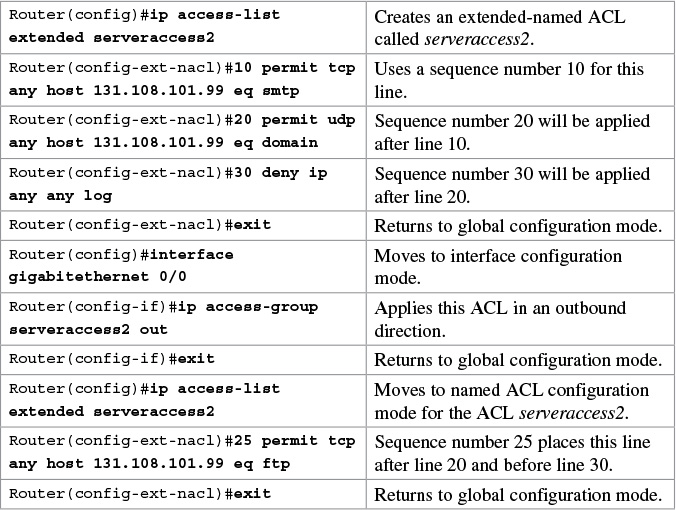
![]() Using sequence numbers in named ACLs
Using sequence numbers in named ACLs
![]() Removing specific lines in named ACLs using sequence numbers
Removing specific lines in named ACLs using sequence numbers
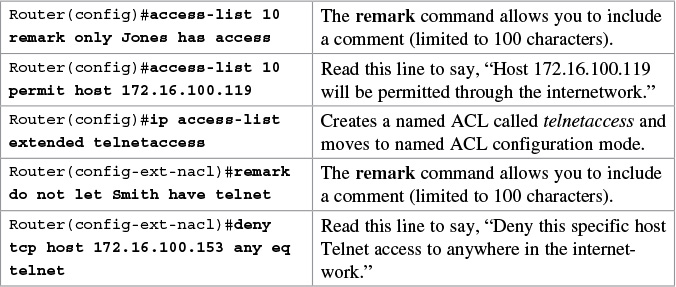
![]() Including comments about entries in ACLs
Including comments about entries in ACLs
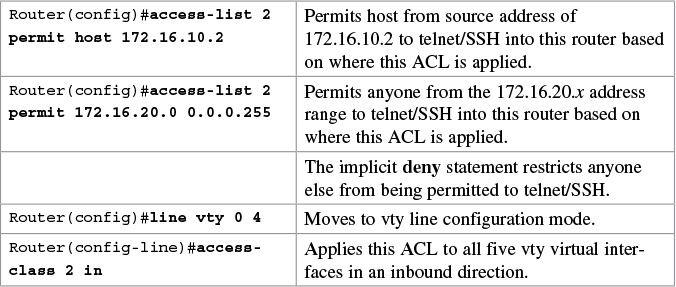
![]() Restricting virtual terminal access
Restricting virtual terminal access
![]() Configuration examples: IPv4 ACLs
Configuration examples: IPv4 ACLs
![]() Configuration examples: IPv6 ACLs
Configuration examples: IPv6 ACLs
Access List Numbers
Although many different protocols can use access control lists (ACL), the CCNA Routing and Switching vendor certification exams are concerned only with IPv4 ACLs. The following chart shows some of the other protocols that can use ACLs.

Note
IPv6 ACLs do not use numbers; IPv6 ACLs are configured using names only.
Using Wildcard Masks
When applied to an IP address, a wildcard mask identifies which addresses get matched to be applied to the permit or deny argument in an ACL statement. A wildcard mask can identify a single host, a range of hosts, a complete network or subnetwork, or even all possible addresses.
There are two rules when working with wildcard masks:
![]() A 0 (zero) in a wildcard mask means to check the corresponding bit in the address for an exact match.
A 0 (zero) in a wildcard mask means to check the corresponding bit in the address for an exact match.
![]() A 1 (one) in a wildcard mask means to ignore the corresponding bit in the address—can be either 1 or 0. In the examples, this is shown as x.
A 1 (one) in a wildcard mask means to ignore the corresponding bit in the address—can be either 1 or 0. In the examples, this is shown as x.
Example 1: 172.16.0.0 0.0.255.255

Tip
An octet of all 0s means that the octet has to match exactly to the address. An octet of all 1s means that the octet can be ignored.
Example 2: 172.16.8.0 0.0.7.255
172.16.8.0 = 10101100.00010000.00001000.00000000
0.0.7.255 = 00000000.00000000.00000111.11111111
result = 10101100.00010000.00001xxx.xxxxxxxx
00001xxx = 00001000 to 00001111 = 8–15
xxxxxxxx = 00000000 to 11111111 = 0–255
Anything between 172.16.8.0 and 172.16.15.255 matches the example statement.
ACL Keywords

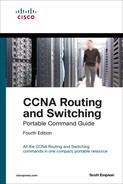
Creating Standard ACLs
Note
Standard ACLs are the oldest type of ACL. They date back as early as Cisco IOS Release 8.3. Standard ACLs control traffic by comparing the source of the IP packets to the addresses configured in the ACL.
Note
Each line in an ACL is called an access control entry (ACE). Many ACEs grouped form a single ACL.

Tip
An implicit deny statement is assumed into every ACL. You cannot see it, but it states “deny everything not already matched by an ACE in the list.” This is always the last line of any ACL. If you want to defeat this implicit deny, put a permit any statement in your standard ACLs or a permit ip any any in your extended ACLs as the last line.

Tip
Access lists can be applied in either an inbound direction (keyword in) or an outbound direction (keyword out). Best practice is to have ACLs applied in an outbound direction.
Tip
Not sure in which direction to apply an ACL? Look at the flow of packets. Do you want to filter packets as they are going in a router’s interface from an external source? Use the keyword in for this ACL. Do you want to filter packets before they go out of the router’s interface toward another device? Use the keyword out for this ACL.
Tip
Apply a standard ACL as close as possible to the destination network or device. You do not want packets with the same source IP address to be filtered out early and prevented from reaching a legitimate destination.
Verifying ACLs

Removing ACLs
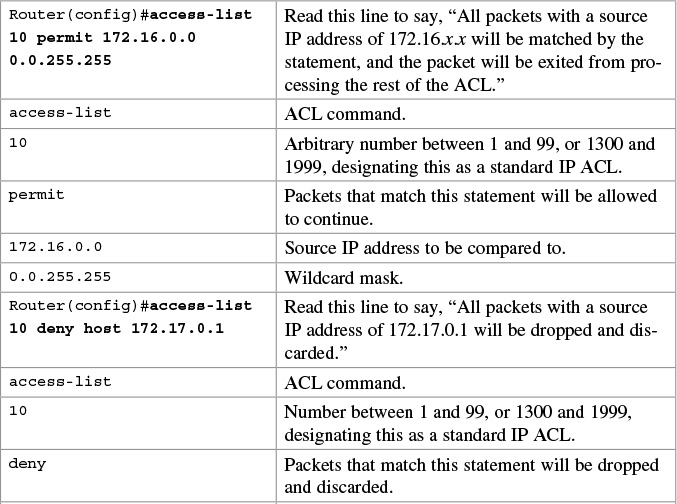
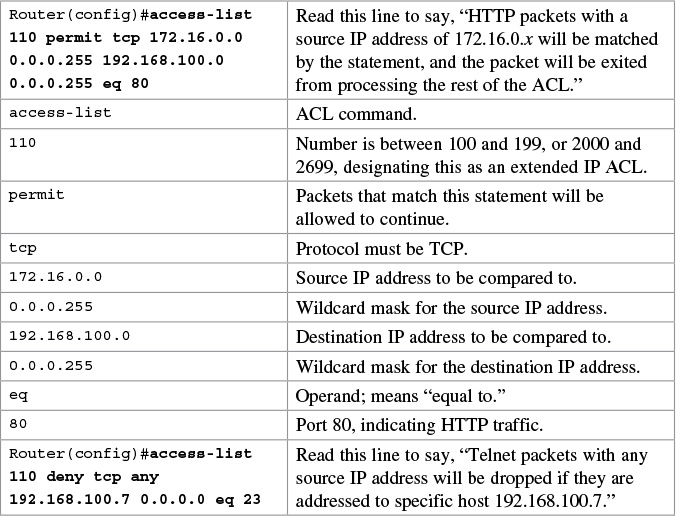
Creating Extended ACLs
Note
Extended ACLs were also introduced in Cisco IOS Release 8.3. Extended ACLs control traffic by comparing the source and destination of the IP packets to the addresses configured in the ACL. Extended ACLs can also filter packets using protocol/port numbers for a more granular filter.
Applying Extended ACLs to an Interface

Tip
Access lists can be applied in either an inbound direction (keyword in) or an outbound direction (keyword out). Best practice for extended ACLs is to apply them in an inbound manner.
Tip
Apply an extended ACL as close as possible to the source network or device. This ensures that packets that are intended to be dropped are not allowed to travel.
The established Keyword
The established keyword is an optional keyword that is used with the TCP protocol only. It indicates an established connection. A match occurs only if the TCP segment has the ACK or RST control bits set.

Tip
The established keyword works only for TCP, not User Datagram Protocol (UDP).
Tip
Consider the following situation: You do not want hackers exploiting destination port 80 to access your network. Because you do not host a local web server (destination port 80), it is possible to block incoming (to your network) traffic on destination port 80, except that your internal users need web access. When they request a web page from the Internet, return traffic inbound on source port 80 must be allowed. The solution to this problem is to use the established command. The ACL allows the response to enter your network because it has the ACK bit set as a result of the initial request from inside your network. Requests from the outside world are blocked because the ACK bit is not set, but responses are allowed through.
The log Keyword
Logging is an optional keyword that causes an informational logging message about the packet matching the entry to be sent to the console. The log message includes the access list number, whether the packet was permitted or denied, the source address, the number of packets, and if appropriate, the user-defined cookie or router-generated hash value. The message is generated for the first packet that matches and then at 5-minute intervals, including the number of packets permitted or denied in the prior 5-minute interval.
Caution
ACL logging can be CPU intensive and can negatively affect other functions of the network device.

Tip
After you specify the log keyword (and the associated word argument) or the log-input keyword (and the associated word argument), you cannot specify any other keywords or settings for this command.
Tip
The log-input keyword (and the associated word argument) is only available in extended ACLs for IPv4 or IPv6 ACLs.
Creating Named ACLs
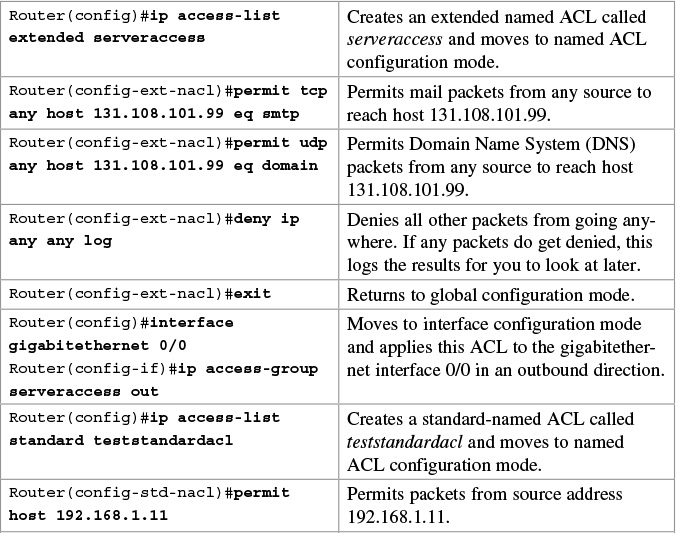

The prompt of the device changes according to whether the named ACL is standard (config-std-nacl) or extended (config-ext-nacl).
Using Sequence Numbers in Named ACLs
Tip
Sequence numbers are used to allow for easier editing of your ACLs. The preceding example used numbers 10, 20, and 30 in the ACL lines. If you had needed to add another line to this ACL, it would have previously been added after the last line—line 30. If you had needed a line to go closer to the top, you would have had to remove the entire ACL and then reapply it with the lines in the correct order. Now you can enter a new line with a sequence number, placing it in the correct location.
The sequence-number argument was added in Cisco IOS Software Release 12.2(14)S. It was integrated into Cisco IOS Software Release 12.2(15)T.
Removing Specific Lines in Named ACLs Using Sequence Numbers

Sequence Number Tips
![]() Sequence numbers start at 10 and increment by 10 for each line.
Sequence numbers start at 10 and increment by 10 for each line.
![]() The maximum sequence number is 2147483647.
The maximum sequence number is 2147483647.
![]() If you have an ACL that is so complex that it needs a number this big, I’d ask your boss for a raise.
If you have an ACL that is so complex that it needs a number this big, I’d ask your boss for a raise.
![]() If you forget to add a sequence number, the line is added to the end of the list and assigned a number that is 10 greater than the last sequence number.
If you forget to add a sequence number, the line is added to the end of the list and assigned a number that is 10 greater than the last sequence number.
![]() If you enter an entry that matches an existing entry (except for the sequence number), no changes are made.
If you enter an entry that matches an existing entry (except for the sequence number), no changes are made.
![]() If the user enters a sequence number that is already present, an error message of “Duplicate sequence number” displays. You have to reenter the line with a new sequence number.
If the user enters a sequence number that is already present, an error message of “Duplicate sequence number” displays. You have to reenter the line with a new sequence number.
![]() Sequence numbers are changed on a router reload to reflect the increment by 10 policy (see first tip in this section). If your ACL has numbers 10, 20, 30, 32, 40, 50, and 60 in it, on reload these numbers become 10, 20, 30, 40, 50, 60, 70.
Sequence numbers are changed on a router reload to reflect the increment by 10 policy (see first tip in this section). If your ACL has numbers 10, 20, 30, 32, 40, 50, and 60 in it, on reload these numbers become 10, 20, 30, 40, 50, 60, 70.
![]() If you want to change the numbering sequence of your ACLs to something other than incrementing by 10, use the global configuration command ip access-list resequence name/number start# increment#:
If you want to change the numbering sequence of your ACLs to something other than incrementing by 10, use the global configuration command ip access-list resequence name/number start# increment#:
Router(config)#ip access-list resequence serveracces 1 2
![]() This resets the ACL named serveraccess to start at 1 and increment by steps of 2 (1, 3, 5, 7, 9, and so on). The range for using this command is 1 to 2147483647.
This resets the ACL named serveraccess to start at 1 and increment by steps of 2 (1, 3, 5, 7, 9, and so on). The range for using this command is 1 to 2147483647.
![]() Sequence numbers cannot be seen when using the Router#show running-config or Router#show startup-config command. To see sequence numbers, use one of the following commands:
Sequence numbers cannot be seen when using the Router#show running-config or Router#show startup-config command. To see sequence numbers, use one of the following commands:
Router#show access-lists
Router#show access-lists list_name
Router#show ip access-list
Router#show ip access-list list_name
Tip
You can use the remark command in any of the IP numbered standard, IP numbered extended, or named IP ACLs.
Tip
You can use the remark command either before or after a permit or deny statement. Therefore, be consistent in your placement to avoid confusion about which line the remark statement is referring to.
Restricting Virtual Terminal Access
Tip
When restricting access through Telnet, use the access-class command rather than the access-group command, which is used when applying an ACL to a physical interface.
Caution
Do not apply an ACL intending to restrict Telnet traffic on a physical interface. If you apply to a physical interface, all packets are compared to the ACL before it can continue on its path to its destination. This scenario can lead to a large reduction in router performance.
![]() Conversely, ACEs are commonly called ACL statements.
Conversely, ACEs are commonly called ACL statements.
![]() The type of ACL determines what is filtered.
The type of ACL determines what is filtered.
![]() Standard filters only on source IP
Standard filters only on source IP
![]() Extended filters on source IP, destination IP, protocol number, and port number
Extended filters on source IP, destination IP, protocol number, and port number
![]() Use only one ACL per interface, per protocol (IPv4 or IPv6), per direction.
Use only one ACL per interface, per protocol (IPv4 or IPv6), per direction.
![]() Place your most specific statements at the top of the ACL. The most general statements should be at the bottom of the ACL.
Place your most specific statements at the top of the ACL. The most general statements should be at the bottom of the ACL.
![]() The last test in any ACL is the implicit deny statement. You cannot see it, but it is there.
The last test in any ACL is the implicit deny statement. You cannot see it, but it is there.
![]() Every ACL must have at least one permit statement. Otherwise, you will deny everything.
Every ACL must have at least one permit statement. Otherwise, you will deny everything.
![]() Place extended ACLs as close as possible to the source network or device when applying ACLs to an interface.
Place extended ACLs as close as possible to the source network or device when applying ACLs to an interface.
![]() Place standard ACLs as close as possible to the destination network or device when applying ACLs to an interface.
Place standard ACLs as close as possible to the destination network or device when applying ACLs to an interface.
![]() You can use numbers when creating a named ACL. The name you choose is the number: For example, ip access-list extended 150 creates an extended ACL named 150.
You can use numbers when creating a named ACL. The name you choose is the number: For example, ip access-list extended 150 creates an extended ACL named 150.
![]() An ACL can filter traffic going through a router, depending on how the ACL is applied.
An ACL can filter traffic going through a router, depending on how the ACL is applied.
![]() Think of yourself as standing in the middle of the router. Are you filtering traffic that is coming into the router toward you? Make the ACL an inbound one using the keyword in.
Think of yourself as standing in the middle of the router. Are you filtering traffic that is coming into the router toward you? Make the ACL an inbound one using the keyword in.
![]() Are you filtering traffic that is going away from you and the router and toward another device? Make the ACL an outbound one using the keyword out.
Are you filtering traffic that is going away from you and the router and toward another device? Make the ACL an outbound one using the keyword out.
![]() Access lists that are applied to interfaces do not filter traffic that originates from that router.
Access lists that are applied to interfaces do not filter traffic that originates from that router.
![]() When restricting access through Telnet, use the access-class command rather than the access-group command, which is used when applying an ACL to a physical interface.
When restricting access through Telnet, use the access-class command rather than the access-group command, which is used when applying an ACL to a physical interface.
IPv6 ACLs
ACLs can also be created in IPv6. The syntax for creating an IPv6 ACL is limited to named ACLs.
Tip
You use the traffic-filter keyword rather than the access-group keyword when assigning IPv6 ACLs to an interface.
Tip
Wildcard masks are not used in IPv6 ACLs. Instead, the prefix-length is used.
Tip
You still use the access-class keyword to assign an IPv6 ACL to virtual terminal (vty) lines for restricting Telnet/SSH access.
Verifying IPv6 ACLs

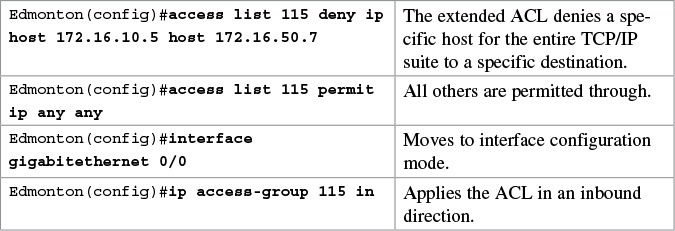
Configuration Examples: IPv4 ACLs
Figure 24-1 illustrates the network topology for the configuration that follows, which shows five ACL examples using the commands covered in this chapter.

Example 1: Write an ACL that prevents the 10.0 network from accessing the 40.0 network but allows everyone else to.

Example 2: Write an ACL that states that 10.5 cannot access 50.7. Everyone else can.
Example 3: Write an ACL that states that 10.5 can telnet to the Red Deer router. No one else can.

Example 4: Write a named ACL that states that 20.163 can telnet to 70.2. No one else from 20.0 can telnet to 70.2. Any other host from any other subnet can connect to 70.2 using anything that is available.

Example 5: Write an ACL that states that hosts 50.1 to 50.63 are not allowed web access to 80.16. Hosts 50.64 to 50.254 are. Everyone can do everything else.

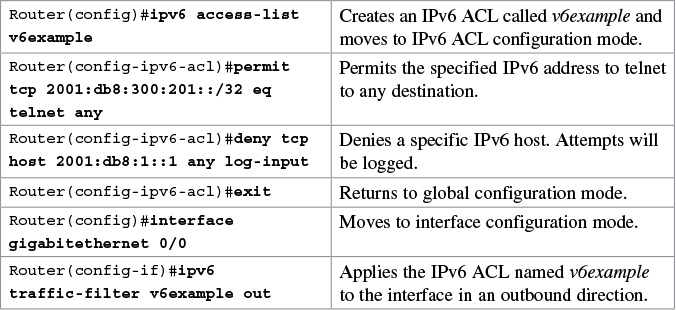
Configuration Examples: IPv6 ACLs
Figure 24-2 shows the network topology for the configuration that follows, which demonstrates how to configure IPv6 ACLs. Assume that all basic configurations are accurate. The objective here is to create an ACL that acts as a firewall allowing HTTP, HTTPS, DNS, and Internet Control Message Protocol (ICMP) traffic to return from the Internet.


The “implicit deny” rule has changed for IPv6 access lists to take into account the importance of the Neighbor Discovery Protocol (NDP). NDP is to IPv6 what Address Resolution Protocol (ARP) is to IPv4, so naturally the protocol should not be disrupted. That is the reason two additional implicit statements have been added before the “implicit deny” statement at the end of each IPv6 ACL.
These implicit rules are as follows:
permit icmp any any nd-na
permit icmp any any nd-ns
deny ipv6 any any
It is important to understand that any explicit deny ipv6 any any statement overrides all three implicit statements, which can lead to problems because NDP traffic is blocked.