
Chapter 18. Compute Security
Most computing platforms are designed to meet performance and function requirements with little or no attention to security. Compute hardening is an important security requirement for any data center platform. As a result, Cisco released a UCS hardening guide to help users secure Cisco Unified Computing System (Cisco UCS) platform devices to improve network security.
This chapter covers the following key topics:
• Securing UCS Management Using Authentication, Authorization, and Accounting (AAA): This section discusses the concepts of Cisco UCS authentication, authorization, and accounting. Later in this section, we discuss user attributes; two-factor authentications; LDAP, RADIUS, and TACACS providers; and group configurations.
• Keychains Authentication: This section discusses keychain management that allows administrators to create and maintain keychains, which are sequences of keys (sometimes called shared secrets). Keychains are used to secure communications with other devices by using key-based authentication.
“Do I Know This Already?” Quiz
The “Do I Know This Already?” quiz enables you to assess whether you should read this entire chapter thoroughly or jump to the “Exam Preparation Tasks” section. If you are in doubt about your answers to these questions or your own assessment of your knowledge of the topics, read the entire chapter. Table 18-1 lists the major headings in this chapter and their corresponding “Do I Know This Already?” quiz questions. You can find the answers in Appendix A, “Answers to the ‘Do I Know This Already?’ Quizzes.”
Table 18-1 “Do I Know This Already?” Section-to-Question Mapping”

Caution
The goal of self-assessment is to gauge your mastery of the topics in this chapter. If you do not know the answer to a question or are only partially sure of the answer, you should mark that question as wrong for purposes of the self-assessment. Giving yourself credit for an answer you correctly guess skews your self-assessment results and might provide you with a false sense of security.
1. What are the UCS authentication protocols that support dual-factor authentications? (Choose two answers.)
a. LDAP
b. RADIUS
c. TACACS+
d. Local
2. What UCS authentication protocol does not require user attributes?
a. LDAP with group mapping
b. RADIUS
c. TACAC+
d. Key chain authentication
3. What port is used by LDAP SSL protocols?
a. UDP 49
b. UDP 1645/1646
c. TCP 636
d. TCP 389
4. What is the key start time in the keychain?
a. The absolute time that the lifetime ends
b. The absolute time that the lifetime begins
c. The number of seconds after the start time
d. Infinite lifetime (no end time)
Foundation Topics
Securing UCS Management Using Authentication, Authorization, and Accounting
The authentication, authorization, and accounting (AAA) framework is vital to securing network devices. The AAA framework provides authentication of management sessions, limits users to specific administrator-defined commands, and logs all commands entered by all users.
RADIUS and TACACS+ are both supported on the UCS compute system. TACACS+ encrypts the entire TCP payload, which includes both the username and password. RADIUS only encrypts the password. Therefore, ACACS+ is more secure. Additionally, you can use LDAP for user authentication. To encrypt the LDAP authentication exchange, enable the SSL option.
1. Authentication: Authentication is the process of establishing whether a client is who or what it claims to be in a particular context. A client can be an end user, a machine, or an application. Authentication mechanisms differ depending on the components that are communicating.
Cisco UCS provides two methods of user authentication:
• Local accounts on the Cisco UCS Manager
• Remote authentication using LDAP, RADIUS, or TACACS+
The Unified Infrastructure Manager supports the LDAP protocol, as well as RADIUS, the External TACACS+ server, and the Native Registry.
2. Authorization: Role management helps to manage authorization, which enables you to specify the resources that users are allowed to access. Role management lets you treat groups of users as a unit by assigning users to roles such as manager, sales, or member.
After you have established roles, you can create access rules. By using roles, you can establish these types of rules independent from individual users. Users can belong to more than one role.
Cisco UCS user roles include the following:
• AAA administrator: Read/write access to users, roles, and AAA configuration. Read access to the rest of the system.
• Administrator: Complete read/write access to the entire system. The default admin account is assigned this role by default and cannot be changed.
• Network administrator: Read/write access to the fabric interconnect infrastructure and network security operations. Read access to the rest of the system.
• Operations: Read/write access to system logs, including the syslog servers, and faults. Read access to the rest of the system.
• Read-only: Read-only access to the system configuration with no privileges to modify the system state.
• Server equipment administrator: Read/write access to physical server-related operations. Read access to the rest of the system.
• Server profile administrator: Read/write access to logical server-related operations. Read access to the rest of the system.
• Server security administrator: Read/write access to server security-related operations. Read access to the rest of the system.
• Storage administrator: Read/write access to storage operations. Read access to the rest of the system.
![]()
User RADIUS and TACACS Attributes
For RADIUS and TACACS+ configurations, you must configure a user attribute in each remote authentication provider through which users log in to the Cisco UCS Manager. This user attribute holds the roles and locales assigned to each user.
Note
This step is not required for LDAP configurations that use LDAP group mapping to assign roles and locales.
When a user logs in, the Cisco UCS Manager does the following:
1. Queries the remote authentication service.
2. Validates the user.
3. If the user is validated, checks for the roles and locales assigned to that user.
Table 18-2 compares the user attribute requirements for the remote authentication providers supported by Cisco UCS.
![]()
Table 18-2 Comparison of User Attributes by Remote Authentication Provider

Example 18-1 shows an OID sample for a custom Cisco AVPair attribute.
Example 18-1 Cisco AVPair Attribute Sample
CN=CiscoAVPair,CN=Schema,
CN=Configuration,CN=X
objectClass: top
objectClass: attributeSchema
cn: CiscoAVPair
distinguishedName: CN=CiscoAVPair,CN=Schema,CN=Configuration,CN=X
instanceType: 0x4
uSNCreated: 26318654
attributeID: 1.3.6.1.4.1.9.287247.1
attributeSyntax: 2.5.5.12
isSingleValued: TRUE
showInAdvancedViewOnly: TRUE
adminDisplayName: CiscoAVPair
adminDescription: UCS User Authorization Field
oMSyntax: 64
LDAPDisplayName: CiscoAVPair
name: CiscoAVPair
objectCategory: CN=Attribute-Schema,CN=Schema,CN=Configuration,CN=X
![]()
Two-Factor Authentication
The Cisco UCS Manager supports two-factor authentication for remote user logins, which adds a level of security to account logins. Two-factor authentication login requires a username, a token, and a password combination in the password field. You can provide a PIN, certificate, or token.
Two-factor authentication uses authentication applications that maintain token servers to generate one-time tokens for users during the login process and to store passwords in the AAA server. Requests are sent to the token server to retrieve a vendor-specific attribute. The Cisco UCS Manager expects the token server to integrate with the AAA server; therefore, it forwards the request to the AAA server. The password and token are validated at the same time by the AAA server. Users must enter the token and password sequence in the same order as it is configured in the AAA server.
Two-factor authentication is supported by associating RADIUS or TACACS+ provider groups with designated authentication domains and enabling two-factor authentication for those domains. Two-factor authentication does not support IPM and is not supported when the authentication realm is set to LDAP, local, or none.
UCS Web Session Refresh and Session Timeout Period
The Web Session Refresh Period is the maximum amount of time allowed between refresh requests for a Cisco UCS Manager GUI web session. The Web Session Timeout is the maximum amount of time that can elapse after the last refresh request before a Cisco UCS Manager GUI web session becomes inactive.
You can increase the Web Session Refresh Period to a value greater than 60 seconds up 172,800 seconds to avoid frequent session timeouts that require regenerating and re-entering a token and password multiple times. The default value is 7200 seconds when two-factor authentication is enabled and 600 seconds when two-factor authentication is not enabled.
You can specify a value between 300 and 172,800 for the Web Session Timeout Period. The default is 8000 seconds when two-factor authentication is enabled and 7200 seconds when two-factor authentication is not enabled.
UCS LDAP Providers and Groups
UCS LDAP supports nested LDAP. You can add an LDAP group as a member of another group and nest groups to consolidate member accounts and to reduce the replication of traffic. Cisco UCS Manager release 2.1(2) and higher enable you to search LDAP groups that are nested within another group defined in an LDAP group map.
Note
Nested LDAP search support is supported only for Microsoft Active Directory servers. The supported versions are Microsoft Windows 2003 SP3, Microsoft Windows 2008 R2, and Microsoft Windows 2012.
By default, user rights are inherited when you nest an LDAP group within another group. For example, if you make Group 1 a member of Group 2, the users in Group 1 have the same permissions as the members of Group 2. You can then search users that are members of Group 1 by choosing only Group 2 in the LDAP group map, instead of having to search Group 1 and Group 2 separately. You do not always need to create subgroups in a group map in the Cisco UCS Manager.
The LDAP group rule determines whether Cisco UCS should use LDAP groups when assigning user roles and locales to a remote user. The following scenario shows step by step how to create, modify, and delete a default LDAP provider.
![]()
The following scenario describes default LDAP provider configurations.
Note
The properties that you configure in this example are default settings for all provider connections of this type defined in the Cisco UCS Manager. If an individual provider includes a setting for any of these properties, Cisco UCS uses that setting and ignores the default setting.
Before you start, if you are using Active Directory as your LDAP server, create a user account in the Active Directory server to bind it with Cisco UCS. Give this account a nonexpiring password.
• In the LDAP server, perform one of the following configurations:
• Configure LDAP groups. LDAP groups contain user role and locale information.
• Configure users with the attribute that holds the user role and locale information for the Cisco UCS Manager. You can choose whether to extend the LDAP schema for this attribute. If you do not want to extend the schema, use an existing LDAP attribute to hold the Cisco UCS user roles and locales. If you prefer to extend the schema, create a custom attribute, such as the CiscoAVPair attribute. Cisco LDAP implementation requires a Unicode type attribute. If you choose to create the CiscoAVPair custom attribute, use the following attribute ID: 1.3.6.1.4.1.9.287247.1.
• For a cluster configuration, add the management port IPv4 or IPv6 addresses for both fabric interconnects. This configuration ensures that remote users can continue to log in if the first fabric interconnect fails and the system fails over to the second fabric interconnect. All login requests are sourced from these IP addresses, not the virtual IPv4 or IPv6 address used by the Cisco UCS Manager.
• If you want to use secure communications, create a trusted point containing the certificate of the root certificate authority (CA) of the LDAP server in the Cisco UCS Manager.
• If you need to change the LDAP providers or add or delete them, change the authentication realm for the domain to local, make the changes to the providers, and then change the domain authentication realm back to LDAP.
Note
LDAP remote usernames that include special characters cannot log in to systems that are running NX-OS versions 2.2(3a) and later. The user cannot log in because of the NX-OS limitations where special characters (!, %, ^) are not supported in the username.
The following steps show how to create the LDAP provider:
Step 1. In the Navigation pane, click Admin.
Step 2. Expand All > User Management > LDAP, as in Figure 18-1.
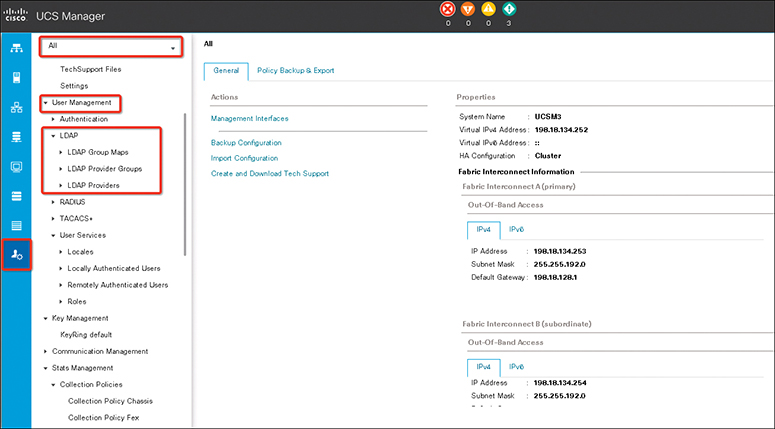
Figure 18-1 Creating an LDAP Provider Main Page
Step 3. In the Work pane, click the General tab.
Step 4. In the Actions area, click Create LDAP Provider.
Step 5. On the Create LDAP Provider page of the wizard, complete all fields with appropriate LDAP service information. Complete the fields shown in Table 18-3 with information about the LDAP service you want to use, as in Figure 18-2, and then click Next.
Table 18-3 LDAP Provider Fields

![]()

Figure 18-2 LDAP Provider Fields
Step 6. On the LDAP Group Rule page of the wizard, complete all fields with the appropriate LDAP group rule information as shown in Figure 18-3.
Note
Role and locale assignment is cumulative. If a user is included in multiple groups, or has a role or locale specified in the LDAP attribute, Cisco UCS assigns that user all the roles and locales mapped to any of those groups or attributes.
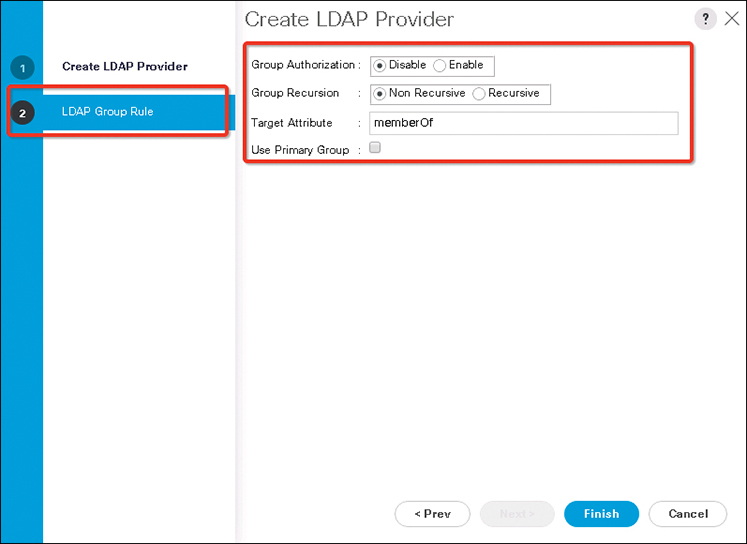
Figure 18-3 LDAP Provider Group Rule
Step 7. Click Finish, and then Save Changes.
Note
If your implementations involve a single LDAP database, select LDAP as the authentication service, but if your implementations involve multiple LDAP databases, you need to configure an LDAP provider group.
The following steps show how to modify an existing LDAP group rule:
Step 1. In the Navigation pane, click Admin.
Step 2. Expand All > User Management > LDAP.
Step 3. Expand LDAP Providers and choose the LDAP provider for which you want to change the group rule.
Step 4. In the Work pane, click the General tab.
Step 5. In the LDAP Group Rules area, complete the fields shown in Table 18-4.
Table 18-4 LDAP Provider Fields

Step 6. Click Save Changes (see Figure 18-4).
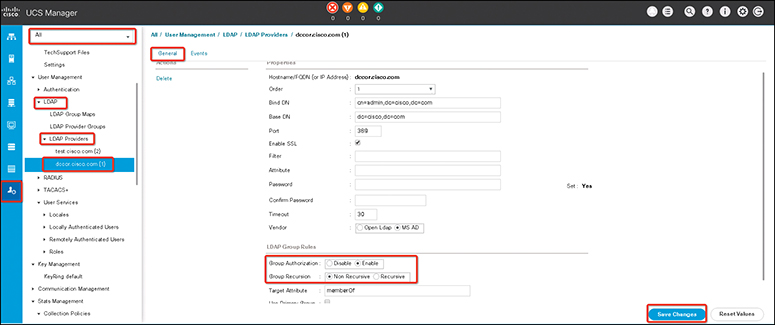
Figure 18-4 LDAP Group Rules
The following steps show how to delete an existing LDAP group:
Step 1. In the Navigation pane, click Admin.
Step 2. Expand All > User Management > LDAP.
Step 3. Expand LDAP Providers.
Step 4. Right-click the LDAP provider that you want to delete and choose Delete.
Step 5. If a confirmation dialog box displays, click Yes (see Figure 18-5).
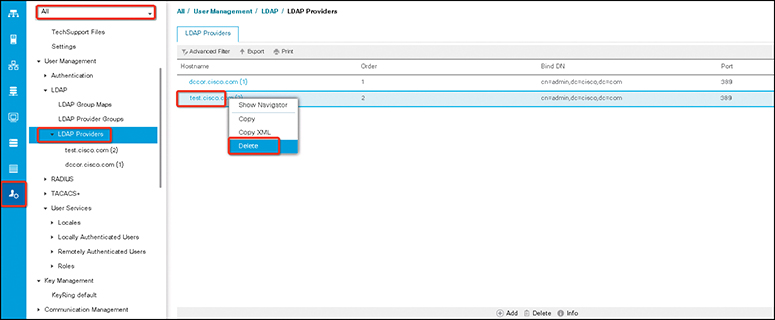
Figure 18-5 Deleting an LDAP Provider
LDAP Group Mapping
LDAP group mapping eliminates the requirement to define role or locale information in the LDAP user object. The UCS Manager can use group membership information to assign a role or locale to an LDAP user during login for organizations using LDAP groups to restrict access to LDAP databases.
When a user logs in to the Cisco UCS Manager, the LDAP group map pulls information about the user’s role and locale. If the role and locale criteria match the information in the policy, access is granted. The Cisco UCS Manager supports a maximum of 28, 128, or 160 LDAP group maps depending on the release version.
Note
Cisco UCS Manager Release 3.1(1) supports a maximum of 128 LDAP group maps, and Release 3.1(2) and later support a maximum of 160 LDAP group maps.
The role and locale definitions that you configure locally in the Cisco UCS Manager do not update automatically based on changes to an LDAP directory. When deleting or renaming LDAP groups in an LDAP directory, you must also update the Cisco UCS Manager with the change.
You can configure an LDAP group map to include any of the following combinations of roles and locales:
• Roles only
• Locales only
• Both roles and locales
For example, consider an LDAP group representing a group of server administrators at a specific location. The LDAP group map might include user roles such as server profile and server equipment. To restrict access to server administrators at a specific location, you can set the locale to a particular site name. The following scenario shows how to create and delete the LDAP group map.
Note
The Cisco UCS Manager includes out-of-the-box user roles but does not include any locales. Mapping an LDAP provider group to a locale requires that you create a custom locale.
This example shows step by step how to create and delete LDAP group maps. Before adding an LDAP group map, you need to configure the LDAP server. The LDAP server configuration requirements are as follows:
• Create an LDAP group in the LDAP server.
• Configure the distinguished name for the LDAP group in the LDAP server.
• Create locales in the Cisco UCS Manager (optional).
• Create custom roles in the Cisco UCS Manager (optional).
After configuring the LDAP server, follow these steps to create an LDAP group mapping:
Step 1. In the Navigation pane, click Admin.
Step 2. Expand All > User Management > LDAP.
Step 3. Right-click LDAP Group Maps and choose Create LDAP Group Map.
Step 4. In the Create LDAP Group Map dialog box, specify all LDAP group map information as appropriate (see Figure 18-6).
Note
The name that you specify in the LDAP Group DN field must match the name in the LDAP database.
Note
If you use a special character in the LDAP Group DN field, you must prefix the special character with an escape character (single backslash).
![]()
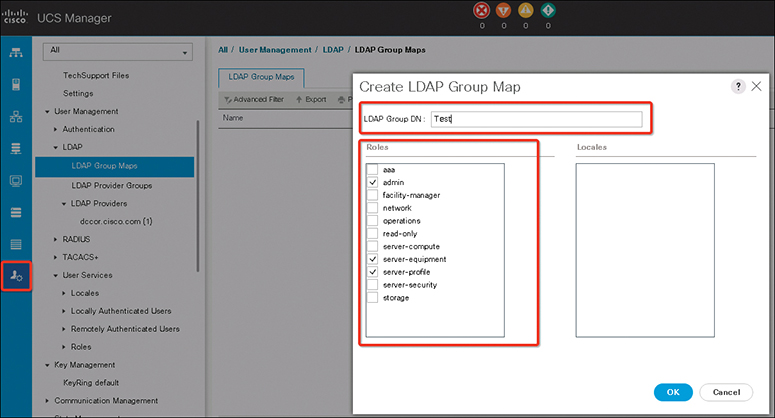
Figure 18-6 Create LDAP Group Mapping
The following steps show how to delete an existing LDAP group map:
Step 1. In the Navigation pane, click Admin.
Step 2. Expand All > User Management > LDAP.
Step 3. Expand LDAP Group Maps.
Step 4. Right-click the LDAP group map that you want to delete and choose Delete.
Step 5. If a confirmation dialog box displays, click Yes (see Figure 18-7).

Figure 18-7 Deleting LDAP Group Mapping
RADIUS and TACACS+ Authentication Configurations
To add a RADIUS or TACACS+ provider, first you need to configure RADIUS/TACACS+ properties, and after that to add RADIUS/TACACS+ server information. You can configure default settings; default properties apply to all provider connections of this type defined in the Cisco UCS Manager. If an individual provider includes a setting for any of these properties, Cisco UCS uses provider setting and ignores the default setting. The following scenario shows step by step how to create a UCS provider.
Note
RADIUS authentication uses the Password Authentication Protocol (PAP).
Note
The Cisco UCS Manager supports a maximum of 16 RADIUS providers.
This example shows you step by step how to create RADIUS/TACACS+ remote authentication. Before adding a RADIUS provider, you need to perform the following RADIUS server configurations:
• Configure users with the attribute that holds the user role and locale information for the Cisco UCS Manager. You can choose whether to extend the RADIUS schema for this attribute. If you do not want to extend the schema, use an existing RADIUS attribute to hold the Cisco UCS user roles and locales. If you prefer to extend the schema, create a custom attribute, such as the cisco-avpair attribute.
The vendor ID for the Cisco RADIUS implementation is 009, and the vendor ID for the attribute is 001.
The following syntax example shows how to specify multiple user roles and locales if you choose to create the cisco-avpair attribute: shell:roles=“admin,aaa” shell:locales=“L1,abc”. Use a comma (,) as the delimiter to separate multiple values.
• For a cluster configuration, add the management port IPv4 or IPv6 addresses for both fabric interconnects. This configuration ensures that remote users can continue to log in if the first fabric interconnect fails and the system fails over to the second fabric interconnect. All login requests are sourced from these IP addresses, not the virtual IP address used by the Cisco UCS Manager.
Similar for TACACS+, before adding the provider, you need to perform the following TACACS+ server configurations:
• Create the cisco-av-pair attribute. You cannot use an existing TACACS+ attribute.
• The cisco-av-pair name is the string that provides the attribute ID for the TACACS+ provider.
• The following syntax example shows how to specify multiple user roles and locales when you create the cisco-av-pair attribute: cisco-av-pair=shell:roles=“admin aaa” shell:locales*”L1 abc”. Using an asterisk (*) in the cisco-av-pair attribute syntax flags the locale as optional, preventing authentication failures for other Cisco devices that use the same authorization profile. Use a space as the delimiter to separate multiple values.
• For a cluster configuration, add the management port IPv4 or IPv6 addresses for both fabric interconnects. This configuration ensures that remote users can continue to log in if the first fabric interconnect fails and the system fails over to the second fabric interconnect. All login requests are sourced from these IP addresses, not the virtual IP address used by the Cisco UCS Manager.
After configuring the remoter authentication server (RADIUS or TACACS+), you can configure authentication server properties. The following steps show how to configure the RADIUS server default properties:
Step 1. In the Navigation pane, click Admin.
Step 2. Expand User Management > RADIUS.
Step 3. In the Properties area, complete all fields.
Step 4. Click Save Changes.
The following steps show how to configure TACACS+ server default properties:
Step 1. In the Navigation pane, click Admin.
Step 2. Expand User Management > TACACS+.
Step 3. In the Properties area, complete the Timeout field.
Step 4. Click Save Changes.
After configuring remote authentication server properties, the next step is to configure the authentication server provider. The following steps show how to configure the UCS RADIUS server provider:
Step 1. In the Navigation pane, click Admin.
Step 2. Expand All > User Management > RADIUS.
Step 3. In the Create RADIUS Provider dialog box, specify all appropriate RADIUS service information.
Note
If you use a host name rather than an IPv4 or IPv6 address, you must ensure that a DNS server is configured for the host name.
Step 4. Click OK and then Save Changes (see Figure 18-8).
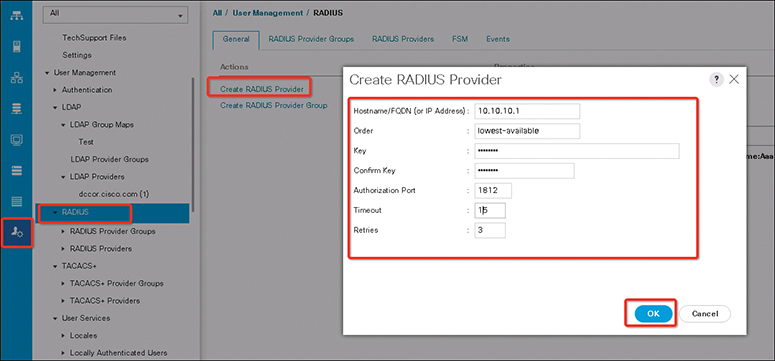
Figure 18-8 Creating a RADIUS Provider
Note
If your implementations involve a single RADIUS database, select RADIUS as the primary authentication service, but if your implementations involve multiple RADIUS databases, configure a RADIUS provider group.
The following steps show how to configure the UCS TACACS+ server provider:
Step 1. In the Navigation pane, click Admin.
Step 2. Expand All > User Management > TACACS+.
Step 3. In the Actions area of the General tab, click Create TACACS+ Provider.
Step 4. In the Create TACACS+ Provider dialog box, do the following:
• Complete all fields with TACACS+ service information, as appropriate.
Note
If you use a host name rather than an IPv4 or IPv6 address, you must ensure a DNS server is configured for the host name.
• Click OK.
Step 5. Click Save Changes.
Note
If your implementations involve a single TACACS+ database, select TACACS+ as the primary authentication service, but if your implementations involve multiple TACACS+ databases, configure a TACACS+ provider group.
The final step to activate a remote authentication server is to assign an authentication method to management.
The following steps show how to add remote access authentication to management:
Step 1. In the Navigation pane, click Admin.
Step 2. Expand All > User Management > Authentication.
Step 3. Click Native Authentication.
Step 4. In the Work pane, click the General tab.
Step 5. To set the console, you can select the Console Authentication area, as in Figure 18-9. To set a default authentication, select Default Authentication, as in Figure 18-10. Then complete the fields described in Table 18-5.
Table 18-5 Authentication Method Fields

Step 6. Click Save Changes.

Figure 18-9 Setting UCS Management Console Authentication
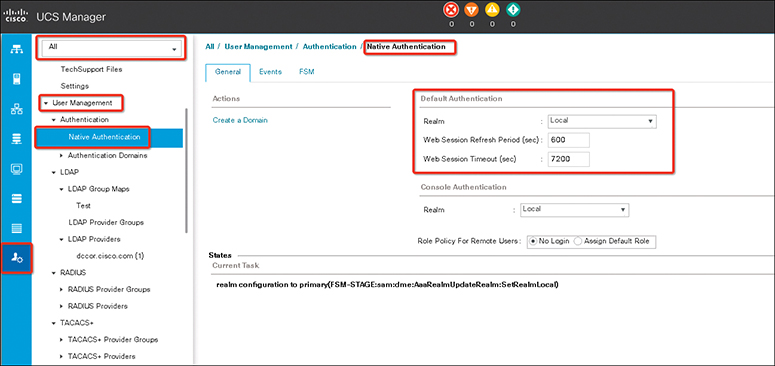
Figure 18-10 UCS Manager Default Authentication
UCS Remote Users Role Policy
By default, if user roles are not configured in the Cisco UCS Manager, read-only access is granted to all users logging in to the Cisco UCS Manager from a remote server using the LDAP, RADIUS, or TACACS protocols. For security reasons, it might be desirable to restrict access to those users matching an established user role in the Cisco UCS Manager.
You can configure the role policy for remote users in the following ways:
• assign-default-role: Does not restrict user access to the Cisco UCS Manager based on user roles. Read-only access is granted to all users unless other user roles have been defined in Cisco UCS Manager. This is the default behavior.
• no-login: Restricts user access to the Cisco UCS Manager based on user roles. If user roles have not been assigned for the remote authentication system, access is denied.
The following steps show how to configure the remote user role policy:
Step 1. In the Navigation pane, click Admin.
Step 2. Expand All > User Management > Authentication.
Step 3. Click Native Authentication.
Step 4. In the Work pane, click the General tab and complete the parameters shown in Table 18-6.
Table 18-6 Remote Users Role Policy Fields

Step 5. In the Role Policy for Remote Users field, click one of the following radio buttons to determine what happens when a user attempts to log in and the remote authentication provider does not supply a user role with the authentication information:
• No Login: The user is not allowed to log in to the system, even if the username and password are correct.
• Assign Default Role: The user is allowed to log in with a read-only user role.
Step 6. Click Save Changes.
Multiple Authentication Services Configuration
You can configure Cisco UCS to use multiple authentication services by configuring the following features:
• Provider groups
• Authentication domains
A provider group is a set of providers that the Cisco UCS accesses during the authentication process. All of the providers within a provider group are accessed in the order that the Cisco UCS provider uses to authenticate users. If all of the configured servers are unavailable or unreachable, the Cisco UCS Manager automatically falls back to the local authentication method using the local username and password.
The Cisco UCS Manager allows you to create a maximum of 16 provider groups, with a maximum of 8 providers allowed per group.
![]()
Keychains Authentication
NX-OS Keychain management allows you to create and maintain keychains, which are sequences of keys (sometimes called shared secrets). You can use keychains with features that secure communications with other devices by using key-based authentication. The device allows you to configure multiple keychains.
Some routing protocols that support key-based authentication can use a keychain to implement a hitless key rollover for authentication.
To maintain stable communications, each device that uses a protocol that is secured by key-based authentication must be able to store and use more than one key for a feature at the same time. Based on the send and accept lifetimes of a key, keychain management provides a secure mechanism to handle key rollover. The device uses the lifetimes of keys to determine which keys in a keychain are active. Each key in a keychain has two lifetimes, as follows:
• Accept lifetime: The time interval within which the device accepts the key during key exchange with another device.
• Send lifetime: The time interval within which the device sends the key during key exchange with another device.
You define the send and accept lifetimes of a key by using the following parameters:
• Start-time: The absolute time that the lifetime begins.
• End-time: The end time can be defined in one of the following ways:
• The absolute time that the lifetime ends
• The number of seconds after the start time that the lifetime ends
• Infinite lifetime (no end-time)
During a key send lifetime, the device sends routing update packets with the key. The device does not accept communication from other devices when the key sent is not within the accept lifetime of the key on the device.
It is recommended that you configure key lifetimes that overlap within every keychain. This practice avoids failure of neighbor authentication due to the absence of active keys.
NX-OS Keychain Configurations
Keychain configuration does not require a license. Any feature not included in a license package is bundled with the Cisco NX-OS system images and is provided at no extra charge to you.
Note
Changing the system clock impacts when keys are active.
Tables 18-7 and 18-8 describe the keychain commands.
Table 18-7 Keychain Commands

Table 18-8 AAA Passphrase and Locking User Accounts Commands

Example 18-2 shows how to configure key chains with four keys. First, key 0 has a lifetime of one day (August 19, 2019) and one-day activation. Second, key 1 has a three-month lifetime but will be only active for two months. Key 2 has a lifetime of seven months and will be active for six months, and key 3 has a lifetime of seven months and will be active for seven month as well.
Example 18-2 NX-OS Keychain Configuration
SWITCH-A(config)# key chain dccor
SWITCH-A(config-keychain)# key 0
SWITCH-A(config-keychain-key)# key-string  C!sC@123
SWITCH-A(config-keychain-key)# accept-lifetime 00:00:00 aug 19 2019 23:59:59 aug 19 2019
SWITCH-A(config-keychain-key)# send-lifetime 00:00:00 aug 19 2019 23:59:59 aug 19 2019
SWITCH-A(config-keychain-key)# exit
SWITCH-A(config-keychain)# key 1
SWITCH-A(config-keychain-key)# key-string  My&3t2918
SWITCH-A(config-keychain-key)# accept-lifetime 00:00:00 aug 19 2019 23:59:59 oct 19 2019
SWITCH-A(config-keychain-key)# send-lifetime 00:00:00 sep 19 2019 23:59:59 oct 19 2019
SWITCH-A(config-keychain-key)# exit
SWITCH-A(config-keychain)# key 2
SWITCH-A(config-keychain-key)# key-string DC4C0r
SWITCH-A(config-keychain-key)# accept-lifetime 00:00:00 aug 12 2019 23:59:59 feb 12 2020
SWITCH-A(config-keychain-key)# send-lifetime 00:00:00 aug 12 2019 23:59:59 jan 12 2020
SWITCH-A(config-keychain)# key 3
SWITCH-A(config-keychain-key)# key-string N3tr0kP@Ss
SWITCH-A(config-keychain-key)# accept-lifetime 00:00:00 aug 12 2019 23:59:59 feb 12 2020
SWITCH-A(config-keychain-key)# send-lifetime 00:00:00 aug 12 2019 23:59:59 feb 12 2020
Key Selection
![]()
To select a key, the router looks through its entire list of keys and sends the key-string of the lowest key number that is currently valid. Assuming today is September 15, 2019, both key 2 and key 3 would be the only valid keys of the four keys shown in Figure 18-11. Because key 2 is the lowest numbered key, this is the key that will be used to attempt authentication with the neighboring router.
Based on the same information, if this router were to receive a key string as part of the authentication process, it would try to validate that key against the same key number in its own key chain. If the received key matched the same key number (key 2), the authentication would be validated, as in Example 18-3.
![]()
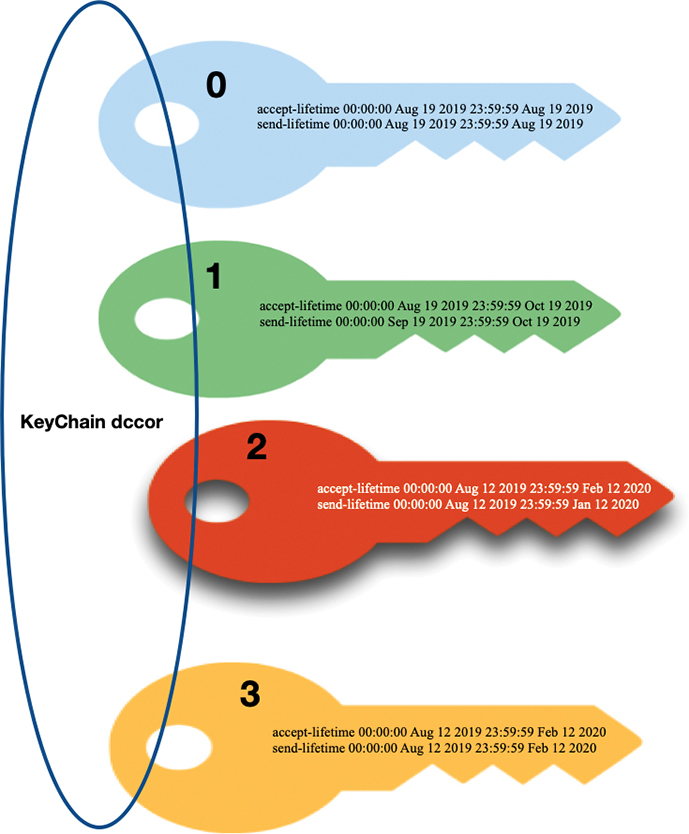
Figure 18-11 Authentication Key Selection
Example 18-3 Keychain Authentication Selection Result
SWITCH A(config-keychain-key)# show key chain
Key-Chain dccor
  Key 0 -- text 7 “072c605f6d29485744”
    accept lifetime UTC (00:00:00 Aug 19 2019)-(23:59:59 Aug 19 2019)
    send lifetime UTC (00:00:00 Aug 19 2019)-(23:59:59 Aug 19 2019)
  Key 1 -- text 7 “0f498fdadde485741”
    accept lifetime UTC (00:00:00 Aug 19 2019)-(23:59:59 Oct 19 2019)
    send lifetime UTC (00:00:00 Sep 19 2019)-(23:59:59 Oct 19 2019)
 Key 2 -- text 7 “071a20495f0d000c031d”
    accept lifetime UTC (00:00:00 Sep 12 2019)-(23:59:59 Feb 12 2020) [active]
    send lifetime UTC (00:00:00 Oct 12 2019)-(23:59:59 Jan 12 2020)
Key 3 -- text 7 “212c605ead29235733”
    accept lifetime UTC (00:00:00 Aug 12 2019)-(23:59:59 Feb 12 2019)
    send lifetime UTC (00:00:00 Aug 12 2019)-(23:59:59 Feb 12 2019)
Exam Preparation Tasks
As mentioned in the section “How to Use This Book” in the Introduction, you have a couple of choices for exam preparation: the exercises here, Chapter 20, “Final Preparation,” and the exam simulation questions in the Pearson Test Prep software online.
Review All Key Topics
Review the most important topics in the chapter, noted with the key topic icon in the outer margin of the page. Table 18-9 lists a reference to these key topics and the page numbers on which each is found.
![]()
Table 18-9 Key Topics for Chapter 18

Define Key Terms
Define the following key terms from this chapter, and check your answers in the Glossary.
authentication, authorization, and accounting (AAA)
Remote Authentication Dial-In User Service (RADIUS)
Terminal Access Controller Access Control System (TACACS+)
Lightweight Directory Access Protocol (LDAP)
virtual device context (VDC)
role-based access control (RBAC)
Domain Name System (DNS)
American Standard Code for Information Interchange (ASCII)
Cisco attribute-value pair (Cisco AVPair)
Password Authentication Protocol (PAP)
Cisco NX-OS
Cisco Nexus
References
Cisco Nexus 9000 Series NX-OS Security Configuration Guide, Release 9.2(x): https://www.cisco.com/c/en/us/support/switches/nexus-9000-series-switches/products-installation-and-configuration-guides-list.html
Cisco Nexus 7000 Series NX-OS Security Configuration Guide: https://www.cisco.com/c/en/us/td/docs/switches/datacenter/nexus7000/sw/security/config/cisco_nexus7000_security_config_guide_8x.html
Cisco UCS Manager Administration Management Guide 4.0: https://www.cisco.com/c/en/us/td/docs/unified_computing/ucs/ucs-manager/GUI-User-Guides/Admin-Management/4-0/b_Cisco_UCS_Admin_Mgmt_Guide_4-0.html