![]()
ASA and IDS
No other network security device is as common as the firewall; however, modern firewalls have evolved leaps over the traditional plain state tracking firewalls. Modern firewalls provide options such as traffic normalization, template style policies, application inspection, IDS integration, and VPN capabilities among many other features. Of particular interest and not commonly enabled, perhaps mainly for lack of understanding are the TCP normalization and application inspections features. This chapter gleans over some of these features; however, if you wish to get a deep understanding, we suggest references,1,2 and.3
Testing Policies in Safe Environment
The Cisco ASA firewall has an extensive set of features that would take a bit of time and practice to master. The dilemma is how do we construct complex policies that can be effective without affecting production networks and gain enough real-world experience to master the technology? In order to construct complex policies, a virtual of physical test bed is needed.
GNS3 offers a great opportunity to construct a virtual network environment or to merge virtual components with physical devices in order to test complex policies before deployment. When constructing security policies you have to think like the adversary and since hopefully you would have better knowledge of your network than attackers you can devise better merciless attacks to test your own security policies in a safe environment. Certainly, you need more than just the defensive device that would implement the security policy, you also need offensive capabilities to test the candidate security policies, and for this task, we suggest you use Kali, Black Arch Linux, Pentoo, or any other pen testing distribution that you feel comfortable.
Another addition that we suggest for your test bed is the Security Onion IDS. Having an IDS collecting the traffic between the attacker and the simulated victims gives you a better insight into (a) IDS signatures and (b) the structure of packets that trigger alerts. Also, the promiscuous interface on the IDS is good for seeing packets that don’t trigger alerts, and is therefore useful for further optimization of the firewall rules and the IDS signatures. Last but not least, in order to help you master the concepts of a good security policy, we suggest that you use a vulnerable VM to practice all sorts of possible scenarios to protect it without taking the targeted services offline. If you can design security policies when the odds are stacked against you, you definitely have a better chance and understanding of effective policies. Some vulnerable good VMs distributions to practice attacking and defending are Metasploitable 2, OWASP Broken Web App, Lord Of The Root, SpyderSec, and pWnOS, among many others.
Before continuing, let’s briefly discuss each item in the test lab and their function in a network security policy (see Table 21-1).
Table 21-1. Composition of a Security Policy-Testing Lab

Remember, there are also tools that can clone, virtualize production systems, or replay traffic to assist you in testing your policies. Remember, there is no artificial intelligence capable of outsmarting a human in the realm of network security; therefore don’t depend on any “intelligence” from the security devices other than the one you have explicitly designed into it via good security policy design.
Before starting the journey, let’s talk about the ASA’s management setup. After all, if the security of the device itself is compromised, there won’t be any security policy implementation. It is crucial to achieve and keep the management plane for any security device secured. A few tips to achieve this goals is to keep the footprint of the management network small, use only strong cryptographic protocols to push or pull data from the devices, enable mutual authentication between the device and the management agent.
The following are basic points to consider when setting up the ASA.
- Cryptographically secure access.
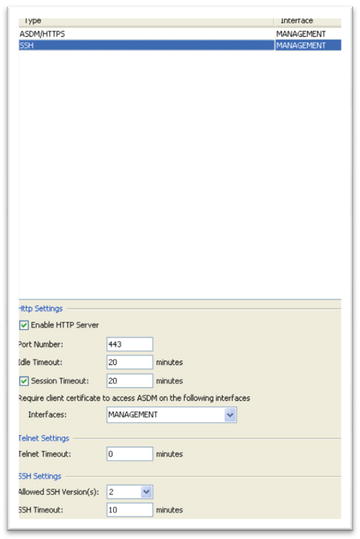
- HTTPS or SSHv2
- Secured layer 2 network segment for access.
- Static IP to MAC (ARP) bindings on the management network
- Port Security
- 802.1X authentication for clients to access the management network
- Only cryptographic protocols allowed on the management network
- syslog over TLS/SSL
- SSH
- HTTPS
- If possible, incorporate the ASA into the PKI infrastructure by issuing a CA signed certificate to replace the factory self-signed certificate. Ensure that any client accessing the ASDM management requires a CA signed certificate also.
- Implement accurate NTP for logs and event correlations.
- Create strict service level access lists for the access of the ASA management.
- Avoid receiving traffic other than management-related ones addressed at the ASA itself.
- Plan your security zones and their respective security levels. Keep in mind that any traffic from a higher security zone is allowed to traverse to a lower security zone by default. You may want to limit the types of traffic allowed to traverse from higher security zones to lower ones with access rules and or inspect the traffic with a service policy.
The first step is to start with the basic ASA setup steps:
- Set up the management IP address via the CLI.
- ciscoasa> en
- ciscoasa# conf t
- ciscoasa(config)# int gig 2
- ciscoasa(config-if)# nameif Management
- ciscoasa(config-if)# ip address 10.10.10.1 255.255.255.252
- ciscoasa(config-if)# security-level 100
- ciscoasa(config-if)# management-only
- ciscoasa(config-if)# no shut
- Generate RSA keys and enable SSHv2 and a secure copy.
- ciscoasa(config)# crypto key generate rsa modulus 2048
- ciscoasa(config)# ssh version 2
- ciscoasa(config)# ssh scopy enable
- Configure a username and password account for administration.
- ciscoasa(config)# username admin password <very_complex_password_here> privilege 15
- Note: If you find yourself questioning how complex a password must be, check out the oclHashcat page and the recovered passwords from hash dumps from hacks from various sites.4
- For ease of setup, copy ASDM UI into ASA.
- Secure copy from the host via SSH: scp –v –pw adsm-702.bin [email protected]
 Note You need Java JDK 6 or greater for the ASDM to run correctly. If you have multiple versions of Java versions on your PC, you may get errors, depending on the Java version used to run the ASDM. If this happens, use the Java console to select which Java version should be active. Repeat this process until you find the Java version best suited to run your version of the ASDM.
 - Now enable the HTTPS server.
- ciscoasa(config)# http server enable
- ciscoasa(config)# http 10.10.10.0 255.255.255.252 Management
- Enable the ASDM image.
- ciscoasa(config)# asdm image flash://asdm-702.bin
- Make sure that you can ping the management interface from the intended management PC.
- Set up the enable password for console access.
- ciscoasa(config)# enable password <very_complex_password_here>
- Access the ASDM via https://<management_ip>. Here it is https://10.10.10.1.
- Note: Whether or not you agree that an HTTP server in a network appliance makes it less secure, it is a fact that the ASDM makes the setup of complex policies rather easy. Once you have set up the device, you can disable the http server functionality. However, if you find that the ASDM is quite useful, then we recommend that you set up a CA and PKI infrastructure for mutual managing client and ASA authentication.
- Alternatively, you can set up an IPSec tunnel to the management interface.
- Encrypt password with AES.
- ciscoasa(config)# key configs-key password-encryption <very_complex_password>
- ciscoasa(config)# password encryption aes

Figure 21-1. ASDM UI
Now that there is an easy interface to interact with the firewall, let’s start the setup of other ASA parameters.5 The top bar tabs menus (Configuration, Monitoring) change the ASDM view (see Figure 21-3).

Figure 21-3. Configuration pane for the ASA interfaces
At this point, it is fair to say that we assume that you will refer to one of the many available guides6 for securing the ASA’s management plane. The following are a few things to consider:
- Set up a password policy. See the following example:
- ciscoasa(config)# password-policy lifetime 30 (every 30 days)
- ciscoasa(config)# password-policy minimum changes 5 (every new password must change 5 characters from previous ones)
- ciscoasa(config)# password-policy minimum length 14 (again if you think this is too long look at what is possible with GPUs in crossfire or SLI running oclHashcat)
- ciscoasa(config)# password-policy minimum-lowercase 2
- ciscoasa(config)# password-policy minimum-uppercase 3
- ciscoasa(config)# password-policy minimum-numeric 3
- ciscoasa(config)# password-policy minimum-special 4
- Note: Alternatively, you can use TACACS+ or RADIUS to enforce these rules.
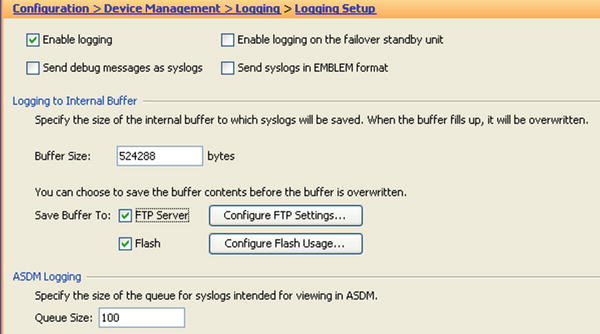
- Logging.
- ciscoasa(config)# logging console debugging
- ciscoasa(config)# logging asdm notifications
- ciscoasa(config)# logging buffered notifications
- ciscoasa(config)# logging buffer-size 524288
- ciscoasa(config)# logging flash-bufferwrap
- ciscoasa(config)# logging flash-maximum-allocation 65536
- ciscoasa(config)# logging flash-maximum-free 8192
- ciscoasa(config)# logging timestamp
- ciscoasa(config)# logging device-id ipaddress management

Figure 21-6. Logging filters per destination setup
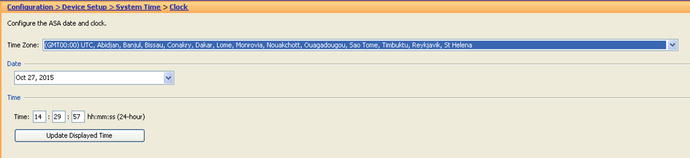
- Time is probably the most important setting for all security-related tools and appliances. Having accurate and consistent time is very important to be able to correlate events via the use of timestamps. Our advice is that you use UTC time for all of your security-related appliances. Avoid time-zone issues and make sure that you have a daily script that checks for time drift in your appliances. Always set up authenticated NTP sources in your enterprise.
- Clock Setup
- ciscoasa# clock set 14:29:00 27 Oct 2015
- ciscoasa(config)# clock timezone UTC
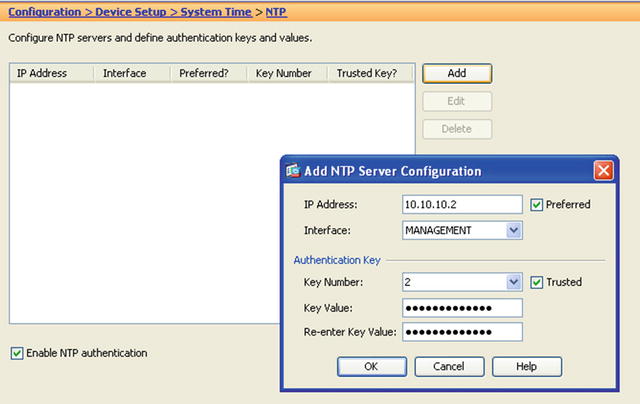
- NTP Setup
- ciscoasa(config)# ntp authenticate
- ciscoasa(config)# ntp authentication-key 2 md5 <very_complex_key>
- ciscoasa(config)# ntp trusted-key 1
- ciscoasa(config)# ntp server 10.10.10.2 key 2 source management
- Stealth Mode
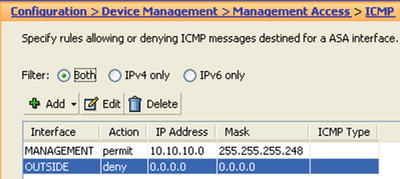
- For untrusted security zones you have the option to disable the ASA responses to ICMP messages. ciscoasa(config)# icmp deny any outside
- Clock Setup


Before continuing to other aspects of hardening the ASA, let’s introduce the offensive security system, Kali. The Kali system is pre-loaded with useful offensive security tools that will assist us in producing a baseline of the security systems and the vulnerabilities of our assets. It also serves to establish the reasons for which certain settings are recommended. To start assessing the vulnerabilities of our assets, we used an easy and powerful scan integration tool called Sparta. Sparta integrates NMAP, THC Hydra, and Nikto, among others, to do a quick assessment of open ports and available services in a simplistic fashion. See Figure 21-12 through Figure 21-19 for the results of the quick assessment. The initial test was done bypassing the firewall to determine which of the available services were to be made accessible from the outside security zone.
Now let’s further explore the Cisco ASA firewall and the Security Onion IDS. In our opinion, the Cisco ASA is a great firewall with capabilities to do deep packet inspection; however like previously mentioned it must be properly programmed to do so. For the IDS, we picked Security Onion for its free availability, which allows us to drop a sensor in any place that we feel protection or network insight is needed. Also, the fact that Security Onion is based on open source allows us to optimize the behavior of the IDS. The insight provided by the packet capture and session reassembly capabilities of the Security Onion IDS will assist us in further tuning the firewall policy for a particular boundary. Notice that we mentioned tuning a policy for a boundary since the best way to secure an enterprise is by boundaries and each boundary has specific needs depending on the assets to be protected this allows the defenders to narrow their focus when searching for possible threats. It wouldn’t make sense to use IDS Windows OS signatures to protect Linux servers that would just generate many false positives and too much noise; therefore, the need to customize the protection policy for the assets contained in the security boundary.
Baseline the Network
In this example, let’s proactively tune the IDS and ASA to prevent attacks against the Metasploitable2 server; not an easy task since the server is full with security vulnerabilities, but it is a great way to learn the defensive technologies. Figure 21-12 illustrates the test network.

Figure 21-12. Sparta UI
Before starting, let’s break down some of the threats:
- Reconnaissance: The beginning of all offensive endeavors.
- Open ports and services.
- Services or applications that reveal too much information upon query.
- Network devices, operating systems, and application versions.
- Lay out the network and test for security devices.
- Map each device’s information into a network simulation.
- Test for security devices that could hinder attacks.
- Fill the gaps.
- Test for spoofing.
- Test for easy-to-guess passwords.
- Search vulnerable databases for possible exploits.
- Test for systems’ reaction to packet mangling and fuzzing.
- Social engineering.
- Open source.
- Preparation.
- Gather all acquired knowledge, and re-create and simulate the network.
- Practice until the most effective vector is found.
- Launch decoy.
- Attack.
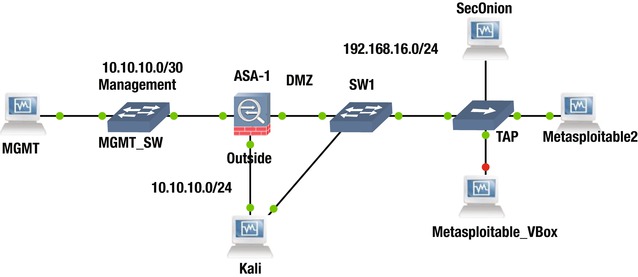
The test network contains an attacker system loaded with various offensive security tools, Kali. Kali is connected to the outside interface of the ASA firewall while also bypassing it; the bypass connection is used to baseline the zone that requires protection. The MGMT PC manages the ASA via the ASDM Java-based UI (user interface). The Security Onion IDS is connected via a passive tap to the vulnerable servers Metasploitable1 and Metasploitable2 that require protection in order to provide the deep packet inspection to optimize the firewalls rules, as well to tune the signatures from the IDS as we try a variety of scans and attacks on the Metasploitable servers. It is recommended that before you turn and IDS into an IPS, you first deploy it as passive IDS in order to tune the signatures and avoid dropping legitimate traffic. It is also advisable that if you don’t have a policy for the firewalls regarding protocol inspection that you use an IDS and an offensive suite like Kali to get insight into possible damaging traffic and better craft an inspection policy for the firewall and IDS. To assist in crafting security policies is advisable that the following data types are collected:
- Full packet captures: pcaps
- Statistical Network Analysis: NetFlow, IPFIX, and sFlow
- Packet String: An HTTP session, for example
- Log Data: syslog from network devices
- Alert Data: IDS
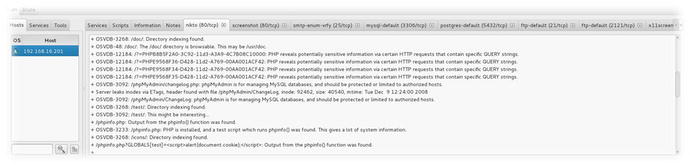
Alternatively, Nessus or OpenVAS can be used to scan the system for vulnerabilities. The OSVDB numbers from Sparta or the CVE numbers from OpenVAS could be used to narrow searches in Metasploit to find and filter the most likely exploits.
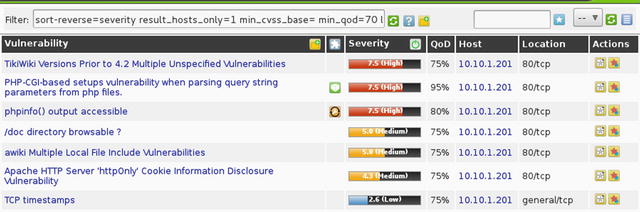
Figure 21-15. OpenVAS vulnerability scanner included in Kali
Now let’s look at the passive IDS, Security Onion. For this example lab, let’s perform a “quick setup” rather than the “advanced setup” from Security Onion. The setup is rather easy and self-explanatory; if you need more information, refer to one of the many videos by Doug Burks or to Chris Sander’s book.7 For the IDS engine, we are using Snort. To view the Snort-generated alerts that are triggered on matching rules, we are using Snorby.

Figure 21-19. Snorby alerts pane displays the data that triggered the alert
Before getting into designing access rules for traffic flows from lower-security boundaries to higher security ones, a plan is needed on how to establish the security boundaries. In this example, let’s use the guidelines shown in Table 21-2.
Table 21-2. Example of Zone Security-Level Preparation
|
Area |
Security Level |
|---|---|
|
Outside |
0 |
|
DMZ |
50 |
|
Inside |
90 |
|
Management |
100 |
To start testing data across the firewall, you need to enable an access rule for incoming data from the lower security boundary, “outside,” to the higher security boundary, “dmz”. To achieve this objective, you will do the following:
- Create a network object group to group all DMZ servers that will be accessed from the outside. We called this group HTTP_Servers.
- Create a TCP Service Group to group the TCP services that will be allowed. In this case, we named the TCP service group Public_Servers, containing TCP/HTTP and TCP/HTTPS services.
- Create an ICMP group that contains the ICMP message types that will be allowed. In this case, we select only echo and echo-reply.
- Create two access rules allowing any source to access any destination in the network object group HTTP_Servers to any service included in the Public_Servers TCP service group (see Figure 21-20 and 21-21).
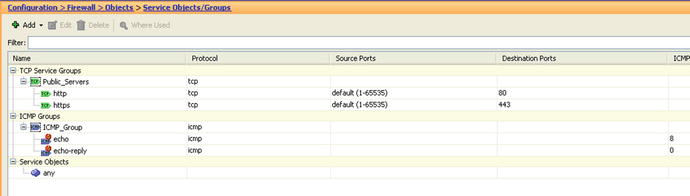
Figure 21-20. TCP and ICMP service groupings. Groupings act as place-holders for all the services we want to apply similar rules to
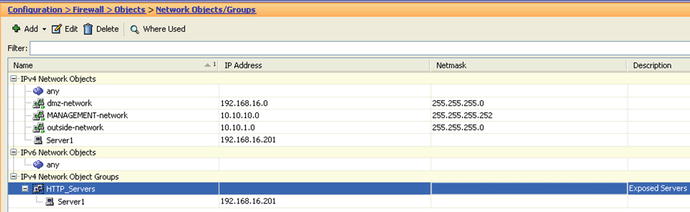
Figure 21-21. Network object groups act as placeholders for the servers we want to apply similar rules to
|
Access Object Construct |
Applied to Objects |
|---|---|
|
Network Object |
Single IP address or network |
|
Service Objects |
Layer 4 protocols TCP/UDP source and destination ports |
|
ICMP |
Control ICMP message types |
|
Protocol |
IP protocol field. Example IPSec ESP mode or IP protocol 50 |
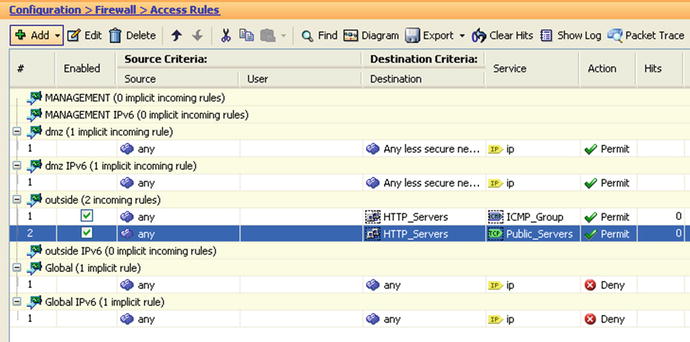
Figure 21-22. Using network and TCP service groupings for access rules to allow access from the outside interface to traverse the firewall
Open Services
After creating the firewall, accessing rules for the allowed accessible services, we run a second scan. Note that we are not using NAT at this stage since we want to address real concerns with the firewall rules first. The second scan with Sparta is less revealing about open services.
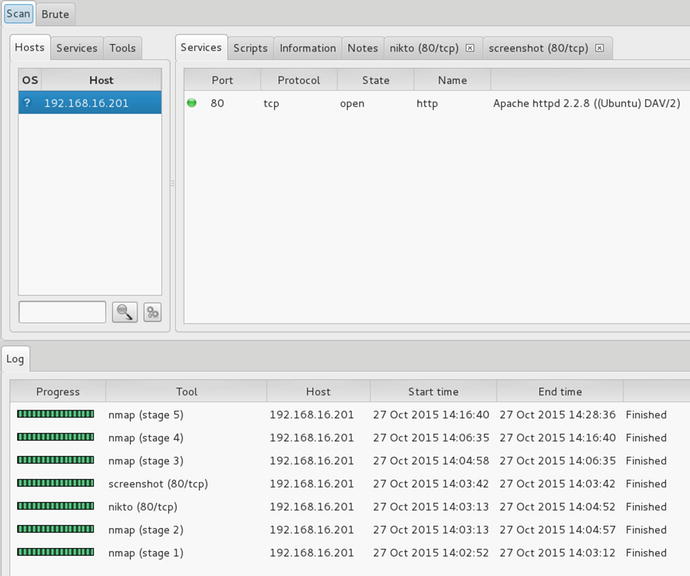
Figure 21-23. Now only port 80 (HTTP) is visible by the attacker
Studying how the firewall responds to various scanning methods is of particular importance to ensure that the firewall remains stealthy to the attacker and does not reveal any information of reconnaissance value (see Figure 21-24).

Figure 21-24. Packets from the scan interaction only allowed services by the firewall should generate responses
To further improve the firewall rules set, we attempted all scan types and firewall evasion techniques. The following are some basic Nmap scans to test the firewall responses.
- nmap -sS -T4 192.168.16.201 (Syn Stealth)
- nmap -sA -T4 192.168.16.201 (TCP Ack)
- nmap -sF -T4 192.168.16.201 (Fin)
- nmap-sX -T4 192.168.16.201 (Xmas)
- nmap -sN -T4 192.168.16.201 (Null)
- nmap -sW -T4 192.168.16.201 (TCP Window)
We need to verify that the only responses we get for service scanning are valid responses from allowed services to ensure that the firewall state tracking and rule set are operating as expected. We also need to test spoofing by sending spoofed packets from the outside with inside addresses and observe how the firewall reacts to the spoofed packets. To this extent, we will use hping3 as an example:
hping3 -c 5 -p 443 -S –spoof 192.168.16.1 192.168.16.201
Of course, the firewall should drop these packets if reverse path forwarding checks were enabled; otherwise, you would get the packet capture shown in Figure 21-25.

Figure 21-25. Spoofed packets sent using hping3 are forwarded by the firewall
Good access rules are not effective if it’s easy to impersonate the characteristics that the access rules look for. There are numerous programs to generate packets with any chosen MAC and IP address with valid payloads; therefore the ability to impersonate traffic is not difficult but thanks to a concept called scoping we can determine the scopes or zones in from which certain types of traffic originate. For example if 192.168.16.0/24 is used in the DMZ it should not be present as source in the Ingress of the Inside zone interface but rather only on the egress of the Inside zone interface. In other words packets from any source in the DMZ should not be entering the Inside interface as source but rather as destination.

Figure 21-26. Enable Anti-Spoofing for all interfaces to avoid the scenario from Figure 21-23
The following are commands to enable reverse forwarding path checks:
- ciscoasa(config)# ip verify reverse-path interface dmz
- ciscoasa(config)# ip verify reverse-path interface outside
- ciscoasa(config)# ip verify reverse-path interface management
- ciscoasa(config)# ip verify reverse-path interface inside
Since we are on the subject of anti-spoofing, remember to use Anti-Bogon rules or RFC 2827 filtering to filter private, multicast and any other source addressees that should not be in the source field of any packet entering the a firewall interface. For this scenario, we will implement group rules for all addresses, except, of course, the private range that we intend to use in our lab. The reverse path forwarding checks for the ASA anti-spoofing only checks the source address against its routing table of know networks it won’t work if we spoof an IP on a network not contained in the ASA’s routing table. For this reason when placing a firewall facing the Internet a Bogon filter list8 should be programmed at the ingress interface (see Figures 21-27 and 21-28).
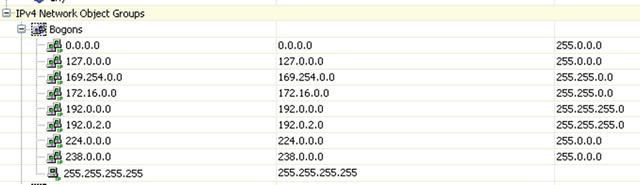
Figure 21-27. Example Bogon network list prepared under Bogon network group

Figure 21-28. Example Bogon filter list applied at the outside ingress interface
Now we want to test more-advanced firewall evasion techniques, such as idle host scanning and source routing. To this effect, we bring online the second server, Metasploitable1, and edit the Network object group from host to range to include both servers.
- ciscoasa(config)# object network Server1
- ciscoasa(config-network-object) range 192.168.16.201 192.168.16.202
Now we try an idle host scan and a source routing scan.
- nmap -vv -n -PN -sI 192.168.16.202:80 -p 23 192.168.16.201
- nmap -vv -n -sS -PN –ip-options "L 192.168.16.201" --reason 192.168.16.202
And, of course, we get no responses. Now we try to use Nmap’s scripting engine to run a firewall script to see what other ports are open.
- nmap –script=firewalk –traceroute 192.168.16.201
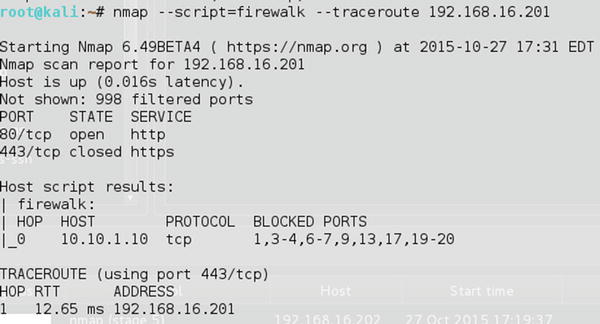
Figure 21-29. NMAP NSE Firewalk script is able to differentiate between open ports with no running service such as 443 and blocked ports
Fragmentation
There are many tests that you can perform to make sure that the firewall state machine is working as intended; for example, you can perform flag scans, fragmentation scans, and so forth. For a more complete listing of possible scans using NMAP, see reference.9 When considering fragmentation and firewalls, the best policy is not to fragment at the firewall. This is for two reasons: (a) it consumes resources from the firewall that could be dedicated to inspecting and/or normalizing traffic, and (b) it enables fragmentation-based firewall evasion techniques. For these reasons, it is best if you can avoid fragmentation at the firewall. To disable fragmentation for an interface:
- ciscoasa(config)# fragment chain 1 outside
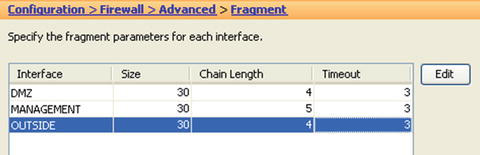
Figure 21-30. Zone interface fragmentation settings
Table 21-4. Fragmentation Field Definitions
|
Field |
Meaning |
|---|---|
|
Size |
Interface IP reassembly queue size |
|
Chain Length |
Max number of IP fragments per fragmented transport PDU |
|
Timeout |
Time to wait for the fragments reassembly |
Designing Service Policies
Now that you have an idea how to use filters and scanning to test filters let’s focus in a more in depth problem; that is when legitimate services are abused. For the next phase of ASA exploration, let’s focus on HTTP protocol inspection. The ASA has multiple modules for protocol inspection, but for brevity, let’s focus on the HTTP module. Let’s see what happens when an attacker attempts an attack against a vulnerable web service running on the Metasploitable2 server. The first step in any attacker chain of attack is the reconnaissance stage. Let’s suppose the attacker used Sparta and the Nikto integration to scan the Metasploitable2 web server (see Figure 21-31).
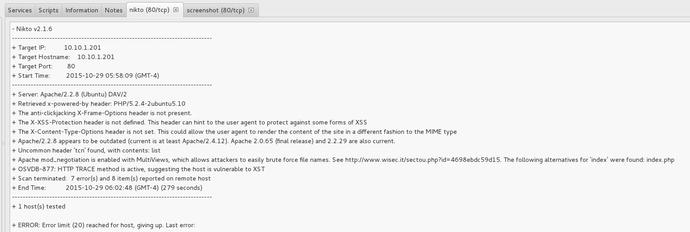
Figure 21-31. Nikto Scan of port 80 shows various vulnerabilities
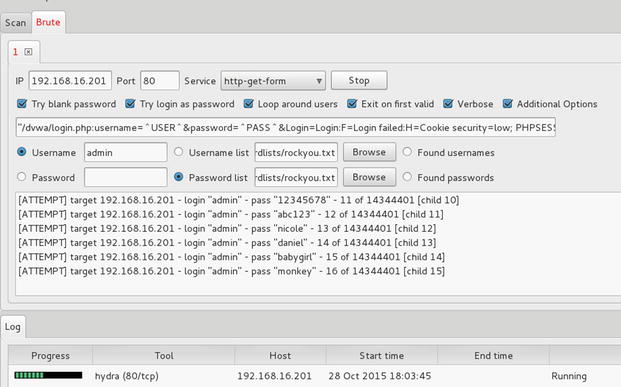
Passwords
Rather than immediately kicking the door to the web server via an exploit, we are going to check if the door was left open by performing a login brute force attack for the username/password combination. We start by inspecting the form presented by http:192.168.16.201/dvwa/login.php. Next, we start an analysis of the login form to obtain the forms parameters used in the HTTP POST method. Then, we capture the username field and the password field, along with the session cookie used, in the first login attempt (see Figure 21-32).

Figure 21-32. Using Burp Suite proxy to capture HTTP exchanges between the client and the server
We then use Sparta, which functions as a UI for Hydra, and set up the test. Since the DVWA web service is set up with a very weak password, it is not long before the attack succeeds. Let’s suppose we want to implement and HTTP inspect policy that would drop connections if an login attempt with admin credentials were to happen from the outside interface that is if they meet the following requirements: (1) URI has /dvwa/login.php, (2) IT is an HTTP POST method, and (3) it contains the parameters username:admin. We then create two regular expressions in the regex objects in the ASA for requirements 1 and 2. We then add those two objects to a HTTP class map, and finally, we incorporate the class map into the HTTP inspect policy to be applied as a service policy to the outside interface.
Before we start with a detailed discussion of class traffic maps, class application map, traffic policy maps, inspection policy maps, and service policy. Let’s explore Tables 21-5, 21-6, and 21-7 to get an idea of the composition of these structures.
Table 21-5. Modular Policy Framework (MPF) Composition
|
Modular Policy Framework Construct |
Use |
|---|---|
|
Traffic Class Map (L3 and L4) |
Traffic to match |
|
Policy Map |
Action to take |
|
Service Policy |
Location to apply policy map |
Table 21-6. Layer 3 to 4 Policy Construction
|
Class Map Match |
Policy Map Actions |
|---|---|
|
Port numbers |
Inspect traffic |
|
Access list |
Set connection options |
|
Traffic flow |
Send to iPS module |
|
IP precedence |
Send to CSC module |
|
DSCP |
Police the traffic |
|
RTP Port Range |
Shape the traffic (outgoing) |
|
VPN Tunnel Group |
Apply priority |
|
Export NetFlow data |
Table 21-7. Directionality of Policy Map Actions
|
Actions |
Applied to Interface |
Applied Globally |
|---|---|---|
|
Connection Limits |
Bidirectional |
Ingress only |
|
Adjust TCP options (TCP Map) |
Bidirectional |
Ingress only |
|
Inspection with application engines |
Bidirectional |
Ingress only |
|
Offload to IPS or CSC module |
Bidirectional |
Ingress only |
|
Policing |
Depends on policing directionality |
Depends on policing directionality |
|
Shaping |
Egress only |
Egress only |
|
Priority handling |
Egress only |
Egress only |
Service policy maps are composed of policy maps whether the policy maps are traffic policy maps or application inspection policy maps. The following hierarchy provides a different look at the structure.
- Service Policy Map applied to an interface
- Layer 3 and layer 4 traffic policy map
- Layer 3 and layer 4 traffic class maps
- Application Inspection Policy Map
- Application specific class maps
- Connection Limits
- TCP map (TCP normalization)
- Layer 3 and layer 4 traffic policy map
The first step is to implement a class map to be used in the inspect policy, but since there are no pre-made class maps matching the /dvwa/login.php URI, you have to first create a regular expression object to use in the URI inspection portion of the policy. Once you’ve constructed the regex for the URI match, you should test it. It is easier to incrementally test all the parts of a complex inspection policy adding all the elements together.
Regular expressions used:
/dvwa/login.php  - Matches the login URI
username=admin  -  Matches the username "admin" in the post form
As an exercise, you should try to construct the preceding regular expression, taking into account uppercase and lowercase letters (see Figure 21-34 through Figure 21-38).
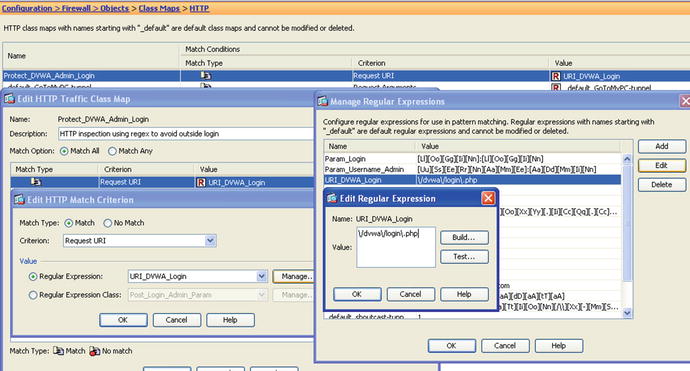
Figure 21-34. Constructing the first element of the HTTP inspection policy to look for the /dvwa/login.php URL path within the client’s request

Figure 21-35. Constructing a class map to match conditions on HTTP traffic
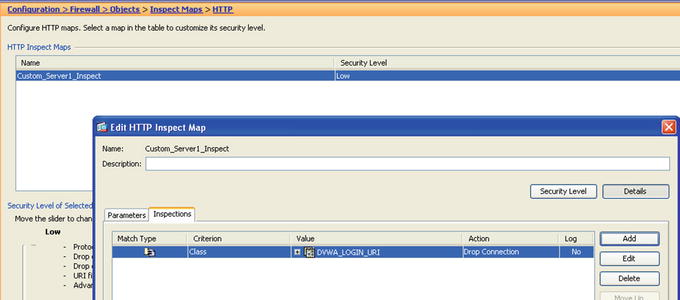

Figure 21-37. Adding the custom HTTP inspection policy to the outside service policy
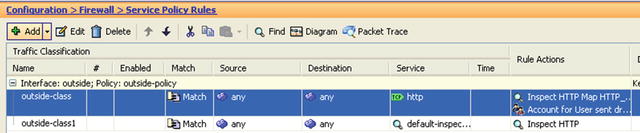
Figure 21-38. Finally, add the default inspection policy along with the custom HTTP inspection policy to the outside interface set of policies
Now when you try to log in from the outside as an admin, the connection drops and the request times out (see Figure 21-39). The facilities included in the ASA to perform protocol inspections are very powerful, particularly when they are customized to protect assets by taking into account the properties of these assets; like in the case of web applications, the different interactions allowed by HTTP methods and possible input parameters.

Figure 21-39. Post request to login as “admin” times out due to the custom inspection policy
Let’s do one more example. In this instance, you want only HTTP GET, HEAD, and POST methods. Again, start by making a class map Allowed_HTTP_Methods (see Figure 21-40).
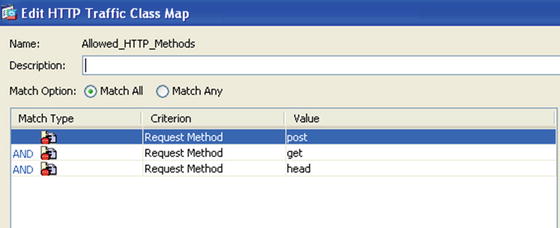
Figure 21-40. Designing a class map to allow HTTP methods GET, POST, and HEAD
The steps for adding the class map to the inspect map are the same as discussed before; however, keep in mind that you add multiple class maps to an inspect map.
This time when creating the service policy, we are going to add a TCP map for TCP traffic normalization. Normalization means that we intend to alter certain properties of, in this case, the TCP packets so that they meet the criteria for accepting the packets. Some of the reasons why normalization is important are (a) TCP options incompatibility with old applications or systems, and (b) covert channels in the options or other fields of the protocol. A TCP map, for example, allows you to clear options or allows a limited set of options in the TCP options field, clear the urgent flag, check for TCP window validity, and check TCP checksum validity, among other options. Before using the TCP map for normalizing the traffic, we suggest that you take some time to analyze their traffic via either NetFlow or sFlow analysis. The TCP map is used when the service policy for an interface is created and it complements the connection settings of the service policy.
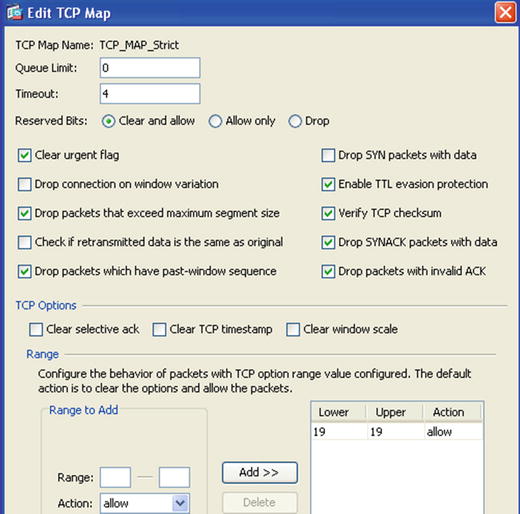
Table 21-8. TCP Normalization (TCP Map)
|
Field |
Description |
Action |
|---|---|---|
|
Queue limit |
Max number of out order packets that can be buffered. |
N/A |
|
Timeout |
Time that the out order packets can remain in the buffer. |
Clears the out of order buffer. |
|
Reserved bits |
Bits from the IP header that are for reserved used. |
Clear: Resets the value to zero and forwards the packet Allow only: Packets are forwarded with no alterations. Drop: Drops the packet. |
|
Clear urgent flag |
Reset the value of the urgent flag to zero. |
Default settings to forward the packet unaltered. |
|
Drop connection on window variation |
Tracks the TCP window variation as expected from TCP windowing algorithms. |
When selected, drastic variation will cause a session to be dropped (see Figure 21-42 as an example). Default settings are to allow window variations. |
|
Drop packets that exceed the maximum segment size (MSS) |
The TCP maximum segment size is normally set at the beginning of the TCP connection. |
When selected, variations from the MSS agreed at the beginning of the TCP connection will cause the packets to be dropped. |
|
Check if retransmitted data is the same as the original |
Checks that retransmission arrive in sequential order. |
When selected, out of order re-transmission packet will be dropped. |
|
Drop packets on replayed window sequence |
If a packet contains a repeated window sequence. |
When selected, drops the packet otherwise the packet is forwarded. |
|
TTL evasion |
Check for retransmitted packets that have TTL variations. |
When selected any packet meeting the criteria is dropped otherwise packets are forwarded. |
|
Verify TCP checksum |
TCP checksum must be valid. |
When selected, the packet is dropped if the TCP checksum calculation upon receipt doesn’t match the advertise checksum. |
|
Drop SYN packets with data |
Normally, a SYN packet is the initiation of the three-way handshake before TCP data is transmitted. Unless you are using TCP fast open. |
When selected, SYN packets that contain data will be dropped. Be sure TCP fast open is not in use. |
|
Drop SYN ACK packets with data |
The second part of the TCP three-way handshake before TCO data is transmitted. Unless TCP fast open is in used. |
When selected, SYN ACK packets with data will be dropped. Make sure that TCP fast open is not in use. |
|
Invalid ACK |
The TCP sequence number of the ACK doesn’t correspond to the next segment. |
When selected, invalid ACK packets will be dropped. |
|
TCP options |
TCP options field. |
Great care to identify any protocols in use that use TCP options. For example, BGP uses TCP options value 19 for MD5 authentication or the newer TCP authentication option value 29. Selective filtering is allowed. |

Figure 21-42. Drastic TCP window variations cause the ASA to drop this session
Table 21-9. Service Policy Connection Limits
|
Field |
Scope |
Default Values |
|---|---|---|
|
Maximum TCP & UDP Connections |
Interface |
0 = Unlimited |
|
Maximum embryonic connections (half open) |
Interface |
0 = Unlimited |
|
Maximum per client UDP & TCP connections |
Per originating IP address for the Interface |
0 = Unlimited |
|
Maximum embryonic per client connections |
Per originating IP address for the Interface |
0 = Unlimited |
Before attempting to set the TCP timeout field values, we suggest that you utilize statistical data from current service users round trip times (RTT) to make a more educated guess. The TCP timeout settings should complement the maximum connection settings to avoid resource exhaustion attacks (see Table 21-10).
Table 21-10. TCP Timeouts
|
Field |
Minimum Values |
Default Value |
|---|---|---|
|
Automatically close half-open connections |
5 seconds |
30 seconds |
|
Automatically close half-closed connections |
5 minutes |
10 minutes |
|
Automatically close TCP connections |
5 minutes |
1 hour |
|
Dead connection detection (sends a sort of keep alive ACK) |
Interval = 15 seconds Retries = 5 75 seconds without a reply to an ACK the connection is declared defunct. |

Figure 21-43. The service policy connection settings refer to the TCP map
Connection settings and TCP map settings for normalization are best, based on historical data gleaned for analyzing NetFlow or sFlow data or from careful planning. Once you believe the settings are dialed in you should test them against DoS tools to observe were further adjustments can be made. For example, of the difference that these settings can make during a DoS attack (see Figure 21-43) before the use of connections settings, and TCP map and using the default values and no TCP map (see Figure 21-44). Notice the number of connections established by a single client launching a DoS; only 4 connections in the first case and 2000 connections in the second case. The following is the command used for this simple test case:
hping3 –c 1000000 –d 500 –w 256 –S –p 80 –flood 10.10.1.201
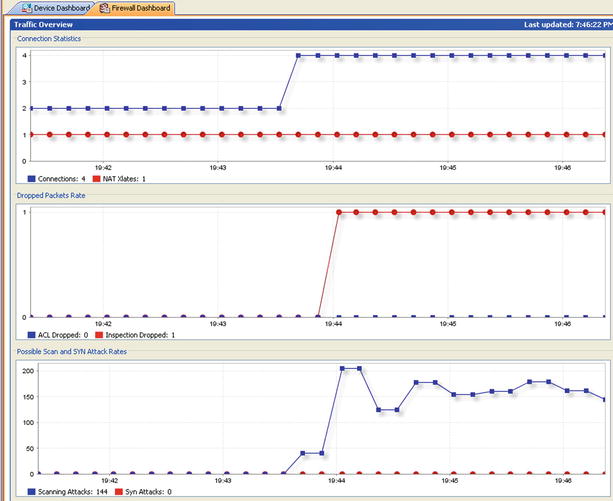
Figure 21-44. Effect of DoS with tuned connection settings and TCP normalization map is used
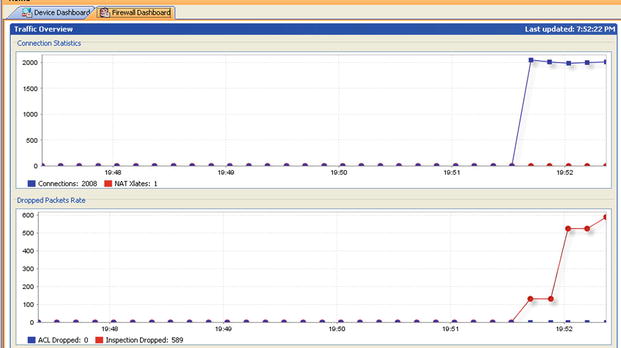
Figure 21-45. Effects of a DoS with default connection settings and no TCP normalization
Now that you have sampled a custom HTTP inspection policy, let’s set up static NAT for the Metasploitable2 server. To make NAT policies manageable, we suggest you use the same concepts that we explored for access rules construction by leveraging the use of network objects and network groups. Since we only intend to translate one address in this example, we are going to use a network object. We begin by defining a network object for the address inside called Metasploitable2 with the IP address 192.168.16.201 and a network object called Metasploitable2_Outside with an assigned IP address of 10.10.1.201.

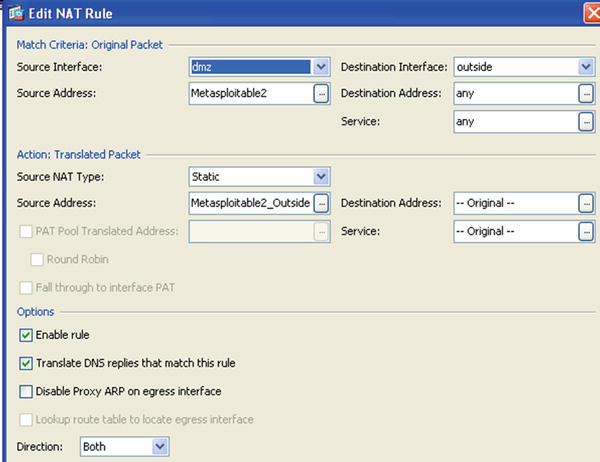


Figure 21-49. Example PAT configuration for the second DMZ server using the firewall interface IP as its source translated IP
For the second example, we are going to use PAT for the second DMZ server, Metasploitable1. The source address of the Metasploitable1 (192.168.16.202) server will be replaced with the outside interface IP address of the firewall (10.10.1.1) as shown in Figure 21-35.
An important consideration when using PAT is that normally it would be desirable, for security considerations, to disable proxy ARP in the firewall interfaces; however, this is not possible when the address space of the firewall in share with other clients as it is the case with PAT.
To disable proxy ARP in non-PAT interfaces:
- ciscoasa(config-if)# sysopt noproxyarp Management
- ciscoasa(config-if)# sysopt noproxyarp DMZ

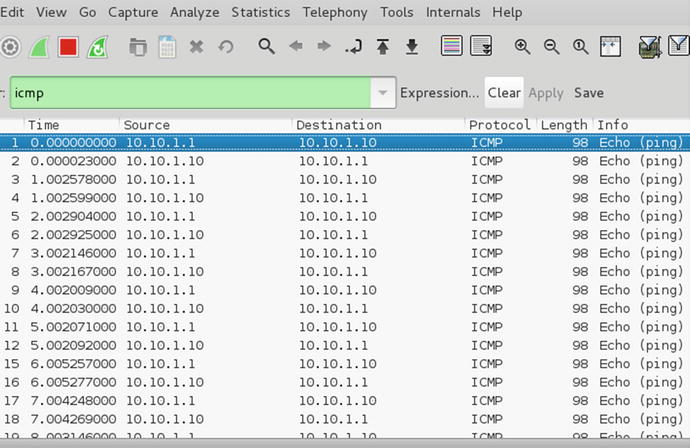
Figure 21-51. ICMP echo requests from the second DMZ server with source address of the firewall (PAT)
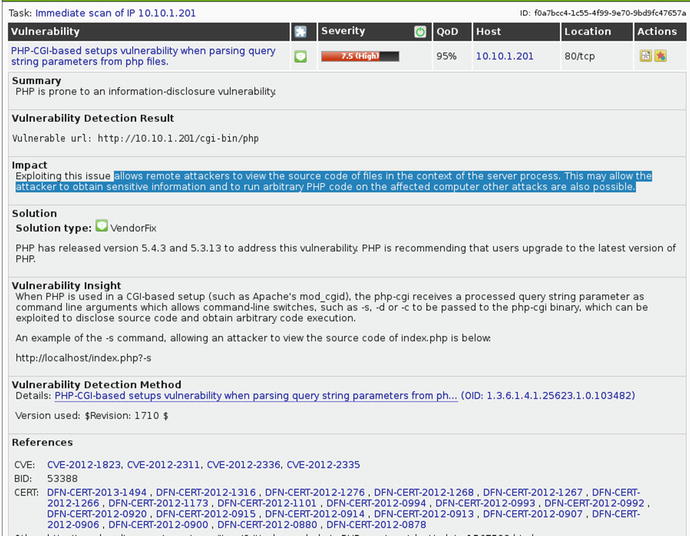
Until this point, we have considered the implications of access rules, inspection policies, TCP normalization, and connection settings. You must also consider analysis a very important factor of the default behavior of the ASA firewall, in which any connection from a higher security zone is allowed to traverse to a lower security zone. Going back to the OpenVAS or Sparta scan of the Metasploitable2 target in Figure 21-15 and Figure 21-12, we found a vulnerability CVE-2012-1823. At this point we can use the Metasploit framework or a throw away script at www.packetstormsecurity.com, CVE-2012-1823.py. Figure 21-52 shows the results of launching the exploit from the outside interface of the firewall toward the vulnerable server in the DMZ.
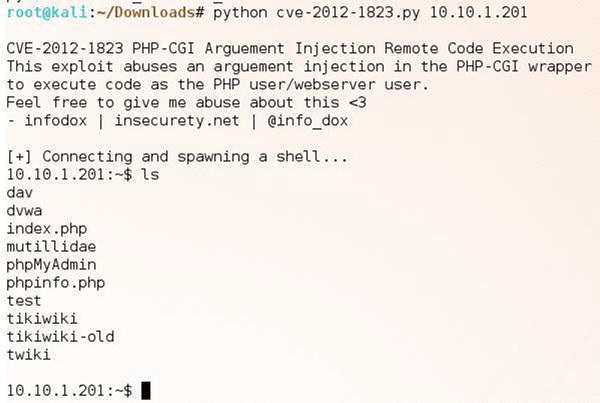
Figure 21-52. Launching the exploit toward the vulnerable Metasploitable2 server

Figure 21-53. Get the usernames to attempt password attacks on
The question then becomes: How can we further secure the firewall rules to change the default behavior that allows any traffic from higher security zones to lower security zones, and minimize the chances of the attacker successfully spawning a shell?

Figure 21-54. Using access rules to change the default behavior from higher security zone to lower security zones
As an exercise, you should try to implement a policy to block the exploit using an HTTP inspection policy without blocking the service just blocking the delivery method of the exploit. Figure 21-55 shows the exploit (in an action capture using Wireshark), which should help you with this exercise.
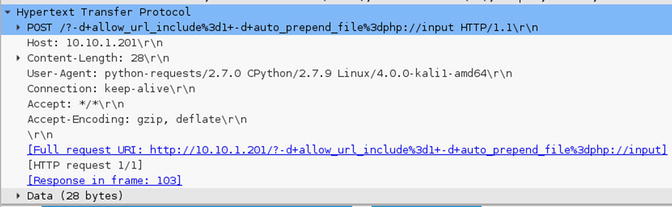
Figure 21-55. HTTP POST exploit PHP argument injection
Consider that beside the HTTP inspection engine with its own application specific set of class map to match aspects of the application protocol, there are many more included by default in the ASA (see Table 21-11).
Table 21-11. Supportted Application Inspection Engines
|
Protocol |
Default ASA Protocol engine port |
|---|---|
|
DNS |
UDP 53 |
|
ESMTP |
TCP 25 |
|
FTP |
TCP 21 |
|
H323 |
TCP 1720, TCP 1718-1719 |
|
HTTP |
TCP 80 |
|
ICMP | |
|
IP Options |
RSVP |
|
IPSec pass thru | |
|
MGCP |
UDP 2427-2727 |
|
NetBIOS |
UDP 137 - 138 |
|
PPTP | |
|
RSTP |
TCP 554 |
|
SIP |
TCP 5060 |
|
Skinny |
TCP 2000 |
|
SNMP | |
|
WAAS |
TCP 1 - 65535 |
We hope that this chapter has given you some ideas and tools on how to make the best of the security-policy design experience, as well as some practical background to accomplish your security goals.
________________
1CCNP Security Firewall 642-618 Official Cert Guide, David Hucaby, Cisco Press
2CCNP Security VPN 642-648 Official Cert Guide, Howard Hopper, Cisco Press
3Cisco Firewalls, Alexandre M.S.P Moraes, Cisco Press
4http://www.adeptus-mechanicus.com/codex/hashpass/hashpass.php
5Cisco ASA: All-in-one Next Generation Firewall, IPS and VPN Services, 3rd edition, Jazib Frahim, Cisco Press
6Cisco ASA configuration guide, National Security Agency, https://www.nsa.gov/ia/_files/factsheets/Cisco_ASA_Configuration_Guide.pdf
7Applied Network Security Monitoring: Collection, Detection and Analysis, 1st edition, Chris Sanders, Syngress
8https://www.team-cymru.org/bogon-reference.html
9NMAP Network Scanning, Gordon Lyon, Insecure.com