Chapter 2
Studio techniques and working on location
This chapter covers the essential practicalities involved in running a classical recording session on location and coming away from it all with plenty of usable recorded material, venue staff who would be happy to see you return, and no third-party insurance claims. Much of this chapter is about preparation, getting to know your equipment well, and devising an efficient workflow in advance. Making recordings is essentially about communication and working with the fragility of musical performance, and the more time and attention you are able to give to the musicians, the happier and more productive the session will be. This means making your technology as quick and simple to use as you can so that it does not get in the way of the flow of the session.
It is strongly advised that you make a detailed visit to a venue that you have never used before. By introducing yourself to the venue staff (and making yourself look organised and professional in their eyes) you can work out all the practical details in advance that make the difference between a successful or stressful experience. A reconnoitre is particularly valuable prior to a church or cathedral organ recording; see sections 14.2 and 14.9 for discussion of problems particular to churches.
2.1 Equipment
Preparation of a standard checklist that you take out every time you go is essential. Make a signal flow diagram of the whole process from microphones back to control room, including monitoring, talkback, and other communications, and then go through it methodically to make your list. Once you have done this, try to think what could go wrong at every stage of setting up and decide what you could do, or what you might need to ameliorate this. Take spares of everything; if you plan on using 10 microphones, take 14 with you.
For example, the list of things you might need to be sure of being able to rig a microphone could be:
- Microphone.
- Clip – make sure clip has a thread adapter (3/8″ to 5/8″).
- Shock mount.
- Microphone stand.
- Boom (and counterweights).
- Stand weights or sandbags.
A cable run planning process might look like this:
- How long are the cable runs? Measure them, don’t guess.
- How many cables?
- Multi-core or single cables?
- Will the cables need to go through a door at any point? Find out.
- Will cables need to go over a door (fire exit)? Find out.
- What sort of protection will you use for cables placed in vulnerable positions?
Cables are something that need looking after, and they will last a very long time if you do. They will need protection anywhere that they might be trodden on, have vehicles drive over them, pianos wheeled over them, or even get chewed on by rodents. (Rodent-proof fibre cable is available; it is about 10 mm thick, but is worth having if you have to leave a long cable run through the outdoors for any length of time.) Cable covers are used both to protect cables and prevent a trip hazard. In reverse order of effectiveness, the options are:
- Gaffer tape – can be used to stick cables down and prevent tripping. Cheaper makes in particular can leave sticky floor and sticky cables – and the venue might not allow you to use it.
- Carpet – will prevent tripping, but will not protect the cables if a piano goes over them.
- Rubber cable covers with a channel on the underside – will prevent damage to cables unless a vehicle drives over them.
- Heavy duty cable channel covers (such as Adam Hall defenders) will protect cables from damage by vehicles, so they are for use outdoors.
Fibre cable can be protected from damage in door hinges and so forth by using some cheap, extruded foam pipe insulation that comes with a long tube slit down the side and is easily cut to length.
Apart from the obvious things like microphones, stands, cables, mixing desk, and DAW, there are several additional essentials:
- Tape measure or a cheap laser measurer – for measuring cable runs, room dimensions and microphone locations. Logging your microphone positions is a good discipline; it allows you to accurately add delays in mixing, or reproduce the session again another time, or to learn from your experience.
- White insulation tape and a permanent waterproof marker – these can be used for labelling cables and mixing desk channels.
- Black insulation tape – for discreet marking of microphone stand positions.
- Torch – always useful for when you have to plug something up, find the essential widget you dropped in the dark, or read something in a dark corner of an old, badly lit building.
- A heater for the control room (see section 2.2.4 for heating and lighting the musicians’ areas.)
- Sandbags to use as stand weights – especially for lightweight stands such as Manfrottos.
- Plug-in circuit tester and Residual Current Devices (RCDs) – you will find out if there is mains-borne hum and if the sockets are safe to use.
2.2 Practicalities at the recording venue
As noted in the introduction, doing a reconnoitre of the venue beforehand with a member of staff is immensely valuable, if not essential. You will need to plan cable routes, find power points, locate any potential control room, and assess parking and building access. This will tell you what, where, and who your problems are going to be. Background noise levels are often a particular problem in churches and cathedrals; see section 14.9 for further discussion.
2.2.1 Venue staff
Your first job on arriving at the venue for a reconnoitre is to introduce yourself by name to all the officials, to give them your phone number, and to get their names and phone numbers if you can. Be nice to them, and be open about your plans; you want to avoid surprising them with anything that you want to do, as many people’s reaction to surprise is to say, ‘No’. Make them a cup of tea/coffee when you are having a break, bring them mid-morning pastries if you are having them, and never underestimate the power of goodwill to smooth the path if you have to negotiate something tricky.
Someone will be in charge of keys and letting you in and out of the building. If you are going to be there for a few days, and have made a good impression by being organised, safety-conscious, courteous, and all-round good guests, they might even be persuaded to let you have a set of keys for the duration. If you are leaving equipment in the building overnight, locking up securely is very much in your own interests. There will also be someone in charge of health and safety (H&S) and fire regulations, and it is extremely important that you do as they ask with good grace. They have the power to inspect your equipment and to put a stop to your session at any time if they are so minded, so try not to get involved in any altercations. There will also be rules about whether or not you can use gaffer tape, especially if it is a historic building. Many venues do not allow it at all or have a specific brand that you must use, and it is up to you to ask about this beforehand and adhere to the rules.
2.2.2 Health and safety: fire exits, cable runs, and electricity supply
At all times, remember that you are a guest in someone else’s premises, and what you consider to be safe might not be the same as that which the H&S officer considers as safe. The fire exits are sacred; they should be the first thing you look at when you go into a location in order to work out how you are going to manage your cable runs around them. You will not get away with running cables across the floor in front of a fire exit – so do not even try – and if the fire officer tells you that a piece of equipment can’t go somewhere, then it can’t go there. Cables that have to cross a doorway have to pass above the doorway on brackets fitted for that purpose; they cannot be taped around the door frame as this would fail in the event of a fire.
All cable runs should be as neat as possible; it always looks better to run cables together as far as possible and branch out with individual cables as required rather than having them splaying out at random. Tidy cable runs make it safer for the players in the stage or orchestra pit area and also make it easier to troubleshoot and replace a faulty cable where required. Leave the coil of cable next to the stand in case you need to move the microphone; if the session is being filmed or it is a live concert, the coil should be located by the stage box once microphone stand positions are confirmed.
Colour coded cables can work on a small session, but labelling both ends of a cable (with insulation tape and a marker, or masking tape and pencil/ballpoint) is the most comprehensive way of dealing with a large number of cables, and all cables will have to be black if it is being filmed or is a live event. Insulation tape is also good for marking the positions of microphone stands that need to be moved and replaced in the same position. Place a marker under the centre pole of the microphone, and include an arrow for the direction in which the microphone should be facing. If you are coming back in a few days to continue with a recording, it is worthwhile making sure that the cleaners know not to remove your microphone stand markers.
The electricity supply should be tested using a socket tester, and then you should use an RCD circuit breaker on each of a number of distribution boards, and feed everything from these. As modern recording equipment does not consume a great deal of current, the only things that should have an individual supply would be large, class A power amplifiers.
2.2.3 Security and insurance
You should of course have adequate insurance for your equipment and professional indemnity insurance to cover accidental damage to buildings, musical instruments, and people. Using a specialist insurance broker will usually be more cost-effective than going directly to a mainstream musical instrument and equipment insurer that is primarily aimed at gigging musicians and their individual instruments. It is easy to lose track of the value of what you have, especially if you have built it up over a number of years, so make sure your insurance is adequate for your needs, in terms of value and locations in which you might work.
Once you are working in a venue, be aware that there are a lot of expensive instruments and equipment lying around, and there should always be someone in the hall if any doors to the building are unlocked. Security in older churches can be particularly difficult, as they are sometimes harder to secure completely and can be located in large urban areas with a higher risk of opportunistic crime. You need to find out if you can leave your set-up overnight if sessions are to run into another day; ideally, you would get a set of keys and make sure that the keyholders treat locking up extremely seriously. Avoid advertising your presence in the building by keeping any control room blinds down, even during the times that you are working. It is easy for someone to spot that you are working there and decide to come back later when all is quiet. Make your vehicle as anonymous as possible for when it is parked up outside the venue; choose a van without windows, and if you have to leave equipment in it, see if you can arrange for others to block the van in with other closely parked vehicles to make opening doors impossible.
2.2.4 Heating, lighting, air conditioning, and ventilation
All these are aspects of making the location a comfortable space for the musicians to give of their best. It can be easy for an artist who is feeling a little stressed to channel that feeling into complaints about draughts, temperature, and lighting. You should make every effort to pre-empt these and address any complaints that arise as best you can. Do not be drawn into an argument that tells the artist that they are wrong to be feeling too hot/cold/unable to see the score. They have to perform, and your job is to make that easier for them. To get a good idea about additional heating or air-conditioning needs, do your recce visit at an appropriate time of day; if you are planning an overnight session, bear this in mind if you visit the church on a warm day.
The temperature in an old church is almost inevitably too hot or too cold; the building’s heating system (often hot air based) is likely to emit a lot of noise while it is getting up to temperature or cooling down. There might also be localised hot spots near to scalding heating pipes and hot air vents, and extremes of temperature are bad for both performers and acoustic instruments. The best plan is to get the heating switched on early, and let the temperature settle to avoid ‘cracking’ sounds. If you are working in a really large space, you might need additional heating to create an area that is warm. Gas heaters are a common solution, but if they are a bit hissy, you will have to move them away from the microphones, and then prevent the musicians from repositioning them. You could switch them off for when actually recording as they will still retain a lot of latent heat and should radiate this efficiently. Calor gas heaters will produce a lot of moisture and some fumes, so ventilation will also be important. Electric heaters will involve a lot of current, so you need to be sure that the electrical system in the venue is able to cope with this. If they are fitted with a thermostat, they will switch on and off at intervals with an acoustic click, and very possibly an electrical click that can turn up on your recording. Making sure that the recording gear is on a different circuit is one way of dealing with this, but it will not solve the acoustic noise.
Few recording venues other than studios have air conditioning built in (in the UK), but if they do, you can at least hope that it is both quiet and effective. The stand-alone portable air conditioning units that can be brought in tend to make a lot of noise, and they generate heat and water that have to be channelled into a different room or to the outside. The only way to use these is to turn them on in the breaks only. A room full of musicians, such as choir and orchestra will generate a lot of heat and moisture, and will lead to air quality loss over a long session. This increased concentration of carbon dioxide can lead to creeping tiredness amongst the players and loss of performance. This can happen even in a large space, such as St Eustache, Montreal, if there are enough people, so opening any possible ventilation in the breaks is a good idea. The Royal Albert Hall has air vents in the top of the roof for this purpose. The same problem might manifest itself with a smaller ensemble in a small space and is also likely to affect your control room, so bear it in mind.
Lighting is very important for classical players when they need to be able to read their score or see the conductor clearly, and it can also be used to create a comfortable session ambience, such as by the use of table lamps in a chamber music session. It needs to illuminate the right things and not dazzle anyone, so diffuse lighting is best. Barn doors fitted to lamps can be very useful in directing light, and solving problems of lights shining into people’s eyes. Different bulb types have advantages and disadvantages, but LED bulbs are the best overall solution. Halogen lighting can be very easily damaged, especially if the musicians move them around to suit themselves. Old-fashioned bulbs will give out heat as well as light, which is potentially useful in a cold church, but not good in a room that has struggling air conditioning. Being able to set the colour temperature of the room is psychologically advantageous, and if you can find a set of LED lights that will crossfade between a set of warm and cold white colours, this would be a very flexible solution. Lights can be mounted on most microphone stands, and the tall aluminium stands, such as Manfrottos, were originally designed for lighting but have been adopted for microphone use as they have fittings for both. If you have a heavy light mounted on a tall stand, make sure it is absolutely safe by weighting the bottom of the stand.
2.3 Rigging microphones and running cables
2.3.1 Planning signal routing
Unless it is a very small session, draw a set-up diagram and write a plug-in list (which microphone, what it is pointing at, which channel of multi-core it is going down, any intermediate routing, and track number on the DAW). Prepare this in advance and make multiple copies for anyone who is helping. This helps very clear communication and avoids time-wasting with assistants. Label microphone cables at both ends, and for a complicated set-up or live show, label the stands with microphone type, what it’s pointing at, and which line it is going down. This enables assistants to go through the whole orchestra or pit band and set up efficiently by following instructions, without needing to have a full overview.
2.3.2 Stands
Making stands safe is essential. Lightweight stands are strong, but need weighting at the bottom as they can more easily tip over. Where you are using a boom arm, it should be properly counterbalanced with weights, and a long, extended boom arm should stay where it is even if you undo the clutch. A friction clutch is not sufficient to hold a full Decca Tree rig in place, and it is dangerous practice to rely on this to prevent it from swinging down onto the orchestra or conductor. Stand legs can be a trip hazard in a tight space, and places like the orchestra pit at the Royal Opera House will usually use heavy, round-based stands so that they can be fitted in more neatly.
2.3.3 Stereo bars
It is worth saying a few words about stereo bars here. Many of the spacings discussed in the book require wider stereo bars than the standard narrow ones which are about 15 cm (6″) wide. It is possible to buy wider stereo bars at around 25 cm (10″) wide, and even wider still at around 70–80 cm (27″ to 30″). Some of the widest stereo bars can be expensive, but look for one that will allow for mounting several microphones on the single bar. Cheaper versions of the wide stereo bars made by DPA and Manfrotto are coming onto the market (e.g. the Superlux MA90). If you find yourself without a wide enough bar, two or three K&M narrow stereo bars can be screwed together using the microphone clip 3/8″ screws that are attached, but they can be completely unscrewed if necessary.
2.3.4 Slinging microphones
The first thing to say about slinging microphones is that it is a serious business, and you need to be certain of what you are doing. Do not do anything without a detailed discussion with the technical manager of the hall; the decision to go ahead will be a joint one, and you cannot expect to turn up on the day and start suspending microphones from parts of the building without permission. Any large venue is likely to specify what you can use to sling microphones, and all rules must be followed; for example, the Royal Albert Hall has very detailed technical specifications for what can be used, and who can access any gantries in the high roof spaces. When someone is working at height, there should be a system for clearing the floor below. Even if it is a small venue that is more relaxed, you should be vigilant and safety conscious. Do not take risks – you will be liable for damages if anything happens as a result of your microphone rig descending from the ceiling by accident. If you can avoid slinging, you should; it will take a lot longer than you think, and once microphones are slung, it is time-consuming to move them if you need to do so.
Never try to sling microphones alone as it will take hours of adjustment and will probably not be safe while you do so. You will realistically need three people to make it more efficient. Two will deal with the mounting positions on the building structure (attachment to either side of a balcony, for example) and the third needs to be in the middle to watch over the microphone rig and to take control of the positioning instructions. To give an idea of the time-consuming nature of safe slinging of multiple microphones in a large space, it takes the BBC about a week to rig the Albert Hall for radio and TV broadcasts from the Proms season each year.
One of the key principles of slinging microphones is that there should be redundancy in your rig; that is if something breaks, something else should still be holding the microphones in place. Microphone cables are not to be used for suspending microphones, but additional steel wire (preferred) or ropes need to be securely attached to both the microphone stereo bar and the building support. Microphones need to be firmly attached; the clip must be screwed properly onto the stereo bar, and the microphone tightly held by the clip. Spring loaded clips are not suitable for slinging, so friction clips that can be tightened around the microphone should be used. This is to protect both your microphones and anyone below the rig. It should also be noted that when you suspend microphones on a stereo bar, they will be mounted hanging down below the bar rather than sitting above it, as would be the case if it were on a stand. This keeps the centre of gravity of the assembly as low as possible.
Manufacture of materials that are suitable for slinging is a specialist undertaking, and you should look to a theatrical chandlers (such as Flints in the UK) for advice and stocks of black steel wire and ropes that will not melt under hot lights. These companies will also finish off steel wires to your own requirements, including properly made loops on the ends that will hook into a shackle or other clip. For tying off steel wires to an appropriate length, there is an excellent range of cable grippers made by Reutlinger. These come in various sizes for different thicknesses of wire and weight limits and are spring-loaded, enabling quick adjustment of wire length by quickly pulling it through. The spring-loaded grip ensures that the cable won’t slip back while it is being adjusted, and once the microphones are in the right position, the mechanism can be screwed up securely. Give some forethought to the equipment that you might need, remembering that if you look professional, you will inspire more confidence in your clients.
When suspending microphones on a stereo bar or a lightweight Decca Tree frame, you will have to deal with running microphone cables out along the supporting wires. The cable can be attached to the wires at intervals with cable ties, and this needs to be done before you hoist the whole rig into the air. The weight of the cables needs to be evenly distributed to avoid overbalancing the rig, and making it tilt to one side. If you rig a stereo bar with a steel wire on each side, the cables will have to be run out from the bar one to each side. If you rig a wide pair of omnis plus a central ORTF pair (see Chapter 3) onto a single wide stereo bar, the cables from both left microphones will need to be tied along the left wire and the cables from the right microphones along the right wire. This is less convenient for keeping your cable runs together, but will make it possible to hoist the rig without it tilting.
2.4 The control room
When you commandeer a room to use as a control room on location, it will almost certainly be unsuitable in some way, but you will have to make the best of it, and keep it as tidy and organised as possible. If you are in a theatre or hall, you might end up with a dressing room that is covered in mirrors and is an awkward shape and too small. It is a good idea to come prepared with fabric that you can use to drape on mirrors to dampen off any HF reflections. You won’t be able to affect much else about the acoustics, but this is worth doing. On the practical front, you need somewhere for microphone cables to come into the room, and if you can avoid putting them through the same door that the artists will use to come in for playbacks, you should do so. Trip hazards are something you should be aware of in general, but particularly in the areas of the control room that will be used by you and the musicians, who will be fresh from performing and not looking out for cables.
The control room has three zones:
- 1A desk surface for computers/fader controllers/mixing desks/producer scores.
- 2Area in front of the desk where engineer/producer and musicians are moving around.
- 3Behind the desk where the loudspeakers are (if you have them).
Any mess belongs behind the desk and loudspeakers as it is assumed that no one will be walking in that area unless they are fixing something.
2.4.1 Monitoring arrangements: loudspeakers and headphones
If you can monitor on loudspeakers, you should do so, as there are many aspects of classical recording that can’t be well judged on headphones, such as lateral panning and reverb choices. (See section 2.6.6 for discussion of monitoring on headphones versus loudspeakers as it affects workflow.) Most control rooms will not have enough space to set up full-size studio monitors in a large equilateral triangle, and the acoustics will probably not be suitable for this. Smaller active monitors that can be used in the near to mid field will be the most practical solution, and will give you a better idea of the overall sound than using headphones alone. They also enable better communication between artists and producer during playbacks because closed-back headphones in particular make it difficult for people to listen and exchange comments at the same time. If you do make allowance for several pairs of headphones in the control room, make sure that each has its own volume control that is isolated from any main loudspeaker level control. If you have some stands for the loudspeakers, then bring them; if they are not very substantial or weighty, see if you can use sandbags both to damp them and to prevent them falling over.
2.4.2 Aids to monitoring: phase scopes
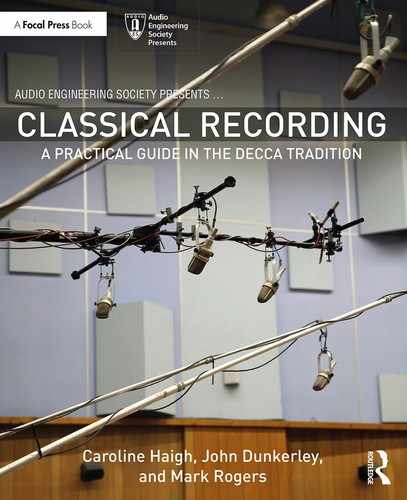
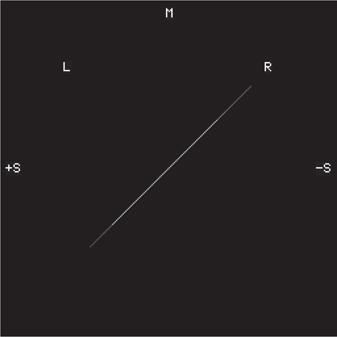
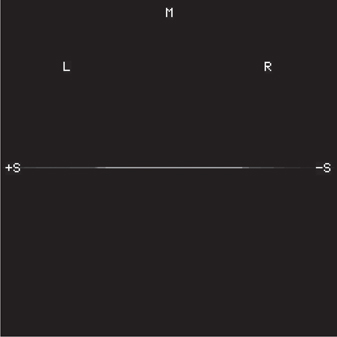
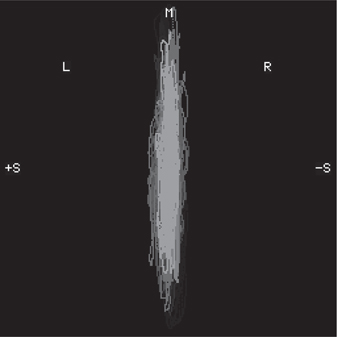
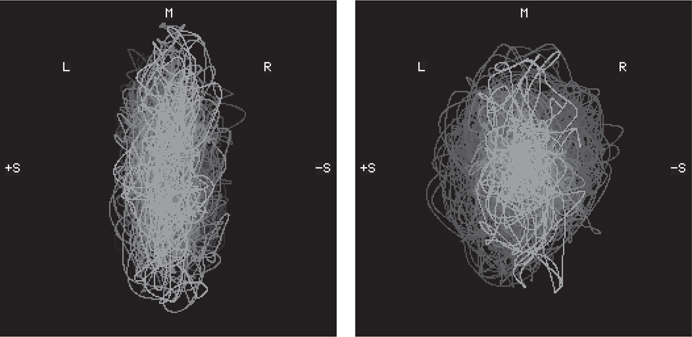
A very useful tool for indicating stereo image width, particularly when monitoring on headphones, or on loudspeakers in a poor quality control room (such as a church vestry), is a phase scope – also known as a vector scope or Lissajous display. Originally these were built around modified cathode ray tube oscilloscopes, but these days it is much easier (and cheaper) to use a software plug-in or application. There are numerous freeware and shareware phase scopes available; the images in Figures 2.1 through 2.4 are taken from the Vector Audio Scope included in RME’s free Digicheck software, which will work with any RME audio interface.
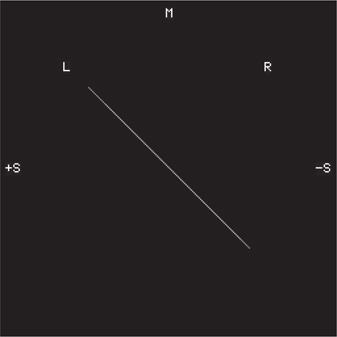
The phase scope takes an incoming stereo signal and uses the two channels to generate a display using a moving point that leaves a trace on the screen. If only a left signal is present, then the result is a line (formed by the dot moving back and forth at speed) that is tilted over to the left by 45°, as shown in Figure 2.1. The length of the line corresponds to the amplitude of the signal. Likewise, if there is only a right signal, the display shows a line tilted over to the right by 45°, as shown in Figure 2.2.
When there are signals on both channels, the resulting display depends on the difference between the two signals. If they are identical (i.e. mono) the result is a vector sum of identical left and right signals (i.e. a vertical line), as shown in Figure 2.3. If they are identical, but one is phase inverted, the result is a horizontal line, as shown in Figure 2.4.
A display taken from actual music will look like those shown in Figure 2.5. The shape of the ‘ball of scribble’ gives information about the stereo image width, L-R balance and degree of phase coherence between the left and right channels. The more vertical the display, the more components of the sound are in phase; the more horizontal the display, the more they are out of phase. The ‘fatness’ of the display gives a very good indication of stereo width, and when its width exceeds its height, the amount of out of phase components will make a stereo image that is over-wide, spacey, and uncomfortable to listen to. See Chapter 5 for more practical examples.
Figure 2.3 Identical signal on both left and right channels (mono)
2.4.3 Control room seating layout
Different layouts of the control room encourage different styles of communication between the engineer and the producer (unless one person is performing both roles). Emerging from the 1950s and 1960s, Decca and EMI developed different traditions in this respect; at Decca, the engineer sat centrally with the producer alongside, which reflected a collaborative relationship; at EMI, the producer sat behind the engineer in a central listening position at a separate desk. Both approaches have different merits; side-by-side seating aids communication but places the producer in a less good stereo listening position. A desk area is always needed for the producer to spread out scores and notes; placing this behind the engineer gives the producer a good workspace, but it also requires a deep control room. Your control room positioning might be a matter of compromise as well as personal preference.
Finally, control room heating and lighting needs to be considered, as both producer and engineer will be sitting down for a long time, and a cold church in the winter will be quite miserable in that regard. You will need an electric heater, without a fan, to keep the background noise level down. Run it from a separate circuit to your equipment if you can, or make sure that the thermostat is not set so that it keeps clicking in and out.
2.5 Studio communications: talkback, telephones, and cue lights
During a classical recording session, none of the performers is wearing headphones as a rule, (there is usually no click-track or backing track), and a small loudspeaker is used to relay the producer’s comments to the studio floor. Where there is a larger ensemble and a conductor, a talkback telephone is also used. This enables a more private discussion to take place if necessary, although the producer should avoid this going on for too long as it can cause stress to any soloists who naturally assume that the conversation is about their performance, and also that it is not complimentary. If the telephone is used all of the time, the performers can feel out of the communication loop, but if it is used too rarely on a session, their immediate assumption is that it is bad news, so a balance needs to be struck.
A basic talkback (TB) system consists of a microphone in the control room and an active loudspeaker in the studio area (requiring a power supply) connected by a microphone cable, or a built in microphone tie line if there are any that you can use. Ideally, the loudspeaker should be on the same electricity supply as the control room to avoid potential for hum on the talkback loudspeaker, but using an earth lift XLR barrel will solve this. The TB microphone needs to be switchable, preferably dimming the control room monitoring when it is engaged. This function will be included in any mixing desk with a dedicated talkback. A more complicated TB system will include a selection of destinations for the producer to talk to, so they do need to be certain of which buttons to press to talk to whom. This is only likely to come into play on a large session with chorus, orchestra, soloists, and offstage performers requiring additional conductors.
A bell (rather like a small fire alarm bell) is sometimes included in talk-back systems and should be operable from the control room. It has two functions; in a busy session, it can be used to gain everyone’s attention if they are chattering and can’t hear the talkback, and it is also a useful source of sound on the studio floor that can be triggered from the control room for testing microphones.
In order that the artist or conductor can talk back to the producer, they will also need a microphone. There are, of course, many microphones set up on the studio floor, but they are not all necessarily near enough to the performers themselves, and a dedicated talk microphone might be needed. This will always be the case for pianists and organists who are seated some distance from the microphones on their instruments. Make sure that any talk microphones are cut during recording, or are not sent to the main mix bus if you are able to arrange separate monitoring for them.
Some sort of visual communications such as a video link is a very good idea, and some would say essential. Being without a window into the studio area means that you are left guessing what is happening if something isn’t going to plan, and means that you cannot see if someone is not standing where they should be in relation to their microphone. Something to beware of is the latency of modern digital video monitors, and this can only be avoided with an analogue camera and CRT monitor. Latency is not a problem if the images are just for general use, but if you are using remote cameras for communication with a conductor who needs to cue in some offstage performers, this can be a problem. Line whistle from a camera in the studio is another thing to look out for; even if you are old enough not to be able to hear it (15.625 kHz for PAL video), you should be able to check for it using a spectrum analyser on your DAW.
Cue lights are traditionally red, but there is an interesting school of thought that suggests using a green light might be less psychologically stressful for the musicians. Whatever the colour, everybody in the room needs to be able to see the light to know when you are in record, and you might need to place more than one light at the back of the orchestra. Mounting a bulb on a tall stand (with a diffuser if it is very bright and directional like an LED) will mean it is generally visible. It is also useful to have a separate light outside the studio door that can either be tied in to switch with the studio floor lights or treated separately so that it is on all the time during a session to discourage interruptions. Switching of lights (which is under the control of the engineer or producer) is best implemented by use of low voltage DC control lines that can be used either to drive an LED or to operate a mains relay near to where the mains powered lights are located. This avoids long runs of mains cable that can induce hum onto microphone cables and is safer than switching mains voltage directly. There are several companies that supply control panels for this purpose.
2.6 Optimising recording workflow
This section deals with engineering work practices aimed at achieving a smooth and quick operation that minimises flow disruption in a session; section 2.7 deals with the production aspects of running a session.
2.6.1 Headroom and microphone gain
Working at 24-bit resolution is standard in the classical world, and this does allow you to leave enough headroom when setting microphone levels so there is no risk of accidental clipping. A degree of under-modulation of between about −5 dB and −10 dB will not produce any really significant noise problems; the ambient noise of a typical, practical room will be down at around −60 dBFS.
Keep notes of your microphone gains on each session and you will get to know your microphones and your microphone amps. Typical gains will be around 30 dB for condenser microphones and 50–60 dB for ribbon microphones. (Dynamic microphones are not usually used in classical recording as their off-axis colouration in particular will detrimentally affect the quality of spill.)
2.6.2 Capturing clean mic feeds plus a stereo mix
There are a several methods of achieving the desired result: clean microphones feeds plus a stereo mix. One is to use an in-line console arrangement, and make the stereo mix (along with any EQ) from the monitor paths. The stereo mix is then sent to the DAW to be recorded alongside the clean microphone feeds from the channel paths. Another is to use a straight to stereo mixer to provide the stereo mix, but record the channel direct outputs after the microphone amps as additional tracks. Finally, if you are working completely inside the DAW without a mixing desk (but perhaps with a hardware fader controller), the mix can be created within the DAW and then be sent via an internal bus to another pair of tracks to be recorded alongside the microphone feeds. This has the advantage that all the fader moves can be retained as automation within a single project, and small amounts of remixing can be just a matter of trimming the fader moves from the original mix. Where you are working with an external mixing desk, microphone gains, fader levels, panning and EQ should be logged to enable you to address any remixing as efficiently as possible.
2.6.3 Using faders versus mixing with a mouse
Using real faders, whether on a mixing desk or on a control surface for the DAW, enables the engineer to react immediately to the need for a live, real-time level change, and control more than one level at once. The experience of balancing a few sources against one another simultaneously is very important when learning to mix and, although it is not impossible to mix with a mouse alone, it is harder and it takes longer. Using a mouse inevitably changes the workflow from making balance decisions at the time of recording to deferring them until there is more time to manipulate channels singly. In a commercial situation, using less time is very important, and although it feels more pressurised to make decisions during the session, greater experience will make this easier, and ultimately workflow will be considerably faster.
2.6.4 Mixing to stereo on session: why use this workflow?
The traditional classical workflow was to mix everything live to stereo on the session and produce a series of two-track master takes that were then edited together. However, to allow for the possibility of remixing the edited material at a later date, it is more flexible to record the stereo mix alongside the clean microphone feeds as part of the same multi-track file. As noted in 2.6.2, this is easy to achieve, and the multitrack files can be edited across all the tracks whilst monitoring the stereo mix. If the session mix is good enough, it can be used for the production master and the edited multi-track files ignored. Budget constraints do not always allow for remixing later on, but this method is less time-consuming than the old-fashioned method of remixing all the individual takes and editing the whole project again if a remix was required.
Apart from time or budget constraints, other factors point to the need to spend time on obtaining a good, working balance at the start of a session:
- 1Microphone placement needs to be assessed as part of the mix; if the microphones won’t blend together well, the answer will be to move some of them. If you don’t take the mix seriously on session in the belief that anything can be ‘fixed in the mix’ later, you might find the microphone placement is not good enough to make a really good sound.
- 2Doing the best mix you can on session (while there are conversations and input from the producer and musicians) means that you will not be starting from scratch at a later date without this memory and experience.
- 3You need to have something good to play to the musicians during session playbacks, and to send to them as part of the post-production schedule. It makes the post-production workflow quicker if the edited master can be sent directly to the musicians at any stage without the need to spend time on creating a mix.
- 4Editing with a monitor mix that is going to be significantly changed is likely to cause audible edits once remixed.
For further discussion of managing post-production workflow, please see section 18.2.1.
2.6.5 Obtaining a good monitor mix quickly
Achieving a good balance quickly is increasingly important in a commercial context. This is due mainly to increasing financial pressures but also partly to some engineers’ egos and the somewhat erroneous belief that technological advances mean that all problems can be sorted out after the session.
The UK and US systems of running a session gave the engineer different amounts of time to obtain a balance. In the UK, the ‘rehearse then record’ system gave the engineer about 20–40 minutes of session time to get a good balance, so this gave time to move microphones if necessary. In the United States, the engineer had about 10 minutes at the start of the session, and the beginner should be reassured that short a time is only possible if the engineer is experienced and knows the hall and the orchestra. Additionally, as noted in 2.6.3, using faders rather than a mouse will make for much faster balancing.
Eighty to ninety percent of the overall balance comes from the main microphones, with the rest being finishing touches, so it is worth prioritising these and taking time to get them in the right place. Speed of balancing will come with experience, but a good balance can only be achieved on the back of good microphone placement. If you have the opportunity to set up and try out your balance in a rehearsal environment, you should take it. This gives you the chance to take your time, to listen to what the band actually sounds like in the hall, to listen to how the room behaves, and to observe any strange squeaks and noises that might be coming from piano stools, pedals, or other instrumental sources that need to be addressed. Spending time in the hall listening also tells the musicians that you care about what they are doing and makes for a greater degree of trust in your work.
You should avoid changing balance and microphone or player positions part way through a session. Changing any of these things makes editing very, very difficult, and you can end up with two sets of mutually incompatible takes. This does make the responsibility to get it right at the start quite terrifying, but it is ultimately much better to live with your initial decisions. The only exception to this should be if the request for a change during the session comes from the artist; this is unusual, and it has to be for a good reason. The producer should be aware that any takes recorded before the change may need to be discounted.
2.6.6 Monitoring: loudspeakers and/or headphones
The most flexible arrangement on location is to take both loudspeakers and headphones, but you should avoid spending too much time on headphones if you can, as reverb and lateral panning judgements made on headphones do not translate well onto loudspeakers. It does, however, work perfectly well the other way around, so a mix made on loudspeakers will translate onto headphones. Headphones are useful for listening to small details in a compromised listening environment such as on location, and most producers like to wear them during takes. Semi-open back designs will often give a slightly better spatial sense that is closer to the loudspeaker sound, but you will have to dim or cut the loudspeaker monitoring when you use them. Closed back headphones will shut out the sound from the loudspeakers and any other sources, including spill from the studio floor.
In practice of course, there will be times when you have to monitor on headphones because there is no isolation between your control room and the main room, or you are actually in the room with the artist. If this is the case, then you will not really know how the recording is sounding at the time; the best thing to try is to record part of the rehearsal and play it back during a break so you can make some judgements while you have the chance. If you are working on headphones alone, panning the headphone feed inwards to about 75% can help a little with compatibility with the expected sound on loudspeakers. Under these circumstances, you should multi-track the session if at all possible and avoid adding any high-pass filters to microphone sources. Despite the monitoring limitations, you should create and record a monitor mix which will give you some idea of whether your microphone placement is working and give you something to use in playbacks (see section 2.6.4). If you are not able to multi-track but can only capture a mix, keep any additional reverb low in level as it is easy to add too much – you can always add a little more later if you need to. See also Chapter 18.
2.7 Running the session
There are many organisational and logistical aspects to running a session quickly and smoothly, all of which will need some advance planning and preparation. The time when the musicians are with you is precious and should not be wasted. From the players’ point of view, the session needs to flow without pauses for technical hitches or administrative tasks such as logging takes.
2.7.1 Keeping musicians happy: home comforts
People involved in the session need to be looked after, which means that someone needs to have sorted out refreshments and toilets. If this is an orchestral session, the orchestra should have the means of supplying hot drinks, although you might have to be involved with agreeing where to set up the water urn, kettles, waste bins, and so forth, and locating the water supply if the venue does not have a kitchen area. If your session is a smaller group, you should provide the refreshments, including snacks as well as drinks. Be generous in your provision and it will not go unnoticed; the recording session is a special event for the artist, and treat food in the form of nice biscuits or similar will usually be welcomed. Tea break frequency and timings will be decided according to local musicians’ union rules for a large ensemble and in accordance with the session flow for a smaller group. Comfortable levels of lighting and heating were discussed in section 2.2.4.
2.7.2 Session durations and session breaks
Most UK/US recording sessions are three hours long and run for three sessions a day, usually 10.00–13.00, 14.00–17.00, and 19.00–22.00. If you are working with a soloist or small group, the time can be split up in whatever way works, but for a larger group, a system is needed. The current arrangements might seem rather strict, especially for those who imagine that musicians are simply doing something they love, and so will be happy to play for additional minutes without payment. However, it must be remembered that they are highly trained professionals, and the system evolved to put a stop to record company abuse in the early days. Unions have worked hard to maintain co-operative session discipline without which recording an orchestra would be very difficult, given than any one player can halt the session. The strict discipline on timings is there because it is a team operation that requires every member of the team to be present at the right time.
A 10.00 start time means that the first downbeat can be at 10.00, so everyone has to be set up, tuned, and ready to play at that time. This also means that the engineering team has to be ready to begin, and being late is considered extremely discourteous to all the other people involved. If you are late, it suggests that you consider yourself important enough to waste everybody else’s time.
In the UK, the standard recording session length as defined by the Musicians’ Union is three hours, with five minutes’ break per hour (or part hour) to be taken at once (15 minutes) approximately halfway through the three-hour session. During this time, the maximum duration of repertoire to be recorded (once it has been edited together) is 20 minutes. This excludes breaks taken for playbacks, and the players are free to use the break time to do anything they like. Overtime has to be agreed by all the players in advance of the end of the session (some players might have a booking elsewhere and be unable to stay on), and so all are entitled to leave at the end of the allocated time, and they will do so. There is an agreed minimum unit of overtime (15 minutes) that will become payable if you overrun the session by a second. For up-to-date rules and rates in the UK, contact the Musicians’ Union, 60–62 Clapham Road, London SW9 0JJ (www.musiciansunion.org.uk).
In the United States, the basic regular session as set out by the American Federation of Musicians is of the same length, but has to contain two 10-minute breaks, and a maximum of 15 minutes of repertoire can be recorded. The basic unit of overtime is 30 minutes, but this can be 15 minutes if the purpose of the overtime is to complete a piece of repertoire. However, different rules apply where the recording is by a named ‘symphonic orchestra’. For symphonic orchestra recordings, the basic session is three hours but can be extended to four by agreement. Break time is 20 minutes in each hour, but this can be grouped together, with players playing for a maximum of 60 minutes without a break, so a session can be run as ‘one hour on, one hour off, one hour on’, and the break used for playbacks. Seven and a half minutes of music can be recorded in 30 minutes of session time, which means that 45 minutes of repertoire can be recorded in a three-hour session. For up-to-date rules and rates in the United States, contact the American Federation of Musicians, 1501 Broadway, Suite 600, New York, NY 10036 (www.afm.org).
Because the rules are strictly applied, the producer really needs to be on top of the session planning and timing, and there are many occasions where an orchestral recording has had to be halted with a few bars to go and the whole piece tackled again during the next session. It is not unknown for players, particularly in the rear string desks, to set wristwatch or phone alarms to go off a few seconds before the end of the session.
2.7.3 Over-exertion of artists, especially singers
It is very important that you remain aware of rising tiredness levels, especially where you are running a session that does not have set break times. All players, but soloists in particular, are giving very deeply of themselves, and if they are new to recording, they are likely to find this particularly draining. For the artist, making a recording is a really important and special experience, even if it is a routine experience for the engineer. Singers are particularly prone to becoming tired, and you should also be aware that solo singers will usually give of their best in afternoons and evenings, so morning sessions are best avoided.
2.7.4 Page turns and scores
Page turns are noisy, and you should plan in advance how to deal with them. The most prominent will come from a choir who will all be turning the page at the same time, whereas orchestral parts all have their page turns at different times. Most orchestral players will be sharing a stand so that one player can turn while the other plays. For large choral page turns, you might need to record small sections from memory to cover the page turn in editing. Ring-bound scores should be avoided as they cannot be turned quietly.
Soloists will need to prepare scores before the session with the aim of minimising page turns. Pianists will often ask for a page turner, but if the turner is inexperienced, they might not be completely silent. Both the actual page turns and the movements of the page turner as they stand up and sit down have to be inaudible. Someone with experience should do an excellent job, but if no one experienced is available, it is often preferable for the piano score to be photocopied and spread across the music stand, which will take five sheets on a grand piano.
The producer also needs to prepare scores, and this will sometimes mean photocopying to make quick repeats easier to deal with. Many producers prefer to work with a pile of single-sided photocopied score sheets than a bound score; in this case, make sure that page numbers are included. It is important to make sure that everyone is working from the same edition, and it is advisable to put in page and bar numbers before the session, as these might be the only common reference point between the artist and control room. If the artist has been asked to provide a score for the producer, it should be made clear to them that this score will need to be kept after the session for post-production, and that it will be written on in pencil and ink as part of the production and editing process.
2.7.5 Approaches to recording takes
In order to allow the musicians to settle into the room and get into their playing zone, it is usual to do about three complete takes at the start of the session. Record all of these; the first take is rarely the best, but it might contain useful short segments of material that can be used to patch another take. It is usually on the third time through that the performance will start to gel properly. After this, the producer can start on patches, sometimes working through the piece from the start, some preferring to work backwards through the piece, making sure that any flaws that exist in the complete takes are covered. Where you need a short patch, take a longer one as it will work better for editing. Having told the musicians where the problem lies, ask them where they would like to pick up from so they can pick a comfortable starting point. Once all mistakes have been covered (and covered more than once for preference, and more editing choice), it is often a good idea to run another complete take. The aim should be to get relaxed musicians for this take, so tell them that you have everything that you need already, and that they should just enjoy the performance without worrying about mistakes. With any luck, you will get another good, complete take.
Flaws that you are listening for include intonation, wrong notes, missing notes, wrong rhythm, poor ensemble (not playing together), poor dynamics, noises in the room such as page turn noises and bow hits, and so forth.
2.7.6 Pitch and tempo consistency
Maintaining tempo consistency is a factor in all recording sessions, and maintaining pitch is a problem when recording unaccompanied choir. Most experienced musicians playing repertoire that they know well tend to be very consistent in tempo between takes; the performance tends to settle into its own pace and feel rather like breathing. The times that tempo can become unstuck are when recording shorter sections, when the overall feel can get lost. In this situation, you should have a metronome to hand which you can use over the talkback if needed. Most metronomes of phone apps now have the means to measure a tempo if you tap along, and this can be a useful double check between takes.
When it comes to choir pitch, it is useful to have a realistic assessment of the choir’s consistency; the choirmaster or mistress should have a good idea from rehearsals. A pitch reference needs to be given before each take, either from a piano or keyboard (which can be played over the talkback if needed.) Anything you can do to avoid having to correct pitch later on in post-production will save time and money. (See section 18.5.4 for discussion of managing pitch correction after the session.)
2.7.7 Logging takes
Keeping a record of the takes that have been recorded and which bars of the piece they cover is an essential part of the session. The session will move quickly, and your primary task is to concentrate on the artists and the music. Any take logging system needs to be very simple and should not involve you having to make complicated decisions about naming takes. If the session record-keeping is not good enough, expensive post-production time will be wasted. Most typically, this will mean trying to reconcile the producer’s notes with an incompatible list of timings produced by the engineer or assistant. Inconsistencies make it difficult to work out which takes are actually meant to be used in the edit.
The requirements of any system are:
- 1Everyone must agree on which take number is currently in use (this avoids the producer’s take numbers not matching up with engineer’s take numbers in post-production).
- 2The take number should appear in the audio file name, as a marker on the project timeline, or both.
- 3The take durations should be readily available during the session (useful for a rough guide to the speed of performance).
- 4The numbers of the bars covered by each take should be recorded.
If the recording session is a simple one, with a single producer-engineer, it is relatively straightforward to log takes and avoid confusion about which take number is current. Where you have both a producer and an engineer (or assistant) operating the DAW, it is usual for the DAW operator to log take timings and name audio files correctly. They will also take charge of deciding on the take numbering because they are starting and stopping the recording process; many workstations will display the take number on a large display if required. The producer will note musical flaws in the score and keep notes of which bars of the piece are covered. The coverage of each take might also be noted by the engineer or assistant as a backup, especially if the producer is known for keeping sketchy notes.
For take logging to work smoothly, you need to get to know the marker system and audio file naming system on your DAW inside and out. Evolve a plan for working with the markers so that you can use it at speed on session, and know what will happen to the markers under every circumstance:
- Do they increment each time you add one?
- Will it add one every time you drop into record?
- Will they all get renumbered if you insert a marker?
- Are the markers attached to the timeline or the recorded media?
- Do you have to drop out of record at the end of every take?
- Are the audio files named incrementally?
- If you have to stop and start unexpectedly, how will you deal with this?
- Can you name a file at the end of recording to enable you to drop-in quickly?
It can be very useful to be able to leave the DAW in record through a section of short retakes that happen one after another – can you split these up and rename them easily afterwards?
Most DAWs do not really adequately manage the nuanced business of logging takes on a classical session, and as a result, many professional engineers use additional pieces of software of their own devising. One important facet of these is their ability to differentiate between the act of dropping into record and marking the start of a take. It is often useful to drop into record some time ahead of the take start, and so any bespoke system will allow the user to use keystrokes to log take starts, ends, false starts, breakdowns and restarts, all independently of dropping in and out of record. Accurate start and stop times also allow for the automatic calculation of take durations, which is a good guide to tempo consistency. Some systems will allow the user to leave the DAW in record throughout and will automatically split up the long audio file into shorter clips and rename each according to the take logging marker information. Systems of this kind superseded the manual jotting down of time codes at Abbey Road during the 1990s.1
Where an artist makes a start on a take, but stops again well short of the planned end point, it becomes very important to have a single person in charge of take naming, and to decide if the next attempt is a new take number, or whether the aborted first attempt (which could be several bars long) is just a ‘false start’ to the current take number. A take might have several false starts, and the producer will log them all in this way: F/S, F/S, F/S. This material might still be used as part of an edit sequence, and would be indicated as ‘take 56 F/S 2’ for the second false start to take 56.
Another frequent occurrence is where the players stop a take, and then quickly pick up again a few bars earlier. They will do this of their own accord after a very short discussion so that the producer and engineer have no time to intervene. In this case, the take will have ‘BDRS’ noted, along with a bar number and/or time code to show that there was a ‘break-down and restart’ in the middle of the take. Soloists can manage a BDRS almost imperceptibly as they need no discussion and can stop and start a few bars earlier with minimal pause in the music. The producer needs to keep an ear open for this happening and make a note of it.
A final note on the subject of takes is whether to announce the take number to the studio floor or not. Announcing it to the DAW is an excellent way of adding a means of unambiguous take identification to an audio file should the file naming go astray, and will be valued in post-production. However, announcing the take number to the studio is not universally practised because it can be stressful for artists to hear that they are on a very high take number. This requires a talkback system that can send to the DAW independently of the studio floor.
2.7.8 Playbacks
Artist playbacks are an essential part of the recording session, and they are an opportunity for them to comment on the sound as well as the performance. It is usual to invite them into the control room after the first few complete takes to assess what has been recorded so far, and what still needs to be done. This also gives the producer an opportunity to review the recorded material and plan the next moves in the session.
The producer will be in charge of what is to be reviewed, and the engineer must locate the material quickly and without hesitation. The process needs to be seamless, fast, and efficient. You should get to know the fastest way to locate to a particular marker, and how to mute the playback until the right section of audio comes along. Artists really do not like to hear out-takes, false starts, and chatter between takes. Listening to their own mistakes makes them more stressed, which is the opposite of what is required for good session performance. As noted earlier, headphones during playbacks will reduce interaction between performers and the producer, or they will all start shouting at one another over their closed back headphones.
2.7.9 Recording room tone
The final word in this chapter belongs to room tone, or ‘ambience’ as it is sometimes known. This is a recording of the sound of the room with nothing happening in it, and needs to be done with the microphone set-up as you have it for each session that you do. Room tone is essential in classical recording, as it is used for the gaps between pieces on the final master and is useful for editing repairs and extending pauses. It will make editing and post-production much easier if you capture a few minutes of quiet room tone on the session; if you forget to do this, you will have to spend a lot of time scraping together about 20 seconds of room tone constructed from half-second snippets taken from between takes (if the artists stop talking, making noises or tuning for long enough). Record several minutes of the artists sitting silently if they can manage it or leave the DAW in record when you go for lunch. If you do this on every session, you will eventually build up a collection of room tone; this sounds very unexciting, but it is a tremendously valuable resource that is hard to fake.