Chapter 13
Wind, brass, and percussion bands
The focus in this chapter will be on larger groups of players, typically requiring a conductor, although small classical brass ensembles have also been included. For smaller groups of 4 to 12 string or wind players, please refer to Chapter 12.
13.1 A note about dynamic range and ear protection
It perhaps goes without saying that brass and percussion ensembles in particular can get very loud, and an adequately sized room is needed for performance and recording or the room will saturate acoustically. (See Chapter 1.) When recording and setting up microphones around any very loud ensemble, you should consider the benefits of ear plugs or ear defenders for when you find yourself rigging microphones whilst close to an instrument’s bell or percussion section. You may also need to make use of the pads in your condenser microphones to avoid clipping in the head amplifier.
Percussion groups and brass bands can have very high level peaks on the transients. When a brass band is playing legato, the sustained sound has a very smooth envelope, but if the whole band comes in together with a sforzando, there can be a very large peak in level at the start of the note. Managing and preserving the excitement of this dynamic range is an important consideration when recording them. This leads us to the question of whether compression should ever be used when recording classical music, and while different engineers will have slightly different approaches, all would agree that the music should never be audibly compressed. The dynamic range (between noise floor and peak level) of modern recording media is such that compression is not needed from any technical point of view, and the spirit of classical recording is to preserve the natural dynamic range. The norm, therefore, is not to use any automatic compression. However, broadcasters’ requirements mean that they often need to reduce the dynamic range of natural playing. If you need to reduce the dynamic range of a performance for any other reason, then you can produce better results (i.e. inaudible) by manually altering the levels throughout. This is best left to the mastering stage, if it needs to be done at all (see Chapter 19 for more details on this).
13.2 Large wind ensembles
Wind ensembles come in many shapes and sizes, from concert wind bands to flute choirs, but they have no standardised line-up equivalent to that of the standard brass band or orchestra. The concert wind band might also include drum kit and bass guitar, and possibly a PA system for a singer. At this point, it starts to become a non-classical ensemble and the recording approach will be that used for a big band of similar line-up.
The wind instrument family contains a wide variety of tone colours, and the overall sound from a wind ensemble lacks the homogeneity that is characteristic of a string orchestra or brass band. In addition to an overall similarity of tone quality between all the parts, the exclusively string or brass ensemble can also play very soft, smooth attacks which if played together gives a feeling of a single, coherent unit. Wind instruments (the double reeds in particular) have more definite transients that punctuate the playing more clearly even when the group is playing perfectly together. Capturing some of the detail and individual tone colours of the woodwind lines is an important part of the recording approach.

For wind ensembles of up to about 20 players, the semicircle layout outlined in section 12.6.1 can be adapted by placing the players in two rows instead of a single row and using an overall pickup with some spot microphones to capture more detail.
Figure 13.1 shows a layout for a typical larger wind/concert band where there are enough individual players to form distinct sections. Overall coverage is given by a five-microphone Decca Tree with ancillary microphones on each section. The ancillary microphones would be placed above and looking down, at a height of around 2.5 m (8′2″), and ideally about 1.2 m (4′) back from the instruments, although this is likely to be limited by chair spacing.
Large wind ensembles that include PA are really outside the remit of this book, however, there are a few principles to remember. Once you are working with a PA, spill from the PA loudspeakers onto the microphones has to be reduced to imperceptible levels to avoid feedback. Therefore, the direct sound from each instrument must be at a high level compared with any background reverb or PA sound, and this means placing microphones closer to the instruments. As we will see in Chapter 15, the closer microphones have to be, the more of them are needed to obtain even coverage of all the players; this will mean at least one microphone between two players, and possibly one each. More EQ will be needed, as a close-up sound will not give a good overall representation of the natural sound of the instrument. Balancing an ensemble in this way is much closer to pop recording than to classical work.
13.3 Classical brass ensemble
Instruments used for classical brass ensembles will usually come from the standard orchestral brass section, consisting of French horns, trumpets, trombones, and tubas. The individual tone colours are more varied than those that make up a traditional brass band (see section 13.4).
13.3.1 General approach to microphone placement
There are two features of brass instruments that make recording them different to strings and woodwinds. One is their huge dynamic range and ability to play sudden fortissimos, and the other is their strong and simple directionality of radiation from the bell. The whole sound from a brass ensemble needs to combine a good overall tone (acquired at a distance to allow the fortissimos to interact with the room) with a flavour of the attack and immediacy of the sound heard just in front of the instruments.
For most previous scenarios in this chapter, the balance of reverb to direct sound has been arranged by the careful placement of the main pickup at an appropriate distance from the players. Additional spot microphones have been added in small amounts to bring some focus and detail where needed. Brass come into their own when heard at an appropriate distance in a good room, so the overall pickup is placed further away, at a height of at least 3 m (9′10″) to capture a slightly more spacious blend that is better suited to the instruments and to avoid a feeling of congestion and saturation, which can arise with the microphones too close when the players play loud.
With the main microphones at a distance and the players facing one another in a semicircle and not projecting any HF towards them, the attack of the instruments will be lost. These transients would be easily picked up on a closer and more on-axis microphone, but this can sound very bright and does not make a well-balanced brass sound taken in isolation. It is important, however, that it is included as part of the mix as it represents an essential part of the instrument’s character and provides detail and punctuation to the playing. To this end, spot microphones are used to capture the immediacy of the sound that is heard directly in front of the instruments, although you should avoid them being placed directly on-axis to the instrument’s bell. This means that any change in tonality or level that comes from the player moving the instrument is reduced, and air noises will be minimised.
In many ways the approach to recording brass chamber music reflects orchestral brass techniques; they are heard from quite some distance on any orchestral main pickup, but spot microphones are used to add the essential bite and attack. When the players really let rip, the more distant microphones will add a wonderful bloom and can fully convey the excitement of just how big the sound is.
In the brass recording suggestions that follow, the balance between reverberant and direct sound is created in this more artificial way. A relatively distant main pickup that provides the main tonal character of the sound is blended with a more substantial level of spot microphones than would be usual for strings or woodwinds. The spot microphones and overall pickup will usually be contributing about equal amounts to the mix in this scenario, with the spot microphones placed a little closer than is usual in a classical context to really capture the attacks.
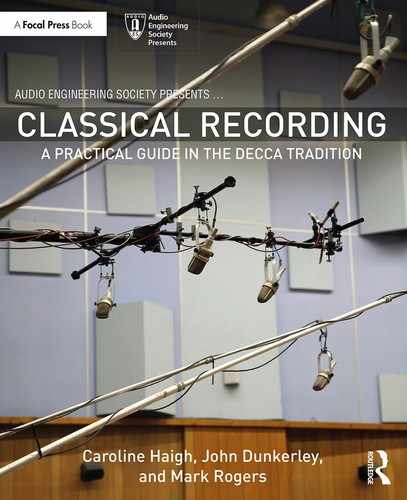
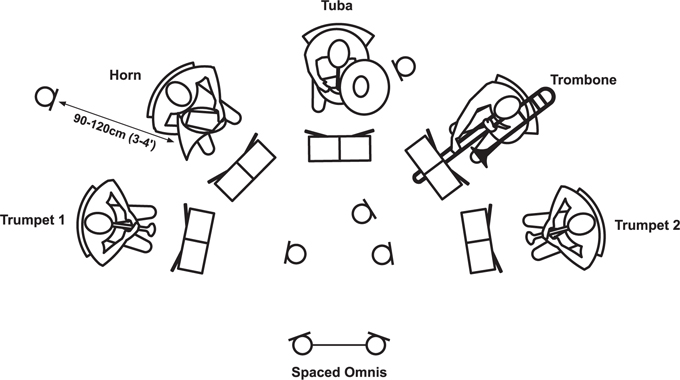
Figure 13.2 shows a set-up for a brass quintet comprising a spaced pair and some spot microphones for each instrument or pair of players. Figure 13.3 shows a set up for brass octet/nonet following similar principles. The layouts shown have a single row of players, but if there is a second row of players (for a larger classical brass group), the microphones can be raised up to look at both rows, and if the back row can be offset a little, the microphone can be aimed through the gaps in the front row (Figure 13.5).
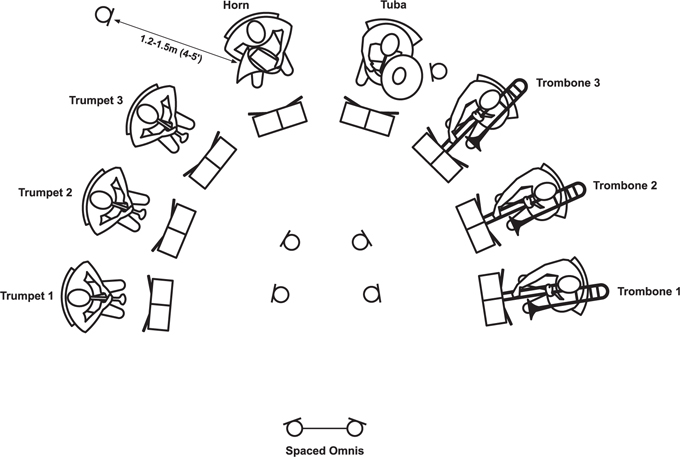
For the smaller quintet group, the microphones will be a little closer, as there is less space between the players as they are grouped around in a semicircle, so they will be about 60–90 cm (2′ to 3′) back and about 1.2 m (4′) high, again just above the bell. See Figure 13.4 for a sideways view.
For the larger nonet layout, the spot microphones on the forward-facing players are a little further away and slightly higher at 1–1.2 m (3′4″ to 4′) back from each individual player and about 1.5 m (5′) high, above the bell and looking down across it. The additional height is particularly important if there is a back row of players as well; if the back row can be offset a little, the microphone can be arranged to aim between the front row of players.
The upwards-facing tuba(s) will need a microphone 60–90 cm (2′ to 3′) above, but not on-axis to the bell (to avoid the blasts of air that are a particular problem with the tuba), and the French horn will need a microphone from behind. If you are working at the slightly greater distances used for the nonet, the horn microphone will be at about 1.2–1.5 m (4′ to 5′) away, but if you are using the closer placement used in the quintet, the horn mic can be about 90–120 cm (3′ to 4′) away. In both cases, it should be high enough to be just looking down across the bell. When the players are sitting in a fairly close position, the spot microphones on the forward-facing players form a tight back-to-back horseshoe in the middle of the ensemble.
Figure 13.4 Sideways view of microphone placement on single row of trumpet players

When the players are seated in a horseshoe shape, the choice of microphones will be limited to cardioids. If a fig of 8 is used, it will pick up any player situated behind it as much as the player in front, and the independent control over the level of the two instruments will be lost. The inverted phase of the rear lobe signal will also potentially result in phase cancellations. If the players are in a line, or the rear lobe is not pointing at any other player, ribbon microphones (Royer R-121 or Coles 4038) can sound wonderful on brass, as long as they are kept out of any wind flow to avoid damaging the ribbon by stretching it beyond its normal limits.

Figure 13.6 A photograph from a Philip Jones Brass Ensemble session showing the tight horseshoe of central microphones
Photo: Mike Evans; courtesy Decca Music Group Ltd.
13.3.2 Blending the microphones
When trying to find a suitable balance for the classical brass ensemble, it can be helpful to listen to the spot microphones alone first, making sure they are positioned well and are producing the sound you want. They will be used at a higher level than the spot microphones on a woodwind or string recording and will be contributing a similar level to the mix as the overall pickup, so spending some time getting them well placed is important.
As noted earlier, the microphones on the trumpets and trombones will be physically very close to one another in the middle of the ensemble and will produce quite good image localisation because of their proximity to one another. They should be panned individually between about three-quarters left around to three-quarters right, depending on the number of players, and this will give you a secure basis for the sound. Once you are happy with the sound and balance between the spot microphones, the more distant and warmer sound from the spaced omnis can be introduced to glue the separate spot microphone sources together and place them in the room. Because the image localisation from the omnis will be fairly unfocussed, the spot microphones can be panned as you prefer them and the addition of the omni pair should not cause any imaging confusion.
The act of balancing the ensemble starting with the spot microphones is the opposite to most other situations, including brass band (see section 13.4); the usual approach is to listen to the overall pair first and bring up the spot microphones, having adjusted their panning to match the main image. It is of course possible to balance a classical brass ensemble in the more conventional way by starting from the main pickup, but because the spot microphones are playing such an important part in the image and tonality of the sounds, it makes more sense to check on their contribution in isolation first.
13.4 Brass band
The brass band is potentially a much larger ensemble than the smaller classical brass group, and it is best approached as a ‘brass orchestra’ in terms of recording and balancing. The instruments used are different to those in the standard orchestral brass section, and include cornets (instead of trumpets), tenor horns, baritone horns, euphoniums and tubas, a trombone section, and a variety of percussion. The cornets have a darker and warmer tone than trumpets which arises from their having conical rather than cylindrical bores. The whole family of instruments taken together produces a homogeneity of sound that blends very well, and as the parts are written in a similar way to those of a string orchestra, it can help to think of them as ‘strings in brass form’ when approaching a recording. This is quite a different experience to recording a wind or orchestral brass group with their mix of very distinctive tonalities that don’t blend in the same way.
The sound of a brass band should be mellow and smooth, and the attacks can be very soft when required, particularly when playing more lyrical repertoire. None of the instruments has its bell pointing directly at the audience; the forward-firing cornets and trombones are seated in the place of the violins and double basses and face the conductor and the centre of the ensemble. Figure 13.7 shows a typical layout with suggested microphone set-up.
Here a three-microphone tree with outriggers has been used, along with ancillary microphones for individual sections. As a general principle with this approach, there is no need to provide a microphone for each player; one microphone between two players would be plenty, the aim being to obtain even coverage of each section as we would for an orchestral string section. At all times, remember the rule that brass instruments are best not recorded on-axis to the bell if a natural sound is required. The spot microphones will be used to provide more attack sound and are particularly useful for preventing the lower end of the ensemble (E flat and B flat tubas) from lacking any definition and becoming ‘woofy’.
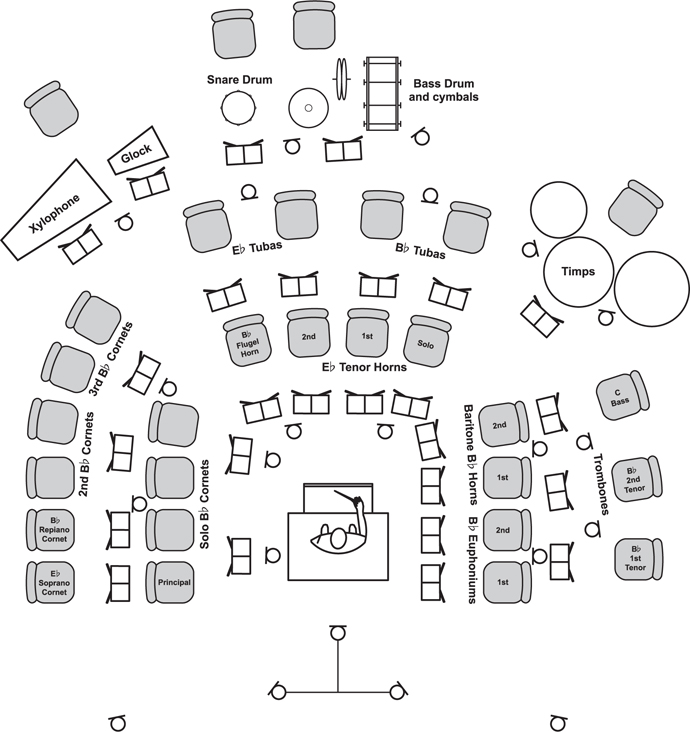
Percussion will be arranged along the back, as for an orchestra, and spot microphones can be added in the same way, including panning slightly wider than they occur in the natural image from the tree (see Chapter 9). The timpani can be covered with two microphones, and panned to about half right to three-quarters right. If you pan them too close together, it rather negates the effort of having rigged two microphones on them, and it will give them a very narrow image.
The forward-facing cornets and trombones are recorded from about 1–1.2 m (3′4″ to 4′) in front and just above bell height, looking slightly down. The larger, upwards-facing instruments (tubas, euphoniums, and baritones) are recorded from above but off-axis, with one microphone between two players, at about 60–90 cm (2′ to 3′) above the bell (about 2.6 m (8′6″) from the floor). The tenor horn bell faces more diagonally upwards and forwards when played and can be recorded from a position about 90 cm (3′) above the bell, 90 cm (3′) in front, and looking down. The trombones can be recorded from the front and above, but where there is difficulty erecting a stand between the trombones and euphoniums (they often prefer to sit fairly close together), a boom or booms can be lowered from behind the trombone section in order to manoeuvre the microphones into position.
Figure 13.8 shows a typical brass band set-up from Abbey Road studios.
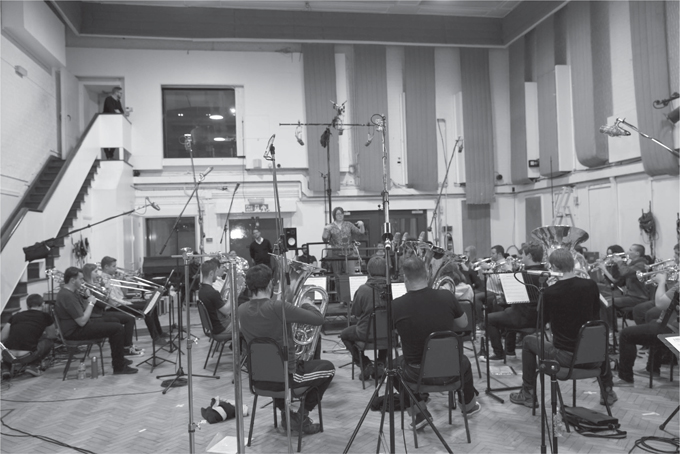
Photo: Carlos Lellis, Programme Director, Abbey Road Institute.
When mixing the brass band, treat the brass band as an orchestral string section: start with the overall tree pickup and then blend in the spot microphones until there is sufficient detail. You should aim to retain some natural perspective (i.e. the tubas and timpani are further back) as you would with an orchestra.
13.5 Percussion ensembles
Percussion ensembles are all completely different in their composition. To record one, follow the principles outlined previously and use an overall pickup to provide the sense of space, depth, and overall character of the sound, and then add spot microphones for clarifying the attacks and stabilising the image.
The very percussive content will not sit well in a small, live room. Early reflections from nearby walls or surfaces will make all the transients very prominent and uncomfortable, and so the choice of venue for recording is important. If you decide to avoid prominent early reflections by recording in a large venue where the walls are some distance away, you run the risk of finding you are in a space with too long a reverb time. In order to manage the longer reverb in this situation, you would need to use a lot of spot microphones fairly close to the instruments to capture more direct sound and less of the overall pickup. If you cannot get access to a good-sounding hall, it might be a better approach to record somewhere fairly dry and add in artificial reverb afterwards, although this will be a less enjoyable playing experience for your musicians.
13.5.1 A note on small percussion ensembles
The method outlined in section 13.3 for the small classical brass ensemble would also work for a percussion ensemble of similar size. That is, placing the players in a horseshoe, relying more on slightly closer spot microphones for a large component of the sound to make sure the attacks are clean, and then adding some good overall room sound to set the group together into the space.
13.5.2 The steel band
The steel band is again a very loud ensemble, with immensely complex overtones best suited to outdoor or large venue performance. As with brass bands, one of the biggest concerns will be the acoustic saturation of the space that you are recording in. The space needs to be big enough to allow the acoustic energy to dissipate somewhat before rebounding off the walls, and you should avoid trying to record them in a village hall with a low ceiling or a similar environment.