Chapter 11
Solo instruments and orchestra
Following on from our chapters on orchestral recording techniques, the next thing to consider is how to approach the addition of a soloist to an orchestral layout. A concerto might be written for any instrument and orchestra, and in the case of the concerto grosso, a small group of solo players is involved. From the recording point of view, we would like the appearance of orchestral perspective and depth to be maintained as before but with the addition of a soloist that is performing a central musical role. The soloist therefore needs a certain degree of prominence in the recording while retaining a believable perspective in relation to the rest of the orchestra. The soloist should feel as if they are located in the same space and should be placed just in front of the orchestra with a sense of appropriate scale between the two. For example, a piano should not fill the width of the image of the orchestra. This can be a challenge to get right, and it must also be remembered that the balance is never a static thing but is likely to need to be altered during the course of the piece depending on musical content.
The most common situation that the engineer is likely to come across will be a piano or violin concerto. The size of the grand piano means that its addition to the stage in a live situation results in the greatest disruption to the orchestral layout and to our ability to implement the usual orchestral microphone techniques.
The sections on non-piano instruments in this chapter begin with the violin, and this includes the most detailed discussion on spot microphones, imaging, and layouts. Even if you are looking for information on another instrument, it is recommended that you read the section on violin concertos first to get a more detailed overview of the principles involved. The sections on wind, cello, guitar, brass, and percussion build on the ideas discussed in the violin section, and you should begin to get a good feel for how these can be adapted to suit your circumstances.
Where a pair of microphones is discussed on the soloists in this chapter, it is assumed that they are spaced 25–30 cm (10″ to 12″) apart and forward facing unless otherwise specified. For more detailed discussion about placing microphones on individual instruments, see Chapter 4. This information should help you to make judgements about how the microphone placement might be adapted in a live concerto scenario while still getting a good tone from the solo instrument.
11.1 Piano concerto: studio layouts
The first thing to consider is where the piano is to be located. For a recording session where there is enough space and the engineer has some control over the layout, it is usual to place the piano approximately 0.9–1.2 m (3′ to 4′) in front of the orchestra, and behind the tree (see Figure 11.1). This is further away from the orchestra than the piano would normally be placed for a concert, but it does allow for reduced piano spill onto the outer tree microphones. If the piano is too close to the tree, there will be a high level of piano on the overall pickup. When the tree microphones are fully panned, an over-wide and diffuse piano image will result, and it is best if this can be kept from dominating the orchestra in level. The additional piano spot microphones will be used to centre the piano image and give more localisation and focus. While a greater distance between piano and orchestra is of benefit to the recording engineer, it impairs communication between the conductor and the pianist, and the final piano position is a compromise between these two conflicting requirements. You will need to do some negotiating with the musicians involved; the piano could also be placed a little off-centre over to the right so that the conductor is closer to the keyboard and pianist. (See Figure 11.1.)
To fit the main tree microphones in between the piano and the orchestra is awkward, and there are a couple of possible solutions. The most usual solution is to rig an upright stand with its base in the gap between piano and orchestra, with the tree rigged on a short horizontal boom on top, and with ample counterweights at the other end of the boom. Much less common is to use a really heavy duty stand with its base on the open side of the piano and the boom arm leaning right over the piano to get the tree into the right position. It is becoming harder to find such large stands in good working order, and it goes without saying that this is only practical for a recording session as it is extremely obtrusive. See Figure 11.2 for a photo of this arrangement taken in a Martha Argerich session in Montreal.
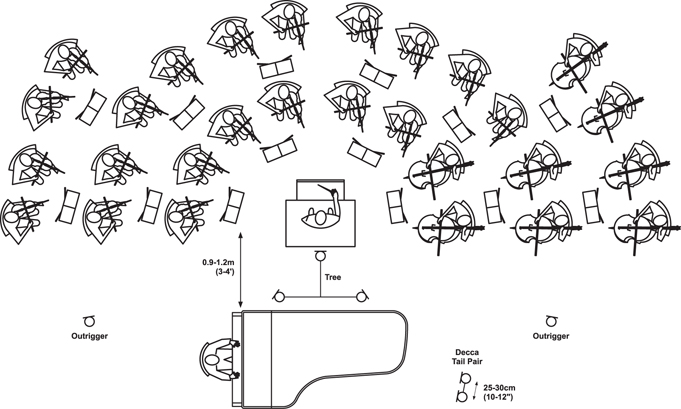
Figure 11.1 Session layout for piano concerto using a single piano pair
In addition to providing more stability to the piano’s image, the additional spot microphones shown in Figure 11.1 are needed to provide appropriate detail and to make sure that musically important lines are not lost in the tutti sections. Their level in the final mix will be dynamic rather than static, depending on the changing musical content of the piece. The spot microphones can be placed in a similar position to the microphones we looked at for solo piano recording (see Chapter 5), and with a spacing of around 25–30 cm (10″ to 12″) so that they do not produce too wide an image when panned fully left and right.
In a situation where the piano is placed at least 0.9–1.2 m (3′ to 4′) back from the orchestra, omnidirectional microphones would be the first choice for adding depth and warmth to the lower end of the piano. Because of the microphones’ positioning near the lower orchestral strings, the omnis have the potential to pick up a lot of cellos if they are too close. The presence of the cello spill will limit how much of these microphones can be used before their contribution to the orchestral image starts to pull the cello placement towards the centre and conflict with the cello image from the tree. The distance of the piano from the orchestra makes a big difference to whether the omnis will work; once this distance is reduced by only a little, to around 0.6–0.9 (1′ to 2′), the cello spill will be too high in level and the omnis will need to be replaced with wide cardioids (or cardioids as a final resort).

Figure 11.2 A side view of the two main microphones of a four-microphone tree being boomed over the piano in St Eustache, Montreal. Martha Argerich and the OSM conducted by Charles Dutoit, recording Bartók’s piano concerto in 1997.1
Photo: Richard Hale.
Where the piano has been placed over to the right to bring the keyboard closer to the conductor, this side orchestral spill problem is greater as the piano microphones will now pick up basses as well as cellos and drag these towards the centre if overused. If image confusion becomes a problem and it is not possible to increase the distance between the piano and the orchestra, it will be better to use directional microphones for the spots. In theory, even more directional microphones such as hyper-cardioids could be used, but only if their off-axis response is smooth, as they will still be picking up orchestral spill on their side axis. A flat off-axis response is something that will only be found in very high end hyper-cardioids as it is something that is difficult to engineer. A cheap pair is not likely to perform well enough in this particular situation, and the orchestral spill has the potential to be very coloured and unpleasant sounding. Ribbon fig of 8 microphones (Royer R-121 or Coles 4038) might also be helpful in this situation as, although they lack HF, their off-axis response is very smooth and their side rejection is excellent.
Microphones placed in the well of the piano are discussed in section 11.2 in the context of recording a piano concerto in concert. The sound will be rather close and dry, and so on a session where you have more control of the physical piano placement, using the tail pair would be a first choice.
11.1.1 Using two pairs on the piano
This is a more advanced and nuanced technique than using one pair, and it can offer greater control when used correctly. Rather than using a single tail pair, two spaced pairs are used, one of omnis and one of cardioids (or wide cardioids). See Figure 11.3 for their placement on the piano; the orchestral microphones remain the same as for Figure 11.1.

Figure 11.3 Session layout for piano concerto using a two pairs on the piano
The omnis are placed closer to the piano because they pick up more indirect sound and side orchestral spill, so placing them a little closer helps maintain the piano’s relative level. Fig of 8 ribbon microphones could also be used as an alternative to the cardioid pair; they have two advantages: being able to point the null axes at the cellos and having a very smooth off-axis frequency response so that any spill has a good quality of sound.
The relative levels of the omni and cardioid pairs will control how much focus there is on the piano, and this will vary between pieces and within a piece as the musical texture changes. However, it important to base the sound on either one pair or the other and not have them contributing equal levels to the mix. This is because the spatial separation of the two piano pairs results in phase differences between the signals from each, and this can produce a comb filtering effect that is dependent on the relative levels of the two signals. The effect will be most pronounced where the two pairs are contributing equal levels to the mix, and cancellations of specific frequencies will occur where the distance between the microphone pairs is an odd multiple of a half wavelength. Making one pair or the other more dominant and restricting the other to a level at least 6–8 dB lower will reduce any colouration from interference between the two signals to insignificant amounts. Figure 11.4 shows the effect of summing two signals that are half a wavelength different in phase: when they are equal level (top) and when one is allowed to dominate (bottom).
If the cardioids are used as a basis for the piano sound, adding a little of the omni will bring in some warmth to the lower notes. If the omnis are used as a base, the cardioids will be brought in for clarity in loud tutti passages where piano detail might be lost. This would be normal practice for a large concerto such as by Liszt or Rachmaninov, where the orchestration is very full, and if the omnis were used to try to lift the piano detail further out of the mix, too much level would be required and the main orchestral image will be affected too much (as discussed in section 11.1). Therefore, lifting the cardioid level will be more effective at bringing out the piano detail without disturbing the orchestra.

On a mixer operational note, the four piano microphones would usefully be assigned to their own group so that their relative levels can be preserved while the orchestral versus piano balance can be adjusted during the mix. Always beware of using too much of the piano spot microphones and aim to keep the perspective between piano and orchestra believably natural in feeling (even if it is better than nature, and detail more consistent!). The piano should feel only marginally in front of the orchestra, and during tutti passages you should add just enough additional spot microphones to retain the detail without pushing the piano into the face of the listener.
11.1.2 Double piano concerto recording layout
For the best communication between players, and placing both pianos centrally, the sort of nested layout in Figure 11.5 is preferred. However, because this would mean that the lids are facing in different directions, shielding one piano from the tree more than the other, it is usual practice to remove the lids for the purposes of recording this layout.
A word of caution: when removing a piano lid, you will need more people than you imagine as they are very heavy. Dropping the piano lid into the mechanism while trying to remove it is something that no one wants to have to explain to the pianist, conductor, or the representative from Steinway. The lid should ideally be placed flat somewhere completely out of the way where no one will fall over it, walk on it, or otherwise inadvertently damage it. An alternative is to bend the hinged portion to 90° and store the lid vertically on its side, supporting its own weight, and again, making sure no one can knock it over, including orchestral players rushing towards their tea break. Unless you are a master at not losing things, put the locking screws back into the hinges on the piano for safekeeping.
On each piano, a pair of microphones can be used above the instrument at a height of 1.2–1.5 m (4′ to 5′) above the strings (i.e. in the position where the raised lid would have been). Each pair should be panned differently to separate the two pianos a little in the final image, but they should not be panned so hard that one piano is over to the left and the other over to the right. The aim is to be able to differentiate them but have them overlapping somewhat. The left-hand piano (microphones 1 and 2) would be panned hard left and about 30% right, and the right-hand piano (microphones 3 and 4) would be panned about 30% left and hard right. As for the single concerto, the fairly wide panning of the piano pairs will not result in an overwide piano image because their constituent microphones are not widely spaced, at around 25–30 cm (10″ to 12″). These piano pairs can be rigged on long booms to reach over into position. The tree is placed so that its outer microphones are on the orchestral side of the piano and not above the instrument. As before, this positioning will be a trade-off between the artists’ preference for close communication and the engineer’s preference for space between the piano and the orchestra. The tree stand in this instance will be best managed by use of a vertical stand, as described for the single piano concerto; using a very heavy duty stand to reach over two pianos is likely to be impractical.

11.2 Single piano concerto: concert layout
The layout in a live concert is often less than ideal for recording, with the piano partially embedded in the string section and a shallower stage than would allow for any further physical separation of the piano and orchestra. The most important difference from a studio recording is that the main tree pickup will be on the audience side of the piano, and this has implications for the overall orchestral pickup used. Figure 11.6 shows a typical concert layout for a piano concerto.
It can be seen from this that the awkward placement of the tree creates two problems: firstly, the proximity of the piano to the main pickup, and secondly, the main pickup having to be placed further back from the orchestra than usual. In this situation, replacing the three main tree microphones with cardioids (while retaining omnis for the outriggers) will reduce the level of piano on these microphones and compensate a little for the increased distance from the orchestra. The microphones should be arranged to point towards the orchestra, placing the piano on their side axes. It cannot be emphasised enough that microphones used in so many classical recording situations need a smooth off-axis response because they will often be picking up direct sound from all sides. In a concert situation, it would be very common to have an orchestral piece in one half and the concerto in the other. A practical solution to producing a satisfactory recording of both pieces would be to rig the tree frame with a set of omnis for the orchestral piece and cardioids for the piano concerto where the orchestra will have shunted backwards on the stage to accommodate the piano. The only way to really manage the tree in this situation will be to sling it, as any stand large enough to reach from the floor to 3 m (9′10″) above the stage will be far too visually intrusive.

A single piano spot pair can be placed as for a tail pair (using cardioids, wide cardioids, or fig of 8 ribbon microphones to reduce pickup of lower strings; the problems inherent in side orchestral string spill onto piano microphones were discussed in the studio layouts section 11.1), or they could also be placed in the well of the piano. The tail pair is more likely to cause imaging problems because of the proximity of the lower strings, but the pair in the well of the piano will sound somewhat dry and close, and will need some reverb to help it to blend in. Depending on the exact situation you find yourself in, there is trade-off to be made here when deciding which to use. Another way of helping the closer sound from piano spots placed in the well would be to add an upwards-facing ambient pair of good cardioids to the tree frame. (See Chapter 6 for discussion of ambient pairs.) These could be used as a piano ambient pair to reduce the relative dryness of the piano and would also avoid picking up much of the audience. They would cause no imaging problems as their image would be based around the same centre line as that of the tree.
11.3 Piano concerto conducted from the keyboard
This is a more common arrangement within groups that specialise in the performance of early music, where the tradition of conducting from the keyboard was part of the performance practice of the time.
The layout in Figure 11.7 shows the piano end on to the orchestra, with the lid removed. This positioning will necessitate some adaptation in the positioning of the overall pickup if you are using a tree because its usual position will place it directly above the piano where it will pick up a lot of hammer noise. A three-microphone tree in particular will have to be moved further back so that the centre microphone is also away from the piano hammers. A two-microphone tree could be used, such as in the set-up for Ashkenazy’s recordings of the Mozart concertos with the Philharmonia2 in the mid-1970s, although this can leave a ‘hole’ between the strings on either side. In this particular case, the woodwind microphones were used to fill this in.
With the tree set back in this way, string detail will be lost, and it is usually necessary to add in some microphones for the inner strings to help with perspective. Using cardioids or wide cardioids will help discriminate against piano and woodwinds, and these ‘in-riggers’ would be at a height of around 2.6–2.75 m (8′6″ to 9′). The only word of caution is that if you use too much of the string in-riggers, you can flatten the orchestral perspective and lose too much depth. Their use is commonplace in film music recording where the natural sense of orchestral depth is less important than a very full and enveloping string sound.
Having avoided too much hammer piano pickup on the tree, additional piano microphones can be added to obtain a good piano sound. There are two options to try to begin with: one above the piano strings (but not above the hammers) and one on a floor stand at tail pair height. (Both are shown in Figure 11.6, but it is not intended that both should be used.) The narrowly spaced pair of wide cardioids (or cardioids) above the strings should be slung if this is a concert, but they could be stand mounted if on a session. They would be spaced around 25–30 cm (10″ to 12″) and positioned about 1.2–1.5 m (4′ to 5′) directly above the strings as shown. They can be orientated L-R as viewed from the audience, and can then simply be panned L-R as the image will overlay comfortably onto that produced by the tree. They can also be orientated one directly in front of the other (as one might place a pair on the piano if the orchestral pickup was of no consideration). In this case, the L-R panning could be either way; try both and see which works better.

The second option using a pair of omnis can be thought of as a ‘reverse tail pair’. The spacing and height of the microphones is that of the tail pair but placed instead at the keyboard end of the piano, looking over the player’s right shoulder to the upper range of the instrument. This technique was something that was used by renowned Decca engineer Kenneth Wilkinson; it does not seem very promising at first glance, but it actually works very well, and it was frequently used on Ashkenazy’s Mozart concerto recordings mentioned earlier. Figure 11.8 shows Vladimir Ashkenazy conducting from the keyboard.
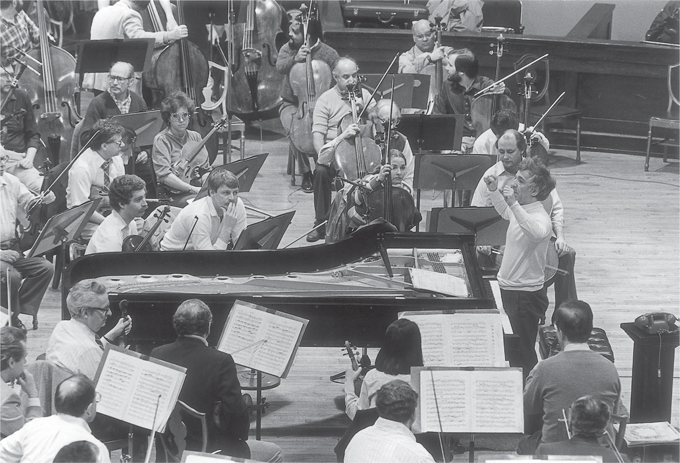
Photo: Courtesy Decca Music Group Ltd.
11.4 A note on the size of the grand piano
It is not unusual to have to deal with a piano that is smaller than a full-sized concert grand piano, and apart from the instrument having a less good bass tone and smaller overall acoustic power, the approach to recording it will be essentially the same. Because the smaller grand piano is somewhat quieter, you will find that you either have to fade up the piano microphones a little more to get enough piano or move the microphones closer. The latter is likely to produce a better result given that there will be plenty of orchestral spill on the piano microphones, and fading them up too high could be detrimental to the orchestral image. However, when dealing with the traditional concert or studio layout with the piano sideways on to the orchestra, a shorter piano means that the tail pair is not so far from the centre of the orchestra, and so the disruption of the lower strings image should be reduced.
When using the ‘end on’ piano recording layout, a smaller instrument will result in less disruption of the central orchestral layout and so might be considered an advantage. The inner strings should not need so much support from string section microphones, and the woodwinds will be closer to the tree and therefore require less use of their own ancillary section microphones.
11.5 Violin concerto: studio layouts
Other solo instruments are easier to accommodate physically on the stage than the grand piano, and so the orchestral layout can remain undisturbed. One of the advantages of a recording over a concert layout is that the soloist and conductor can have much better eye contact during a recording. There are a couple of ways that this can be achieved (see Figures 11.9 and 11.10).

Figure 11.9 Violin concerto – reverse concert layout for recording

Figure 11.10 Violin concerto – soloist in orchestra recording layout
In Figure 11.9, the violinist stands a little behind the tree, and faces towards the orchestra and conductor in a ‘reverse concert’ position. The obvious problem arising from this layout is that the soloist is very much on the left-hand side of the tree and will be skewed towards the left in the image from the tree. The soloist’s spot microphones can be used to help correct this by panning them left and right to place the soloist in the centre. However, if there is too much orchestral spill on the spot microphones, doing this might produce some orchestral imaging problems if they are faded up too far. The spot microphones also bring some more focus and clarity to the soloist’s image, which will be quite diffuse on the tree alone. A pair rather than a single microphone is used to avoid the soloist coming across as a narrow point source in the recording image. If a single microphone is used, the more it is faded up, the smaller and narrower the instrument becomes, and the spot microphone begins to draw attention to itself. It is destructive to the beautiful illusion of the music arriving naturally and unmediated at the listener’s ear if the listener becomes aware of the presence of an individual microphone.
The spot microphones are around 2.5–3 m (8′2″ to 9′10″) high, looking quite steeply downwards towards the player. Cardioids would be a good choice for the violin spot pair as there will be some degree of discrimination against the orchestral players, even though the microphones’ rear axes are pointing towards the ceiling. The height of the microphones depends on the player; they can be lowered if the player is quieter, or brought lower and further in front if you need to reduce the HF in the player’s tone; you should experiment to get the best that you can from the individual player.
The addition of a central ribbon microphone (Royer R-121 or Coles 4038) to the soloist’s pair is another technique that can be helpful in two ways. Firstly, if the player has a thin or scratchy sound, the ribbon microphone’s inbuilt HF roll-off will ameliorate this naturally. Secondly, the ribbon microphone’s side rejection means that it can be placed lower without picking up too much orchestra. In turn, this means that the reduced spill on the ribbon microphone gives you more scope for panning it centrally without causing disruption to the orchestral image. Therefore, if you are having trouble with the orchestral image from the violin spaced pair being panned L-R and having to be faded up too high, or trouble getting the violin image to be central, adding a single central ribbon microphone can be used to lock the image more into place.
In Figure 11.10, the violinist stands in the middle of the orchestra in a space created in front of the second violins and violas. This position is central to the midline of the tree and hence avoids any problems with lateral imaging. In this scenario, it should be sufficient to use just the pair of cardioids as spot microphones without running into image problems, unless you choose to use the ribbon microphone for reasons of violin tone. In this case, you could use a pair of ribbon microphones instead of the cardioids. Some players like standing in the orchestra like this, and others do not find it comfortable. It is generally only used as an option for a solo violinist, and not for other instruments as they can feel rather hemmed in by strings, even if they are standing to play. A seated cellist would certainly feel a bit too embedded, and for a classical guitarist, the instrument is too quiet to be placed in this position.
11.6 Violin concerto: concert layout
In a concert setting, placing microphones to pick up the violin from the front at a good enough height on a stand will be too visually intrusive to be acceptable. If it is possible to sling the microphones above the player and thus do without the stand, then this would be the best solution. Where slinging the microphones is not possible, or where the position of the slung microphones is not ideal, the next thing to try would be a pair of spot microphones mounted lower down in front of the player, roughly at the height of the violin. Bearing in mind that positioning microphones on a violin any lower than the height of the bowing elbow will result in a significant loss of mid and high frequencies, this solution will not be tonally as good; the lower the microphones have to be, the less ‘presence’ the instrument will have. These microphones can be rigged very discreetly with the use of very slim ‘Pavarotti stands’ (Schoeps RC series; see Chapter 6), which are designed to be aesthetically acceptable in a concert situation. Another potential solution is to place the violin microphones high up and behind the player, although the tone will be affected in a similar way, with loss of higher frequencies. An ideal scenario would be to combine a slung, high-up pair and the lower microphones on the Pavarotti stands. The higher microphones would contribute most to the tonality of the sound, with the lower microphones adding some focus and a touch of closer perspective.
11.7 Wind concertos: studio and concert layouts
The oboe, clarinet, and bassoon can be treated in a similar way to the solo violin for concert and studio layouts, although it would not be usual to try placing the soloist within the central front strings for a studio session (as in Figure 11.10). With the player at the front to the conductor’s left, the principles of microphone placement and panning would be the same as for the violin. The microphones, as before, would be a narrowly spaced cardioid pair, placed so that they look down on the instrument from high up, just in front of the player. For a concert layout, the player faces the audience, making slung microphones and/or a lower stand necessary, but for the recording layout the player can turn around, take a step backwards, and face the orchestra and conductor. If lower microphones have to be used, you should avoid them being placed directly in the firing line of the bell. (See also Chapter 7.)
The flute is the only woodwind that can be successfully recorded from behind the player when necessary, as the combination of its inherent radiation pattern and playing position mean that it radiates to front and back equally. All that is really lost in this position is the wind noise from the player blowing across the mouthpiece, and in a classical music scenario, flautists do not want this to be obtrusive (in a similar way to classical guitarists not wanting to hear any fret noises). This is useful in a live flute concerto situation where microphones can be placed behind, either by slinging them or by using a stand if it is permitted by the venue. The rear of the spot microphones will be towards the orchestra in this position and will afford the engineer some useful additional discrimination in favour of the flute. For a recording session situation, the flautist can turn and face the orchestra, with the microphone placed high up and in front.
In a concert situation, the player will be standing on the left and closer to the orchestra than for a recording session. Some thought should be given to how far to go in trying to centralise the soloist in the recorded image. Any microphones facing the front of the soloist will also be facing the orchestra and will be picking up significant orchestral spill from the violins. Initially, you should try to pan the soloist microphones fully left and right, but note the effect on the orchestral image as you fade them up. If the image is affected too much by the addition of hard panned soloist spot mics, you can adapt the panning of the soloist’s microphones by bringing the right microphone inwards, and moving the soloist back off centre to nearer his or her natural position in the room. A word of caution: do not try to make this judgement when listening on headphones; they are not the best place to judge stereo imaging. See Chapter 2 for a discussion about pros and cons of monitoring on headphones.
11.8 Cello concerto: studio and concert layouts
For the recording session, the cello can be placed at the front of the orchestra, facing towards them, in the ‘reverse concert’ position. The distance from the orchestra will need to be enough to accommodate the cellist’s microphones. The cello is less directional than the violin in the radiation of its middle and upper range fundamentals, and the instrument faces in a different direction because the player is seated. For both these reasons, the spot microphones do not need as much height in order to obtain a good balanced tone and can be placed in the plane perpendicular to the instrument’s front in the region of 2.25 m (7′6″) high and 1.8–2.1 m (6′ to 7′) away (see also Chapter 7). Omnidirectional microphones should be considered for the pair as they have a smooth LF response that can capture the depth of the instrument’s tone (the cello’s lowest fundamental note is around 60 Hz). They will produce a tone that coheres well with the rest of the orchestra being picked up on the tree, so as long as the balance can be made to work, they would be the first choice. Wide cardioids and cardioids would be next, and alternatively, the technique of using a narrowly spaced pair of omnis plus a central directional microphone (introduced in the context of recording the violin) would also be applied to the cello. It is often considered to have a tone that is close to that of a singing voice, and using a vocal type microphone for the centre microphone could be an effective choice. An example would be to use a Neumann U87 in this role, where the slight presence edge and fatness to the sound would work well to enhance the cello’s singing quality; the AKG C414 is another good alternative. The addition of a central directional microphone means that the omnis would not have to be faded up as high, so reducing any attendant imaging problems for the orchestra.
In a concert situation with the player facing out towards the audience and positioned on the conductor’s left close to the orchestra, the cello can be discreetly recorded very well with a lower-down pair, looking slightly upwards at the instrument from a distance of about 1.5 m (5′) and height of 60–75 cm (2′ to 2′6″). Ribbon microphones can be useful in this scenario as the side axis can be used to discriminate against the orchestra. They can also be placed a bit closer in than high-end cardioids because their HF roll-off will soften any increase in noises and scrapes and avoid any oppressive closeness. Orchestral imaging should be carefully observed when deciding how the spot microphones can be panned, as detailed in section 11.7.
11.9 Guitar concerto: studio layout
The guitar and the cello have some similarities in that they cover essentially the same musical range, are of a similar size, and the players are seated. The approach to recording the guitar for a studio recording session is also similar, the main difference being that it is a very quiet instrument. When you have a quiet source, there are a few ways of getting more of the instrument on the microphone signal and less of everything else. Remember that orchestral spill onto the guitar microphones is not so much of a problem for the guitar as it is for the orchestral image if the guitar is sitting off-centre and the guitar microphones have to be faded up high enough to be useful.
- Firstly, distance between guitar and orchestra – moving the guitar back from the orchestra will help, but only within the bounds of keeping comfortable communication with the conductor. It is not feasible to put the guitarist right on the other side of the room (and if you did this, the orchestral spill would be so distant sounding as to have a detrimental effect on the orchestral sound).
- Secondly, distance between guitar and microphone – to help with the low acoustic levels, you could place microphones closer to the soloist, bearing in mind that the closer they are, the more localised sound and fret noise from the instrument they will collect, so microphone placement will become more critical. A closer spot microphone will also be drier, and it might need additional reverb when blending into the mix.
- Thirdly, you could use high-quality directional microphones and place them to discriminate against the orchestra whilst maintaining a good guitar sound. However, you should be careful using directional microphones too close, as the proximity effect will start to colour the sound.
Putting all these ideas together, the main danger to avoid is placing microphones so close to the soloist so that they give an artificial level of focus on the guitar and pick up a great deal of finger noise. The best approach would be to use some physical distance between the orchestra and guitar in the first instance and then bring in the other ideas if needed. The limit to placing the guitarist behind the podium will be around 1.2–1.5 m (4′ to 5′) before communication will start to suffer.
To find a good place for the microphones, it is suggested that you try sitting on the floor when the guitarist is playing and move around in an arc about 1 m (3′4″) away to see where it sounds best. A useful pair to start with would be some small omnis such as Neumann KM83s, which will produce a good tone and can be placed around 30–60 cm (1′ to 2′) back from the instrument without having to worry about colouration from the proximity effect. An additional central ribbon microphone can also be used to help with focus and soloist imaging (as for the violin/cello) and, as noted previously, the HF roll-off will soften any squeaks from fingers.
Whichever microphones are used, there will need to be a lot of fader riding during mixing to bring out the details in the guitar part and prevent the instrument from being swamped. In modern-day performances of the well-loved Concierto de Aranjuez, the guitarist is almost always amplified with a tiny clip-on microphone. When the piece was written, the orchestral forces were assumed to be smaller, and the venues more intimate than a modern orchestral concert hall. Bearing this in mind, if setting out to record a guitar concerto, a small chamber orchestra will make it easier to create a natural sounding result that sets the guitar and orchestra together in a believable acoustic space.
11.10 Brass concertos: studio and concert layouts
Brass instruments are loud, and the forward facing trumpets and trombones can be particularly hard to manage in a concerto recording because they spill onto the orchestral microphones.
The concert position with the player with their back to the orchestra is sometimes easier to handle; although the tree will pick up the soloists, the microphones are above and behind the instrument, so not on its front axis. Soloist’s microphones will still be needed if only to give some focus to the image, and these should be placed above or below the bell to avoid an over-bright sound and large changes in tone as the player moves (see section 7.6 on brass and piano and Chapter 13). In a concert situation, below the bell is the most discreet option and could be managed with a pair of ‘Pavarotti’ microphones (Schoeps RC series; see Chapter 6). In this low position, they can be around 90 cm (3′) high and still avoid sight lines. They should not be too close, as you are only trying to collect enough of the soloist to provide a little focus. ‘Too close’ in this context means around 60 cm (2′); move the microphones as far back as you can get them given the constraints of the stage, which is likely to be in the range of 90–150 cm (3′ to 5′). Apart from Pavarotti microphones, the microphone choice should be one that doesn’t make the actual placement distance feel even shorter (i.e. it shouldn’t have any sort of HF lift or be too directional). A ribbon microphone will provide useful HF roll-off, and wide cardioids will sound less close than cardioids. Unless your placement has to be very close to the soloist, omnis will probably pick up too much in the way of other unwanted signals from all directions.
For a recording layout, placing the soloist behind the conductor (as for all the other soloists discussed in this chapter) is the usual option, but in this case the priority has to be how far away they can be positioned before contact with the conductor and orchestra becomes too compromised. The trombone or trumpet soloists will potentially be playing directly towards the orchestral microphones in this scenario, and it is a good idea to ask them to stand sideways on to the orchestra, so aiming sideways across the front, see Figure 11.11. It is also possible to use a tree of cardioids or wide cardioids instead of omnis to reduce soloist pickup.

Figure 11.11 Showing placement of forward-facing brass for a studio concerto recording
The soloist’s microphones should again be placed off the direct axis of the bell, and they could be cardioids or ribbon microphones as the extended LF is not required (the lowest note on the trombone is around 80 Hz). The main priority when placing the brass solo microphones is to get a good tone and enough focus on the soloist, and you should not be overly concerned about orchestral spill. For recording a standing trombone or trumpet soloist in this context, the microphones should be just above the bell and as far back as possible without losing the focus, which will be around 1.5–1.8 m (5′ to 6′) away. Cardioid and ribbon microphones will pick up a similar amount of reverberant sound at the same distance, but the ribbon microphone will be able to go in a little closer because it will not pick up so much HF. It goes without saying that you should not place a ribbon microphone in the direct stream of moving air from the bell of a trombone, as it may be physically damaged.
Horns and tubas are much easier to deal with as they can be placed at a similar distance in front of the orchestra and behind the conductor as the violin (see Figure 11.8 and section 11.5). Neither instrument is firing directly at the orchestral microphones, and the horn can be recorded from behind and the tuba from above, both off-axis to the bell to avoid the HF and wind noises. For the French horn, typical distances would be 1.2–1.5 m (4′ to 5′) back from the horn and about 30 m (1′) above the bell looking down and across it. For the tuba, the placement would be about 60 cm (2′) above the bell but off-axis; this is close enough to capture enough attack to give it some focus in the mix. If the microphones are much further back than this on a tuba, some of the important attack is lost and the signal will be less effective at bringing the tuba to the foreground.
11.11 Percussion concertos
There are concertos for marimba but also for groups of untuned percussion. These instruments can be very loud, and the difficulties when recording a live concerto are similar to those when recording the trumpet or trombone. The percussion will be situated directly under the tree for a live concert and will easily dominate the sound in terms of level and perspective. One solution to avoiding the dominance of the percussion on the main pickup would be to place the microphones for the orchestra closer in, including both the tree and sectional ancillary microphones. Alternatively, as with the forward facing brass, a tree of wide cardioids or cardioids could be used to reduce the percussion spill on the orchestral microphones.
In a studio session, it would be usual to place the percussion facing the orchestra, on the rear side of the tree, and screen the players off to some extent. Where there are no screens available, getting some distance between the percussion and the orchestral pickup will also help, but this has to be balanced against loss of communication with the conductor. As with the live concert, closer orchestral microphones and/or a tree of more directional microphones can also be used. Microphone placement on the percussion themselves would be the same sort of distances as noted for the percussion section in Chapter 9, as the aim is to pick up the transients and attack and use these to add clarity and definition to the sound of the instrument on the main pickup.