Chapter 14
Organ
14.1 Brief introduction to the pipe organ
When recording the pipe organ, one of the first problems that presents itself is that of the organ’s location, or rather the lack of a single location within the building. Because of the number and size of pipes, the ranks of pipes are commonly split up over at least two or more locations set within the architecture of the church or concert hall. It is worth taking a brief moment to present a simple overview of how the organ works so we can see how it comes to be split up in such a way.
The organ consists of at least one keyboard (or manual), usually of five octaves, and a set of foot pedals, usually of two and a half octaves. The number of manuals varies, but larger instruments might have four or five. The pipes are physically arranged in ranks of a single timbre and pitch type, which are grouped into divisions, each of which is activated by one manual. The player selects which pipes they want to use by means of stops (selecting a single rank of pipes) and mixtures (selecting a pre-set mix of pipes). The primary manual division is called the ‘Great’ (in the UK/USA), and it forms the main tone and character of the instrument. Other divisions include the ‘Swell’ (whose pipes are enclosed in a box with movable opening louvres controlled by a pedal, enabling a degree of volume control) and the ‘Choir’ or ‘Positiv’, which is a set of smaller pipes traditionally placed behind the organist’s back, and therefore closest to the congregation.
Pipes can be made of metal (circular cross section) or wood (square cross section) and are of two basic types: flue pipes and reed pipes. Flue pipes produce their sound by means of a fipple, such as found on a recorder mouthpiece. They include the principal or diapason (producing the basic organ sound, often very visible and decorated at the front of the casing), flute pipes (wide bored, producing mainly fundamental tones) and string pipes (narrow bored, producing little fundamental tones and a lot of overtones). Reed pipes produce their sound by passing air through a single reed, such as found on a clarinet. These include trumpet and clarion stops, intended to be used as part of a mix, and solo reeds, designed to imitate orchestral reed instruments. Pipes are organised by pitch, where an eight-foot pipe (8′) is the reference unison pitch (i.e. the pitch of the same keys on a piano); 4′, 2′, and 1′ represent one, two, and three octaves higher, respectively, and 16′, 32′, and 64′ represent one, two and three octaves lower, respectively. The ranks of pipes are placed where convenient within the building and are often split across separate sites, especially in a large cathedral.
14.2 Doing a venue reconnoitre
A venue reconnoitre is uniquely valuable if you are planning an organ recording, as the instrument and the building are intimately bound together. This visit can be used to plan microphone layouts, listen for any acoustic quirks of the building, assess background noise levels, and befriend the venue’s technical manager, verger, cathedral staff, or college porters. These are the people you will need on your side at every stage – for trouble-free parking while you unload, for permissions for slinging microphones, and to ensure quiet while you are recording (see section 2.2).
Sitting quietly in the venue will give you a good idea of where the noise problems are (e.g. traffic, heating pipes, organ blowers, pigeons or bats), and asking the organist to play will reveal the degree of isolation that you have between your control room and the main church building. Your control room is likely to be poorly acoustically isolated from the instrument, whether you set up in a vestry, storeroom, or crypt, and will sometimes be located directly under the organ, making monitoring your recording accurately quite a challenge.
While the organist plays something that uses a large range of pipes, take a walk around the building to identify where the nodes of various standing waves occur. You are looking for places where certain notes really become prominent and seem to hang around in the air longer. These places should usually be avoided when placing your microphones, or an uneven coverage of the instrument will result. However, in unusual circumstances, you might find that you only really get very low bass in one particular part of the building, and you might choose to place microphones here in order to capture this. (An example of this is Temple Church, London, where the 32′ stops are only really audible near the rounded end of the building and have to be captured with microphones at this position, which are then delayed to account for the great distance to the main pair.) It is a good idea to always bring some spare microphones to use on important sections of pipework that you might have overlooked.
14.3 Microphone choices, stands, and cable runs
To capture the lovely extended LF that the organ produces (the lowest C of a 32′ stop has a fundamental frequency of 16 Hz), omnidirectional microphones are essential to form the bedrock of the sound. It can be tempting to try and use cardioids to capture more detail and discriminate against some of the reverberant sound, but the instrument will not carry enough weight and hence will sound like a small organ if the extended LF is not recorded. Additional pair(s) of cardioids can be added to pick out more detail if necessary by positioning them high enough to capture the attack as the air hits the lip of the pipe at its opening. All the microphones used to record the organ (the omnis for overall sound, and cardioids for detail of each section of pipes) should be mounted at least as high as the front opening of the pipes (the part that looks like a recorder mouthpiece). If they are too low down, some of the attack will be missed, and if they cannot be raised high enough, they should at least be pointed upwards.
The most pressing practical problem here is getting stands that will go high enough (at least 6 m (20′) in most reasonably sized buildings) while remaining safe and stable. If you are fortunate enough to be able to record the organ in King’s College, Cambridge, Westminster Abbey, or Winchester or Coventry cathedrals, you will need stands that go to around 12 m (40′) as the organs are all very high. You should use stands that are designed for this purpose and that make use of weights or sandbags on the base of each stand. Apart from this being a safety-conscious course of action, you will also come across as serious and professional, and this is another important factor in gaining the confidence of the venue staff. Record companies that make a lot of organ recordings often make use of telescopic lighting stands or even aerial masts to mount microphones. Decca adapted Clarkson aerial masts for use as microphone stands (these were originally used by the BBC and the military for radio transmissions). You should never make any sort of improvised arrangement using ‘stands on top of stands’; your own safety and that of others has to be the highest priority, followed by the fabric of the church building, and finally, the safety of the microphones.
Slinging microphones rather than using stands is another option to be considered, but you will need to make sure that you can do this safely (see Chapter 2) and that you have the correct permissions from the venue. The staff of old churches and cathedrals can justifiably be very difficult to negotiate with when it comes to attaching ropes or cables to parts of an ancient building, and you must be sure that you can avoid damage to stonework and wooden structures. It is worth noting that cable runs within a large church can very quickly run into hundreds rather than tens of metres, and you should include this in your planning.
14.4 Basic technique: straightforward organ layout
Figure 14.1 shows a nice symmetrical organ arrangement as a place to start our discussion, with part of the casing on either side of the central choir/positiv division.
This diagram shows some useful principles which will have to be adapted to your own situation. There is a two microphone tree of omnis spaced at around 1 m (3′4″) apart, at a distance of at least 3–4.5 m (10′ to 15′) away and probably more, which is aimed at capturing a good overall sound from the organ. The exact distance will depend on the instrument itself, but the aim is to avoid as much blower noise and action noise as possible. If these sounds are quite dominant, your microphones are too close. Because the casing in this particular example is spread out over quite a wide area, a single additional omni is placed on each side, rather like orchestral outriggers. If the casing was more self-contained, as might be the case for a smaller organ, there would be no need for these. (If you do not have access to enough tall microphone stands, one suggestion is to rig these wide outriggers on a long piece of aluminium slotted angle, screwed to the top of a single microphone stand rather like a very wide stereo bar (in the order of 3 m (10′) wide). Care must be taken to ensure this is absolutely symmetrical and safely attached.)
The cardioids in Figure 14.1 are shown centred on the choir/positiv organ (which is usually sited lower down nearer to the player). A pair of cardioids can also be used for more detail from the main organ without having to get any closer. They will discriminate against some of the reverberation from the building and so sound clearer, catching the note attacks before they are swallowed up by the building. If you were to move the omnis in closer instead of using cardioids, you are likely to find that the wind and blower noise becomes intrusive. Therefore, the combination of more distant omnis for a good tone (without blower noise) and some cardioids to pick out some detail from the reverb should enable you to find a good balance of all the desired attributes of the sound.

14.5 Organs with pipe divisions in several locations
Where the case is divided into two or more widely separated sections within the building, we can develop the principles from the straightforward organ in Figure 11.1 further. An overall pair of omnis spaced at around 1 m (3′4″) should be used as ambience microphones to tie all the contributing sections of pipework together in the same space. Additionally, each section of casing and pipework should have its own pair of microphones (cardioids or omnis) which are panned so that they overlap but do not completely overlay one another. For example, two casing sections could be panned fully left and half right, and half left and fully right, respectively. This will give some sense that different parts of the organ are spatially separated without trying to reproduce exactly the experience of standing in the building. Overlaying the different parts in this way should not cause any stereo imaging conflict because they are separated by relatively large distances within the building. This means there is insufficient correlation between the separate microphone pairs to confuse the stereo imaging. Coventry Cathedral has widely separated sets of pipes, and for the 1994–1995 recording of Janáček’s Glagolitic Mass with Thomas Trotter,1 completely separate organ booms were placed on either side of the nave.
14.5.1 Very distant pipes and use of delays when mixing
There might be some very distant, specialised ranks of pipes, such as a fanfare rank mounted over the west door (as in St Paul’s Cathedral, London). It is always worth talking to the organist and finding out when, or even if, they will be using various ranks of pipes during a piece. It is a good idea to fade out very distant microphones if they don’t need to be in use, as they might cause problems with imaging and delayed sound compared with the main pickups. (See also Chapter 17 for discussion about the use of delays in general.)
Figure 14.2 includes a very distant set of fanfare pipes. There is always some degree of timing difference when a main pickup and additional spot or ancillary microphones are used. The sound of the distant instrument or organ pipes will arrive at the nearby spot microphones earlier than it arrives at the main pickup. There are many different opinions on the effectiveness or necessity of using an electronic delay to retard the signal in the spot microphones so that it is time-aligned with the same instrument on the main pickup. With a complicated multi-microphone set-up over large distances such as a cathedral organ, the question of which signals you delay with respect to which other signals does not always have an obvious answer. In order for delays to work at all, there must be a single pair of microphones that are the dominant pair in the mix to which all the others are delayed. In the illustration in Figure 14.2, the dominant pair will be the omnis that are capturing the overall organ sound, labelled ‘Main Pair’.
It is possible to get into quite a muddle if you start introducing electronic delays at the time of recording, so it is recommended that you do not try to address this until the mixing stage. If at all possible, it will be better to capture a multi-track recording with no delays and mix later on, away from the live instrument. This is not to discourage the skill of mixing straight to stereo at the time, but because of the difficulties of monitoring accurately in a church (see section 14.7). You should also measure the distances between the sets of microphones and note these so that if you do decide to try out electronic delays while mixing, you will have a good idea of the sort of delays that might need to be involved. On a practical note, measuring long distances within a venue is most easily accomplished by use of a laser measuring device. If you are going to use one of these, make sure you notify the venue staff beforehand so that you don’t cause any alarm by waving a laser around the building.

Figure 14.2 Organ with ranks of pipes spaced around the building
Each additional metre causes approximately 3 ms delay, and once the distance is more than about 10 m (35′), or 30 ms delay, it is likely that you will hear the time difference between sources as a discrete signal (i.e. as an echo). Below this threshold, your ear will tend to fix on the signal that arrives earliest (which will be the spot microphones) as being the timing of that rank of pipes. A later arriving signal will not be perceived as a discrete echo but just as part of the original sound. Although there is a grey area where you might perceive some blurring of note attacks, this depends on the relative levels of the two signals, and it is more likely to occur with more transient sounds. Therefore, with moderate distances, not using any delays might well be perfectly satisfactory.
Another potential source of delay with a mechanical organ is the time that different ranks of pipes might take to speak, with the greatest problems caused by the largest distances. This is something that is best discussed with the organist to see how much of a problem it is in that particular venue, whether they are able to compensate for this at all in their playing, and whether it is another factor of which you need to be aware.
14.6 Interesting acoustic effects and other awkward corners
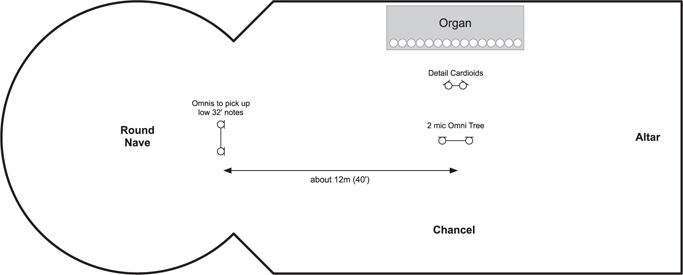
Figure 14.3 shows the set up used at the Temple Church, London, whose organ was used on the Interstellar film sound track. This church has a curved back wall at the end of the nave, and this has an interesting acoustic effect on the lower frequencies of the 32′ stop such that they are best picked up by placing some microphones near to the curved wall. The signal from these microphones is then delayed to match the main pair. This method has been developed by practical experience of this particular church, and if anything is to be taken away from this chapter on organs, it is that every organ and every situation create different problems to be solved, and you should always take some time to walk around the building and see how the organ’s sound develops in different areas.
An arrangement of pipes that is frequently found in the UK is to have the organ mounted all together in a corner of the church, with pipes visible on two sides at right angles to one another. Using the principles that we have looked at, the approach to an arrangement like this is to put a pair (a two-microphone tree, or a pair on a normal-sized stereo bar, but splayed outwards to increase their spacing) on each section of pipework, and then use an overall, more ambient pair to join them all together. In this case, the overall pair would be panned fully left and right, and then the pairs for each section could be panned to overlap (e.g. fully left and half right, and half left and fully right) as previously discussed. A corner organ is illustrated in Figure 15.4.
14.7 Monitoring limitations
In addition to the organ sound being audible in every far corner of the building, there are other monitoring limitations that mitigate against trying to mix at the time of recording (as discussed in Chapter 2). You are likely to find that you end up using headphones because of the spill of the live instrument into your monitoring area, and it is important to recognise the limitations of headphones when it comes to panning, imaging, and reverb amounts. Small near field monitors will help you with these aspects of the recording but will not give you any sense of how the low frequencies are sounding. Your headphones will be better at the LF reproduction, but in the absence of some really large studio monitors and a good isolated control room, you should leave as many mixing decisions as possible until after the event.
14.8 Communication: talk microphone
Communication with the player is very important as always, and in addition to rigging the normal talkback speaker near the player so you can speak to them, you will need to rig a dedicated organist’s talk microphone in order for the player to be able to communicate with you. A talk microphone is only needed when a player is not sitting close to the microphones that have been placed on their instrument; the organ is an excellent example of this problem given that the player maybe sitting a long way from the pipes, and it is easy to forget that the player won’t be audible unless they have a microphone near to where they are sitting. There is a very natural tendency for musicians and conductors to speak towards the talkback loudspeaker as this is the source of the producer’s voice, but this of course only provides one-way communication. Remember to fade down the talk microphone during takes, unless you want to capture humming, singing along, mumbling, and other chit-chat from the player.
14.9 Noise
Churches and cathedrals are likely to have high levels of broadband ambient background noise from rumble, traffic, and sounds from the central heating system. The organ itself also contributes to the background noise with its blower, and minimising picking up of the blower noise is part of the challenge, as noted earlier. To remove rumble, our instincts might be to reach for a high-pass filter of some sort, but this will inevitably take the LF of the organ away with it. (See also note about limited monitoring in section 14.7). A better solution is to use software that can analyse the rumble and remove it whilst leaving the LF notes intact. (See Chapter 19 for software suggestions.)
Other common noise sources include birds from inside or outside the building. Pigeons or bats can be nesting in the roof area, and the cooing of pigeons from high up will reverberate around the whole space. Some engineers carry a starter pistol to scare them away when recording is to start, which is at least a non-lethal solution. Outside, songbirds such as blackbirds have been known to imitate tunes being recorded (which is so endearing that you might choose to leave some of them on the recording). St Jude’s Church in Hampstead Garden Suburb, London, is a frequently used recording venue and is situated in the middle of a leafy residential area. Here, lawn mowers and nearby school playing fields can be a problem, and persuading the neighbours and children to keep quiet is another task for the diplomatic engineer.
Recording overnight is a common solution to bird noise and traffic noise in particular, and you should consider if this might be a possibility for your project.
14.10 Electronic organs
In this context, this refers to electronic organs that are mounted within a church, using loudspeakers where the pipes and casing would normally be sited. This has become more common as electronic organs have improved, and the cost of replacing old instruments or installing a new one from scratch has become insurmountable for many churches. The wonderful Victorian Gothic Roman Catholic cathedral in Norwich, for example, has a beautiful acoustic but has never had a real pipe organ, and whilst fund-raising continues, it has an electronic organ for now.
The first thing to say is that these instruments need the sound of the building in which they are installed to bring them to life, and they should not be DI’ed (directly injected, or plugged straight into the audio interface or mixing desk) or closely recorded, as would be appropriate for a Hammond-type organ in a jazz context. The core approach is to place the microphones at the same distance from the loudspeakers as you would for ranks of pipes in order to capture the effect of the church acoustics as well as the direct sound. Treat them as you would an acoustic organ in terms of panning and overlaying different sections of the instrument if they are split up within the building. The two main differences from the sound of a real, live organ are that you may notice are a lack of ‘edge’ and upper harmonics, and the pedal fundamentals are not usually reproduced as well because of the loudspeaker limitations.
Portable electronic organs are sometimes used for concert performances with other instruments if the organ in the venue is at a pitch that doesn’t match with the performance practice of the players. The modern standard pitch is notionally A = 440 Hz, and authentic early music performers are likely to be using lower values such as A = 430 Hz as a reference instead. The organ within the building might not match any of these, which leads us onto making recordings with organ and orchestra.
14.11 Organ with orchestra: overdubbing or simultaneous recording
This is a combination that can be hard to balance at the time of recording because the organ and orchestra have some conflicting requirements. The orchestra is best suited to a reverb of around 2 seconds, and the organ tends to be in a building where the reverb time is around 5 seconds or more. It is very common to record the organ and orchestra separately, and it is often essential to do so to make a success of it. The basic workflow when recording separately would be to record the orchestral session first, edit it in the usual way (see Chapter 18), and use this as a track onto which the organ can be added. For cases where the organ pitch does not match the orchestral pitch, see section 14.12.
There are a two primary reasons for choosing to record the organ as a later overdub:
- 1The type of organ. The organ in the recording venue will have different registrations and possible combinations of sounds depending on when and where it was built, but the repertoire being recorded might have been written for an organ that produces a particular sound that works with the orchestration. A good example are the renowned Cavaillé-Coll organs found in the Gothic cathedrals and churches of northern France (such as the church of St. Ouen in Rouen), for which much of the big romantic French repertoire was written. An organ of a different type to this might need to have many stops out simultaneously to produce the required tone, at which point it can easily be so loud as to overpower the orchestra.
- 2Acoustic saturation of the recording venue. Even with the right organ in the building, if it is recorded together with the orchestra, it can take up so much of the acoustic space at low frequencies that the room will saturate too quickly. Recording simultaneously for a large scale work is only likely to be successful in somewhere as huge in volume as the Royal Albert Hall.
A good example of a complex project with overdubbed organ is the OSM (Orchestre Symphonique de Montréal) recording of Fauré’s Requiem,2 which was recorded in St Eustache Church, Montreal, with the organ of Gloucester Cathedral added afterwards.
14.11.1 Dealing with two different acoustics
Recording the orchestra and organ separately in different venues can then easily lead to a problem with mismatched acoustics, with the organ recording having a longer reverb characteristic than the orchestral recording.
In order to help this problem when mixing, it is possible to artificially shorten (by fading out) the reverb tails left at the ends of organ phrases and especially at the end of the piece so that the orchestra and organ reverbs appear to finish at the same time. However, this requires a great deal of skill and painstaking attention to detail, and the producer needs to be aware of the potential for expensive remedial post-production work when deciding where and how to record the organ overdub.
Rather than opting for the grandest and most enormous instrument available, it might be a better match to record a smaller instrument in a smaller acoustic to avoid a lot of salvage work later on. It is very important that the orchestra and organ can be made to feel as if they are in the same space. A very fine example of a successful combination of orchestra and organ is the OSM/Dutoit recording of Holst’s The Planets,3 where the orchestra was recorded at St Eustache, Montreal, and the organ was recorded at King’s College, Cambridge. UK churches that are known for having a big sounding organ but a shorter reverb time include St Paul’s Church, Knightsbridge, and Temple Church, London.
14.12 Organ pitch
Organs are tuned to a variety of pitches, depending on the time of construction and local choral traditions, and are often found to be not tuned to A = 440. This is something else that needs to be researched in advance and factored into the recording and production process. Where the organ that needs to be overdubbed is not at the same pitch as the orchestra, the normal process would be to pitch shift the edited orchestral recording to match the organ, overdub the organ, and then pitch shift the organ back again, and put it back into sync with the original orchestral track. The OSM’s recording of The Planets was managed in this way: the OSM play at around A = 443 Hz, and the King’s College organ is at A = 440 Hz. The orchestra was pitch shifted down to A = 440 for playback to the organist at King’s, and then the organ overdub itself was pitch shifted up to match the original orchestral recording and the two resynced together.
Pitch shifting can be done as purely a pitch shift or as a vari-speed (where the duration and tempo will be altered along with the pitch). Care should be taken to understand exactly which you are doing, as well as making sure that your audio files are time-stamped and can easily be synced up again.
It is also worth taking a moment to think about audio quality during post-production; it is not a good idea to process something twice in order to get back where you started because there will be some small loss of quality or increase in noise. If the original orchestral file (let’s call it A) is pitch shifted in one direction to make a new file (B), and then file B is pitch shifted back up again to make a third file at the original pitch (C), the audio quality of C when compared with A will have suffered a small amount of degradation. The original orchestral recording at pitch (A) should be used in the final master, matched up with the pitch shifted organ.
14.13 Sampled organs
This leads us to one obvious solution to pitch problems, which is to use a sampled organ that can be played back at any pitch. Where a part is a subsidiary one and not a solo, using a sampled organ would be a very good alternative to recording one live. The best known sampled organ system is Hauptwerk (www.hauptwerk.com), which makes available complete sets of organ samples of every note from a variety of organs all over the world, and enables them to be played using MIDI controllers. When you load in a set of samples from a particular church or cathedral, the available stops can appear on the computer screen and you can control them as you would on the real instrument. Now that technology has moved on, these samples and other systems far surpass the quality of the early Allen-type organs from 30 to 40 years ago.