Chapter 15
Choirs
Choirs and singing groups come in many sizes, from the small vocal quartet through the chamber choir and church choir to the large opera chorus or choral society of 80–150 singers. They could be performing in a concert hall or a church, and they could be positioned on the floor, on risers, on raked seating, or in the traditional choir stalls in a church. Each situation will need a different approach, but for a choir rather than a small vocal group, the aim of the recording is to present the overall blend of singers and avoid highlighting individuals. Achieving a blended sound that is well balanced between the parts is the responsibility of the choir and conductor, but the recording engineer also needs to bear this aim in mind when choosing and placing microphones.
15.1 General notes on microphone choice and placement
One overall principle to note when recording choirs is that it is not essential to use omnidirectional microphones for their extended LF frequency response, as no one is singing low enough for this to be necessary (unless you happen to be recording a Russian male voice choir where contrabass singing is a feature). You can of course choose to use omnis for other reasons (organ or piano accompaniment), but some good cardioids will cover the frequency range of the singers perfectly well. The lack of extreme low bass also means that the application of an appropriate HPF to choir microphones to alleviate rumble should leave the musical content unaffected.
15.2 Choir spacing
When planning choir recordings, estimating the space required by a choir of a given size can be a challenge, and you may find the following guidelines useful:
- Each singer and their chair will be approximately 75 cm (2′6″) wide.
- Each singer and their chair will need a depth of at least 90 cm (3′), although 120 cm (4′) is more comfortable – giving them enough room both to sit and to stand whilst holding their music in front of them.
- The height rise for each level of most staging is at least 20 cm (8″).
15.3 Small choir
A small choir means a choir of around 20 singers, and because of its small size, it will work best to rely on overall microphone techniques rather than the additional use of section microphones as would be used for the choral society (see section 15.4). Trying to use SATB section microphones on a small choir is likely to make individuals prominent, as the microphones may have to be too close to obtain an even and well-blended coverage.
15.3.1 Small choir: unaccompanied
A straightforward overall approach is to start with an ORTF pair (see section 3.3) at about 3 m (10′) high. Start with it placed in the room further back than you think you will need, and listen to it. Move it forwards until the balance of reverb to direct sound is satisfactory and you are getting enough diction detail from the singers without any of them starting to be too singled out. If obtaining sufficient diction means you are not picking up enough reverb, you can add in a spaced pair of omnis at a similar height and about 70–100 cm (2′4″ to 3′4″) apart to collect more of the room sound.
Next, consider the image width. The choir should fill the stereo recording angle of the ORTF pair and so fill the space between the loudspeakers in the image. (If it is a very small chamber group of individual singers, it will work better if individuals are not located exclusively in either loudspeaker.) If the image is not filling the space when you have the distance from the choir adjusted, you can change the angling of the microphones a little to alter its width. Decreasing the angle will decrease the image width and vice versa. (See section 3.3 for general discussion of spaced and angled cardioids.) If you end up with two pairs, the ORTF and the spaced omnis, remember that as a general rule you will need to choose one of them to form the main component of the sound; do not mix them in equal parts, as this would maximise any comb filtering effects. In this scenario, the ORTF pair will be your main pickup, and the omnis can be used to add in a little extra room sound and spaciousness if needed. The image width of the choir on the spaced omnis can be adjusted to match that of the ORTF pair by altering the spacing between the omni microphones.
15.3.2 Small choir with piano accompaniment: concert
The ideal situation would be to have a grand piano placed centrally so that it is straightforward to produce a recording with the piano central to the image. (In practice, the piano is much more likely to be placed over to the left-hand side for a concert; see following discussion and Figure 15.2.)
Figure 15.1 shows a concert layout designed with the recording engineer in mind. It includes an ORTF pair of good condenser cardioids (fully panned) as the main coverage on the choir at 3 m (10′) high to produce a good overall image and to discriminate against the piano. Also included are spaced omnis to add some room sound and a pair of forward-facing cardioids on the piano itself (using techniques from Chapter 5). In a concert, the piano is likely to be on a short stick if it has been placed centre front (to make sure the choir can be seen) and the piano pair will have to be arranged to ‘look’ into the small opening that is left when a piano is open on a short stick.
When this ensemble performs live, it is usual practice to place the piano (whether it is an upright or a grand piano) off to one side in order that the choir can take centre stage and be more visible, as shown in Figure 15.2. From the recording point of view, a more central piano image would be preferred, and it will be possible to use the panning of the piano microphones to pull the piano image partially towards the centre. Bear in mind, however, that the piano image on the main choir image will be on the far left, and to try and manipulate this too far towards the middle could result in a confusing or unstable image.

Figure 15.1 Small choir concert layout – ideal for recording with piano in the centre
One method of piano recording that usually allows for greater range in artificially moving the piano image towards the centre is to use the LCR three-microphone technique (see Chapter 5). Because these microphones are closer to the piano than the usual piano pair, you will need only a small amount of them for focus, and because they contain less choir, they can be panned more centrally without image confusion.

Figure 15.2 Small choir concert layout with piano off to one side and alternative microphone techniques on the piano
Figure 15.2 shows a grand piano to one side of the stage with both a normal piano pair and the LCR microphones in place. Only one set of these microphones needs to be used.
15.3.3 Small choir with upright piano accompaniment
An upright piano might be used because it is what is available, but good results can still be obtained. However, because an upright piano is often used in pop sessions, or live concerts of more pop-orientated repertoire, there are a lot of suggestions for microphone techniques that are not suitable in this classical choral context. This includes using two widely separated spot microphones placed close to the opening at each end of the open lid. These will behave as two individual mono sources when rigged this close to the piano and will not create a believable stereo image with a sense of real space around it.
An approach that works well is to open up the lid at the top and place the microphones pointing down into the instrument from a height of about 60 cm (2′) above the top of the instrument. This is more or less the equivalent to placing microphones at the tail end of the grand piano that look along the length of the soundboard and strings, and (as we would for a grand piano) using an ORTF-type or narrowly spaced pair will give good stability of image with the sense of spaciousness that comes from non-coincident microphones. On an upright piano, a pair of cardioids spaced at around 15–20 cm (6″ to 8″), angled at about 80°–90° apart and widely panned, will give an appropriate piano image width. In a choral accompaniment context, the piano image could be a little narrower than would be usual for a solo piano recording; it needs to be in keeping with the scale of the choir. Co-incident cardioids at 90° can also work quite well in this scenario; they will give a naturally narrow and centre-heavy image when fully panned, which would form an acceptable piano image when blended in with the overall choir pickup. (See Chapter 3 for discussion of use of spaced and angled cardioids to produce an appropriate image width without panning inwards too much.)
15.3.4 Small choir with piano accompaniment: recording session
For a recording session with a small choir and grand piano, the piano can be placed centrally, on full stick, and turned around to face the choir. This means they can hear the piano, communication is better, and the piano microphones and choir microphones can be used to discriminate against each other. (See Figure 15.3.)
15.3.5 Small choir with organ accompaniment
This scenario is a common one for church choirs, youth choirs, and music societies using a church as a performance space, and capturing a recording of an event might be used for a fund-raising CD.
The choir is very often placed on the chancel or altar steps, rather than standing in the choir stalls. The most common questions concern how to capture the choir sound whilst also dealing with the organ, which will almost inevitably be placed off to one side of the choir position or in several places around the church. It is not possible to deal with every conceivable scenario given the variety of church layouts and organs that might be encountered, but we can suggest some principles to be adapted.
As we saw in Chapters 14 and 7, it is possible to overlay and overlap the images of different instruments generated by different pairs of microphones, if the pairs are a sufficient distance apart so that their signals lack any significant correlation with one another. Where distances are large, in the order of 10 m (35′) or more, the images become effectively completely separate, but there is still sufficient decorrelation at smaller distances for stereo pairs to be overlaid. The choir image should always be prioritised and should be panned fully about the centre of the image. If there are any problems with image conflict (e.g. a high level of choir spill onto one side of an organ pair), then the organ panning should be adapted so as not to disturb the choir image. So if there is significant choir spill onto only the right microphone of an organ pair, then that organ pair will have to be panned part right (or centre) and fully left, placing that section of pipework spread around left of centre rather than centrally.
The organ microphones should be omnis in order to pick up the very low frequencies, and using an HPF should be avoided on any organ microphones that will be picking up the lowest pipes. The choir microphones can be cardioids, and they can usefully have a high-pass filter applied if it helps with LF church noise. Any overall ambient pairs can also be filtered if necessary, as the organ LF will still be present on the organ microphones.
See Figure 15.4 for a general layout, with the choir using the chancel or altar steps instead of risers and an organ in the corner as an example.

Figure 15.3 Small choir with the piano facing the choir for recording session
15.3.6 Children’s choirs
This section will concentrate on the general school choir; professional choristers will be dealt with in section 15.6.
Of course, approaching recording a children’s choir presents the same scenario as recording a normal choir of any size. However, an additional challenge, and something to bear in mind if you are called upon to record a school choir, is that there might be a group of singers who cannot really sing well, or especially cannot sing in tune. It would be a good idea to talk to the teacher beforehand and find out if it is a choir that represents the whole school, or whether it is a selective choir. For the sake of the recording, and everybody’s sense of happiness and achievement and pride in the result, it is worth discussing confidentially with the teacher the possibility of placing any ‘non-singers’ together at one end, so that section microphones (as used for the choral society; see section 15.4.2) can be used to discriminate against them. You can then rig an overall pickup and some section microphones along the front, only fade up the section microphones covering sections of good singers, and pan these section microphones across the full image width.

Another alternative is to place the ‘non-singers’ at the back, or even in the front row with directional section microphones looking over their heads to the singers behind. Whichever method you use, the whole choir will be picked up by the main pair, but the section microphones should be predominantly the good singers. Your aim is to give the impression that all are participating equally during the recording session, while hopefully producing a recording that is more listenable.
One useful attribute of all children’s choirs is that there is no LF to speak of, and therefore a high-pass filter can be used a little higher up in the frequency range than usual if needed.
15.4 The choral society
The choral society is usually a large choir of up to about 200 amateur singers, and singing standards can be very high. Three rows of singers is a common layout, but a choir approaching 200 singers will need to be arranged in five rows to avoid being excessively wide. It is highly desirable for the rear rows to be arranged on risers for recording and performing; this makes the rear singers more audible in performance and makes it easier to keep the perspective and level consistent between front and rear singers during a recording. It is most common to find the singers arranged in blocks containing singers of one type (soprano, alto, tenor, and bass). From a performance perspective, this allows weaker singers to be supported by standing with others who are singing the same notes, and when recording, it can make it easier to rebalance the parts by use of section microphones if that turns out to be necessary.
A common problem with amateur and semi-professional choirs is an imbalance between the sections due to different numbers of singers, and different levels of strength in singing technique. There will very often be more women than men, which usually results in sopranos being too loud and the bass section underpowered. The blocks of singers might be arranged from left to right as SATB, but choirs often have their own preferences depending on section strength, repertoire and what works best for them. If the soprano and alto sections are stronger than the tenors and basses, a common performance layout is STBA, with the women on either side, and the men projecting directly down the centre of the room. It can also help to put the women at the back and the men in front in this situation. Figure 15.5a and 15.5b shows two common layouts, both using risers. When it is not possible to stand the choir on risers, it is usual to put the women in front (because of their shorter average height) and offset the singers so that the back rows are singing through the gaps in the front rows and can be ‘seen’ by the microphones (see Figure 15.5c). Because of the potential for the choral society choir to be unbalanced in the room, it is usually necessary to put a microphone on each section, which gives the engineer more control over the levels and internal balance.
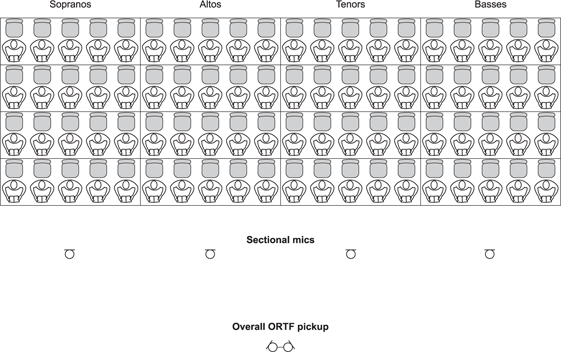
Figure 15.5a Large choral society arranged in blocks with risers SATB left to right

Figure 15.5b Large choral society arranged in blocks with SA at back on risers and TB in front

A second potential problem with an amateur choir is the individuals who are particularly prominent due to lack of skill at blending into the overall sound of the choir. If you discover this problem, have a listen in the room to work out who they are, and see if you can avoid the culprit(s) to any extent by judicious positioning of section ancillary microphones. It should also be possible to have a discreet word with the conductor about a problem individual to see if any rearranging of seating plan is possible. The conductor is likely to be all too aware of the problem, but it might be politically difficult to address if the singers have their own particular positions that they have been sitting in for years.
15.4.1 Main microphone placement
The core approach will be some sort of overall pickup to provide the basis for the main image, with the addition of section microphones to support detail and diction and to give some control over the musical balance.
The main pickup should be placed at a height of around 3 m (10′) (possibly higher if the risers are more like steeply raked seating), and the distance from the choir will depend on the acoustics and the microphone technique chosen. The standard ORTF pair (see Chapter 3) is useful in that the overall pickup angle is quite wide (at around 100°), enabling them to be placed close enough to the choir to hear the words clearly without the choir falling significantly outside this angle. As noted earlier, cardioids can be used on choirs without loss of LF, but they should be of good quality with a smooth off-axis response for the ORTF techniques to work well, as almost all the singers will be singing into the side of the microphones. The image from an ORTF pair is well defined and sounds closer than spaced omnis at a similar distance, and the image width can be tailored to a certain extent by modifying the angle between the microphones. If your choir is physically very wide, and you cannot move the ORTF pair further away (perhaps due to venue restrictions, or acoustics), you might find that the choir presents too large a subtended angle at the microphones, and the outer regions of the choir will appear to come solely from each loudspeaker. This can be helped by narrowing the angle between the microphones a little until the image has a more even spread. Another idea is to use an ORTF pair with a pair of spaced omnis mounted on either side, approximately 70–80 cm (2′4″ to 2′8″) apart. A blend of the two can be used to produce the desired overall sense of distance and space.
15.4.2 Section microphones
Positioning a section microphone to obtain an even coverage across three rows of singers is similar to trying to ‘light up’ an orchestral woodwind section (see Chapter 9). You should avoid section microphones being too close, as individual singers will be picked out despite the choir being well blended in the room.
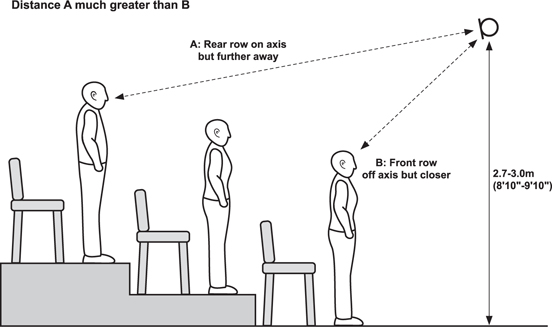
There are a couple of approaches to getting the even coverage that is required. One is to point a directional microphone over the heads of the front row, aiming at the back row. If the back rows are on risers, the microphones will need to be about 2.7–3.0 m (8′10″ to 9′10″) high for this. The front singers will have their level reduced by virtue of the microphone’s directionality, and this will help to compensate for them being closer to the microphone (see Figure 15.6a).
Alternatively, you could take the microphones higher still and look down at the section, foreshortening the distance to the back row and making it more equal to the distance to the front row (see Figure 15.6b). With increasing height will come a loss of HF, as this content is not projected upwards into the microphones; this is even more the case if the singers are looking slightly down at their scores. Plosives such as ‘p’ and ‘b’ emerge forwards and downwards from the mouth, and the HF that gives shape to ‘t’, ‘d’, and ‘s’ sounds is also projected forwards. Therefore, some clarity of diction will be lost from any singers where the microphones are raised above the on-axis line of projection from their mouths. This may or may not be a desired effect depending on your context, but it is worth remembering as a rule of thumb that higher microphones on a choir will pick up less HF. The arrangement in Figure 15.6a should retain more diction from the choir than that shown in Figure 15.6b.
It should also be noted that if the choir is very wide (assuming SATB layout left to right), you might need an additional centre section microphone to avoid a ‘hole in the middle’ appearing because the distances between the section microphones become too large for the signals to have enough correlation. There would then be five section ancillary microphones ‘lighting up’ the choir, and they would be panned approximately left, half left, centre, half right, right. Where only four section microphones are used, it is a good idea to avoid panning the outer microphones fully to prevent a whole choir section being placed exclusively into the loudspeaker. Therefore, panning in this case might be approximately three-quarters left, half left, half right, three quarters right.

The larger the choir, the higher and further back the section microphones will need to be to avoid discriminating in favour of a particular area of the choir, but this will eventually result in some loss of diction from all rows, not just the front. If the overall sound is working well in terms of choir image and control over section balance, a useful method of overcoming the loss of word clarity is to add in microphones whose primary role is to pick up diction sounds. These would be pointing at the front row at head height, and the resulting signal containing all the hard consonants and sibilant sounds can be blended into the overall mix at a low level. These additional microphones can also be useful if you need to pick up a semi-chorus within the choir.
Where the choir is laid out such that the back rows and front rows are not part of the same section (as in Figure 15.5b), the section microphones need to be aimed at covering the correct rows. It is sometimes possible to boom in microphones from the back or side to cover the rear block sections (see Figure 15.7).
Microphone choice for the section ancillary microphones would be cardioids or wide cardioids for their ability to discriminate against the front rows of singers, as noted earlier. Wide cardioids would be the preferred choice because the amount of overlap and spill between the signals at each microphone will create a nicely blended sound. There will be some altos and basses on the tenor microphone, for example, but this spill should not be feared, as it helps to avoid the creation of very clinically separated parts when the section microphones are faded up. Cardioids can also be used, but they have reduced levels of spill; another option to try is wide cardioids on the outer section microphones and cardioids on the inner pair.
Switchable directivity pattern microphones have particular benefits, as the effect of the section microphones can be fine-tuned simply by changing the directivity at the time of recording and hence changing the amounts of spill. In a concert situation where microphone placement is restricted, they also enable the user to alter the amount of reverberant sound being picked up from the room without moving the microphones.
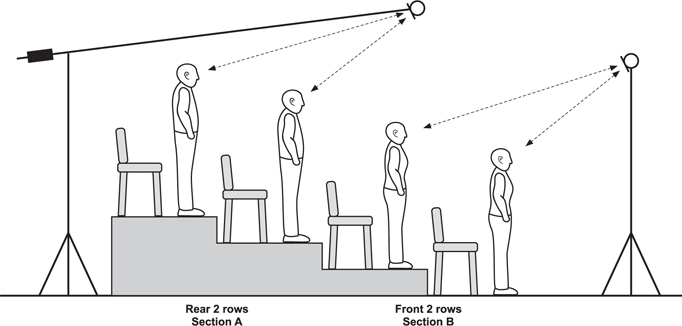
Figure 15.7 Sideways view of section microphones where back rows are from one section (e.g. basses) and the front rows from another (e.g. altos)
15.4.3 Mixing overall pickup with section microphones
The main part of the sound and image is created by the ORTF or spaced omni pair, fully panned, and the section microphones blended in to achieve enough focus but without making their presence obvious. The amount used will depend on the acoustic, and more will be needed if this is very reverberant. If you can hear the section spots as little mono pools of ‘closeness’ in the image, you have faded them up too far. If you find you are not getting enough detail when you pull them down in level so that they no longer stick out, you then need to move the microphones a little closer. Section microphones should be evenly panned across the image, and avoid hard panning the outer microphones if it places too much of the choir directly into the loudspeakers. (See note on four- and five-microphone set-ups in section 15.3.2.)
The section microphones will be used on a professional choir for very occasional and subtle rebalancing of parts, but if you are dealing with a less experienced or non-professional choir, the sectional microphones will be of some use to you in correcting inter-part balance where the choir are not able to do it for themselves.
15.5 Choral society with soloists and organ in concert
Oratorios such as Handel’s Messiah are the core concert repertoire that requires choir, soloists, and organ. A concert will often combine an amateur choral society with professional SATB soloists and organist. Figure 15.8 shows the layout of the choir and soloists, and the organ could be anywhere, so it is not shown. In a concert situation, consideration needs to be given to being unobtrusive and also to being aware that your favourite microphone technique might not be the best one if you are unable to position your microphones where you would like to. If you can, you should include some omnis somewhere in your set-up (as main pickup or organ pickup) to capture the LF of the organ.
15.5.1 Choir microphones
The choir coverage is achieved in the same way as was detailed in sections 15.4.1 and 15.4.2. The main pair could be spaced omnis at 80–100 cm (2′8″ to 3′4″) apart, cardioids in an ORTF-type arrangement, or a blend of the two if you need some flexibility in mixing after the event. The choice of ORTF or omnis will depend on the acoustic, where you are able to place the microphones, and personal preference. If you are in a reverberant space, and you have to place your microphones a little further back than you would like, the ORTF pair will work better as it will discriminate against some of the reverb.
Shown in Figure 15.9 is another option to give you some control over the amount of reverb when the microphones cannot be moved. This is an ORTF-type pair with an additional rear-facing ORTF-type pair which can be mounted on two stereo bars joined together to form an X on a vertical stand. The rear-facing ORTF pair is to collect reverb rather than direct choir sound; this is a very tidy and unobtrusive rig, so it is good for concert use. Figure 15.9 shows how to mount two small stereo bars together.

15.5.2 Soloists’ microphones
Soloists are usually placed in front of the choir and are sometimes seated within the front row. Each individual soloist is not continuously involved during a large choral work, so when they are not singing a solo, their microphone should not be left faded up. If you leave the soloist microphones open all the time, you will have a close-up on individuals in the front row of the chorus that will ruin your attempts at a good blended image. If you plan to mix to stereo at the time of recording, you will either need to know the work well or have a musical score to follow, or someone to follow it on your behalf.

Figure 15.9 Mounting two small stereo bars in a X with an ORTF pair on each
Photo: Mark Rogers
A single directional microphone can be used for each soloist. Although this seems to contradict the advice given previously about placing two microphones on a soloist to avoid presenting a strongly mono point source in the image (as discussed in Chapters 4, 6, and 7), you will find that each soloist’s image will be given enough feeling of width by the singer’s voice being picked up on the choir microphones. Provided the soloist’s microphone is not too close or faded up too high, there should not be a problem of their image collapsing to a patch of dry, mono sound. Care should be taken in mixing to listen for this.
In a concert setting, the soloist microphones will cause the most problems with visual obstruction in terms of stands, unless you are able to suspend them from above. Microphone placement would ideally be as for a solo voice (see Chapter 6).
For oratorio performances, the soloists will usually be holding their music, which can get in the way when using alternative, lower microphone positions. Placing the microphone over to one side but pointing towards the singer can help with the obstacle presented by the score. See also section 16.2.1 for concert oratorio with orchestra.
15.5.3 Organ microphones
The organ should be approached as for an organ recording as much as possible (see Chapter 14) and using an omnidirectional pair in order to pick up LF where needed. If you are lucky enough to be in a dedicated concert hall which has an organ, the main pipes are likely to be placed around the central axis of the building, which means that your choir pair will also pick up a good central image of the organ, even if it sounds a little distant. You can then modify this with the addition of organ microphones.
If you are in a church and the organ is to one side or ranks of pipes are dotted about the building, you should pan your organ pairs as close as possible to how you would have done for solo organ (see Chapter 14). This means overlapping stereo images from the various organ pipe ranks, although not necessarily overlaying them all evenly spread about the centre.
However, if there is significant choir spill that affects only one side of a pair of organ microphones, you will have to pan the organ partly to one side to avoid disturbing the choir image. See section 15.3.5 for discussion of conflict between choir image and organ placement.
15.6 Antiphonal church choir
In the Anglican choral tradition, the church or cathedral choir is split into two sections, arranged facing each other across the aisle of the church at the eastern end of the building. The two sides are ‘Dec’ (‘decani’, the side on which the dean sits, the south side) and ‘Can’ (‘cantoris’ the side on which the cantor sits, the north side). Each side contains voices of all four parts (trebles, altos, tenors, basses), and so this layout can be used for straightforward four-part writing, antiphonal arrangements, or eight-part writing.
For a service, the choir will be situated in the choir stalls, but if recording a church/cathedral/chapel choir as a recording session, it is more usual to bring the choir out of the stalls onto the chancel steps, as this makes stereo imaging much easier.
15.6.1 Recording during a service
Because the choir from the congregation’s point of view is seen sideways on and separated to the left and right, the listening perspective of someone seated in the pews is not one that will translate directly into a satisfactory recording. Some thought has to be given about how to capture and then pan the parts to fill the centre of the recorded image.
See Figure 15.10a and 15.10b for a church choir layout set in the choir stalls using microphones on stands or suspended.
This figure shows four ‘floodlighting’ microphones covering the choir on each side, which will form the main basis of the sound, and a vertically mounted ambient pair of microphones pointing upwards above the choir at a height of about 3–3.3 m (9′10″ to 10′10″). These can be used if the organ ambient microphones are not picking up enough ambient choir, which is often the case if the organ is playing very loudly. The four floodlighting microphones are at a height of 2.8–3 m (9′2″ to 9′10″) and are aiming more towards the men in the back row, as the boys and/or girls in the front row usually come across very clearly. If this is not the case, then the microphones can be angled differently to pick up the front and back rows more equally. These four microphones can be panned to spread the two choirs to fill the width of the recorded image, rather than presenting them all split between left and right with an aisle up the middle. The panning would be along these lines:
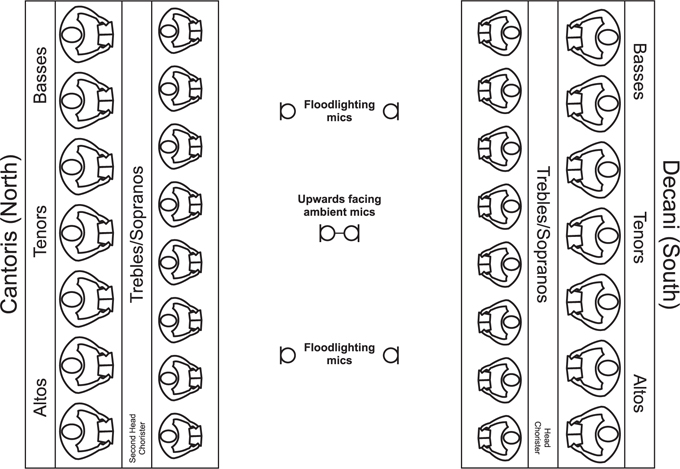
Figure 15.10a Microphone layout for church choir in choir stalls – plan view
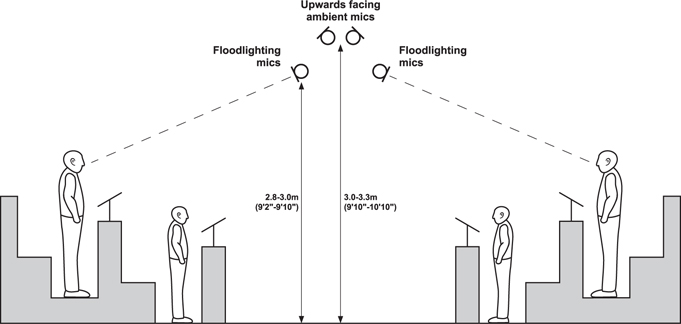
Figure 15.10b Microphone layout for church choir in choir stalls – side view
- Cantoris Alto end − left
- Cantoris Bass end − half left
- Decani Bass end − half right
- Decani Alto end − right
Therefore, if the choirs perform something that is written antiphonally, the listener to the recording will still get this effect, with one choir spread between the far left and centre and the other spread from centre to far right. The person seated in the congregation will not experience the antiphonal effects as coming from very hard left and right, as the reverb within the building muddies any extreme localisation.
The disadvantage of the arrangement in shown in Figure 15.10a and 15.10b is that if you are unable to suspend microphones and have to use stands, these will be very obstructive to any movements up and down the aisle during the service unless the aisle is unusually wide. An alternative to this layout is shown in Figure 15.11. This shows an ORTF pair at each end of the choir stalls looking along the length of the aisle where the width is not so restricted, although slinging these would still be a better option if possible. They will capture two images of the choirs – one with the altos in the foreground and one with the basses in the foreground – which can be overlaid. The pairs should be panned L-R and R-L, as the image of one with respect to the other will be left/right reversed because they are looking at the choirs from opposite ends. If you are only able to rig a single pair due to restrictions, it will usually be preferable to choose the west end (furthest from the altar) because that is where the head chorister and second head chorister are seated, in the decani and cantoris, respectively. You will inevitably lose something of the basses’ end of the choir to a more distant perspective and lower level with this arrangement. If there is room on the back row on one side or the other, it might be possible to rig an ambient pair of ceiling-facing cardioids on a vertical stand at least 3 m (10′) high to help with adding in some more reverberant sound.
Where the choir is unaccompanied, then a high-pass filter of appropriate turnover frequency can be used to help with any very low frequency church rumble. If organ is also used, the organ microphones can be left unfiltered while still filtering the choir microphones.
When organ is in use, the main question that arises is how to combine the choir in the choir stalls and various sets of organ pipes into a coherent and believable image. As discussed in section 15.3.5 and Chapter 14, we can use the principle that if pairs of microphones are sufficiently separated from each other, the lack of correlation between them means that the images from the separate pairs can be overlaid onto one another, either directly on top or with partial overlapping. Where there is any image conflict, the choir should take precedence and be panned left to right across the centre of the image, and the organ panning should be adjusted to work with this.
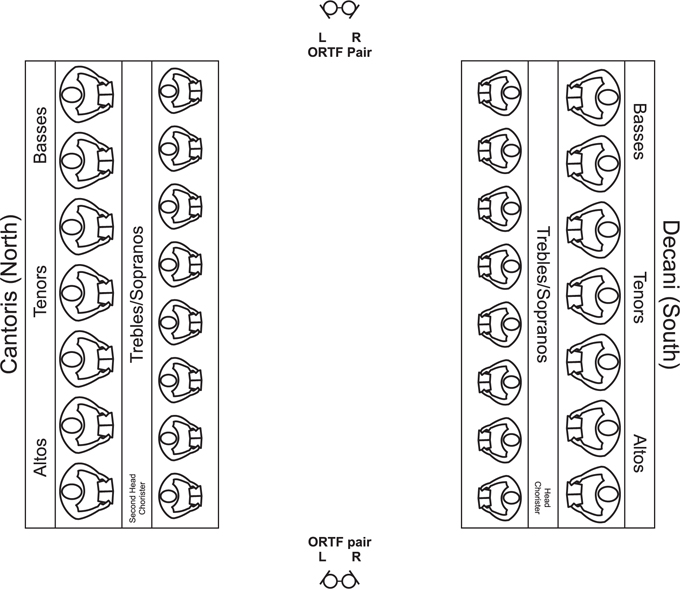
Figure 15.11 Church choir in choir stalls – modified microphone set-up for use during service
In the layout shown in Figure 15.12, the choir are in the stalls and the organ is placed in the corner behind the cantoris. This will certainly result in some choir spill onto organ microphone 3 in particular, and this part of the organ will have to be panned partly to the right (panning microphone 4 to right and microphone 3 to centre or partially left) in order not to disturb the choir image.
15.6.2 Antiphonal church choir recording session
Unless it is a service that is being recorded, choosing to record in the choir stalls simply makes the process more difficult. For a recording session, there is no need to have the choir seated in the choir stalls, and they can be placed wherever the best sound might be achieved in the building. This is very often in front of the choir screen and chancel steps, as for the many Decca sessions with King’s College Choir, Cambridge. For these, the choir were arranged in a wide, semicircular layout in front of the choir screen. If the separation between cantoris and decani is to be preserved, then the layout will commonly be to have the trebles in the front row and the altos, tenors, and basses in the back row, with the cantoris to the left and the decani to the right (see Figure 15.13). This will work best if the choir has good internal balance; blocking the sections by part (as for the choral society) will usually prove helpful if there is an imbalance between parts (e.g. the trebles are too strong), as it will give the engineer more control.
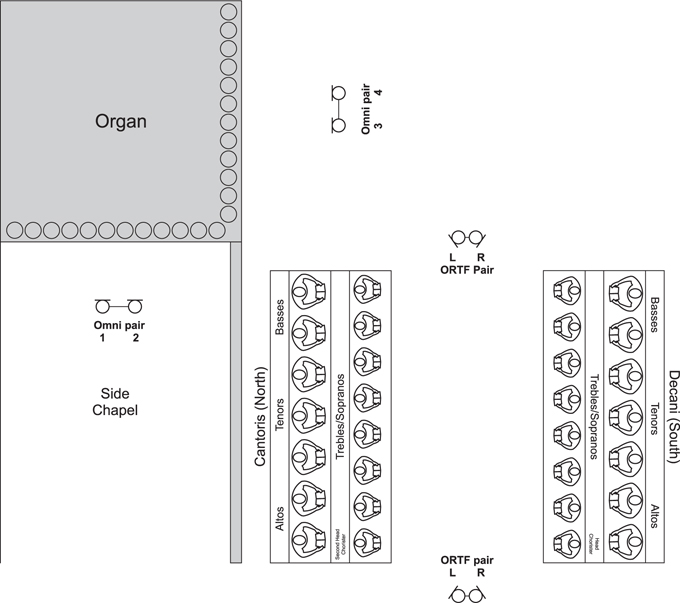

Figure 15.13 Chapel choir arranged in semicircle away from choir stalls; organ microphones can be added separately as in Figure 15.12
An overall ORTF pair or spaced omnis at 80–100 cm (2′8″ to 3′4″) apart is used, along with an upwards- or reverse-pointing additional ORTF pair for adding more indirect, reverberant sound, which is a very important and characteristic part of a church recording. Mounting the forward-facing and rear/upwards-facing pairs close together means there is a high degree of timing coherence between them, and the amount of reverberant sound can be adjusted without any significant occurrence of phase cancellations. The rear-facing pair is panned the same way as the front-facing pair (i.e. the left-hand microphone of each pair from the audience point of view is panned left).
Figure 15.13 also includes sectional spots in the same way as were indicated for the choral society choir, with wide cardioids being the preferred choice, but cardioids are an acceptable alternative (see sections 15.4.2 and 15.4.3 for discussion of section microphones and their panning and blending.)