Chapter 16
Solo voice, orchestra, and choir
The planning and logistics required to record a session or a capture a live performance of a choral symphony, oratorio, or opera are complex, and the aim should be to produce a convincing recorded image that conveys all the musical detail and audible words whilst retaining a believable sense of perspective. It is a demanding task, but we can bring together principles from previous chapters to construct a successful approach.
This chapter will start with choir and orchestra and move on to the addition of stationary soloists for oratorio and operatic repertoire. Lastly, given that recording studio opera is now outside the budget of most record companies, we will look at the recording of live performance as is done at the Royal Opera House, Covent Garden. For those interested in other approaches, Appendix 1 gives details on how opera was recorded at Decca from the 1950s to the 1990s – that is as a semi-staged performance with soloists moving according to stage directions but under session conditions.
16.1 Orchestra and choir
To record a large choir and orchestra at the same time, we can draw on the techniques outlined so far in Chapters 8 and 15, with some adjustments for different layouts of the choir and the orchestra.
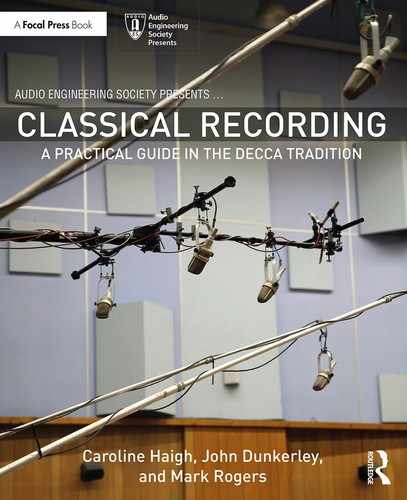
16.1.1 Orchestra and choir: concert layout
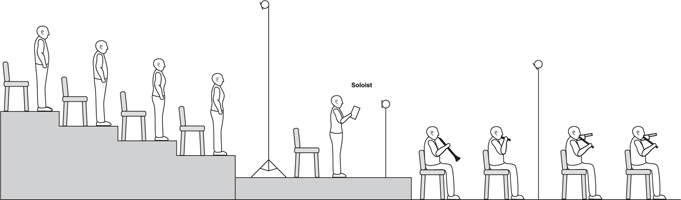
Figure 16.1 shows an idealised starting point for an overall set-up for a concert, or a session recording using this conventional layout.
In a concert setting, the usual arrangement is to place the choir behind the orchestra, either on a stage or on some sort of raised and tiered seating so that the singers can both see the conductor and project over the heads of the orchestra to the audience. From the engineer’s point of view, having at least 3 m (9′10″) separation between the back of the orchestra and the front of the choir would be ideal, but in practice this is unlikely to be achievable in a concert venue of normal size. It might be achievable in a session scenario in a large studio or other venue. From the conductor’s point of view, allowing the choir to be positioned too far beyond the orchestra makes for difficulties in communication and sight lines. This is likely to be especially important in amateur choirs, where there can be a tendency for singers to keep their eyes on their score and not on the conductor.
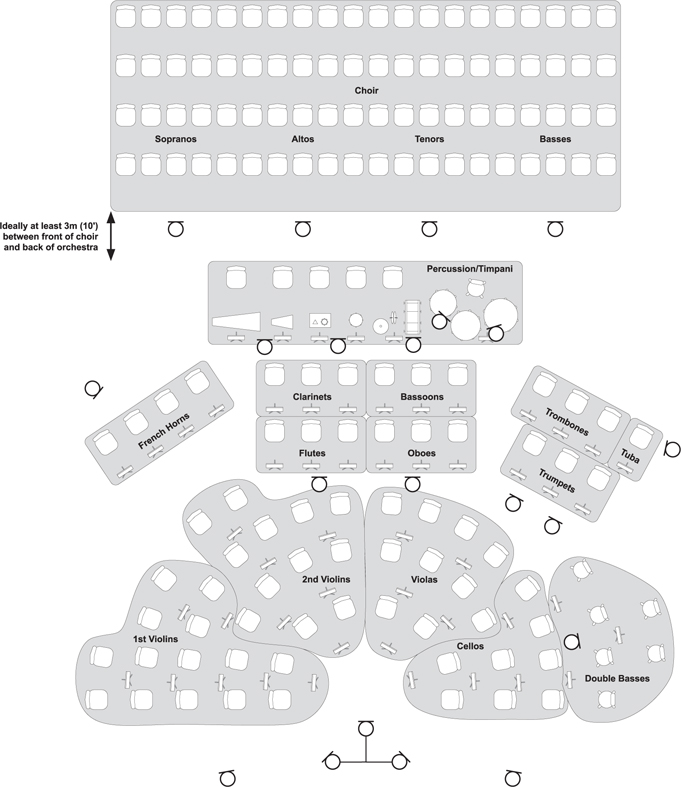
Figure 16.1 Orchestra with 80-member choir in concert layout with a sufficient gap between them
There are two main reasons for aiming for some physical separation between choir and orchestra; one is so that choir section microphones can be positioned far enough away from the choir to obtain a good balance between the blended choral sound and clarity of diction. This is harder to achieve with stands placed close to the front of the choir.
The second is so that percussion spill can be reduced; where there is a large percussion section that stretches across the back of a large orchestra, the choir microphones will pick up a great deal of this, especially if they are too close. The louder the orchestra and percussion section, the more of the choir microphones’ signals will be needed to achieve a good balance in the recording, but there will be more percussion on those choir microphones. This is a big problem and not always easy to solve, especially in repertoire that is choral and percussion heavy, such as Prokofiev’s 1939 cantata, Alexander Nevsky.
In a concert situation, solutions can only be partial, and the first choice of the engineer would always to be to negotiate moving the percussion section to either side of the rear of the orchestra. In a recording session, the second-best option after moving the section would be to use screens (if available) to reduce the percussion spill. The only other solution, if you must have choir and percussion right next to each other, is to place microphones closer in to the choir, but this will need more microphones to obtain even coverage and still retain a blended choir sound. Using fig of 8 microphones to discriminate against the percussion is also a possibility illustrated and discussed in Figure 16.2c.
Figure 16.2a shows reverse booming microphones so that the backs of the booms are above the orchestra. This would be useful on a session and where there is no loud percussion section directly in front of the choir. The outer microphones could be boomed in from the sides of the choir in a similar way. Slinging all these microphones would be a less visually intrusive way of getting them into a good position.
Figure 16.2b shows using more microphones to cover the choir in the event that the microphones have to be placed closer than is ideal. This might be because of physical restrictions on stand placement and height or deliberately closer placing to reduce the amount of percussion spill. Going back to our lighting analogy, in order to cover the choir evenly, the closer the microphones, the more of them are needed to avoid patches of the choir being more ‘brightly lit’ (i.e. sounding louder) than others. If the option is available, using wide cardioids when closer in will help reduce the localising effect. Where close microphones have to be used, adding a high ambience pair pointing upwards above the rear of the choir will pick up very useful blended choir sound to help bind the other microphones together.
Figure 16.2c shows the use of fig of 8 microphones to help ameliorate the effects of percussion along the back for the orchestra, but because their front lobes are narrower than a cardioid or wide cardioid, more of them would still be needed to obtain even choir coverage (analogous to using a narrower beamed spotlight).
Where there is a good distance between the back of the orchestra and the front of the choir, it might be necessary to add in some delays when mixing. This would mean delaying the choir microphone signals to be more in time with the choir sound as it arrives at the main orchestral tree pickup, which might be 10 m (35′) away (a delay of around 35 ms). (See Chapter 17 for more on using delays.)
16.1.2 Orchestra and choir: alternative layout for recording sessions
For a studio recording of choir and orchestra, the concert layout outlined in section 16.1.1 can be used, but if there is a lot of percussion or the venue lends itself better, an alternative layout can be used with the choir on the rear side of the main orchestral pickup (i.e. behind the conductor). This has implications for communication, in that the conductor has to turn around to address the choir and split their attention between choir and orchestra. Therefore, it is probably not a good set-up for an inexperienced ensemble or conductor who might be thrown by a very different seating arrangement. In a large recording set-up, an assistant conductor can be used for the chorus if the choir has poor sight lines to the main conductor. This will also be the method used for live opera, where the chorus are offstage and cannot see into the pit. See Figure 16.3 for layout with choir behind the conductor, and note that the usual section order (SATB from left to right) is reversed so that they appear the right way round on the tree microphones.
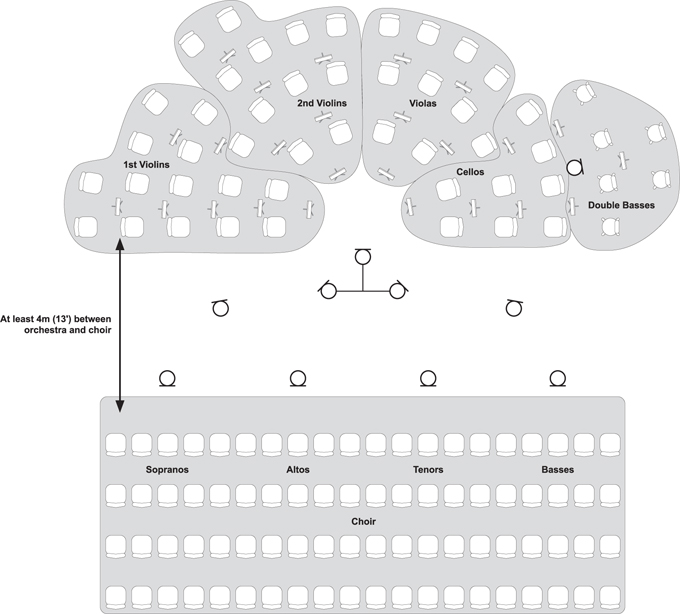
Figure 16.3 Choir on the far side of the tree for recording session
Using the position shown in Figure 16.3, it is important to make sure that the choir is far enough away from the main orchestral pickup; this approach should not be used unless the choir can be set back by at least 4 m (13′). This is to avoid close orchestral spill onto the choir microphones and also to create an appropriate sense of choir perspective by ensuring they sound sufficiently distant on the orchestral tree. The orchestra and choir images can be laid on top of one another in the final recording, although the choir microphones should be panned appropriately left/right reversed; the end of the choir nearest the first violins must be panned towards the left, and the end nearest the double basses panned towards the right.
If there is a suitable balcony in the venue, this can be used for the choir as it will introduce some distance between the choir and the orchestra without having to place them horizontally further back. Recordings made at Walthamstow Assembly Hall or Watford Colosseum have made use of the balcony for the choir, with the orchestra positioned just in front of the balcony so that the conductor can face everyone at the same time.
16.2 Orchestra and choir with stationary soloists
The main concert repertoire categories that include soloists who will be standing in one position are oratorios and some choral symphonic works. Opera can also be recorded with static soloists, but this will usually be done as a recording session, with the inclusion of offstage effects, chorus, or soloists where they occur in the score. Appendix 1 contains details of Decca’s opera recording sessions of the 1950s to 1990s, where the singers were positioned on a stage in order to capture stage movement and perspective rather than positioning them in one place. Sections 16.3 and 16.4 consider how to record live, fully staged opera.
16.2.1 Orchestra and choir with stationary soloists in concert
In a concert, the soloists are most commonly presented in front of the orchestra, usually on the violin side but sometimes split on either side of the conductor. The immediate problem with this position is that the soloists are likely to be picked up strongly on either the left or right microphone of the overall orchestral pickup. Without additional spot microphones, the singers’ images can be quite unfocussed, hard to locate, and biased towards one side. The singers will need additional spot microphones – preferably one each – in order to stabilise and focus their images. It will be sufficient to add a single spot microphone each rather than using a pair of spot microphones (as we looked at in Chapter 6), because the additional microphones in the room will add width and bloom to each individual.
Occasionally, soloists will stand within the choir, and either sing solo from their usual choral position, or step forwards a little for the solo. In this case, the layout is closer to that used for session recording, and the methods in section 16.2.2 can be adapted with more discreet soloist microphones. If you rig a soloist spot for someone who remains in situ within the choir during solos, remember to only fade it up when there is a solo or you will spotlight the singer throughout the work. You will need to bring the microphone up very gradually, in advance of the solo, to 4–5 dB below the target level because any fast fader movements will be audible. To do this successfully, you are likely to need a score and/or a lot of rehearsal time; if you can persuade them to come to the front where you have rigged some soloists’ microphones, so much the better!

Figure 16.4 Low stand spot microphones for soloists in oratorio
For stand-mounted microphones to be reasonably discreet, they will need to be low down, with the microphone below the level of the mouth and pointing upwards about 1 m (3′4″) away from the mouth. These could be normal pencil cardioids of some kind, or ‘Pavarotti’ microphones (as discussed in Chapter 6) if they are available. This position is quite good for capturing some diction and avoids large changes in tone as the singer moves their head. If there are music stands in use, or the performers are holding a score that causes an obstruction between the microphone and the singer’s mouth, its position will have to be a compromise. It will need to be set up looking in from the side of the score/stand to minimise loss of diction and higher frequencies. Care should be taken not to ruin the singer’s tone if you try to add some presence back into the voice with EQ.
When using low stands on the stage, use an anti-vibration mount if there is one available to avoid any seismically transmitted energy, such as footsteps producing LF and subsonic signals from the microphone. These will be unnoticeable in a compromised monitoring situation, and they will only show up later and have to be removed. Given that monitoring on location is almost always lacking in LF, it is sensible to avoid applying an HPF to the soloists’ microphones until you can really hear what you are doing.
Alternatives to mounting spot microphones on stands include slinging microphones or using radio microphones. Slinging is very time-consuming; it means setting up before the performers arrive, and all your plans will come to nothing if they decide to stand somewhere else during rehearsals, or they accidentally stand away from their microphones during the performance. There is nothing you can do to quickly move slung microphones, whereas you can potentially move microphones on stands to where the performers are standing. If you were to sling, the microphones will have to be above the singers and pointing down towards them from a height of about 2.1–2.4 m (7′ to 8′). If they are much lower, they will probably be causing obstruction to audience sight lines.
The difficulties inherent in using radio microphones for classical singers will be discussed in the context of the Royal Opera House in sections 16.4.3 and 16.5.2. Because they produce a close, dry sound, radio microphones will need a generous amount of artificial reverb or actual ambient sound and some delays to blend them into the overall mix. You also need someone who is experienced at fitting radio microphones and with dealing carefully with artists, as this involves running cables through the clothes of performers who might be nervous (and very particular).
Whether the singers’ close sound comes from radio microphones or normal microphones, they will need additional reverb to help them blend in. This could be artificial reverb or an upwards-facing ambient pair of angled cardioids positioned about 3 m (10′) above the singers’ heads. This pair should be positioned with the aim of picking up more indirect sound from the singers than from the string section.
Any microphones aimed at singers standing in front of the orchestra will pick up something of the strings, particularly violins or cellos depending on the singer’s location. When these signals are added to the mix, they will potentially affect the orchestral sound and image. The soloists’ microphones need to be faded up enough to solidify the singers’ image and draw the ear to them, without pulling them artificially close to the listener or affecting the orchestral sound too much. If you can sense the presence of a spot microphone on the singer as a patch of dry or close sound, it is faded up too high. If enough of the signal is used, it can be panned away from the singer’s image as presented on the main pickup (especially if this is a tree and the singers’ images are imprecise). The usual practice would be to pan them towards the centre as far as is possible without this confusing the orchestral image. How much artificial panning is possible will depend on where the singer was standing in the first place, and how much of the spot signal is necessary to focus their image.
16.2.2 Choir and orchestra with stationary soloists for recording session
Given the problems of orchestral and singer imaging that arise from having soloists on either side of the conductor in front of the orchestra, when a recording session is undertaken, alternative soloist positions can be explored.
The most common position is to place the soloists behind the orchestra and in front of the choir, as shown in Figure 16.5. Staging is included in the illustration, but less frequently, singers might also be standing on the floor.
The layout shown in Figure 16.5 enables the singers to see the conductor easily and to feel support from both the orchestra and chorus. Anything that supports the singers in their performance should result in a better recording. From the engineer’s point of view, this position avoids close voice spill onto the orchestral microphones and it allows the singers to be placed centrally if required. It also produces a nice diffuse reverberant voice sound on the orchestral microphones which will enhance the setting of the voices into the room acoustic while having little influence on their lateral image position. The singers’ exact position in the image will be controlled by the panning of the spot microphones, but the singers should also be standing more or less where they are required to be heard in the L-R plane to make imaging more secure.
For the recording of Handel’s Messiah with Christopher Hogwood and the Academy of Ancient Music (July 1979)1 recorded at St. Jude’s, Hampstead, the chorus was raised on wooden staging and the soloists positioned one at a time behind the woodwinds and standing on the floor just in front of the choir microphone stands. This gave them some space to move in, but with closeness to the orchestra. See Figure 16.6 for the original session orchestral set-up sketch.
Although the usual place for the singers will be behind the orchestra, alternative positions for soloists can be used if this will work for the repertoire and suits the conductor and singers better. For the EMI studio recording of Tristan und Isolde2 (2005 in Abbey Road Studio 1), the soloists were positioned within the orchestra as shown in Figure 16.7. This was done to facilitate good connection between the soloists and conductor, and it enabled the singers to hear everything, thus feeling enveloped and supported by the orchestra. Because the chorus in Tristan is only ever offstage, a large chorus at the rear of the orchestra was not needed. With the soloists in this position, their individual microphones had to be a little closer than usual to reduce orchestral spill, but a vertically facing pair was added about 3 m (10′) above the singers’ heads to pick up some more reverberant sound from them whilst avoiding too much woodwind and brass.
The other most common place for soloists on a recording session is behind the conductor by about 5 m (16′). This is usually done because the conductor wants to be able to hear them properly and feel in contact with their singing. There are two obvious potential drawbacks to this layout: one is the loss of eye contact between conductor and soloists, and the other is a reduction in the feeling of orchestral support experienced by the singers.
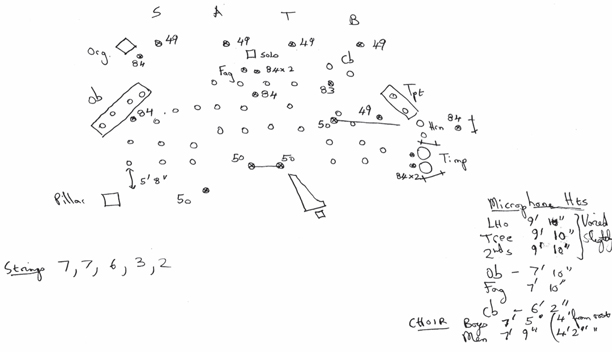
Figure 16.6 Session and soloists layout for Handel’s Messiah, 1979. See Appendix 3 for the electrical set-up.
Source: John Dunkerley.
Source: John Dunkerley.
The first can be addressed by the conductor using a swivel high chair so they are able to turn around to face the orchestra or soloists as required. The second is less easy, and if the singers are at all uncomfortable with the reduction in orchestral support, it would be better to allow them to stand behind the orchestra and for the engineer to deal with any difficulties that arise from spill. Figure 16.8 shows this alternative position for the soloists.
Examples of recording made in this way include Beethoven’s Ninth Symphony with the Academy of Ancient Music (AAM) and Christopher Hogwood (1988),3 which was recorded in Walthamstow Assembly Hall with the chorus in the balcony and the soloists behind the conductor. Also recorded with soloists behind the conductor was La Bohème with the Berlin Philharmonic and Karajan (October 1972) recorded in Jesus Christus Kirche (Berlin).4 In this case, the soloists were positioned on a stage erected over the altar steps with the typical grid layout found in Decca’s opera recordings (see Appendix 1 for discussion of Decca’s semi-staged style of studio opera recording.)
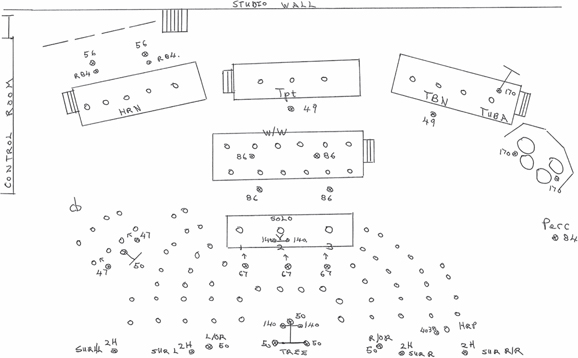
When the soloists are placed behind the conductor, the chorus is most commonly placed behind the orchestra in its natural position, but given an unusual venue or other restricted layout, it would be possible to work with both the chorus and the soloists behind the conductor. Figure 16.9 shows Christopher Hogwood and the AAM recording Haydn’s Creation with the split chorus and soloists laid out behind the conductor.
Although the conductor can now hear the soloists well and verbal communication between them is straightforward, there will be higher-level and closer-sounding soloist spill onto the main microphones than would be the case with the singers placed at the back of the orchestra. This will not be as hard to manage as the spill that arises in a concert situation (see section 16.2.1) as it will not be as close or high in level, and therefore it should not cause imaging problems. The relative closeness of the voice spill will mean that some additional reverb might be needed on the voices to blend them in, although the further back the singers are placed, the more distant the spill will become. However, with greater distance comes poorer communication, so the improvement in spill quality might not be worth it.
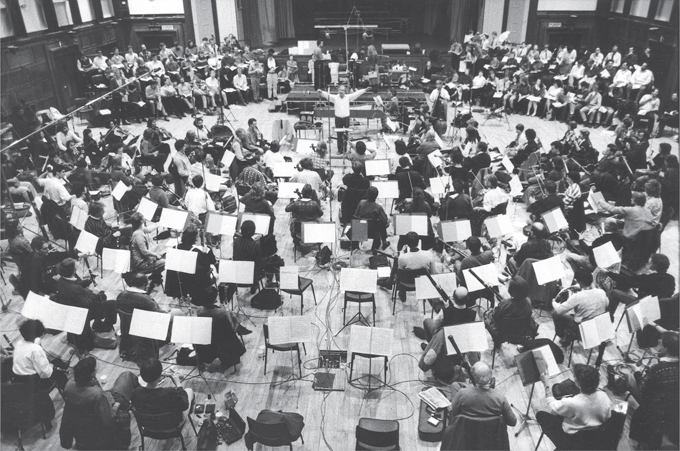
Figure 16.9 Recording Haydn’s Creation with Christopher Hogwood and the AAM at Walthamstow Town Hall.5 Split chorus and soloists behind the conductor with orchestra in the foreground.
Photo: Mary Robert; courtesy Decca Music Group Ltd.
It might be thought that screens could be used to help to reduce spill between soloists and orchestra, but adding screens in a classical recording context can have negative as well as positive effects. (See Appendix 1 for experimental use of screens in older Decca recordings.)
One of the important messages of this book is that nice-sounding spill can be a very useful component of the overall sound provided it is considered as part of the microphone’s signal during the set-up planning. When screens are added, there will inevitably be some sort of boundary effects and colouration in the form of additional very early reflections for those players near the screens. If the players can be moved to a position where the spill becomes a positive attribute, the negative aspects of screen use can be avoided. Of course, if the performers cannot be moved, and the quality of the spill is detrimental to the overall sound, using screens might be a better solution. To reduce boundary effects from screens, directional microphones should be positioned with their null axis towards the screen to reduce pickup of reflections.
16.2.3 Offstage chorus, soloists, and sound effects
Where an offstage chorus is specified, the best approach will be to place them at some distance away from the orchestral microphones to produce a natural offstage effect; a distant balcony would be one option. The sense of distance can be enhanced with artificial reverb if necessary.
Positioning a singer ‘offstage’ can be achieved by reducing the level of their individual microphone so that they are placed further back in the perspective without also moving them off to one side. In the era of Decca’s studio opera recordings, a singer could also be asked to turn around to face the back of the stage to produce a distancing effect.
Any effects specifically required by the score (wind machines, car horns, boat sounds) can be easily added after the main recording, and nowadays there is also the option of overdubbing soloists as a last resort if illness requires them to miss a recording session where the orchestra, chorus, and other singers are already booked.
16.2.4 Balancing orchestra, choir, and soloists when mixing
There are three main elements to the opera balance: the orchestra, the chorus, and the soloists. (Chapter 17 gives more advice on which microphones to bring in first.)
The foundation of the whole sound will be the orchestra, as it is playing for the majority of the time. The orchestral microphones can be panned as for an orchestral recording (see Chapters 3, 8, and 9 for orchestral microphone techniques) to ensure the orchestra fills the full image width between the loudspeakers.
The next part of the puzzle to slot into place will be the soloists. Given the complexity of the medium, it is not surprising that there is a lot of disagreement among engineers and producers about exactly how the solo voices should sit in the mix, with stars of the opera world having their own views as well. Opera is a musical dialogue, and no one element is more important than the other. The sung words must be understood, but the voice must be supported by the orchestra and not appear to be a separate entity. The orchestral writing must be heard, but it must not get in the way of the voice. A useful contrast can be drawn with musical theatre or crooner-style recordings (such as Frank Sinatra) where the voice sits above and in front of everything. The operatic singer should be more embedded in the orchestra and in the natural acoustic, better reflecting the live performance in a medium where singers are not amplified.
The soloists should feel just in front of the orchestra in terms of perspective but must not be too close or dry. There will be soloist spill onto all the orchestral microphones; when the soloists are placed behind the orchestra in particular, this spill will be quite distant and useful for setting the singers into the same acoustic space as the orchestra. The individual soloists’ microphones are used to capture diction and to give the image some stable localisation, but they must do this without dominating the sound and making each soloist into a narrow point source. It is really important that the soloists retain some bloom around their sound; the listener should not be able to discern that they have individual microphones. Therefore, care should be taken not to fade them up too far; levels will have to be frequently altered to keep the voice supported but not sticking out.
Another reason for avoiding pushing the singer levels too much is that this will start to ruin the orchestral sound because of orchestral spill onto the soloists’ microphones. Opera recordings using the techniques that have been discussed have their basis in the Decca orchestral sound, which is a careful balancing act. The microphone balance that works is completely tied up in the microphone placement, and to achieve a vocal balance that is less naturalistic and more upfront would require the use of closer microphones. The material being recorded might also inform how the soloists and orchestra are balanced, especially if the engineer is sensitive to the musical intentions of the work; in Wagner’s writing, for instance, the voice is very much only one element, and the orchestral parts can stand on their own in terms of musical interest. In Verdi’s work, to take another example, the orchestral parts can sometimes be more accompanying in nature.
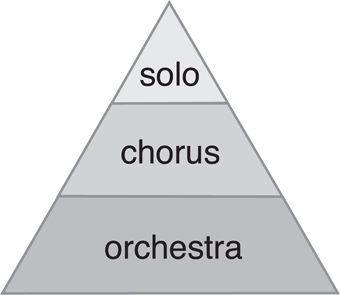
Finally, the chorus requires a good balance between diction and a solid body of sound, and it should be set into the acoustic space just behind the orchestra. This creation of appropriate depth is going to be an illusion; even in a concert, you might find that the natural depth is too deep and you need to foreshorten it. As we have seen, a session-based recording might have the singers and chorus standing in a number of places relative to the orchestra, but the end goal of mixing is to create a good orchestral foundation, a layer of chorus, and the soloists supported on top. This can be visualised as a pyramid (see Figure 16.10).
If the chorus is covered by five microphones, the outer ones can be panned fully left and right, with the central three panned half left, centre, and half right. Where the chorus is covered by four microphones across its width, panning the outer microphones inwards to about 80% left and 80% right will prevent the outer parts of the choir appearing to be located exclusively in either loudspeaker. Fully left or right panning of spot microphones and sectional microphones can have this localising effect, which detracts from the illusion of the orchestra filling the space between the speakers while not being obviously located in either of them. To avoid too much thickness in the LF, the choir microphones can be high-pass filtered, but care must be taken to avoid placing the HPF at too high a frequency and starting to remove the body and weight from the choir. It is best done when mixing in a good monitoring environment – probably after the recording.
The main danger in trying to make sure that both the orchestral detail and the choir diction is clear is that the perspective can become quite flat. There is likely to be some foreshortening of the natural distance to get enough clarity from the choir, but additional reverb can help provide cues that still place the choir slightly further back than the orchestra. The requirement for clear choir diction is also repertoire dependent; where the choir is being used as an orchestral colour (Ravel’s Daphnis et Chloé; Holst’s ‘Neptune’), it can be placed behind the orchestra at a more natural distance. For something like Orff’s Carmina Burana, the diction needs to be much more accessible.
16.3 Recording live opera for cinema, DVD, TV, radio, or CD
Live opera is most commonly recorded and filmed for cinema or DVD production, but this is often done simultaneously with a live radio transmission or audio-only recording. Live recordings and transmissions of opera, plays, and ballet for local cinema distribution have become a popular way of disseminating the activities of our cultural institutions to those who cannot get to the theatre in person.
The sound quality requirements for each delivery method differ very little; radio microphones are more common where there is picture as well, but their use is increasingly accepted in audio-only recordings as a way of capturing the detail and contact with the singers that makes for more viscerally engaging recording. Radio microphones should never be obviously perceptible, and so they are very carefully blended to bring just enough detail without making their presence felt (see section 16.5.2). If a recorded sound is a good one, it should work adequately for both radio and TV; the aim should be for a good static balance that caters for 80% of the transmission and does not have to be drastically altered for a close-up shot, as large fader moves can distract from the listener’s experience of the music. Therefore, to cater for close-up images without sudden audio perspective changes, the recorded sound for picture might need to be slightly more detailed.
The most serious limitation when recording live opera is in the inability to place microphones anywhere that is obtrusive or disruptive of audience sight lines; any differences between audio-only and audio-for-picture live recordings are small compared with the compromises in microphone placement that are required.
Sections 16.4 and 16.5 deal in some depth with how live recording and mixing to surround for cinema is approached at the Royal Opera House, Covent Garden.
16.4 Recording live opera at the Royal Opera House: microphone set-ups
Any microphone set-up for live opera can be divided into four main areas:
- Orchestral microphones.
- Stage coverage for soloists and chorus.
- Individual singer radio microphones (if they are used).
- Auditorium microphones.
16.4.1 Orchestral microphones
The orchestra in an opera house is physically constrained in the pit, so space is tight for accommodating stands, and no microphones can be rigged higher than the pit wall. This means that the use of an overall Decca Tree or ORTF-type technique is not possible, and other solutions have had to be found. Stands with heavy round bases are designed for use where a tripod-legged stand would cause some obstruction.
Figure 16.11 shows the orchestral layout in the Royal Opera House (ROH) pit, and it can be seen that the brass section is placed on the right, immediately behind the violas. For this reason, the overall string section microphone set-up is not symmetrical, and the distances between string microphones on the right-hand side are much smaller to avoid getting too close to the brass. The numbers in the following text refer to the microphones as numbered in this diagram.
The ‘main pair’ [1, 2] is usually a pair of DPA 4006 omnis placed on either side of the conductor in line with the music stands belonging to the front desks. They are as high as possible, which means about 2.4 m (8′) above the pit floor, and about 2.5 cm (1″) below the auditorium rail around the pit edge.

Figure 16.11 The ROH orchestral pit layout with overall pickup microphones numbered 1–8
Moving outwards from the main pair, there is another set of omnis (Neumann KM83) [3, 4] positioned at the same height as the main pair. On the left-hand side, this is in line with the third desk of violins, and on the right-hand side, it is in line with the second desk of violas.
Moving outwards again is a pair of ‘outriggers’ [5, 6], which are wide cardioids (Schoeps MK21) located in line with the fifth desk of violins and the third desk of violas.
Finally, there is another pair of DPA 4006s [7, 8] positioned within the orchestra in the gap between the string desks and horns on the left and a mirrored position on the right. The microphone on the right will sometimes pass through a little compression because it will pick up some brass, and this will automatically reduce the level when it does.
These eight microphones form the basis of the string section coverage, and the ‘main pair’ [1, 2] are panned to about 70% left and right, with the other microphones being panned fully left [3, 5, 7] and right [4, 6, 8], and also partly into the rear loudspeakers (see section 16.5.1).
In addition, the strings have one spot microphone per desk, the trumpets have two microphones between three players, and the horns have two microphones between four players. There is often a camera at the back of the pit to get shots of the conductor, and so any woodwind microphones have to avoid being in shot. They are therefore lower down than usual, and so one microphone is used for every two players to keep the coverage even. Because the pit layout is very shallow front to back, the woodwinds are much closer to the overall pickup microphones [1–8] than usual, and their spot microphones are used only a little.
16.4.2 Stage microphones
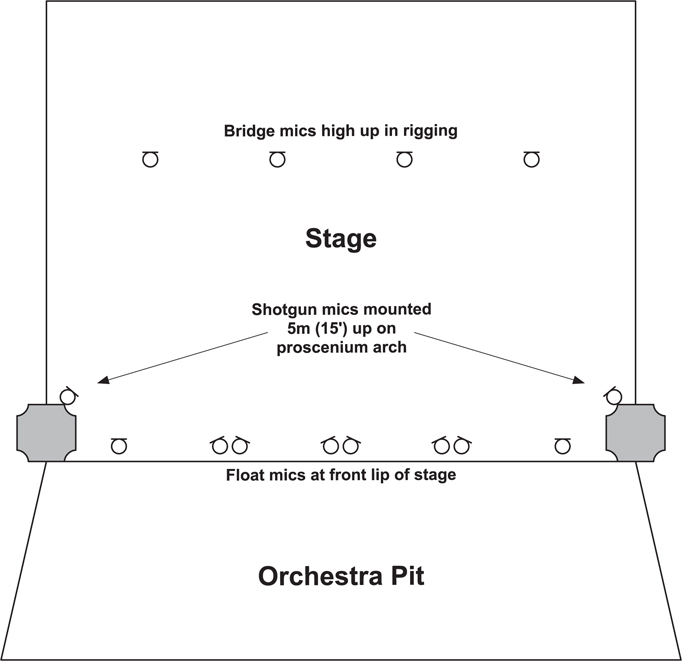
Capturing the stage in live opera is something of a challenge, as the options for microphone placement are either high above the stage or very low, near to the stage floor. A method for capturing the stage has evolved which uses low-mounted ‘float’ microphones at the front and ‘bridge’ microphones high up at the rear. This is illustrated in Figure 16.12.
The front ‘float’ array consists of three narrowly angled (about 25°–30°) co-incident stereo pairs of cardioids and two single cardioids at each end of the row. This is a similar method of stage coverage to that used by Decca for their studio recordings (Appendix 1), but because this is a live context, the microphones have to be placed as low down as possible to remain unobtrusive. If modular condenser microphones such as the Neumann KM140 (KM100 bodies, AK40 capsules) are used, they can be mounted very low at a height of about 5 cm (2″). The capsule can be separated from the output stage of the microphone to enable the use of a variety of accessories to adapt the microphone for different physical locations. If the stage has a front lip, or there is a false floor to the set, the microphones can be arranged to just peek up over the edge. An alternative float array of five microphones across the front of the stage can be made from a set of PZMs. The Schoeps BLM 03C is one example; it has a hemispherical pickup pattern and takes the form of a flat disk, so it sits very unobtrusively on the stage. This microphone is not as suitable if there is a lot of stamping and movement in the choreography, as it can easily get knocked out of place.
This basic array creates a series of ‘stations’ through which the singers will pass as they move laterally across the stage. The narrow stereo pairs give some coherency of image without creating excessive lateral image movement as the singers move. If the three inner stereo pairs are replaced with single microphones (e.g. if using PZMs), good coverage of the stage will still result, although the image will be slightly less coherent. The float microphones are panned between the front channels of a surround sound mix, much as they appear across the stage. The outer microphones placed at around 80% left and 80% right, and the inner three pairs are panned so that they are centred around half left, centre, and half right, respectively, with a small amount of panning separation between the left and right microphone of each pair. This keeps the stage action contained in front of the listener, which will be particularly important when mixing for picture and in surround.
An alternative method of covering the stage is to use hyper-cardioids or shotgun microphones instead of cardioids which will produce a closer sound on the singers. This approach is often favoured by radio engineers if there are no additional radio microphones on individual singers (see section 16.4.3). The disadvantages of shotgun microphones are that they are physically larger, the singer’s sound is rather brighter, the microphones are noisier, and the off-axis pickup is very coloured, which can detrimentally affect the orchestral sound.
To support the chorus and any other singers located towards the back of the stage, four ‘bridge’ microphones are placed high up in the theatre rigging aiming towards the back of the stage. These are usually shotgun microphones, as they are some distance above the singers. At the ROH, there are two additional shotgun microphones placed on either side of the proscenium arch at about 5 m (16′) high; these are used as fill-in microphones to give a fuller feel in the chorus scenes.
16.4.3 Soloist microphones
The ‘float’ microphones will be used as the primary source for the stage, providing most of the tone colour and body of the sound. To provide some more contact and detail, each soloist is fitted with an omnidirectional radio microphone which is very small and discreet and exhibits very little handling noise. Because the radio microphones are very close to their sources, there is very little spill from other stage performers or the orchestra, but the closeness of the sound itself presents problems in mixing.
Unlike for pop or musical theatre work, the personal microphone signals should never be conceived of as the main vocal source and will never be used separately from the overall ‘float’ stage microphone sound. Their role is to act as a small part of the mix in order to add some detail and image stability to the individual singers; all the radio microphones are panned to the centre channel when mixing to surround, as is the convention with cinema dialogue. Time delays have to be used to avoid the radio microphones being perceived as the dominant source; the singers’ voice will arrive at the radio microphone tens of milliseconds before arriving at the ‘float’ microphones and will dominate due to the precedence effect. (See section 16.5.2.)
Fitting radio microphones to performers so that they are hidden in clothing and wigs is a specialist job that requires excellent interpersonal skills. The microphone and pack must be hidden, and also allow for costume changes where necessary. Any singers that sweat a lot will be fitted with two microphones to allow for microphone failure if moisture enters the capsule and starts to cause pops and bumps.
As mentioned in 16.4.2, in a situation where no radio microphones are to be used, it is usual to use shotgun or hyper-cardioid microphones across the front of the stage to obtain more focus on the singers. This will produce good results, but it will not give such a nuanced degree of control over the singers’ sound as using radio microphones in conjunction with cardioid float microphones. The more the hyper-cardioid/shotgun float microphones have to be raised in level, the more the orchestral sound will be adversely affected by them, and so there is a limit to the amount of contact with the voices that can be achieved with this approach.
16.4.4 Auditorium microphones
The number of auditorium microphones used will depend on whether the project is to be mixed in stereo only or surround sound (see section 16.5), but auditorium microphones tend to form part of any permanent installation. As a minimum requirement for picking up reverberant sound and audience applause, there are four ‘drop’ microphones suspended from the auditorium ceiling very high above the audience, more or less above the orchestra pit wall. The outer ones are omnis, and the middle two form a near-coincident pair of cardioids.
There are two additional wide cardioid microphones rigged on the side balcony above the lowest tier of boxes and roughly in line with the front of the orchestra pit. On the rear balcony there are two more ambience microphones, and in the dome of the auditorium ceiling is a Hamasaki square of fig of 8 microphones, which is an array designed to produce four discrete channels of reverberant sound to use in surround mixing (see section 10.3). See Figure 16.13 for the location of auditorium microphones.
In general, a surround mix can support more reverb without losing clarity, as some of it can be sent to the surround loudspeakers. This gives the listener the experience of more reverb without muddying the image coming from the front loudspeakers. Conversely, if a surround mix has to be folded down into stereo, some reverb will have to be removed in preference to sending it all to the front loudspeakers.
16.4.5 Offstage effects
In a live performance, any offstage chorus or other sound source is placed behind the set and picked up by a pair of microphones placed there for the purpose. They will also be picked up as a distant sound on the main orchestral and stage pickups, and a balance between these and the backstage microphones can be used to give an appropriate sense of perspective. When mixing in stereo, the offstage chorus can only be made to sound as if it is coming from somewhere other than the main stage by use of appropriate reverb, reduced HF detail, and lowered level. When an offstage chorus is mixed in surround, the sense of location away from the main stage can be reinforced by placing the chorus into the rear speakers.
16.5 Mixing opera to 5.1 surround for cinema
When mixing audio for picture, the soundtrack should not pull the audience’s attention away from the images being shown in front of them. For this reason, almost all the direct sound is presented as coming from the front channels, with the rear channels reserved for reverb and offstage sources. The difference between listening to classical music in stereo and in surround is a subtle one (see Chapter 10), but the reverb and the sense of space envelop the listener and can really add to the excitement of the performance. If the technology distracts the listener from being immersed in the moment, it is not being used to best effect; the surround speakers need to be as involving as possible but not to the point of being annoying or distracting. The engineer has to remember that the goal is enhancement of the musical experience rather than showcasing the technology. During the mixing process for the ROH productions, time is allowed for refining mixes in a cinema setting ahead of production.

16.5.1 Orchestra
The centre channel of the surround set-up, C, is usually mainly for the soloists’ radio microphones and the central stage float microphones; this helps with the perception of vocal clarity, particularly in a large auditorium like a cinema. Therefore, the orchestra is mixed primarily between the front LF and RF channels, with some divergence into the centre, C, and a small amount sent to the rear channels, LS and RS. (See section 10.2 for wider discussion of the centre channel and divergence control in orchestral mixes.)
The ‘main pair’ (microphones 1 and 2 in Figure 16.11) are panned about 70% LF and RF to avoid a hole in the middle, but the overall orchestral string section is spread a little wider than in stereo by panning the outer string microphones (microphones 3–8 in Figure 16.11) partly into the rear LS and RS speakers. They are panned between 30% and 50% into the rears, beyond which the effect becomes distracting. The effect is one of greater envelopment in the orchestral sound by bringing the outer edges of the orchestra partially around the sides of the listener. (See section 10.2 for similar technique when panning a Decca Tree in surround.) All the spot microphones in the orchestra are sent to the front channels only, keeping the woodwinds, brass, harp, and percussion firmly in front of the listener.
16.5.2 Solo voices
The main body of the soloists’ voices will come from the ‘float’ microphones at the front of the stage which are panned evenly spaced across LF, C, and RF (see section 16.4.2), keeping the stage image in front of the listeners. The float and bridge microphones are not all left fully open at all times, as this is detrimental to the orchestral sound, so the engineer will mix in more of the microphones nearest to the soloist (as outlined in the old Decca stage method in Appendix 1). In addition to overall stage microphones, small amounts of the radio microphones are added to provide some singer detail without ever allowing the presence of the radio microphones to become discernible. To help the very close and dry radio microphone signals to blend in, they are delayed so they are never ahead of the signals from the float microphones. When working live, one engineer is assigned to changing the delay in real time on each radio microphone, depending on where the singer is standing at the time. For singers towards the front of the stage, the delay will be in the region of 10 ms (because in this position they are approximately 3 m (10′) away from the float microphones, and for those standing at the back, the delay will be up to about 28 ms). It is better to play safe and add too much delay to be certain that the radio microphone signal is never ahead of the float microphones; if it arrives earlier, it will be perceived as the dominant signal and will be very audible, even at a fairly low level in the mix. The delays enable an appropriate level of the radio microphones to be used to bring in some detail and stability of image.
The radio microphones are all panned into the centre channel and then diverged (see section 10.2) by 10% to 20% into the LF and RF channels. Their presence will anchor the singers’ images a little more to the centre, but enough of the float microphones are used to retain some degree of lateral movement. In theory, it would be possible to follow each singer’s position with panning as well as delays on the radio microphone, but to do this live demands a lot of engineers and it is generally not practical. In a cinema setting, perceived lateral image positioning will vary across the audience according to seating position, and so keeping the voices somewhat anchored around the centre has the effect of reducing this variation. This follows the usual practice in film dubbing, where the dialogue is all placed in the centre channel unless there is a very good reason not to do so.
The next aspect of the voice mixing to consider is how much to take into account different camera perspectives (e.g. whether a singer’s close-up shot should sound less reverberant than a wide angle shot). Film and TV sound usually avoids large changes in dialogue audio perspective with a shot change, because sudden audio changes can be particularly distracting from the story. For many TV dramas and soap operas, the dialogue is almost uniformly processed regardless of the environment or shot angle. A recorded live play is a slightly different genre in that the viewer is aware that the actors are in a theatre performing a live event. In these circumstances, it is common practice to make some gesture towards realism in the mixing by increasing the ambient sound for wider angle shots, although this can only be performed live with sufficient rehearsal time.
Live opera could be considered as an extension of the live play scenario, but dealing with music makes it different again. A noticeable change of audio perspective in the middle of a sung phrase would really detract from the beauty of the musical line, and anything that takes the viewer/listener out of that moment would be less than good practice. Therefore, consistency of sound is prioritised over perspective realism, and changes in sound are mainly reserved for when a singer leaves the stage whilst singing (reducing the radio microphone level) and for very obvious wide shots. A close-up of a soloist might be enhanced with the slightest increase in radio microphone level, but all the audio perspective changes used are subtle; the engineer is aiming for a balance that feels live, with the singing clear but not close. The radio microphones are there to provide diction clarity without being audibly present.
16.5.3 Chorus
When the chorus are on stage, they will be picked up on the float and bridge microphones, which will be faded up as required. Float microphone panning has been discussed, and the four bridge microphones will be panned in a similar way across the width of the front image, avoiding fully left and right. The microphones on either side of the proscenium arch (see section 16.4.2 and Figure 16.12) are used to add greater fullness to large chorus scenes; they are panned fully LF and RF, respectively. In this way, the direct chorus sound will come from in front of the listener, even though the chorus will be present to some extent in the reverb signals from the auditorium microphones that are set to front and rear (see section 16.5.4).
When the chorus is offstage, however, it can work very well to place the direct sound and some additional reverb in the rear speakers (LS and RS). This places the chorus spatially away from the stage, and it feels further away because of the increased use of reverb.
16.5.4 Ambient microphones and artificial reverb
The audience microphones and the rear balcony microphones are placed completely in the rears and sent only to the rear artificial reverb unit, so that any audience applause and noise is located predominantly behind the listener (although there will be some audience pickup on the orchestral microphones). The Hamasaki square is designed to pick up four channels of reverb, and these are sent to LF, RF, LS, and RS as they are laid out. (See section 10.3.)
As with most classical recording, artificial reverb is used to enhance the sound, but when working in surround, four discrete channels of reverb are needed. This can be provided by a surround reverb unit, but depending on what is available, it is common to use a stereo unit for the front reverb and another one for the rear reverb. They do not need to be using the same algorithm, although the overall reverb time and general characteristics should match. (See section 10.4 for fuller discussion on use of reverb in surround.)
The singer’s radio microphones are usually kept dry, unless there is a weaker singer who needs more of the radio microphone to match in with more experienced, stronger singers. In this case, some reverb will be added to the radio microphone to allow it to be mixed in at a slightly higher level. This will usually be some sort of general ambient reverb to soften the impact of the radio microphone signal, not the same hall type reverb as is being used on the orchestra. Where special effects are needed, such as a scene set in a church with organ playing, the front reverb programme could be altered to a slightly more church-type reverb to help with the theatricality of the staging, as long as it serves the artistic purpose well. Creative decisions of this type will need to be taken in conjunction with the producer.