
Chapter 11
Installing and Configuring Printers
THE FOLLOWING COMPTIA A+ 220-901 EXAM OBJECTIVES ARE COVERED IN THIS CHAPTER:
- ✓ 1.13 Install SOHO multifunction device/printers and configure appropriate settings.
- Use appropriate printer drivers for a given operating system
- Configuration settings
- Duplex
- Collate
- Orientation
- Quality
- Configuration settings
- Device sharing
- Wired
- USB
- Serial
- Ethernet
- Wireless
- Bluetooth
- 802.11(a,b,g,n,ac)
- Infrastructure vs. adhoc
- Integrated print server (hardware)
- Cloud printing/remote printing
- Wired
- Public/shared devices
- Sharing local/networked devices via Operating System settings
- TCP/Bonjour/AirPrint
- Data privacy
- User authentication on the device
- Hard drive caching
- Use appropriate printer drivers for a given operating system
- ✓ 1.14 Compare and contrast differences between the various print technologies and the associated imaging process.
- Laser
- Imaging drum, fuser assembly, transfer belt, transfer roller, pickup rollers, separate pads, duplexing assembly
- Imaging process: processing, charging, exposing, developing, transferring, fusing and cleaning
- Inkjet
- Ink cartridge, print head, roller, feeder, duplexing assembly, carriage and belt
- Calibration
- Thermal
- Feed assembly, heating element
- Special thermal paper
- Impact
- Print head, ribbon, tractor feed
- Impact paper
- Virtual
- Print to file
- Print to PDF
- Print to XPS
- Print to image
- Laser
- ✓ 1.15 Given a scenario, perform appropriate printer maintenance.
- Laser
- Replacing toner, applying maintenance kit, calibration, cleaning
- Thermal
- Replace paper, clean heating element, remove debris
- Impact
- Replace ribbon, replace print head, replace paper
- Inkjet
- Clean heads, replace cartridges, calibration, clear jams
- Laser
Let’s face it. No matter how much we try to get away from it, our society is dependent on paper. When we conduct business, we use different types of paper documents, such as contracts, letters, and, of course, money. And because most of those documents are created on computers, printers are inherently important. Even with electronic business being the norm in many situations, you will likely still have daily situations that require an old-fashioned hard copy of something.
Printers are electromechanical output devices that are used to put information from the computer onto paper. They have been around since the introduction of the computer. Other than the display monitor, the printer is the most popular peripheral purchased for a computer because a lot of people want to have paper copies of the documents that they create.
In this chapter, we will discuss the details of each major type of printing technology, including impact printers, inkjet printers, laser printers, thermal printers, and virtual printers. Once we cover the different types, we’ll talk about installing and configuring printers and finish up with a section on printer maintenance.
Understanding Print Technologies and Imaging Processes
Several types of printers are available on the market today. As with all other computer components, there have been significant advancements in printer technology over the years. Most of the time, when faced with the decision of purchasing a printer, you’re going to be weighing performance versus cost. Some of the higher-quality technologies, such as color laser printing, are rather expensive for the home user. Other technologies are less expensive but don’t provide the same level of quality.
In the following sections, you will learn about the various types of print technologies that you will see as a technician as well as their basic components and how they function. Specifically, we are going to look at five classifications of printing: impact, inkjet, laser, thermal, and virtual.
Impact Printers
The most basic type of printer is in the category known as impact printers. Impact printers, as their name suggests, use some form of impact and an inked ribbon to make an imprint on the paper. Impact printers also use a paper feed mechanism called a tractor feed that requires special paper. Perhaps you’ve seen it before—it’s continuous feed paper with holes running down both edges.
There are two major types of impact printers: daisy wheel and dot matrix. Each type has its own service and maintenance issues.
Daisy-Wheel Printers
The first type of impact printer we’re going to discuss is the daisy-wheel printer. This is one of the oldest printing technologies in use. These impact printers contain a wheel (called the daisy wheel because it looks like a daisy) with raised letters and symbols on each “petal” (see Figure 11.1). When the printer needs to print a character, it sends a signal to the mechanism that contains the wheel. This mechanism is called the print head. The print head rotates the daisy wheel until the required character is in place. An electromechanical hammer (called a solenoid) then strikes the back of the petal containing the character. The character pushes up against an inked ribbon that ultimately strikes the paper, making the impression of the requested character.
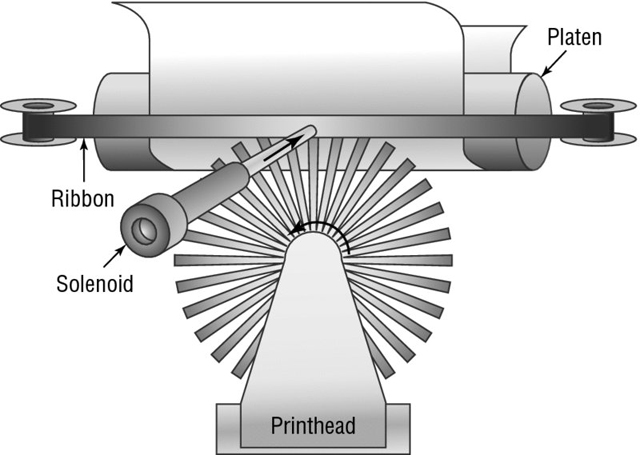
Figure 11.1 A daisy-wheel printer mechanism
Daisy-wheel printers were among the first types of impact printer developed. Their speed is rated by the number of characters per second (cps) they can print. The earliest printers could print only two to four characters per second. Aside from their poor speed, the main disadvantage of this type of printer is that it makes a lot of noise when printing—so much so, in fact, that special enclosures were developed to contain the noise. There is also no concept of using multiple fonts; the font is whatever the character on the wheel looks like.
The daisy-wheel printer has a few advantages, of course. First, because it is an impact printer, you can print on multipart forms (like carbonless receipts), assuming that they can be fed into the printer properly. Sometimes, you will hear this type of paper referred to as impact paper. Second, it is relatively inexpensive compared to the price of a laser printer of the same vintage. Finally, the print quality is easily readable; the level of quality was given a name: letter quality (LQ). Today, LQ might refer to quality that’s better than an old-school typewriter (if you’re familiar with them) but not up to inkjet standards.
Dot-Matrix Printers
The other type of impact printer that we’ll discuss is the dot-matrix printer. These printers work in a manner similar to daisy-wheel printers, but instead of a spinning, character-imprinted wheel, the print head contains a row of pins (short, sturdy stalks of hard wire). These pins are triggered in patterns that form letters and numbers as the print head moves across the paper (see Figure 11.2).
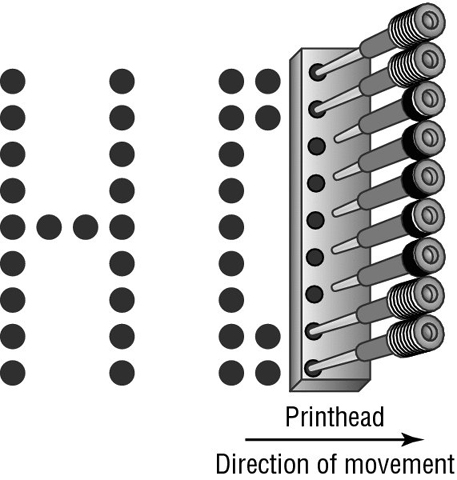
Figure 11.2 Formation of images in a dot-matrix printer
The pins in the print head are wrapped with coils of wire to create a solenoid and are held in the rest position by a combination of a small magnet and a spring. To trigger a particular pin, the printer controller sends a signal to the print head, which energizes the wires around the appropriate print wire. This turns the print wire into an electromagnet, which repels the print pin, forcing it against the ink ribbon and making a dot on the paper. The arrangement of the dots in columns and rows creates the letters and numbers that you see on the page. Figure 11.2 shows this process.
The main disadvantage of dot-matrix printers is their image quality, which can be quite poor compared to the quality produced with a daisy wheel. Dot-matrix printers use patterns of dots to make letters and images, and the early dot-matrix printers used only nine pins to make those patterns. The output quality of such printers is referred to as draft quality—good mainly for providing your initial text to a correspondent or reviser. Each letter looked fuzzy because the dots were spaced as far as they could be and still be perceived as a letter or image. As more pins were crammed into the print head (17-pin and 24-pin models were eventually developed), the quality increased because the dots were closer together. Dot-matrix technology ultimately improved to the point that a letter printed on a dot-matrix printer was almost indistinguishable from daisy-wheel output. This level of quality is known as near letter quality (NLQ).
Dot-matrix printers are noisy, but the print wires and print head are covered by a plastic dust cover, making them quieter than daisy-wheel printers. They also use a more efficient printing technology, so the print speed is faster (typically starting around 72cps). Some dot-matrix printers (like the Epson DFX series) can print at close to a page per second! Finally, because dot-matrix printers are also impact printers, they can use multipart forms. Because of these advantages, dot-matrix printers quickly made daisy-wheel printers obsolete.
Inkjet
One of the most popular types of printers in use today is the inkjet printer. As opposed to impact printers, which strike the page, these printers spray ink on the page to form the image. Inkjet printers typically use a reservoir of ink, a pump, and a nozzle to accomplish this. Older ones were messy, noisy, and inefficient, but the technology is good enough now that you see plenty of photo printers using inkjet technology. You might also hear these types of printers referred to as bubble-jet printers, but that term is copyrighted by Canon. The main difference is that in a bubble-jet printer, droplets of ink are sprayed onto a page and form patterns that resemble the items being printed. You can think of it as spraying droplets of ink in a very high-definition dot-matrix pattern, although printer manufacturers would likely scoff at the comparison to an older technology.
In the following sections, you will learn the parts of an inkjet printer as well as how inkjet printers work.
Parts of a Typical Inkjet Printer
Inkjet printers are simple devices. They contain very few parts (even fewer than dot-matrix printers) and, as such, are inexpensive to manufacture. It’s common today to have a $40 to $50 inkjet printer with print quality that rivals that of basic laser printers.
The printer parts can be divided into the following categories:
- Print head/ink cartridge
- Head carriage, belt, and stepper motor
- Paper-feed mechanism
- Control, interface, and power circuitry
Print Head/Ink Cartridge
The first part of an inkjet printer is the one that people see the most: the print head. This part of a printer contains many small nozzles (usually 100 to 200) that spray the ink in small droplets onto the page. Many times, the print head is part of the ink cartridge, which contains a reservoir of ink and the print head in a removable package. Most color inkjet printers include multiple print heads, one for each of the CMYK(cyan, magenta, yellow, and black) print inks. The print cartridge must be replaced as the ink supply runs out.
Inside the ink cartridge are several small chambers. At the top of each chamber are a metal plate and a tube leading to the ink supply. At the bottom of each chamber is a small pinhole. These pinholes are used to spray ink on the page to form characters and images as patterns of dots, similar to the way a dot-matrix printer works but with much higher resolution.
There are two methods of spraying the ink out of the cartridge. Hewlett-Packard (HP) popularized the first method: When a particular chamber needs to spray ink, an electric signal is sent to the heating element, energizing it. The elements heat up quickly, causing the ink to vaporize. Because of the expanding ink vapor, the ink is pushed out of the pinhole and forms a bubble. As the vapor expands, the bubble eventually gets large enough to break off into a droplet. The rest of the ink is pulled back into the chamber by the surface tension of the ink. When another drop needs to be sprayed, the process begins again. The second method, developed by Epson, uses a piezoelectric element (either a small rod or a unit that looks like a miniature drum head) that flexes when energized. The outward flex pushes the ink from the nozzle; on the return, it sucks more ink from the reservoir.
When the printer is done printing, the print head moves back to its maintenance station. The maintenance station contains a small suction pump and ink-absorbing pad. To keep the ink flowing freely, before each print cycle, the maintenance station pulls ink through the ink nozzles using vacuum suction. The pad absorbs this expelled ink. The station serves two functions: to provide a place for the print head to rest when the printer isn’t printing and to keep the print head in working order.
Head Carriage, Belt, and Stepper Motor
Another major component of the inkjet printer is the head carriage and the associated parts that make it move. The print head carriage is the component of an inkjet printer that moves back and forth during printing. It contains the physical as well as electronic connections for the print head and (in some cases) the ink reservoir. Figure 11.3 shows an example of a head carriage. Note the clips that keep the ink cartridge in place and the electronic connections for the ink cartridge. These connections cause the nozzles to fire, and if they aren’t kept clean, you may have printing problems.

Figure 11.3 A print head carriage (holding two ink cartridges) in an inkjet printer
The stepper motor and belt make the print head carriage move. A stepper motor is a precisely made electric motor that can move in the same very small increments each time it is activated. That way, it can move to the same position(s) time after time. The motor that makes the print head carriage move is also often called the carriage motor or carriage stepper motor. Figure 11.4 shows an example of a stepper motor.

Figure 11.4 A carriage stepper motor
In addition to the motor, a belt is placed around two small wheels or pulleys and attached to the print head carriage. This belt, called the carriage belt, is driven by the carriage motor and moves the print head back and forth across the page while it prints. To keep the print head carriage aligned and stable while it traverses the page, the carriage rests on a small metal stabilizer bar. Figure 11.5 shows the stabilizer bar, carriage belt, and pulleys.

Figure 11.5 Stabilizer bar, carriage belt, and pulleys in an inkjet printer
Paper-Feed Mechanism
In addition to getting the ink onto the paper, the printer must have a way to get the paper into the printer. That’s where the paper-feed mechanism comes in. The paper-feed mechanism picks up paper from the paper drawer and feeds it into the printer. This component consists of several smaller assemblies. First are the pickup rollers (see Figure 11.6), which are several rubber rollers with a slightly flat spot; they rub against the paper as they rotate and feed the paper into the printer. They work against small cork or rubber patches known as separator pads (see Figure 11.7), which help keep the rest of the paper in place so that only one sheet goes into the printer. The pickup rollers are turned on a shaft by the pickup stepper motor.
Figure 11.6 Inkjet pickup rollers

Figure 11.7 Inkjet separator pads
Sometimes the paper that is fed into an inkjet printer is placed into a paper tray, which is simply a small plastic tray in the front of the printer that holds the paper until it is fed into the printer by the paper-feed mechanism. On smaller printers, the paper is placed vertically into a paper feeder at the back of the printer; it uses gravity, in combination with feed rollers and separator pads, to get the paper into the printer. No real rhyme or reason dictates which manufacturers use these different parts; some models use them, and some don’t. Generally, more expensive printers use paper trays because they hold more paper. Figure 11.8 shows an example of a paper tray on an inkjet printer.
Figure 11.8 A paper tray on an inkjet printer
The final parts of the paper-feed mechanism are the paper-feed sensors. These components tell the printer when it is out of paper as well as when a paper jam has occurred during the paper-feed process. Figure 11.9 shows an example of a paper-feed sensor. Being able to identify the parts of an inkjet printer is an important skill for an A+ candidate. In Exercise 11.1, you will identify the parts of an inkjet printer. For this exercise, you’ll need an inkjet printer.
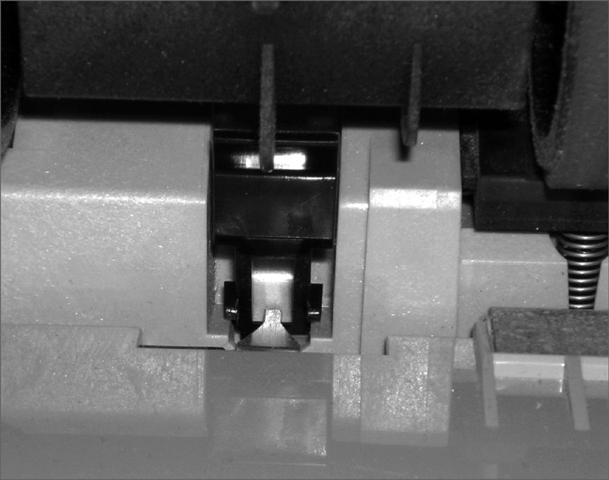
Figure 11.9 A paper-feed sensor on an inkjet printer
Control, Interface, and Power Circuitry
The final component group is the electronic circuitry for printer control, printer interfaces, and printer power. The printer control circuits are usually on a small circuit board that contains all of the circuitry to run the stepper motors the way the printer needs them to work (back and forth, load paper and then stop, and so on). These circuits are also responsible for monitoring the health of the printer and for reporting that information back to the PC.
The second power component, the interface circuitry (commonly called a port), makes the physical connection to whatever signal is coming from the computer (USB, serial, network, infrared, and so on) and also connects the physical interface to the control circuitry. The interface circuitry converts the signals from the interface into the datastream that the printer uses.
The last set of circuits the printer uses is the power circuits. Essentially, these conductive pathways convert 110V (in the United States) or 220V (in most of the rest of the world) from a standard wall outlet into the voltages that the inkjet printer uses, usually 12V and 5V, and distribute those voltages to the other printer circuits and devices that need it. This is accomplished through the use of a transformer. A transformer, in this case, takes the 110V AC current and changes it to 12V DC (among others). This transformer can be either internal (incorporated into the body of the printer) or external. Either design can be used in today’s inkjets, although the integrated design is preferred because it is simpler and doesn’t show the bulky transformer.
The Inkjet Printing Process
Before you print to an inkjet printer, you must ensure that the device is calibrated. Calibration is the process by which a device is brought within functional specifications. For example, inkjet printers need their print heads aligned so that they print evenly and don’t print funny-looking letters and unevenly spaced lines. The process is part of the installation for all inkjet printers. Printers will typically run a calibration routine every time you install new ink cartridges. You will only need to manually initiate a calibration if the printing alignment appears off.
Just as with other types of printing, the inkjet printing process consists of a set of steps that the printer must follow in order to put the data onto the page being printed. The following steps take place whenever you click the Print button in your favorite software (like Microsoft Word or Internet Explorer):
- You click the Print button (or similar) that initiates the printing process.
- The software from which you are printing sends the data to be printed to the printer driver that you have selected.
- The printer driver uses a page-description language to convert the data being printed into the format that the printer can understand. The driver also ensures that the printer is ready to print.
- The printer driver sends the information to the printer via whatever connection method is being used (USB, network, serial, and so on).
- The printer stores the received data in its onboard print buffer memory. A print buffer is a small amount of memory (typically 512KB to 16MB) used to store print jobs as they are received from the printing computer. This buffer allows several jobs to be printed at once and helps printing to be completed quickly.
- If the printer has not printed in a while, the printer’s control circuits activate a cleaning cycle. A cleaning cycle is a set of steps the inkjet printer goes through to purge the print heads of any dried ink. It uses a special suction cup and sucking action to pull ink through the print head, dislodging any dried ink or clearing stuck passageways.
- Once the printer is ready to print, the control circuitry activates the paper-feed motor. This causes a sheet of paper to be fed into the printer until the paper activates the paper-feed sensor, which stops the feed until the print head is in the right position and the leading edge of the paper is under the print head. If the paper doesn’t reach the paper-feed sensor in a specified amount of time after the stepper motor has been activated, the Out Of Paper light is turned on and a message is sent to the computer.
- Once the paper is positioned properly, the print head stepper motor uses the print head belt and carriage to move the print head across the page, little by little. The motor is moved one small step, and the print head sprays the dots of ink on the paper in the pattern dictated by the control circuitry. Typically, this is either a pattern of black dots or a pattern of CMYK inks that are mixed to make colors. Then the stepper motor moves the print head another small step; the process repeats all the way across the page. This process is so quick, however, that the entire series of starts and stops across the page looks like one smooth motion.
- At the end of a pass across the page, the paper-feed stepper motor advances the page a small amount. Then the print head repeats step 8. Depending on the model, either the print head returns to the beginning of the line and prints again in the same direction only or it moves backward across the page so that printing occurs in both directions. This process continues until the page is finished.
- Once the page is finished, the feed-stepper motor is actuated and ejects the page from the printer into the output tray. If more pages need to print, the process for printing the next page begins again at step 7.
- Once printing is complete and the final page has been ejected from the printer, the print head is parked (locked into rest position) and the print process is finished.
Some nicer models of inkjet printers will have a duplexing assembly attached to them, usually at the back of the printer. It’s used for two-sided printing. After the first page is printed, it’s fed into the duplexing assembly, turned over, and fed back into the paper feed assembly. Then the second page can be printed on the back side of the original piece of paper. It’s a fancy attachment that gives your inkjet more functionality.
Laser Printers
Laser printers and inkjet printers are referred to as page printers because they receive their print job instructions one page at a time rather than receiving instructions one line at a time. There are two major types of page printers that use the electrophotographic (EP) print process. The first uses a laser to scan the image onto a photosensitive drum, and the second uses an array of light-emitting diodes (LEDs) to create the image on the drum. Even though they write the image in different ways, both types still follow the EP print process. Since the A+ exam focuses on the EP print process and not on differences between laser and LED, we’ll focus on the same here.
Xerox, Hewlett-Packard, and Canon were pioneers in developing the laser printer technology we use today. Scientists at Xerox developed the electrophotographic (EP) process in 1971. HP introduced the first successful desktop laser printer in 1984 using Canon hardware that used the EP process. This technology uses a combination of static electric charges, laser light, and a black powdery ink-like substance called toner. Printers that use this technology are called EP process laser printers, or just laser printers. Every laser printer technology has its foundations in the EP printer process.
Let’s discuss the basic components of the EP laser printer and how they operate so that you can understand the way an EP laser printer works.
Basic Components
Most printers that use the EP process contain nine standard assemblies: the toner cartridge, laser scanner, high-voltage power supply, DC power supply, paper transport assembly (including paper-pickup rollers and paper-registration rollers), transfer corona, fusing assembly, printer controller circuitry, and ozone filter. Let’s discuss each of the components individually, along with a duplexing assembly, before we examine how they all work together to make the printer function.
The Toner Cartridge
The EP toner cartridge (see Figure 11.10), as its name suggests, holds the toner. Toner is a black carbon substance mixed with polyester resins to make it flow better and iron oxide particles to make it sensitive to electrical charges. These two components make the toner capable of being attracted to the photosensitive drum and of melting into the paper. In addition to these components, toner contains a medium called the developer (also called the carrier), which carries the toner until it is used by the EP process. The toner cartridge also contains the EP print drum. This drum is coated with a photosensitive material that can hold a static charge when not exposed to light but cannot hold a charge when it is exposed to light—a curious phenomenon and one that EP printers exploit for the purpose of making images. Finally, the drum assembly contains a cleaning blade that continuously scrapes the used toner off the photosensitive drum to keep it clean.
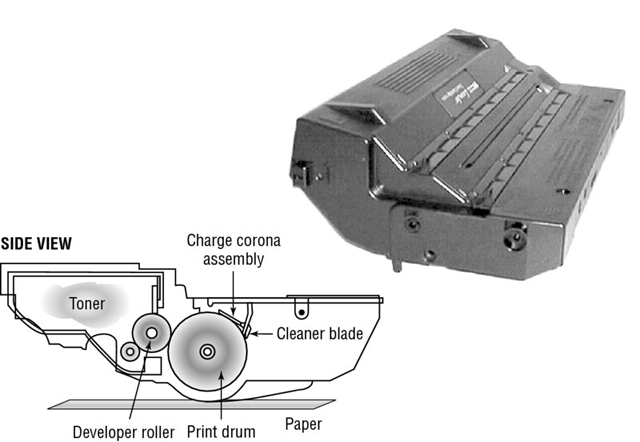
Figure 11.10 An EP toner cartridge
The Laser Scanning Assembly
As we mentioned earlier, the EP photosensitive drum can hold a charge if it’s not exposed to light. It is dark inside an EP printer, except when the laser scanning assembly shines on particular areas of the photosensitive drum. When it does that, the drum discharges, but only in the area that has been exposed. As the drum rotates, the laser scanning assembly scans the laser across the photosensitive drum, writing the image onto it. Figure 11.11 shows the laser scanning assembly.
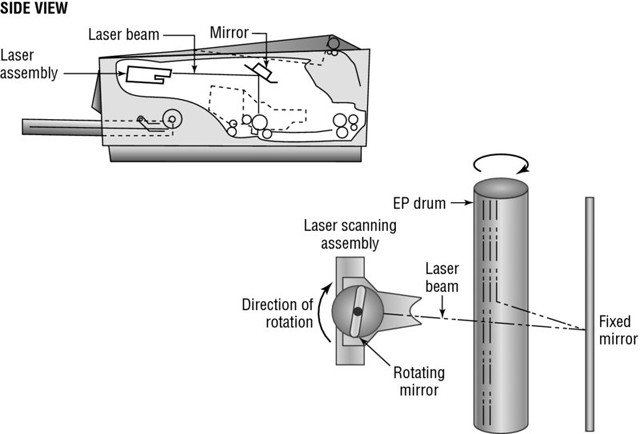
Figure 11.11 The EP laser scanning assembly (side view and simplified top view)
High-Voltage Power Supply (HVPS)
The EP process requires high-voltage electricity. The high-voltage power supply (HVPS) provides the high voltages used during the EP process. This component converts AC current from a standard wall outlet (120V and 60Hz) into higher voltages that the printer can use. This high voltage is used to energize both the charging corona and the transfer corona.
DC Power Supply (DCPS)
The high voltages used in the EP process can’t power the other components in the printer (the logic circuitry and motors). These components require low voltages, between +5VDC and +24VDC. The DC power supply (DCPS) converts house current into three voltages: +5VDC and –5VDC for the logic circuitry and +24VDC for the paper-transport motors. This component also runs the fan that cools the internal components of the printer.
Paper-Transport Assembly
The paper-transport assembly is responsible for moving the paper through the printer. It consists of a motor and several rubberized rollers that each performs a different function.
The first type of roller found in most laser printers is the feed roller, or paper-pickup roller (see Figure 11.12). This D-shaped roller, when activated, rotates against the paper and pushes one sheet into the printer. This roller works in conjunction with a special rubber separator pad to prevent more than one sheet from being fed into the printer at a time.
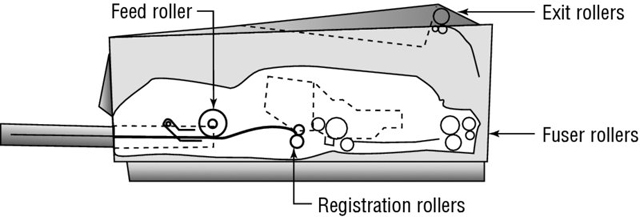
Figure 11.12 Paper-transport rollers
Another type of roller that is used in the printer is the registration roller (also shown in Figure 11.12). There are actually two registration rollers, which work together. These rollers synchronize the paper movement with the image-formation process in the EP cartridge. The rollers don’t feed the paper past the EP cartridge until the cartridge is ready for it.
Both of these rollers are operated with a special electric motor known as an electronic stepper motor. This type of motor can accurately move in very small increments. It powers all of the paper-transport rollers as well as the fuser rollers.
The Transfer Corona Assembly
When the laser writes the images on the photosensitive drum, the toner then sticks to the exposed areas; we’ll cover this in the section “Electrophotographic (EP) Print Process.” How does the toner get from the photosensitive drum onto the paper? The transfer corona assembly (see Figure 11.13) is given a high-voltage charge, which is transferred to the paper, which in turn pulls the toner from the photosensitive drum.

Figure 11.13 The transfer corona assembly
Included in the transfer corona assembly is a static-charge eliminator strip that drains away the charge imparted to the paper by the corona. If you didn’t drain away the charge, the paper would stick to the EP cartridge and jam the printer.
There are two types of transfer corona assemblies: those that contain a transfer corona wire and those that contain a transfer corona roller. The transfer corona wire is a small-diameter wire that is charged by the HVPS. The wire is located in a special notch in the floor of the laser printer (under the EP print cartridge). The transfer corona roller performs the same function as the transfer corona wire, but it’s a roller rather than a wire. Because the transfer corona roller is directly in contact with the paper, it supports higher speeds. For this reason, the transfer corona wire is infrequently used in laser printers today.
Fusing Assembly
The toner in the EP toner cartridge will stick to just about anything, including paper. This is true because the toner has a negative static charge and most objects have a net positive charge. However, these toner particles can be removed by brushing any object across the page. This could be a problem if you want the images and letters to stay on the paper permanently!
To solve this problem, EP laser printers incorporate a device known as a fuser (see Figure 11.14), which uses two rollers that apply pressure and heat to fuse the plastic toner particles to the paper. You may have noticed that pages from either a laser printer or a copier (which uses a similar device) come out warm. This is because of the fuser.

Figure 11.14 The fuser
The fuser is made up of three main parts: a halogen heating lamp, a Teflon-coated aluminum-fusing roller, and a rubberized pressure roller. The fuser uses the halogen lamp to heat the fusing roller to between 329° F (165° C) and 392° F (200° C). As the paper passes between the two rollers, the pressure roller pushes the paper against the fusing roller, which melts the toner into the paper.
Printer Controller Circuitry
Another component in the laser printer that we need to discuss is the printer controller assembly. This large circuit board converts signals from the computer into signals for the various assemblies in the laser printer using a process known as rasterizing. This circuit board is usually mounted under the printer. The board has connectors for each type of interface and cables to each assembly.
When a computer prints to a laser printer, it sends a signal through a cable to the printer controller assembly. The controller assembly formats the information into a page’s worth of line-by-line commands for the laser scanner. The controller sends commands to each of the components, telling them to wake up and begin the EP print process.
Ozone Filter
Your laser printer uses various high-voltage biases inside the case. As anyone who has been outside during a lightning storm can tell you, high voltages create ozone. Ozone is a chemically reactive gas that is created by the high-voltage coronas (charging and transfer) inside the printer. Because ozone is chemically reactive and can severely reduce the life of laser printer components, many older laser printers contain a filter to remove ozone gas from inside the printer as it is produced. This filter must be removed and cleaned with compressed air periodically (cleaning it whenever the toner cartridge is replaced is usually sufficient). Most newer laser printers don’t have ozone filters. This is because these printers don’t use transfer corona wires but instead use transfer corona rollers, which dramatically reduce ozone emissions.
Duplexing Assembly
Any laser printer worth its money today can print on both sides of the paper (as can some nicer models of inkjet printers, mentioned earlier). This is accomplished through the use of a duplexing assembly. Usually located inside or on the back of the printer, the assembly is responsible for taking the paper, turning it over, and feeding back into the printer so the second side can be printed.
Electrophotographic (EP) Print Process
The EP print process is the process by which an EP laser printer forms images on paper. It consists of seven major steps, each designed for a specific goal. Although many different manufacturers call these steps different things or place them in a different order, the basic process is still the same. Here are the steps in the order you will see them on the exam:
- Processing
- Charging
- Exposing (writing)
- Developing
- Transferring
- Fusing
- Cleaning
Before any of these steps can begin, however, the controller must sense that the printer is ready to start printing (toner cartridge installed, fuser warmed to temperature, and all covers in place). Printing cannot take place until the printer is in its ready state, usually indicated by an illuminated Ready LED light or a display that says something like 00 READY (on HP printers). The computer sends the print job to the printer, which begins processing the data as the first step to creating output.
Step 1: Processing
The processing step comprises two parts: receiving the image and creating the image. The computer sends the print job to the printer, which receives it via its print interface (USB, wireless, etc.). Then, the printer needs to create the print job in such a way that it can accurately produce the output.
If you think back to our discussion of dot-matrix printing earlier in this chapter, you might recall that dot-matrix printers produce images by creating one strip of dots at a time across the page. Laser printers use the same concept of rendering one horizontal strip at a time to create the image. Each strip across the page is called a scan line or a raster line.
A component of the laser printer called the Raster Image Processor (RIP) manages raster creation. Its responsibility is to generate an image of the final page in memory. How the raster gets created is dependent upon the page description language that your system is using, such as PostScript (PS) or Printer Control Language (PCL). Ultimately, this collection of lines is what gets written to the photosensitive drum and onto the paper.
Step 2: Charging
The next step in the EP process is charging (see Figure 11.15). In this step, a special wire or roller (called a charging corona) within the EP toner cartridge (above the photo sensitive drum) gets high voltage from the HVPS. It uses this high voltage to apply a strong, uniform negative charge (around –600VDC) to the surface of the photosensitive drum.

Figure 11.15 The charging step of the EP process
Step 3: Exposing (Writing)
Next is exposing the drum to the image, often referred to as the writing or exposing step. In this step, the laser is turned on and scans the drum from side to side, flashing on and off according to the bits of information that the printer controller sends it as it communicates the individual bits of the image. Wherever the laser beam touches, the photosensitive drum’s charge is severely reduced from –600VDC to a slight negative charge (around –100VDC). As the drum rotates, a pattern of exposed areas is formed, representing the image to be printed. Figure 11.16 shows this process.
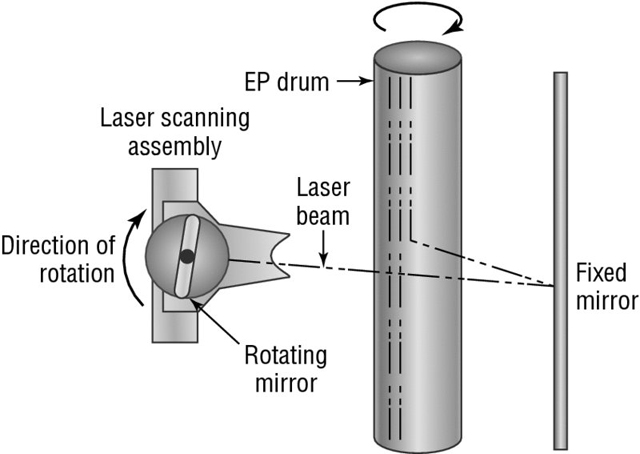
Figure 11.16 The writing step of the EP process
At this point, the controller sends a signal to the pickup roller to feed a piece of paper into the printer, where it stops at the registration rollers.
Step 4: Developing
Now that the surface of the drum holds an electrical representation of the image being printed, its discrete electrical charges need to be converted into something that can be transferred to a piece of paper. The EP process step that accomplishes this is developing (see Figure 11.17). In this step, toner is transferred to the areas that were exposed in the writing step.
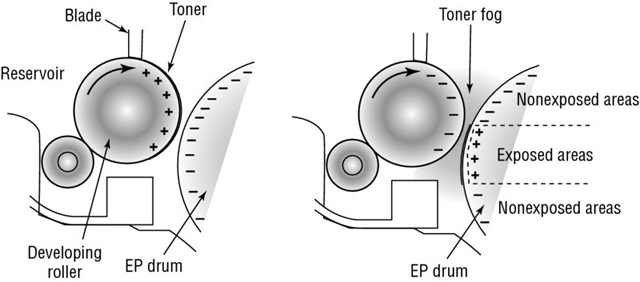
Figure 11.17 The developing step of the EP process
A metallic roller called the developing roller inside an EP cartridge acquires a –600VDC charge (called a bias voltage) from the HVPS. The toner sticks to this roller because there is a magnet located inside the roller and because of the electrostatic charges between the toner and the developing roller. While the developing roller rotates toward the photosensitive drum, the toner acquires the charge of the roller (–600VDC). When the toner comes between the developing roller and the photosensitive drum, the toner is attracted to the areas that have been exposed by the laser (because these areas have a lesser charge, –100VDC). The toner also is repelled from the unexposed areas (because they are at the same –600VDC charge and like charges repel). This toner transfer creates a fog of toner between the EP drum and the developing roller.
The photosensitive drum now has toner stuck to it where the laser has written. The photosensitive drum continues to rotate until the developed image is ready to be transferred to paper in the next step.
Step 5: Transferring
At this point in the EP process, the developed image is rotating into position. The controller notifies the registration rollers that the paper should be fed through. The registration rollers move the paper underneath the photosensitive drum, and the process of transferring the image can begin; this is the transferring step.
The controller sends a signal to the charging corona wire or roller (depending on which one the printer has) and tells it to turn on. The corona wire/roller then acquires a strong positive charge (+600VDC) and applies that charge to the paper. Thus charged, the paper pulls the toner from the photosensitive drum at the line of contact between the roller and the paper because the paper and toner have opposite charges. Once the registration rollers move the paper past the corona wire, the static-eliminator strip removes all charge from that line of the paper. Figure 11.18 details this step. If the strip didn’t bleed this charge away, the paper would attract itself to the toner cartridge and cause a paper jam.
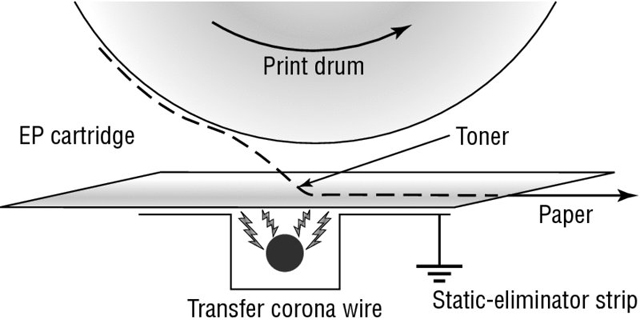
Figure 11.18 The transferring step of the EP process
The toner is now held in place by weak electrostatic charges and gravity. It will not stay there, however, unless it is made permanent, which is the reason for the fusing step.
Step 6: Fusing
The penultimate step before the printer produces the finished product is called fusing. Here the toner image is made permanent. The registration rollers push the paper toward the fuser rollers. Once the fuser grabs the paper, the registration rollers push for only a short time longer. The fuser is now in control of moving the paper.
As the paper passes through the fuser, the 350° F fuser roller melts the polyester resin of the toner, and the rubberized pressure roller presses it permanently into the paper (see Figure 11.19). The paper continues through the fuser and eventually exits the printer.
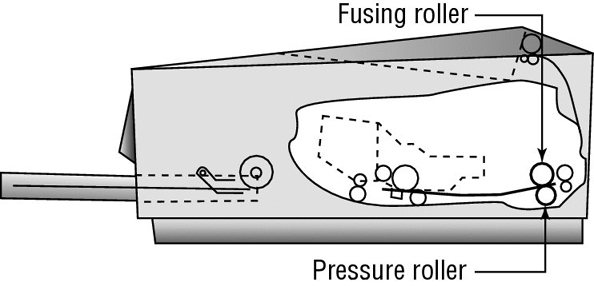
Figure 11.19 The fusing step of the EP process
Once the paper completely exits the fuser, it trips a sensor that tells the printer to finish the EP process with the cleaning step.
Step 7: Cleaning
In the last part of the laser print process, a rubber blade inside the EP cartridge scrapes any toner left on the drum into a used toner receptacle inside the EP cartridge, and a fluorescent lamp discharges any remaining charge on the photosensitive drum. (Remember that the drum, being photosensitive, loses its charge when exposed to light.) This step is called cleaning (see Figure 11.20).

Figure 11.20 The cleaning step of the EP process
The EP cartridge is constantly cleaning the drum. It may take more than one rotation of the photosensitive drum to make an image on the paper. The cleaning step keeps the drum fresh for each use. If you didn’t clean the drum, you would see ghosts of previous pages printed along with your image.
At this point, the printer can print another page, and the EP process can begin again.
Summary of the EP Print Process
Figure 11.21 provides a diagram of all of the parts involved in the EP printing process. Here’s a summary of the process, which you should commit to memory:
- The printer receives and processes the image and stores a page in memory.
- The printer places a uniform –600VDC charge on the photosensitive drum by means of a charging corona.
- The laser “paints” an image onto the photosensitive drum, discharging the image areas to a much lower voltage (–100VDC).
- The developing roller in the toner cartridge has charged (–600VDC) toner stuck to it. As it rolls the toner toward the photosensitive drum, the toner is attracted to (and sticks to) the areas of the photosensitive drum that the laser has discharged.
- The image is then transferred from the drum to the paper at its line of contact by means of the transfer corona wire (or corona roller) with a +600VDC charge. The static-eliminator strip removes the high, positive charge from the paper, and the paper, now holding the image, moves on.
- The paper then enters the fuser, where a fuser roller and the pressure roller make the image permanent. The paper exits the printer.
- The printer uses a rubber scraper to clean the photosensitive drum. At that point, it is ready to print the next page or it returns to the ready state.

Figure 11.21 The EP print process
Thermal Printers
The types of printers that you have learned about so far in this chapter account for 90 percent of all printers that are used with home or office computers and that you will see as a repair technician. The remaining 10 percent consist of other types of printers that primarily differ by the method they use to put colored material on the paper to represent what is being printed. Examples of these include solid ink, dye sublimation, and thermal printers. Keep in mind that, for the most part, these printers operate like other printers in many ways: They all have a paper-feed mechanism (sheet-fed or roll); they all require consumables such as ink or toner and paper; they all use the same interfaces, for the most part, as other types of printers; and they are usually about the same size.
Thermal printing technology is used in many point-of-sale terminals and older fax machines (newer fax machines usually use inkjet or laser technology). They print on a kind of special, waxy paper that comes on a roll; the paper turns black when heat passes over it. Thermal printers work by using a print head that is the width of the paper. When it needs to print, a heating element heats certain spots on the print head. The paper below the heated print head turns black in those spots. As the paper moves through the printer, the pattern of blackened spots forms an image on the page of what is being printed. Another type of thermal printer uses a heat-sensitive ribbon instead of heat-sensitive paper. A thermal print head melts wax-based ink from the ribbon onto the paper. These are called thermal transfer or thermal wax-transfer printers.
Thermal direct printers typically have long lives because they have few moving parts. The only unique part that you might not be as familiar with is the paper feed assembly, which oftentimes needs to accommodate a roll of paper instead of sheets. The paper is somewhat expensive, doesn’t last long (especially if it is left in a very warm place, like a closed car in summer), and produces poorer-quality images than the paper used by most of the other printing technologies.
Virtual Printers
All of the print technologies that we have covered so far are physical technologies; that is, they do something to the paper to produce an image, by using ink, toner, or heat. The final technology that we need to cover is virtual printing, which sends the desired output to a file instead of to paper. From the end user’s standpoint, starting the print process is the same. They click Print in their application and the process starts. From there though, instead of sending the output to an electromechanical device, a new file containing the output is generated.
Printing to a file is nothing new; this option has been around for probably 20 years or more. You open the document (or other file) that you wanted to print, select Print, and a print window similar to the one shown in Figure 11.22 opens. Once there, you check the Print To File box, and then click OK. Then, choose where to save the file (just as saving any other file), and after you chose a destination, you are done. Some programs or operating systems would even let you print to an image (such as JPG) instead of a file, but the process works the same way.
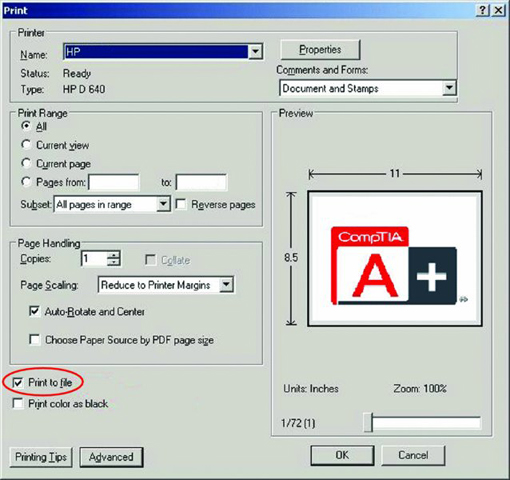
Figure 11.22 Print To File option
It used to be that people only chose this option when the printer was not available. You could print your output to a file, take the file to a different machine that had a printer available, and print the file from that machine. Now, you might ask, why wouldn’t you just take the original file from the first computer to the second and print it from the application? That would make sense, but this method allowed you to print from a second computer that didn’t have the application in which you created the file installed on it. There was one big caveat; you had to be printing to the same type of printer using the same print driver as you used to publish the electronic print file; otherwise, it wouldn’t work. The upshot was that it was rarely, if ever, used.
Another option has emerged though, and this one is actually useful! Instead of printing to a generic file format that can be later used to produce a paper copy, you can print to a PDF file. Basically, you are just creating a PDF file using your application’s print function.
To print to PDF from Windows, you need to install an application that installs support for printing to PDF (the Windows operating system does not currently support this natively). There are no shortage of apps in the market that will do this; for example Adobe Acrobat (www.adobe.com), CutePDF Writer (www.cutepdf.com), and Nitro PDF (www.gonitro.com) will do the trick. When you install one of these apps, it will add the option to print to PDF as one of your available printers. After it’s installed, open an app, choose the print option, and you will get a screen similar to the one shown in Figure 11.23.

Figure 11.23 Printing to PDF
Select CutePDF Writer (or your version of it), and click Print. A window will pop up asking where you want to save the file. Save it and a PDF file is created for you. It’s as easy as that.
As we mentioned earlier, Windows does not come with the Print To PDF option by default. It does, however, come with the Print To XPS option (you can see the Microsoft XPS Document Printer option on the right side of Figure 11.23). An Open XML Paper Specification (XPS) file is Microsoft’s version of a PDF. It’s designed to be an open standard, like PDF, but it hasn’t really taken off in terms of popularity. In fact, with Windows 8, Microsoft included support for OpenXPS (OXPS), which is incompatible with the XPS reader included with Windows 7. In addition, Windows 8 includes a native PDF reader, so it seems that Microsoft isn’t heavily invested in supporting the XPS format itself.
Let’s go back to printing to an image for a minute. If your program doesn’t support printing to an image but you need the output of the file in an image format (JPG, TIF, PNG, or other), you can print the file as a PDF first, and then convert it to an image file. There are dozens of free image file converters on the Web.
To summarize, there are four potential options for printing to a virtual printer: print to file, print to image, print to PDF, and print to XPS. Of the four, the only one that you will likely find to be useful is print to PDF.
Installing and Configuring Printers
Odds are that if someone owns a computer, they own a printer as well. If they don’t, they have easy access to a printer at a library, work, or some other place. Many retailers and computer manufacturers make it incredibly easy to buy a printer because they often bundle a printer with a computer system as an incentive to get you to buy.
The A+ 220-901 exam will test your knowledge of the procedures to install printers. We’re going to break this section into two parts: printer interface components and installing and sharing printers.
Printer Interface Components
A printer’s interface is the collection of hardware and software that allows the printer to communicate with a computer. The hardware interface is commonly called a port. Each printer has at least one interface, but some printers have several to make them more flexible in a multiplatform environment. If a printer has several interfaces, it can usually switch between them on the fly so that several computers can print at the same time.
An interface incorporates several components, including its interface type and the interface software. Each aspect must be matched on both the printer and the computer. For example, if you have an older HP LaserJet 4L, it only has a parallel port. Therefore, you must use a parallel cable as well as the correct software for the platform being used (for example, a Macintosh HP LaserJet 4L driver if you connect it to a Macintosh computer).
Interface Types
When we say interface types, we’re talking about the ports used in getting the printed information from the computer to the printer. There are two major classifications here: wired and wireless. Wired examples are serial, parallel, USB, and Ethernet. Wireless options include 802.11 and Bluetooth. You’ve learned about these connections in earlier chapters, but now you will learn how they apply to printers.
Serial
When computers send data serially, they send it 1 bit at a time, one after another. The bits stand in line like people at a movie theater, waiting to get in. Old-time serial (RS-232) connections were painfully slow, but new serial technology (FireWire, Thunderbolt, and others) makes it a more viable option than parallel. While it’s quite common to see USB (another type of serial connection) printers on the market, it’s rare to find any other types of serial printers out there.
Parallel
When a printer uses parallel communication, it is receiving data 8 bits at a time over eight separate wires (one for each bit). Parallel communication was the most popular way of communicating from computer to printer for many years, mainly because it was faster than serial. In fact, the parallel port became so synonymous with printing that a lot of companies simply started referring to parallel ports as printer ports. Today though, parallel printers are becoming uncommon. The vast majority of wired printers that you see will be USB or Ethernet.
A parallel cable consists of a male DB25 connector that connects to the computer and a male 36-pin Centronics connector that connects to the printer. Most of the cables are shorter than 10′. Parallel cables should be IEEE 1284 compliant.
Universal Serial Bus (USB)
The most popular type of wired printer interface as this book is being written is the Universal Serial Bus (USB). In fact, it is the most popular interface for just about every peripheral. The convenience for printers is that it has a higher transfer rate than older serial or parallel connections, and it automatically recognizes new devices. And of course, USB is physically very easy to connect.
Ethernet
Many printers sold today have a wired Ethernet interface that allows them to be hooked directly to an Ethernet cable. These printers have an internal network interface card (NIC) and ROM-based software that allow them to communicate on the network with servers and workstations.
As with any other networking device, the type of network interface used on the printer depends on the type of network to which the printer is being attached. It’s likely that the only connection type that you will run into is RJ-45 for an Ethernet connection.
Wireless
The latest boon in printer interface technology is wireless. Clearly, people love their Wi-Fi because it enables them to roam around an office and still remain connected to one another and to their network. It logically follows that someone came up with the brilliant idea that it would be nice if printers could be that mobile as well—after all, many are on carts with wheels. Some printers have built-in Wi-Fi interfaces, while others can accept wireless network cards. Wi-Fi enabled printers support nearly all 802.11 standards (a, b, g, n, ac), and the availability of devices will mirror the current popularity of each standard.
The wireless technology that is especially popular among peripheral manufacturers is Bluetooth. Bluetooth is a short-range wireless technology; most devices are specified to work within 10 meters (33 feet). Printers such as the HP Officejet 100 mobile printer have Bluetooth capability.
When printing with a Bluetooth-enabled device (like a smartphone or tablet) and a Bluetooth-enabled printer, all you need to do is get within range of the device (that is, move closer), select the print driver from the device, and choose Print. The information is transmitted wirelessly through the air using radio waves and is received by the device.
Interface Software
Now that we’ve looked at the ways that you can connect your printer, it’s time to face a grim reality: Computers and printers don’t know how to talk to each other. They need help. That help comes in the form of interface software used to translate software commands into commands that the printer can understand.
There are two major components of interface software: the page-description language and the driver software. The page-description language (PDL) determines how efficient the printer is at converting the information to be printed into signals that the printer can understand. The driver software understands and controls the printer and must be written to communicate between a specific operating system and specific printer. It is very important that you use the correct interface software for your printer. If you use either the wrong page-description language or the wrong driver software, the printer will print garbage—or possibly nothing at all.
Page-Description Languages
A page-description language works just as its name implies: It describes the whole page being printed by sending commands that describe the text as well as the margins and other settings. The controller in the printer interprets these commands and turns them into laser pulses (or pin strikes). There are several printer communication languages in existence, but the three most common ones are PostScript, Printer Command Language (PCL), and Graphics Device Interface (GDI).
The first page-description language was PostScript. Developed by Adobe, it was first used in the Apple LaserWriter printer. It made printing graphics fast and simple. Here’s how PostScript works: The PostScript printer driver describes the page in terms of “draw” and “position” commands. The page is divided into a very fine grid (as fine as the resolution of the printer). When you want to print a square, a communication like the following takes place:
POSITION 1,42%DRAW 10%POSITION 1,64%DRAW10D% . . .
These commands tell the printer to draw a line on the page from line 42 to line 64 (vertically). In other words, a page-description language tells the printer to draw a line on the page, gives it the starting and ending points, and that’s that. Rather than send the printer the location of each and every dot in the line and an instruction at each and every location to print that location’s individual dot, PostScript can get the line drawn with fewer than five instructions. As you can see, PostScript uses commands that are more or less in English. The commands are interpreted by the processor on the printer’s controller and converted into the print-control signals.
PCL was developed by Hewlett-Packard in 1984 and originally intended for use with inkjet printers as a competitor to PostScript. Since then, its role has been expanded to virtually every printer type, and it’s a de facto industry standard.
GDI is actually a Windows component and is not specific to printers. Instead, it’s a series of components that govern how images are presented to both monitors and printers. GDI printers work by using computer processing power instead of their own. The printed image is rendered to a bitmap on the computer and then sent to the printer. This means that the printer hardware doesn’t need to be as powerful, which results in a less expensive printer. Generally speaking, the least expensive laser printers on the market are GDI printers.
The main advantage of page-description languages is that they move some of the processing from the computer to the printer. With text-only documents, they offer little benefit. However, with documents that have large amounts of graphics or that use numerous fonts, page-description languages make the processing of those print jobs happen much faster. This makes them an ideal choice for laser printers, although nearly every type of printer uses them.
Driver Software
The driver software controls how the printer processes the print job. When you install a printer driver for the printer you are using, it allows the computer to print to that printer correctly (assuming that you have the correct interface configured between the computer and printer). The driver must be written specifically for the operating system the computer is using and for the printer being used. In other words, Mac clients need a different driver than Windows clients do, even to print to the same printer.
When you need to print, you select the printer driver for your printer from a preconfigured list. The driver that you select has been configured for the type, brand, and model of printer as well as the computer port to which it is connected. You can also select which paper tray the printer should use as well as any other features the printer has (if applicable). Also, each printer driver is configured to use a particular page-description language.
Installing and Sharing Local Printers
Although every device is different, there are certain accepted methods used for installing almost all of them. The following procedure works for installing many kinds of devices:
- Attach the device using a local port (generally USB, but maybe parallel) and connect the power.
- Install and update the device driver and calibrate the device.
- Configure options and settings.
- Print a test page.
- Verify compatibility with the operating system and applications.
- Educate users about basic functionality.
Step 1: Attach the Device Using a Local Port and Connect the Power
When installing a printer, you must first take the device out of its packaging and set it up on a flat, stable surface. Then, with the device powered off, connect it to the host computer. Today, the vast majority of local printers are USB, but you will occasionally find ones that use different ports as well.
Once you have connected the device, connect power to it using whatever supplied power adapter comes with it. Some devices have their own built-in power supply and just need an AC power cord connecting the device to the wall outlet, while others rely on an external transformer and power supply. Finally, turn on the device.
Step 2: Install and Update the Device Driver and Calibrate the Device
Once you have connected and powered up the device, boot up the computer and wait for Windows to recognize the device. Windows will pop up a screen similar to the one shown in Figure 11.24, and you will choose Add A Local Printer. This wizard will allow you to configure the driver for the printer (depending on the device). You can insert the driver CD or DVD that comes with the device and the wizard will guide you through the device driver installation. If Windows fails to recognize the device, you can use the Add A Printer Wizard (in Windows 7 and Windows 8/8.1) or the Add Printer Wizard (in older Windows versions) to troubleshoot the installation and to install the device drivers.
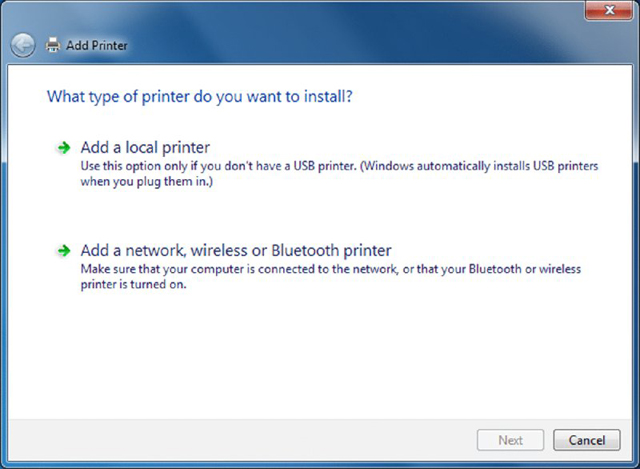
Figure 11.24 Adding a printer in Windows 7
Once the driver is installed, the device will function. But some devices, such as inkjet printers, must be calibrated. If the printer requires this step, it will tell you. You’ll need to walk through a few steps before the printer will print, but instructions will be provided either on your computer screen or on the printer’s display.
Each manufacturer’s process is different, but a typical alignment/calibration works like this:
- During software installation, the installation wizard asks you if you would like to calibrate now, to which you will respond Yes or OK.
- The printer prints out a sheet with multiple sets of numbered lines. Each set of lines represents an alignment instance.
- The software will ask you which set(s) looks the best. Enter the number and click OK or Continue.
- Some alignment routines end at this point. Others will reprint the alignment page and see if the alignment “took.” If not, you can reenter the number of the one that looks the best.
- Click Finish to end the alignment routine.
Step 3: Configure Options and Settings
Once you have installed the software and calibrated the device, you can configure any options that you would like for the printer. All of the settings and how to change them can be found online or in your user manual.
Where you configure specific printer properties depends a lot on the printer itself. As a rule of thumb, you’re looking for the Printer Properties or Printing Preferences applet. In Windows 7, if you click Start and then Devices And Printers, you will get a window similar to the one shown in Figure 11.25. At the top there is an option to add a device or a printer. If you double-click the printer icon, you will get another window (like the one in Figure 11.26) that lets you get to the printer’s configuration options.
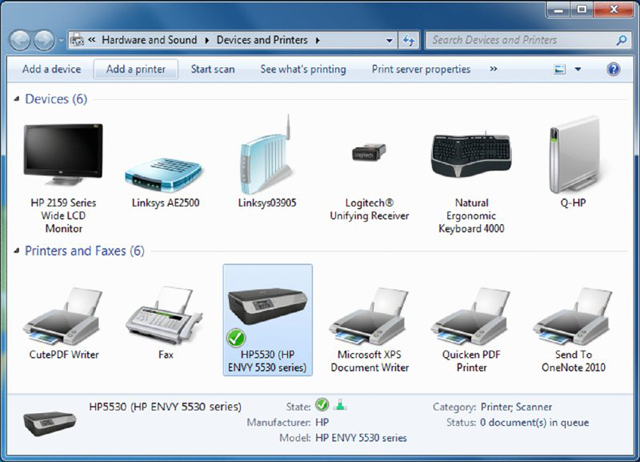
Figure 11.25 Devices And Printers
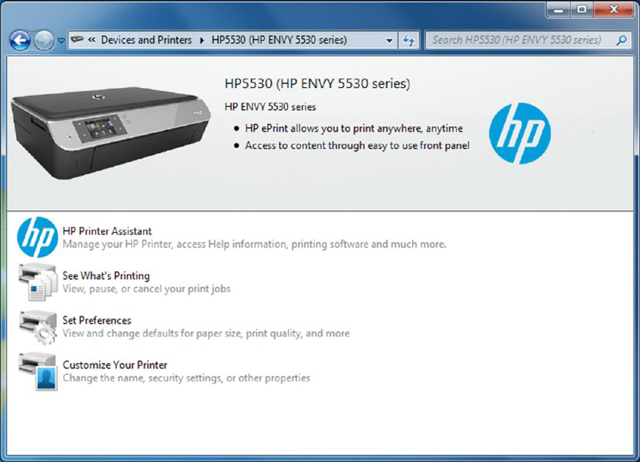
Figure 11.26 Printer information and options
Various configuration features can be set from each menu option. In this example, there are three options in which you would probably be most interested. The first one, See What’s Printing, lets you look at and manage the print queue. This is something we’ll talk about more in Chapter 12. The second one, Set Preferences, gives you a number of settings related to print output. The third one, Customize Your Printer, is where you find the printer’s properties, shown in Figure 11.27.
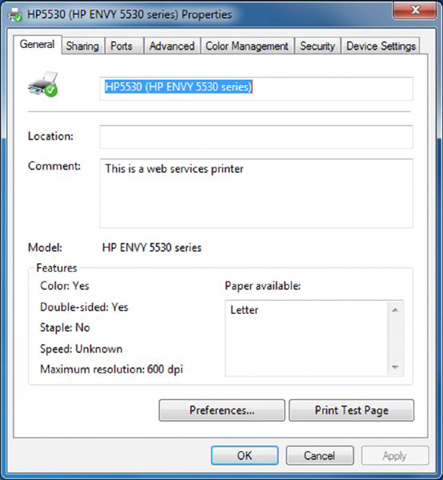
Figure 11.27 Printer Properties dialog box
From the Printer Properties dialog box, you can configure nearly any option that you want to for your printer. The Properties dialog box will be pretty much the same for any printer that you install, and we’ll cover a few options here in a minute. First though, notice the Preferences button on the General tab. Clicking this will produce a new window like the one in Figure 11.28. That window will have configuration options based on your specific model of printer.

Figure 11.28 Printing Preferences window
Now back to the Properties dialog box. The printer’s Properties dialog box is less about how the printer does its job and more about how people can access the printer. From the Properties dialog box, you can share the printer, set up the port that it’s on, configure when the printer will be available throughout the day, and specify who can use it. Let’s take a look at a few key tabs. We’ve already taken a look at the General tab, which has the Preferences button as well as the all-important Print Test Page button. It’s handy for troubleshooting!
Figure 11.29 shows the Sharing tab. If you want other users to be able to print to this printer, you need to share it. Notice the warnings above the Share This Printer check box. Those are important to remember. When you share the printer, you give it a share name. Network users can map the printer through their own Add Printer Wizard (choosing a networked printer) and by using the standard \computer_nameshare_name convention. User permissions are managed through the Security tab.
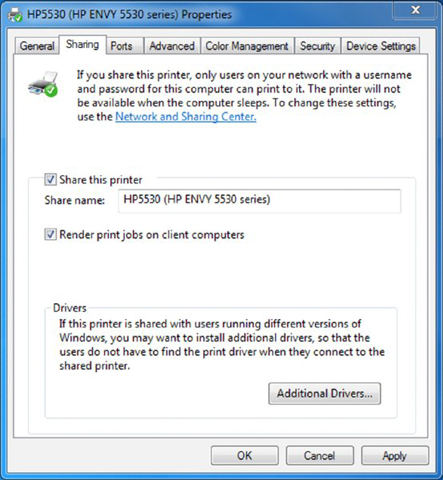
Figure 11.29 Printer Properties Sharing tab
One other important feature to call out on this tab is the Additional Drivers button. This one provides a description that is fairly self-explanatory.
Figure 11.30 shows the Ports tab. Here you can configure your printer port and add and delete ports. There’s also a check box to enable printer pooling. This would be used if you have multiple physical printers that operate under the same printer name.

Figure 11.30 Printer Properties Ports tab
Figure 11.31 shows the important Advanced tab of the printer Properties dialog box. On this tab, you can configure the printer to be available during only certain hours of the day. This might be useful if you’re trying to curtail after-hours printing of non-work-related documents, for example. You can also configure the spool settings. For faster printing, you should always spool the jobs instead of printing directly to the printer. However, if the printer is printing garbage, you can try printing directly to it to see if the spooler is causing the problem.
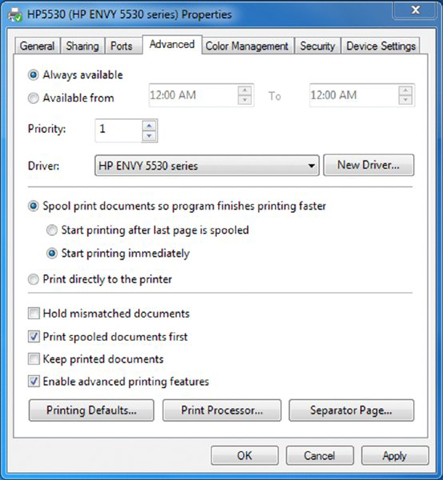
Figure 11.31 Printer Properties Advanced tab
Regarding the check boxes at the bottom, you will always want to print spooled documents first because that speeds up the printing process. If you need to maintain an electronic copy of all printed files, check the Keep Printed Documents check box. Keep in mind that this will eat up a lot of hard disk space.
Finally, the Printing Defaults button takes you to the Printing Preferences window (shown earlier in Figure 11.28). Print Processor lets you select alternate methods of processing print jobs (not usually needed), and Separator Page lets you specify a file to use as a separator page (a document that prints out at the beginning of each separate print job, usually with the user’s name on it), which can be useful if you have several (or several dozen) users sharing one printer.
Step 4: Print a Test Page
Once you have configured your printer, you are finished and can print a test page to test its output. Windows has a built-in function for doing just that. To print a test page, right-click the icon for the printer you installed from within the Devices And Printers window and click Printer properties. On the General tab of the Printer properties (shown in Figure 11.27), there will be a Print Test Page button. Click that button and Windows will send a test page to the printer. If the page prints, your printer is working. If not, double-check all of your connections. If they appear to be in order, then read ahead to Chapter 12 for troubleshooting tips.
Step 5: Verify Compatibility with Operating System and Applications
Once your printer is installed and you have printed a test page, everything else should work well, right? That’s usually true, but it’s good practice to verify compatibility with applications before you consider the device fully installed.
With printers, this process is rather straightforward. Open the application you’re wondering about and print something. For example, open up Microsoft Word, type in some gibberish (or open a real document if you want), and print it out. If you are running non-Microsoft applications (such as a computer-aided drafting program or accounting software) and have questions about their compatibility with the printer, try printing from those programs as well.
Step 6: Educate Users about Basic Functionality
Most users today know how to print, but not everyone knows how to install the right printer or how to print efficiently. This can be a significant issue in work environments.
Say your workplace has 10 different printers, and you just installed number 11. First, your company should use a naming process to identify the printers in a way that makes sense. Calling a printer HPLJ4 on a network does little to help users understand where that printer is in the building. After installing the printer, offer installation assistance to those who might want to use the device. Show users how to install the printer in Windows (or if printer installation is automated, let them know that they have a new printer and where it is). Also, let the users know the various options available on that printer. Can it print double-sided? If so, you can save a lot of paper. Show users how to configure that. Is it a color printer? Do users really need color for rough drafts of documents or presentations? Show users how to print in black and white on a color printer to save the expensive color ink or toner cartridges.
On the printer we’ve used as an example in this chapter, most of the options involving print output are located in Preferences (look back at Figure 11.28). Two of them are on the Printing Shortcut tab: Duplex (or Print On Both Sides) and Print Quality (Best, Normal, Draft). Orientation (Portrait or Landscape) is set on the Layout tab. This printer does not have a collate feature, which is used if you are printing several copies of a longer document. Collation will let you select whether you want it to print pages in order (1, 2, 3. . . 1, 2, 3. . . and so on) or multiple copies of the same page at once (1, 1, 1. . . 2, 2, 2. . . and so forth).
In Exercise 11.2, we’ll step through the process of installing a USB printer in Windows 7; the process will work in Windows XP and Vista as well.
Installing and Sharing Networked Printers
The previous section was about installing a printer attached to your local computer. There are advantages to that approach, such as being able to manage and control your own printer, not to mention having a printer at your own desk. That doesn’t happen often in the business world these days!
There are some big disadvantages as well. First, it means that all users who need to print to your device may need local accounts on your computer, unless you are on a domain or have configured a homegroup. If so, you will need to manage security for these accounts and the printer. Second, your computer is the print server. The print server is the device that hosts the printer and processes the necessary printer commands. This can slow your system down. Third, because your computer is the print server, if for any reason it’s turned off, no one will be able to print to that device.
There is another option, though. Instead of needing a specific computer to be the print server, why not make the print server part of the printer itself, or make it a separate network device that hosts the printers? That is exactly the principle behind network printing. Next, we will cover two types of network printing, local network printing and cloud printing, as well as talk about data privacy concerns with printing to public or shared printers.
Local Network Printing
The key to local network printing is that you are moving the print server from your computer to another location, accessible to other users on the network. Therefore, the print server needs a direct attachment to the network, via either a wired (RJ-45) or wireless connection. There are two major varieties of print servers that you will find. The first is incorporated into the printer itself (called an integrated print server), and the second is a separate hardware print server. If you are using a stand-alone print server, the printers attach to the print server, either physically or logically. In most cases, if a printer is capable of connecting directly to a network, it has the ability to be its own print server.
Installing and using a networked printer is very similar to installing and using a local printer. You need to ensure that both devices are plugged in, turned on, and attached to the network (either with an RJ-45 Ethernet connection or by using wireless). Probably the biggest difference is that when you install it, you need to tell your computer that you are adding a networked printer instead of a local one. For example, in Windows 7, when you open the Add Printer utility (shown in Figure 11.24), you choose Add A Network, Wireless, Or Bluetooth Printer instead of Add A Local Printer. From there, you will be asked to install the printer driver, just as you would if the printer were directly attached to your computer. Once it’s installed, you use it just as you would use a local printer, including setting the configuration options that we looked at in earlier sections. Every computer on the local network should be able to see and add the printer in the same way.
There are a few other ways that you can add shared networked printers, and they are by using TCP, Bonjour, and AirPrint.
TCP Printing
Printers that are network aware need IP addresses, so it makes sense that you can add a networked printer by using TCP/IP, also known as TCP printing. Exercise 11.3 walks you through the general process of installing a TCP printer, using Windows 7 as an example.
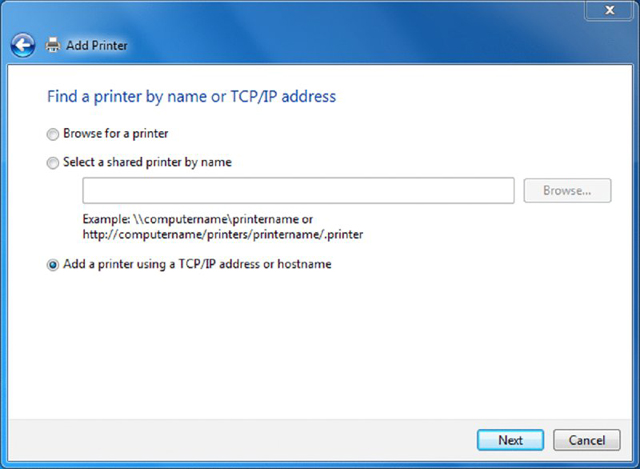
Figure 11.32 Adding a TCP printer
Some installations will ask you which TCP printing protocol you want to use: RAW or LPR. RAW (also called the Standard TCP/IP Port Monitor) is the default, and it uses TCP port 9100 by default. It also uses the SNMP protocol for bidirectional communication between the computer and the printer. LPR is older, and the protocol is included for use with legacy systems. It’s limited to source ports 721–731 and the destination port 515.
After the printer is installed, it will appear in your Devices And Printers window just as any other printer would.
There are a few advantages to using TCP printing. First, it sends the print jobs directly to the printer, so your system does not need to act as the print server or spend processing time dealing with formatting the print job. Second, it allows clients with different OSs, such as Linux or OS X, to add printers without worrying about intra-OS conflicts.
Bonjour
Apple introduced Bonjour in 2002 (then under the name Rendezvous) as an implementation of zero configuration networking. It’s designed to enable automatic discovery of devices and services on local networks using TCP/IP as well as to provide hostname resolution. Currently, it comes installed by default on Apple’s OS X and iOS operating systems. Bonjour makes it easy to discover and install printers that have been shared by other Bonjour-enabled clients on the network.
Even though Apple developed Bonjour, it does work on other operating systems. For example, it comes with iTunes and the Safari browser, so if you have either of those installed on your, say, Windows computer, odds are that you have Bonjour as well. Once installed, the Bonjour service starts automatically and scans the network looking for shared devices. Exercise 11.4 shows you how to see if Bonjour is installed in Windows.

Figure 11.33 Bonjour service is set to start automatically
Bonjour only works on a single broadcast domain, meaning that it will not find a printer or other device if it’s on the other side of a router from your computer. All major printer manufacturers support Bonjour technology.
If you are using a Mac, adding a Bonjour printer is easy. You open System Preferences ➢ Print And Scan, click the plus sign under Printers to open the Add Printer window, and look for the printer on the list. If the Mac doesn’t have the driver available, you will be asked to provide it. Otherwise, you’re done.
In order to add or share a Bonjour printer from Windows, you need to download Bonjour Print Services for Windows. It’s found on Apple’s support site at https:// support.apple.com/kb/dl999.
AirPrint
The one big complaint that Apple aficionados had about Bonjour was that it didn’t support printing from iPhones or iPads. In 2010, Apple introduced AirPrint to meet that need.
The idea behind AirPrint is quite simple. Mobile devices can automatically detect AirPrint-enabled printers on their local network and print to them without requiring the installation of a driver. To be fair, what Apple really did was eliminate the need for a specific printer driver to be installed on the client and replaced it with the AirPrint concept. Then it was up to the printer manufacturers to develop their own drivers that talked to AirPrint. HP was happy to oblige with its Photosmart Plus series, and other manufacturers soon followed. The list of AirPrint-enabled printers is available at https://support.apple.com/en-us/HT201311. From the end-user standpoint though, no driver is required.
There really is no installation process, and printing is easy. Just be sure that your mobile device is on the same local network as an AirPrint printer. When you attempt to print from your device, select the printer to which you want to print, and it should work.
Cloud Printing
Through the first decade of the 2000s, it seemed like wireless networking was the hot new trend in computing. Now that technology has matured a bit, and the cloud has replaced it as the trend du jour. Not everyone knows what the cloud is or what the cloud does, but they think they are supposed to have it. The cloud would be a sad place if it didn’t support printing, but fortunately for us it does.
For the purpose of this chapter, know that cloud printing means printing to a remote device, one that is not necessarily located on your local network. Essentially, you are using the Internet to send the print job from your device to the printer from which you want the output to come, and the printer can be located practically anywhere in the world. To use cloud printing, you need to work through a cloud printing service, such as Google Cloud Print, HP ePrint, or others. Some printers are cloud-ready, but you can often get older devices to work on the cloud as well.
Cloud services will have their own steps on how to activate printing, but in Exercise 11.5 we will go through an example using Google Cloud Print.
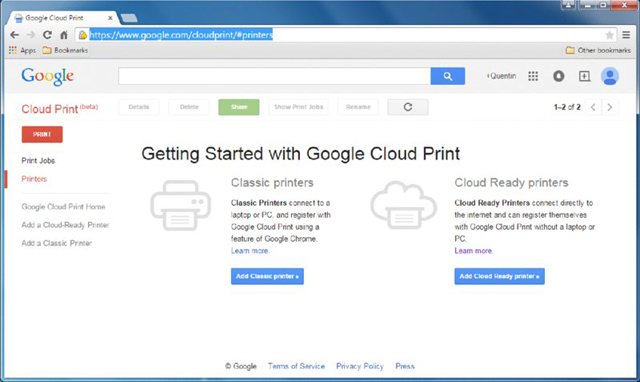
Figure 11.34 Getting Started with Google Cloud Print
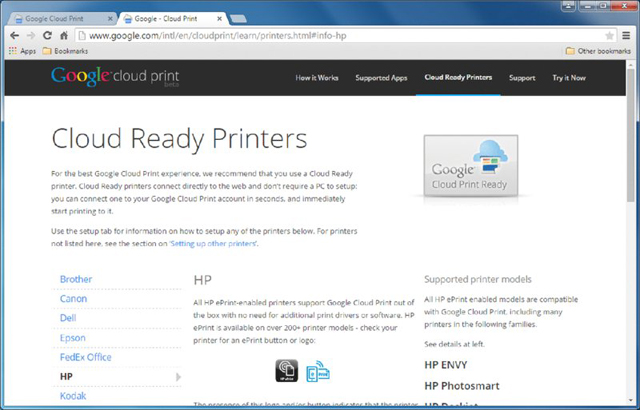
Figure 11.35 Adding an HP cloud-ready printer
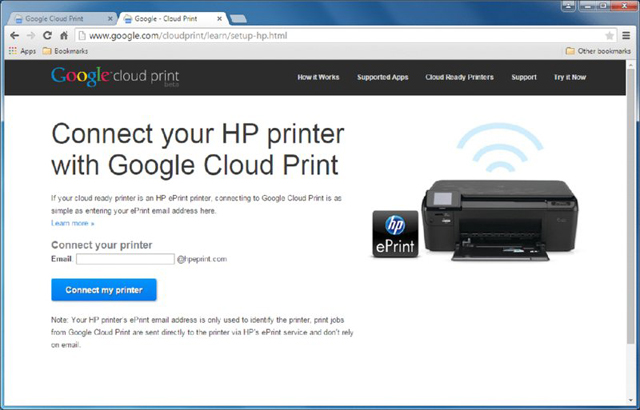
Figure 11.36 Enter the printer’s email address
After registering your printer, you can print from Google Cloud Print, as shown in Figure 11.37. Notice that the printer is now installed in the right pane. Exercise 11.6 shows you how to print to Google Cloud Print using the Chrome browser.
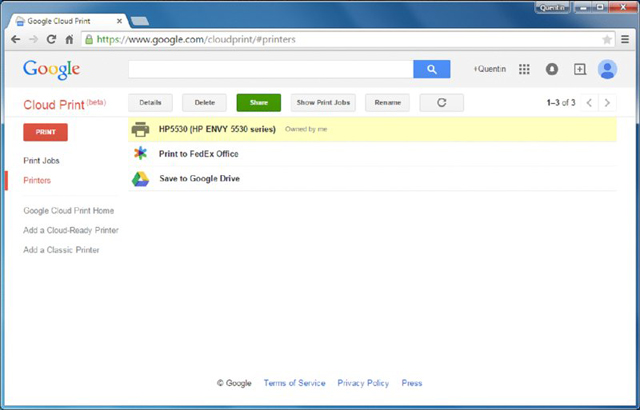
Figure 11.37 Printer registered with Google Cloud Print
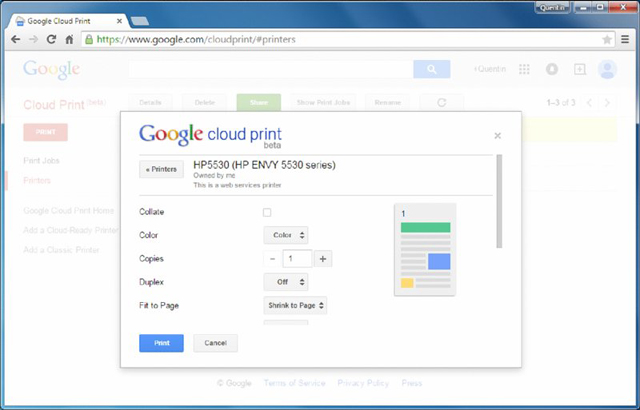
Figure 11.38 Google Cloud Print options
The steps involved to print directly from client computers differ based on the client you are using. Table 11.1 provides information to get you started in the right direction.
Table 11.1 Google Cloud Print OS client options
| Client | Option |
| Windows | Go to https://tools.google.com/dlpage/cloudprintdriver to download the print client. After installation, Google Cloud Printer will appear in your list of printers when you print from an application. |
| Mac OS X | Download Cloud Printer from the Mac App Store. |
| Android | Android should natively support Google Cloud Print; if not, download the Google Drive Android app from Google Play, or use a third-party app such as PrinterShare Mobile Print or Easy Cloud Print. |
| iOS | Download PrintCentral Pro, gCloud Print, or other apps from iTunes. |
Earlier we mentioned HP’s ePrint capability as well. Of course, this only works if you purchased an HP cloud-ready printer. If it’s cloud-ready, it will have an icon on it that looks like a printer with a wireless signal coming from it (the bottom icon on the right side of Figure 11.39), and you can configure it with an email address @hpeprint.com. Printer settings, including the email address and security related to who can print to the printer, can be managed at www.hpconnected.com. If you have access, it’s very easy to print. Simply email what you want printed to the email address of your printer, and it will print.
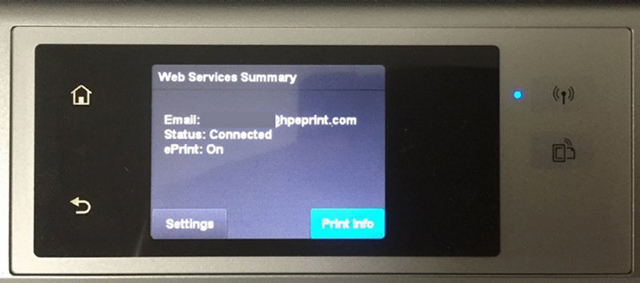
Figure 11.39 HP ePrint information
Data Privacy Concerns
When printing to a public printer, or one that is shared in a common workspace, there may be data privacy concerns. For example, employees in Human Resources might need to print confidential personnel files, or someone in the Mergers group might have a highly restricted contract to print.
Several printer manufacturers, including Brother, Canon, HP, and Xerox, offer a feature called Secure Printing (or Private Printing) on many of their office printers. When users print, they need to go into the printer preferences (or a similar place) and indicate that it’s a secure print job. They are then asked to enter a PIN and, finally, print the document. The document will not print until they physically go to the printer and enter the PIN.
Another security issue is storing print jobs on print servers. Print jobs are cached on the print server, and they can be saved indefinitely. We looked at the check box to keep printed documents in Figure 11.31. If you are configuring a printer for a public area, do not select this option. If you’re printing to a public printer (such as at a hotel), and you can see the printer properties, check to make sure that this option is not selected. That will help ensure that your files will not be cached on the hotel computer’s hard drive.
Performing Printer Maintenance and Upgrades
Considering the amount of work they do, printers last a pretty long time. Some printers handle over 100,000 pages per month, yet they’re usually pretty reliable devices. You can help your printers live long and fulfilling lives by performing the right maintenance, and smoothly running printers always make your officemates happy. After all, going to get your print job from the printer and discovering that the printer is in the shop is a very frustrating experience! In addition, there may be ways that you can upgrade a slower printer or add functionality without breaking the bank. In the following sections, we’ll look at performing printer maintenance and upgrading your printers.
Performing Printer Maintenance
Regardless of the type of printer you use, giving it a regular check-up is a good idea. You’re probably familiar with some of the activities that fall under maintenance, such as replacing paper, ink, or toner cartridges. We’ll look at those as well as some additional, more involved maintenance procedures.
Replacing Consumables
To maintain a printer properly, you need to replace consumables such as toner or ink cartridges, assemblies, filters, and rollers on occasion. Trying to cut costs by buying cheaper supplies rarely pays off.
Whenever purchasing supplies for your printer, always get supplies from the manufacturer or from an authorized reseller. This way, you’ll be sure that the parts are of high quality. Using unauthorized parts can damage your printer and possibly void your warranty.
Printer Paper
Most people don’t give much thought to the kind of paper they use in their printers. It’s a factor that can have a tremendous effect on the quality of the hard-copy printout, however, and the topic is more complex than people think. For example, if the wrong paper is used, it can cause frequent paper jams and possibly even damage components.
Several aspects of paper can be measured; each gives an indication as to the paper’s quality. The first factor is composition. Paper is made from a variety of substances. Paper used to be made from cotton and was called rag stock. It can also be made from wood pulp, which is cheaper. Most paper today is made from the latter or a combination of the two.
Another aspect of paper is the property known as basis weight (or simply weight for short). The weight of a particular type of paper is the actual weight, in pounds, of a ream (500 sheets) of the standard size of that paper made of that material. For regular bond paper, that size is 17 × 22.
The final paper property we’ll discuss is the caliper (or thickness) of an individual sheet of paper. If the paper is too thick, it may jam in feed mechanisms that have several curves in the paper path. (On the other hand, a paper that’s too thin may not feed at all.)
These are just three of the categories we use to judge the quality of paper. Because there are so many different types and brands of printers as well as paper, it would be impossible to give the specifications for the “perfect” paper. However, the documentation for any printer will give specifications for the paper that should be used in that printer.
Many impact printers need to use special paper that has tractor feed perforations on the side or they will not work properly. When replacing tractor feed paper, it’s very easy to get it misaligned, and it will feed crookedly and ultimately jam the printer. Similarly, thermal printers also require special paper that needs to be loaded properly. In many cases, if you load it upside down, the unit will not produce images. By comparison, adding paper to a laser or inkjet printer is usually very easy!
Ink and Toner
The area in which using recommended supplies is the biggest concern is ink and toner cartridges. Using the wrong ink or toner supplies is the easiest way to ruin a perfectly good printer.
Dot-matrix printers use a cloth or polyester ribbon soaked in ink and coiled up inside a plastic case. This assembly is called a printer ribbon (or ribbon cartridge). Once the ribbon has run out of ink, it must be discarded and replaced. Ribbon cartridges are developed closely with their respective printers. For this reason, ribbons should be purchased from the same manufacturer as the printer. The wrong ribbon could jam in the printer as well as cause quality problems.
Inkjet cartridges have a liquid ink reservoir. The ink in these cartridges is sealed inside. Once the ink runs out, the cartridge must be removed and discarded. A new, full one is installed in its place. Because the ink cartridge contains the printing mechanism as well as ink, it’s like getting a new printer every time you replace the ink cartridge.
In some inkjet printers, the ink cartridge and the print head are in separate assemblies. This way, the ink can be replaced when it runs out, and the print head can be used several times. This works fine if the printer is designed to work this way. However, some people think that they can do this on their integrated cartridge/print head system, using special ink cartridge refill kits. These kits consist of a syringe filled with ink and a long needle. The needle is used to puncture the top of an empty ink cartridge, and the syringe is then used to refill the reservoir.
The final type of consumable is toner. Each model of laser printer uses a specific toner cartridge. You should check the printer’s manual to see which toner cartridge your printer needs. Many businesses will recycle your toner or ink cartridges for you, refill them, and sell them back to you at a discount. Don’t buy them. While some businesses that perform this “service” are more legitimate than others, using recycled parts is more dangerous to your hardware than using new parts. The reason for this is that refilled cartridges are more likely to break or leak than new parts, and this leakage could cause extensive damage to the inside of your printer. And again, using secondhand parts can void your warranty, so you’re left with a broken printer that you have to pay for. Avoid problems like this by buying new parts.
Performing Scheduled Maintenance
When shopping for a printer, one of the characteristics you should look for is the printer’s capacity, which is often quoted in monthly volume. This is particularly important if the printer will be serving in a high-load capacity. Every printer needs periodic maintenance, but printers that can handle a lot of traffic typically need it less frequently. Check the printer specifications to see how often scheduled maintenance is suggested. Never, ever fall behind on performing scheduled maintenance on a printer.
Many laser printers have LCD displays that provide useful information, such as error messages or notices that you need to replace a toner cartridge. The LCD display will also tell you when the printer needs scheduled maintenance. How does it know? Printers keep track of the number of pages they print, and when the page limit is reached, they display a message, usually something simple like Perform user maintenance. The printer will still print, but you should perform the maintenance.
Being the astute technician that you are, you clean the printer with the recommended cleaning kit or install the maintenance kit that you purchased from the manufacturer. Now, how do you get the maintenance message to go away? Reset the page count using a menu option. For example, on many HP laser printers, you press the Menu button until you get to the Configuration menu. Once there, you press the Item key until the display shows Service Message = ON. Then press the plus key (+) to change the message to Service Message = OFF. Bring the printer back online, and you’re ready to go.
Performing routine maintenance will keep the printer clean, make it last longer, and help prevent annoying paper jams.
Using Cleaning Solutions
With all of the ink or toner they use, printers get dirty. If printers get too dirty or if the print heads get dirty, you’ll notice print problems. No one wants this to happen.
Most printers have a self-cleaning utility that is activated through a menu option or by pressing a combination of buttons on the printer itself. It’s recommended that you run the cleaning sequence every time you replace the toner or ink cartridges. If you experience print-quality problems, such as lines in the output, run the cleaning routine.
Sometimes, the self-cleaning routines aren’t enough to clear up the problem. If you are having print-quality issues, you might want to consider purchasing a cleaning or maintenance kit, which frequently comes with a cleaning solution.
Each cleaning kit comes with its own instructions for use. Exercise 11.7 walks you through the steps of using an inkjet cleaning solution. Note that the steps for your printer might differ slightly; please consult your manual for specific instructions. After using a cleaning kit on a laser or inkjet printer, it’s best to perform a calibration per the printer’s instructions.
Thermal printers require special attention because they contain a heating element. Always unplug the device and ensure that it’s cooled off before trying to clean it. Thermal printer cleaning cards, cleaning pens, and kits are widely available in the marketplace. If you need to remove any debris (from any printer), use compressed air or a specialized computer vacuum.
Ensuring a Suitable Environment
Printers won’t complain if the weather outside is too hot or too cold, but they are susceptible to environmental issues. Here are some things to watch out for in your printer’s environment:
Heat Laser printers can generate a lot of heat. Because of this, ensure that your laser printer is in a well-ventilated area. Resist the temptation to put the laser printer in the little cubbyhole in your desk; overheating will reduce the shelf life of your printer.
Humidity High humidity can cause printer paper to stick together. Sticky paper leads to paper jams. Humidity over 80 or 90 percent can cause issues.
Light The laser printer’s toner cartridge contains a photosensitive drum. Exposing that drum to light could ruin the drum. While the drum is encased in plastic, it’s best to avoid exposing the printer or toner cartridges to extreme light sources. Under no circumstance should you open the toner cartridge, unless you’re ready to get rid of it as well as clean up a big mess.
Ozone Laser printers that use corona wires produce ozone as a by-product of the printing process. In offices, ozone can cause respiratory problems in small concentrations, and it can be seriously dangerous to people in large amounts. Ozone is also a very effective oxidizer and can cause damage to printer components.
Fortunately, laser printers don’t produce large amounts of ozone, and most laser printers have an ozone filter. Ozone is another reason to ensure that your printer area has good ventilation. Also, replace the ozone filter periodically; check your printer’s manual for recommendations on when to do this.
Ammonia A printer doesn’t produce ammonia, but it is contained in many cleaning products. Ammonia can greatly reduce the printer’s ability to neutralize ozone and can cause permanent damage to toner cartridges. It’s best to avoid using ammonia-based cleaners near laser printers.
Installing Printer Upgrades
The printer market encompasses a dizzying array of products. You can find portable printers, photo printers, cheap black-and-white printers for under $30, high-end color laser printers for over $5,000, and everything in between. Most of the cheaper printers do not have upgrade options, but higher-end printers will have upgrade options, including memory, network cards, and firmware.
Installing Printer Memory
When purchasing a memory upgrade for your printer, you need to make sure of two things. First, buy only memory that is compatible with your printer model. Most printers today use a standard computer dual in-line memory module (DIMM), but check your manual or the manufacturer’s website to be sure. If you’re not sure, purchasing the memory through the manufacturer’s website (or an authorized reseller) is a good way to go. Second, be sure that your printer is capable of a memory upgrade. It’s possible that the amount of memory in your printer is at the maximum that it can handle.
Once you have obtained the memory, it’s time to perform the upgrade. The specific steps required to install the memory will depend on your printer. Check the manual or the manufacturer’s website for instructions tailored to your model.
Exercise 11.8 walks you through the general steps for installing memory into a laser printer.
Installing a Network Interface Card
Installing a NIC directly into a printer has become popular as more and more people need their printers to be on the network but don’t want to hassle with a host computer. The NIC in a printer is similar to the NIC in a computer, with a couple of important differences. First, the NIC in a printer has a small processor on it to perform the management of the NIC interface (functions that the software on a host computer would do). This software is usually referred to as a print server, but be careful because that term can also refer to a physical computer that hosts many printers. Second, the NIC in a printer is proprietary, for the most part. The same manufacturer makes the printer and the NIC.
When a person on the network prints to a printer with a NIC, they are printing right to the printer and not going through any third-party device (although in some situations, that is desirable and possible with NICs). Because of its dedicated nature, the NIC option installed in a printer makes printing to that printer faster and more efficient—that NIC is dedicated to receiving print jobs and sending printer status to clients.
Your manual is the best place to check to see if you can install a print server. Specific steps for installing the print server will also be in the manual or on the manufacturer’s website. Generally speaking, it’s very similar to installing a NIC into a computer.
Upgrading Printer Firmware
As with upgrading memory, methods to upgrade a printer’s firmware depend on the model of printer you have. Most of the time, upgrading a printer’s firmware is a matter of downloading and/or installing a free file from the manufacturer’s website. Printer firmware upgrades are generally done from the machine hosting the printer (again, usually called the print server).
Firmware is usually upgraded for one of two reasons. One, if you are having compatibility issues, a firmware upgrade might solve them. Two, firmware upgrades can offer newer features that are not available on previous versions.
Installing Other Upgrades
While we’ve covered some of the most important upgrades, most printers (especially laser printers) can be upgraded with additional capabilities as well. Each manufacturer, with the documentation for each printer, includes a list of all of the accessories, options, and upgrades available. The following options can be included on that list:
- Hard drives
- Trays and feeders
- Finishers
Hard Drives
For a printer to print properly, the type style, or font, being printed must be downloaded to the printer along with the job being printed. Desktop publishing and graphic design businesses that print color pages on slower color printers are always looking for ways to speed up their print jobs, so they install multiple fonts into the onboard memory of the printer to make them printer-resident fonts. There’s a problem, however: most printers have a limited amount of storage space for these fonts. To solve this problem, printer manufacturers made it possible for hard drives to be added to many printers. The hard drives can be used to store many fonts used during the print process and are also used to store a large document file while it is being processed for printing.
Trays and Feeders
One option that is popular in office environments is the addition of paper trays. Most laser and inkjet printers come with at least one paper tray (usually 500 sheets or fewer). The addition of a paper tray allows a printer to print more sheets between paper refills, thus reducing its operating cost. In addition, some printers can accommodate multiple paper trays, which can be loaded with different types of paper, stationery, and envelopes. The benefit is that you can print a letter and an envelope from the same printer without having to leave your desk or change the paper in the printer.
Related to trays is the option of feeders. Some types of paper products need to be watched as they are printed to make sure that the printing happens properly. One example is envelopes: You usually can’t put a stack of envelopes in a printer because they won’t line up straight or they may get jammed. An accessory that you might add for this purpose is the envelope feeder. An envelope feeder typically attaches to the front of a laser printer and feeds in envelopes, one at a time. It can hold usually between 100 and 200 envelopes.
Finishers
A printer’s finisher does just what its name implies: It finishes the document being printed. It does this by folding, stapling, hole punching, sorting, or collating the sets of documents being printed into their final form. So rather than printing out a bunch of paper sheets and then having to collate and staple them, you can have the finisher do it. This particular option, while not cheap, is becoming more popular on laser printers to turn them into multifunction copiers. As a matter of fact, many copiers are now digital and can do all the same things that a laser printer can do but much faster and for a much cheaper cost per page.
Summary
In this chapter, we discussed how different types of printers work as well as the most common methods of connecting them to computers. You learned how computers use page-description languages to format data before they send it to printers and drivers to talk to them. You also learned about the various types of consumable supplies and how they relate to each type of printer.
The most basic category of printer currently in use is the impact printer. Impact printers form images by striking something against a ribbon, which in turn makes a mark on the paper. You learned how these printers work and the service concepts associated with them.
One of the most popular types of printer today is the inkjet printer, so named because of the mechanism used to put ink on the paper.
The most complex type of printer is the laser printer. The A+ 220-901 exam covers this type of printer more than any other. You learned about the steps in the electrophotographic (EP) process, the process that explains how laser printers print. We also explained the various components that make up this printer and how they work together.
Virtual printing has become more popular in recent years, with people choosing to output electronic PDF files instead of physical paper.
You then learned about the interfaces used to connect printers to PCs and how to install and share a printer. Proper steps include connecting the device, installing the driver, configuring options, validating application and operating system compatibility, and educating users on how to use the device. Installing the device is the first step, but you’re not done until you ensure that it works properly and that users know how to access it.
Installing network printers usually involves a few more steps than are needed to install local printers, and the device is connected to the network instead of to a host. Cloud printing is becoming more popular with the flexibility it offers, but installing cloud printers is an entirely different process than installing local and networked printers.
Finally, we looked at how to perform printer maintenance, including the importance of using recommended supplies and various types of upgrades you can install in printers.
Exam Essentials
Know the differences between types of printer technologies (for example, laser, inkjet, thermal, impact). Laser printers use a laser and toner to create the page. Inkjet printers spray ink onto the page. Thermal printers use heat to form the characters on the page. Impact printers use a mechanical device to strike a ribbon, thus forming an image on the page.
Know the names, purposes, and characteristics of interfaces used by printers, including port and cable types.
Most printers today use the same interfaces, no matter what their type. Printers use serial, parallel, USB, Ethernet, Wi-Fi, Bluetooth, or infrared to connect to their host computers. By far the most common is USB.
Know how to install and configure printers. The basic procedure is as follows:
- Attach the device using a local or network port and connect the power.
- Install and update the device driver and calibrate the device.
- Configure options and default settings.
- Print a test page.
- Verify compatibility with the operating system and applications.
- Educate users about basic functionality.
Know the seven steps in the laser printing print sequence. The seven steps are processing, charging, exposing, developing, transferring, fusing, and cleaning.
Understand the importance of using recommended supplies. Using consumables (paper, ink, toner) that are recommended for your printer is important. Using bad supplies could ruin your printer and void your warranty.
Understand how to upgrade printer memory and firmware. Printer memory is upgraded by installing an additional or replacement memory module. To do this, you must remove a panel from the printer. The specific steps depend on your printer model. Firmware is upgraded by downloading a file from the manufacturer’s website and installing it. Some printers require that you manually enable the added memory.
Know what environmental hazards to watch out for around printers. Heat, excessive light, ozone, and ammonia are all bad things for printers to be around.
Review Questions
The answers to the chapter review questions can be found in Appendix A.
-
Which voltage is applied to the paper to transfer the toner to the paper in an EP process laser printer?
- +600VDC
- –600VDC
- +6000VDC
- –6000VDC
-
Which types of printers are referred to as page printers because they receive their print job instructions one page at a time? (Choose two.)
- Daisy wheel
- Dot matrix
- Inkjet
- Laser
- Thermal
-
Which of the following is not an advantage of a Universal Serial Bus (USB) printer interface?
- It has a higher transfer rate than a serial connection.
- It has a higher transfer rate than a parallel connection.
- It automatically recognizes new devices.
- It allows the printer to communicate with networks, servers, and workstations.
-
Which type of printers can be used with multipart forms?
- Inkjet printers
- Laser printers
- Thermal printers
- Dot-matrix printers
-
Which step in the EP print process uses a laser to discharge selected areas of the photosensitive drum, thus forming an image on the drum?
- Writing
- Transferring
- Developing
- Cleaning
-
Which of the following are page-description languages? (Choose two.)
- Page Description Language (PDL)
- PostScript
- PageScript
- Printer Control Language (PCL)
-
What voltage does the corona wire or corona roller hold?
- +600VDC
- –600VDC
- 0VDC
- –100VDC
-
Which device in an inkjet printer contains the print head?
- Toner cartridge
- Ink cartridge
- Daisy wheel
- Paper tray
-
What is the correct order of the steps in the EP print process?
- Developing, exposing, transferring, fusing, charging, cleaning, processing
- Charging, processing, exposing, developing, transferring, fusing, cleaning
- Processing, transferring, exposing, developing, charging, cleaning, fusing
- Processing, charging, exposing, developing, transferring, fusing, cleaning
-
Most printers that use the electrophotographic process contain how many standard assemblies?
- Five
- Six
- Four
- Nine
-
What is typically included in the EP laser printer toner cartridge? (Choose three.)
- Toner
- Print drum
- Laser
- Cleaning blade
-
What happens during the developing stage of laser printing?
- An electrostatic charge is applied to the drum to attract toner particles.
- Heat is applied to the paper to melt the toner.
- The laser creates an image of the page on the drum.
- An electrostatic charge is applied to the paper to attract toner particles.
-
Which of the following are possible interfaces for printers? (Choose three.)
- Parallel
- PS/2
- USB
- Network
-
You have just installed a new printer. After it is installed, it prints only garbled text. Which of the following is likely the problem?
- Wrong IP address
- Worn print head
- Incorrect print drivers
- Unsupported printer
-
Which printer contains a wheel that looks like a flower with raised letters and symbols on each petal?
- Inkjet printers
- Daisy-wheel printer
- Dot-matrix printer
- Laser printer
-
What part of a laser printer supplies the voltages for charging and transferring corona assemblies?
- High-voltage power supply (HVPS)
- DC power supply (DCPS)
- Controller circuitry
- Transfer corona
-
Which printer part gets the toner from the photosensitive drum onto the paper?
- Laser-scanning assembly
- Fusing assembly
- Corona assembly
- Drum
-
Which step in the laser printer printing process occurs immediately after the exposing phase?
- Charging
- Fusing
- Transferring
- Developing
-
Which laser printer component permanently presses the toner into the paper?
- Transfer corona
- Fuser assembly
- Printer controller circuitry
- Paper transport assembly
-
Which of the following most accurately describes how to obtain a firmware upgrade for your laser printer?
- Download the firmware upgrade for free from the manufacturer’s website.
- Pay to download the firmware upgrade from the manufacturer’s website.
- Have a certified laser printer technician come to your site and install a new firmware chip.
- Contact the manufacturer of the printer, and they will send you the firmware upgrade on a CD.
Performance-Based Question
You will encounter performance-based questions on the A+ exams. The questions on the exam require you to perform a specific task, and you will be graded on whether or not you were able to complete the task. The following requires you to think creatively in order to measure how well you understand this chapter’s topics. You may or may not see similar questions on the actual A+ exams. To see how your answer compares to the authors’, refer to Appendix B.
Your network has several inkjet printers in use. A user is complaining that their documents are consistently printing with extra smudges along the lines of print on one of them. What steps would you take to clean the printer?