
Chapter 22
Troubleshooting Theory, OSs, and Security
THE FOLLOWING COMPTIA A+ 220-902 EXAM OBJECTIVES ARE COVERED IN THIS CHAPTER:
- ✓ 4.1 Given a scenario, troubleshoot PC operating system problems with appropriate tools.
- Common symptoms: Proprietary crash screens (BSOD/pin wheel), Failure to boot, Improper shutdown, Spontaneous shutdown/restart, Device fails to start/detected, Missing dll message, Services fail to start, Compatibility error, Slow system performance, Boots to safe mode, File fails to open, Missing NTLDR, Missing Boot Configuration Data, Missing operating system, Missing graphical interface, Missing GRUB/LILO, Kernel panic, Graphical interface fails to load, Multiple monitor misalignment/orientation
- Tools: BIOS/UEFI, SFC, Logs, System Recovery Options, Repair disks, Pre-installation environments, MSCONFIG, DEFRAG, REGSRV32, REGEDIT, Event viewer, Safe mode, Command prompt, Uninstall/reinstall/repair
- ✓ 4.2 Given a scenario, troubleshoot common PC security issues with appropriate tools and best practices.
- Common symptoms: Pop-ups, Browser redirection, Security alerts, Slow performance, Internet connectivity issues, PC/OS lock up, Application crash, OS updates failures, Rogue antivirus, Spam, Renamed system files, Files disappearing, File permission changes, Hijacked email (Response from users regarding email, Automated replies from unknown sent email), Access denied, Invalid certificate (trusted root CA)
- Tools: Antivirus software, Antimalware software, Recovery console, Terminal, System restore/Snapshot, Pre-installation environments, Event viewer, Refresh/restore, MSCONFIG/Safe boot
- Best practices for malware removal: 1. Identify malware symptoms, 2. Quarantine infected system, 3. Disable system restore (in Windows), 4. Remediate infected systems (a. Update antimalware software, b. Scan and removal techniques (safe mode, pre-installation environment)), 5. Schedule scans and run updates, 6. Enable system restore and create restore point (in Windows), 7. Educate end user
- ✓ 4.3 Given a scenario, troubleshoot common mobile OS and application issues with appropriate tools.
- Common symptoms: Dim display, Intermittent wireless, No wireless connectivity, No Bluetooth connectivity, Cannot broadcast to external monitor, Touchscreen non-responsive, Apps not loading, Slow performance, Unable to decrypt email, Extremely short battery life, Overheating, Frozen system, No sound from speakers, Inaccurate touch screen response, System lockout
- Tools: Hard reset, Soft reset, Close running applications, Reset to factory default, Adjust configurations/settings, Uninstall/reinstall apps, Force stop
- ✓ 4.4 Given a scenario, troubleshoot common mobile OS and application security issues with appropriate tools.
- Common symptoms: Signal drop/weak signal, Power drain, Slow data speeds, Unintended WiFi connection, Unintended Bluetooth pairing, Leaked personal files/data, Data transmission overlimit, Unauthorized account access, Unauthorized root access, Unauthorized location tracking, Unauthorized camera/microphone activation, High resource utilization
- Tools: Antimalware, App scanner, Factory reset/Clean install, Uninstall/reinstall apps, WiFi analyzer, Force stop, Cell tower analyzer, Backup/restore (iTunes/iCloud/Apple Configurator, Google sync, One Drive)
- ✓ 5.5 Given a scenario, explain the troubleshooting theory.
- Always consider corporate policies, procedures and impacts before implementing changes.
- Identify the problem: Question the user and identify user changes to computer and perform backups before making changes.
- Establish a theory of probable cause (question the obvious): If necessary, conduct external or internal research based on symptoms.
- Test the theory to determine cause: Once theory is confirmed, determine next steps to resolve problem. If theory is not confirmed, re-establish new theory or escalate.
- Establish a plan of action to resolve the problem and implement the solution.
- Verify full system functionality and if applicable implement preventive measures.
- Document findings, actions and outcomes.
- Always consider corporate policies, procedures and impacts before implementing changes.
Mentioning the words troubleshooting theory to many technicians can cause their eyes to roll back in their heads. It doesn’t sound glamorous or sexy, and a lot of techs believe that the only way to solve a problem is just to dive right in and start working on it. Theories are for academics. In a way, they’re right—you do need to dive in to solve problems because they don’t just solve themselves. But to be successful at troubleshooting, you must take a systematic approach.
You may hear people say, “Troubleshooting is as much of an art as it is a science,” and our personal favorite, “You just need to get more experience to be good at it.” While there is an art to fixing problems, you can’t ignore science. And if you need experience to be any good, why are some less experienced folks incredibly good at solving problems while their more seasoned counterparts seem to take forever to fix anything? More experience is good, but it’s not a prerequisite to being a good troubleshooter. It’s all about a systematic approach.
Applying a systematic approach to troubleshooting is key; systematic solutions also work well in preventing problems in the first place. Many of the computer problems that you stress over can be prevented.
Preventive maintenance tends to get neglected at many companies because technicians are too busy fixing problems. Spending some time on keeping those problems from occurring in the first place is a good investment of resources.
In this chapter, we’ll look at the two systematic methods we just talked about. First we’ll cover troubleshooting theory and the steps that you need to take to solve problems successfully. Then we’ll look at some ways to help keep your systems running and in top shape.
Understanding Troubleshooting Theory
When troubleshooting, you should assess every problem systematically and try to isolate the root cause. Yes, there is a lot of art to troubleshooting, and experience plays a part too. But regardless of how “artful” or experienced you are, haphazard troubleshooting is doomed to fail. Conversely, even technicians with limited experience can be effective troubleshooters if they stick to the principles. The major key is to start with the issue and whittle away at it until you can get down to the point where you can pinpoint the problem—this often means eliminating, or verifying, the obvious.
Although everyone approaches troubleshooting from a different perspective, a few things should remain constant. First, always back up your data before making any changes to a system. Hardware components can be replaced, but data often can’t be. For that reason, always be vigilant about making data backups.
Second, establish priorities—one user being unable to print to the printer of their choice isn’t as important as a floor full of accountants unable to run payroll. Prioritize every job and escalate it (or de-escalate it) as you need to.
Third, but perhaps most important, document everything—not just that there was a problem but also the solution that you found, the actions that you tried, and the outcome of each. In the next few sections, we’ll take you through each step of the troubleshooting process.
Identifying the Problem
While this may seem obvious, it can’t be overlooked: If you can’t define the problem, you can’t begin to solve it. Sometimes, problems are relatively straightforward, but other times they’re just a symptom of a bigger issue. For example, if a user isn’t able to connect to the Internet from their computer, it could indeed be an issue with their system. But if other users are having similar problems, then the first user’s difficulties might just be one example of the real problem.
Problems in computer systems generally occur in one (or more) of four areas, each of which is in turn made up of many pieces:
- A collection of hardware pieces integrated into a working system. As you know, the hardware can be quite complex, what with motherboards, hard drives, video cards, and so on. Software can be equally perplexing.
- An operating system, which in turn is dependent on the hardware.
- An application or software program that is supposed to do something. Programs such as Microsoft Word and Microsoft Excel are bundled with a great many features.
- A computer user, ready to take the computer system to its limits (and beyond). A technician can often forget that the user is a very complex and important part of the puzzle.
Talking to the Customer
Many times, you can define the problem by asking questions of the user. One of the keys to working with your users or customers is to ensure, much like a medical professional, that you have good bedside manner. Most people are not as technically hip as you, and when something goes wrong, they become confused or even fearful that they’ll take the blame. Assure them that you’re just trying to fix the problem but that they can probably help because they know what went on before you got there. It’s important to instill trust with your customer—believe what they are saying, but also believe that they might not tell you everything right away. It’s not that they’re necessarily holding back information; they just might not know what’s important to tell.
Help clarify things by having the customer show you what the problem is. The best method we’ve seen of doing this is to say, “Show me what ‘not working’ looks like.” That way, you see the conditions and methods under which the problem occurs. The problem may be a simple matter of an improper method. The user may be performing an operation incorrectly or performing the operation in the wrong order. During this step, you have the opportunity to observe how the problem occurs, so pay attention.
Here are a few questions to ask the user to aid in determining the problem:
Can you show me the problem? This question is one of the best. It allows the user to show you exactly where and when they experience the problem.
How often does this happen? This question establishes whether this problem is a one-time occurrence that can be solved with a reboot or whether a specific sequence of events causes the problem to happen. The latter usually indicates a more serious problem that may require software installation or hardware replacement.
Has any new hardware or software been installed recently? New hardware or software can mean compatibility problems with existing devices or applications. For example, a newly installed device may want to use the same resource settings as an existing device. This can cause both devices to become disabled. When you install a new application, that application is likely to install several support files. If those support files are also used by an existing application, then there could be a conflict.
Has the computer recently been moved? Moving a computer can cause things to become loose and then fail to work. Perhaps all of the peripherals of the computer didn’t complete—or weren’t included in—the move, meaning that there’s less functionality than the user expects.
Has someone who normally doesn’t use the computer recently used it? That person could have mistakenly (or intentionally) done something to make the computer begin exhibiting the irregular behavior.
Have any other changes been made to the computer recently? If the answer is yes, ask if the user can remember approximately when the change was made. Then ask them to tell you approximately when the problem started. If the two dates seem related, there’s a good chance that the problem is related to the change. If it’s a new hardware component, check to see that it was installed correctly.
Be careful of how you ask questions so that you don’t appear accusatory. You can’t assume that the user did something to mess up the computer. Then again, you also can’t assume that they don’t know anything about why it’s not working.
While it’s sometimes frustrating dealing with end users and computer problems, such as the user who calls you up and gives you the “My computer’s not working” line (okay, and what exactly is that supposed to mean?), even more frustrating is when no one was around to see what happened. In cases like this, do your best to find out where the problem is by establishing what works and what does not.
Gathering Information
Let’s say that you get to a computer and the power light is on and you can hear the hard drive spinning but there is no video and the system seems to be unresponsive. At least you know that the system has power, and you can start investigating where things start to break down. (We sense a reboot in your future!)
The whole key to this step is to identify, as specifically as possible, what the problem is. The more specific you can be in identifying what’s not working, the easier it will be for you to understand why it’s not working and how to fix it. If you have users available who were there when the computer stopped working, you can try to gather information from them. If not, you’re on your own to gather clues. It’s like CSI but not as gory.
So now instead of having users to question, you need to use your own investigative services to determine what’s wrong. The questions you would have otherwise asked the user are still a good starting point. Does anything appear amiss or seem to have been changed recently? What is working and what is not? Was there a storm recently? Can I reboot? If I reboot, does the problem seem to go away?
The key is to find out everything that you can that might be related to the problem. Document exactly what works and what doesn’t and, if you can, why. If the power is out in the house, as in the story related earlier, then there’s no sense in trying the power cord in another outlet.
Determining If the Problem Is Hardware or Software Related
This step is important because it determines the part of the computer on which you should focus your troubleshooting skills. Each part requires different skills and different tools.
To determine whether a problem is hardware or software related, you can do a few things to narrow down the issue. For instance, does the problem manifest itself when the user uses a particular piece of hardware (a DVD-ROM or a USB hard drive, for example)? If it does, the problem is more than likely hardware related.
This step relies on personal experience more than any of the other steps. Without a doubt, you’ll run into strange software problems. Each one has a particular solution. Some may even require reinstallation of an application or the operating system. If that doesn’t work, you may need to resort to restoring the entire system (operating system, applications, and data) from a data backup done when the computer was working properly.
Determining Which Component Is Failing (for Hardware Problems)
Hardware problems are usually pretty easy to figure out. Let’s say that the sound card doesn’t work. You’ve tried new speakers that you know do work, and you’ve reinstalled the driver. All of the settings look right, but it just won’t respond. The sound card is probably the piece of hardware that needs to be replaced.
With many newer computers, several components such as sound, video, and networking cards are integrated into the motherboard. If you troubleshoot the computer and find a hardware component to be bad, there’s a good chance that the bad component is integrated into the motherboard and the whole motherboard must be replaced—an expensive proposition, to be sure.
Establishing a Theory
Way back when, probably in your middle school or junior high school years, you learned about the scientific method. In a nutshell, scientists develop a hypothesis, test it, and then figure out if their hypothesis is still valid. Troubleshooting involves much the same process.
Once you have determined what the problem is, you need to develop a theory as to why it is happening. No video? It could be something to do with the monitor or the video card. Can’t get to your favorite website? Is it that site? Is it your network card, the cable, your IP address, DNS server settings, or something else? Once you have defined the problem, establishing a theory about the cause of the problem—what is wrong—helps you develop possible solutions to the problem.
Eliminating Possibilities
Theories can state either what can be true or what can’t be true. However you choose to approach your theory generation, it’s usually helpful to take a mental inventory to see what is possible and what is not. Start eliminating possibilities, and eventually the only thing that’s left is what’s wrong. This type of approach works well when it’s an ambiguous problem; start broad and narrow your scope. For example, if the hard drive won’t read, there is likely one of three culprits: the drive itself, the cable it’s on, or the connector on the motherboard. Try plugging the drive into another connector or using a different cable. Narrow down the options.
Once you have isolated the problem, slowly rebuild the system to see if the problem comes back (or goes away). This helps you identify what is really causing the problem and determine if there are other factors affecting the situation. For example, we have seen memory problems that are fixed by switching the slot containing the memory chips.
Using External Resources
Sometimes, you can figure out what’s not working, but you have no idea why or what you can do to fix it. That’s okay. In situations like these, it may be best to fall back on an old trick called reading the manual. As they say, “When all else fails, read the instructions.” The service manuals are your instructions for troubleshooting and service information. Virtually every computer and peripheral made today has service documentation on the company’s website, a DVD, or even in a paper manual. Don’t be afraid to use them!
If you’re lucky enough to have experienced, knowledgeable, and friendly co-workers, be open to asking for help if you get stuck on a problem.
Testing Solutions
You’ve eliminated possibilities and developed a theory as to what the problem is. Your theory may be pretty specific, such as “the power cable is fried,” or it may be a bit more general, like “the hard drive isn’t working” or “there’s a connectivity problem.” No matter your theory, now is the time to start testing solutions. Again, if you’re not sure where to begin to find a solution, the manufacturer’s website is a good place to start!
Check the Simple Stuff First
This step is the one that even experienced technicians overlook. Often, computer problems are the result of something simple. Technicians overlook these problems because they’re so simple that the technicians assume they couldn’t be the problem. Here are some examples of simple problems:
Is it plugged in? And plugged in at both ends? Cables must be plugged in at both ends to function correctly. Cables can easily be tripped over and inadvertently pulled from their sockets.
Is it turned on? This one seems the most obvious, but we’ve all fallen victim to it at one point or another. Computers and their peripherals must be turned on to function. Most have power switches with LEDs that glow when the power is turned on.
Is the system ready? Computers must be ready before they can be used. Ready means that the system is ready to accept commands from the user. An indication that a computer is ready is when the operating system screens come up and the computer presents you with a menu or a command prompt. If that computer uses a graphical interface, the computer is ready when the mouse pointer appears. Printers are ready when the Online or Ready light on the front panel is lit.
Do the chips and cables need to be reseated? You can solve some of the strangest problems (random hang-ups or errors) by opening the case and pressing down on each socketed chip (known as reseating). This remedies the chip-creep problem, which happens when computers heat up and cool down repeatedly as a result of being turned on and off, causing some components to begin to move out of their sockets. In addition, you should reseat any cables to make sure that they’re making good contact.
Check to See If It’s User Error
User error is common but preventable. If a user can’t perform some very common computer task, such as printing or saving a file, the problem is likely due to user error. As soon as you hear of a problem like this, you should begin asking questions to determine if the solution is as simple as teaching the user the correct procedure. A good question to ask is, “Were you ever able to perform that task?” If the answer is no, it means that they are probably doing the procedure wrong. If they answer yes, you must ask additional questions to get at the root of the problem.
If you suspect user error, tread carefully in regard to your line of questioning to avoid making the user feel defensive. User errors provide an opportunity to teach the users the right way to do things. Again, what you say matters. Offer a “different” or “another” way of doing things instead of the “right” way.
Restart the Computer
It’s amazing how often a simple computer restart can solve a problem. Restarting the computer clears the memory and starts the computer with a clean slate. Whenever we perform phone support, we always ask the customer to restart the computer and try again. If restarting doesn’t work, try powering down the system completely and then powering it up again (rebooting). More often than not, that will solve the problem.
Establishing a Plan of Action
If your fix worked, then you’re brilliant! If not, you need to reevaluate and look for the next option. After testing solutions, your plan of action may take one of three paths:
- If the first fix didn’t work, try something else.
- If needed, implement the fix on other computers.
- If everything is working, document the solution.
Try, Try Again
So you tried the hard drive with a new (verified) cable and it still doesn’t work. Now what? Your sound card won’t play and you’ve just deleted and reinstalled the driver. Next steps? Move on and try the next logical thing in line.
When evaluating your results and looking for that golden “next step,” don’t forget about other resources that you might have available. Use the Internet to look at the manufacturer’s website. Read the manual. Talk to your friend who knows everything about obscure hardware (or arcane versions of Windows). When fixing problems, two heads can be better than one.
Spread the Solution
If the problem was isolated to one computer, this step doesn’t apply. But some problems that you deal with may affect an entire group of computers. For example, perhaps some configuration information was entered incorrectly into the DHCP server, giving everyone the wrong DNS server address. The DHCP server is now fixed, but all of the clients need to renew their IP addresses.
Document the Solution
Once everything is working, you’ll need to document what happened and how you fixed it. If the problem looks to be long and complex, we suggest taking notes as you’re trying to fix it. It will help you remember what you’ve already tried and what didn’t work. We’ll discuss documenting in more depth in the section “Documenting the Work” later in this chapter.
Verifying Functionality
After fixing the system, or all of the systems affected by the problem, go back and verify full functionality. For example, if the users couldn’t get to any network resources, check to make sure they can get to the Internet as well as to internal resources.
Some solutions may actually cause another problem on the system. For example, if you update software or drivers, you may inadvertently cause another application to have problems. There’s obviously no way that you can or should test all applications on a computer after applying a fix, but know that these types of problems can occur. Just make sure that what you’ve fixed works and that there aren’t any obvious signs of something else not working all of a sudden.
Another important thing to do at this time is to implement preventive measures, if possible. If it was a user error, ensure that the user understands ways to accomplish the task that doesn’t cause the error to recur. If a cable melted because it was too close to someone’s space heater under their desk, resolve the issue. If the computer overheated because there was an inch of dust clogging the fan…you get the idea.
Documenting the Work
Lots of people can fix problems. But can you remember what you did when you fixed a problem a month ago? Maybe. Can one of your co-workers remember something you did to fix the same problem on that machine a month ago? Unlikely. Always document your work so that you or someone else can learn from the experience. Good documentation of past troubleshooting can save hours of stress in the future.
Documentation can take a few different forms, but the two most common are personal and system based.
We always recommend that technicians carry a personal notebook and take notes. The type of notebook doesn’t matter—use whatever works best for you. The notebook can be a lifesaver, especially when you’re new to a job. Write down the problem, what you tried, and the solution. The next time you run across the same or a similar problem, you’ll have a better idea of what to try. Eventually, you’ll find yourself less and less reliant on it, but it’s incredibly handy to have!
System-based documentation is useful to both you and your co-workers. Many facilities have server logs of one type or another, conveniently located close to the machine. If someone makes a fix or a change, it gets noted in the log. If there’s a problem, it’s noted in the log. It’s critical to have a log for a few reasons. One, if you weren’t there the first time it was fixed, you might not have an idea of what to try, and it could take you a long time using trial and error. Two, if you begin to see a repeated pattern of problems, you can make a permanent intervention before the system completely dies.
We’ve seen several different forms of system-based documentation. Again, the type of log doesn’t matter as long as you use it! Often, it’s a notebook or a binder next to the system or on a nearby shelf. If you have a rack, you can mount something on the side to hold a binder or notebook. For client computers, one way is to tape an index card to the top or side of the power supply (don’t cover any vents!), so if a tech has to go inside the case, they can see if anyone else has been in there fixing something too. In larger environments, there is often an electronic knowledge base or incident repository available for use; it is just as important to contribute to these systems as it is to use them to help diagnose problems.
Troubleshooting Operating Systems
Windows is mind-bogglingly complex. Other operating systems are too, but the mere fact that Windows 7 has nearly 50 million lines of code (and over 2,000 developers worked on it!) makes you pause and shake your head.
Windows-based issues can be grouped into several categories based on their cause, such as boot problems, missing files (such as system files), configuration files, and virtual memory. If you’re troubleshooting a boot problem, it’s imperative that you understand the Windows boot process. Some common Windows problems don’t fall into any category other than “common Windows problems.” We cover those in the following sections, followed by a discussion of the tools that can be used to fix them.
Common Symptoms
There are numerous “common symptoms” that CompTIA asks you be familiar with for the exam. They range from the dreaded Blue Screen of Death (BSOD) to spontaneous restarts and everything in between. They are discussed here in the order in which they appear in the objective list.
Proprietary Crash Screens (BSOD/Pinwheel)/Kernel Panic
The Blue Screen of Death (BSOD)—not a technical term, by the way—is another way of describing the blue-screen error condition that occurs when Windows fails to boot properly or quits unexpectedly. Because it is at this stage that the device drivers for the various pieces of hardware are installed/loaded, if your Windows GUI fails to start properly, more likely than not the problem is related to a misconfigured driver or misconfigured hardware.
There are a few things that you can try if you believe that a driver is causing the problem. One is to try booting Windows in Safe Mode. In Safe Mode, Windows loads only basic drivers, such as a standard VGA video driver and the keyboard and mouse. Once in Safe Mode, you can uninstall the driver that you think is causing the problem. Another option is to boot into the last known good configuration. Doing this will revert the system drivers back to the state they were in during the last successful login. Bear in mind that the Last Known Good Configuration option is useful only if the user has not logged in again since the problem began occurring. If the problem is with a driver and the user has logged in since the driver went “bad,” the last known good configuration will include the bad driver.
In the Apple world, the pinwheel is equivalent to BSOD, so named because the cursor turns into a pinwheel and does not let you do anything else. The only solution is to force a shutdown and reboot.
In the Unix/Linux world (which includes OS X), the equivalent crash is known as a kernel panic. This occurs when the operating system detects an error from which it cannot safely recover—rather than one app crashing, the whole system does. Solutions usually include updating hardware, firmware, software, and the OS itself. You can also check drives and RAM for errors that might be causing the crash and correct any problems that you uncover.
Failure to Boot
To troubleshoot boot problems, you must understand the Windows boot process. Windows requires only a few files to boot, each of which performs specific tasks. The main one, and the first one to load, is the one that bootstraps the system. In other words, this file starts the loading of an OS on the computer. While Windows 8/7/Vista uses BOOTMGR, CompTIA also wants you to know NTLDR, which is the equivalent file used by Windows XP and earlier Windows versions. Whichever of the two files the operating system uses, that file is responsible for switching from real to protected mode during the boot process.
System files come into the picture next. In addition to the previously listed files, all of which (except NTOSKRNL.EXE) are located in the root of the C: partition on the computer, Windows needs a number of files from its system directories (for example, system and system32), such as the hardware abstraction layer (HAL.DLL). In Windows 8/7/Vista, WINLOAD.EXE and WINRESUME.EXE replace NTLDR/NTDETECT.COM.
Numerous other dynamic link library (DLL) files are also required, but usually the lack or corruption of one of them produces a noncritical error, whereas the absence of HAL.DLL causes the system to be nonfunctional.
We’ll now look at the Windows boot process. It’s a pretty long and complicated process, but keep in mind that these are complex operating systems, providing you with a lot more functionality than older versions of Windows:
- The system self-checks and enumerates hardware resources. Each machine has a different startup routine, called the POST (power-on self-test), which is executed by the commands written to the motherboard of the computer. Newer PnP boards not only check memory and processors, they also poll the systems for other devices and peripherals.
- The Master Boot Record (MBR) loads and finds the boot sector. Once the system has finished with its housekeeping, the MBR is located on the first hard drive and loaded into memory. The MBR finds the bootable partition and searches it for the boot sector of that partition.
- The MBR determines the file system and loads WINLOAD (or NTLDR). Information in the boot sector allows the system to locate the system partition and to find and load into memory the file located there.
- WINLOAD/NTLDR switches the system from real mode (which lacks multitasking, memory protection, and those things that make Windows so great) to protected mode (which offers memory protection, multitasking, and so on) and enables paging. Protected mode enables the system to address all of the available physical memory. It’s also referred to as 32-bit flat mode. At this point, the file system is also started.
- WINLOAD/NTLDR processes a file that resides in the root directory specifying what OSs are installed on the computer and where they reside on the disk. During this step of the boot process, you may be presented with a list of the installed OSs (depending on how your startup options are configured and whether you have multiple OSs installed). If you’re presented with the list, you can choose an OS; if you don’t take any action, the default selection is chosen automatically.
- WINRESUME/NTDETECT.COM checks the system for installed devices and device configurations and initializes the devices it finds. It passes the information to WINLOAD/NTLDR, which collects this information and passes it to the kernel after this file is loaded.
- The OS kernel loads the executive subsystems. Executive subsystems are software components that parse the Registry for configuration information and start needed services and drivers.
- The HKEY_LOCAL_MACHINESYSTEM Registry hive and device drivers are loaded. The drivers that load at this time serve as boot drivers, using an initial value called a start value.
- Control is passed to the kernel, and it initializes loaded drivers. It loads the Session Manager, which then loads the Windows subsystem and completes the boot process.
- Winlogon loads. At this point, you are presented with the Logon screen. After you enter a username and password, you’re taken to the Windows Desktop.
Improper Shutdown
Not shutting down properly can result in lost data from open applications or corrupted operating system files. Neither option is good.
You would think that people are pretty aware of how to shut down, but sadly that’s not always true. When it comes to your own computers, always shut down properly. If you are a technician at a company, it’s your responsibility to train all users on how to shut down properly as well.
Spontaneous Shutdown/Restart
Occasionally, a rogue system will begin automatically shutting down and/or restarting while in use. While it could be indicative of a hardware problem (malfunctioning motherboard, for example), it can also indicate a setting misconfiguration problem. Check the sleep settings for hibernation and disable those to see if it makes a difference. If the problem continues, start looking at drivers.
To begin ruling out possibilities, boot the system into Safe Mode and see if the problem continues. If the problem does not occur while in Safe Mode, then boot normally and begin testing what occurs as you eliminate drivers/devices one by one (sound, video, and so forth) until you find the culprit.
Device Fails to Start/Not Detected
When you are using Windows, you are constantly interacting with pieces of hardware. Each piece of hardware has a Windows driver that must be loaded in order for Windows to be able to use it. In addition, the hardware must be installed and functioning properly. If the device driver is not installed properly or the hardware is misconfigured, the device won’t function properly.
If you have just updated a driver and the device isn’t functioning, rolling back the driver installation can sometimes solve the problem. To roll back a driver, right-click on the device name in Device Manager and choose Properties. On the Drivers tab, click the Roll Back Driver button.
Missing DLL Message
The dynamic link library (DLL) files are required. (They were mentioned earlier in the section “Failure to Boot.”) The problem of missing DLL files can also occur with applications when you attempt to start them, and the solution involves finding a copy of the DLL (online, on a backup, and so on) and replacing it. A great article on the topic can be found at the following location:
www.makeuseof.com/tag/how-to-fix-missing-dll-file-errors/
Within the Windows toolkit, the best utility to use to tackle this problem is the System File Checker (SFC).
Service Fails to Start
Once you have an application successfully installed, you may run into a problem of getting it to start properly. This problem can come from any number of sources, including an improper installation, a software conflict, or system instability. If your application was installed incorrectly, the files required to run the program properly may not be present, and the program can’t function without them. If a shared file that’s used by other programs is installed, installation of the wrong (usually older) version can cause conflicts with other programs already installed. Finally, if one program causes a general protection fault (GPF), it can result in memory problems that can destabilize the system and cause other programs to crash. The solution to these problems is to uninstall and reinstall the offending application, first making sure that all programs are closed.
Compatibility Error
Device drivers are software programs that tell the operating system how to work with the hardware. When you purchase a hardware device, odds are that it’s been in that box for a while. By the time it gets made, packaged, stored, delivered to the store, stored again at the retailer, and then purchased by you, it’s entirely likely that the company that made the device has updated the driver—even possibly a few times if there have been a lot of reported problems.
If Microsoft does not digitally sign your device driver—that is, it hasn’t been tested for compatibility with your version of Windows—then you will get a warning message when you attempt to install it. You can tell Windows to continue the installation, and most of the time this doesn’t cause any problems. Be aware, though, that if the driver isn’t signed or isn’t compatible, this means that there could be problems with it after you complete the installation. We’ve installed dozens of unsigned drivers without problems, but we’ve also run across a few that didn’t work as advertised.
In Windows, the User Account Control (UAC) feature has the sole purpose of keeping the user from running programs that could pose a potential threat if the user’s privileges were equal to that of Administrator. While turning UAC off is an option, it is not a recommended one. If you have a program that you regularly run and do not want to be prompted each time, you can right-click the icon for that program and then click Properties. Choose the Compatibility tab and then select the Run This Program As An Administrator check box. This will prevent the prompt from occurring each time you use the program.
Slow System Performance
Over time, systems seem to run slower than they once did. This can be due to a plethora of drivers, lots of background processes, memory hogs, or many other possibilities. The first place to turn for help to troubleshoot this problem is the Performance Troubleshooter.
In Windows, choose Start ➢ Control Panel ➢ Troubleshooting ➢ Check For Performance Issues (under System And Security). The Performance Troubleshooter will look for common problems, such as more than one virus detection program running, multiple users logged into the same machine, visual settings affecting performance, and so on.
If no problems are found, then take the usual steps: deleting programs that are never run, removing items from startup, defragmenting the hard drive, and so on. Disk Cleanup can help you free up space by deleting unneeded files.
Boots to Safe Mode
At times, a system will become corrupted to the point where it will only boot into Safe Mode and not allow a normal boot. While a hardware issue can cause this, it can often be associated with a damaged/missing driver. To address the problem, boot into the Recovery Console and scan for problems. You can choose to boot to the last known good configuration or resort to the recovery DVD.
File Fails to Open
When a file fails to open, it is often due to corruption. The corruption can be caused from improperly shutting down the application or system. The best solution to this problem is to recover the file from a backup.
Missing NTLDR
The NTLDR loader file is a key component of the Windows XP boot process and the system will not boot without it. Occasionally, a message that the file is missing will occur if you change your active partition (which may be done if you are dual-booting with another operating system, such as Windows 7, for example). A BOOT.INI file that points to the wrong location can also trigger this message. In this case, the problem is not with the NTLDR file at all but rather with the misconfigured BOOT.INI.
The file can be retrieved from the Recovery Console or from bootable media (recovery DVD, repair disk, and so on).
Missing Boot Configuration Data
Different versions of Windows use different files to identify what operating systems are installed and where their boot files can be found. With Windows XP and earlier versions (something you need to know only because NTLDR is an objective), the text file BOOT.INI is used to identify the operating systems installed, their locations, and the boot options to use. This text-based file can be (re)created using any text editor. When it is missing or damaged, you can recover it by booting into the Recovery Console.
Windows 8, Windows 7, and Windows Vista use the Windows Boot Configuration Data (BCD) file instead, and a similar message that this file is missing will appear. To resolve this problem, you can boot into System Recovery Options and choose Startup Repair (or type BOOTREC /REBUILDBCD at the command prompt).
Missing Operating System
The first thing to check when it’s reported that an operating system is missing is that there is no media in the machine (DVD, CD, and so on), which the system is reading during boot prior to accessing the hard drive. If that is the case, remove the media and reboot (down the road, change the BIOS settings to boot from the hard drive before any other media).
If there is no removable media attempting to boot, then turn to the installation DVD (you may have to set the BIOS to use the DVD drive as your primary boot device) or to the Windows Repair CD. In Windows 8/8.1, Windows 7, and Windows Vista, go to System Recovery Options and choose Startup Repair.
Missing Graphical Interface/GUI Fails to Load
Occasionally, the Windows graphical user interface (GUI) won’t appear. The system will hang just before the GUI appears. Missing or corrupt files cause this, and the best tool to turn to here is the Windows Repair CD or the installation DVD. In Windows, go to System Recovery Options and choose Startup Repair.
Missing GRUB/LILO
If you are using GRUB (GRand Unified Bootloader) or LILO (LInux LOader) as a multiboot loader, you can encounter problems if they become corrupted or deleted. To solve these problems, you need to re-create the loader (and reconfigure it for your system) to be able to use it.
If the problem is just an invalid boot disk message, try removing any media in the machine (DVD, CD, and so on) that the system is reading during boot prior to accessing the hard drive and reboot. If that solves the problem, change the BIOS settings to make the hard drive the primary boot device. Two great references on solving GRUB/LILO errors can be found at the following locations:
https://kb.acronis.com/content/1686 or http://sourceforge.net/p/boot-repair/home/Home/

www.aboutlinux.info/2005/11/how-to-repair-corrupt-mbr-and-boot.html
Multiple Monitor Misalignment/Orientation
The ability to stretch the desktop across multiple monitors is a great feature, but it is one that can also be difficult to fix if the display settings are not working properly. In Windows, go to Display Settings and choose the appearance you want for your system. From this configuration interface, you can choose the orientation and whether you want to extend or mirror the displays. Fine-tuning is particularly critical when all of the monitors are not the same size.
Operating System Tools
Many of the tools needed for troubleshooting appear in the objectives pertaining to the operating systems as well. Chapter 13, “Operating System Basics,” and Chapter 14, “Operating System Administration,” introduced and discussed many of the operating system tools. To avoid needless repetition, only new information or topics not fully covered previously are addressed here.
BIOS/UEFI
First-line tools include the system basic input/output system (BIOS) and Unified Extensible Firmware Interface (UEFI) firmware. Keeping the most current versions of firmware on these devices can sideline a plethora of problems.
SFC
The purpose of this utility is to keep the operating system alive and well. SFC.EXE automatically verifies system files after a reboot to see if they were changed to unprotected copies. If an unprotected file is found, a stored copy of the system file overwrites it.
Only users with administrative permissions can run SFC. It also requires the use of a parameter. The valid parameters are as follows:
| Parameter | Function |
| /OFFBOOTDIR | Allows you to set the location of an offline boot directory that can then be used for offline repair |
| /OFFWINDIR | Allows you to set the location of an offline Windows directory that can then be used for offline repair |
| /SCANFILE | Specifies a file to be scanned and repaired if needed |
| /SCANNOW | Checks system files now and repairs any problems found |
| /VERIFYFILE | Specifies a file to be scanned but not repaired if errors are found |
| /VERIFYONLY | Specifies that files are scanned but not repaired if errors are found |
Logs
Log files are created to record significant events. Those events can range from system problems to just normal user activity. It is the former on which you should focus when troubleshooting PC operating system problems. Windows includes Event Viewer (discussed in a later section) for the purpose of looking at log files and identifying problems.
System Recovery Options
System Recovery Options allows for troubleshooting system problems (the Recovery Console served a similar purpose with Windows XP and earlier versions of Windows). Once you’ve booted into the Recovery Options, you can use a number of command-line commands to fix issues. Two of the most important commands are BOOTREC /FIXBOOT and BOOTREC /FIXMBR to work with the Master Boot Record. The utility BOOTCFG does a job similar to BOOTREC /REBUILDBCD, and it is a bit easier to work with.
Repair Disks
If you want to recover your computer and bring it back to the point where it was when it was new (minus any files that you added since purchasing the machine), you can use the recovery CD set or DVD. With Dell computers, for example, this is known as the Reinstallation DVD, and it accompanies each machine shipped. It can only be used to reinstall the operating system on the machine. After the Reinstallation DVD finishes, you must then use a similar DVD to reinstall the applications that were on the machine when it shipped.
In Windows, you can create a system repair disc from the Backup And Restore interface (beneath the Control Panel options for System And Security). The system repair disc can be used to boot the computer, and it will contain the system recovery tools. Windows 8/8.1 added Refresh and Restore options as well.
Pre-installation Environments
The Windows Pre-installation Environment (Windows PE) is a minimal Win32 OS that is running the Windows kernel and is intended as a stub that can be run on a machine to allow it to begin an installation. As such, you can think of it as a bootable OS for the Windows Recovery Environment or for installation deployment through System Center Configuration Manager (SCCM), Systems Management Server (SMS), or Windows Deployment Services (WDS). This is the operating system booted into when recovery or installation is necessary.
The technical reference for Windows PE can be found at the following location:
http://technet.microsoft.com/en-us/library/dd744322(WS.10).aspx
MSCONFIG
This utility helps troubleshoot startup problems by allowing you to selectively disable individual items that are normally executed at startup. There is no menu command for this utility; you must run it with the Run command (on the Start menu). Choose Start ➢ Run, and type MSCONFIG. It works in most versions of Windows, although the interface window is slightly different among versions.
On the boot tab of the tool, you can choose Safe Boot and then opt for a minimal configuration, and alternate shell, Active Directory repair, or to have networking enabled.
DEFRAG
When you save files to a hard drive, Windows will generally write the file into the first available space on the disk. So let’s say that you create an Excel spreadsheet and save it. It will be written to the disk. Next, you create a dozen new Word documents and save them as well. Then you go back and add a ton of data to your spreadsheet. Now the Excel file is much bigger. Instead of moving it all to a space on the hard drive big enough to handle the file, Windows will keep part of the file in its original location and write the rest of the data to another available space on the hard drive. When a file is in several places on a disk, it’s called a fragmented file. Excessive fragmentation of your files can slow down your computer’s performance.
Defragmenting a disk involves analyzing the disk and then consolidating fragmented files and folders so that they occupy a contiguous space, thus increasing performance during file retrieval. In Windows, there are a few different ways that you can get to the Disk Defragmenter:
- In Windows 8/7/Vista, click Start and type defrag into the Start Search box. Choose Disk Defragmenter from the Programs list.
- In Windows, open Computer or My Computer, right-click on a hard drive, choose Properties, select the Tools tab, and click Defragment Now.
- Start typing defrag in Windows 8 at the Start Screen, choose Defragment, and optimize your hard drives (see Figure 22.1).

Figure 22.1 Disk Defragmenter
Clicking Change Settings gives you options for scheduling defragmentation, as shown in Figure 22.2.

Figure 22.2 Schedule optimization
Microsoft recommends that you enable scheduled defragmentation. If you want to defragment immediately, click the Defragment Now button.
There are two versions of Disk Defragmenter: a command-line version and a Windows version that runs from within Windows. The Windows version is located on the System Tools submenu on the Start menu (Start ➢ All Programs ➢ Accessories ➢ System Tools ➢ Disk Defragmenter). In Exercise 22.1, you will run the Disk Defragmenter in Windows 7.
These are some of the available switches for the command-line version (DEFRAG.EXE):
| /A | Analyze only |
| /C | Defrags all disks |
| -F | (Vista only) Force defragmentation even if disk space is low |
| /V | Verbose output |
REGSVR32
REGSVR32.EXE, known as the REGSVR32 tool, allows you to register and unregister modules and controls for troubleshooting purposes. It is often associated with Internet Explorer, but it can be used with any control or module. The command-line syntax is REGSVR32 DLLNAME, and Figure 22.3 shows the options that are available with it.

Figure 22.3 REGSVR32 options
REGEDIT
The Registry Editor is used to change values and variables stored in a configuration database known as the Registry. This centralized database contains environmental settings for various Windows programs along with registration information, which details the types of filename extensions associated with applications so that when you double-click a file in Windows File Explorer, the associated application runs and opens the file.
The Registry Editor, shown in Figure 22.4, enables you to make changes to the large hierarchical database that contains all of Windows’s settings. These changes can potentially disable the entire system, so they should not be made lightly.
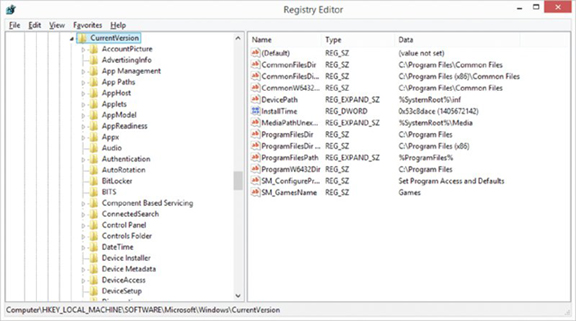
Figure 22.4 The Registry Editor
There is no menu command for the Registry Editor. You must run it with the Run command. REGEDIT is the name of the program. Windows also includes a second Registry Editor program called REGEDT32. But in recent versions of the OS, this has been nothing more than a link to REGEDIT.
Event Viewer
This utility provides information about what’s been going on with the whole system to help you troubleshoot problems. Event Viewer shows warnings, error messages, and records of things that have happened successfully. It’s found in all current versions of Windows (which include Windows 8/8.1, Windows 7, and Windows Vista). You can access it through Computer Management, or you can access it directly from the Administrative Tools in Control Panel.
Safe Mode
If when you boot Windows won’t load completely (it hangs or is otherwise corrupted), you can often solve the problem by booting into Safe Mode. Safe Mode is a concept borrowed from Windows 95 wherein you can bring up part of the operating system by bypassing the settings, drivers, or parameters that may be causing it trouble during a normal boot. The goal of Safe Mode is to provide an interface with which you’re able to fix the problems that occur during a normal boot and then reboot in normal mode.
To access Safe Mode, you must press F8 when the operating system menu is displayed during the boot process. You’ll then see a menu of Safe Mode choices, as listed in Table 22.1. Select the mode into which you want to boot.
Table 22.1 Windows Advanced Boot Options
| Choice | Loaded |
| Safe Mode | Provides the VGA monitor, Microsoft mouse drivers, and basic drivers for the keyboard (storage system services, no networking). |
| Safe Mode With Networking | Same as Safe Mode, but with networking. |
| Safe Mode With Command Prompt | Same as Safe Mode, but without the interface and drivers/services associated with it. |
| Enable Boot Logging | Creates NTBTLOG.TXT in the root directory during any boot. |
| Enable VGA Mode | Normal boot with only basic video drivers. In Windows, this option is called Enable Low-Resolution Video. |
| Last Known Good Configuration | Uses the last backup of the Registry to bypass corruption caused during the previous session. |
| Disable Automatic Restart On System Failure | Disables automatic restarting and is helpful when troubleshooting. |
| Debugging Mode | Sends information through the serial port for interpretation/ troubleshooting at another computer. |
| Start Windows Normally | Bypasses any of the options here. |
| Return To OS Choices Menu | Gives you an out in case you pressed F8 by accident. |
You need to keep a few rules in mind when booting in different modes:
- If problems don’t exist when you boot to Safe Mode but do exist when you boot to normal mode, the problem isn’t with basic services/drivers.
- If the system hangs when you load drivers, the log file can show you the last driver it attempted to load, which is usually the cause of the problem.
- If you can’t solve the problem with Safe Mode, try the Last Known Good boot, System Restore, or System Image Recovery (if it is Windows 8/8.1, you can also try Refresh/Restore).
Command Prompt
The command prompt has been mentioned numerous times in this chapter, and it is the environment in which you can run many troubleshooting utilities. Typing CMD at the Run prompt on the Start menu can start this. Figure 22.5 shows an example of the command prompt interface.

Figure 22.5 The command prompt interface
If you will be regularly running commands as Administrator, you can create an icon on the desktop for the executable (CMD.EXE) and configure on the Advanced section of the Shortcut tab to run the program as Administrator in Windows 7 and Windows Vista. Windows 8 already gives you the option of Command Prompt (Admin).
Uninstall/Reinstall/Repair
When a problem pops up with the Windows 8 operating system, you can boot into the Windows Recovery Environment (Windows RE) and repair it by choosing to refresh, reset, or restore it. Refreshing it keeps personal files and settings along with the default apps and those that you installed from the Windows Store.
Resetting reinstalls Windows and deletes all your personal files and settings. Restoring allows you to just undo recent system changes.
Depending on the type of repair operation you perform, you may or may not need the Windows 8 product key to continue.
Troubleshooting Security Issues
Many viruses will announce that your system is infected as soon as they gain access to it. They may take control of your system, flash annoying messages on your screen, or destroy your hard disk. When this occurs, you’ll know that you’re a victim. Other viruses will cause your system to slow down, cause files to disappear from your computer, or take over your disk space. The Windows Action Center, shown in Figure 22.6, can show you what security measures are set on your system.

Figure 22.6 The Windows Action Center offers a quick glimpse of current protection settings.
You should look for some of the following symptoms when determining if a virus infection has occurred:
- The programs on your system start to load more slowly. This happens because the virus is spreading to other files in your system or is taking over system resources.
- Unusual files appear on your hard drive, or files start to disappear from your system. Many viruses delete key files in your system to render it inoperable.
- Program sizes change from the installed versions. This occurs because the virus is attaching itself to these programs on your disk.
- Your browser, word processing application, or other software begins to exhibit unusual operating characteristics. Screens or menus may change.
- The system mysteriously shuts itself down or starts itself up, and a great deal of unanticipated disk activity occurs.
- You mysteriously lose access to a disk drive or other system resources. The virus has changed the settings on a device to make it unusable.
- Your system suddenly doesn’t reboot or gives unexpected error messages during startup.
- You notice an X in the system tray over the icon for your virus scanner, or the icon for the scanner disappears from the system tray altogether.
This list is by no means exhaustive. What is an absolute, however, is the fact that you should immediately quarantine the infected system. It is imperative that you do all that you can to contain the virus and keep it from spreading to other systems within your network and beyond. Many enterprises have a no-tolerance (zero tolerance) policy for infected systems, and they are always physically destroyed.
Common Symptoms
There are a number of common symptoms CompTIA expects you to know for the 220–902 exam when it comes to security issues. Many of these issues also appear in other CompTIA certification exams, namely Security+. Rest assured that for the 220–902 exam, you do not need to know the content as well as you would if you were preparing for the Security+ exam.
Pop-Ups
Pop-ups (also commonly known as popups) are both frustrating and chancy. When a user visits a website and another instance (either another tab or another browser window) opens in the foreground, it is called a pop-up; if it opens in the background, it is called a pop-under. Both pop-ups and pop-unders are pages or sites that you did not specifically request and may only display ads or bring up applets that should be avoided.
Pop-up blockers are used to prevent both pop-ups and pop-unders from appearing. While older browsers did not incorporate an option to block pop-ups, most newer browsers, including the latest versions of Internet Explorer, now have that capability built in.
Browser Redirection
Pharming is a form of redirection in which traffic intended for one host is sent to another. This can be accomplished on a small scale by changing entries in the hosts file and on a large scale by changing entries in a DNS server (poisoning). In either case, when a user attempts to go to a site, they are redirected to another. For example, suppose Illegitimate Company ABC creates a site to look exactly like the one for Giant Bank XYZ. The pharming is done (using either redirect method) and users trying to reach Giant Bank XYZ are tricked into going to Illegitimate Company ABC’s site, which looks enough like what they are used to seeing that they give their username and password data.
As soon as Giant Bank XYZ realizes that the traffic is being redirected, it will immediately move to stop it. But while Illegitimate Company ABC will be shut down, it was able to collect data for the length of time that the redirection occurred, which could vary from minutes to days.
Security Alerts
Users have plenty of real viruses and other issues to worry about. Yet some people find it entertaining to issue phony threats disguised as security alerts to keep people on their toes. Some of the more popular hoaxes that have been passed around are the Good Time and the Irina viruses. Millions of users received emails about these two viruses, and the symptoms sounded awful.
Both of these warnings claimed that the viruses would do things that are impossible to accomplish with a virus. When you receive a virus warning, you can verify its authenticity by looking on the website of the antivirus software you use, or you can go to several public systems. One of the more helpful sites to visit to get the status of the latest viruses is the CERT organization (www.cert.org). CERT monitors and tracks viruses and provides regular reports on this site.
When you receive an email that you suspect is a hoax, check the CERT site before forwarding the message to anyone else. The creator of the hoax wants to create widespread panic, and if you blindly forward the message to co-workers and acquaintances, you’re helping the creator accomplish this task. For example, any email that includes “forward to all your friends” is a candidate for hoax research. Disregarding the hoax allows it to die a quick death and keeps users focused on productive tasks. Any concept that spreads quickly through the Internet is referred to as a meme.
Slow Performance
Slow performance was addressed previously in this chapter in relation to operating system issues. Viruses, worms, and other malware can slow performance because they rob resources from the other applications and services forced to share them.
Internet Connectivity Issues
If your computer is hooked up to a network, you need to know when your computer is not functioning properly on the network and what to do about it. In most cases, the problem can be attributed either to a malfunctioning network interface card (NIC) or improperly installed network software. The biggest indicator in Windows that some component of the network software is nonfunctional is that you can’t log on to the network or access any network service. To fix this problem, you must first fix the underlying hardware problem (if one exists) and then properly install or configure the network software.
PC/OS Lock Up
It is obvious when a system lockup occurs. The system simply stops responding to commands and stops processing completely. System lockups can occur when a computer is asked to process too many instructions at once with too little memory. Usually, the cure for a system lock-up is to reboot. If the lockups are persistent, it may be a hardware-related problem instead of a software problem.
Application Crash
When an application crashes, you want to isolate the cause of the crash—it could be a compatibility issue, hardware, or a host of other problems—and solve it. One step to take early on is to look for updates/patches/fixes to the application released by the vendor. Be sure to try these updates on a test machine first before rolling them out to all, and verify that they do address the problem and not introduce new ones.
OS Update Failures
Failed updates for Windows—assuming that connectivity issues do not cause them—can often be traced to setting misconfigurations. These settings can also cause the operating system to report that an update needs to be installed when it has already been installed. The best solution is to find the error code being reported in Windows Update Troubleshooter, solve the problem, and download the update.
For information on addressing this problem with both Windows Update and Microsoft Office, see the knowledge base article at http://support.microsoft.com/kb/906602.
Rogue Antivirus
One of the more clever ways of spreading a virus is to disguise it so that it looks like an antivirus program. When it alerts the user to a fictitious problem, the user then begins interacting with the program and allowing the rogue program to do all sorts of damage. One of the more tricky things for troublemakers to do is to make the program look as if it came from a trusted source—such as Microsoft—and mimic the Windows Action Center interface enough to fool an unsuspecting user.
Microsoft offers a page on fake virus alerts that can be shared with employees to help educate them about rogue security software at the following location:
Spam
While spam is not truly a virus or a hoax, it is one of the most annoying things with which an administrator must contend. Spam is defined as any unwanted, unsolicited email, and not only can the sheer volume of it be irritating, it can often open the door to larger problems. For instance, some of the sites advertised in spam may be infected with viruses, worms, and other unwanted programs. If users begin to respond to spam by visiting those sites, then viruses and other problems will multiply in your system.
Just as you can, and must, install good antivirus software programs, you should also consider similar measures for spam. Filtering the messages out and preventing them from ever entering the network is the most effective method of dealing with the problem. Recently, the word spam has found its way into other forms of unwanted messaging beyond email, giving birth to the acronyms SPIM (spam over Instant Messaging) and SPIT (spam over Internet Telephony).
Renamed System Files/Disappearing Files/Permission Changes/Access Denied
Creators of malware have a number of methods by which they can wreak havoc on a system. One of the simplest ways is to delete key system files. When this occurs, the user can no longer perform the operation associated with the file, such as print, save, and so on. Just as harmful as deleting a file is to rename it or change the permissions associated with it so that the user can no longer access it or perform those operations.
Hijacked Email
One of the easiest ways to spread malware is to capture the email contacts of a user and send the malware as an attachment to all of those in their circle. The recipient is more likely to open the attachment because it seemingly comes from a trusted source. It is important that you scan all email, both internal and external, and identify problems before they spread. Be wary of responses from users regarding email that they haven’t sent and watch for automated replies from unknown sent email. As good as your malware detection may be, one of the best things to do to prevent these types of attacks from being successful is to educate users of what to watch out for, how to respond, and how to get a hold of you as quickly as possible.
Invalid Certificate
PKI, or public key infrastructure, was discussed in Chapter 21, and it relies upon digital certificates for security. An invalid certificate usually means that the certificate that you have has expired. If this is the case, renew the certificate—or get one that is valid—and the problem will correct itself.
Security Tools
A number of the security tools that fall beneath this objective have already been discussed. These include Recovery Console, pre-installation environments, Event Viewer, and MSCONFIG/Safe boot. Refresh/Restore was also discussed earlier in the chapter, and the sections that follow focus on topics not yet addressed.
Antivirus Software
This type of preventive maintenance is absolutely critical these days if you have a connection to the Internet. A computer virus is a small, deviously ingenious program that replicates itself to other computers, generally causing those computers to behave abnormally. Generally speaking, a virus’s main function is to reproduce. A virus attaches itself to files on a hard disk and modifies those files. When a program accesses the files, the virus can infect the program with its own code. The program may then in turn replicate the virus code to other files and other programs. In this manner, a virus may infect an entire computer.
When an infected file is transferred to another computer (via disk or download), the process begins on the other computer. Because of the frequency of downloads from the Internet, viruses can run rampant if left unchecked. For this reason, antivirus programs were developed. They check files and programs for any program code that shouldn’t be there and either eradicate it or prevent the virus from replicating. An antivirus program is generally run in the background on a computer, and it examines all of the file activity on that computer. When it detects a suspicious activity, it notifies the user of a potential problem and asks the user what to do about it. Some antivirus programs can also make intelligent decisions about what to do. The process of running an antivirus program on a computer is known as inoculating the computer against a virus.
There are two categories of viruses: benign and malicious. Benign viruses don’t do much besides replicate themselves and exist. They may cause the occasional problem, but it is usually an unintentional side effect. Malicious viruses, on the other hand, are designed to destroy things. Once a malicious virus (for example, the Michelangelo virus) infects your machine, you can usually kiss the contents of your hard drive goodbye.
To prevent virus-related problems, you can install one of any number of antivirus programs (Norton AntiVirus or McAfee VirusScan, for example). These programs will periodically scan your computer for viruses, monitor regular use of the computer, and note any suspicious activity that might indicate a virus. In addition, these programs have a database of known viruses and the symptoms each one causes.
Anti-malware Software
There are many other forms of malware in addition to viruses. While a true antivirus program will scan for viruses, anti-malware programs are a superset of virus scanners and will look for more than just traditional viruses. One program included with Windows that falls into this category is Windows Defender, which is mainly a spyware detector (and incorporates Microsoft Security Essentials, or MSE, with it as of Windows 8 and later).
As with similar programs, for Windows Defender to function properly, you need to keep the definitions current and scan on a regular basis. In Exercise 22.2, you’ll run Windows Defender (shown in Figure 22.7).

Figure 22.7 Windows Defender can identify security threats.
Terminal
The terminal, or command prompt, allows you to interact with the system at the command line. In UNIX/Linux environments, this is where you interact with the shell and run many of the commands discussed in Chapter 18, “Working with Mac OS and Linux.”
System Restore/Snapshot
There are times when bad things happen to good computers. No matter how hard you’ve tried to keep a system running flawlessly, your computer crashes. There are several ways to get your computer back up and running, but many of them (such as reinstalling the operating system) take a lot of time. System Restore was added to Windows, and it allows you to create restore points to make recovery of the operating system easier.
A restore point is a copy, or snapshot, of your system configuration at a given point in time. It’s like a backup of your configuration but not necessarily your data. Restore points are created in one of three ways. One, Windows creates them automatically by default. Two, you can manually create them yourself. Three, during the installation of some programs, a restore point is created before the installation (that way, if the install fails, you can “roll back” the system to a preinstallation configuration). Restore points are useful for when Windows fails to boot but the computer appears to be fine otherwise or if Windows doesn’t seem to be acting right and you think it was because of a recent configuration change.
To open System Restore, click Start ➢ All Programs ➢ Accessories ➢ System Tools ➢ System Restore. By clicking Next, you can choose a restore point.
You’ll notice that checkpoints are included in the list of restore points along with backups that you have performed.
Creating a restore point manually is easy to do using the System Restore utility. In Exercise 22.3, we’ll walk you through the process of creating a restore point in Windows Vista.
Best Practices for Malware Removal
Rounding out this chapter is a discussion of the best practices for malware removal. The best way to think of this is as a seven-item list of what CompTIA wants you to consider when approaching a possible malware infestation. The following discussion presents the information that you need to know in just that fashion.
- Identify malware symptoms. Before doing anything major, it is imperative first to be sure that you are dealing with the right issue. If you suspect malware, then try to identify the type (spyware, virus, and so on) and look for the proof needed to substantiate that it is indeed the culprit.
- Quarantine infected system. Once you have confirmed that malware is at hand, then quarantine the infected system to prevent it from spreading the malware to other systems. Bear in mind that malware can spread in any number of ways, including through a network connection, email, and so on. The quarantine needs to be complete enough to prevent any spread.
- Disable System Restore (in Windows). This is a necessary step because you do not want to have the infected system create a restore point—or return to one—where the infection exists.
- Remediate infected systems. The steps taken here need to be dependent upon the type of malware with which you’re dealing, but they should include updating anti-malware software with the latest definitions and using the appropriate scan and removal techniques. The latter can include booting into Safe Mode, booting to a pre-installation environment, and so on.
- Schedule scans and run updates. The odds of the system never being confronted by malware again are slim. To reduce the chances of it being infected again, though, schedule scans and updates to run regularly. Most anti-malware programs can be configured to run automatically at specific intervals, but should you encounter one that does not have such a feature, you can run it through Task Scheduler.
- Enable System Restore and create a restore point (in Windows). Once everything is working properly, it is important once again to create restore points should a future problem occur and you need to revert back.
- Educate the end user. Education should always be viewed as the final step. The end user needs to understand what led to the malware infestation and what to avoid, or look for, in the future to keep it from happening again.
Together, these seven steps offer a best practices approach to confronting malware removal.
Troubleshooting Mobile Issues
As mobile devices have been rapidly replacing the desktop and laptop machines that used to rule the workplace, the equipment an administrator must maintain has now evolved to cover a plethora of options. This section focuses on common mobile OS and application issues and some of the tools that can be used to work with them. A subsequent section will look at the same topics with more of a focus on security.
The following symptoms of problems are common with mobile OSs and applications:
- Dim display. Light can quickly drain a battery on a mobile device, and thus most of them include the ability to dim the display both manually and automatically after a period of inactivity. While you normally want these actions, if the settings are incorrect, the screen can be too dim to work with. Check the settings on the device to see if it possible to brighten the screen and/or keep it from automatically dimming within a short period of time.
- Intermittent wireless. There are a number of causes why intermittent wireless connections can occur, but the two most common are lack of a good signal, and interference. Increasing the number of repeaters, or being closer to them, can address the lack of a good signal. Interference can be addressed by reducing the number of devices competing for the same channel.
- No wireless connectivity. A common cause for lack of wireless connectivity is for a device to be in airplane mode. Make sure your device is not in that mode, and do a hard reboot if necessary.
- No Bluetooth connectivity. Lack of Bluetooth connectivity is often caused when a device is not turned on and/or has an improper setting for discoverabilty. Make sure the device is turned on and discoverable (checking manufacturer’s documentation if necessary).
- Cannot broadcast to an external monitor. Connecting a mobile device, such as a phone, to a television or monitor should not be problematic as long as auto-detection is working. If auto-detection is disabled, or just not working, then you may need to configure the output device manually.
- Nonresponsive touchscreen. If your touchscreen becomes nonresponsive with a mobile device, try some basic steps: first, remove any added case or screen protector that may have been put on your device and then clean the screen (use a lint-free cloth). Next, unplug your device and restart it (forcing it to restart, if necessary).
- Apps not loading. If an app does not load, try rebooting (forcing the device to restart, if necessary). If that does not work, attempt to reload the app and be sure to check the vendor’s site for any similar problems (and solutions) encountered by others.
- Slow performance. Slow performance is often related to RAM. Look for any apps that are running and can be closed, and add more RAM if possible.
- Unable to decrypt email. Mail decryption depends upon certificates, and problems can occur when those certificates expire or you have a configuration problem (which can accompany upgrades). To address the problem, try reimporting S/MIME certificates and deleting/importing them from the source.
- Extremely short battery life. Batteries never last as long as you would like. Apple defines battery life as the amount of time a device runs before it needs to be recharged (as opposed to battery life span, which is the amount of time a battery lasts before it needs to be replaced). Tips for increasing battery life include keeping OS updates applied (they may include energy saving patches), avoiding ambient temperatures that are too high or too low, letting the screen automatically dim, and turning off location-based services. You should also disconnect peripherals and quit applications not in use (Wi-Fi, for example, uses power when enabled, even if you are not using it to connect to the network).
- Overheating. When most mobile devices get too warm, they will tell you that they need to cool down before they can continue to be used and they will automatically take measures to protect themselves (turning off features, closing apps, and so on). One of the best ways to avoid overheating is to avoid ambient temperatures that are too hot or too cold: avoid having the device in direct sunlight for extended time periods, in a hot car on a summer day, or on top of a heat source. When the device does overheat, you can often help it cool down quicker by removing any protective case that may be there—and putting it back on later.
- Frozen system. If the system is frozen—not responding to a single thing—try to force a restart. For example, press and hold the Sleep/Wake and Home buttons an iPhone for at least 10 seconds until you see the Apple logo. If the restart does not work, try plugging the device in and letting it charge (an hour or more is recommended) and try restarting again.
- No sound from speakers. Occasionally, a device can be unknowingly put into silent mode, and this will keep sound from coming to the speakers, headphones, or other connected devices. When troubleshooting, always check to see that silent mode is not enabled and restart the device if necessary.
- Inaccurate touchscreen response. To solve problems with inaccurate touchscreen responses, start by cleaning the screen, as discussed earlier, and rebooting the device.
- System lockout. Being locked out of a system can be a frustrating experience. The lockout can be the result of the device being disabled, forgetting the passcode, or any of a number of other possibilities. Apple outlines how to approach this for the iPhone, iPad, or iPod Touch at https://support.apple.com/en-us/HT204306.
There are a number of tools—really just techniques—that can be used to approach these common problems:
- Hard reset. A hard reset should always be done as a last resort. With Apple’s iPhone, iPad, and iPod Touch, forcing a restart on the device is done by pressing and holding the Sleep/Wake and Home buttons for at least 10 seconds until you see the Apple logo.
- Soft reset. Not as forceful as a hard reset, a soft reset keeps the data of running applications. With Apple’s iPhone, iPad, or iPod Touch, press and hold the Sleep/Wake button until the red slider appears, and then drag the slider to turn the device off. Next, press and hold the Sleep/Wake button again until you see the Apple logo.
- Close running applications. With most smartphones, iPads, and so on, you do not need to close running applications unless there is a problem. When there is, press the Home button two times and then find the desired application (sliding between choices, if necessary). Hold your finger on the application for 2 seconds, and the icon for it will start to shake with a minus symbol on the top left of it. Press the icon again, and it will close the app.
- Reset to factory default. When you need to get to a safe state—such as when you are disposing of a device or assigning it to a new user—you can reset it to factory default settings. To do this, tap Settings and then General. Scroll down until you see the Reset option and choose it. Tap Erase All Content And Settings. At this point, the iPhone or iPad will ask you to confirm the reset, and when you tap OK, it will start the process.
- Adjust configurations/settings. Configurations and settings need to be personalized to the user using the device. Except for apps, choosing Settings on the device usually does this, followed by finding the areas that you want to modify and then making the desired changes and saving them.
- Uninstall/reinstall apps. Apps that are not used should be removed from a device to free up resources: the last thing you need is apps to continually update when they are ones you never use. Occasionally, an app may need to be reinstalled to correct problems with its configuration.
- Force stop. When an app is unresponsive, you can do a force stop to close it. With iOS, press the Home button twice quickly and small previews of your recently used apps will appear. Swipe left to find the app that you want to close, and then swipe up on the app’s preview to close it using a force stop.
This list constitutes the “tools” CompTIA wants you to be familiar with for the common mobile OS and application issues section of the exam.
Troubleshooting Mobile Security Issues
While the preceding section—and its corresponding objectives—looked at mobile devices and focused on common OS and application issues, this one builds on that and focuses on security-related issues. Once again, it looks at common symptoms and tools, differing only in that there is more of a focus on security. It needs to be pointed out, though, that CompTIA is stretching the definition of the word security to include more than many would: a fair number of the issues that appear in this section would easily have fit in the last section.
The following list includes common symptoms of problems with mobile OS and applications security issues:
- Signal drop/weak signal. Weak signals are a common culprit behind dropped signals. Before engaging in communication, signal strength on the device should be evaluated. If the signal is low (for example, no bars), then change location (step outside, drive out of the tunnel, exit the elevator, and so forth) and try for a better signal. A low battery can affect signal strength, so keep the battery charged as much as possible.
- Power drain. While apps, usage, and so on can contribute to power drain, one of the biggest offenders is the search for a signal. If the antenna is not able to perform at its peak, it can reduce its efficiency, which causes it to search more for a signal. Make sure that nothing is impeding the performance of the antenna.
- Slow data speeds. Slow data speeds can be caused by too much interference, as pointed out earlier in this chapter. Try changing the channel on Wi-Fi routers to less-used channels and performance should increase.
- Unintended Wi-Fi connection. When autoconnect is enabled on devices, it is possible for them to seek out open Wi-Fi networks and try to connect to them automatically. This setting should be disabled for all devices because an untrusted connection is a possible place for a DNS or man-in-the-middle attack to occur.
- Unintended Bluetooth pairing. When anonymous devices are allowed to connect to Bluetooth-enabled devices, this is known as unintended Bluetooth pairing and it represents a security threat. Mobile security policies should be created and enforced to prevent this from occurring.
- Leaked personal files/data. When authorized users access devices through unintended connections or unauthorized users access absconded devices, they can access the data on the device. Every firm should have a policy for protecting data (encryption) and dealing with leaks when they occur.
- Data transmission overlimit. Going over the limits on data plans can be symptomatic of a hacked account. Closely monitor account usage.
- Unauthorized account access. Unauthorized account access can give users access to personal files and data to which they should not have access. Closely monitor account usage.
- Unauthorized root access. Security holes in mobile device operating systems can leave back doors into which users can get unauthorized root access. The majority of these holes are closed by patches and upgrades as soon as they are discovered, so be sure to keep operating systems current.
- Unauthorized location tracking. While location-based data can be very valuable when you are using maps and trying to find sites, it can also give away sensitive information if accessed by someone who should not have it. You can optimize your battery life and protect yourself by turning off Location Services. On an iPhone, turn it off in Settings ➢ Privacy ➢ Location Services. There you will see each app listed along with its permission setting. Apps that recently used Location Services have an indicator next to the on/off switch, and you can configure them accordingly.
- Unauthorized camera/microphone activation. The camera and microphone can be activated remotely and allow a troublemaker to spy on you. It is suggested that, when not in authorized use, you cover the camera and microphone to keep them from providing any data if they are remotely accessed.
- High resource utilization. High resource utilization can be a telltale sign that a device is running more than you think it should be—perhaps the drives are being searched or the camera is recording your every move. Monitor for high resource usage, and if it’s discovered, find out what is causing it and respond appropriately.
There are a number of tools—or techniques—that can be used to approach these common problems. Some of them have been discussed before in this chapter and are not in the following list (factory reset/clean install, uninstall/reinstall apps, and force stop). Those that remain are as follows:
- Anti-malware. As has been pointed out several times in this chapter, keep malware definitions current and run scanning programs on every device.
- App scanner. Similar to anti-malware, an app scanner looks for problems with apps. On an Android phone, for example, the Lookout app automatically scans every app that you install, performs a full scan of all of the apps on your device every week, and downloads the latest definitions regularly.
- Wi-Fi analyzer. This is a tool that can show you the Wi-Fi channels, and it can be useful in problem detection.
- Cell tower analyzer. What the Wi-Fi analyzer can do for Wi-Fi, the cell tower analyzer can do for cell towers—showing a graphical representation of traffic and signals.
- Backup/restore. Because problems tend to happen no matter how careful you may be, it is important to back up devices and be able to restore from those backups after an incident. Some services exist beyond just giving you a place to store backups. In the Apple world, there is iTunes/iCloud/Apple Configurator. The latter simplifies mass configuration and deployment on iPhone, iPad, and iPod Touch, and it is intended for use by schools, businesses, and institutions. In the Google world, there is Google Sync, which allows you to sync your phone, desktop, and tablet devices. Last, in the Microsoft world, there is OneDrive, which has been discussed previously.
As with so many issues involving troubleshooting, common sense is most important. Using logic and a systematic approach, you can often identify and correct small problems before they become large ones.
Summary
This chapter addressed systematic approaches to working with computer problems as well as troubleshooting operating systems and resolving security-related issues. In our discussion of troubleshooting theory, you learned that you need to take a systematic approach to problem solving. Both art and science are involved, and experience in troubleshooting is helpful but not a prerequisite to being a good troubleshooter. You learned that in troubleshooting, the first objective is to identify the problem. Many times, this can be the most time-consuming task!
Once you’ve identified the problem, you need to establish a theory of why the problem is happening, test your theory, establish a plan of action, verify full functionality, and then document your work. Documentation is frequently the most overlooked aspect of working with computers, but it’s an absolutely critical step!
Next we discussed operating system troubleshooting issues. First, we looked at common trouble symptoms and followed that by discussing tools that can be helpful in solving problems.
Finally, we looked at security troubleshooting issues. Again, we started by looking at common issues and then turned to tools. The discussion concluded by looking at the best practices for malware removal.
Exam Essentials
Know the steps to take in troubleshooting computers. First identify the problem. Then establish a theory of probable cause, test your theory, establish a plan of action to resolve the problem, verify full system functionality, and finally, document your findings.
Understand how to talk to the customer. Questions should be nonaccusatory and neutral in tone. Seek to understand what happened, but be careful not to blame the users because they may become defensive and not give you the information that you need to solve the problem.
Know how to create restore points. Restore points in Windows can be created through the System Restore utility and the System Protection tab.
Review Questions
The answers to the chapter review questions can be found in Appendix A.
-
In Windows, which utility is responsible for finding, downloading, and installing Windows service packs?
- Update Manager
- Service Pack Manager
- Download Manager
- Windows Update
-
Which boot mode loads only basic drivers?
- Limited Mode
- Safe Mode
- Feature Mode
- Windows Mode
-
Which BOOTREC option can be used in Windows to rebuild the boot configuration file?
- /FIXBOOT
- /REBUILDBCD
- /FIXBCD
- /FIXMBR
-
What is the first step in the troubleshooting process?
- Document findings
- Identify the problem
- Establish a theory
- Verify functionality
-
Which tool do you use to create a restore point in Windows?
- Backup
- System Restore
- Restore Point
- Emergency Repair
-
Which of the following operating systems use the BOOT.INI file during boot?
- Windows XP
- Windows Vista
- Windows 7
- Windows 8/8.1
-
One of the users you support has a Windows 7 laptop that continues to shut down and restart spontaneously. What should you try first?
- Swap the motherboard.
- Begin disabling drivers one by one until you find the culprit.
- Disable the sleep settings for hibernation.
- Reinstall Windows 7.
-
Windows 7 includes a feature called a ____________, which is a copy of your system configuration that can be used to roll back the system to a previous state if a configuration error occurs.
- Restore point
- Repair point
- Rollback point
- Registry point
-
Which of the following are used to prevent pop-unders from appearing?
- Anti-malware utilities
- Pop-up blockers
- Phishing sites
- Antivirus software
-
In general, how often should you update your antivirus definitions?
- Once a week.
- Once a month.
- Once a year.
- Antivirus definitions do not need to be updated.
-
One of your users claims that their hard drive seems to be running slowly. What tool can you use to check to see how fragmented the hard drive is?
- Disk Analyzer
- Disk Cleanup
- Disk Defragmenter
- CHKDSK
-
You want to ensure that your computer receives automatic updates to Windows and other Microsoft products. Which tool will take care of this for you?
- Windows Update
- Microsoft Update
- System Update
- None of the above
-
Which of the following programs could be considered anti-malware?
- Windows Defender
- Microsoft Monitor
- System Watchdog
- None of the above
-
Which of the following allows you to register and unregister modules and controls for troubleshooting purposes?
- REGSVR32
- SFC
- FIXBOOT
- FIXMBR
-
Which of the following can you do to help eliminate security problems? (Select all that apply.)
- Establish security policies and procedures.
- Update your operating systems.
- Update your applications.
- Update your network devices.
-
Internal users are seeing repeated attempts to infect their systems as reported to them by pop-up messages from their virus scanning software. According to the pop-up messages, the virus seems to be the same in every case. What is the most likely culprit?
- A server is acting as a carrier for a virus.
- You have a worm virus.
- Your antivirus software has malfunctioned.
- A DoS attack is under way.
-
Which of the following tools can you use to delete temporary Internet files and other unneeded files to free up disk space?
- Disk Analyzer
- Disk Cleanup
- Disk Defragmenter
- CHKDSK
-
Which of the following tools automatically verifies system files after a reboot to see if they were changed to unprotected copies?
- DAZR
- NTLDR
- REGEDIT
- SFC
-
To open System Restore, click Start ➢ All Programs ➢ Accessories, and then what?
- Advanced
- System Tools
- Backup
- TCP/IP
-
Which utility is shown in Figure 22.8?
- REGEDIT
- REGSRV32
- MSCONFIG
- Event Viewer
Performance-Based Question
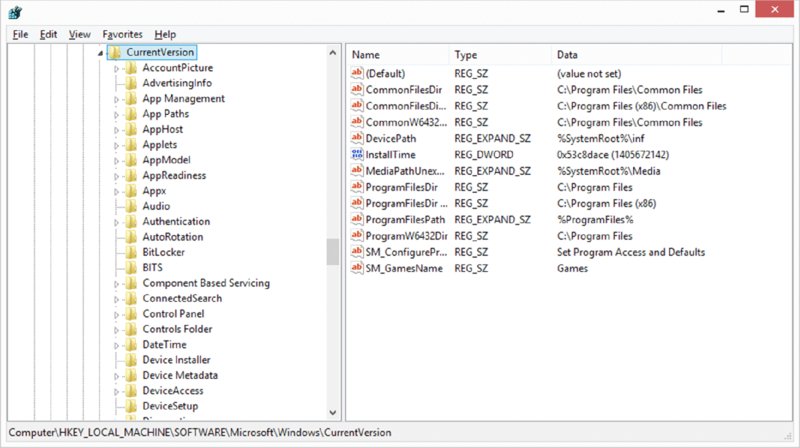
Figure 22.8 A Windows-based utility
You will encounter performance-based questions on the A+ exams. The questions on the exam require you to perform a specific task, and you will be graded on whether or not you were able to complete the task. The following requires you to think creatively in order to measure how well you understand this chapter’s topics. You may or may not see similar questions on the actual A+ exams. To see how your answers compare to the authors’, refer to Appendix B.
List, in order, the seven best practice steps associated with malware removal.