
Appendix B
Answers to Performance-Based Questions
Chapter 1: Motherboards, Processors, and Memory
Answer to Performance-Based Question 1
Here is how to remove a DIMM and replace it with another one:
- Pull the tabs on either end of the DIMM away from the DIMM.
- Pull the loose DIMM straight out of the slot and away from the motherboard.
- Ensure that the locking tabs are completely opened and out of the way of the slot.
- Align the module's notch with the tab or tabs in the slot.
- Insert the new DIMM straight down into the slot.
- Apply firm and even pressure downward until the locking tabs automatically snap into place.
- Nudge the tabs inward toward the module to make sure that they are tight.
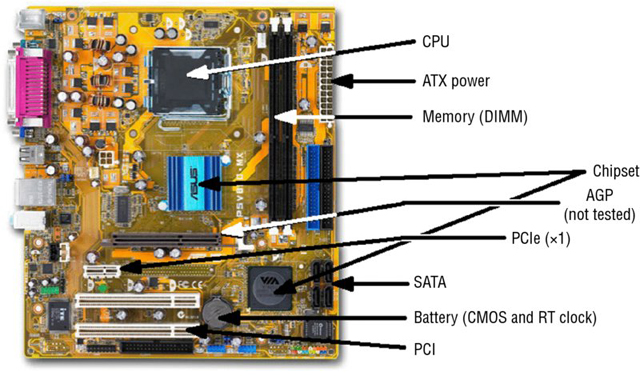
Answer to Performance-Based Question 2
The components are labeled in the following illustration.
Chapter 2: Storage Devices and Power Supplies
Here are the steps to remove a power supply from a computer chassis:
- Remove the power source from the system.
- Ground yourself and the computer to the same source of ground.
- Remove the cover from the system.
- Locate the power supply.
- Follow all wiring harnesses from the power supply to their termini, disconnecting each one.
- Remove any obstructions that appear as if they might hinder removal of the power supply.
- Locate and remove the machine screws on the outside of the case that are used to secure the power supply.
- Pull the power supply out of the case.
Chapter 3: Peripherals and Expansion
Based on the connectors, here are the connections to make:
- Plug the VGA cable into the blue, DE15 interface.
- Plug the USB cable into the gray, flat 4-pin interface.
- Plug the mouse into the green, mini-DIN-6 interface.
- Plug the keyboard into the purple, mini-DIN -6 interface.
- Plug the speaker into the green, 3.5mm TRS interface.
Chapter 4: Display Devices
Here is how to extend a display onto a second monitor and adjust their orientation with respect to each other:
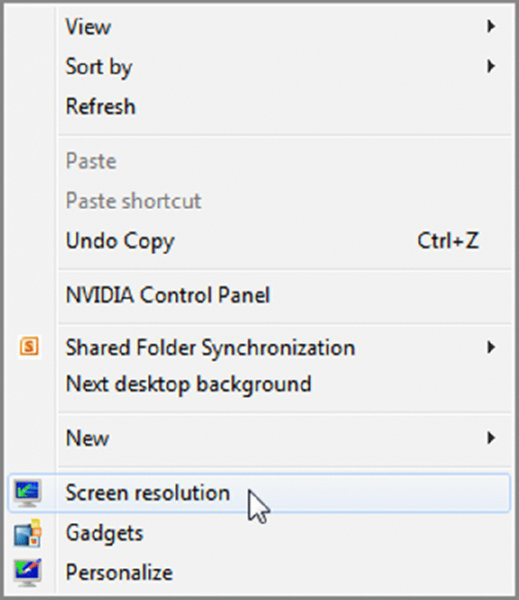
- Right-click a blank portion of the Desktop.
- Click Screen Resolution.
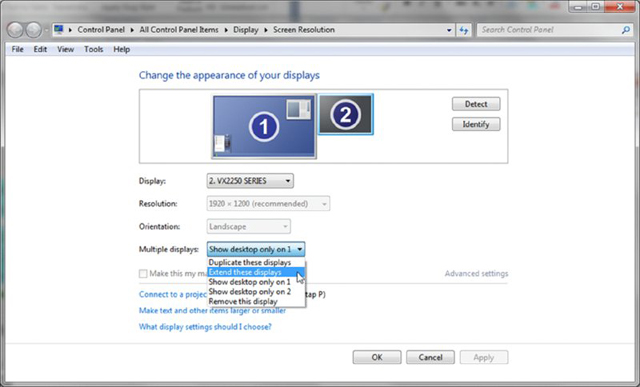
- Click on the picture of the monitor with the number 2 on it.

- Pull down the menu labeled Multiple Displays; select Extend These Displays.
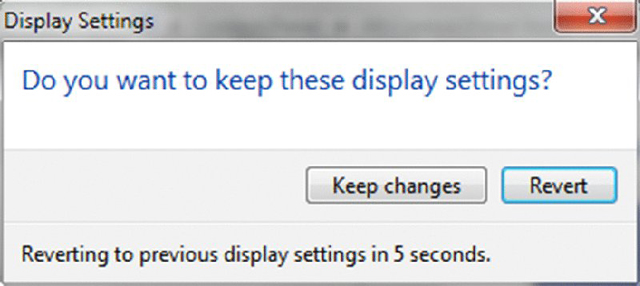
- Click Keep Changes in the pop-up dialog that results.
- Click and drag the second monitor to the desired virtual position around the primary monitor.
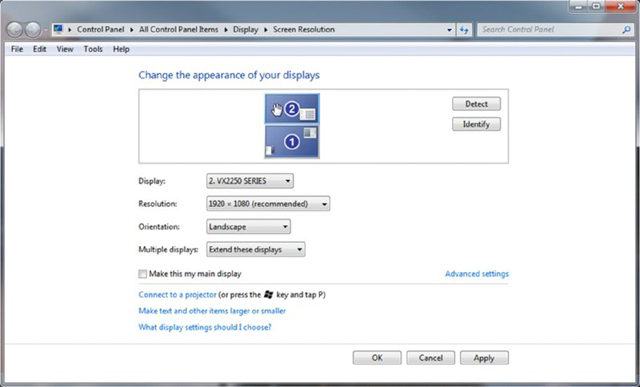
- Click OK to save the changes and exit, or click Cancel to exit without saving the changes.
Chapter 5: Custom Configurations
These are the steps to set up video streaming from one Windows 7 computer to another in the same house:
- Run Network And Sharing Center.
- Click the Change Advanced Sharing Settings link in the left frame.
- Expand the Home Or Work configuration section.
- Click the Choose Media Streaming Options link.
- Change desired Blocked buttons to Allow.
- Open Windows Media Player and switch to Library mode, if necessary.
- Ensure that streaming is enabled.
- On the remote system, start Windows Media Player.
- Expand the remote library that you just shared under Other Libraries to play music, watch videos or recorded TV, and view pictures.
Chapter 6: Network Fundamentals
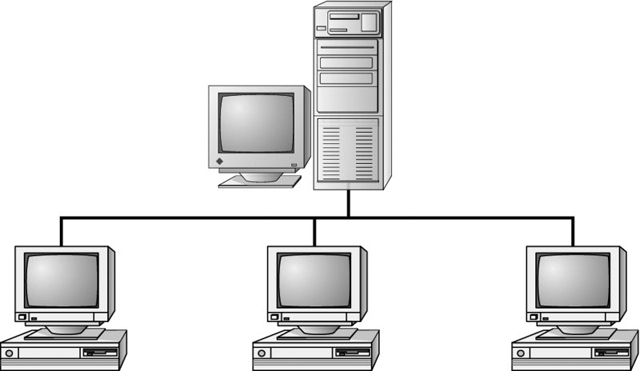
Possible answers for examples of physical network topologies could include bus, ring, star, mesh, and hybrid. The simplest topology, and the one that uses the least amount of cable, is a bus. It consists of a single cable that runs to every workstation, as shown in the following illustration.
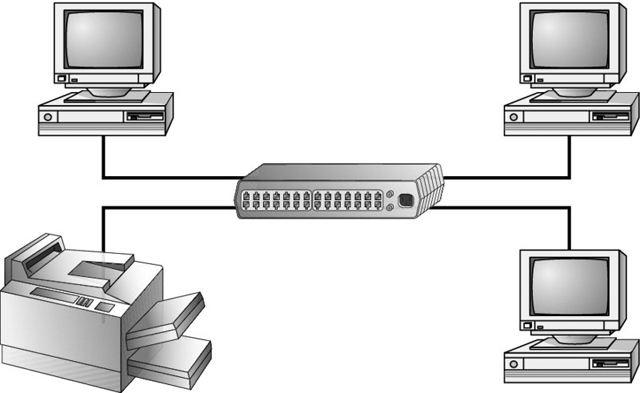
In a star topology, shown in the next illustration, each network device branches off a central device called a hub or a switch, making it easy to add a new workstation. If the hub or switch fails, the entire network fails.
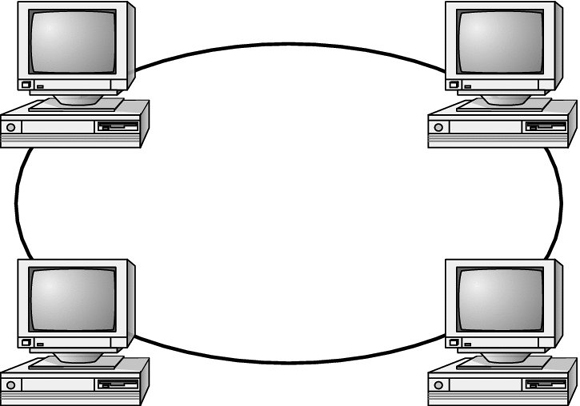
In a physical ring, each computer connects to two other computers, joining them in a circle and creating a unidirectional path where messages move from workstation to workstation. These are very rarely implemented.
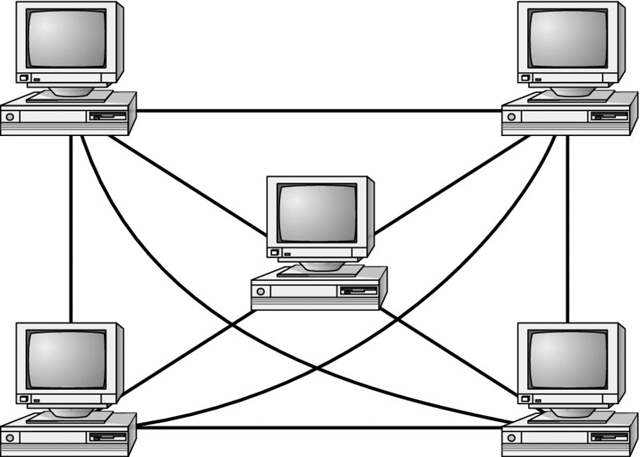
The mesh topology is the most complex in terms of physical design. In a mesh, each device is connected to every other device as shown in the following illustration. This provides redundancy but costs more to implement.
A hybrid topology combines two or more other topologies into one network. An example might be a server room that has a partial mesh for redundancy but the clients are all connected to switches in a star.
Chapter 7: Introduction to TCP/IP
Here's how to use Internet Explorer to connect using FTP:
First open Internet Explorer. Then, in the address window, type the following:
Chapter 8: Installing Wireless and SOHO Networks
Here are the steps to install a PCI network card for a Windows 7 desktop:
- Power off the PC.
- Remove the case and the metal or plastic blank covering the expansion slot opening.
- Insert the new expansion card into the open slot.
- Secure the expansion card with the screw provided.
- Put the case back on the computer and power it up.
- Windows Plug and Play (PnP) should recognize the NIC and install the driver automatically. It may also ask you to provide a copy of the necessary driver if it does not recognize the type of NIC that you have installed.
- If Windows does not start the installation routine immediately, open Control Panel in Small Icon or Large Icon view, and choose Devices And Printers and then Add A Device. Choose the NIC and continue the installation.
- After installing a NIC, you must hook the card to the network using the appropriate cable (if you're using wired connections). Attach a patch cable to the connector on the NIC and to a port in the wall (or connectivity device), thus connecting your PC to the rest of the network.
Chapter 9: Understanding Laptops
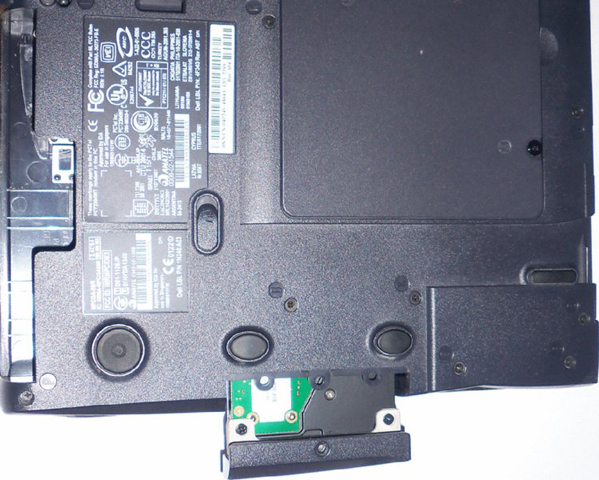
Here is how to replace a hard drive on the example laptop computer:
- Turn off the computer.
- Disconnect the computer and any peripherals from their power sources, and remove any installed batteries.
- Locate the hard drive door and remove the screw holding it in place.
- Lift the hard drive door until it clicks.
- Slide the hard drive out to remove it.
- Remove the two screws holding the hard drive to the hard drive door.
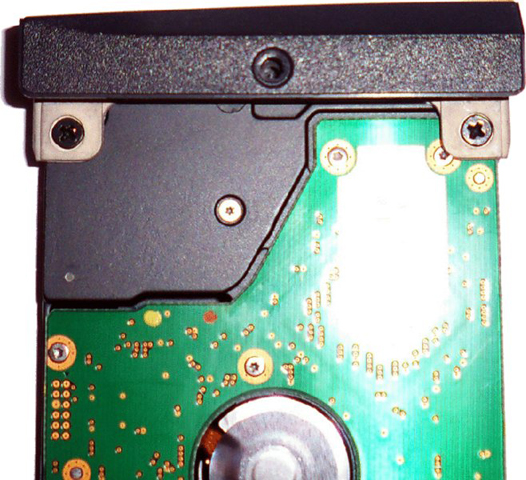
- Attach a new hard drive to the hard drive door.
- Slide the new hard drive back into the hard drive bay.
- Snap the hard drive door back into place, and insert and tighten the screw to hold the door in place.
Chapter 10: Understanding Mobile Devices
The five steps to pair a Bluetooth device are:
- Turn on the Bluetooth device.
- Enable Bluetooth.
- Enable pairing.
- Use your mobile device to locate and select the Bluetooth device.
- Enter the Bluetooth device's passcode.
- Confirm pairing on the Bluetooth device by pressing a button or a combination of buttons.
- Test connectivity.
Chapter 11: Installing and Configuring Printers
Here are some example steps to take to clean an inkjet printer. The process for starting the cleaning cycle on inkjet printers can vary, and some printers have both quick and deep-clean cycles. Always check your documentation for steps specific to your printer.
- Power on the printer, and open the top cover to expose the area containing the print cartridges.
- Initiate a self-cleaning cycle.
- When the print head moves from its resting place, pull the AC power plug.
- Locate the sponge pads on which to apply the cleaning solution.
- Using the supplied syringe, apply the cleaning solution to the sponge pads until they are saturated.
- Plug the printer back into the wall outlet and turn it on. The print heads will park themselves.
- Turn the printer off. Let the solution sit for at least three hours.
- Power the printer back on, and run three printer cleaning cycles. Print a nozzle check pattern (or a test page) after each cleaning cycle to monitor the cleaning progress.
Chapter 12: Hardware and Network Troubleshooting
Here is how to stop and restart the print spooler in Windows 7:
- Open Computer Management, and navigate to Services by right-clicking the Computer icon and choosing Manage. If necessary, click the arrow next to Services And Applications to expand the list.
- Find the Print Spooler service.
- Stop the spooler service. There are several ways that you can do this:
- Right-clicking on the service and choosing Stop
- Clicking the Stop square above the list of services
- Using the More Actions menu on the right
- Restart the spooler by right-clicking on the service and choosing Start or by clicking the Start arrow above the list of services.
- Close Computer Management.
Chapter 13: Operating System Basics
Given the information that you need to collect, the easiest method is to use the System applet in Control Panel
- Click Start.
- Select Control Panel.
- Choose System.
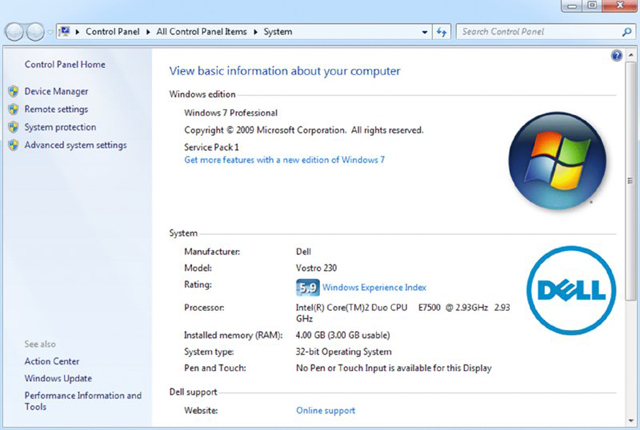
- Write down the information for every item except the information related to the paging file.
- Click Advanced System Settings. The System Properties dialog box appears.
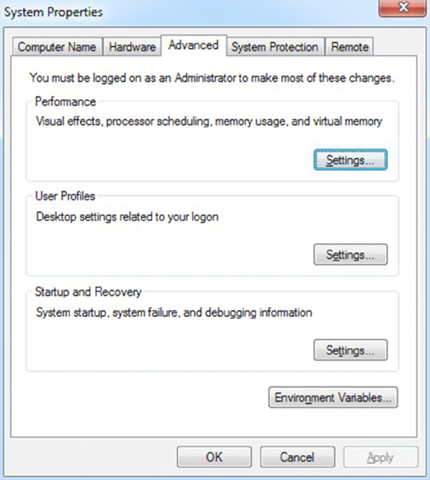
- Click the Settings button beneath Performance, and choose the Advanced tab.
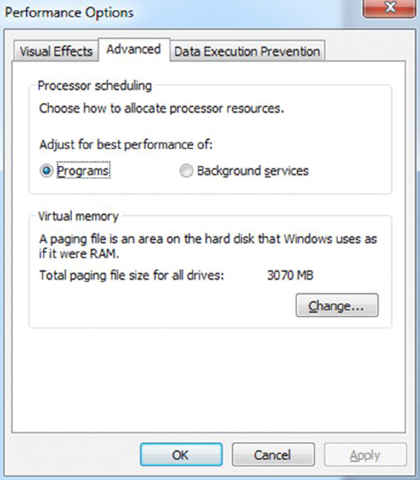
- Write down the paging file information.
- Click OK to exit the Performance Options dialog box.
- Click OK to exit System Properties.
- Close the System applet.
Chapter 14: Operating System Administration
To check to see what background processes are running, and the resources they are using, open Task Manager. Do this by pressing Ctrl+Alt+Del and selecting Start Task Manager. You can also press Ctrl+Shift+Esc.
Once in Task Manager, click the Processes tab. It will also be helpful to check the Show Processes From All Users box if it is not already checked. Click the CPU column header to sort by CPU usage. If a process is taking up a considerable amount of CPU time, you can highlight it and click End Process to shut it down. You can also sort by memory used and shut down processes that look to be using excessive amounts of memory. Note that shutting down critical processes may cause Windows to lock up or otherwise not work properly, so be careful what you choose to terminate. Note as well that right-clicking on one of the processes offers the End Process Tree option—a useful option when the process being killed is associated with others.
Chapter 15: Working with Windows 8/8.1
To write a PowerShell script to find other scripts in a user profile directory and all of its subdirectories, you need the environment variable $home. While there are a number of ways of writing this script, one possibility from Technet is as follows:
Get-ChildItem -Path $home* -Include *.ps1 -Recurse
Chapter 16: Working with Windows 7
To configure the TCP/IP values given in Windows 7:
- Choose Start ➢ Control Panel ➢ Network And Sharing Center.
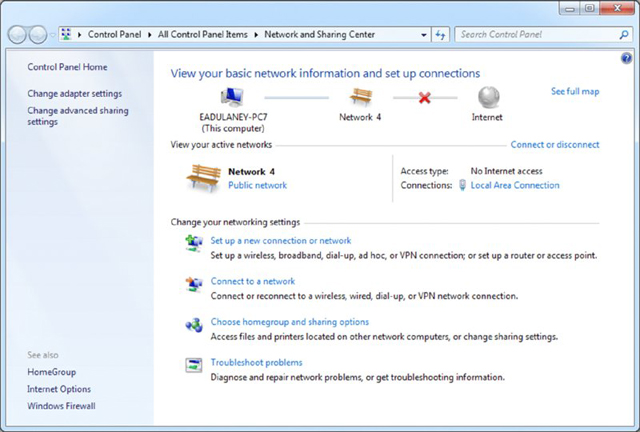
- Click Change Adapter Settings. A screen similar to the one in the next screen shot will appear.
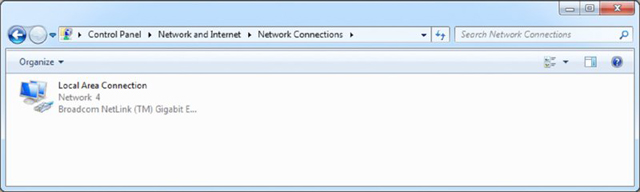
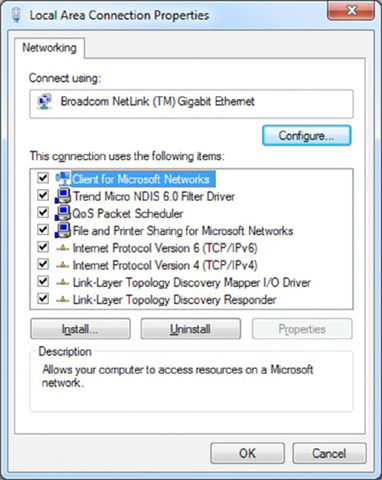
- Right-click the connection icon and choose Properties.
- Click Internet Protocol Version 4 (TCP/IPv4), and then click the Properties button.
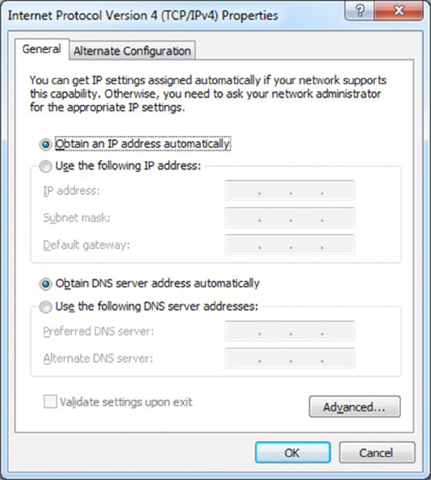
- On the General tab, make certain that the Obtain An IP Address Automatically radio button is selected.
- Click the Alternate Configuration tab.
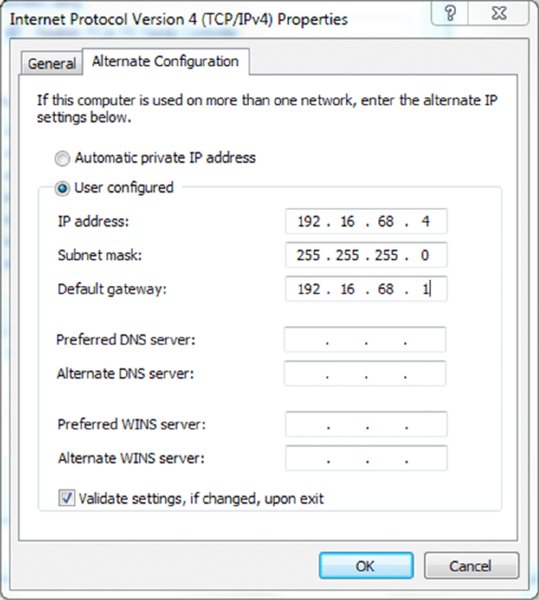
- Click the User Configured radio button.
- Enter the three values given for the IP address, the subnet mask, and the default gateway.
- Click OK to close the dialog box. Click Close to exit the Local Area Connection Properties dialog box. Click the close icon in the upper-right corner of the Network Connections window.
Chapter 17: Working with Windows Vista
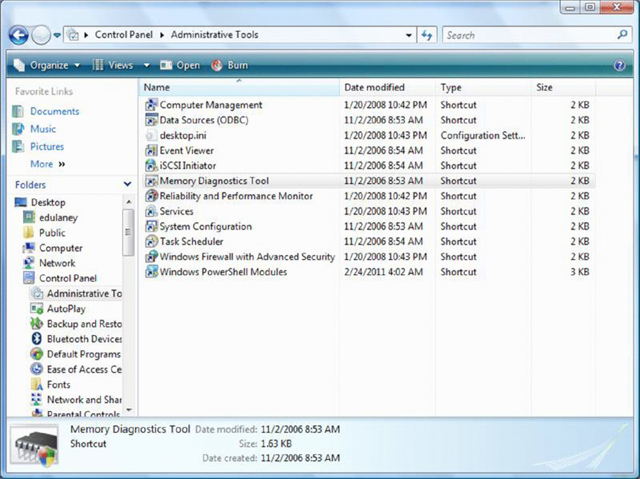
Here are the steps needed to run the Windows Memory Diagnostics tool:
- Choose Start ➢ Control Panel ➢ Administrative Tools.
- Choose Memory Diagnostics Tool.
- Click Restart Now And Check For Problems.
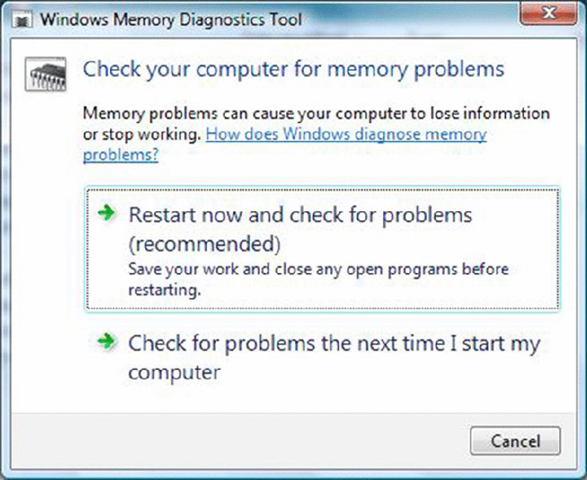
- Upon reboot, the test will take several minutes and the display screen will show which pass number is being run and the overall status of the test (percent complete).
Chapter 18: Working with Mac OS and Linux
The listing you see when typing these commands will differ based on such factors as the system, the directory, your permissions, and the files/subdirectories present, but in all cases, there will be entries present with the –a option that do not appear in the display without it. Among those listings that now appear are a single period (representing the present directory) and a double period (representing the parent directory).
If there are any files or directories starting with a period, they will now appear where they did not before. The easiest way to “hide” a file or directory in Linux is to start the name of it with a period, and thus it will not show up in a listing unless the –a option is used.
Chapter 19: Security
Here is how to block pop-ups but allow them from one specific website:
- Click Start ➢ Control Panel ➢ Internet Options.
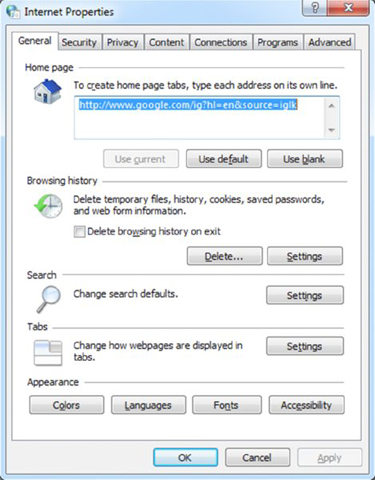
- Click the Privacy tab.
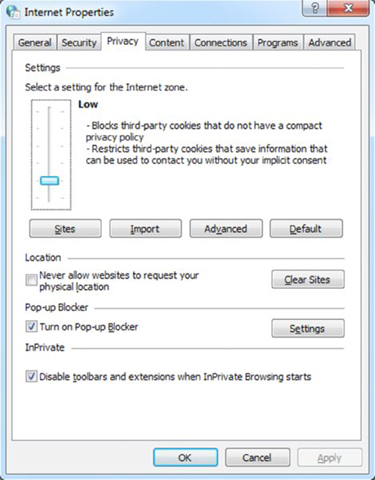
- Click the Turn On Pop-Up Blocker check box, and then click the Settings button.
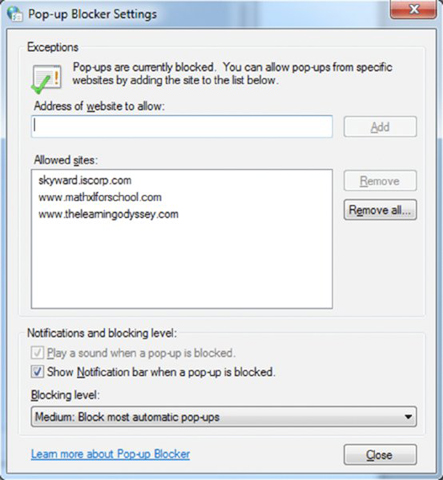
- Type in the address www.sybex.com and click Add.
- Click Close to exit the Pop-Up Blocker Settings dialog. Click OK to exit Internet Properties.
Chapter 20: Network Services, Cloud Computing, and Virtualization
Using Lubuntu will probably feel very similar using Windows. The interfaces have quite a few similarities in terms of navigation. Here are some hints on where you can find the utilities you need to complete the steps in the Chapter 20 performance-based question:
- Creating a user account. You can do this by clicking the launcher (it looks like a button with a bird on it), about where you would expect the Start button to be in Windows, and then choosing System Tools ➢ Users And Groups. Click the Add button to create a new user.
- Managing storage space. Open the launcher, and choose Preferences ➢ Disk Utility. This one won't work exactly like the one in Windows because it's on a virtual hard drive.
- Manipulating files. Open the launcher, and choose Accessories ➢ File Manager, or you can choose File Manager using the icon to the right of the launcher. Once File Manager opens, you can right-click files to perform your tasks,
- Creating a shortcut. Right-click the desktop, and choose Create New ➢ Shortcut.
- Configuring accessibility options. As of now, Lubuntu does not offer the types of accessibility options Windows offers. The developer is committed to accessibility, but it has not yet developed these capabilities. For more information, see
https://wiki.ubuntu.com/Lubuntu/Developers/Accessibility
Maybe you can help!
Chapter 21: Mobile Operating Systems and Connectivity
Here are the steps to connect an iPhone to a Wi-Fi network:
- Tap the Settings app on the Home screen.
- Select Wi-Fi from the Settings menu.
- Swipe the Wi-Fi switch to the right to turn it on if it is off. You can also tap switches to toggle them to the opposite state.
- In the Choose A Network list, tap the name of the wireless network that you want to join.
- Enter the password or key for the wireless network, if you are asked for one, and then tap the Join button. If it connects, the network name will appear under the Wi-Fi switch with a check mark next to it.
Chapter 22: Troubleshooting Theory, OSs, and Security
There are seven best practice steps associated with malware removal. Some of these steps, such as educating the end user, apply with almost every troubleshooting venture. In order, the seven steps are as follows:
- Identify malware symptoms.
- Quarantine infected system.
- Disable system restore (in Windows).
- Remediate infected systems:
- Update antimalware software.
- Scan and removal techniques (safe mode, pre-installation environment).
- Schedule scans and run updates.
- Enable system restore and create restore point (in Windows).
- Educate end user.
Chapter 23: Understanding Operational Procedures
Here are some steps to take to look for trip hazards and eliminate them:
- Walk around the server room, and count how many cables are lying on the floor.
- Walk around the client areas, and see how many cables are lying on the floor or are exposed underneath cubicles.
- Devise a plan to secure the cables and prevent them from being hazards. For example, purchase and install floor guards, use cable ties, or install conduit as necessary to secure all loose cables.