
Chapter 12
Hardware and Network Troubleshooting
THE FOLLOWING COMPTIA A+ EXAM 220-901 OBJECTIVES ARE COVERED IN THIS CHAPTER:
- ✓ 2.9 Given a scenario, use appropriate networking tools.
- Crimper
- Cable stripper
- Multimeter
- Tone generator & probe
- Cable tester
- Loopback plug
- Punchdown tool
- WiFi analyzer
- ✓ 4.1 Given a scenario, troubleshoot common problems related to motherboards, RAM, CPU, and power with appropriate tools.
- Common symptoms
- Unexpected shutdowns
- System lockups
- POST code beeps
- Blank screen on bootup
- BIOS time and settings resets
- Attempts to boot to incorrect device
- Continuous reboots
- No power
- Overheating
- Loud noise
- Intermittent device failure
- Fans spin – no power to other devices
- Indicator lights
- Smoke
- Burning smell
- Proprietary crash screens (BSOD/pin wheel)
- Distended capacitors
- Tools
- Multimeter
- Power supply tester
- Loopback plugs
- POST card / USB
- Common symptoms
- ✓ 4.2 Given a scenario, troubleshoot hard drives and RAID arrays with appropriate tools.
- Common symptoms
- Read/write failure
- Slow performance
- Loud clicking noise
- Failure to boot
- Drive not recognized
- OS not found
- RAID not found
- RAID stops working
- Proprietary crash screens (BSOD/pin wheel)
- S.M.A.R.T errors
- Tools
- Screwdriver
- External enclosures
- CHKDSK
- FORMAT
- File recovery software
- Bootrec
- Diskpart
- Defragmentation tool
- Common symptoms
- ✓ 4.3 Given a scenario, troubleshoot common video, projector, and display issues.
- Common symptoms
- VGA mode
- No image on screen
- Overheat shutdown
- Dead pixels
- Artifacts
- Color patterns incorrect
- Dim image
- Flickering image
- Distorted image
- Distorted geometry
- Burn-in
- Oversized images and icons
- Common symptoms
- ✓ 4.4 Given a scenario, troubleshoot wired and wireless networks with appropriate tools.
- Common symptoms
- No connectivity
- APIPA/link local address
- Limited connectivity
- Local connectivity
- Intermittent connectivity
- IP conflict
- Slow transfer speeds
- Low RF signal
- SSID not found
- Tools
- Cable tester
- Loopback plug
- Punch down tools
- Tone generator and probe
- Wire strippers
- Crimper
- Wireless locator
- Command line tools
- PING
- IPCONFIG/IFCONFIG
- TRACERT
- NETSTAT
- NBTSTAT
- NET
- NETDOM
- NSLOOKUP
- Common symptoms
- ✓ 4.5 Given a scenario, troubleshoot and repair common mobile device issues while adhering to the appropriate procedures.
- Common symptoms
- No display
- Dim display
- Flickering display
- Sticking keys
- Intermittent wireless
- Battery not charging
- Ghost cursor/pointer drift
- No power
- Numlock indicator lights
- No wireless connectivity
- No Bluetooth connectivity
- Cannot display to external monitor
- Touchscreen non-responsive
- Apps not loading
- Slow performance
- Unable to decrypt email
- Extremely short battery life
- Overheating
- Frozen system
- No sound from speakers
- GPS not functioning
- Swollen battery
- Disassembling processes for proper re-assembly
- Document and label cable and screw locations
- Organize parts
- Refer to manufacturer documentation
- Use appropriate hand tools
- Common symptoms
- ✓ 4.6 Given a scenario, troubleshoot printers with appropriate tools.
- Common symptoms
- Streaks
- Faded prints
- Ghost images
- Toner not fused to the paper
- Creased paper
- Paper not feeding
- Paper jam
- No connectivity
- Garbled characters on paper
- Vertical lines on page
- Backed up print queue
- Low memory errors
- Access denied
- Printer will not print
- Color prints in wrong print color
- Unable to install printer
- Error codes
- Printing blank pages
- No image on printer display
- Tools
- Maintenance kit
- Toner vacuum
- Compressed air
- Printer spooler
- Common symptoms
Troubleshooting can be hard. With all of the integration between software applications and hardware components, it can be challenging to understand where one stops and the other starts, or how their interoperation affects one another. To top it all off, you’re probably going to be working in an environment that requires you to understand not just one computer but a network full of workstations, servers, switches, routers, and other devices and how they should play nicely together. Situations will arise that make even the most experienced technicians shake their heads in frustration.
Sometimes, you will hear people say things like, “It just takes practice and experience to become good at troubleshooting.” Those words are of little comfort to someone who is relatively new and facing a challenging problem. Yes experience does help, but even newer technicians can be effective troubleshooters if they understand the fundamentals and follow a logical process.
Objective 5.5 of the second A+ exam (the 220-902 exam) asks you to understand the steps of troubleshooting theory. That will be great background for you to have. However, because hardware troubleshooting is an objective of the 220-901 exam, we need to cover the topic before diving into the theory. It may feel a bit like we’re putting the cart before the horse, but we’ll give you some high-level pointers now to get you started before addressing specific issues.
The best way to tackle any problem is to take a systematic approach to resolving it. This applies to the hardware and networking issues that we’ll talk about here as well as the software and security issues that we will cover in Chapter 22, “Troubleshooting Theory, OSs, and Security.” Troubleshooting becomes a lot easier if you follow logical procedures to help you develop experience. The first thing to do is always to check the easy stuff, such as physical cables and connections. You would be amazed at how many times the simple question, “Is it plugged in?” resolves hardware problems. Second, see if anything has recently changed or if there are any recent incidents that might have caused the problem. For example, if someone’s laptop won’t boot up, you might not have a clue as to why. But if they tell you that they just dropped it down the stairs, you might have a better idea of where to start. Finally, narrow down the scope of the problem. Find out exactly what works and what doesn’t. Knowing where the problem starts and stops helps you to focus your troubleshooting efforts.
There’s one last thing to remember before getting into the details of specific problems: In order to troubleshoot anything, you need to have a base level of knowledge. For example, if you’ve never opened the hood of a car, it will be a bit challenging for you to figure out why your car won’t start in the morning. If you’re not a medical professional, you might not know why that body part hurts or how to make it feel better. In the same vein, if you don’t know how data is stored and accessed on a computer, it’s unlikely that you’ll be able to fix related computer problems. So before you get too heavy into troubleshooting, make sure you understand how the systems on which you are working are supposed to function in the first place!
Because this chapter comes after the hardware and networking chapters, we’re going to assume that you’ve read them already. Therefore, we’re not going to get into a lot of detail about how things work—it’s assumed that you know those details by now. (If you’re still not certain, this book is a great reference manual!) Instead, we’ll talk more about what happens when things don’t work the way they’re supposed to: what signs to look for and what to do to fix the problem. The first part of this chapter will cover key internal hardware components. After that, we’ll look at issues specific to mobile devices and printers and then finish off the chapter with a section on network troubleshooting.
Troubleshooting Core Hardware Issues
To many who are not familiar with computers, that whirring, humming box sitting under or on their desk is an enigma. They know what shows up on the screen, where the power button is, where to put DVDs, and what not to spill on their keyboard. But the insides are shrouded in mystery.
Fortunately for them, we’re around. We can tell the difference between a hard drive and a motherboard and have a pretty good idea of what each part inside that box is supposed to do. When the computer doesn’t work like it’s supposed to, we can whip out our trusty screwdriver, crack the case, and perform surgery. And most of the time, we can get the system running just as good as new.
In the following sections, we’re going to focus our troubleshooting efforts on the key hardware components inside the case, but we’re also going to include monitors (which are attached to video cards inside the case, so close enough for our purposes). We will start off with motherboards, processors, memory, and power. Then we will look at storage devices and finish off the discussion with video and display issues.
Troubleshooting Motherboards, CPUs, RAM, and Power Problems
These components are the brains, backbone, and nervous system of your computer. Without a network card, you won’t be able to surf the Web. Without a processor, well, you won’t be able to surf the Web—or do much of anything else for that matter. So we’ll get started with these components.
As you continue to learn and increase your troubleshooting experience, your value will increase as well. This is because, if nothing else, it will take you less time to accomplish common repairs. Your ability to troubleshoot from past experiences and gut feelings will make you more efficient and more valuable, which in turn will allow you to advance and earn a better income. We will give you some guidelines that you can use to evaluate common hardware issues that you’re sure to face.
Identifying Hardware Symptoms and Causes
Before we get into specific components, let’s take a few minutes to talk about hardware symptoms and their causes at a general level. This discussion can apply to a lot of different hardware components.
Some hardware issues are pretty easy to identify. If there are flames shooting out of the back of your computer, then it’s probably the power supply. If the power light on your monitor doesn’t turn on, it’s the monitor itself, the power cord, or your power source. Other hardware symptoms are a bit more ambiguous. We’ll now look at some hardware-related symptoms and their possible causes.
Excessive Heat
Electronic components produce heat; it’s a fact of life. While they’re designed to withstand a certain amount of the heat that’s produced, excessive heat can drastically shorten the life of components. There are two common ways to reduce heat-related problems in computers: heat sinks and cooling systems, such as case fans.
Any component with its own processor will have a heat sink. Typically these look like big, finned hunks of aluminum or another metal attached to the processor. Their job is to dissipate heat from the component so that it doesn’t become too hot. Never run a processor without a heat sink!
Case fans are designed to take hot air from inside the case and blow it out of the case. There are many different designs, from simple motors to high-tech liquid-cooled models. Put your hand up to the back of your computer at the power supply fan and you should feel warm air. If there’s nothing coming out, you either need to clean your fan out or replace your power supply. Some cases come with additional cooling fans to help dissipate heat. If your case has one, you should feel warm air coming from it as well.
We’ve mentioned dust before and now is a good time to bring it up again. Dust, dirt, grime, paint, smoke, and other airborne particles can become caked on the inside of the components. This is most common in automotive and manufacturing environments. The contaminants create a film that coats the components, causing them to overheat and/or conduct electricity on their surface. Blowing out these exposed systems with a can of compressed air from time to time can prevent damage to the components. While you’re cleaning the components, be sure to clean any cooling fans in the power supply or on the heat sink.
One way to ensure that dust and grime don’t find their way into your computer is to always leave the blanks (or slot covers) in the empty slots on the back of your box. Blanks are the pieces of metal or plastic that come with the case and cover the expansion slot openings. They are designed to keep dirt, dust, and other foreign matter from the inside of the computer. They also maintain proper airflow within the case to ensure that the computer doesn’t overheat.
Noise
Have you ever been working on a computer and heard a noise that resembles fingernails on a chalkboard? If so, you will always remember that sound, along with the impending feeling of doom as the computer stops working.
Some noises on a computer are normal. The POST beep (which we’ll talk about in a few pages) is a good sound. The whirring of a mechanical hard drive and power supply fan are familiar sounds. Some techs get so used to their “normal” system noises that if anything is slightly off pitch, they go digging for problems even if none are readily apparent.
For the most part, the components that can produce noise problems are those that move. Mechanical hard drives have motors that spin the platters. Power supply fans spin. CD and DVD drives spin the disks. If you’re hearing excessive noise, these are the likely culprits.
If you hear a whining sound and it seems to be fairly constant, it’s more than likely a fan. Either it needs to be cleaned (desperately) or replaced. Power supplies that are failing can also sound louder and quieter intermittently because a fan will run at alternating speeds.
The “fingernails on a chalkboard” squealing could be an indicator that the heads in a mechanical hard drive have crashed into the platter. This thankfully doesn’t seem to be as common today as it used to be, but it still happens. Note that this type of sound can also be caused by a power supply fan’s motor binding up. A rhythmic ticking sound is also likely to be caused by a mechanical hard drive.
Problems with the CD-ROM or DVD-ROM drive tend to be the easiest to diagnose. Those drives aren’t constantly spinning unless you put some media in them. If you put a disc in and the drive makes a terrible noise, you have a good idea what’s causing the problem.
So what do you do if you hear a terrible noise from the computer? If it’s still responsive, shut it down normally as soon as possible. If it’s not responsive, then shut off the power as quickly as you can. Examine the power supply to see if there are any obvious problems such as excessive dust, and clean it as needed. Power the system back on. If the noise was caused by the hard drive, odds are that the drive has failed and the system won’t boot normally. You may need to replace some parts.
If the noise is mildly annoying but doesn’t sound drastic, boot up the computer with the case off and listen. By getting up close and personal with the system, you can often tell where the noise is coming from and then troubleshoot or fix the appropriate part.
Odors and Smoke
Bad smells or smoke coming from your computer are never good things. While it normally gets pretty warm inside a computer case, it should never be hot enough inside there to melt plastic components, but it does happen from time to time. And power problems can sometimes cause components to get hot enough to smoke.
If you smell an odd odor or see smoke coming from a computer, shut it down immediately. Open the case and start looking for visible signs of damage. Things to look for include melted plastic components and burn marks on circuit boards. If components appear to be damaged, it’s best to replace them before returning the computer to service.
Status Light Indicators
Many hardware devices have status light indicators that can help you identify operational features or problems with a device. Obviously, when you power on a system, you expect the power light to come on. If it doesn’t, you have a problem. The same holds true for other external devices, such as wireless routers, external hard drives, and printers. In situations in which the power light doesn’t come on and the device has no power, always obey the first rule of troubleshooting: Check your connections first!
Beyond power indicators, several types of devices have additional lights that can help you troubleshoot. If you have a hub, switch, or other connectivity device, you should have an indicator for each port that lights up when there is a connection. Some devices will give you a green light for a good connection and a yellow or red light if they detect a problem. A lot of connectivity devices will also have an indicator that blinks or flashes when traffic is going through the port. Sometimes it’s the same light that indicates a connection, but at other times it’s a separate indicator. The same holds true for NICs. They usually have a connectivity light and a transmission light. If no lights are illuminated, it can indicate a lack of connection.
Many computers also have hard drive activity lights. When disk reads or writes occur, the light will blink, otherwise it will be off. A hard drive indicator that is constantly on is generally not a good sign; it could indicate that the hard drive is constantly busy or that the system is frozen, either of which is bad.
If you have a device with lights and you’re not sure what they mean, it’s best to check the manual or the manufacturer’s website to learn about them.
Alerts
An alert is a message generated by a hardware device. In some cases, the device has a display panel that will tell you what the alert is. A good example of this is an office printer. Many have an LCD display that can tell you if something is wrong. Other devices, particularly rack-mounted servers or connectivity devices, will have status lights that indicate that there’s an issue.
Other alerts will pop up on the computer screen. If the device is attached to a specific computer, the alert will generally pop up on that computer’s screen. Some devices can be configured to send an alert to a specific user account or system administrator, so the administrator will get the alert regardless of which computer they are currently logged into.
Visible Damage
The good news about visible damage is that you can usually figure out which component is damaged pretty quickly. The bad news is that it often means you need to replace parts.
Visible damage to the outside of the case or the monitor casing might not matter much as long as the device still works. But if you’re looking inside a case and see burn marks or melted components, that’s a sure sign of a problem. Replace damaged circuit boards or melted plastic components immediately. After replacing the part, it’s a good idea to monitor the new component for a while too. It could be the power supply causing the problem. If the new part fries quickly too, it’s time to replace the power supply as well.
POST Routines
Every computer has a diagnostic program built into its basic input/output system (BIOS) called the power-on self-test (POST). When you turn on the computer, it executes this set of diagnostics. Many steps are involved in the POST, but they happen very quickly, they’re invisible to the user, and they vary among BIOS vendors. The steps include checking the CPU, checking the RAM, checking for the presence of a video card, and verifying basic hardware functionality. The main reason to be aware of the POST’s existence is that if it encounters a problem, the boot process stops. Being able to determine at what point the problem occurred could help you troubleshoot.
If the computer doesn’t perform the POST as it should, one way to determine the source of a problem is to listen for a beep code. This is a series of beeps from the computer’s speaker. A successful POST generally produces a single beep. If there’s more than one beep, the number, duration, and pattern of the beeps can sometimes tell you what component is causing the problem. However, the beeps differ depending on the BIOS manufacturer and version, so you must look up the beep code in a chart for your particular BIOS. AMI BIOS, for example, relies on the number of beeps and uses patterns of short and long beeps.
Another way to determine a problem during the POST routine is to use a POST card. This is a circuit board that fits into an expansion slot (PCI or PCIe) in the motherboard and reports numeric codes as the boot process progresses. Each of those codes corresponds to a particular component being checked. If the POST card stops at a certain number, you can look up that number in the manual for the card to determine the problem. Figure 12.1 shows an example of a PCI POST card. You will find newer POST cards that have a USB connection on them, which makes them easier to use. You don’t have to crack the case to check for POST errors, and they can be used to test laptops as well.

Figure 12.1 PCI POST card
POST card 98usd by Rumlin—Own work. Licensed under CC BY-SA 3.0 via Wikimedia Commons http://commons.wikimedia.org/wiki/File:POST_card_98usd.jpg#/media/File:POST_card_98usd.jpg
Identifying BIOS Issues
Because we just talked about the POST routine, which is a function of the BIOS, let’s look at a few other BIOS issues as well. First, computer BIOSs don’t go bad; they just become out-of-date. This isn’t necessarily a critical issue—they will continue to support the hardware that came with the box. It does, however, become an issue when the BIOS doesn’t support some component that you would like to install—a larger hard drive, for instance.
Most of today’s BIOSs are written to an EEPROM and can be updated through the use of software. This process is called “flashing the BIOS.” Each manufacturer has its own method for accomplishing this. Check the documentation for complete details.
A fairly common issue with the BIOS is when it fails to retain your computer’s settings, such as time and date and hard drive configuration. The BIOS uses a small battery (much like a watch battery) on the motherboard to help it retain settings when the system power is off. If this battery fails, the BIOS won’t retain its settings. Simply replace the battery to solve the problem.
Finally, remember that your BIOS also contains the boot sequence for your system. You probably boot to the first hard drive in your system (the one that contains the OS boot files), but you can also set your BIOS to boot from a secondary hard drive, the optical drive, or the network. If your computer can’t find a proper boot device, it could be that it’s attempting to boot from the wrong device. Check the BIOS to see if you need to change the boot sequence. To do this, reboot the system, and look for the message telling you to press a certain key to enter the BIOS (usually something like F2). Once you’re in the BIOS, find the menu with the boot sequence (like the one shown in Figure 12.2) and set it to the desired order. If the changes don’t hold the next time you reboot, check the battery!
![Screenshot of a window shows Boot page which displays first to fourth boot devices. [CD-ROM Group] is matched with first boot device. Right column indicates Item Specific Help. Bottom portion of page indicates F1, F5, F10 and Esc.](http://images-20200215.ebookreading.net/22/4/4/9781119137856/9781119137856__comptia-a-complete__9781119137856__images__ec12f002.jpg)
Figure 12.2 BIOS boot sequence settings
Identifying Motherboard and CPU Problems
Most motherboard and CPU problems manifest themselves by the system appearing to be completely dead. However, “completely dead” can be a symptom of a wide variety of problems, not only with the CPU or motherboard but also with the RAM or the power supply. At other times, a failing motherboard or CPU will cause the system to lock up completely, or “hang,” requiring a hard reboot, or the failing motherboard or CPU may cause continuous reboots. A POST card may be helpful in narrowing down the exact component that is faulty.
When a motherboard fails, it’s usually because it has been damaged. Most technicians can’t repair motherboard damage; the motherboard must be replaced. Motherboards can become damaged due to physical trauma, exposure to electrostatic discharge (ESD), or short-circuiting. To minimize the risk, observe the following rules:
- Handle a motherboard as little as possible, and keep it in an antistatic bag whenever it’s removed from the PC case.
- Keep all liquids well away from the motherboard; water can cause a short circuit.
- Wear an antistatic wrist strap when handling or touching a motherboard.
- When installing a motherboard in a case, make sure you use brass standoffs with paper or plastic washers to prevent any stray solder around the screw holes from causing a short circuit with the metal of the screw.
A CPU may fail because of physical trauma or short-circuiting, but the most common cause for a CPU not to work is overheating, and most overheating issues are due to installation failures. This means that the heat sink and/or fan must be installed properly along with the processor. With a PGA- or LGA-style CPU, ensure that the CPU is oriented correctly in the socket. With an older SECC- or ZIF-style CPU, make sure the CPU is completely inserted into its slot or socket.
Identifying I/O Port and Cable Problems
Input/output (I/O) ports are most often built into the motherboard and include legacy parallel and serial, USB, and FireWire ports. All of them are used to connect external peripherals to the motherboard. When a port doesn’t appear to be functioning, make sure the following conditions are met:
- The cables are snugly connected.
- The port has not been disabled in BIOS Setup.
- The port has not been disabled in Device Manager in Windows.
- No pins are broken or bent on the male end of the port or on the cable being plugged into it.
If you suspect that it’s the port, you can purchase a loopback plug to test it sfunctionality. If you suspect that the cable, rather than the port, may be the problem, swap out the cable with a known good one. If you don’t have an extra cable, you can test the existing cable with a multimeter by setting it to ohms and checking the resistance between one end of the cable and the other.
Use a pin-out diagram, if available, to determine which pin matches up to which at the other end. There is often—but not always—an inverse relationship between the ends. In other words, at one end pin 1 is at the left, and at the other end it’s at the right on the same row of pins. You see this characteristic with D-sub connectors where one end of the cable is male and the other end is female.
Distended Capacitors
Many motherboards have capacitors on them, which store electricity. They are short cylindrical tubes. Figure 12.3 shows three of them on the left side of the motherboard. Sometimes, when capacitors fail, they will bulge and brownish-red electrolyte residue may seep out of the vents in the top. These are called distended capacitors. If a capacitor fails, the motherboard will not work. You have a few options. The first and probably best option is to replace the motherboard. Whatever you do, do not touch the residue coming from a distended capacitor! The second option is to drain the energy from the failed capacitor and replace it. Only do this if you have specialized training on how to deal safely with capacitors because they can cause lethal shocks.
Figure 12.3 Capacitors on a motherboard
Identifying Memory Issues
Isolating memory issues on a computer is one of the more difficult tasks to do properly because so many memory problems manifest themselves as software issues. For example, memory problems can cause applications to fail and produce error messages such as general protection faults (GPFs). Memory issues can also cause a fatal error in your operating system, producing the infamous Blue Screen of Death (BSOD) in Windows or the rotating pinwheel in OS X, which we will discuss later, in Chapter 22. Sometimes these are caused by the physical memory failing. At other times, they are caused by bad programming, when an application writes into a memory space reserved for the operating system or another application.
In short, memory problems can cause system lockups, unexpected shutdowns or reboots, or the errors mentioned in the preceding paragraph. They can be challenging to pin down. If you do get an error message related to memory, be sure to write down the memory address if the error message gives you one. If the error happens again, write down the memory address again. If it’s the same or a similar address, then it’s very possible that the physical memory is failing. You can also use one of several hardware- or software-based RAM testers to see if your memory is working properly.
Identifying Power Supply and Cooling Problems
Power supply problems can manifest themselves in two ways. In the first, you will see an obvious problem such as an electrical flash or possibly a fire. In the second, the system doesn’t respond in any way when the power is turned on. Hopefully you don’t have to deal with many of the first type!
When the system doesn’t respond when you try to power it up, try a new power cable and make sure the outlet is functional. If those check out, open the case, remove the power supply, and replace it with a new one. Partial failures, or intermittent power supply problems, are much less simple. A completely failed power supply gives the same symptoms as a malfunctioning wall socket, uninterruptible power supply (UPS), or power strip; a power cord that is not securely seated; or some motherboard shorts (such as those caused by an improperly seated expansion card, memory stick, CPU, and the like). You want to rule out those items before you replace the power supply and find that you still have the same problem as when you started. At other times, the power supply fan might spin but the rest of the system does not appear to get power. This can be a power supply issue or possibly a motherboard (POST) issue. Be aware that different cases have different types of on/off switches. The process of replacing a power supply is a lot easier if you purchase a replacement with the same mechanism.
If you’re curious as to the state of your power supply, you can buy hardware-based power supply testers online starting at about $10 and running up to several hundred dollars. Multimeters are also effective devices for testing your power supplies.
Identifying Cooling Issues
A PC that works for a few minutes and then locks up is probably experiencing overheating because of a heat sink or fan not functioning properly. To troubleshoot overheating, first check all fans inside the PC to ensure that they’re operating, and make sure that any heat sinks are firmly attached to their chips.
In a properly designed, properly assembled PC case, air flows in a specific path driven by the power supply fan and using the power supply’s vent holes. Make sure that you know the direction of flow and that there are limited obstructions and no dust buildup. Cases are also designed to cool by making the air flow in a certain way. Therefore, operating a PC with the cover removed can make a PC more susceptible to overheating, even though it’s “getting more air.”
Similarly, operating a PC with expansion-slot covers removed can inhibit a PC’s ability to cool itself properly because the extra holes change the airflow pattern from what was intended by its design.
Although CPUs are the most common component to overheat, occasionally other chips on the motherboard, such as the chipset or chips on other devices, particularly video cards, may also overheat. Extra heat sinks or fans may be installed to cool these chips.
Liquid cooling systems have their own set of issues. The pump that moves the liquid through the tubing and heat sinks can become obstructed or simply fail. If this happens, the liquid’s temperature will eventually equalize with that of the CPU and other components, resulting in their damage. Dust in the heat sinks has the same effect as with nonliquid cooling systems, so keep these components as clean as you would with any such components. Check regularly for signs of leaks that might be starting, and try to catch them before they result in damage to the system.
Exercise 12.1 walks you through the steps of troubleshooting a few specific hardware problems. The exercise will probably end up being a mental one for you, unless you have the exact problem that we’re describing here. As practice, you can write down the steps that you would take to solve the problem and then check to see how close you came to our steps. Clearly, there are several ways to approach a problem, so you might use a slightly different process, but the general approach should be similar. Finally, when you have found the problem, you can stop. As you go through each step, assume that it didn’t solve the issue so you need to move on to the next step.
Troubleshooting Storage Device Problems
Storage devices present unique problems simply due to their nature. Most of them are devices with moving parts, which means that they are more prone to mechanical failure than a motherboard or a stick of RAM. (SSDs are the exception.) In the following sections, we’ll discuss hard disk problems, including RAID arrays. Then we’ll take a quick look at optical drive issues.
Identifying Hard Disk System Problems
Hard disk system problems usually stem from one of three causes:
- The adapter (that is, the SATA or PATA interface) is bad.
- The disk is bad.
- The adapter and disk are connected incorrectly.
The first and last causes are easy to identify, because in either case, the symptom will be obvious: the drive won’t work. You won’t be able to get the computer to communicate with the disk drive.
However, if the problem is a bad disk drive, the symptoms aren’t as obvious. As long as the POST routines can communicate with the disk drive, they’re usually satisfied. But the POST routines may not uncover problems related to storing information. Even with healthy POST results, you may find that you’re permitted to save information to a bad disk, but when you try to read it back, you get errors. Or the computer may not boot as quickly as it used to because the disk drive can’t read the boot information successfully every time.
Let’s take a look at some specific hard-drive related issues, the likely culprits, and actions to take:
Loud clicking or scratching noises You will only hear these coming from mechanical drives, and they are usually caused by a physical malfunction within the drive itself. If the drive is still usable, back up the information on it as soon as possible. The drive is going to stop working in short order. It’s time to brandish the screwdriver and replace the hard drive.
Slow performance or read/write failures A failing hard drive might exhibit these symptoms. They can also be a symptom of the hard drive being too full. Hard drives move information around a lot, especially temporary files. If the drive doesn’t have enough free space (at least 10 percent), it can slow down dramatically. The solution here is to remove files or old applications to free up space and look at defragmenting the hard drive. If problems persist, consider formatting the hard drive and reinstalling the OS. If the issues don’t go away, assume that the hard drive is on its last legs.
Boot problems This could be any of a number of problems, such as a complete failure to boot, the hard drive not being recognized by the BIOS, or the OS not being found. Failure to boot at all likely means the drive is dead. Do your due diligence and reseat your connections and make sure that the BIOS recognizes the drive before replacing it. Most BIOSs today auto-detect the hard drive. If that auto-detection fails, it’s bad news for the hard drive unless there’s a cable, connection, or jumper issue (for example, if you just added a new hard drive, the master/slave jumper could be set incorrectly). Finally, if the system boots fine but it can’t find the OS, it could indicate a problem with the Master Boot Record (MBR). You can boot from a bootable disk and repair the MBR with BOOTREC /FIXMBR (Windows Vista and newer).
S.M.A.R.T.
As of 2004, nearly every hard drive has been built with Self-Monitoring, Analysis, and Reporting Technology (S.M.A.R.T.) software installed on them, which monitors hard drive reliability and theoretically can warn you in the event of an imminent failure. The idea behind S.M.A.R.T. is great. Who wouldn’t want to know when their hard drive was going to fail so they could back up the drive? In practice, though, it seems to help manufacturers locate persistent issues by identifying hard drive design flaws more than it helps end users avoid catastrophic data losses. Helping hard drive manufacturers do a better job isn’t a bad thing, but S.M.A.R.T. hasn’t enjoyed widespread commercial success with end users. This can largely be attributed to three factors:
- Windows OSs don’t come with a built-in graphical utility to parse the data.
- The 70 metrics provided by S.M.A.R.T. aren’t always easy to understand, and there has been little guidance as to which metric or metrics are most closely associated with impending drive failure.
- Manufacturers have not consistently defined the metrics among themselves; there are no industry-wide analysis applications or standards for this technology.
Let’s address the three issues in order. First, you can download one of several graphical tools from the Internet if you want to run S.M.A.R.T. diagnostics on a hard drive. Table 12.1 gives you a few options. Each one has a free option, and they all offer a variety of hard drive diagnostic capabilities.
Table 12.1 S.M.A.R.T. software utilities
| Name | Website |
| GSmartControl | gsmartcontrol.sourceforge.net |
| SpeedFan | www.almico.com/speedfan.php |
| HD Tune | www.hdtune.com |
| Crystal Disk Info | http://crystalmark.info/software/CrystalDiskInfo/index-e.html |
Second, yes there are a lot of metrics that S.M.A.R.T. reports, and not all of them make sense in English. Figure 12.4 shows the output from GSmartControl. Looking at it, you can tell that three metrics appear to be problematic because they are highlighted in pink (warning) or red (failed). The question is, which metrics are most likely to predict drive failure?
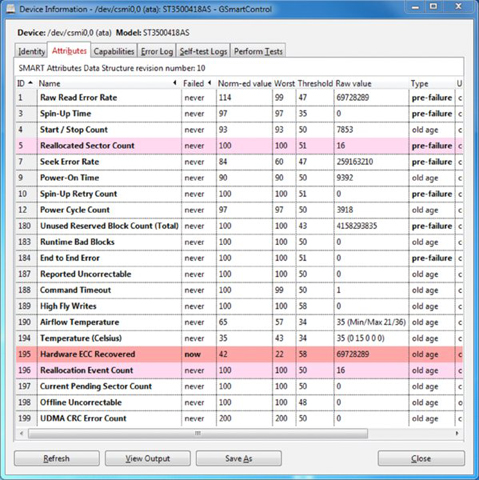
Figure 12.4 S.M.A.R.T. report from GSmartControl
In 2014, Google and cloud service provider Backblaze ran large-scale tests to determine which metrics most strongly correlated with drive failure. Their results showed five metrics, which are highlighted in Table 12.2.
Table 12.2 S.M.A.R.T. metrics most correlated with hard drive failure
| ID | Attribute Name | Description |
| 05 | Reallocated sector count | The number of bad sectors that have been found and remapped during read/write processes. Any nonzero number could indicate a problem. |
| 187 | Reported uncorrectable errors | The number of errors that could not be recovered using hardware error correction. |
| 188 | Command timeout | The number of failed hard drive read/write operations due to disk timeout. |
| 197 | Current pending sector count | The number of unstable sectors waiting to be remapped. |
| 198 | Uncorrectable sector count | The total number of bad sectors when reading from or writing to a sector. |
Interestingly enough, metrics related to higher temperatures or the number of reboots did not correlate to drive failure. The old adage that you should leave your computer running to make the hard drive last longer wasn’t verified by the research. In addition, over half of the drives in the study failed without recording a sector error, and over 30 percent of the drives failed with no S.M.A.R.T. error whatsoever.
What does that mean for the drive shown in Figure 12.4, which has errors on ID 5? Maybe not much. The same drive passed that ID when scanned with SpeedFan (see Figure 12.5). The safe conclusion is that S.M.A.R.T. can provide useful diagnostics on a hard drive’s health, but it’s by no means a guaranteed problem finder.
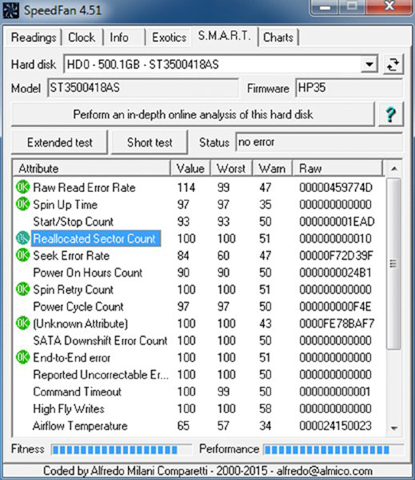
Figure 12.5 SpeedFan S.M.A.R.T. output
As for the last issue, there being little consistency between hard drive manufacturers, that’s an annoyance but not a critical issue. All it really means is that you can’t compare data from one drive manufacturer with that of another. It’s likely that if you’re running S.M.A.R.T. data on a hard drive, you’re primarily concerned with that drive’s performance and not how it compares to other hard drives anyway. If you have a situation where you’re worried about a drive, you can benchmark its performance and track it over time, or you can just replace it.
RAID Issues
If you are using a Redundant Array of Independent Disks (RAID) system, you have additional challenges to deal with. First, you have more disks, so the chance of having a single failure increases. Second, you more than likely have one or more additional hard disk controllers, so again you introduce more parts that can fail. Third, there will likely be a software component that manages the RAID array.
Boiling it down, though, dealing with RAID issues is just like dealing with a single hard drive issue, except that you have more parts that make up the single storage unit. If your RAID array isn’t found or stops working, try to narrow down the issue. Is it one disk that’s failed, or is the whole system down, indicating a problem with a controller or the software? Along with external enclosures, which require a separate connection to the computer, most external RAID systems have status indicators and troubleshooting utilities to help you identify problems. Definitely use those to your advantage.
Finally, the problem could be dependent on the type of RAID you’re using. If you are using RAID 0 (disk striping), you actually have more points of failure than a single device, meaning that you’re at a greater risk of failure versus using just one hard drive. One drive failure will cause the entire set to fail. RAID 1 (disk mirroring) increases your fault tolerance; if one drive fails, the other has an exact replica of the data. You’ll need to replace the failed drive, but unless both drives unexpectedly fail, you shouldn’t lose any data. If you’re using RAID 5 (disk striping with parity), a single drive failure usually means that your data will be fine, provided you replace the failed drive. RAID 10 is a mirrored striped set. As long as one drive in each mirrored pair is functional (just like in RAID 1), you shouldn’t lose any data.
Identifying Optical Drive Issues
Optical drive (CD-ROM, DVD, and Blu-ray) problems are normally media related. Although compact disc technology is pretty reliable, it’s not perfect. One factor to consider is the cleanliness of the disc. On many occasions, if a disc is unreadable, cleaning it with an approved cleaner and a lint-free cleaning towel will fix the problem. The next step might be to use a commercially available scratch-removal kit. If that fails, you always have the option to send the disc to a company that specializes in data recovery.
If the operating system doesn’t see the drive, start troubleshooting by determining whether the drive is receiving power. If the tray will eject, you can assume there is power to it. Next, check BIOS Setup (SATA or PATA drives) to make sure that the drive has been detected. If not, check the master/slave jumper on the drive, and make sure that the PATA adapter is set to Auto, CD-ROM, or ATAPI in BIOS Setup. Once inside the case, ensure that the ribbon cable is properly aligned with pin 1 and that both the drive and motherboard ends are securely connected.
To play movies, a DVD or Blu-ray drive must have MPEG decoding capability. This is usually built into the drive, video card, or sound card these days, but it may require a software decoder. If DVD or Blu-ray data discs will read but not play movies, suspect a problem with the MPEG decoding.
If an optical drive works normally but doesn’t perform its special capability (for example, it won’t burn discs), perhaps you need to install software to work with it. For example, with CD-RW drives, unless you’re using an operating system that supports CD writing, you must install CD-writing software to write to CDs.
Troubleshooting Video Issues
Troubleshooting video problems is usually fairly straightforward because there are a limited number of issues that you might face. You can sum up nearly all video problems with two simple statements:
- There is either no video or bad video.
- Either the video card or the monitor/projector is to blame.
In the vast majority of cases when you have a video problem, a good troubleshooting step is to check the monitor by transferring it to another machine that you know is working. See if it works there. If the problem persists, you know it’s the monitor. If it goes away, you know it’s the video card (or possibly the driver). Is the video card seated properly? Is the newest driver installed?
Let’s take a look at some common symptoms and their causes:
Booting into VGA mode Video graphics array (VGA), as you will recall from Chapter 4, “Display Devices,” is a basic mode for displaying video. Pretty much all you get is 640×480 with 16 colors. (That used to be awesome!) When your system refuses to boot into anything other than VGA mode, it indicates one of two problems. Either the video card is set to a resolution that it can’t handle, or the video card driver isn’t loading properly. When in VGA mode, reset the video resolution to something you know the card can handle and reboot. If that doesn’t solve it, reinstall the driver. If it still doesn’t work, replace the video card.
No image on the screen Troubleshooting this one is usually pretty easy. Try another monitor or try this monitor on another computer. That will narrow it down pretty quickly. Remember, if it’s not the monitor it’s probably the video card. (Don’t forget to make sure that the system POSTed properly!)
Monitor that keeps shutting down Monitors have their own internal power supply, and they can overheat. Overheating was more common with CRT displays than LCDs, but it still happens. Make sure the air vents on the back of the monitor are dust and debris free. If the problem persists, it’s best to replace the monitor.
Dead pixels or artifacts These two problems are definitely monitor related. Dead pixels are spots on the screen that never “fire,” or light up. You can check for these by setting the background to white and seeing if any spots don’t light up. With artifacts, no matter what you have on your screen, you can still see the outlines of a different image. That image has been “burned” into the monitor (sometimes simply referred to as burn-in) and isn’t going away. In either case, the only solution is to replace the monitor.
Incorrect colors This too is most likely a monitor issue, but you should confirm it by switching monitors. This can happen when the LCD monitor’s controller board starts to fail and doesn’t perform color mapping correctly. It also used to happen on CRTs, and you used a process called degaussing (decreasing or eliminating an unwanted magnetic field), which was done through a utility built into the menu on the monitor, to try to fix the problem. Finally, this can also happen if the pins on the connector are damaged or if the connector isn’t plugged all the way in. If switching the monitor makes the problems go away, it’s probably time to replace the monitor.
Dim or flickering images In LCD monitors, these issues are most commonly caused by the backlight starting to fail. In those cases, replace the backlight.
Distorted images This used to be more of a problem on CRT monitors if they were near a motor or other device that produced a magnetic field. Sometimes, the image would be wavy, and at other times it might look like it was getting stretched to one side of the screen. If your office is a cubicle farm, desk fans can be a major culprit. If you can eliminate the possibility of any sort of external interference, and you’ve confirmed that it’s the monitor and not the video card, then replace the monitor.
Distorted geometry In Chapter 4, we discussed the concepts of resolution and aspect ratio. Older, square-ish CRT monitors had a 4:3 aspect ratio, and newer widescreen HD displays are either 16:9 or 16:10. The point is, if you set your resolution such that it doesn’t match the monitor’s geometry, you may get distorted geometry problems. When this happens, the screen will look stretched or squeezed, depending on how you set it. Just choose a different resolution and the problem should go away.
Oversized images and icons Oversized images and icons are also related to screen resolution; it usually means that your resolution is set too low for the monitor or projector you are using. Increase the resolution, and the issue should disappear.
Other graphics issues can be attributed to the memory installed on the video card. This is the storage location of the screens of information in a queue to be displayed by the monitor. Problems with the memory modules on the video card have a direct correlation to how well it works. It follows, then, that certain unacceptable video-quality issues (such as jerky refresh speeds or lags) can be remedied by adding memory to a video card. Doing so generally results in an increase in both quality and performance. If you can’t add memory to the video card, you can upgrade to a new one.
Troubleshooting Mobile Devices, Printers, and Networking
Now that we’ve taken a whirlwind tour of troubleshooting the inside of a computer, it’s time to change our focus. First, we will cover unique challenges to troubleshooting mobile devices. They have most of the same components as desktop computers, so a lot of what we’ve already covered still applies. Because of their small size and features, though, they introduce a whole host of new potential problems. After we discuss mobile issues, we’ll move into troubleshooting two services that most computer users are fond of: printing and networking.
Troubleshooting Common Mobile Device Issues
Mobile devices, for the most part, are essentially the same types of devices as desktops, but troubleshooting the two can feel very different. While the general troubleshooting philosophies never change—steps such as gathering information, isolating the problem, and then testing one fix at a time—the space and configuration limitations can make troubleshooting smaller devices more frustrating.
Before getting into specific mobile device issues, remember that good troubleshooting means acting in a methodical manner. You need to find out if the device or software ever worked, what happened before the problem occurred, and what changes were made (if any). Then you must try to isolate the problem and test one fix at a time.
We will take a look at five areas where mobile devices could have different problems than their desktop counterparts: power, video, input, wireless networking, and responsiveness. Much of what we cover here will be more closely related to laptops than smaller mobile devices, but the concepts generally apply to mobile computers of all sizes.
Power Issues
Is it plugged in? Everyone hates getting asked that question if their computer doesn’t work. But it’s the critical first question to ask. After all, if it’s not plugged in, who knows whether or not it will work? You can’t assume that the battery is working (or is attached) as it’s supposed to be. Always check power and connections first!
Most laptop power adapters have a light on them indicating that they’re plugged in. If there’s no light, check to make sure that the outlet is working, or switch outlets. Also, most laptops have a power-ready indicator light when plugged into a wall outlet as well. Check to see if it’s lit. If the outlet is fine, try another power adapter. They do fail on occasion.
Smaller mobile devices will have a lightning bolt next to their battery icon or an animated filling battery when charging. If the device doesn’t appear to charge, the same culprits apply: it could be the outlet, the adapter, or the device itself.
If you’re working on a DC adapter, the same concepts apply. Check for lights, try another adapter if you have one, or try changing plugs if possible. For example, if you’re using a DC outlet in a car, many newer models have secondary power sources, such as ones in the console between the seats.
Another thing to remember when troubleshooting power problems is to remove all external peripherals. Strip your laptop down to the base computer so that there isn’t a short or other power drain coming from an external device.
Smaller devices have greater potential to overheat than do their larger brethren. Space is at a premium, so all of the components are packed tightly together, which means less room for each component to breathe. Manufacturers realize this, of course, so they use components that generate less heat. Overheating can still be a problem though. If your mobile device is overheating, turn it off to let it cool down. It could be from overuse, or perhaps it did not have proper ventilation (for example, if it was stuffed into someone’s pocket or purse). If the overheating is persistent, you have a few options. The first is to test or replace the battery, as that’s the most likely culprit. If overheating still happens, you may have to replace the device.
Another issue that small devices can have is an extremely short battery life. We’re not talking about when people complain that their laptop only runs for an hour-and-a-half when they are playing a DVD while surfing the Internet and talking to their friends on their Bluetooth headset over a social media instant messenger. No, that’s bound to drain your battery quickly. What we’re referring to here is when a laptop battery only lasts for an hour or so after a full charge with normal usage, or if a mobile phone battery is only able to power the device for 30 minutes or so. These things happen.
If it’s a laptop, you can try to perform a battery calibration, as we discussed in Chapter 9. For all mobile devices, you can try to drain the battery completely and then charge it fully before turning the device back on. If these options don’t work, then it’s likely that the battery needs to be replaced.
The last power issue that we need to discuss is a swollen battery. As the term swollen battery suggests, the battery physically swells in size. It can be caused by a number of things, including manufacturer defects, age, misuse, using the wrong adapter for charging, or leaving the laptop constantly plugged into a wall outlet. Inside the battery, the individual cells become overcharged, causing them to swell.
If you have a swollen battery, turn the device off immediately and make sure that it’s not plugged into a charger. If the battery is removable, you can try to remove it if you wish, but be very careful. Swollen batteries are more prone to explosions than normal ones because the casing is already compromised. If you are able to remove it, place it into a safe container, just in case there are further issues. If the battery is not removable, it’s time for a new device. In either case, take the battery or device to a proper recycling center to dispose of it. Never just throw it in the trash because it can explode and harm sanitation workers, as well as cause significant damage to the environment.
Video Difficulties
The video card (built into the motherboard on most mobile devices) and the display unit are usually the cause of video problems. Video problems on small computers can also occur if the connection between the motherboard and the LCD screen becomes damaged. On laptops, this connection typically passes through the hinges of the case, which is the weakest part.
The coverage for video problems follows the section on power problems for a reason: Make sure the computer is on before diagnosing the issue as a video problem!
Here are a few things to try for laptops:
- Plug in an external monitor that you know works. On most laptops, you need to press the function key and another key known as the LCD cutoff switch (often F4 or F8) to direct the video output to an external monitor. This is called toggling the display. You might need to do this a few times. Figure 12.6 shows a laptop keyboard where F4 is the appropriate toggle key. Look for the symbol that looks like a VGA video connector.
- Check the LCD cutoff switch. Remember the function+F4 idea? Try toggling it a few times, waiting a few seconds between each press of the toggle key to let the display power up. Most laptops have three or four display states: LCD only, external only, both displays, and extend screen (where the second screen becomes an extension of the first monitor). Raise or lower the brightness level. This is usually done with a function key combination as well, such as Fn+F9 or Fn+F10. Check your keyboard for function keys that have a sun on them.
- If you have a handheld computer, try turning the backlight feature on or off. For specifics on how to do this, check your manual.
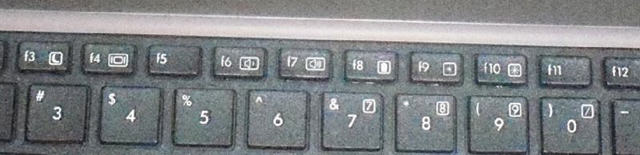
Figure 12.6 Video adjustment keys F4 (LCD toggle), F9 (dim), and F10 (brighten)
If the display is not working, you can order a new one from the manufacturer—although it may be cheaper to just buy a new device. If the computer won’t output a screen image to an external monitor or projector, it means one of two things (assuming you know that the monitor or projector works): Either the external VGA port is shot, or the function keys aren’t working. In either case, you likely need to replace the motherboard if you want the display to appear on an external device.
Input Problems
Laptop keyboards aren’t as easy to switch out as desktop keyboards. You can, however, very easily attach an external keyboard to your laptop if the keys on your laptop don’t appear to work. If you have an ancient laptop or keyboard with a PS/2 connector, most electronics stores will have USB-to-PS/2 or PS/2-to-USB converters.
If the keyboard doesn’t seem to respond at all, try pressing the Num Lock and Caps Lock keys to see if they toggle the Num Lock and Caps Lock lights on and off. If the lights don’t respond, the keyboard isn’t functioning properly. Try rebooting the system. (You will probably have to press and hold the power button for 5 seconds, and the system will shut off. Wait 10 seconds, and press the power button again to turn it back on.) If that doesn’t fix the problem, you probably have faulty hardware.
Another problem unique to laptop keyboards is the Fn key. (It can be your friend or your enemy.) You can identify it on your laptop keyboard because it’s in the lower-left corner and has the letters Fn on it (often in blue), as shown in Figure 12.7. If the Fn key is “stuck” on, the only keys that will work are those with functions on them. If you look at other keys on your laptop, several of them will have blue lettering too. Those are the functions that the keys may perform if you press and hold the Fn key before pressing the function key that you want. If the Fn key is stuck on, try toggling it just as you would a Caps Lock or Num Lock key.
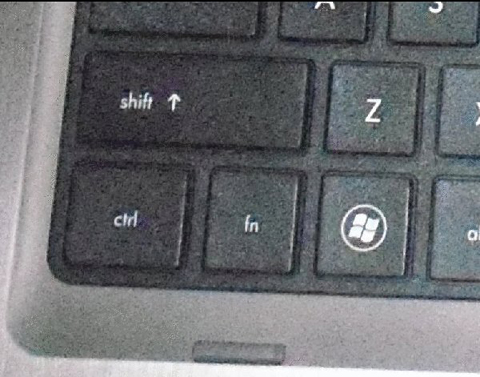
Figure 12.7 The Fn key on a laptop
One of the conveniences that users often take advantage of in laptops is a built-in pointing device. Most laptops have touchpads or point sticks that function much like a mouse. They’re nice because you don’t need to carry an external mouse around with you. While these types of devices are usually considered very handy, some people find them annoying. For example, when you are typing your palm might rest on the touchpad, causing erratic pointer behavior. This is referred to as a ghost cursor because it seems like the cursor just randomly jumps all over the screen. You can turn the touchpad off through Control Panel. While understanding that you can turn it off on purpose, remember that it can be turned off accidentally as well. Check to make sure that it’s enabled. Some laptops allow you to disable or change the sensitivity of the touchpoint as well, just as you can adjust the sensitivity of your mouse.
Another potential issue is pointer drift, where the mouse cursor will slowly drift in one direction even though you are not trying to make it move. This issue is generally related to the point stick not centering properly after it’s been used. If you have pointer drift, try using the point stick and moving it back and forth a few times to get it to re-center itself. You can also try rebooting. If the problem persists, either disable or replace the point stick.
Networking Troubles
Nearly every mobile device sold is equipped with integrated wireless networking, and most have Bluetooth built in as well. In many cases, the wireless antenna is run into the LCD panel. This allows the antenna to stand up higher and pick up a better signal.
If your wireless networking isn’t working, check to make sure that the LEDs on your network card are functioning. If there are no lights, it could indicate a problem with the card itself or, on some cards, that there is no connection or signal. First, make sure the wireless card is enabled through Windows. You generally do this in Windows by right-clicking My Network Places, selecting Properties, right-clicking the wireless network connection, and selecting Properties to look at the network card properties. However, some network cards have their own proprietary configuration software. You can also often check here by clicking a tab (often called Wireless Networks) to see if you’re getting a signal and, if so, the strength of that signal.
A weak signal is the most common cause of intermittent wireless networking connection problems. If you have intermittent connectivity and keep getting dropped, see if you can get closer to the WAP or remove obstructions between you and the WAP. Failing network cards and connectivity devices can also cause intermittent wireless networking connection failures.
Most laptops also come with an external switch or button on the front or side or above the keyboard that can toggle the network card on and off. Be sure that this is set to the On position! Figure 12.8 shows a toggle above the keyboard (it’s the one on the left that looks like an antenna).
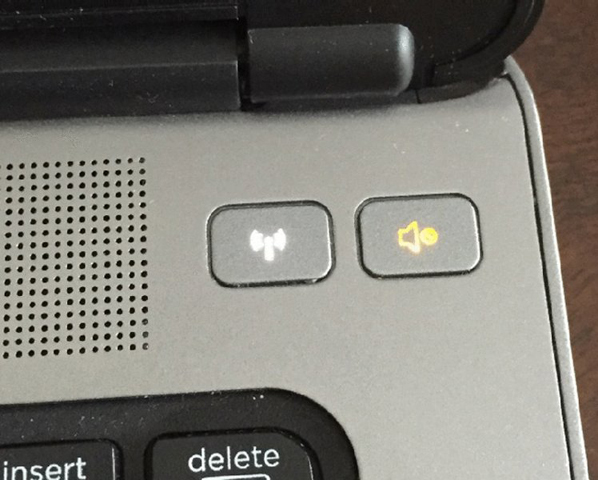
Figure 12.8 Network card toggle switch above the keyboard
When the wireless connection fails but the network card appears to be working, try plugging it in. Most laptops with wireless cards also have wired RJ-45 network ports. Plug the card in and see if you get lights, and see if the network works.
The principles behind troubleshooting network or Bluetooth connectivity issues on mobile phones and tablets is the same as on laptops. The big difference is that you can’t try an external network card if your internal one is failing. The first thing to check is that the network connection or Bluetooth is enabled, which also means double-checking that airplane mode is not turned on. On Android and iOS devices, this is done through Settings. Figure 12.9 shows iOS network settings and Figure 12.10 shows Android network settings. Toggle the connection off and then back on to reset it; oftentimes, that will resolve connectivity issues.
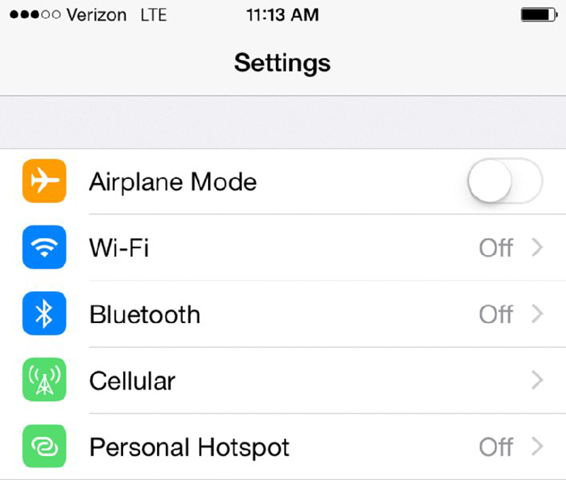
Figure 12.9 iOS network settings

Figure 12.10 Android network settings
Another way to access network settings in iOS is from the Control Center. You can do this from both the lock screen and the home screen. Simply swipe your finger up from the very bottom of the iPhone’s touchscreen, and you will get the Control Center, similar to what’s shown in Figure 12.11.

Figure 12.11 iPhone Control Center
Responsiveness Issues
Responsiveness issues are most common on smaller mobile devices such as phones and tablets. For the most part, we expect these devices to run automatically without any problems, but when they decide to stop working, it can be tricky figuring out why. Here are six common responsiveness scenarios you might run into, and the steps to take to resolve them:
Apps not loading Sometimes you will tap on an app and nothing happens. Of course you tap it again, and still nothing. After a dozen or so taps, you might just give up. It could be one of three things. The touchscreen has stopped responding, something has corrupted the app, or the memory has become corrupted. Try another app to help narrow down the problem. If that doesn’t work, try powering the device off and back on again, and then try the app once more. If that doesn’t resolve the problem, look to see if there is an updated version of the app that you need to install. If not, simply uninstall and reinstall the app.
Frozen system This is one step further than just one app not working. If the touchscreen is completely non-responsive and the system is entirely frozen, all you really can do is to power it off and then back on. You might need to hold the power button down for several seconds to force the device to power off. If the power button does not work, you can reset an iPhone by pressing and holding the power button and the sleep/wake button simultaneously for about 10 seconds. The Apple logo will appear, and the phone should reset.
If that doesn’t work, then you need to restore the phone to factory settings. Note that doing this will cause all data on the phone to disappear, which is one reason it’s always good to have the phone sync so that you have a backup! If the restore process also fails, then it’s time to have the device repaired by a service technician or replaced.
Slow performance This happens when the device is really slow but isn’t completely locked up. First, isolate the issue. Is it one app or overall performance? It could be that apps are running in the background and need to be closed. Shutting down those apps or powering the device off and then back on is a good step. You can also check to see how much memory is available. If it’s very little, you might uninstall some items to see if that improves performance.
If it’s one app giving you problems instead of the entire device, look for updates to the app, or delete and reinstall the app.
Finally, if none of these steps work, perform a restore to factory settings. If the problems persist, it’s time for a new device.
Unable to decrypt email Security certificates and public and private keys are used to accomplish encryption and decryption. Security certificates are obtained through a certificate authority (CA), similar to how secure websites get set up so that you know they’re legitimate. The entire process for enabling encryption and decryption is beyond the scope of this chapter, but you do need to know two key points. First, you need a certificate to enable encryption, and second, public keys are used to encrypt messages and private keys are used to decrypt the same message. In other words, if you want to send Mary an encrypted message, you will use Mary’s public key to encrypt it. The only key that can properly decrypt the message is Mary’s private key.
Android and iOS both support the Secure/Multipurpose Internet Mail Extensions (S/MIME) standard for public key encryption.
If you can’t decrypt email, it is most likely because S/MIME settings are not properly enabled on your email account, which means installing the certificate (and by extension, your private key) on your mobile device. Exercise 12.2 walks you through the general steps to enable S/MIME on iOS, using iOS 8 as an example. The exercise assumes that you already have obtained a security certificate through a CA.
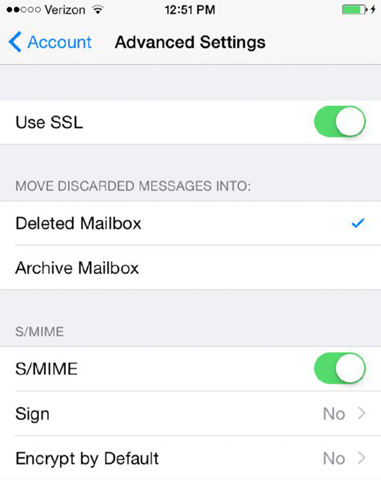
Figure 12.12 Advanced Settings for email
No sound from speakers Make sure that your device is not set to silent operation. Most mobile devices will have a switch on the side that sets them to silent or vibrate mode, and that will mute your device from making a noise when you get a call or a message. Also check your volume settings, which are in Settings ➢ Sounds, as well as the control center, shown in Figure 12.11. If the speakers have failed on a mobile device, it’s time for a new device.
GPS not functioning iPhones and other devices have an amazing array of kinetic sensors built in. For example, the iPhone 6 has a gyroscope, accelerometer, linear acceleration sensor, magnetometer, altitude sensor, and gravity sensor. These sensors let your device act like a GPS and compass, and they also detect movements that many apps take advantage of, such as tilting or shaking the device. GPS must be enabled to use it. On an iPhone, you do so through Location Services, which is under Settings ➢ Privacy ➢ Location Services as shown in Figure 12.13. Then, you have to give each app permission to use the service, which is also done on the same screen. In Android, location access settings are configured under Settings ➢ Location and then Location, Location Services, or Location Reporting, depending on the Android version.
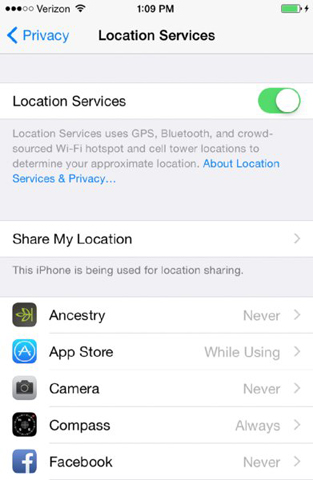
Figure 12.13 Location Services
If GPS is not working, check to ensure that the device has either a cellular or a Wi-Fi connection. Location Services doesn’t work without one of those two enabled. It’s possible for any of the kinetic sensors to fail, including those that enable GPS services. If the settings are properly enabled and GPS still does not work, the only way to resolve this problem is to send it in for service or replace the device.
Troubleshooting Printer Problems
Other than the monitor (which every computer needs), the most popular peripheral purchased for computers today is the printer. Printers are also the most complex peripheral as far as troubleshooting is concerned; this arises from complications in putting ink to paper. There are several different ways that this can be accomplished, but the end result is all pretty much the same.
Different types of printers work in different ways, so you would expect that laser printers might have different issues than impact printers. Because problems are often dependent upon the type of printer you’re using, we’ve chosen to break down this discussion by printer type. We’ll start with a quick review of the technology and then get into specific issues. At the end, we’ll look at the process of managing the print spooler, which is the same regardless of the printer type in use.
Dot-Matrix Printer Problems
Dot-matrix printers are impact printers, meaning that they rely upon making a physical impact in order to print. A dot-matrix printer contains a print head, which has a row of short, sturdy pins made of a hard wire. The pins in the print head are wrapped with coils of wire to create a solenoid and are held in the rest position by a combination of a small magnet and a spring. To trigger a particular pin, the printer controller sends a signal to the print head, which energizes the wires around the appropriate print wire. This turns the print wire into an electromagnet, which repels the print pin, forcing it against the ink ribbon and making a dot on the paper.
Although this might sound complex, dot-matrix printers are relatively simple devices. Therefore, only a few problems usually arise. We will cover the most common problems and their solutions here.
Low Print Quality
Problems with print quality are easy to identify. When the printed page comes out of the printer, the characters may be too light or have dots missing from them. Table 12.3 details some of the most common print quality problems, their causes, and their solutions.
Table 12.3 Common dot-matrix print quality problems
| Characteristics | Cause | Solution |
| Consistently faded or light characters | Worn-out printer ribbon | See if you can adjust the print head to be closer to the ribbon. If not (or if it doesn’t help), replace the ribbon with a new, vendor-recommended ribbon. |
| Print lines that go from dark to light as the print head moves across the page | Printer ribbon-advance gear slipping | Replace the ribbon-advance gear or mechanism. |
| A small, blank line running through a line of print (consistently) | Print head pin stuck inside the print head | Replace the print head. |
| A small, blank line running through a line of print (intermittently) | A broken, loose, or shorting print head cable | Secure or replace the print head cable. |
| A small, dark line running through a line of print | Print head pin stuck in the out position | Replace the print head. (Pushing the pin in may damage the print head.) |
| Printer making a printing noise, but no print appears on the page | Worn, missing, or improperly installed ribbon cartridge | Replace the ribbon cartridge correctly. |
| Printer printing garbage | Cable partially unhooked, wrong driver selected, or bad printer control board (PCB) | Hook up the cable correctly, select the correct driver, or replace the PCB (respectively). |
Printout Jams Inside the Printer
Printer jams (aka “the printer crinkled my paper”) are very frustrating because they always seem to happen more than halfway through your 50-page print job, requiring you to take time to remove the jam before the rest of your pages can print. A paper jam happens when something prevents the paper from advancing through the printer evenly. There are generally three causes of printer jams: an obstructed paper path, stripped drive gears, and using the wrong paper.
Obstructed paper paths are often difficult to find. Usually it means disassembling the printer to find the bit of crumpled-up paper or other foreign substance that’s blocking the paper path. A common obstruction is a piece of the “perf”—the perforated sides of tractor-feed paper—that has torn off and gotten crumpled up and then lodged in the paper path. It may be necessary to remove the platen roller and feed mechanism to get at the obstruction.
Stripped drive gears cause the paper to feed improperly, causing it to crinkle and cause jams. Using the wrong paper, such as thick paper when the platen has been set for thin paper, can also cause jams. When loading new paper, always be sure that the platen is properly adjusted.
Stepper Motor Problems
Printers use stepper motors to move the print head back and forth as well as to advance the paper. The carriage motor is responsible for the back-and-forth motion while the main motor advances the paper. These motors get damaged when they are forced in any direction while the power is on. This includes moving the print head over to install a printer ribbon as well as moving the paper-feed roller to align paper. These motors are very sensitive to stray voltages. If you are rotating one of these motors by hand, you are essentially turning it into a small generator and thus damaging it.
A damaged stepper motor is easy to detect. Damage to the stepper motor will cause it to lose precision and move farther with each step. If the main motor is damaged (which is more likely to happen), lines of print will be unevenly spaced. If the print head motor goes bad, characters will be scrunched together. If a stepper motor is damaged badly enough, it won’t move at all in any direction; it may even make high-pitched squealing noises. If any of these symptoms appear, it’s time to replace one of these motors.
Stepper motors are usually expensive to replace—about half the cost of a new printer! Damage to them is easy to avoid; the biggest key is to not force them to move when the power is on.
Inkjet Printer Problems
An inkjet printer has many of the same types of parts as a dot-matrix printer. In this sense, it’s almost as if the inkjet technology is simply an extension of the technology used in dot-matrix printers. The parts on an inkjet can be divided into four categories:
- Print head/ink cartridge
- Print head carriage, belt, and stepper motor
- Paper-feed mechanism
- Control, interface, and power circuitry
Perhaps the most obvious difference between inkjet and dot-matrix printers is that dot-matrix printers often use tractor-feed paper while inkjets use normal paper. The differences don’t end there, though. Inkjet printers work by spraying ink (often in the form of a bubble) onto a page. The pattern of the bubbles forms images on the paper.
Inkjet printers are the most common type of printer found in homes because they are inexpensive and produce good-quality images. For this reason, you need to understand the most common problems with these printers so that your company can service them effectively. Let’s take a look at some of the most common problems with inkjet printers and their solutions.
Print Quality
The majority of inkjet printer problems are quality problems. Ninety-nine percent of these can be traced to a faulty ink cartridge. With most inkjet printers, the ink cartridge contains the print head and the ink. The major problem with this assembly can be described by “If you don’t use it, you lose it.” The ink will dry out in the small nozzles and block them if they are not used at least once a week.
An example of a quality problem is when you have thin, blank lines present in every line of text on the page. This is caused by a plugged hole in at least one of the small, pinhole ink nozzles in the print cartridge. Another common problem is faded printing. Replacing the ink cartridge generally solves these issues.
If an ink cartridge becomes damaged or develops a hole, it can put too much ink on the page and the letters will smear. Again, the solution is to replace the ink cartridge. (You should be aware, however, that a very small amount of smearing is normal if the pages are laid on top of each other immediately after printing.)
One final print quality problem that does not directly involve the ink cartridge occurs when the print quickly goes from dark to light and then prints nothing. As we already mentioned, ink cartridges dry out if not used. That’s why the manufacturers include a small suction pump inside the printer that primes the ink cartridge before each print cycle. If this priming pump is broken or malfunctioning, this problem will manifest itself and the pump will need to be replaced.
After you install a new cartridge into many inkjet printers, the print heads in that cartridge must be aligned. Print head alignment is the process by which the print head is calibrated for use. A special utility that comes with the printer software is used to do this. You run the alignment utility, and the printer prints several vertical and horizontal lines with numbers next to them. It then shows you a screen and asks you to choose the horizontal and vertical lines that are the most “in line.” Once you enter the numbers, the software understands whether the print head(s) are out of alignment, which direction, and by how much. The software then makes slight modifications to the print driver software to tell it how much to offset when printing. Occasionally, alignment must be done several times to get the images to align properly.
Color Output Problems
Sometimes, when you print a color document, the colors might not be the same colors that you expected based on what you saw on the screen. A few different issues could cause this problem. First, ink could be bleeding from adjacent areas of the picture, causing the color to be off. A leaking cartridge can cause this, as can using the wrong type of paper for your printer.
If you know that you’re using the right paper, try cleaning the print cartridges using the software utility that should have been included with the printer software. Once you do that, print a test page to confirm that the colors are correct. On most color printers, the test page will print colors in a pattern from left to right that mirrors the way the ink cartridges are installed. That brings us to our second potential problem: the ink cartridges are installed in the wrong spot. (This is for printers with multiple color ink cartridges.) That should be easy to check. Obviously, if that’s the problem, put the color cartridges where they’re supposed to be!
Third, if the ink that comes out of the cartridge doesn’t match the label on the cartridge, try the self-cleaning utility. If that doesn’t help, replace the cartridge. Finally, if one of the colors doesn’t come out at all and self-cleaning doesn’t help, just replace the cartridge.
Paper Jams
Inkjet printers have pretty simple paper paths. Therefore, paper jams due to obstructions are less likely than they are on dot-matrix printers. They are still possible, however, so an obstruction shouldn’t be overlooked as a possible cause of jamming.
Paper jams in inkjet printers are usually due to one of two things:
- A worn pickup roller
- The wrong type of paper
The pickup roller usually has one or two D-shaped rollers mounted on a rotating shaft. When the shaft rotates, one edge of the D roller rubs against the paper, pushing it into the printer. When the roller gets worn, it gets smooth and doesn’t exert enough friction against the paper to push it into the printer.
If the paper used in the printer is too smooth, it can cause the same problem. Pickup rollers use friction, and smooth paper doesn’t offer much friction. If the paper is too rough, on the other hand, it acts like sandpaper on the rollers, wearing them smooth. Here’s a rule of thumb for paper smoothness: paper slightly smoother than a new dollar bill will work fine.
Paper-Feeding Problems
You will normally see one of two paper-feeding options on an inkjet printer. The first is that the paper is stored in a paper tray on the front of the printer. The second, which is more common on smaller and cheaper models, is for the paper to be fed in vertically from the back of the printer in a paper feeder. Both types may also have manual feed or envelope feed options.
Regardless of the feed style, the printer will have a paper-feed mechanism, which picks up the paper and feeds it into the printer. Inside the paper-feed mechanism are pickup rollers, which are small rubber rollers that rub up against the paper and feed it into the printer. They press up against small rubber or cork patches known as separator pads. These help to keep the rest of the paper in the tray so that only one sheet gets picked up at a time. A pickup stepper motor turns the pickup rollers.
If your printer fails to pick up paper, it could indicate that the pickup rollers are too worn. If your printer is always picking up multiple sheets of paper, it could be a couple of things, such as problems with the separator pads or your paper being too “sticky,” damp, or rough. Some printers that use vertical paper feeders have a lever with which you can adjust the amount of tension between the pickup rollers and the separator pads. If your printer is consistently pulling multiple sheets of paper, you might want to try to increase the tension using this lever.
The final component is the paper-feed sensor. This sensor is designed to tell the printer when it’s out of paper, and it rarely fails. When it does, the printer will refuse to print because it thinks it is out of paper. Cleaning the sensor might help, but if not, you should replace the printer.
Stepper Motor Problems
Inkjet printers use stepper motors, just like dot-matrix printers. On an inkjet, the print head carriage is the component containing the print head that moves back and forth. A carriage stepper motor and an attached belt (the carriage belt) are responsible for the movement. So the print head carriage stays horizontally stable, it rests on a metal stabilizer bar. Another stepper motor is responsible for advancing the paper.
Stepper motor problems on an inkjet will look similar to the ones on a dot-matrix printer. That is, if the main motor is damaged, lines of print will be unevenly spaced, and if the print head motor goes bad, characters will be scrunched together. A lot of damage may cause the stepper motor to not move at all and possibly make high-pitched squealing noises. If any of these symptoms appear, it’s time to replace one of these motors. As with dot-matrix printers, stepper motors can be expensive. It may make more economical sense to replace the printer.
Power Problems
Inkjet printers have internal power circuits that convert the electricity from the outlet into voltages that the printer can use, typically 12V and 5V. The specific device that does this is called the transformer. If the transformer fails, the printer will not power up. If this happens, it’s time to get a new printer.
Laser Printer Problems
The process that laser printers use to print, called the electrophotographic (EP) printing process, is the most complex process of all commonly used printers. You should have already memorized the seven-step EP process for the 220-901 A+ exam, but perhaps you’ve forgotten a bit. Table 12.4 gives you the seven steps and a short description of what happens in each step.
Table 12.4 The EP printing process
| Step | Action |
| Processing | The page to be printed gets rendered, one horizontal strip at a time. The image is stored in memory for printing. |
| Charging | The charging corona gets a high voltage from the high-voltage power supply (HVPS). It uses the voltage to apply a strong uniform negative charge (–600VDC) to the photosensitive drum. |
| Exposing (writing) | The laser scans the drum. Wherever it touches the drum, the charge is reduced from –600VDC to around –100VDC. The pattern formed on the drum will be the image that is printed. |
| Developing | The developing roller acquires a –600VDC charge from the HVPS and picks up toner, which gets the same –600VDC charge. As the developing toner rolls by the photosensitive drum, the toner is attracted to the lesser-charged (–100VDC) areas on the photosensitive drum and sticks to it in those areas. |
| Transferring | The charging corona wire or roller acquires a strong positive charge (+600VDC) and transfers it to the paper. As the photosensitive drum with ink on it rolls by, the ink is attracted to the paper. |
| Fusing | The 350˚ F fuser roller melts the toner paper and the rubberized pressure roller presses the melted toner into the paper, making the image permanent. |
| Cleaning | A rubber blade scrapes any remaining toner off the drum and a fluorescent lamp discharges any remaining charge on the photosensitive drum. |
Looking at the steps involved in laser printing, it’s pretty easy to tell that laser printers are the most complex printers that we have discussed. The good news, though, is that most laser printer problems are easily identifiable and have specific fixes. Let’s discuss the most common laser and page printer problems and their solutions.
Power Problems
If you turn your laser printer on and it doesn’t respond normally, there could be a problem with the power it’s receiving. Of course, the first thing to do is to ensure that it’s plugged in!
A laser printer’s DC power supply provides three different DC voltages to printer components. This can all be checked at a power interface labeled J210, which is a 20-pin female interface. Pin 1 will be in the lower-left corner, and the pins along the bottom will all be odd numbers, increasing from left to right.
Using the multimeter, you should find the following voltages:
- Pin 1 +5v
- Pin 5 –5v
- Pin 9 +24v
If none of the voltages are reading properly, then you probably need to replace the fuse in the DC power supply. If one or more (but not all) of the voltages aren’t reading properly, then the first thing to do is to remove all optional hardware in the printer (including memory) and test again. If the readings are still bad, it’s likely you need to replace the DC power supply.
No Connectivity (IP Issues)
You can connect many laser printers directly to your network by using a network cable (such as Category 5e or 6a) or by using a wireless network adapter with the printer. In cases like these, the printer acts as its own print server (typically print server software is built into the printer), and it can speed up printing because you don’t have a separate print server translating and then sending the directions to the printer.
For printers such as these, no connectivity can be a sign of improperly configured IP settings such as the IP address. While each printer is somewhat different, you can manually configure most laser printers’ IP settings a number of ways:
- Through the printer’s LCD control panel. For example, on several HP LaserJet models, you press Menu, navigate to the Network Config menu, select TCP/IP Config, select Manual, and then enter the IP address. You would then also configure the subnet mask and default gateway.
- By using Telnet to connect to the printer’s management software from your computer.
- By using the management software that came with your printer.
You can also configure most IP printers to obtain an IP address automatically from a Dynamic Host Configuration Protocol (DHCP) server. Whenever the printer is powered up, it will contact the server to get its IP configuration information just like any other client on the network. While this may be convenient, it’s usually not a good idea to assign dynamic IP addresses to printers. Client computers will have their printer mapped to a specific IP address; if that address is changed, you will have a lot of people complaining about no connectivity. If you are using the DHCP server to manage all of your network’s IP addresses, be sure to reserve a static address for the printers.
Nothing Prints
You tell your computer to print, but nothing comes out of the printer. That problem is probably the most challenging to solve because several different things could cause it. Are you the only one affected by the problem, or are others having the same issue? Is the printer plugged in, powered on, and online? As with any troubleshooting, check your connections first.
Sometimes when nothing prints, you get a clue as to what the problem is. The printer may give you an “out of memory” error or something similar. Another possibility is that the printer will say “processing data” (or something similar) on its LCD display and nothing will print. It’s likely that the printer has run out of memory while trying to process the print job. If your printer is exhibiting these symptoms, it’s best to power the printer off and then power it back on.
Paper Jams
Laser printers today run at copier speeds. Because of this, their most common problem is paper jams. Paper can get jammed in a printer for several reasons. First, feed jams happen when the paper-feed rollers get worn (similar to feed jams in inkjet printers). The solution to this problem is easy: replace the worn rollers.
Another cause of feed jams is related to the drive gear of the pickup roller. The drive gear (or clutch) may be broken or have teeth missing. Again, the solution is to replace it. To determine if the problem is a broken gear or worn rollers, print a test page, but leave the paper tray out. Look into the paper-feed opening with a flashlight and see if the paper pickup roller(s) are turning evenly and don’t skip. If they turn evenly, the problem is probably worn rollers.
Worn exit rollers can also cause paper jams. These rollers guide the paper out of the printer into the paper-receiving tray. If they are worn or damaged, the paper may catch on its way out of the printer. These types of jams are characterized by a paper jam that occurs just as the paper is getting to the exit rollers. If the paper jams, open the rear door and see where the paper is located. If the paper is very close to the exit rollers, they are probably the problem.
The solution is to replace all of the exit rollers. You must replace all of them at the same time because even one worn exit roller can cause the paper to jam. Besides, they’re inexpensive. Don’t skimp on these parts if you need to have them replaced.
Paper jams can also be the fault of the paper. If your printer consistently tries to feed multiple pages into the printer, the paper isn’t dry enough. If you live in an area with high humidity, this could be a problem. We’ve heard some solutions that are pretty far out but that work (like keeping the paper in a Tupperware-type airtight container or microwaving it to remove moisture). The best all-around solution, however, is humidity control and keeping the paper wrapped until it’s needed. Keep the humidity around 50 percent or lower (but above 25 percent if you can, in order to avoid problems with electrostatic discharge).
Finally, a grounded metal strip called the static-eliminator strip inside the printer drains the transfer corona charge away from the paper after it has been used to transfer toner from the EP cartridge. If that strip is missing, broken, or damaged, the charge will remain on the paper and may cause it to stick to the EP cartridge, causing a jam. If the paper jams after reaching the transfer corona assembly, this may be the cause.
Blank Pages
There’s nothing more annoying than printing a 10-page contract and receiving 10 pages of blank paper from the printer. Blank pages are a somewhat common occurrence in laser printers. Somehow, the toner isn’t being put on the paper. There are three major causes of blank pages:
- The toner cartridge
- The transfer corona assembly
- The high-voltage power supply (HVPS)
Toner Cartridge
The toner cartridge is the source of most quality problems because it contains most of the image-formation pieces for laser printers. Let’s start with the obvious. A blank page or faded prints will come out of the printer if there is no toner or low toner in the cartridge. It might sound simple, but some people think these things last forever. Many laser printers give some sort of warning if the toner cartridge is low, but it’s easy to check. Just open the printer, remove the toner cartridge, and shake it. You will be able to hear if there’s toner inside the cartridge. If it’s empty, replace it with a known, good, manufacturer-recommended toner cartridge. If it is not yet empty, shaking it redistributes the toner and may provide better printing for some time.
Another issue that crops up rather often is the problem of using refilled or reconditioned toner cartridges. During their recycling process, these cartridges may be filled with the wrong kind of toner (for example, one with an incorrect composition). This can cause toner to be repelled from the EP drum instead of being attracted to it. Thus there’s no toner on the page because there was no toner on the EP drum to begin with. The solution once again is to replace the toner cartridge with the type recommended by the manufacturer.
A third problem related to toner cartridges happens when someone installs a new toner cartridge and forgets to remove the sealing tape that is present to keep the toner in the cartridge during shipping. The solution to this problem is as easy as it is obvious: Remove the toner cartridge from the printer, remove the sealing tape, and reinstall the cartridge.
Transfer Corona Assembly
The second cause of the blank-page problem is a damaged or missing transfer corona wire or damaged transfer corona roller. If a wire is lost or damaged, the developed image won’t transfer from the EP drum to the paper. Thus no image appears on the printout. To determine if this is causing your problem, do the first half of the self-test (described later in this chapter in the section called “Self-Tests”). If there is an image on the drum but not on the paper, you know that the transfer corona assembly isn’t doing its job.
To check if the transfer corona assembly is causing the problem, open the cover and examine the wire (or roller, if your printer uses one). The corona wire is hard to see, so you may need a flashlight. You will know if it’s broken or missing just by looking at it (it will either be in pieces or just not be there). If it’s not broken or missing, the problem may be related to the high-voltage power supply.
The transfer corona wire (or roller) is a relatively inexpensive part, and it can easily be replaced with the removal of two screws and some patience.
High-Voltage Power Supply (HVPS)
The HVPS supplies high-voltage, low-current power to both the charging and transfer corona assemblies in laser printers. If it’s broken, neither corona will work properly. If the self-test shows an image on the drum but none on the paper, and the transfer corona assembly is present and not damaged, then the HVPS is at fault.
All-Black Pages
Only slightly more annoying than 10 blank pages are 10 black pages. This happens when the charging unit (the charging corona wire or charging corona roller) in the toner cartridge malfunctions and fails to place a charge on the EP drum. Because the drum is grounded, it has no charge. Anything with a charge (like toner) will stick to it. As the drum rotates, all of the toner is transferred to the page and a black page is formed.
This problem wastes quite a bit of toner, but it can be fixed easily. The solution (again) is to replace the toner cartridge with a known, good manufacturer-recommended one. If that doesn’t solve the problem, then the HVPS is at fault (it’s not providing the high voltage that the charging corona needs to function).
Repetitive Small Marks or Defects
Repetitive marks occur frequently in heavily used (as well as older) laser printers. Toner spilled inside the printer may be causing the problem. It can also be caused by a crack or chip in the EP drum (this mainly happens with recycled cartridges), which can accumulate toner. In both cases, some of the toner gets stuck onto one of the rollers. Once this happens, every time the roller rotates and touches a piece of paper, it leaves toner smudges spaced a roller circumference apart.
The solution is relatively simple: Clean or replace the offending roller. To help you figure out which roller is causing the problem, the service manuals contain a chart like the one shown in Figure 12.14. (Some larger printers will also have the roller layout printed inside the service door.) To use the chart, place the printed page next to it. Align the first occurrence of the smudge with the top arrow. The next smudge will line up with one of the other arrows. The arrow it lines up with tells you which roller is causing the problem.
Figure 12.14 Laser printer roller circumference chart
Vertical White Lines on the Page
Vertical white lines running down all or part of the page are a relatively common problem on older printers, especially ones that don’t see much maintenance. Foreign matter (more than likely toner) caught on the transfer corona wire causes this. The dirty spots keep the toner from being transmitted to the paper (at those locations, that is), with the result that streaks form as the paper progresses past the transfer corona wire.
The solution is to clean the corona wires. LaserJet Series II printers contain a small corona wire brush to help with this procedure. It’s usually a small, green-handled brush located near the transfer corona wire. To use it, remove the toner cartridge and run the brush in the charging corona groove on top of the toner cartridge. Replace the cartridge, and use the brush to remove any foreign deposits on the transfer corona. Be sure to put it back in its holder when you’re finished.
Vertical Black Lines on the Page
A groove or scratch in the EP drum can cause the problem of vertical black lines running down all or part of the page. Because a scratch is lower than the surface, it doesn’t receive as much (if any) of a charge as the other areas. The result is that toner sticks to it as though it were discharged. The groove may go around the circumference of the drum, so the line may go all the way down the page.
Another possible cause of vertical black lines is a dirty charging corona wire. A dirty charging corona wire prevents a sufficient charge from being placed on the EP drum. Because the charge on the EP drum is almost zero, toner sticks to the areas that correspond to the dirty areas on the charging corona.
The solution to the first problem is, as always, to replace the toner cartridge (or EP drum, if your printer uses a separate EP drum and toner). You can also solve the second problem with a new toner cartridge, but in this case that would be an extreme solution. It’s easier to clean the charging corona with the brush supplied with the cartridge.
Image Smudging
If you can pick up a sheet from a laser printer, run your thumb across it, and have the image come off on your thumb, you have a fuser problem. The fuser isn’t heating the toner and fusing it into the paper. This could be caused by a number of things—but all of them can be handled by a fuser replacement. For example, if the halogen light inside the heating roller has burned out, that would cause the problem. The solution is to replace the fuser. The fuser can be replaced with a rebuilt unit, if you prefer. Rebuilt fusers are almost as good as new ones, and some even come with guarantees. Plus, they cost less.
A similar problem occurs when small areas of smudging repeat themselves down the page. Dents or cold spots in the fuser heat roller cause this problem. The only solution is to replace either the fuser assembly or the heat roller.
Ghosting
Ghosting is what you have when you can see light images of previously printed pages on the current page. This is caused by one of two things: a broken cleaning blade or bad erasure lamps. A broken cleaning blade causes old toner to build up on the EP drum and consequently presents itself in the next printed image. If the erasure lamps are bad, then the previous electrostatic discharges aren’t completely wiped away. When the EP drum rotates toward the developing roller, some toner sticks to the slightly discharged areas.
If the problem is caused by a broken cleaner blade, you can replace the toner cartridge. If it’s caused by bad erasure lamps, you’ll need to replace them. Because the toner cartridge is the least expensive cure, you should try that first. Usually, replacing the toner cartridge will solve the ghosting problem. If it doesn’t, you will have to replace the erasure lamps.
Printer Prints Pages of Garbage
This has happened to everyone at least once. You print a one-page letter, but instead of the letter you have 10 pages of what looks like garbage (or garbled characters) or many more pages with one character per page come out of the printer. This problem comes from one of two different sources: the printer driver software or the formatter board.
Printer Driver
The correct printer driver needs to be installed for the printer and operating system. For example, if you have an HP LaserJet III and a Windows 7 computer, then you need to install an HP LaserJet III driver made for Windows 7. Once the driver has been installed, it must be configured for the correct page-description language: PCL or PostScript. Most HP LaserJet printers use PCL (but can be configured for PostScript). Determine what page-description language your printer has been configured for, and set the printer driver to the same setting. If this is not done, you will get garbage out of the printer.
If the problem is the wrong driver setting, the garbage that the printer prints will look like English. That is, the words will be readable, but they won’t make any sense.
Formatter Board
The other cause of several pages of garbage being printed is a bad formatter board. This circuit board takes the information the printer receives from the computer and turns it into commands for the various components in the printer. Usually, problems with the formatter board produce wavy lines of print or random patterns of dots on the page.
It’s relatively easy to replace the formatter board in a laser printer. Usually, this board is installed under the printer and can be removed by loosening two screws and pulling it out. Typically, replacing the formatter board also replaces the printer interface, which is another possible source of garbage printouts.
Example Printer Testing: HP LaserJet
Now that we’ve defined some of the possible sources of problems with laser printers, let’s discuss a few of the testing procedures that you use with them. We’ll discuss HP LaserJet laser printers because they are the most popular brand of laser printer, but the topics covered here apply to other brands of laser printers as well.
We’ll look at two ways to troubleshoot laser printers: self-tests and error codes (for laser printers with LCD displays).
Self-Tests
You can perform three tests to narrow down which assembly is causing the problem: the engine self-test, the engine half self-test, or the secret self-test. These tests, which the printer runs on its own when directed by the user, are internal diagnostics for printers, and they are included with most laser printers.
Engine Self-Test The engine self-test tests the print engine of the LaserJet, bypassing the formatter board. This test causes the printer to print a single page with vertical lines running its length. If an engine self-test can be performed, you know that the laser print engine can print successfully. To perform an engine self-test, you must press the printer’s self-test button, which is hidden behind a small cover on the side of the printer (see Figure 12.15). The location of the button varies from printer to printer, so you may have to refer to the printer manual. Using a pencil or probe, press the button, and the print engine will start printing the test page.
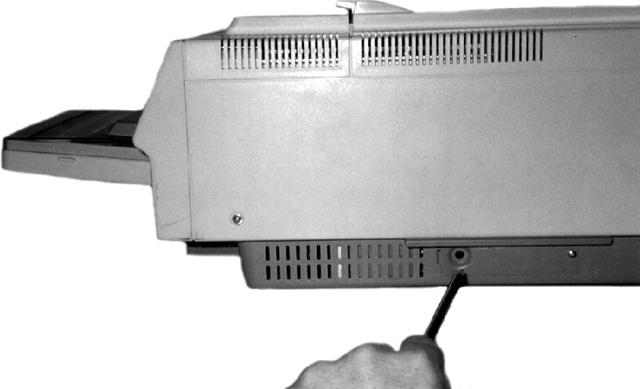
Figure 12.15 Print engine self-test button location. The location may vary on different printers.
Half Self-Test A print engine half self-test is performed the same way as the self-test, but you interrupt it halfway through the print cycle by opening the cover. This test is useful in determining which part of the print process is causing the printer to malfunction. If you stop the print process and part of a developed image is on the EP drum and part has been transferred to the paper, you know that the pickup rollers, registration rollers, laser scanner, charging roller, EP drum, and transfer roller are all working correctly. You can stop the half self-test at various points in the print process to determine the source of a malfunction.
Secret self-test To activate this test, you must first put the printer into service mode. To accomplish this, turn on the printer while simultaneously holding down the On Line, Continue, and Enter buttons (that’s the first secret part, because nobody knows it unless somebody tells them). When the screen comes up blank, release the keys and press, in order, Continue and then Enter. The printer will perform an internal self-test and then display 00 READY. At this point, you are ready to initiate the rest of the secret self-test. Take the printer offline by pressing the On Line button, press the Test button on the front panel, and hold the button until you see the 04 Self Test message. Then release the Test button. This will cause the printer to print one self-test page. (If you want a continuous printout, instead of releasing the Test button at the 04 Self Test message, keep holding the Test button. The printer will print continuous self-test pages until you power it off or press On Line or until it runs out of paper.)
Error Codes
In addition to the self-tests, you have another tool for troubleshooting HP laser printers. Error codes are a way for the LaserJet to tell the user (and a service technician) what’s wrong. Table 12.5 details some of the most common codes displayed on an HP LaserJet.
Table 12.5 HP LaserJet error messages
| Message | Description |
| 00 Ready | The printer is in standby mode and ready to print. |
| 02 Warming Up | The fuser is being warmed up before the 00 Ready state. |
| 05 Self-Test | A full self-test has been initiated from the front panel. |
| 11 Paper Out | The paper tray sensor is reporting that there is no paper in the paper tray. The printer will not print as long as this error exists. |
| 13 Paper Jam | A piece of paper is caught in the paper path. To fix this problem, open the cover and clear the jam (including all pieces of paper causing the jam). Close the cover to resume printing. The printer will not print as long as this error exists. |
| 14 No EP Cart | There is no EP cartridge (toner cartridge) installed in the printer. The printer will not print as long as this error exists. |
| 15 Engine Test | An engine self-test is in progress. |
| 16 Toner Low | The toner cartridge is almost out of toner. Replacement will be necessary soon. |
| 50 Service | A fuser error has occurred. This problem is most commonly caused by fuser lamp failure. Power off the printer, and replace the fuser to solve the problem. The printer will not print as long as this error exists. |
| 51 Error | There is a laser-scanning assembly problem. Test and replace, if necessary. The printer will not print as long as this error exists. |
| 52 Error | The scanner motor in the laser-scanning assembly is malfunctioning. Test and replace as per the service manual. The printer will not print as long as this error exists. |
| 55 Error | There is a communication problem between the formatter and the DC controller. Test and replace as per the service manual. The printer will not print as long as this error exists. |
Troubleshooting Tips for HP LaserJet Printers
Printer technicians usually use a set of troubleshooting steps to help them solve HP LaserJet printing problems. Let’s detail each of them to bring our discussion of laser printer troubleshooting to a close:
-
Is the exhaust fan operational? This is the first component to receive power when the printer is turned on. If you can feel air coming out of the exhaust fan, this confirms that AC voltage is present and power is turned on, that +5VDC and +24VDC are being generated by the AC power supply (ACPS), and that the DC controller is functional. If there is no power to the printer (no lights, fan not operating), the ACPS is at fault. Replacement involves removing all printer covers and removing four screws. You can purchase a new ACPS module, but it is usually cheaper to replace it with a rebuilt unit.
- Do the control panel LEDs work? If so, the formatter board can communicate with the control panel. If the LEDs do not light, it could mean that the formatter board is bad, the control panel is bad, or the wires connecting the two are broken or shorting out.
- Does the main motor rotate at power up? Turn off the power. Remove the covers from the sides of the printer. Turn the printer back on and carefully watch and listen for main motor rotation. If you see and hear the main motor rotating, this indicates that a toner cartridge is installed, all photo sensors are functional, all motors are functional, and the printer can move paper (assuming that there are no obstructions).
- Does the fuser heat lamp light after the main motor finishes its rotation? You will need to remove the covers to see this. The heat lamp should light after the main motor rotation and stay lit until the control panel says 00 Ready.
- Can the printer perform an engine test print? A sheet of vertical lines indicates that the print engine works. This test print bypasses the formatter board and indicates whether the print problem resides in the engine. If the test print is successful, you can rule out the engine as a source of the problem. If the test print fails, you will have to troubleshoot the printer further to determine which engine component is causing the problem.
- Can the printer perform a control panel self-test? This is the final test to ensure printer operation. If you can press the Test Page control panel button and receive a test printout, this means that the entire printer is working properly. The only possibilities for problems are outside the printer (interfaces, cables, and software problems).
Managing Print Jobs
Most people know how to send a job to the printer. Clicking File and then Print, or pressing Ctrl+P on your keyboard, generally does the trick. But once the job gets sent to the printer, what do you do if it doesn’t print?
When you send a job to the printer, that print job ends up in a line with all other documents sent to that printer. The line of all print jobs is called the print queue. In most cases, the printer will print jobs on a first-come, first-served basis. (There are exceptions if you’ve enabled printing priorities in Printer Properties.) Once you send the job to the printer in Windows, a small printer icon will appear in the system tray in the lower-right corner of your desktop, near the clock. By double-clicking it (or by right-clicking it and selecting the printer name), you will end up looking at the jobs in the print queue, like the one shown in Figure 12.16.

Figure 12.16 Print jobs in the print queue in Windows
In Figure 12.16, you can see that the first document submitted has an error, which may explain why it hasn’t printed. All of the other documents in the queue are blocked until the job with the error is cleared. You can clear it one of two ways. Either right-click on the document and choose Cancel or from the Document menu, shown in Figure 12.17, choose Cancel.
Figure 12.17 Printer Document menu in Windows
Note that from the menu that you see in Figure 12.17, you can pause, resume, restart, and cancel print jobs as well as see properties of the selected print job. If you wanted to pause or cancel all jobs going to a printer, you would do that from the Printer menu, as shown in Figure 12.18.
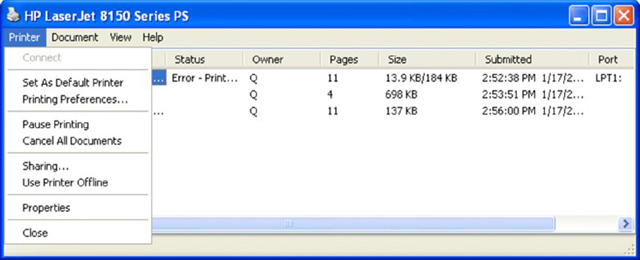
Figure 12.18 Printer menu in Windows
Once you have cleared the print job causing the problem, the next job will move to the top of the queue. It should show its status as Printing, like the one shown in Figure 12.19. But what if it shows that it’s printing but it still isn’t working? (We’re assuming that the printer is powered on, connected properly, and online.) It could be a problem with the print spooler.
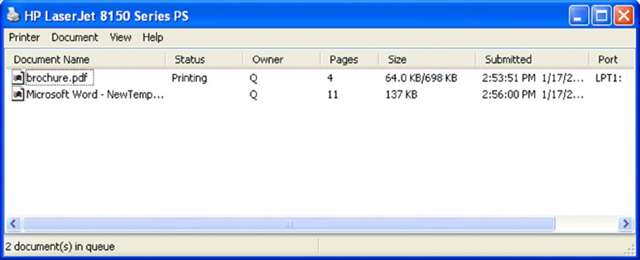
Figure 12.19 Print job printing correctly
Managing the Print Spooler
The print spooler is a service that formats print jobs in a language that the printer understands. Think of it as a holding area where the print jobs are prepared for the printer. In Windows, the spooler is a service that’s started automatically when Windows loads.
If jobs aren’t printing and there’s no apparent reason why, it could be that the print spooler has stalled. To fix the problem, you need to stop and restart the print spooler. Exercise 12.3 walks you through stopping and restarting the spooler in Windows 7.

Figure 12.20 Locating the Print Spooler service
If you have a different version of Windows, the steps to stop and restart the spooler are the same as in Exercise 12.3; the only difference might be in how you get to Computer Management.
Printing a Test Page
If your printer isn’t spitting out print jobs, it may be a good idea to print a test page and see if that works. The test page information is stored in the printer’s memory, so there’s no formatting or translating of jobs required. It’s simply a test to make sure that your printer hears your computer.
When you install a printer, one of the last questions it asks is if you want to print a test page. If there’s any question, go ahead and do it. If the printer is already installed, you can print a test page from the printer’s Properties window (right-click the printer and choose Printer Properties). Just click the Print Test Page button and it should work. If nothing happens, double-check your connections and stop and restart the print spooler. If garbage prints, there is likely a problem with the printer or the print driver.
Troubleshooting Networking Problems
As a technician, you are going to be called on to solve a variety of issues, including hardware, software, and networking problems. Networking problems can sometimes be the most tricky to solve considering that it could be either a software or a hardware problem or a combination of the two causing your connectivity issue.
The first adage for troubleshooting any hardware problem is to check your connections. That holds true for networking as well, but then your troubleshooting will need to go far deeper than that in a hurry. As with troubleshooting anything else, follow a logical procedure when troubleshooting and be sure to document your work.
Nearly all of the issues tested by CompTIA have something to do with connectivity, which makes sense because that’s what networking is all about. Connectivity issues, when not caused by hardware, are generally the result of a messed-up configuration. And because the most common protocol in use today, TCP/IP, has a lot of configuration options, you can imagine how easy it is to configure something incorrectly.
In the following sections, we’ll look at connectivity issues and how to resolve them. We’ll also review several tools that we’ve talked about elsewhere in the book but are handy for network troubleshooting as well.
Resolving Connectivity Issues
The whole purpose of using a network is to connect to other resources, right? So when networks don’t work like they’re supposed to, users tend to get a bit upset. With the explosion of wireless networking over the last several years, our job as technicians has only gotten more complicated. Let’s take a look at some common issues that you might run across and how to deal with them.
No Connectivity
Let’s start with the most dire situation: no connectivity. Taking a step back to look at the big picture, think about all of the components that go into networking. On the client side, you need a network card and drivers, operating system, protocol, and the right configuration. Then you have a cable of some sort or a wireless connection. At the other end is a switch or wireless router. That device connects to other devices, and so forth. The point is, if someone is complaining of no connectivity, there could be one of several different things causing it. So start with the basics.
The most common issue that prevents network connectivity on a wired network is a bad or unplugged patch cable. Cleaning crews and the rollers on the bottoms of chairs are the most common threats to patch cables. In most cases, wall jacks are placed 4 to 10 feet away from the desktop. The patch cables are normally lying exposed under the user’s desk, and from time to time damage is done to the cable or it’s inadvertently snagged and unplugged. Tightly cinching the cable while tying it up out of the way is no better a solution. Slack must be left in the cable to allow for some amount of equipment movement and to avoid altering the electrical characteristics of the cable. When you troubleshoot connectivity, start with the most rudimentary explanations first. Make sure that the patch cable is tightly plugged in, and then look at the card and check if any lights are on. If there are lights on, use the NIC’s documentation to help troubleshoot. More often than not, shutting down the machine, unplugging the patch and power cables for a moment, and then reattaching them and rebooting the PC will fix an unresponsive NIC.
If you don’t have any lights, you don’t have a connection. It could be that the cable is bad or that it’s not plugged in on the other side, or it could also be a problem with the NIC or the connectivity device on the other side. Is this the only computer having problems? If everyone else in the same area is having the same problem, that points to a central issue.
Most wireless network cards also have indicators on them that can help you troubleshoot. For example, a wireless card might have a connection light and an activity light, much like a wired network card. On one particular card we’ve used, the lights will alternate blinking if the card isn’t attached to a network. Once it attaches, the connection light will be solid and the link light will blink when it’s busy. Other cards may operate in a slightly different manner, so be sure to consult your documentation.
If you don’t have any lights, try reseating your cables and rebooting. It might also help to reseat the card. If you’re using a USB or ExpressCard wireless adapter, this is pretty easy. If it’s inside your desktop, it will require a little surgery. If it’s integrated into your laptop, you could have serious issues. Try rebooting first. If that doesn’t help, see if you can use an expansion NIC and make that one light up.
Let’s assume that you have lights and that no one else is having a problem. (Yes, it’s just you.) This means that the network hardware is probably okay, so it’s time to check the configuration. Open a command prompt, type IPCONFIG, and press Enter. You should get an IP address. (If it starts with 169.254.x.x, that’s an APIPA address. We’ll talk about those next.) If you don’t have a valid IP address, that’s the problem.
If you do have a valid IP address, it’s time to see how far your connectivity reaches. With your command prompt open, use the PING command to ping a known, remote working host. If that doesn’t work, start working backward. Can you ping the outside port of your router? The inside port? A local host? (Some technicians recommend pinging your loopback address first with PING 127.0.0.1 and then working your way out to see where the connectivity ends. Either way is fine. The advantage to starting with the loopback is that if it doesn’t work, you know nothing else will either.) Using this methodology, you’ll be able to figure out where your connectivity truly begins and ends.
APIPA and Link Local Addresses
As we talked about in Chapter 7, “Introduction to TCP/IP,” Automatic Private IP Addressing (APIPA) is a service that auto-configures your network card with an IP address. APIPA kicks in only if your computer is set to receive an IP address from the Dynamic Host Configuration Protocol (DHCP) server and that server doesn’t respond. You can always tell an APIPA address because it will be in the format of 169.254.x.x.
When you have an APIPA address, you will be able to communicate with other computers that also have an APIPA address but not with any other resources. The solution is to figure out why you’re not getting an answer from the DHCP server and fix that problem.
Link local addresses are the IPv6 version of APIPA, and link local addresses always start with fe80:: (they are in the fe80::/10 range).They will work to communicate with computers on a local network, but they will not work through a router. If the only IP address that your computer has is a link local one, you’re not going to communicate outside of your network. The resolution is the same as it is for APIPA.
IP Address Conflicts
Every host on a network needs to have a unique IP address. If two or more hosts have the same address, communication problems will occur. The good news is that nearly every operating system today will warn you if it detects an IP address conflict with your computer. The bad news is it won’t fix it by itself.
The communication problems will vary. In some cases, the computer will seem nearly fine, with intermittent connectivity issues. In others, it will appear as if you have no connectivity.
The most common cause of this is if someone configures a computer with a static IP address that’s part of the DHCP server’s range. The DHCP server, not knowing that the address has been statically assigned somewhere, doles out the address and now there’s a conflict. Rebooting the computer won’t help, and neither will releasing the address and getting a new lease from the DHCP server—it’s just going to hand out the same address again because it doesn’t know that there’s a problem.
As the administrator, you need to track down the offending user. A common way to do this is to use a packet sniffer to look at network traffic and determine the computer name or MAC address associated with the IP address in question. Most administrators don’t keep network maps of MAC addresses, but everyone should have a network map with hostnames. If not, it could be a long, tedious process to check everyone’s computer to find the culprit.
Limited or Local Connectivity
In a way, limited connectivity problems are a bit of a blessing. You can immediately rule out client-side hardware issues because they can connect to some resources. You just need to figure out why they can’t connect to others. This is most likely caused by one of two things: a configuration issue or a connectivity device (such as a router) problem.
Check the local configuration first. Use IPCONFIG /ALL to ensure that the computer’s IP address, subnet mask, and default gateway are all configured properly. After that, use the ping utility to see the range of connectivity. In situations like this, it’s also good to check with other users in the area. Are they having the same connectivity issues? If so, it’s more likely to be a central problem rather than one with the client computer.
Intermittent Connectivity
Under this heading, we’re going to consider intermittent connectivity, slow transfer speeds, and low radio frequency (RF) signals because they are all pretty similar.
On a wired network, if you run into slow speeds or intermittent connectivity, it’s likely a load issue. There’s too much traffic for the network to handle, and the network is bogging down. (You obviously don’t need to worry about RF signals on a wired network.) Solutions include adding a switch, replacing your hubs with switches, and even creating virtual LANs (VLANs) with switches. If the network infrastructure is old (for example, if it’s running on Category 3 cable or you only have 10Mbps switches), then it might be time for an upgrade.
Wireless networks can get overloaded too. It’s recommended that no more than 30 or so client computers use one wireless access point (WAP) or wireless router. Any more than that can cause intermittent access problems. The most common reason that users on wireless networks experience any of these issues though is distance. The further away from the WAP the user gets, the weaker the signal becomes. When the signal weakens, the transfer rates drop dramatically. For example, the signal from an 802.11g wireless router has a maximum range of about 300 feet barring any obstructions. At that distance though, 802.11g will support transfer rates of only 6Mbps—far less than the 54Mbps the users think they’re getting! The solution here is to move closer or install more access points. Depending on the configuration of your working environment, you could also consider adding a directional antenna to the WAP. It will increase the distance the signal travels, but only in a limited direction.
SSID Not Found
This is obviously a wireless problem, because wired networks don’t use service-set identifiers (SSIDs). If a client can’t find an SSID for a network it had previously joined, it’s possible that the router’s SSID has been changed. If you’re going to change an SSID, be sure to alert all users or technicians who might be affected. A second potential cause could be that the router is configured to not broadcast SSIDs. Some administrators will stop this broadcast, believing that doing so will increase the network security. It really doesn’t, because any semi-decent hacker with a wireless packet sniffer will pick it up—what it does best, though, is make it difficult for legitimate users to join the network. With all of that said, CompTIA A+ exam objectives list disabling SSID broadcasts as a security measure, so be aware of that. Just don’t expect it to secure the wireless network in real life.
A third potential cause is that the user’s computer is too far out of range. Get closer to the access point or wireless router and the signal should appear.
Using Network Troubleshooting Tools
The CompTIA A+ 220-901 exam will test you on your knowledge of troubleshooting tools for networks. There are two categories of tools that you need to know: hardware tools and software commands.
Hardware and Cabling Tools
We covered several different types of cables and their properties in Chapter 6, “Networking Fundamentals.” Here we will look at some tools that can be used to make or test network cables as well as a few tools to troubleshoot network connectivity issues.
Crimper
A crimper is a very handy tool for helping you put connectors on the end of a cable. Most crimpers will be a combination tool that strips and snips wires as well as crimps the connector on to the end. Figure 12.21 shows you one of these tools. You can also buy tools that are just cable strippers and cable snippers, but usually the point of cutting and stripping a cable is to put a connector on the end of it, so why not just get a crimper that does it all?
Figure 12.21 A UTP crimper
Multimeter
Multimeters are versatile electronic measuring tools. A multimeter can measure voltage, current, and resistance on a wire. There are a wide variety of types and qualities on the market, everywhere from economical $10 versions to ones that cost several thousand dollars. Figure 12.22 shows a basic multimeter.
Figure 12.22 A multimeter
Toner Probe
If you need to trace a wire in a wall from one location to another, a toner probe is the tool for you. Shown in Figure 12.23, it consists of two pieces: a tone generator and a probe. Because it’s so good at tracking, you will sometimes hear this referred to as a “fox and hound.”

Figure 12.23 A toner probe
To use a toner probe, attach one end to one end of the cable, such as the end at the computer. Then go to the patch panel with the other end of the probe to locate the cable. These are lifesavers when the cables are not properly labeled.
Cable Tester
Cable testers are indispensable tools for any network technician. Usually you would use a cable tester before you install a cable to make sure it works. Of course, you can test them after they’ve been run as well. A decent cable tester will tell you the type of cable, and more elaborate models will have connectors for multiple types of cables. Figure 12.24 shows a TRENDnet cable tester.
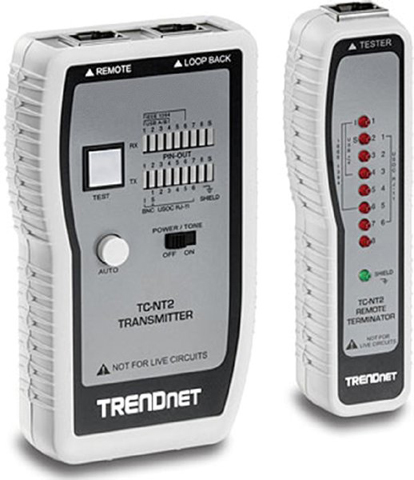
Figure 12.24 TRENDnet cable tester
Punch-Down Tool
If you’re working on a larger network installation, you might use a punch-down tool. It’s not a testing tool but one that allows you to connect (that is, punch down) the exposed ends of a wire into wiring harnesses, such as a 110 block (used many times in connectivity closets to help simplify the tangled mess of cables). Figure 12.25 shows the tool and its changeable bit.

Figure 12.25 A punch-down tool
Loopback Plug
A loopback plug is for testing the ability of a network adapter to send and receive. The plug gets plugged into the NIC, and then a loopback test is performed using troubleshooting software. You can then tell if the card is working properly or not. Figure 12.26 shows an Ethernet loopback plug, but they are made for fiber-optic NICs as well.
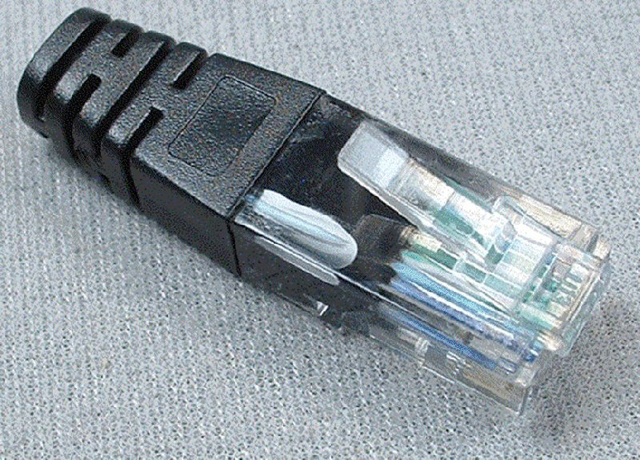
Figure 12.26 An Ethernet loopback plug
Wireless Locator
The one hardware tool that we didn’t talk much about earlier is a wireless locator. Specific tools for locating Wi-Fi networks and analyzing their traffic are indispensable today. A wireless locator or a Wi-Fi analyzer can be either a handheld hardware device, such as the one shown in Figure 12.27, or specialized software that is installed on a laptop and whose purpose is to detect and analyze Wi-Fi signals. Anyone interested in wardriving will definitely have one of these, but they’re also handy for locating wireless hot spots.
Figure 12.27 RF Explorer handheld wireless locator
Software Commands
Troubleshooting networks often involves using a combination of hardware tools and software commands. Usually, the software commands are easier to deal with because you don’t need to dig around physically in a mess of wires to figure out what’s going on. The downside to the software commands is that there can be a number of options that you need to memorize. In the following sections, we’ll cover the networking command-line tools, which you are expected to know for this exam: PING, IPCONFIG/IFCONFIG, TRACERT, NETSTAT, NBTSTAT,NET, NETDOM, and NSLOOKUP.
PING Command
The PING command is one of the most useful commands in the TCP/IP protocol. It sends a series of packets to another system, which in turn sends back a response. This utility can be extremely useful for troubleshooting problems with remote hosts. Pings are also called ICMP echo requests/replies because they use Internet Control Message Protocol (ICMP).
The PING command indicates whether the host can be reached and how long it took for the host to send a return packet. Across wide area network links, the time value will be much larger than across healthy LAN links.
The syntax for PING is ping hostname or ping IP address. Figure 12.28 shows what a ping should look like.
![Screenshot of a window shows C:Windowssystem32cmd.exe page indicating syntax for PING as Ping www.google.com [64.233.178.99] with 32 bytes of data.](http://images-20200215.ebookreading.net/22/4/4/9781119137856/9781119137856__comptia-a-complete__9781119137856__images__ec12f028.jpg)
Figure 12.28 A successful ping
As you can see, by pinging with the hostname, we found the host’s IP address thanks to DNS. The time is how long in milliseconds it took to receive the response. On a LAN, you want this to be 10 milliseconds (ms) or less, but 60ms to 65ms for an Internet ping isn’t too bad.
There are several options for the PING command, and you can see them all by typing ping /? at the command prompt. Table 12.6 lists some of the more useful ones.
Table 12.6 PING options
| Option | Function |
| -t | Persistent ping. Will ping the remote host until stopped by the client (by using Ctrl+C). |
| -n count | Specifies the number of echo requests to send. |
| -l size | Specifies the packet size to send. |
| ping -4 / ping -6 | Use either the IPv4 or IPv6 network explicitly. |
IPCONFIG Command
With Windows-based operating systems, you can determine the network settings on the client’s network interface cards, as well as any that a DHCP server has leased to your computer, by typing the following at a command prompt: IPCONFIG /ALL.
IPCONFIG /ALL also gives you full details on the duration of your current lease. You can verify whether a DHCP client has connectivity to a DHCP server by releasing the client’s IP address and then attempting to lease an IP address. You can conduct this test by typing the following sequence of commands from the DHCP client at a command prompt:
ipconfig /release
ipconfig /renew
IPCONFIG is one of the first tools to use when experiencing problems accessing resources because it will show you whether an address has been issued to the machine. If the address displayed falls within the 169.254.x.x category, this means that the client was unable to reach the DHCP server and has defaulted to Automatic Private IP Addressing (APIPA), which will prevent the network card from communicating outside its subnet, if not altogether. Table 12.7 lists useful switches for IPCONFIG.
Table 12.7 IPCONFIG switches
| Switch | Purpose |
| /ALL | Shows full configuration information |
| /RELEASE | Releases the IP address, if you are getting addresses from a Dynamic Host Configuration Protocol (DHCP) server |
| /RELEASE6 | Releases the IPv6 addresses |
| /RENEW | Obtains a new IP address from a DHCP server |
| /RENEW6 | Obtains a new IPv6 address from a DHCP server |
| /FLUSHDNS | Flushes the Domain Name System (DNS) server name resolver cache |
Figure 12.29 shows output from IPCONFIG, and Figure 12.30 shows you the output from IPCONFIG /ALL.
Figure 12.29 IPCONFIG output
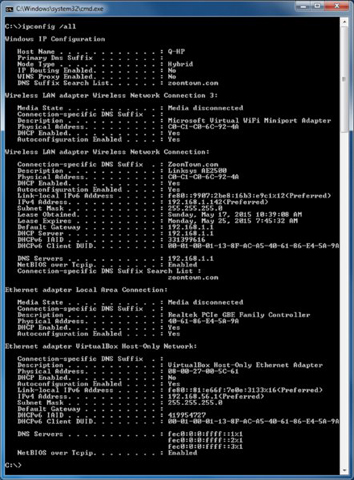
Figure 12.30 IPCONFIG /ALL output
In Exercise 12.4, you will renew an IP address on a Windows 7/Vista system within the graphical interface. Exercise 12.5 shows you how to renew your lease from the command line.
While Windows provides this interface to troubleshoot connection problems, some administrators still prefer the reliability of a command-line interface. Exercise 12.5 shows you how to perform a similar action using the command line.
TRACERT Command
TRACERT (trace route) is a Windows-based command-line utility that enables you to verify the route to a remote host. Execute the command TRACERT hostname, where hostname is the computer name or IP address of the computer whose route you want to trace. Tracert returns the different IP addresses the packet was routed through to reach the final destination. The results also include the number of hops needed to reach the destination. If you execute the TRACERT command without any options, you see a help file that describes all of the TRACERT switches.
This utility determines the intermediary steps involved in communicating with another IP host. It provides a road map of all the routing an IP packet takes to get from host A to host B.
Timing information from TRACERT can be useful for detecting a malfunctioning or overloaded router. Figure 12.31 shows what a TRACERT output looks like. In addition to TRACERT, there are many graphical third-party network-tracing utilities available on the market.
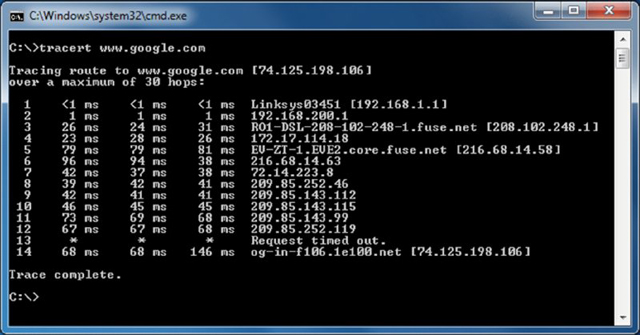
Figure 12.31 TRACERT output
NETSTAT Command
The NETSTAT command is used to check out the inbound and outbound TCP/IP connections on your machine. It can also be used to view packet statistics, such as how many packets have been sent and received and the number of errors.
When used without any options, the NETSTAT command produces output similar to what you see in Figure 12.32, which shows all of the outbound TCP/IP connections.

Figure 12.32 NETSTAT output
There are several useful command-line options for NETSTAT, as shown in Table 12.8.
Table 12.8 NETSTAT options
| Option | Function |
| -a | Displays all connections and listening ports. |
| -b | Displays the executable involved in creating each connection or listening port. In some cases, well-known executables host multiple independent components, and in these cases the sequence of components involved in creating the connection or listening port is displayed. In this case, the executable name is in brackets at the bottom [ ]. At the top is the component it called, in sequence, until TCP/IP was reached. Note that this option can be time consuming, and it will fail unless you have sufficient permissions. |
| -e | Displays Ethernet statistics. This may be combined with the -s option. |
| -f | Displays fully qualified domain names (FQDNs) for foreign addresses. |
| -n | Displays addresses and port numbers in numerical form. |
| -o | Displays the owning process ID associated with each connection. |
| -p proto | Shows connections for the protocol specified by proto; proto may be any of the following: TCP, UDP, TCPv6, or UDPv6. If used with the -s option to display per-protocol statistics, proto may be IP, IPv6, ICMP, ICMPv6, TCP, TCPv6, UDP, or UDPv6. |
| -r | Displays the routing table. |
| -s | Displays per-protocol statistics. By default, statistics are shown for IP, IPv6, ICMP, ICMPv6, TCP, TCPv6, UDP, and UDPv6; the -p option may be used to specify a subset of the default. |
NBTSTAT Command
NBTSTAT is a command that shows NetBIOS over TCP/IP information. While not used as often as other entries in this category, it can be useful when trying to diagnose a problem with NetBIOS name resolution. The /? parameter can be used to see the available switches. Sample output from this command is shown in Figure 12.33.
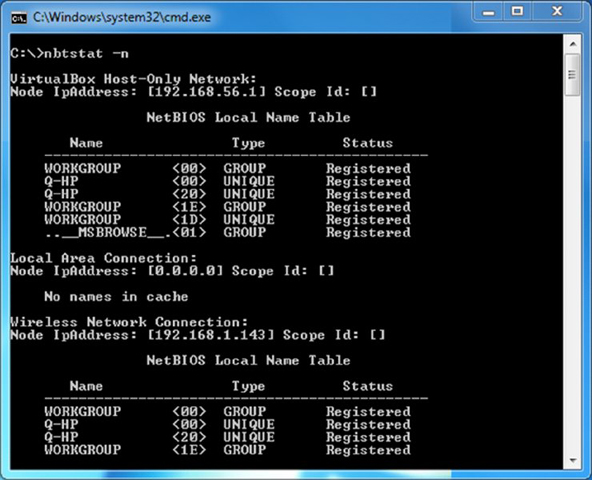
Figure 12.33 NBTSTAT –n output
NET Command
Depending on the version of Windows you are using, NET can be one of the most powerful commands at your disposal. While all Windows versions include a NET command, its capabilities differ based on whether it is used on a server or workstation and the version of the operating system.
While always command-line based, this tool allows you to do almost anything that you want with the operating system.
Table 12.9 shows common NET switches.
Table 12.9 NET switches
| Switch | Purpose |
| NET ACCOUNTS | Set account options (password age, length, and so on). |
| NET COMPUTER | Add and delete computer accounts. |
| NET CONFIG | See network-related configuration. |
| NET CONTINUE, NET PAUSE, NET START, NET STATISTICS, and NET STOP | Control services. |
| NET FILE | Close open files. |
| NET GROUP and NET LOCALGROUP | Create, delete, and change groups. |
| NET HELP | See general help. |
| NET HELPMSG | See specific message help. |
| NET NAME | See the name of the current machine and user. |
| NET PRINT | Interact with print queues and print jobs. |
| NET SEND | Send a message to user(s). |
| NET SESSION | See session statistics. |
| NET SHARE | Create a share. |
| NET TIME | Set the time to that of another computer. |
| NET USE | Connect to a share. |
| NET USER | Add, delete, and see information about a user. |
| NET VIEW | See available resources. |
These commands are invaluable troubleshooting aids when you cannot get the graphical interface to display properly. You can also use them when interacting with hidden ($) and administrative shares that do not appear within the graphical interface.
The NET command used with the SHARE parameter enables you to create shares from the command prompt, using this syntax:
NET SHARE <share_name>=<drive_letter>:<path>
To share the C:EVAN directory as SALES, you would use the following command:
NET SHARE SALES=C:EVAN
You can use other parameters with NET SHARE to set other options. Table 12.10 summarizes the most commonly used parameters, and Exercise 12.6 will give you some experience with the NET SHARE command.
Table 12.10 NET SHARE parameters
| Parameter | Purpose |
| /DELETE | Stop sharing a folder. |
| /REMARK | Add a comment for browsers. |
| /UNLIMITED | Set the user limit to Maximum Allowed. |
| /USERS | Set a specific user limit. |
Figure 12.34 Shares on the local computer Figure 12.35 NET SHARE output with a new shared drive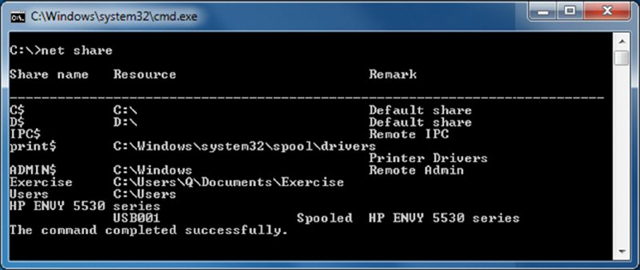
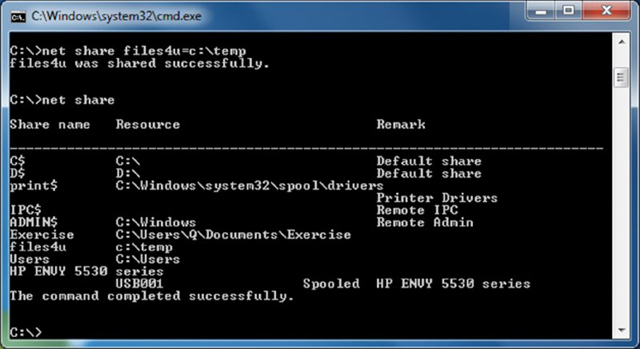
The NET /? command is basically a catch-all help request. It will instruct you to use the NET command in which you are interested for more information.
NETDOM Command
NETDOM is a tool first included with Windows Server 2008 that provides Active Directory management capabilities, specifically domain and trust management. In order to run NETDOM, you must have administrative privileges. NETDOM allows an administrator to perform the following tasks:
- Rename a computer that is a member of a domain.
- Join a client computer (Windows XP or newer) to a Windows domain.
- Manage computer accounts within a domain, such as adding or removing computers, changing the organizational unit (OU) for the computer, or moving a computer from one domain to another.
- Establishing and managing trust relationships between domains.
Most of the actions for which NETDOM is used are relatively advanced Windows Server administrator functions, so it’s a bit surprising to see this command on the A+ exam. For the purposes of the exam, think of NETDOM as the command you would use to manage computer accounts (not user accounts) and membership in domains.
NSLOOKUP Command
One of the key things that must take place to use TCP/IP effectively is that a hostname must resolve to an IP address—an action usually performed by a DNS server.
NSLOOKUP is a command that enables you to verify entries on a DNS server. You can use the NSLOOKUP command in two modes: interactive and noninteractive. In interactive mode, you start a session with the DNS server in which you can make several requests. In noninteractive mode, you specify a command that makes a single query of the DNS server. If you want to make another query, you must type another noninteractive command.
To start nslookup in interactive mode (which is what most admins use because it allows them to make multiple requests without typing NSLOOKUP several times), type NSLOOKUP at the command prompt and press Enter. You will receive a greater than prompt (>) and can then type in the command that you want to run. You can also type HELP or ? to bring up the list of possible commands, as shown in Figure 12.36. To exit nslookup and return to a command prompt, type EXIT and press Enter.
Figure 12.36 Starting NSLOOKUP and using help
To run NSLOOKUP in noninteractive mode, you would use the NSLOOKUP command option you want to run at the command prompt. Examples would be NSLOOKUP /SET TIMEOUT=<3> or NSLOOKUP /VIEW:DOMAIN.
Summary
In this chapter, we discussed hardware and network troubleshooting. First we looked at general hardware troubleshooting. We investigated the causes for hardware problems, such as excessive heat, and signs of problems, such as noise, odors, and visible damage. We also discussed alerts and status lights.
After the discussion of general hardware, we talked about issues specific to internal components, including the motherboard, CPU, RAM, power supply, storage systems, and video cards. Next we covered problems that are unique to laptop computers. Because of their compact nature, they have unique issues relating to heat, power, and input and output. Laptops also typically have built-in wireless networking, which is a blessing but occasionally needs to be fixed.
We followed that with a discussion on troubleshooting printers. Specifically, we discussed problems with three major classes of printers, including dot matrix, inkjet, and laser, and then we talked about managing print jobs, the print spooler, and printing a test page.
Finally, we ended the chapter with a section on troubleshooting issues that are specific to networking. We talked about connectivity issues and looked at tools and commands that you can use to troubleshoot network problems.
Exam Essentials
Understand what happens during the POST routine. During the power-on self-test (POST), the BIOS checks to ensure that the base hardware is installed and working. Generally, one POST beep is good. Any more than that and you might have an error.
Understand the types of symptoms that misbehaving hardware can cause. Hardware problems cause symptoms that include excessive heat, noise, odors, and visible damage. Some devices can also warn of problems with status light indicators or alerts.
Know how to stop and restart the print spooler. Open the Services applet of Computer Management. Find Print Spooler on the right side. Right-click it and click Stop, or highlight it and click the Stop square above the list of services. To restart it, right-click and select Start or click the Start triangle above the list of services.
Understand what to do for laptop video issues. If you have no video, you can try an external monitor or try toggling the LCD cutoff switch. For screens that are too dim or too bright, you can raise and lower the brightness by using the Fn key plus the appropriate function key on your keyboard.
Know what to check if your wireless networking card isn’t working. Make sure the card has lights indicating that it’s working. You might also have an external toggle switch to turn the card on and off. Finally, if your computer has an external RJ-45 connection, you can plug it in and see if it works when wired.
Know how to set IP addresses on a printer. The IP address can often be obtained automatically from a DHCP server, but this is not recommended for corporate networks. Instead, you may be able to use the printer’s control panel, Telnet, or printer management software to configure the IP address.
Know what could cause the printer to print garbage. Most often, the print driver causes this. Deleting and reinstalling it should fix the problem. A defective formatter board can also cause it.
Understand what could cause print-quality issues on a dot-matrix printer. Print-quality issues are generally related to either the ribbon or the print head. The specific problem you are having will help determine the culprit.
Know what can cause unevenly spaced lines or characters on a dot-matrix or inkjet printer. A failing stepper motor usually causes this. For line spacing problems, it’s the main stepper motor. For character spacing, it will be the carriage stepper motor.
Know what causes printers to have paper jams. In a dot-matrix printer, jams are usually caused by material getting into the rollers, such as extra perf from the tractor-feed paper. On inkjets and laser printers, worn pickup rollers often cause this problem.
Know what the IPCONFIG, PING, and TRACERT commands are used for. Both IPCONFIG and PING are network troubleshooting commands. You can use IPCONFIG to view your computer’s IP configuration and PING to test connectivity between two network hosts. TRACERT allows you to view the network path a packet takes from the host to the destination.
Know what the NETSTAT, NBTSTAT, NET, NETDOM, and NSLOOKUP commands are used for. NETSTAT shows network statistics, NBTSTAT shows NetBIOS over TCP/IP information, NET allows you to perform network management tasks such as sharing folders, NETDOM is used for network domain administration, and NSLOOKUP allows you to query a DNS server.
Understand what various networking hardware tools are used for. A cable tester allows you to verify that a cable works, loopback plugs test the functionality of network cards, punch-down tools connect wires to frames such as a 110 block, tone generators allow you trace a cable from one point to another, wire strippers and crimpers are for cutting and putting the ends on network cables, and a wireless locator helps you find wireless network signals.
Review Questions
The answers to the chapter review questions can be found in Appendix A.
-
If the video on your laptop is not working, what should you do to troubleshoot it? (Choose two.)
- Toggle the video function key.
- Try using an external monitor.
- Remove the display unit and reattach it.
- Power the system off and back on.
-
While inspecting a motherboard, you notice a discolored area. What usually causes this?
- Spilled liquid
- Improper manufacture
- Power surge
- Underclocking
-
You need to connect a client computer to a shared network drive from the command prompt. Which command should you use?
- NET USE
- NETSTAT
- NSLOOKUP
- IPCONFIG
-
Every computer has a diagnostic program built into its BIOS called the _____________.
- CMOS
- BIOS
- POST
- DNS
-
While troubleshooting a client computer, you decide to obtain a new IP address from the DHCP server. After releasing the existing address, which command do you use to get new IP information from the DHCP server?
- IPCONFIG /REFRESH
- IPCONFIG /RENEW
- IFCONFIG /RELEASE
- IFCONFIG /START
-
Users are complaining that their print jobs are not printing. You open the print queue and see 50 jobs lined up. The printer is connected properly and online. What should you do?
- Open Printer Troubleshooting and have it diagnose the problem.
- Stop and restart the print spooler.
- Delete and reinstall the printer.
- Delete and reinstall Windows.
-
What two devices are commonly used to cool components within a PC? (Choose two.)
- Fans
- Compressed air
- Freon
- Heat sinks
-
You are having problems with the video card in one of your computers. Where could you check for troubleshooting information?
- Another computer with the same video card
- The video card manufacturer’s website
- The manual that came with the card
- The server log
-
Your laser printer keeps printing vertical black lines on its output pages. What is the most likely cause of the problem?
- There is a groove or scratch in the EP drum.
- The EP drum-cleaning blade is broken.
- The printer is low on toner.
- The transfer corona wire is not working properly.
-
The display on your laptop appears warped and fuzzy. You plug in an external monitor, and the image on it is fine. What is the most likely cause of the problem?
- The video card
- The LCD display
- The motherboard
- The video driver
-
You have an inkjet printer. Recently, papers are being printed with excessive amounts of ink, and the ink is smearing. What is the most likely cause of the problem?
- A faulty ink cartridge
- A corrupt print driver
- A faulty fuser
- Too much humidity in the air
-
You are working with a system that is assigned IP configuration information from a central server. You wish to view the IP information on the system. Which of the following commands would you use from the command prompt?
- IPCONFIG /REFRESH
- IPCONFIG /ALL
- IPCONFIG /RENEW
- WINIPCFG /ALL
-
When you print documents on your laser printer, you see residue from previous images on the output. What two things are the most likely causes of this problem? (Choose two.)
- A faulty transfer corona wire
- An overheating printer
- A bad erasure lamp
- A broken cleaning blade
-
You turn a computer on, but nothing shows up on the monitor. Instead of one beep, you hear one long beep followed by three short beeps. What is the problem?
- The video card is dead.
- The motherboard is dead.
- The BIOS is not functioning.
- Not enough information; you need to look up the beep code to determine the problem.
-
Which of the following Windows command-line utilities is used to verify the route a data packet takes to a remote host?
- Trace
- Tracert
- TraceRoute
- Tracepacket
-
You turn a computer on and it doesn’t boot up properly. From inside the case, you hear a rhythmic ticking sound. What is most likely the problem?
- The motherboard
- The power supply fan
- The hard drive
- The video card
-
You support an old dot-matrix printer at work. When the printer prints, there is always a blank horizontal line in the middle of each line of output. What is the most likely cause of the problem?
- The print ribbon is old and needs to be replaced.
- The print ribbon is not advancing properly.
- The print head needs to be replaced.
- The wrong print driver is installed.
-
A user calls saying that his laptop won’t power on. He charged it all night, so he knows that the battery is fine. What should you have him do first?
- Plug the laptop in using an AC adapter and try to power it on.
- Replace the battery with a spare and try to power it on.
- Toggle the battery power switch on the front of the laptop, and then try to power it on.
- Send the laptop in for service.
-
You suspect a faulty network card on a client machine. Which tool can you use to test your hypothesis?
- Wireless locator
- Cable tester
- Toner probe
- Loopback plug
-
You are troubleshooting a server and discover that one of the hard drives in the RAID 0 array has failed. Which statement is true?
- You need to replace the failed drive, but the data is okay because it is configured as a mirror.
- You need to replace the failed drive, but the data is okay because it is configured as a disk stripe with parity.
- You need to replace the failed drive, and the data on the array is lost.
- You do not need to replace the failed drive; the system will function normally.
Performance-Based Question
You will encounter performance-based questions on the A+ exam. The questions on the exam require you to perform a specific task, and you will be graded on whether or not you were able to complete the task. The following requires you to think creatively in order to measure how well you understand this chapter’s topics. You may or may not see similar questions on the actual A+ exams. To see how your answers compare to the authors’, refer to Appendix B.
Your network users are sending print jobs to the printer, but they are stacking up in the queue and not printing. The printer appears to be online and has paper. How would you stop and restart the print spooler in Windows 7?