
Chapter 16
Working with Windows 7
THE FOLLOWING COMPTIA A+ 220-902 EXAM OBJECTIVES ARE COVERED IN THIS CHAPTER:
- ✓ 1.1 Compare and contrast various features and requirements of Microsoft Operating Systems (Windows 7).
- Features: 32-bit vs. 64-bit; Aero, gadgets, user account control, bit-locker, shadow copy, system restore, ready boost, compatibility mode, easy transfer, administrative tools, defender, Windows firewall, Action Center
- Upgrade paths – differences between in place upgrades, compatibility tools, Windows upgrade OS advisor
- ✓ 1.2 Given a scenario, install Windows PC operating systems using appropriate methods.
- Boot methods: USB, CD-ROM, DVD, PXE
- Types of installations: Upgrade, Clean install, Image deployment
- ✓ 1.4 Given a scenario, use appropriate Microsoft operating system features and tools.
- Administrative: Local Users and groups, Local security policy, System configuration, Component services, Data sources, Print management, Windows memory diagnostics, Windows firewall, Advanced security
- Other: User State Migration Tool (USMT), Windows Easy Transfer
- ✓ 1.5 Given a scenario, use Windows Control Panel utilities.
- HomeGroup
- ✓ 1.6 Given a scenario, install and configure Windows networking on a client/desktop.
- HomeGroup vs. WorkGroup
- Network shares/administrative shares/mapping drives
- Printer sharing vs. network printer mapping
- Establish network connections: VPN, Dialups, Wireless, Wired, WWAN (Cellular)
- Proxy settings
- Remote Desktop Connection
- Home vs. Work vs. Public network settings
- Firewall settings: Exceptions, Configuration, Enabling/disabling Windows firewall
- Configuring an alternate IP address in Windows: IP addressing, Subnet mask, DNS, Gateway
- Network card properties: Half duplex/full duplex/auto, Speed, Wake-on-LAN, QoS, BIOS (on-board NIC)
In the previous three chapters, we looked at operating systems in general and then focused on Windows 8/8.1. This chapter focuses on Windows 7 exclusively: the second of the three operating systems that you need to know well for the 220-902 exam.
Some of the tools covered in this chapter have been touched on in previous chapters, but care has been taken to avoid redundancy whenever possible. Be certain that you know the specifics of Windows 7 and the differences in how this operating system stands out from its predecessors.
Windows 7 Editions
Windows 7 was released in six different editions, only three of which were made available in the retail channel: Windows 7 Home Premium, Windows 7 Professional, and Windows 7 Ultimate. In addition to these, there is also Windows 7 Enterprise, which offers the same features as Ultimate (more than Professional), and it is licensed with a Software Assurance contract and not available in the retail channel. Windows 7 Starter was created for OEMs to install on netbooks. The sixth edition, Windows 7 Home Basic, was marketed only in emerging technology countries.
Table 16.1 lists the five domestic editions of Windows 7 for feature comparison purposes.
Table 16.1 Windows 7 features and editions
| Edition | Maximum RAM Supported | Maximum Physical CPUs Supported (Multiple Cores) | Notes |
| Starter | 2GB (x86) | 1 | Lacks support for Aero, cannot join a Windows Server domain, no parental controls, Remote Desktop client only, can join HomeGroup but not create |
| Home Premium | 16GB | 1 | Includes support for multitouch, cannot join a Windows Server domain, Remote Desktop client only, can join or create HomeGroup |
| Professional | 192GB | 2 | Can join a Windows server domain, includes Remote Desktop Server, includes EFS, includes Windows XP Mode, can create HomeGroup if not domain joined, supports offline files/folders and Group Policy |
| Enterprise | 192GB | 2 | Includes BitLocker, not available in retail or OEM channels (volume licensing only), includes Multilingual User Interface (MUI), can create HomeGroup if not domain joined, supports offline files/folders and Group Policy |
| Ultimate | 192GB | 2 | Includes BitLocker, available in retail and OEM channels, includes MUI, can create HomeGroup if not domain joined, supports offline files/folders and Group Policy. Functionally identical to Enterprise. |
There are 32-bit and 64-bit versions available for each of the editions listed except Starter. Except where indicated, the RAM support in the table is for the 64-bit versions. As a successor to Windows Vista, Microsoft released Windows 7 with the key goals of overcoming the sluggishness in Vista as well as the incompatibilities with applications written for previous versions.
Table 16.2 lists a number of features associated with the Windows 7 operating system that CompTIA wants you to know for the exam, along with a brief description of each.
Table 16.2 Windows 7 features
| Feature | Significance |
| Aero | The Aero interface offers a “glass” design that includes translucent windows. It was new with Windows Vista and is available in every edition of Windows 7 except Starter. |
| Gadgets | These are mini programs, introduced with Windows Vista, which can be placed on the Desktop, allowing them to run quickly and personalize the PC (clock, weather, and so on). Windows 7 renamed these Windows Desktop Gadgets (right-click on the Desktop, click Gadgets in the context menu, and then double-click on the one that you want to add). Figure 16.2 shows an example of the gadgets. |
| Sidebar | Windows Vista had an area known as the Sidebar that was designed for gadgets and could be placed on the Desktop. Windows 7 did away with the Sidebar, and the gadgets are now placed directly on the Desktop. Interestingly enough, though, SIDEBAR .EXE is the program that runs if any gadgets are running. |
| User Account Control | The UAC is intended to prevent unintentional/unauthorized changes to the computer either by prompting for permission to continue or requiring the administrator password before continuing. Changes to this from Windows Vista allow for more granular control over how UAC intercedes. |
| BitLocker | BitLocker allows you to use drive encryption to protect files, including those needed for startup and logon. This is available only with Windows 7 in the Enterprise and Ultimate editions and is shown in Figure 16.3. |
| Shadow Copy | The Volume Shadow Copy Service creates copies from which you can recover should a file be accidentally deleted or overwritten. Windows 7 adds to Vista by including an interface for configuring storage used by volume shadow copies. The Properties dialog box for a file contains a Previous Versions tab that can be used to return to another version of the file. |
| ReadyBoost | This feature allows you to use free space on a removable drive to speed up a system by caching content. In Windows 7, it can work with a USB drive, flash memory, SD card, or CompactFlash drive. Up to eight devices can employ ReadyBoost in Windows 7 (each needing a minimum of 256MB of free space). ReadyBoost is configured from the ReadyBoost tab of the Properties for the removable media device. |
| Compatibility Mode | Program Compatibility is included with Windows 7 to configure programs to believe that they are running with an older version of Windows: Choose Start ➢ Control Panel ➢ Programs, and then click Run Programs Made For Previous Versions of Windows. |
| XP Mode | The ability to run applications in Windows XP Mode (XPM) is included with Windows 7 Professional, Enterprise, and Ultimate. This is a virtual client (emulating Windows XP Professional with Service Pack 3), and you must download and install Windows Virtual PC to use it. This can be downloaded from the Windows Virtual PC site at:
http://windows.microsoft.com/en-US/windows7/install-and-use-windows-xp-mode-in-windows-7 You should have 2GB RAM and 15GB hard drive space for each virtual Windows instance. |
| Windows Defender | Windows 7 includes the Windows Defender antispyware program. |
| Windows Firewall | Windows 7 incorporates Windows Firewall, which can be used to stop incoming and outgoing traffic. There are only three basic settings: On, Off, and Block All Incoming Connections. |

Figure 16.1 The Winver dialog box shows the current operating system and service pack.
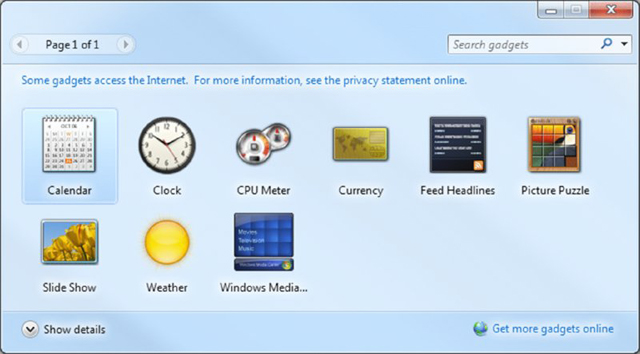
Figure 16.2 The default desktop gadgets.

Figure 16.3 Windows BitLocker can encrypt files and folders.
For removable drives, BitLocker To Go provides the same encryption technology to help prevent unauthorized access to the files stored on them.
While most of the items in Table 16.2 are specifically listed in the objectives, you should also know these other key features of Windows 7:
Jump lists This is a quick way to access files that you’ve been working on through their association with the application that has been using them. Right-click on the application and a list of current files appears.
Pinning to the Taskbar The context menu for each application allows you to choose whether you want to pin (add) it to the Taskbar or remove it if it is already there.
Windows Taskbar This has been redesigned to include thumbnail previews.
Snap Also known as Aero Snap, this is a quick way to resize windows on the Desktop and work with side-by-side apps. Windows will remember sizes and locations of the apps and allow you to work with them much simpler than was possible in the past, allowing for true side-by-side multitasking.
HomeGroup This is a simplified way to set up a home network. It allows you to share files and prevent changes from being made to those files by those sharing them (unless you give them permission to do so).
Windows Search Instantly find anything on your PC as soon as you start typing into the search box.
Windows Touch This feature adds touchscreen functionality to the operating system, allowing you to make selections without using a keyboard or mouse.
Libraries You can logically (as opposed to physically) group files and folders that are not in the same location and make them appear as if they are. For example, suppose that you have to rewrite four chapters of a book. There can be one chapter stored in a folder beneath C:BOOK, another beneath C:REWRITES, and images beneath C:USERSPUBLICPICTURES, and all can be grouped into a library so that when you open C:A_PLUS, all of the entities appear to be beneath it.
Installing Windows 7
Like every operating system, Windows 7 requires more (newer, better, and so forth) hardware than the previous version. If you are planning to install Windows 7 on an older machine, you will want to verify that you can do so before you start. Make sure that the hardware on which you plan to install Windows 7 can support the OS.
If you are installing an operating system on more than one computer, it is always worth the effort to master an automated tool that can simplify this process. In the case of Windows 7, Microsoft has released the Microsoft Assessment and Planning (MAP) Toolkit, which can be downloaded from the Microsoft Download Center (www.microsoft.com/downloads). Using this tool, you can get an inventory of computers on your network and plan a rollout of this operating system. The current version of MAP (9.2) requires a dual core 1.5Hz or faster processor, 2GB of RAM, 1GB of free hard drive space, a network adapter card, and a graphics adapter that supports 1024×768 or higher resolution.
Windows 7 can be installed as an upgrade or a clean installation, which is accomplished with the Custom option (think custom = clean). When you choose Custom, you can choose whether or not to format the hard disk. If you choose not to format the hard disk, the old operating system is placed in a folder called WINDOWS.OLD; if you choose to format, the Custom option will erase your files, programs, and settings. On a standard, default installation, the BOOT directory holds the boot file configuration for Windows.
The installation can be started from an installation disc or from a download (preferably to a USB drive). If the installation does not begin immediately on boot-up, look for the SETUP.EXE file and run it. When the Install Windows page appears, click Install Now.
You’ll be asked if you want to get any updates (recommended) and to accept the license agreement. After you’ve done so, choose Custom (advanced) for the installation type and specify where you want to install Windows (C: is the most common). Follow the steps to walk through the remainder of the installation. It is highly recommended that after the installation is complete, you run Windows Update to get the latest system updates and drivers.
You will need to activate Windows 7. Activation is required, but registration is not. You have 30 days in which to do the activation or Windows 7 will stop working. All that you truly need to complete the process is the product key.
Upgrading to Windows 7
If you want to do an upgrade instead of a clean installation, then review the upgrade options in Table 16.3 (it is worth noting that a “No” does not mean that you can’t buy the upgrade version of Windows 7 but rather that you can’t keep your files, programs, and settings).
Table 16.3 Windows 7 upgrade options
| Existing Operating System | Windows 7 Home Premium 32-bit | Windows 7 Home Premium 64-bit | Windows 7 Professional 32-bit | Windows 7 Professional 64-bit | Windows 7 Ultimate 32-bit | Windows 7 Ultimate 64-bit |
| Windows XP | No | No | No | No | No | No |
| Windows Vista Starter 32-bit | No | No | No | No | No | No |
| Windows Vista Starter 64-bit | No | No | No | No | No | No |
| Windows Vista Home Basic 32-bit | Yes | No | No | No | Yes | No |
| Windows Vista Home Basic 64-bit | No | Yes | No | No | No | Yes |
| Windows Vista Home Premium 32-bit | Yes | No | No | No | Yes | No |
| Windows Vista Home Premium 64-bit | No | Yes | No | No | No | Yes |
| Windows Vista Business 32-bit | No | No | Yes | No | Yes | No |
| Windows Vista Business 64-bit | No | No | No | Yes | No | Yes |
| Windows Vista Ultimate 32-bit | No | No | No | No | Yes | No |
| Windows Vista Ultimate 64-bit | No | No | No | No | No | Yes |
There are additional versions of Windows Vista that are not shown in Table 16.3 because they do not offer an upgrade to Windows 7; that is, you must buy the full version of Windows 7. It should be noted that an easy way to remember the upgrade options for the exam is that you must have at least Windows Vista in order to be able to upgrade to Windows 7. In the real world, the Windows Vista machine should be running Service Pack 1 at a minimum, and you can always take an earlier OS and upgrade it to Vista SP1 and then upgrade to Windows 7.
Microsoft created the Windows 7 Upgrade Advisor to help with the upgrade to this operating system. You can download the advisor from www.microsoft.com/downloads. It will scan your hardware, devices, and installed programs for any known compatibility issues. Once it is finished, it will give you advice on how to resolve the issues found and recommendations on what to do before you upgrade. The reports are divided into three categories: System Requirements, Devices, and Programs. Figure 16.4 shows the opening screen.

Figure 16.4 Run the Windows 7 Upgrade Advisor before beginning the upgrade of a machine.
Figure 16.5 shows an example of a report generated by the Windows 7 Upgrade Advisor.

Figure 16.5 Incompatibilities are highlighted by the Windows 7 Upgrade Advisor.
After all incompatibilities have been addressed, the upgrade can be started from an installation disc or from a download (preferably to a USB drive). If the setup routine does not begin immediately on boot, look for the SETUP.EXE file and run it. When the Install Windows page appears, click Install Now.
You’ll be asked if you want to get any updates (recommended) and to accept the license agreement. After you’ve done so, choose Upgrade for the installation type and follow the steps to walk through the remainder of the installation. It is highly recommended that after the installation is complete, you run Windows Update to get the latest drivers.
Microsoft Windows User State Migration Tool (USMT) allows you to migrate user file settings related to the applications, Desktop configuration, and accounts. Version 4.0 works with Windows 7, but it is currently only available as part of the Windows Automated Installation Kit (WAIK). USMT 5.0 works with all of the migrations that CompTIA’s exam covers, and more discussion of it can be found at the following location:
https://technet.microsoft.com/en-us/library/hh824913.aspx
If all you are doing is a simple migration from one OS to another, you do not need this tool, but it is invaluable during large deployments. Of course, you also don’t need to use this tool if you chose the Upgrade option and are doing an in-place upgrade because user files and applications are preserved.
If you are migrating only a few accounts, Microsoft recommends Windows Easy Transfer (WET) instead of USMT. When you’re transferring to Windows 7, a version of Windows Easy Transfer can be downloaded in either 32-bit or 64-bit versions for Windows Vista from www.microsoft.com/downloads.
Upgrading Editions of Windows 7
Like Windows Vista, Windows 7 has the ability to upgrade at any time from one edition of the operating system to a higher one (for example, from Home Premium to Professional) using the Windows Anytime Upgrade utility in Control Panel (it can also be accessed by clicking the Start button and choosing All Programs. Scroll down the list and choose Windows Anytime Upgrade). Figure 16.6 shows the opening screen of this utility.
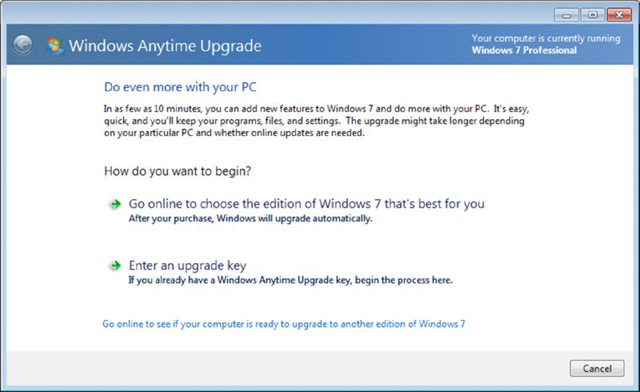
Figure 16.6 Change to a higher edition of Windows 7 using Windows Anytime Upgrade.
Installation/Upgrade Boot Options
You can begin the installation or upgrade process by booting from a number of sources. There are four in particular with which CompTIA wants you to be familiar: CD-ROM, DVD, USB, and PXE. The one most commonly used for an attended installation is the CD-ROM/DVD boot (they are identical). Because Windows 7 only comes on DVD, though, the CD-ROM option applies to older operating systems and not this one. You can boot a PC over the network (rather than from a DVD, USB, or hard disk) with Windows Preinstallation Environment (WinPE), which is a stub operating system that creates a Pre-boot Execution Environment (PXE).
WinPE can be installed onto a bootable CD, USB, or network drive using the COPYPE .CMD command. This can be used in conjunction with a Windows deployment from a server for unattended installations and also to host the Windows Recovery Environment (WinRE).
As was discussed with other operating systems, you want to make certain that you use the latest driver software and Windows updates that are applicable for the operating system you are running. This can solve a great many problems with security holes as well as solve compatibility issues. Make certain, as well, that the boot drive is properly formatted and partitions are correct for your desired setup. Remember that a recovery partition, factory or otherwise, can be used to recover the operating system in the event of a failure.
The Windows 7 Boot Sequences
Both for the exam and for real life, you should know how to recognize common problems with the OS and make certain it is booting correctly. The sections that follow look at a number of topics related to keeping your OS booting and running properly.
Key Boot Files
Windows 7 requires only a few files, each of which performs specific tasks. These mirror the files required for Windows Vista and differ significantly from the files required for previous Windows operating systems. They are discussed next in the order in which they load:
BOOTMGR The Windows Boot Manager (BOOTMGR) bootstraps the system. In other words, this file starts the loading of an OS on the computer.
BCD The Boot Configuration Data (BCD) holds information about OSs installed on the computer, such as the location of the OS files.
WINLOAD.EXE The program used to boot Windows 7. It loads the operating system kernel (NTOSKRNL.EXE).
WINRESUME.EXE If the system is not starting fresh but resuming a previous session, then WINRESUME.EXE is called by the BOOTMGR.
NTOSKRNL.EXE The Windows OS kernel.
System files In addition to the previously listed files, Windows needs a number of files from its system directories (for example, SYSTEM and SYSTEM32), such as the hardware abstraction layer (HAL.DLL), session manager (SMSS.EXE), user session (WINLOGON.EXE), and security subsystem (LSASS.EXE).
Windows 7 Features
There are a number of features that make Windows 7 notable. In the following sections, we will look first at some of the tools and focus on the ones that you need to know for the A+ exam.
Tools in Windows 7
The tools that stand out in Windows 7, and that CompTIA expects you to know for the exam, include System Restore, Windows Defender, Windows Firewall, and Action Center. Each of these are discussed in the sections that follow.
System Restore
Chapter 13, “Operating System Basics,” explored System Restore as it appears in all three versions of Windows. It allows you to restore the system to a previous point in time. This feature is accessed from Start ➢ All Programs ➢ Accessories ➢ System Tools ➢ System Restore, and it can be used to roll back as well as to create a restore point. Figure 16.7 shows the opening dialog box.
After clicking Next, pick a restore point to return to, as shown in Figure 16.8.

Figure 16.7 System Restore in Windows 7
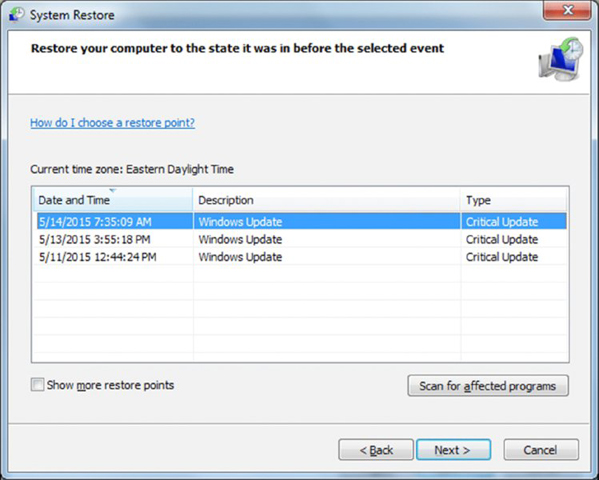
Figure 16.8 Choosing a restore point in Windows 7
Windows Defender
Windows Defender can identify spyware, and it is included with all versions of Windows 7 (with small/large icons, choose Start ➢ Control Panel ➢ Windows Defender). As with similar programs, for Windows Defender to function properly, you need to keep the definitions current and scan on a regular basis.
Windows Firewall
Windows Firewall (with small/large icons, choose Start ➢ Control Panel ➢ Windows Firewall) is used to block access from the network, and in Windows 7, it is divided into separate settings for private networks and public networks as well as domain networks if you’re connected to a domain (see Figure 16.9). If you are using Category view (instead of small/large icons), you have to click System and Security before getting to the Firewall.
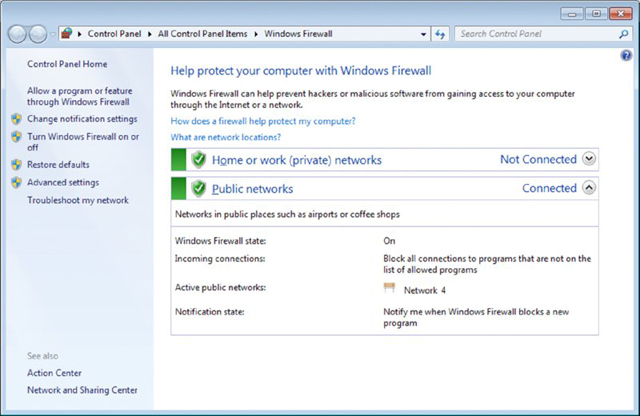
Figure 16.9 Windows Firewall in Windows 7
While host-based firewalls are not as secure as other types of firewalls, Windows Firewall provides much better protection than in previous versions of Windows and it is turned on by default. It is also included in the Security component of the Action Center (discussed in the next section) and can be tweaked significantly using the advanced settings. Once you click Advanced Settings, Windows Firewall with Advanced Security opens (see Figure 16.10).

Figure 16.10 Windows Firewall with Advanced Security in Windows 7
Here you can configure inbound and outbound rules as well as import and export policies and monitor the security of your system. Monitoring is not confined to the firewall; you can also monitor security associations and connection security rules. In short, Windows Firewall with Advanced Security is an incredibly powerful tool that builds upon what Windows Vista started. Not only can this MMC snap-in do simple configuration, but it can also configure remote computers and work with Group Policy.
Firewall logging is not on by default in Windows 7. In Exercise 16.1, we will look at the firewall log settings in Windows 7 and turn them on.

Figure 16.11 Windows Firewall custom logging options
Exceptions
Exceptions are configured as variations from the rules. Windows Firewall will block incoming network connections except for the programs and services that you choose to allow through. For example, you can make an exception for Remote Assistance to allow communication from other computers when you need help (the scope of the exception can be set to allow any computer, only those on the network, or computers from a custom list of allowed addresses that you create). Exceptions can include programs as well as individual ports.
Configuration
Most of the configuration is done as network connection settings. You can configure both ICMP and Services settings. Examples of ICMP settings include allowing incoming echo requests, allowing incoming router requests and redirects. Examples of services often configured include FTP Server, Post Office Protocol Version 3 (POP3), and Web Server (HTTP).
Enabling/Disabling Windows Firewall
In Windows 7, clicking Turn Windows Firewall on or off gives you control over the firewall for each location. While it is possible to choose to turn it off, it is not recommended: as the name implies, this turns Windows Firewall completely off. You can also toggle to block all incoming connections and to be notified when Windows Firewall blocks a new program.
Action Center
What was previously known as the Security Center has been modified in Windows 7 to become the Action Center (Start ➢ Control Panel ➢ Action Center). This interface (shown in Figure 16.12) still includes security, but it has been expanded to include such maintenance issues as problem reports and backup settings.
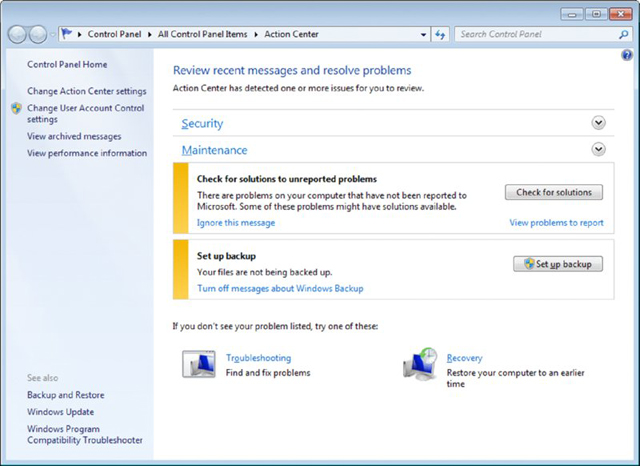
Figure 16.12 Action Center in Windows 7
The Security settings show the status of, and allow you to configure, the firewall, Windows Update, virus protection, spyware and unwanted software protection, Internet security settings, UAC, and network access protection. The solutions portion of Maintenance rolls in the problem reporting features from earlier versions of Windows. In Windows 7, there are four options for error reporting settings that can be chosen:
- Automatically check for solutions (recommended)
- Automatically check for solutions and send additional data, if needed
- Each time a problem occurs, ask me before checking for solutions
- Never check for solutions (not recommended)
The setting that you want can be configured in Problem Report Settings (under Maintenance, click Settings). The administrator may choose to set one universal setting for the machine (not the default) or allow each user to make their own setting (the default), as shown in Figure 16.13.

Figure 16.13 Configuring Windows error reporting options in Windows 7
Windows 7 Administrative Tools
There are a number of system tools included with Windows 7 that you need to know for the exam. These administrative tools, discussed in the order they appear in the objectives, also include Windows Firewall and Advanced Security, previously covered in this chapter.
Local Users and Groups
You can use Computer Management to access Users and Groups. As an administrator, you can also configure the users and groups on a system in the Microsoft Management Console (MMC). Click Start, type MMC in the Search box, and press Enter. If Local Users And Groups is not visible in the left pane, choose File ➢ Add/Remove Snap-in, and then select Local Users And Groups from the list of possible snap-ins and click Add (or double-click on it). You can choose to manage the local computer or another computer (requiring you to provide its address). Figure 16.14 shows the default groups and explanations for each. The built-in groups for a domain are a superset of this set.
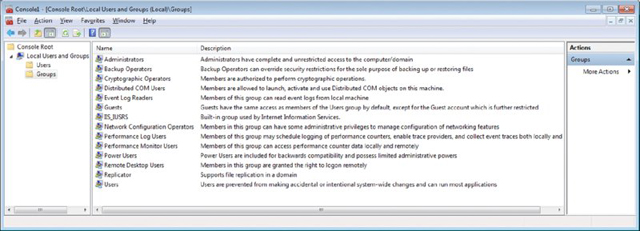
Figure 16.14 Default groups in Windows 7
Local Users And Groups is not available for Windows 7 editions lower than Professional. In all other editions, you must manage user accounts using the User Accounts applet in Control Panel, and you cannot create or manage groups. The default users created are Administrator, Guest, and the administrative account created during the install.
Local Security Policy
Local Security Policy (choose Start ➢ Run and then enter secpol.msc) allows you to set the default security settings for the system. This feature is not available for Windows 7 in any editions other than Windows 7 Professional, Windows 7 Ultimate, and Windows 7 Enterprise. Figure 16.15 shows the utility. A scenario in which you would use this tool is when you want to change the default system settings for many security-related features hidden deep within the Registry.
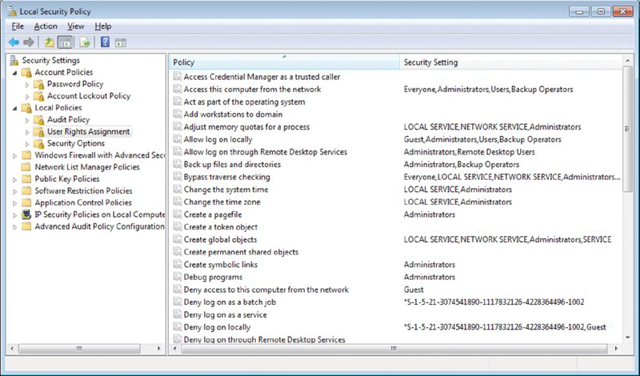
Figure 16.15 Local Security Policy in Windows 7
The following sections examine some of the Security Settings choices.
Account Policies
Account Policies further divides into Password Policy and Account Lockout Policy. The following choices are available under Password Policy:
Enforce Password History This allows you to require unique passwords for a certain number of iterations. The default number is 0, but it can go as high as 24.
Maximum Password Age The default is 42 days, but values range from 0 to 999.
Minimum Password Age The default is 0 days (the password can be changed immediately), but values range from 0 to 998.
Minimum Password Length The default is 0 characters (meaning no passwords are required), but you can specify a number up to 14.
Password Must Meet Complexity Requirements The default is disabled. When this is turned on, the password must include at least three of the following elements: uppercase characters, lowercase characters, numerical characters, nonalphanumeric characters, and Unicode characters.
Store Password Using Reversible Encryption The default is disabled. When enabled, it provides support for applications that require knowledge of the password.
Because the likelihood of laptops being stolen always exists, it’s strongly encouraged that you use good password policies for this audience and security locks. Here’s an example:
- Enforce Password History: 8 passwords remembered
- Maximum Password Age: 42 days
- Minimum Password Age: 3 days
- Minimum Password Length: 6 to 8 characters
The default for domain machines is that complexity requirements be enabled. It is a good idea, and accepted practice, to do so.
Account Lockout Policy
The Account Lockout Policy setting is divided into the following three values:
Account Lockout Duration This is a number of minutes ranging from 1 to 99999. A value of 0 is also allowed here, and it signifies that the account never unlocks itself—administrator interaction is always required.
Account Lockout Threshold This is the number of invalid attempts before lockout occurs. The default is 0 (meaning that the feature is turned off). The settings for invalid attempts range from 1 to 999. A number greater than 0 changes the values of the two associated options to 30 minutes; otherwise, they are “not defined.”
Reset Account Lockout Counter After This is a number of minutes, ranging from 1 to 99999, that each failed login attempt remains on the counter.
When you’re working with a mobile workforce, you must weigh the choice of users calling you in the middle of the night when they’ve forgotten their password against keeping the system from being entered if the wrong user picks up the laptop. A good recommendation for a medium to low security environment may be to use a lockout after five attempts for a period of time between 30 and 60 minutes.
Local Policies Settings
The Local Policies section is divided into three subsections:
Audit Policy The Audit Policy section contains nine settings; the default value for each is No Auditing. Valid options are Success and/or Failure. The Audit Account Logon Events entry is the one you should consider turning on for mobile users to see how often they log in and out of their machines. When auditing is turned on for an event, the entries are logged in the Security log file.
User Rights Assignment The User Rights Assignment subsection of Local Policies is where the meat of the old System Policies comes into play. User Rights Assignment has many options, most of which are self-explanatory. Not Defined indicates that no one is specified for this operation. You can add groups and users. If you want to “remove” users or groups from the list, use the Remove button to do so. The Power User group has no more rights than a standard user in Windows 7; the group has only been left to provide backward compatibility.
Security Options The Security Options section includes a great many options, which for the most part are Registry keys. The default for each is usually Not Defined.
System Configuration
The System Configuration tool (MSCONFIG.EXE) in Windows 7 is unchanged from Windows Vista. The five tabs it offers are General, Boot, Services, Startup, and Tools. The tools, and the executables associated with them, are as follows:
- About Windows: WINVER.EXE
- Change UAC Settings: USERACCOUNTCONTROLSETTINGS.EXE
- Action Center: WSCUI.CPL
- Windows Troubleshooting: CONTROL.EXE /NAME MICROSOFT.TROUBLESHOOTING
- Computer Management: COMPMGMT.MSC
- System Information: MSINFO32.EXE
- Event Viewer: EVENTVWR.EXE
- Programs: APPWIZ.CPL
- System Properties: CONTROL.EXE SYSTEM
- Internet Options: INETCPL.CPL
- Internet Protocol Configuration: IPCONFIG.EXE
- Performance Monitor: PERFMON.EXE
- Resource Monitor: RESMON.EXE
- Task Manager: TASKMGR.EXE
- Command Prompt: CMD.EXE
- Registry Editor: REGEDT32.EXE
- Remote Assistance: MSRA.EXE
- System Restore: RSTRUI.EXE
Each of these should be considered troubleshooting utilities that you can use to solve system problems. Know what they do and the executable associated with each to solve the majority of problems that you will encounter when working with Windows 7.
Component Services
Component Services is an MMC snap-in in Windows 7 that allows you to administer, as well as deploy, component services and configure behavior like security. Figure 16.16 shows an example of the interface (Start ➢ Control Panel ➢ Administrative Tools ➢ Component Services).
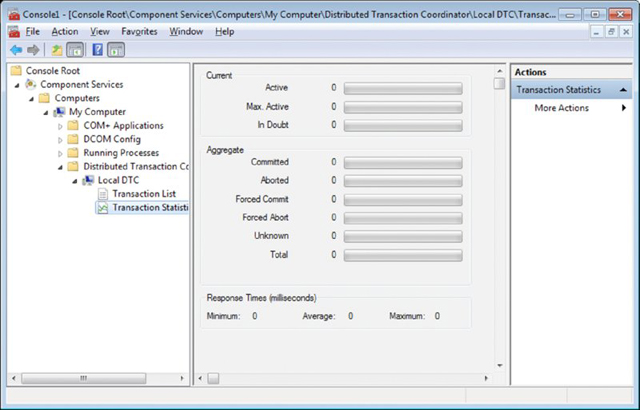
Figure 16.16 Component Services in Windows 7
Data Sources
ODBC Data Source Administrator—Start ➢ Control Panel ➢ Administrative Tools ➢ Data Sources (ODBC)—allows you to interact with database management systems. Figure 16.17 shows an example of the screen.

Figure 16.17 Data Sources in Windows 7
Database drivers that are added to the system will show up here and can be shared between applications.
Print Management
Carrying over from Windows Vista, Print Management (Start ➢ Control Panel ➢ Administrative Tools ➢ Print Management) allows you to manage multiple printers and print servers from a single interface (see Figure 16.18).

Figure 16.18 Print Management in Windows 7
Print Management is not available for Windows 7 in any edition lower than Windows 7 Professional. In all other editions, you must manage individual printers using the Printers applet in Control Panel, and you are very limited in what you can manage.
Windows Memory Diagnostics
The Windows Memory Diagnostics Tool (Start ➢ Control Panel ➢ Administrative Tools ➢ Windows Memory Diagnostics) can be used to check a system for memory problems. For the tool to work, the system must be restarted. The two options that it offers are to restart the computer now and check for problems or to wait and check for problems on the next restart.
When the computer reboots, the test will take several minutes and the display screen will show which pass number is being run and the overall status of the test (percent complete). When the memory test concludes, the system will restart again and nothing related to it is apparent until you log in. If the test is without error, you’ll see a message that no errors were found. If any issues have been detected, the results will be displayed.
Unique Control Panel Utilities
There are four Control Panel applets unique to Windows 7 of which you should be aware. One of these, Action Center, was addressed earlier in this chapter. The other three are discussed here and include HomeGroup, RemoteApp And Desktop Connections, and Troubleshooting.
HomeGroup
The purpose behind HomeGroup (Start ➢ Control Panel ➢ HomeGroup) is to simplify home networking and, more specifically, the sharing of files and printers. Windows 7 Starter can only join a HomeGroup, while all other editions of Windows 7 can both join and create a HomeGroup. The location from which you network must be set to Home.
Shared files can include libraries (a big feature of Windows 7). All computers participating in the HomeGroup must be running Windows 7 or Windows 8/8.1 (but not Vista), and the network cannot extend outside of the small group.
RemoteApp and Desktop Connections
This applet (Start ➢ Control Panel ➢ RemoteApp And Desktop Connections) in Windows 7 is used, as the name implies, to access remote computers and virtual machines made available over the network through port 3389 can run a remote application as if it were installed on the local machine. RemoteApp can be used directly to the host, and it can also be used through Remote Desktop Web Access, which uses HTTPS as a transport at the client end. The applications and virtual machines are hosted on Windows 2008 and 2008 R2 servers.
For the exam, remember that all versions of Windows 7 support outgoing connections but only Professional, Enterprise, and Ultimate can be used for hosting. To enable a remote connection, click Start, right-click Computer, click Properties, and then choose Remote Settings. You can now turn on Remote Assistance and/or Remote Desktop.
Remote Assistance is either on or off, while Remote Desktop offers three options:
- Don’t allow connections to this computer
- Allow connections from computers running any version of Remote Desktop (less secure)
- Allow connections only from computers running Remote Desktop with Network Level Authentication (more secure)
Troubleshooting
This applet (Start ➢ Control Panel ➢ Troubleshooting) in Windows 7 is used, as the name implies, to provide a simple interface to use to attack many common problems. Figure 16.19 shows the opening screen.
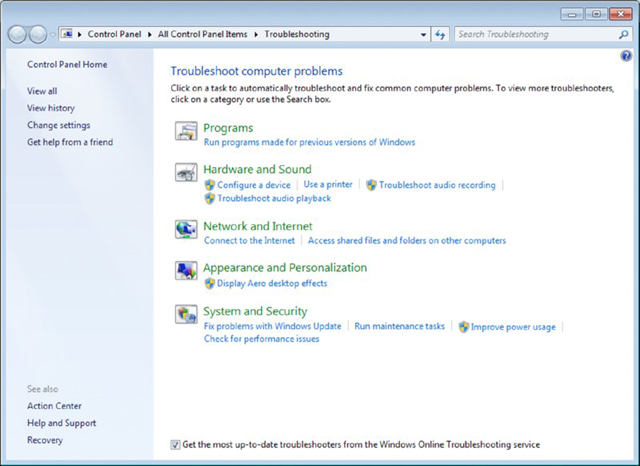
Figure 16.19 The Troubleshooting applet in Windows 7
All links preceded by a shield require administrator permissions to run, and they are often tied to UAC prompts before they will continue. Most of the problems found will be “automatically fixed” without any prompts. For example, clicking the link Improve Power Usage on the machine shown in Figure 16.19 started the Power troubleshooter, which then fixed problems. Clicking to see the detailed report of what was done brings up the screen shown in Figure 16.20.

Figure 16.20 Report of the Power troubleshooter’s changes
Note in Figure 16.17 the link Get Help From A Friend. Selecting this brings up Remote Assistance, allowing someone to connect to this computer. You can also offer to be the one helping another, as shown in Figure 16.21.
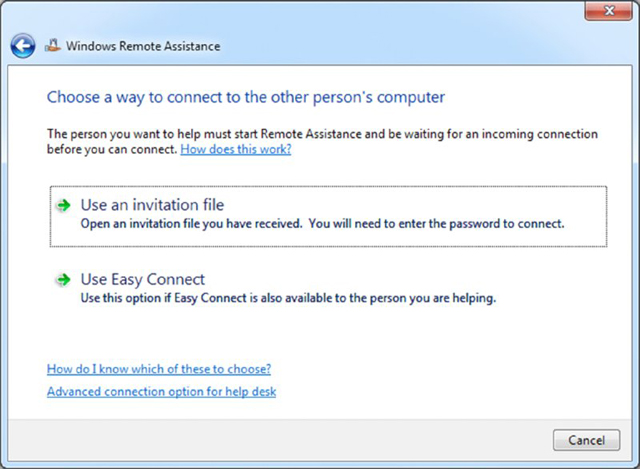
Figure 16.21 Windows Remote Assistance in Windows 7
Networking and Windows 7
There are a number of things CompTIA expects you to know when it comes to the topic of networking and Windows 7. Most of the networking topics are covered in the chapters dedicated to that, and thus the discussion here is limited only to those topics specifically tied to Windows 7.
Connection option choices are shown in Table 16.4.
Table 16.4 Network connection options
| Option | Purpose |
| Connect to the Internet | Use for connection to a proxy server or other device intended to provide Internet access. This includes wireless, broadband, and dial-up. |
| Set up a wireless router or access point | If the wireless device will be connected to this machine, this is the option to use. |
| Manually connect to a wireless network (this option is only visible if a wireless adapter is installed) | If you have a wireless network already in place and the device (router and so forth) is not directly connected to this machine, then use this option. |
| Set up a wireless ad hoc (computer-to-computer) network (this option is only visible if a wireless adapter is installed) | This is meant for peer-to-peer resource sharing, and it is typically a temporary connection. |
| Set up a dial-up connection | If you live in the middle of nowhere and the only way to access a network is by using a dial-up modem, then this is the option to select. |
| Connect to a workplace | If you need to connect to a virtual private network (VPN) from a remote location, this is the option to use. |
Regardless of which option you choose, you will need to fill out the appropriate fields for the device to be able to communicate on the network. With TCP/IP, required values are an IP address for the host, a subnet mask, an address for the gateway, and DNS information.
You also need to specify one of the types of locations for this network: Home, Work, or Public. If you choose one of the first two, network discovery is on by default, allowing you to see other computers and other computers to see you. If you choose Public, network discovery is turned off.
Configuring an Alternative IP Address in Windows
Windows 7, Windows Vista, and Windows 8/8.1 all allow the use of an alternate IP address. This is an address that is configured for the system to use in the event the first choice is not available. For an alternate configuration to be set, the first choice has to be dynamic—the tab becomes visible only when the General configuration is set to Obtain An IP Address Automatically, and the alternate is used only if the primary address cannot be found/used, such as when the DHCP server is down.
The Properties dialog box for each instance of IPv4, on any of the Windows operating systems on which this exam is focused, contains an Alternate Configuration tab. To make changes, you must click on it.
IP Addressing
Two radio buttons exist on the Alternate Configuration tab: Automatic Private IP Address and User Configured. The default is the first, meaning that the alternate address used is one in the APIPA range (169.254.x.x). Selecting User Configured requires you to enter a static IP address to be used in the IP Address field. The entry entered must be valid for your network in order for it to be usable.
Subnet Mask
When the User Configured radio button is chosen on the Alternate Configuration tab, you must enter a value in the Subnet mask field. This value must correspond with the subnet values in use on your network and work with the IP address you enter in the IP Address field.
DNS
When the User Configured radio button is chosen on the Alternate Configuration tab, you should enter values in the Preferred DNS Server and Alternate DNS Server fields. These entries are needed in order to translate domain names into IP addresses.
Gateway
When the User Configured radio button is chosen on the Alternate Configuration tab, you must enter a value in the Default Gateway field. This value must correspond with the subnet values and the IP address that you enter. This address identifies the router to be used to communicate outside the local network.
Network Card Properties
Like other devices, network cards can be configured to optimize performance. Configuration is done through the Properties dialog box for each card.
Half Duplex / Full Duplex / Auto
Duplexing is the means by which communication takes place:
- With full duplexing, everyone can send and receive at the same time. The main advantage of full-duplex over half-duplex communication is performance. NICs can operate twice as fast in full-duplex mode as they do normally in half-duplex mode.
- With half duplexing, communications travel in both directions but in only one direction at any given time. Think of a road where construction is being done on one lane—traffic can go in both directions but in only one direction at a time at that location.
- With auto duplexing, the mode is set to the lowest common denominator. If a card senses that another card is manually configured to half duplex, then it also sets itself to that.
Speed
You can configure whether the card should run at its highest possible setting or not. You often need to be compatible with the network on which the host resides. If, for example, you are connecting a workstation with a 10/100BaseT card to a legacy network, you will need to operate at 10MBps to match the rest of the network.
Wake-on-LAN
Wake on LAN (WoL) is an Ethernet standard implemented via a card that allows a “sleeping” machine to awaken when it receives a wakeup signal.
PoE
If the device that you are networking is in a remote location (such as a wireless access point in a ceiling or other place with no easy access to an electrical outlet), Power over Ethernet (PoE) is a handy technology to supply both power and an Ethernet connection. The purpose of Power over Ethernet (PoE) is pretty much described in its name: Electrical power is transmitted over twisted-pair Ethernet cable (along with data). A key advantage of PoE is that a UPS is required only in the main facility instead of at each device.
QoS
Quality of Service (QoS) implements packet scheduling to control the flow of traffic and help with network transmission speeds. No properties can be configured for the service itself.
Configuring Windows Networking
Given a scenario of configuring Windows networking on a client/desktop, many of the networking features and settings we’ve been discussing will apply. There are, however, a few more to be cognizant of:
HomeGroup vs. WorkGroup As mentioned in Chapter 13, there are three types of networks to choose from: Workgroup, HomeGroup, and Domain. HomeGroups have been covered, but workgroups are those that utilize a peer-based model: there is no central controller and every computer has a set of user accounts. All computers are on the same subnet and there are typically very few computers (20 or less).
Domain Setup As opposed to a HomeGroup or workgroup, with a domain one (or more) computer(s) act as a server and controls the security for the network. There can be many (think thousands) of computers on a domain and a user can access it from any machine as long as they have the credentials to do so whether or not they have an account on that individual workstation or not.
Windows 7 System Performance and Optimization
Windows 7 went beyond Windows Vista in configurability, and it allows you to choose between four UAC settings:
- Always Notify
- Notify me only when programs try to make changes to my computer (the default)
- Notify me only when programs try to make changes to my computer (do not dim my desktop)
- Never Notify
To access the Change User Account Control settings, click Start ➢ Control Panel ➢ User Accounts ➢ Change User Account Control Settings. This opens the slider shown in Figure 16.22.
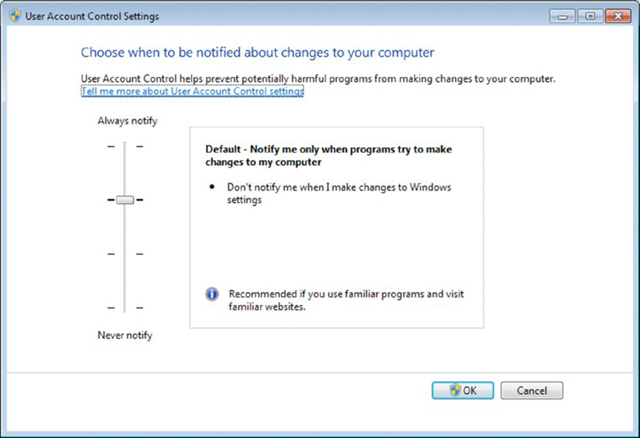
Figure 16.22 Changing UAC settings in Windows 7
Encrypting File System (EFS) is available in the Professional, Enterprise, and Ultimate editions of Windows 7. It allows for the encryption/decryption of files stored in NTFS volumes. EFS can be used by all users (whereas BitLocker can be turned on only by administrators) and does not require any special hardware. While BitLocker benefits from the Trusted Platform Module (TPM), it doesn’t need it; it can also be operated using a USB key to store the encryption keys. Last, EFS can encrypt just one file, if so desired, while BitLocker encrypts the whole volume and whatever is stored on it. EFS can be used in conjunction with BitLocker to increase security further.
Given the appropriate scenario, there are many instances in which an administrator would want to access the User Accounts applet in the Control Panel (shown in Figure 16.23). Not to be confused with the similarly named User Account Control (UAC) settings that you can change from here, from this umbrella-like applet you can also change passwords, manage file encryption certificates and link online IDs.
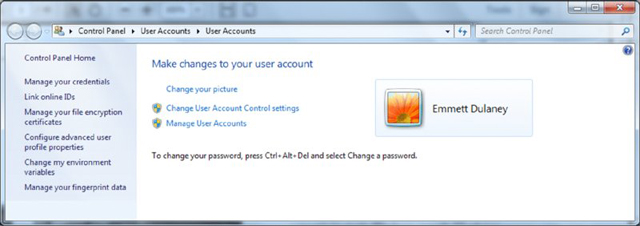
Figure 16.23 The User Accounts applet in Windows 7
Given another scenario, it can be necessary to access the Programs and Features applet in the Control Panel (shown in Figure 16.24) to add or remove programs. From here, you can see update information, check out the version numbers of programs, the amount of space they are occupying, and run repairs.
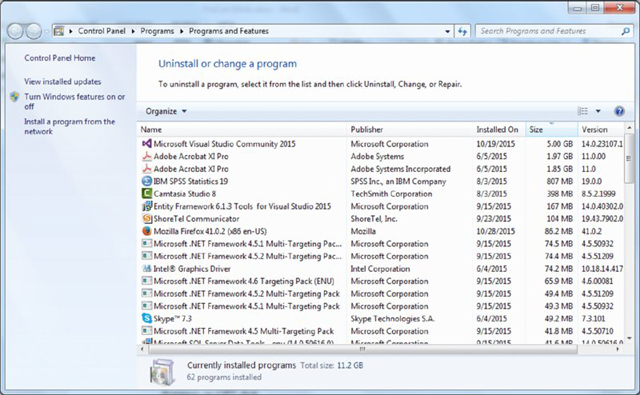
Figure 16.24 The Programs and Features applet in Windows 7
Summary
This chapter focused on Windows 7. This is one of the three Windows operating systems covered on the exam, and CompTIA expects you to be familiar with it and be able to answer questions on everything from installing it to managing it.
We looked at the various features of Windows 7, some that exist in other versions of Windows and some that are unique to this operating system. The latter category includes HomeGroup, Action Center, RemoteApp And Desktop Applications, and Troubleshooting.
Exam Essentials
Know what types of installations are possible with Windows 7. You should know which operating systems can be upgraded to Windows 7 and which require a clean installation.
Understand upgrading. You should know that a custom installation either wipes the old system or replaces the existing system, putting the old files into WINDOWS.OLD. Applications have to be reinstalled and user data has to be migrated from the old system using WET or USMT. An upgrade preserves the existing applications and the user data, moving them into the new system.
Know the editions of Windows 7. Windows 7 Starter was created for netbooks. The retail channel options are Windows 7 Home Premium, Windows 7 Professional, and Windows 7 Ultimate. Windows 7 Enterprise is available only through volume licensing.
Know what Control Panel utilities are unique to Windows 7. The Control Panel applets unique to Windows 7 are HomeGroup, Action Center, RemoteApp and Desktop Applications, and Troubleshooting. You should be familiar with the purpose and options of each.
Review Questions
The answers to the chapter review questions can be found in Appendix A.
-
Which editions of Windows 7 can create a HomeGroup? (Choose four.)
- Windows 7 Starter
- Windows 7 Home Premium
- Windows 7 Professional
- Windows 7 Enterprise
- Windows 7 Ultimate
-
What is the name of the file that runs if there are any gadgets placed on the Windows 7 Desktop?
- NTOS
- GADCONFIG
- GADGET
- SIDEBAR
-
Which of the following is used by BitLocker to be able to encrypt a drive?
- EFS
- TPM
- HPM
- Aero
-
Which feature of Windows 7 allows files and folders to be grouped logically and appear as if they are in the same location even when they are not?
- HomeGroup
- Touch
- Libraries
- Snap
-
As an administrator, you need to get an inventory of computers on your network and plan a rollout of Windows 7. Which tool can be used for this purpose?
- UDMT
- Microsoft Assessment and Planning (MAP) Toolkit
- USMT
- MigWiz
-
Which of the following editions of Windows Vista can be upgraded to Windows 7 Professional?
- Windows Vista Starter
- Windows Vista Home Basic
- Windows Vista Home Premium
- Windows Vista Business
- Windows Vista Ultimate
-
Which utility is shown in Figure 16.25?
Figure 16.25 One of the utilities available in Windows 7
- Windows State Mover
- Windows Easy Transfer
- Windows Anytime Upgrade
- Windows Edition Roller
-
You need to do an installation of Windows 7 in a PXE environment. Which of the following can be used?
- WinLoad
- BOOTMGR
- WinPE
- WinResume
-
Which utility is shown in Figure 16.26?
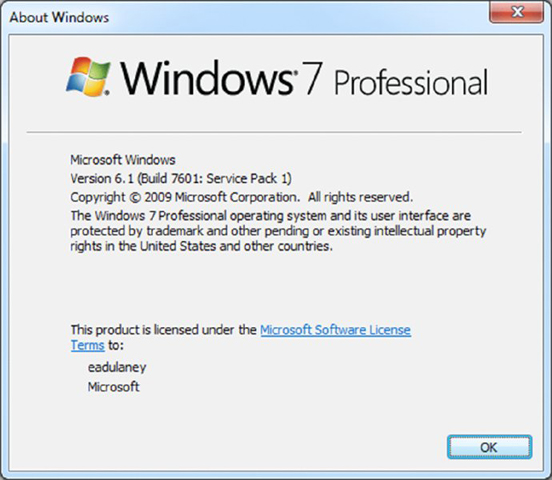
Figure 16.26 One of the utilities available in Windows 7
- WINVER
- MSINFO
- MSCONFIG
- SYSTEM32
-
Which editions of Windows 7 include BitLocker? (Choose two.)
- Windows 7 Starter
- Windows 7 Home Premium
- Windows 7 Professional
- Windows 7 Enterprise
- Windows 7 Ultimate
-
Where in Windows 7 can you manually create a restore point?
- System Restore option beneath System Tools
- System Protection tab of System Properties
- In Backup, beneath Administrative Tools
- Windows 7 does not allow for the manual creation of restore points
-
Which utility is shown in Figure 16.27?

Figure 16.27 One of the utilities available in Windows 7
- Action Center
- Security Center
- HomeGroup
- Windows Vista Enterprise
-
After installing the operating system, what does Windows 7 require in order to curb software piracy?
- Certification
- Confirmation
- Activation
- Substantiation
-
What is the maximum number of physical CPUs supported by Windows 7 Enterprise edition?
- One
- Two
- Three
- Four
-
In Windows 7, what is the default setting for the UAC?
- Always notify
- Notify me only when programs try to make changes to my computer
- Notify me only when programs try to make changes to my computer (do not dim my desktop)
- Never notify
-
Which feature allows you to use free space on an SD card to speed up a system?
- ReadyDrive
- Shadow Copy
- ReadyBoost
- BitLocker to Go
-
Which utility is shown in Figure 16.28?

Figure 16.28 One of the utilities available in Windows 7
- Remote Control
- Remote Applications
- Remote Desktop
- Remote Assistance
-
Remote computers and virtual machines are made available with Windows 7 using which port?
- 80
- 139
- 3389
- 13742
-
Which directory on a standard Windows 7 installation holds the boot file configuration?
- BOOT
- START
- SYSTEM32
- WINDOWS
-
What is the maximum amount of RAM supported in the 64-bit Enterprise edition of Windows 7?
- 8GB
- 16GB
- 128GB
- 192GB
Performance-Based Question
You will encounter performance-based questions on the A+ exam. The questions on the exam require you to perform a specific task, and you will be graded on whether or not you were able to complete the task. The following requires you to think creatively in order to measure how well you understand this chapter’s topics. You may or may not see similar questions on the actual A+ exam. To see how your answers compare to the authors’, refer to Appendix B.
You have been sent to a client’s Windows 7 workstation with specific directions to follow. They are using only IPv4, and they use DHCP for their normal configuration information. In the event that the DHCP server is not accessible, however, APIPA should not be used. An alternate configuration needs to be assigned with the following values:
- IP address: 192.16.68.4
- Subnet mask: 255.255.255.0
- Default gateway: 192.16.68.1
- How would you configure this?