- Designing a deployment strategy for AWS using ECS, S3, EFS and RDS services
- An overview of several AWS-specific hooks and operators
- Demonstrating how to use AWS-specific hooks and operators with a use case
After our brief introduction in the previous chapter, this chapter will dive further into how to deploy and integrate Airflow with cloud services in Amazon AWS. First, we’ll start by designing an Airflow deployment by mapping the different components of Airflow to AWS services. Then we’ll explore some of the hooks and operators that Airflow provides for integrating with several key AWS services. Finally, we’ll show how to use these AWS-specific operators and hooks to implement a use case for generating movie recommendations.
16.1 Deploying Airflow in AWS
In the previous chapter, we described the different components that comprise an Airflow deployment. In this section, we’ll design a few deployment patterns for AWS by mapping them to specific AWS cloud services. This should give you a good idea of the process involved in designing an Airflow deployment for AWS and provide a good starting point for implementing one.
16.1.1 Picking cloud services
Starting with the Airflow webserver and scheduler components, one of the easiest approaches for running these components is probably Fargate, AWS’s serverless compute engine for containers. One of the main advantages of Fargate (compared to other AWS services like ECS1 or EKS2) is that it allows us to easily run containers in AWS without having to worry about provisioning and managing the underlying compute resources. This means we can simply provide Fargate with a definition of our webserver and scheduler container tasks and Fargate will take care of deploying, running, and monitoring the tasks for us.
For the Airflow metastore, we recommend looking toward AWS’s hosted RDS solutions (e.g., Amazon RDS3), which helps with setting up relational databases in the cloud by taking care of time-consuming administration tasks such as hardware provisioning, database setup, patching, and backups. Amazon RDS provides several types of RDS engines you can choose from, including MySQL, Postgres, and Aurora (which is Amazon’s proprietary database engine). In general, Airflow supports using all of these backends for its metastore, so your choice may depend on other requirements such as cost, or features such as high availability.
AWS provides several options for shared storage. The most prominent is S3, a scalable object storage system. S3 is generally great for storing large amounts of data with high durability and availability for a relatively low cost. As such, it is ideal for storing large data sets (which we may be processing in our DAGs) or storing temporary files such as the Airflow worker logs (which Airflow can write to S3 natively). A drawback of S3 is that it cannot be mounted as a local filesystem into the webserver or scheduler machines, making it less ideal for storing files such as DAGs, which Airflow requires local access to.
In contrast, AWS’s EFS storage system is compatible with NFS and can therefore be mounted directly into the Airflow containers, making it suitable for storing DAGs. EFS is, however, quite a bit more expensive than S3, making it less ideal for storing data or our log files. Another drawback of EFS is that it is more difficult to upload files into EFS than S3, as AWS does not provide an easy web-based or CLI interface for copying files to EFS. For these reasons, it may still make sense to look to other storage options such as S3 (or alternatively Git) for storing DAGs and then use an automated process to sync the DAGs to EFS (as we will see later in this chapter).
Overall this gives us with the following setup (figure 16.1):

Figure 16.1 Mapping the Airflow components from figure 15.1 to AWS services. Fargate is used for the compute components (webserver, scheduler, and workers), as it provides an easy and flexible container-based compute service. Amazon RDS is used as a managed database service for the metastore, while EFS and S3 are used for storage. Arrows indicate dependencies between the services.
16.1.2 Designing the network
We also need to consider how these services will be connected and how we can manage internet access to Airflow. A typical AWS networking setup is to create a VPC (virtual private cloud) containing both public and private subnets. In this type of setup, the private subnets inside the VPC can be used for services that should not be exposed directly to the internet, while the public subnets can be used to provide external access to services and outgoing connectivity to the internet.
We have a couple of services that need to be connected by network for our Airflow deployment. For example, both the webserver and scheduler containers need to have access to the Airflow metastore RDS and EFS for retrieving their DAGs. We can arrange this access by connecting both containers, the RDS and our EFS instance, to our private subnet, which will also ensure that these services are not directly accessible from the internet (figure 16.2). To provide access to S3 for our containers, we can also place a private S3 endpoint within the private subnet, which will ensure that any S3 bound traffic doesn’t leave our VPC.

Figure 16.2 Projecting our components onto a network layout with public/private subnets. The public subnet provides access to the webserver over the internet via an application load balancer, coupled with an internet and NAT gateway for routing traffic from/to the internet. The private subnet ensures our compute/storage components can reach each other without being exposed online unintentionally. Arrows indicate the direction of information flowing between the services.
We also want to expose our Airflow webserver to the internet (with the proper access controls of course) so that we can access the webserver from our workspace. A typical approach is to place them behind an application load balancer (ALB), which is publicly accessible in the public subnet via an internet gateway. This ALB will handle any incoming connections and forward them to our webserver container if appropriate. To make sure that our webserver can also send back responses to our requests, we also need to place a NAT gateway in the public subnet.
16.1.3 Adding DAG syncing
As mentioned before, a drawback of using EFS for storing DAGs is that EFS is not very easy to access using web-based interfaces or command line tools. As such, you may want to look toward setting up a process for automatically syncing DAGs from another storage backend, such as S3 or a Git repository.
One possible solution is to create a Lambda function that takes care of syncing DAGs from git or S3 to EFS (figure 16.3). This Lambda can be triggered (either by S3 events or a build pipeline in the case of Git) to sync any changed DAGs to EFS, making the changes available to Airflow.

Figure 16.3 Adding automated DAG syncing to our architecture. This allows us to store and edit DAGs in S3, which is generally easier to access and interact with than EFS. A Lambda service takes care of automatically syncing new DAGs from S3 to EFS.
16.1.4 Scaling with the CeleryExecutor
Although this setup should be robust enough to handle many workloads, we can improve the scalability of our Airflow deployment by switching to the CeleryExecutor. The main advantage of this switch is that the CeleryExecutor allows you to run each Airflow worker in its own container instance, thus substantially increasing the resources available to each worker.

Figure 16.4 An alternative deployment based on the CeleryExecutor. The CeleryExecutor runs workers in separate compute processes, which are run as individual container instances on Fargate. Amazon’s SQS service is used as a message broker to pass tasks to the workers after they have been scheduled.
To use the CeleryExecutor, we have to make a number of changes to our design (figure 16.4). First, we need to set up a separate pool of Fargate tasks for the Airflow workers, which run in separate processes in the Celery-based setup. Note that these tasks also need to have access to the Airflow metastore and the logs bucket to be able to store their logs and results. Second, we need to add a message broker that relays jobs from the scheduler to the workers. Although we could choose to host our own message broker (e.g., RabbitMQ or possibly Redis) in Fargate or something similar, it is arguably easier to use AWS’s SQS service, which provides a simple serverless message broker that requires little effort to maintain.
Of course, a drawback of using the CeleryExecutor is that the setup is a bit more complex than the LocalExecutor and therefore requires more effort. The added components (most notably the extra worker tasks) may also add some considerable costs for the extra compute resources required for each worker.
16.1.5 Further steps
Although we have sketched some basic deployment strategies for Airflow in AWS, we should be careful to note that these setups should not be considered production-ready, as we still need to consider a number of factors.
First and foremost, security is an important consideration for production deployments. Although we have put some effort into shielding our different components from the public internet, we still need to consider further restricting access to components using security groups and network ACLs, limiting access to AWS resources using the appropriate IAM4 roles and policies, and so on. At the Airflow level, you should also consider how you would like to secure Airflow (using Airflow’s RBAC mechanism, etc.).
We would also expect production deployments to have a robust approach for logging, auditing, and tracking metrics and for raising alerts if issues are encountered with any of the deployed services. For this, we recommend looking at the corresponding services provided by AWS, including CloudTrail and CloudWatch.
16.2 AWS-specific hooks and operators
Airflow provides a considerable number of built-in hooks/operators that allow you to interact with a great number of the AWS services. These allow you to (for example) coordinate processes involving moving and transforming data across the different services, as well as the deployment of any required resources. For an overview of all the available hooks and operators, see the Amazon/AWS provider package.5
Due to their large number, we won’t go into any details of the AWS-specific hooks and operators but rather refer you to their documentation. However, tables 16.1 and 16.2 provide a brief overview of several hooks and operators with the AWS services they tie into and their respective applications. A demonstration of some of these hooks and operators is also provided in the next section.
Table 16.1 An excerpt of some of the AWS-specific hooks
Table 16.2 An excerpt of some of the AWS-specific operators
One hook that deserves special mention is the AwsBaseHook, which provides a generic interface to AWS services using AWS’s boto3 library. To use the AwsBaseHook, instantiate it with a reference to an Airflow connection that contains the appropriate AWS credentials:
from airflow.providers.amazon.aws.hooks.base_aws import AwsBaseHook

hook = AwsBaseHook("my_aws_conn")
The required connection can be created in Airflow using the web UI (figure 16.5) or other configuration approaches (e.g., environment variables). The connection essentially requires two details: an access key and secret that point to an IAM user in AWS.6

Figure 16.5 Creating a connection for the AWS hook in Airflow. Note that the access key and secret should be entered as a JSON construct in the extra field rather than in the login/password fields (contrary to what you might expect).
Once we have instantiated the hook, we can use it to create boto3 clients for different services using the get_client_type method. For example, you can create a client for the AWS Glue service as follows:
glue_client = hook.get_client_type("glue")
With this client, we can perform all kinds of operations on the Glue service in AWS. For more details on the different types of clients and the supported operations, you can reference the boto3 documentation (https://boto3.amazonaws.com/v1/documentation/ api/latest/index.html). To be able to perform any of these operations, the hook’s IAM user used should have the appropriate permissions in AWS. As such, make sure to assign the appropriate permissions to the respective user using IAM policies.
In the next section, we’ll show an example of building a custom operator based on the AwsBaseHook, which demonstrates how this all ties together.
16.3 Use case: Serverless movie ranking with AWS Athena
To explore some of these AWS-specific features, let’s turn to a small example.
16.3.1 Overview
In this example, we’re interested in using some of the serverless services in AWS (S3, Glue, Athena) to analyze the movie data we encountered in previous chapters. Our goal is to find the most popular movies by ranking them by their average rating (using all the ratings up to that point in time). One of the advantages of using serverless services for this task is that we don’t have to worry about running and maintaining any servers ourselves. This makes the overall setup relatively cheap (we only pay for things while they’re running), and it requires relatively low maintenance.
To build this serverless movie ranking process, we need to implement a couple of steps:
-
First, we fetch the movie ratings from our API and load them into S3 to make them available in AWS. We plan to load the data on a monthly basis so that we can calculate the ratings for each month as new data comes in.
-
Second, we use AWS Glue (a serverless ETL service) to crawl the ratings data on S3. By doing so, Glue creates a table view of the data stored in S3, which we can subsequently query to calculate our rankings.
-
Finally, we use AWS Athena (a serverless SQL query engine) to execute an SQL query on the ratings table to calculate our movie rankings. The output of this query is written to S3 so that we can use the rankings in any applications downstream.
This provides us with a relatively straightforward approach (figure 16.6) for ranking movies, which should scale easily to large data sets (as S3 and Glue/Athena are highly scalable technologies). Moreover, the serverless aspect means that we don’t have to pay for any servers to run this one-in-a-month process, keeping down costs. Nice, right?

Figure 16.6 Overview of the data process involved in the serverless movie ranking use case. Arrows indicate data transformations performed in Airflow, marked by the corresponding AWS service used for performing the data transformation (where applicable).
16.3.2 Setting up resources
Before implementing the DAG, let’s start by creating the required resources in AWS. Our DAG will require the following cloud resources:
-
A Glue crawler that will create a table from our ratings data
-
An IAM user that will allow us to access the S3 buckets and call services such as Glue and Athena
One way to configure these resources is to open the AWS Console (http://console .aws.amazon.com) and create the required resources manually in the respective sections of the console. However, for sake of reproducibility, we recommend defining and managing your resources using an infrastructure-as-code solution such as CloudFormation (AWS templating solution for defining cloud resources in code). For this example, we have provided a CloudFormation template that creates all of the required resources in your account. For brevity, we will not dive into the details of the template here, but happily refer you to its details online (https://github.com/BasPH/data-pipelines-with-apache-airflow/blob/master/chapter16/resources/stack.yml).
To create the required resources with our template, open the AWS console, go to the CloudFormation section, and click Create Stack (figure 16.7). On the following page, upload the provided template and click Next. On the Stack details page, enter a name for your stack (= this set of resources) and fill in a unique prefix for your S3 bucket names (which is required to make them globally unique). Now click Next a few more times (making sure to select “I acknowledge that AWS CloudFormation might create IAM resources with custom names” on the review page), and CloudFormation should start creating your resources.
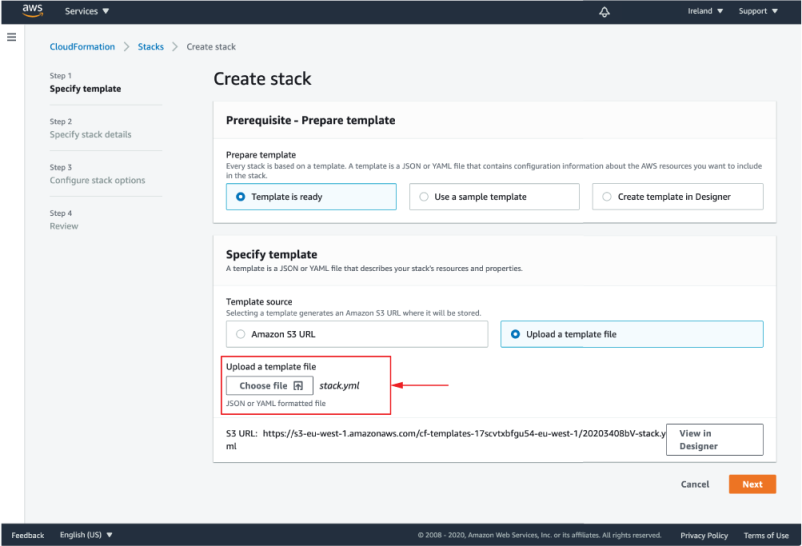
Figure 16.7 Creating a CloudFormation stack in the AWS console
Once complete, you should be able to see the status of the created stack in the CloudFormation stack overview page (figure 16.8). You can also see which resources CloudFormation created for you under the Resources tab (figure 16.9). This should include an IAM user and a bunch of access policies, the two S3 buckets, and our Glue crawler. Note that you can navigate to the different resources by clicking the physical ID link of each resource, which will navigate to the respective resource in the corresponding section of the AWS console.

Figure 16.8 Overview of the created CloudFormation Stack in the AWS console. This page shows the overall status of the stack and provides you with controls for updating or deleting the stack, if needed.
Figure 16.9 Overview of the resources created by the CloudFormation stack. You can use this view to navigate to the different resources created by the stack.
If something went wrong during the creation of the stack, you can try identifying the issue using the events in the Events tab. This can happen if, for example, your bucket names conflict with someone else’s preexisting buckets (as they must be globally unique).
Once we have our required set of resources, we have one thing left to do. To be able to use the IAM user the stack in our DAG created, we need to create an access key and secret for the user that can be shared with Airflow. To create this access key and secret, scroll down until you find the AWS:IAM:USER resource created by the stack and click its physical ID link. This should bring you to the user overview in AWS’s IAM console. Next, navigate to the Security credentials tab and click Create access key (figure 16.10). Write the generated access key and secret down and keep them secure, as we’ll need this later in Airflow.

Figure 16.10 Creating an access key and secret for the generated user
16.3.3 Building the DAG
Now we have all the required resources, let’s start implementing our DAG by looking for the appropriate hooks and operators. For the first step, we need an operator that fetches data from our movie ratings API and uploads them to S3. Although Airflow provides a number of built-in S3 operators, none of them allows us to fetch ratings from our API and upload them directly to S3. Fortunately, we can also implement this step by combining the PythonOperator and the S3Hook. Together, these classes allow us to fetch the ratings using our own Python function(s) and then upload the results to S3.
Listing 16.1 Uploading ratings using the S3Hook (dags/01_aws_usecase.py)
from airflow.operators.python import PythonOperator
from airflow.providers.amazon.aws.hooks.s3 import S3Hook

from custom.hooks import MovielensHook

def _fetch_ratings(api_conn_id, s3_conn_id, s3_bucket, **context):
    year = context["execution_date"].year
    month = context["execution_date"].month

    logging.info(f"Fetching ratings for {year}/{month:02d}")
    api_hook = MovielensHook(conn_id=api_conn_id)
    ratings = pd.DataFrame.from_records(
        api_hook.get_ratings_for_month(year=year, month=month),
        columns=["userId", "movieId", "rating", "timestamp"],
    )                                                         ❶

 logging.info(f"Fetched {ratings.shape[0]} rows")

with tempfile.TemporaryDirectory() as tmp_dir:                ❷
    tmp_path = path.join(tmp_dir, "ratings.csv")
    ratings.to_csv(tmp_path, index=False)

    logging.info(f"Writing results to ratings/{year}/{month:02d}.csv")
    s3_hook = S3Hook(s3_conn_id)
    s3_hook.load_file(                                        ❸
        tmp_path,
        key=f"ratings/{year}/{month:02d}.csv",
        bucket_name=s3_bucket,
        replace=True,
    )

fetch_ratings = PythonOperator(
    task_id="fetch_ratings",
    python_callable=_fetch_ratings,
    op_kwargs={
        "api_conn_id": "movielens",
        "s3_conn_id": "my_aws_conn",
        "s3_bucket": "my_ratings_bucket",
     },
)
❶ Fetch ratings from the API using the MovielensHook from chapter 8 (code for the hook is available in dags/custom/hooks.py).
❷ Write ratings to a temporary directory.
❸ Upload the written ratings to S3 using the S3Hook.
Note that the S3Hook requires a connection ID that specifies which connection (i.e., which credentials) to use for connecting to S3. As such, we need to make sure that Airflow is configured with a connection that has an access key and secret for a user with sufficient permissions. Fortunately, we already created such a user in the previous section (using our CloudFormation stack) and can now use the credentials to create our Airflow connection (figure 16.5). After creating the connection, make sure to substitute its name and the name of your S3 bucket (under the op_kwargs argument to the PythonOperator).
For the second step, we need an operator that is able to connect to AWS to trigger our Glue crawler (which was also created by the CloudFormation stack). Unfortunately, Airflow does not provide an operator for this operation, meaning we have to build our own. However, we can use the built-in AwsBaseHook as a base for our operator, which provides us with easy access to the different AWS services using boto3.
Using this AwsBaseHook, we can create our own operator7 (the GlueTriggerCrawlerOperator) that essentially retrieves a Glue client using the AwsBaseHook and uses it to start our crawler using the Glue client’s start_crawler method. After checking if the crawler started successfully, we can check the status of the crawler using the client’s get_crawler method, which (among other things) returns the status of the crawler. Once the crawler reaches the ready state, we can be fairly confident8 that it has finished running, meaning we can continue with any downstream tasks. Altogether, an implementation of this operator could look something like the following.
Listing 16.2 Operator for triggering Glue crawlers (dags/custom/operators.py)
import time
from airflow.models import BaseOperator
from airflow.providers.amazon.aws.hooks.base_aws import AwsBaseHook
from airflow.utils.decorators import apply_defaults

class GlueTriggerCrawlerOperator(BaseOperator):
    """
    Operator that triggers a crawler run in AWS Glue.

    Parameters
    ----------
    aws_conn_id
        Connection to use for connecting to AWS. Should have the appropriate
        permissions (Glue:StartCrawler and Glue:GetCrawler) in AWS.
    crawler_name
        Name of the crawler to trigger.
    region_name
        Name of the AWS region in which the crawler is located.
    kwargs
        Any kwargs are passed to the BaseOperator.
    """
    @apply_defaults
    def __init__(
        self,
        aws_conn_id: str,
        crawler_name: str,
        region_name: str = None,
        **kwargs
    ):
        super().__init__(**kwargs)
        self._aws_conn_id = aws_conn_id
        self._crawler_name = crawler_name
        self._region_name = region_name

    def execute(self, context):
        hook = AwsBaseHook(                                                ❶
           self._aws_conn_id, client_type="glue",
           region_name=self._region_name
        )
        glue_client = hook.get_conn()                                      ❶

        self.log.info("Triggering crawler")
        response = glue_client.start_crawler(Name=self._crawler_name)      ❷

        if response["ResponseMetadata"]["HTTPStatusCode"] != 200:          ❸
            raise RuntimeError(
                "An error occurred while triggering the crawler: %r" % response
            )

        self.log.info("Waiting for crawler to finish")
        while True:                                                        ❹
            time.sleep(1)
            crawler = glue_client.get_crawler(Name=self._crawler_name)
            crawler_state = crawler["Crawler"]["State"]

            if crawler_state == "READY":                                   ❺
                self.log.info("Crawler finished running")
                break
❶ Create an AwsBaseHook instance and retrieve a client for AWS Glue.
❷ Use the Glue client to start the crawler.
❸ Check if starting the crawler was successful.
❹ Loop to check the crawler state.
❺ Stop once the crawler has finished running (indicated by the READY state).
We can use GlueTriggerCrawlerOperator as follows.
Listing 16.3 Using the GlueTriggerCrawlerOperator (dags/01_aws_usecase.py).
from custom.operators import GlueTriggerCrawlerOperator

trigger_crawler = GlueTriggerCrawlerOperator(
    aws_conn_id="my_aws_conn",
    task_id="trigger_crawler",
    crawler_name="ratings-crawler",
)
Finally, for the third step, we need an operator that allows us to execute a query in Athena. This time we’re in luck, as Airflow provides an operator for doing so: the AwsAthenaOperator. This operator requires a number of arguments: the connection to Athena, the database (which should have been created by the Glue crawler), the execution query, and an output location in S3 to write the results of the query to. Altogether, our usage of the operator would look something like this.
Listing 16.4 Ranking movies using the AWSAthenaOperator (dags/01_aws_usecase.py)
from airflow.providers.amazon.aws.operators.athena import AWSAthenaOperator

rank_movies = AWSAthenaOperator(
    task_id="rank_movies",
    aws_conn_id="my_aws_conn",
    database="airflow",
    query="""
        SELECT movieid, AVG(rating) as avg_rating, COUNT(*) as num_ratings  ❶
        FROM (
            SELECT movieid, rating,
                CAST(from_unixtime(timestamp) AS DATE) AS date
            FROM ratings
        )
        WHERE date <= DATE('{{ ds }}')                                      ❷
        GROUP BY movieid                                                    ❸
        ORDER BY avg_rating DESC
    """,
    output_location=f"s3://my_rankings_bucket/{{ds}}",
)
❶ Retrieve the movie ID, rating value and date of each rating.
❷ Select all ratings up to the execution date.
❸ Group by movie ID to calculate the average rating per movie.
Now that we have created all the required tasks, we can start tying everything together in the overall DAG.
Listing 16.5 Building the overall recommender DAG (dags/01_aws_usecase.py)
import datetime as dt
import logging
import os
from os import path
import tempfile

import pandas as pd

from airflow import DAG
from airflow.providers.amazon.aws.hooks.s3 import S3Hook
from airflow.providers.amazon.aws.operators.athena import AWSAthenaOperator
from airflow.operators.dummy import DummyOperator
from airflow.operators.python import PythonOperator

from custom.operators import GlueTriggerCrawlerOperator
from custom.ratings import fetch_ratings

with DAG(
    dag_id="01_aws_usecase",
    description="DAG demonstrating some AWS-specific hooks and operators.",
    start_date=dt.datetime(year=2019, month=1, day=1),     ❶
    end_date=dt.datetime(year=2019, month=3, day=1),
    schedule_interval="@monthly",
    default_args={
        "depends_on_past": True                            ❷
    }
) as dag:
    fetch_ratings = PythonOperator(...)
    trigger_crawler = GlueTriggerCrawlerOperator(...)
    rank_movies = AWSAthenaOperator(...)
    fetch_ratings >> trigger_crawler >> rank_movies
❶ Set start/end dates to fit the ratings data set.
❷ Use depends_on_past to avoid running queries before past data has been loaded (which would give incomplete results).
With everything in place, we should now be able to run our DAG within Airflow (figure 16.11). Assuming everything is configured correctly, your DAG runs should be successful and you should see some CSV outputs from Athena appearing in your ratings output bucket (figure 16.12). If you run into issues, make sure that the AWS resources were set up correctly and that your access key and secret were configured correctly.
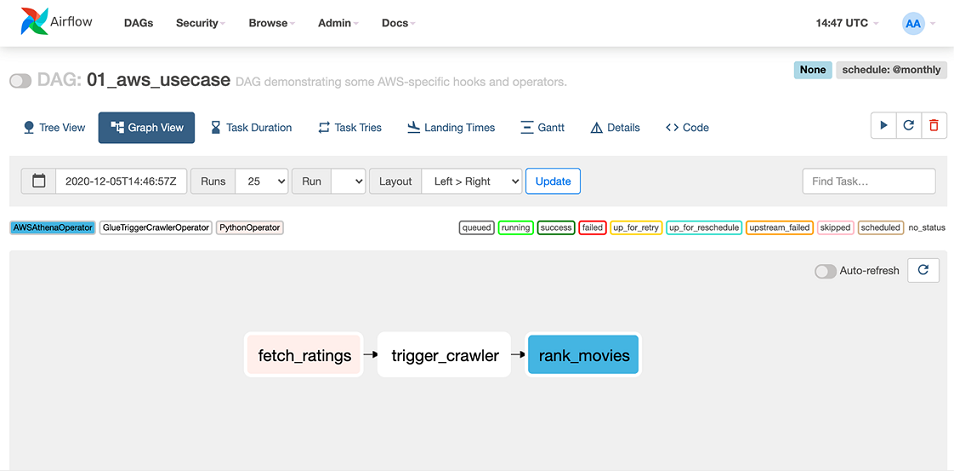
Figure 16.11 The resulting movie-ranking DAG in Airflow, illustrating the three different tasks and the corresponding operators involved in each task
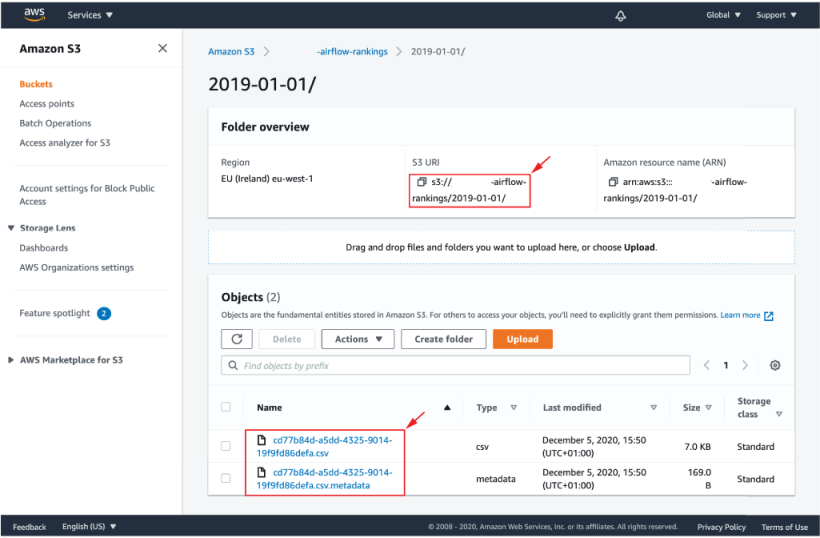
Figure 16.12 The results of the Athena query in the rankings bucket
16.3.4 Cleaning up
After finishing with this example, make sure to clean up any resources you created in AWS to avoid incurring any unnecessary costs. If you used our CloudFormation template for creating the resources, you can delete most by deleting the stack. Note that some resources, like the S3 buckets, will have to be removed manually even if you are using the template, as CloudFormation will not let you delete non-empty buckets automatically. Make sure to check if all created resources were deleted successfully, paying extra attention to check any resources you may have created manually.
Summary
-
Airflow can be deployed in AWS using services such as ECS/Fargate for running the scheduler and webserver processes, EFS/S3 for storage, and Amazon RDS for the Airflow metastore.
-
Airflow provides many AWS-specific hooks and operators that allow you to integrate with different services with the AWS cloud platform.
-
The
AwsBaseHookclass provides low-level access to all services in AWS using the boto3 library, allowing you to implement your own high-level hooks and operators if these do not yet exist. -
Using AWS-specific hooks and operators generally requires you to configure the required resources and access permissions in AWS and Airflow so that Airflow is allowed to perform the required operations.
1.Elastic Compute Service, similar to Fargate but requires you to manage the underlying machines yourself.
2.Elastic Kubernetes Service, AWS’s managed solution for deploying and running Kubernetes.
3.Amazon RDS includes several database types such as PostgreSQL, MySQL, and Aurora.
4.Identity and access management.
5.Can be installed in Airflow 2 using the apache-airflow-providers-amazon providers package, or in Airflow 1.10 using the backport package apache-airflow-backport-providers-amazon.
6.We’ll provide an example of how to obtain these details in the next section.
7.See chapter 8 for more details on creating custom operators.
8.This example could arguably be made more robust by adding more checks for unexpected responses, statuses, and so on.