- Designing a deployment strategy for GCP
- An overview of several GCP-specific hooks and operators
- Demonstrating how to use GCP-specific hooks and operators
The last major cloud provider, Google Cloud Platform (GCP), is actually the best supported cloud platform in terms of the number of hooks and operators. Almost all Google services can be controlled with Airflow. In this chapter, we’ll dive into setting up Airflow on GCP (section 18.1), operators and hooks for GCP services (section 18.2), and the same use case as demonstrated on AWS and Azure, applied to GCP (section 18.3).
We must also note that GCP features a managed Airflow service named “Cloud Composer,” which is mentioned in more detail in section 15.3.2. This chapter covers a DIY Airflow setup on GCP, not Cloud Composer.
18.1 Deploying Airflow in GCP
GCP provides various services for running software. There is no one-size-fits-all approach, which is why Google (and all other cloud vendors) provide different services for running software.
18.1.1 Picking services
These services can be mapped on a scale, ranging from fully self-managed with the most flexibility, to managed completely by GCP with no maintenance required (figure 18.1).

Figure 18.1 Overview of the different compute services available in the Google Cloud Platform
On the left-hand side, we have Compute Engine, which gives you a virtual machine to run any piece of software you desire. Compute Engine provides you complete freedom and control, which can be positive, but it also requires you to manage and configure the virtual machine yourself. For example, if traffic to a service you’re running on Compute Engine increases, it is up to you to scale vertically by creating a new VM with a larger instance type or scale horizontally by configuring an autoscaling policy to create more of the same instances.
On the right-hand side, we have Cloud Functions, to which you can provide a function in one of the supported languages (Node.js, Python, Go, and Java at the time of writing), for example, a Python function that returns the current time in a given time zone. So, if you call the function with an argument, CEST, the function will return the time for the CEST time zone. Functions handle small workloads and operate event-based. Google manages your function (i.e., the underlying infrastructure) and will scale the number of deployed functions automatically. If a high load is requested from your function, Google will automatically scale up. Google handles all logging, monitoring, and the like; you only have to provide the function. If your use case fits the characteristics of a function, it can greatly improve your productivity.
It is not trivial to set up Airflow because of the shared storage it requires for storing and sharing DAG files (mostly applies when running CeleryExecutor or KubernetesExecutor). This limits our options in GCP:
-
Cloud functions serve stateless event-based functions, which Airflow is not, and therefore cannot be deployed on Cloud Functions.
-
Running Airflow on App Engine might be technically possible but with a few caveats: App Engine expects a single Docker container, while the minimum Airflow installation is already split between a webserver and a scheduler process. This poses a challenge: typically, applications that expose something (e.g., a frontend or REST API) are run on App Engine, which scales automatically based on the load. Airflow does not fit this model, as it’s a distributed application by default. The webserver could be a good candidate though to run on GAE.
The Airflow scheduler does not fit the App Engine model, so this leaves us with two options: GCE and GKE. Kubernetes was already discussed in detail in chapter 10.
-
The Kubernetes Engine is a good fit for Airflow. Helm charts for deploying Airflow on Kubernetes are available, plus it provides abstractions for mounting filesystems shared by multiple pods.
-
The Compute Engine gives you complete freedom to run and configure your instance. We can distinguish two flavors of the Compute Engine: a Linux-based VM and a container-optimized OS (COS) VM. A COS system is ideal for running Docker containers, and therefore seems attractive from a deployment perspective but unfortunately poses an issue in combination with Airflow. Airflow requires a filesystem for DAG storage (potentially shared between multiple machines), for which storage accessible via NFS is a common solution. However, COS does not come with NFS libraries. While it might be technically possible to install these, this is not a simple task, so it’s easier to switch to a Linux-based VM, which gives complete control.
For a shared file system, two (out of the many) options on GCP are as follows:
Shared file systems have long been a challenge, and each comes with pros and cons. If possible, we prefer avoiding FUSE filesystems as they apply a file system–like interface over something that was never intended to be a file system (e.g., GCS is an object store), which comes with poor performance and consistency challenges, especially when used by multiple clients.
For other Airflow components, the number of options is less and thus easier. For the metastore, GCP provides Cloud SQL, which can run both MySQL and PostgreSQL. For the storage of logs, we’ll apply Google Cloud Storage (GCS), which is GCP’s object storage service.

Figure 18.2 Mapping Airflow components to GCP in a Kubernetes-based deployment of Airflow
When running on GCP, deploying on Google Kubernetes Engine (GKE) is probably the easiest approach (figure 18.2). GKE is Google’s managed Kubernetes service, which provides an easy way to deploy and manage containerized software. The other obvious option on GCP—running everything on Linux-based Compute Engine VMs—takes more work and time to get up and running as you have to configure everything yourself. Google already provides a managed Airflow service named Composer, but we will demonstrate how Airflow is deployed on GKE and can integrate with other GCP services.
18.1.2 Deploying on GKE with Helm
Let’s start with getting GKE going. In this section, we aim to provide the basic commands for getting Airflow up and running, so we skip various details that are often required in a production setup, such as not exposing services on public IPs. The command in listing 18.1 will create a GKE cluster with a public endpoint.
Listing 18.1 gcloud command to create a GKE cluster
gcloud container clusters create my-airflow-cluster
--machine-type n1-standard-4
--num-nodes 1
--region "europe-west4"
Then use the command in the following listing to connect your kubectl client with the cluster.
Listing 18.2 gcloud command to configure a kubectl config entry
gcloud container clusters get-credentials my-airflow-cluster
--region europe-west4
On this cluster, we will deploy a fully operational Airflow installation using Helm, a package manager for Kubernetes. At the time of writing, a Helm chart is included in the Airflow repository on GitHub but not released via an official channel. We must therefore download it to install. Check the Airflow documentation for the most recent details.
Listing 18.3 Downloading and installing the Airflow Helm chart
$ curl -OL https://github.com/apache/airflow/archive/master.zip     ❶
$ unzip master.zip
$ kubectl create namespace airflow                                  ❷
$ helm dep update ./airflow-master/chart                            ❸
$ helm install airflow ./airflow-master/chart –namespace airflow    ❹

NAME: airflow
LAST DEPLOYED: Wed Jul 22 20:40:44 2020
NAMESPACE: airflow
STATUS: deployed
REVISION: 1
TEST SUITE: None
NOTES:
Thank you for installing Airflow!

Your release is named airflow.

➥ You can now access your dashboard(s) by executing the following command(s) and visiting the corresponding port at localhost in your browser:

➥ Airflow dashboard:        kubectl port-forward svc/airflow-webserver 8080:8080 --namespace airflow
❶ Download Airflow source code.
❷ Create a Kubernetes namespace for Airflow.
❸ Download specified versions of dependent Helm charts.
❹ Install the Airflow Helm chart, which will take some time.
The Helm chart in listing 18.3 installs a complete Airflow installation running in Kubernetes. That means everything runs inside Kubernetes. Many parts are configurable, but by default, it runs the KubernetesExecutor with a Postgres metastore, DAGs are baked into the Docker images, and the webserver username/password is “admin”/ “admin” (which you likely want to change). The webserver runs as a Kubernetes ClusterIP service, which gives you a service inside your cluster that other applications can access but is not accessible externally. To access it we can port forward to the pod.
Listing 18.4 Port forwarding to the Airflow webserver
kubectl port-forward svc/airflow-webserver 8080:8080 --namespace airflow
This makes the webserver accessible on http://localhost:8080.
DAGs can be added via two methods:
-
The default deployment method with the Helm chart is to build DAGs together with the Airflow Docker image. To build a new image and update the Docker image, run the following.
Listing 18.5 Updating the deployed Airflow image with Helm
helm upgrade airflow ./airflow-master/chart
  --set images.airflow.repository=yourcompany/airflow
  --set images.airflow.tag=1234abc
-
Or you can point to a Git repository and configure a Git-sync (https://github .com/kubernetes/git-sync) sidecar container, which pulls in code from the Git repository every X (default 60) number of seconds.
Listing 18.6 Configuring a Git-sync sidecar with the Airflow Helm chart
helm upgrade airflow ./airflow-master/chart
  --set dags.persistence.enabled=false
  --set dags.gitSync.enabled=true
For all details and configuration options, refer to the Airflow documentation.
18.1.3 Integrating with Google services
After running Airflow on GKE, we can view how to make more use of Google’s managed services so that we don’t have to manage applications on Kubernetes ourselves. We will demonstrate how to create a GCP load balancer to expose the webserver externally. To do so, we must change the service type of the webserver, which is a ClusterIP service by default.
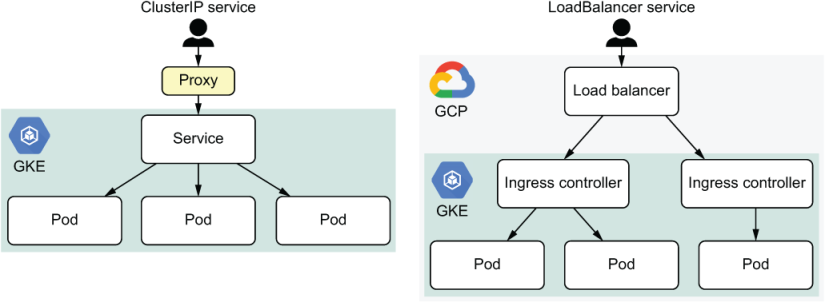
Figure 18.3 Different access patterns for services running in Kubernetes
A ClusterIP-type service can route requests to the correct pod but provides no external endpoint to connect to, requiring a user to set up a proxy to connect to a service (figure 18.3, left). This is not user-friendly, so we want a different mechanism the user can connect to directly without any configuration. There are various options for doing this, and one of them is to create a Kubernetes service LoadBalancer (figure 18.3, right). The service type is applied in chart/values.yaml, in the section “webserver.” Change the service type from ClusterIP to LoadBalancer and apply the changed Helm chart.
Listing 18.7 Installing a new version of a Helm chart
helm upgrade --install airflow ./airflow-master/chart --namespace airflow
GKE receives the request to apply changes on the GKE cluster and notices the change from ClusterIP to LoadBalancer service. GKE integrates with various GCP services, and one of them is a load balancer. When creating a Kubernetes LoadBalancer in GKE, GCP will create a load balancer under the network services menu, serving traffic to your GKE cluster (figure 18.4).

Figure 18.4 Creating a load balancer in the GCP console
Selecting the newly created load balancer will show the address, which is now accessible externally (figure 18.5).
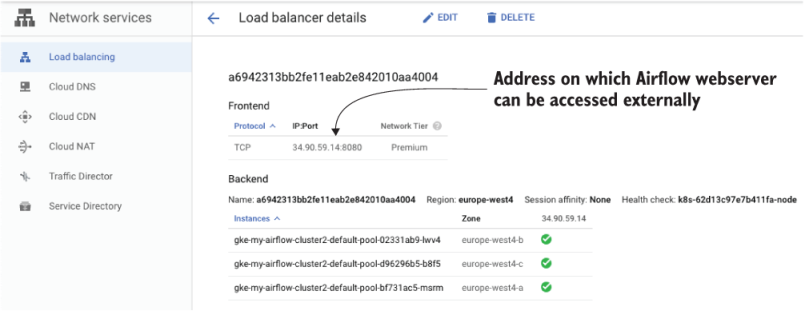
Figure 18.5 Identifying the external address of the load balancer in the GCP console
In this screenshot, the Airflow webserver is now accessible on http://34.90.59 .14:8080.
Other components of the Airflow Helm installation can also be outsourced to GCP services; however, the required work is more involved:
-
We can run our own images from Google Cloud Repository (GCR).
-
We can set up remote logging to GCS (described in section 12.3.4).
18.1.4 Designing the network
The network layout is a personal choice, and the number of options is limitless. For example, is it okay to have traffic going over the public internet and use external IPs, or does security require us to route all traffic internally within GCP and only use internal IPs? We aim to provide a network layout to help you get started, which does not (and cannot) fit everybody but can serve as a starting point. Using the components mentioned gives the result shown in figure 18.6.
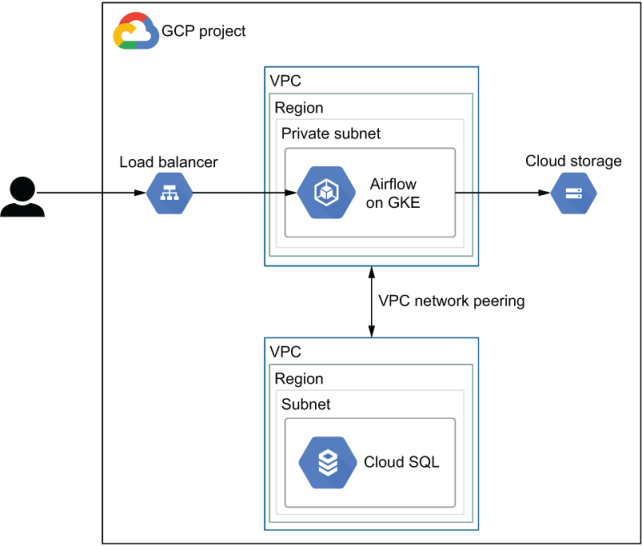
Figure 18.6 Example GCP network layout with Airflow running on GKE, Cloud SQL for the metastore, and the Airflow webserver exposed via a load balancer
As mentioned, Airflow is installed on GKE. The webserver can be exposed to the outside world via a load balancer. Cloud Storage is a globally available service that is not restricted to a VPC. However, GCP does provide a service named VPC Service Controls (VPC SC) to limit communications to selected services (including Cloud Storage) that can only be accessed from within your VPC. The Cloud SQL database serving the Airflow metastore cannot run in the same subnet as your own services. Google creates a fully managed database for you in its own perimeter. Thus, a connection to the database must be created either via the public internet or by peering your own VPC with Google’s VPC.
18.1.5 Scaling with the CeleryExecutor
Celery relies on a message broker to distribute tasks to workers. GCP offers a messaging service named Pub/Sub; however, this is not supported by Celery. Thus, you are limited to using the open source tools Celery does support: RabbitMQ or Redis. From an architectural perspective, this won’t change figure 18.6 since these services can run alongside the Airflow containers in GKE.
By default, the Airflow Helm starts with the KubernetesExecutor. Luckily, it’s very easy to configure the CeleryExecutor. Required components (e.g., Redis) are automatically installed with one command.
Listing 18.8 Configuring the CeleryExecutor
$ helm upgrade airflow ./airflow-master/chart --set executor=CeleryExecutor

Release "airflow" has been upgraded. Happy Helming!
...

➥ You can now access your dashboard(s) by executing the
   following command(s) and visiting the corresponding port at localhost in your browser:

➥ Airflow dashboard:
   kubectl port-forward svc/airflow-webserver 8080:8080 --namespace airflow
➥ Flower dashboard:
   kubectl port-forward svc/airflow-flower 5555:5555 --namespace airflow        ❶
❶ The Celery Flower dashboard is installed for monitoring.
The number of Celery workers can be controlled manually with the Helm property workers.replicas, which is set to 1 by default. It does not scale automatically. However, there is a solution to do so, namely Kubernetes Event-Driven Autoscaling, better known as KEDA.1 Based on a certain given condition, KEDA will automatically scale the number of containers up or down (known as HPA, or horizontal pod autoscaling, in Kubernetes), for example the workload on your Airflow setup. The Airflow Helm chart provides settings to enable KEDA autoscaling and defines the load on Airflow and corresponding workers as the following query on the Airflow metastore:
CEIL((RUNNING + QUEUED tasks) / 16)
For example, say we have 26 running tasks and 11 queued tasks: CEIL((26 + 11)/16) = 3 workers. By default, KEDA queries the database every 30 seconds and changes the number of workers if it differs from the current number of workers, enabling autoscaling of Celery workers, as shown in figure 18.7.

Figure 18.7 Airflow running the CeleryExecutor with KEDA automatically scaling the number of Celery workers up and down depending on the workload. This setup only works when installed on Kubernetes.
Enable the KEDA autoscaling using the Airflow Helm chart.
Listing 18.9 Configuring the CeleryExecutor and autoscaling
helm repo add kedacore https://kedacore.github.io/charts
helm repo update
kubectl create namespace keda
helm install
  --set image.keda=docker.io/kedacore/keda:1.2.0
  ➥ --set image.metricsAdapter=docker.io/kedacore/keda-metrics-adapter:1.2.0
  --namespace keda
  keda kedacore/keda
helm upgrade airflow ./airflow-master/chart
  --set executor=CeleryExecutor
  --set workers.keda.enabled=true
  --set workers.persistence.enabled=false       ❶
❶ KEDA does not support Kubernetes StatefulSets, so it must be turned off.
So why would you prefer the Celery and KEDA setup over the KubernetesExecutor? While both can scale horizontally, the Celery and KEDA setup is more desirable from a performance perspective since it keeps a certain number of Celery workers up and running, workers that immediately process new tasks arriving on the queue. However, the KubernetesExecutor must create a new Airflow pod to run a given task, resulting in startup overhead for every task.
All settings mentioned are configurable; refer to the documentation for all details. At the time of writing, the KEDA setup is considered experimental; refer to the Airflow documentation for the latest information.
18.2 GCP-specific hooks and operators
Many GCP services are covered by GCP-specific Airflow operators, hooks, sensors, and so on, providing much greater coverage than for AWS and Azure. Due to their sheer number, we refer you to the Google/Cloud provider package apache-airflow-providers-google for a full overview of the available hooks and operators.
The Google-related hooks don’t inherit from the airflow.hooks.BaseHook, but from the airflow.providers.google.common.hooks.base_google.GoogleBaseHook class. This base class provides the same authentication mechanism to the Google REST API so that all derived hooks and operators using it don’t have to implement authentication. Three methods of authentication are supported:
-
By configuring an environment variable
GOOGLE_APPLICATION_CREDENTIALS(outside of Airflow) to the path of a JSON key file -
By setting fields “Project id” and “Keyfile Path” in an Airflow connection of type Google Cloud Platform
-
By providing the contents of a JSON key file to an Airflow connection of type “Google Cloud Platform” in the field “Keyfile JSON”
Upon execution of any GCP-related operator, a request will be sent to GCP, which requires authentication. This authentication can be represented by a service account in GCP, an account that can be used by an application (such as Airflow) instead of a human. Airflow requires one of the three options to authenticate GCP with the given service account. For example, say we want to allow Airflow to run BigQuery jobs. Let’s create a service account that grants these permissions.
First, in the GCP console, browse to Service Accounts (figure 18.8).

Figure 18.8 Creating a service account in the GCP console
Click Create Service Account and provide a name, for example, “run-bigquery-jobs.” Next, provide the BigQuery Job User role, which holds permissions to run BigQuery jobs (figure 18.9).

Figure 18.9 Adding the appropriate BigQuery permissions to your service account
After adding the role, click Continue to advance to the next screen, where we can create a key. Click Create Key and you will be given two options to download a key file. JSON is the recommended method, so select it and click Create to download a JSON file holding the key (figure 18.10).
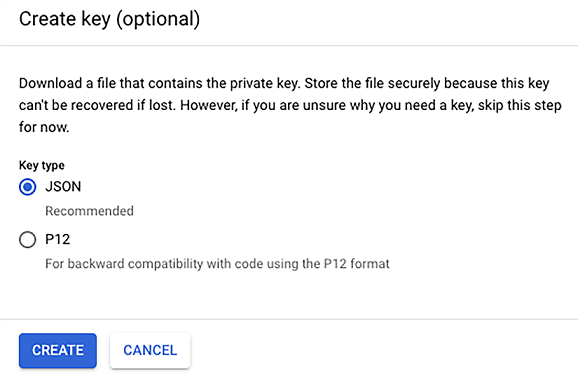
Figure 18.10 Creating and downloading the access key
The just-downloaded JSON file holds a few values that can be used to authenticate with GCP.
Listing 18.10 Contents of a service account JSON key
$ cat airflow-pipelines-4aa1b2353bca.json
{
  "type": "service_account",
  "project_id": "airflow-pipelines",
  "private_key_id": "4aa1b2353bca412363bfa85f95de6ad488e6f4c7",
  ➥ "private_key": "-----BEGIN PRIVATE KEY-----
MIIz...LaY=
-----END PRIVATE KEY-----
",
  "client_email": "[email protected]",
  "client_id": "936502912366591303469",
  "auth_uri": "https://accounts.google.com/o/oauth2/auth",
  "token_uri": "https://oauth2.googleapis.com/token",
  "auth_provider_x509_cert_url": "https://www.googleapis.com/oauth2/...",
  "client_x509_cert_url": "https://...iam.gserviceaccount.com"
}
Keep this file safe and secure. Anybody with access to it can authenticate to GCP and use the granted permissions. Let’s provide it to Airflow so that we can run a BigQuery job. Given the three options, we can provide the key in three ways:
-
By setting an environment variable,
GOOGLE_APPLICATION_CREDENTIALS.Listing 18.11 Setting Google credentials using an environment variable
export GOOGLE_APPLICATION_CREDENTIALS=/path/to/key.json
Note this sets the credentials globally, and all applications authenticating with Google will read this JSON key.
-
By providing the contents of the JSON file to an Airflow connection (figure 18.12).

Figure 18.11 Creating an Airflow connection using the access key file

Figure 18.12 Creating an Airflow connection using the access key JSON
All three options will authenticate. Note that the JSON key is specific to a single project. Using option 1 will set the key globally on your system: all applications connecting with Google will authenticate using this key and use the same permissions. Option 2 also points to the file location of the JSON key but from an Airflow connection. This way you can provide different connection IDs to different tasks, using different sets of permissions between tasks, and possibly also connecting to different GCP projects. The difference between option 2 and 3 is that with option 3 your JSON key is stored only in Airflow and not as a file on your filesystem; this can be desirable, but if there are other applications on your system sharing the same key, go for option 2.
18.3 Use case: Serverless movie ranking on GCP
Let’s look back at the use case previously applied to AWS and Azure. How would it work on GCP? Many of the cloud services can be mapped against each other (table 18.1).
Table 18.1 Comparing similar services on AWS, Azure, and GCP
The services mentioned here provide comparable functionality but are not identical. They can be used for similar purposes but differ in various features and details. For example, AWS Glue is a managed Apache Spark service plus the metadata store. GCP Dataflow is a managed Apache Beam service. Both Spark and Beam are aimed at processing big data but do so in different ways. For our use case, they will both do the job.
18.3.1 Uploading to GCS
Similar to chapters 16 and 17, the first part of the workflow fetches ratings from our ratings API and uploads these to GCS, Google’s object storage service. Although most GCP services can be managed by an Airflow operator, there is obviously no operator for communicating with our custom API. While we could technically split up the work by first extracting ratings data, writing these to a local file, and then uploading the file to GCS in a second step using the LocalFilesystemToGCSOperator, for conciseness we will perform this action in one task. The only component from Airflow we can apply here is the GCSHook for performing actions on GCS.
Listing 18.12 DAG fetching ratings and uploading to GCS
import datetime
import logging
import os
import tempfile
from os import path

import pandas as pd
from airflow.models import DAG
from airflow.operators.python import PythonOperator
from airflow.providers.google.cloud.hooks.gcs import GCSHook

from custom.hooks import MovielensHook

dag = DAG(
   "gcp_movie_ranking",
   start_date=datetime.datetime(year=2019, month=1, day=1),
   end_date=datetime.datetime(year=2019, month=3, day=1),
   schedule_interval="@monthly",
   default_args={"depends_on_past": True},
)


def _fetch_ratings(api_conn_id, gcp_conn_id, gcs_bucket, **context):
   year = context["execution_date"].year
   month = context["execution_date"].month

   logging.info(f"Fetching ratings for {year}/{month:02d}")

   api_hook = MovielensHook(conn_id=api_conn_id)
   ratings = pd.DataFrame.from_records(
       api_hook.get_ratings_for_month(year=year, month=month),
       columns=["userId", "movieId", "rating", "timestamp"],
   )

   logging.info(f"Fetched {ratings.shape[0]} rows")

   with tempfile.TemporaryDirectory() as tmp_dir:
       tmp_path = path.join(tmp_dir, "ratings.csv")                        ❶
       ratings.to_csv(tmp_path, index=False)

       # Upload file to GCS.
       logging.info(f"Writing results to ratings/{year}/{month:02d}.csv")
       gcs_hook = GCSHook(gcp_conn_id)                                     ❷
       gcs_hook.upload(                                                    ❸
           bucket_name=gcs_bucket,                                         ❹
           object_name=f"ratings/{year}/{month:02d}.csv",                  ❺
           filename=tmp_path,
       )


fetch_ratings = PythonOperator(
   task_id="fetch_ratings",
   python_callable=_fetch_ratings,
   op_kwargs={
       "api_conn_id": "movielens",
       "gcp_conn_id": "gcp",
       "gcs_bucket": os.environ["RATINGS_BUCKET"],
   },
   dag=dag,
)
❶ First extract and write results to a local file.
❷ Initialize a connection to GCS.
❸ Upload the local file to GCS.
❹ The GCS bucket to which the file will be uploaded
❺ The GCS key to which the data will be written
If all succeeds, we now have data in a GCS bucket, shown in figure 18.13.
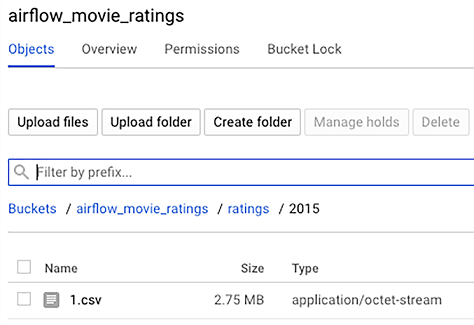
Figure 18.13 Results of a successful run of the initial DAG, with ratings being uploaded into the bucket, in Google Cloud Storage
18.3.2 Getting data into BigQuery
After uploading the data to GCS, we will load the data into BigQuery so that we can query it. While BigQuery can deal with external data, it is somewhat restricted in options when the data is partitioned, especially when creating external tables. It is best is to load the data into BigQuery internally. There are several Airflow operators related to operations on BigQuery; the GCSToBigQueryOperator is specifically for loading data stored on GCS into BigQuery.
Listing 18.13 Importing partitioned data from GCS into BigQuery
➥ from airflow.providers.google.cloud.transfers.gcs_to_bigquery import GCSToBigQueryOperator


import_in_bigquery = GCSToBigQueryOperator(
   task_id="import_in_bigquery",
   bucket="airflow_movie_ratings",
   source_objects=[
       "ratings/{{ execution_date.year }}/{{ execution_date.month }}.csv"
   ],
   source_format="CSV",
   create_disposition="CREATE_IF_NEEDED",    ❶
   write_disposition="WRITE_TRUNCATE",       ❷
   bigquery_conn_id="gcp",
   autodetect=True,                          ❸
   destination_project_dataset_table=(
       "airflow-pipelines:",
       "airflow.ratings${{ ds_nodash }}",    ❹
   ),
   dag=dag,
)

fetch_ratings >> import_in_bigquery
❶ Create the table if it doesn’t exist.
❷ Overwrite partition data if it already exists.
❸ Attempt to autodetect the schema.
❹ Value after the $ symbol defines the partition to write to, called “partition decorator.”
This produces the second part of this DAG (figure 18.14).

Figure 18.14 DAG uploading and importing data in GCP BigQuery
As you can see, we define a source (file in GCS bucket) and target (BigQuery table partition), but there are more configurations. For example, the create and write dispositions define the behavior in case no table exists or the partition already exists, respectively. Their values (CREATE_IF_NEEDED and WRITE_TRUNCATE) might seem to come out of the blue. The GCP-related Airflow operators, bluntly said, provide convenience wrappers around the underlying request to Google. They provide you, as a developer, an interface to call the underlying system while using Airflow’s features such as variables that can be templated. But arguments such as create_disposition are specific to GCP and propagated directly to the request. As such, the only way to know their expected values is to carefully read the Airflow documentation or GCP documentation, or to inspect the source code as a last resort.
After running this workflow, we can inspect the data in BigQuery (figure 18.15).
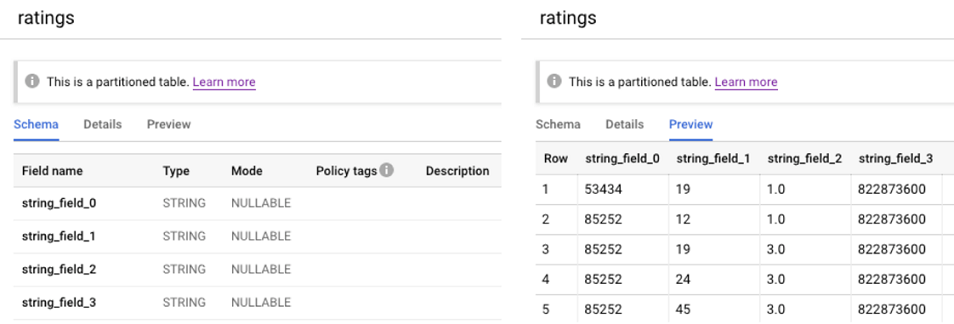
Figure 18.15 Inspecting imported data in BigQuery
As you can see on the right, the data was loaded successfully. However, as we can see on the left, the schema autodetection (which we set to True), did not manage to automatically infer the schema, which is evident from the column names “string_field_0,” “string_field_1,” and so on. While the schema autodetection does the job most of the time, there are no guarantees about the schema inference working correctly. In this situation, we know the structure of the data will not change. So, it is safe to provide the schema with the request.
Listing 18.14 Importing data from GCS into BigQuery with schema
➥ from airflow.providers.google.cloud.transfers.gcs_to_bigquery import GCSToBigQueryOperator

import_in_bigquery = GCSToBigQueryOperator(
   task_id="import_in_bigquery",
   bucket="airflow_movie_ratings",
   source_objects=[
       "ratings/{{ execution_date.year }}/{{ execution_date.month }}.csv"
   ],
   source_format="CSV",
   create_disposition="CREATE_IF_NEEDED",
   write_disposition="WRITE_TRUNCATE",
   bigquery_conn_id="gcp",
   skip_leading_rows=1,                         ❶
   schema_fields=[                              ❷
       {"name": "userId", "type": "INTEGER"},
       {"name": "movieId", "type": "INTEGER"},
       {"name": "rating", "type": "FLOAT"},
       {"name": "timestamp", "type": "TIMESTAMP"},
   ],
   destination_project_dataset_table=(
       "airflow-pipelines:",
       "airflow.ratings${{ ds_nodash }}”,
   ),
   dag=dag,
)
Now inspecting the BigQuery schema not only shows us the correct schema but also displays a nicely formatted timestamp (figure 18.16).

Figure 18.16 Inspecting imported data in BigQuery with a predefined schema
18.3.3 Extracting top ratings
Lastly, we want to compute the top ratings in BigQuery and store the results. Neither BigQuery nor Airflow provide an out-of-the-box solution for this. While we can run queries and export complete tables, we cannot export a query result directly. The workaround is to first store a query result in a new table, export the table, and then delete the intermediate table to clean up.
Listing 18.15 Exporting BigQuery query results via an intermediate table
from airflow.providers.google.cloud.operators.bigquery import
BigQueryExecuteQueryOperator, BigQueryDeleteTableOperator
➥ from airflow.providers.google.cloud.transfers.bigquery_to_gcs import BigQueryToGCSOperator

query_top_ratings = BigQueryExecuteQueryOperator(
   task_id="query_top_ratings",
   destination_dataset_table=(
       "airflow-pipelines:",
       "airflow.ratings_{{ ds_nodash }}",                    ❶
   ),
   sql="""SELECT
movieid,
AVG(rating) as avg_rating,
COUNT(*) as num_ratings
FROM airflow.ratings
WHERE DATE(timestamp) <= DATE("{{ ds }}")
GROUP BY movieid
ORDER BY avg_rating DESC
""",                                                         ❷
   write_disposition="WRITE_TRUNCATE",
   create_disposition="CREATE_IF_NEEDED",
   bigquery_conn_id="gcp",
   dag=dag,
)

extract_top_ratings = BigQueryToGCSOperator(
   task_id="extract_top_ratings",
   source_project_dataset_table=(
       "airflow-pipelines:",
       "airflow.ratings_{{ ds_nodash }}",                    ❸
   ),
   destination_cloud_storage_uris=(
       "gs://airflow_movie_results/{{ ds_nodash }}.csv"      ❹
   ),
   export_format="CSV",
   bigquery_conn_id="gcp",
   dag=dag,
)

delete_result_table = BigQueryTableDeleteOperator(
   task_id="delete_result_table",
   deletion_dataset_table=(
       "airflow-pipelines:",
       "airflow.ratings_{{ ds_nodash }}",                    ❺
   ),
   bigquery_conn_id=”gcp”,
   dag=dag,
)

➥ fetch_ratings >> import_in_bigquery >> query_top_ratings >> extract_top_ratings >> delete_result_table
❶ BigQuery query result destination table
In the Airflow webserver, the result looks like figure 18.17.

Figure 18.17 The complete DAG for downloading ratings and uploading and processing using GCP BigQuery
Using the ds_nodash context variable, we managed to string together a series of tasks performing various actions on BigQuery. Within each DAG run, the value of ds_nodash remains the same and can thus be used to connect task results while avoiding overriding them by the same task at different intervals. The result is a bucket filled with CSVs (figure 18.18).
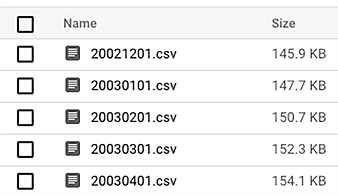
Figure 18.18 Results are exported and stored as CSVs named with the corresponding datetime on GCS.
On the BigQuery side, if we run multiple DAG runs simultaneously, multiple intermediate tables will be created. These are conveniently grouped by BigQuery (figure 18.19).

Figure 18.19 BigQuery groups tables with equal suffixes. When running multiple DAG runs simultaneously, this could result in multiple intermediate tables.
The last task in this DAG cleans up the intermediate result table. Note the operation of querying BigQuery, extracting results, and deleting the intermediate table is now split over three tasks. No operation exists to perform this in one task, not in BigQuery and not in Airflow. Now, say extract_top_ratings fails for some reason—then we’d be left with a remainder in the form of a BigQuery table. BigQuery pricing is composed of multiple elements, including the storage of data, so beware when leaving remainders, as this could induce costs (as on any cloud). Once you’ve finished everything, remember to delete all resources. In Google Cloud, this is simply done by deleting the corresponding project (assuming all resources live under the same project). Under the menu IAM & Admin ® Manage Resources, select your project and click Delete.
After clicking Shut Down, your project is removed. After approximately 30 days, Google removes all resources, although no guarantees are given and some resources might be deleted (much) sooner than others.
Summary
-
The easiest way to install and run Airflow in GCP is on GKE, using the Airflow Helm chart as a starting point.
-
Airflow provides many GCP-specific hooks and operators that allow you to integrate with different services in the Google Cloud Platform, installed with the
apache-airflow-providers-googlepackage. -
The
GoogleBaseHookclass provides authentication to GCP, allowing you to focus on the service details when implementing your own GCP hooks and operators. -
Using GCP-specific hooks and operators usually require you to configure the required resources and access permissions in GCP and Airflow so that Airflow is allowed to perform the required operations.
1.The Celery and KEDA setup was first introduced by this blog post: https://www.astronomer.io/blog/the-keda-autoscaler.