For a photo enthusiast, nothing is quite as exciting as unboxing a new camera—particularly one as innovative as your new Nikon Z6. That’s why YouTube and Nikon-oriented forums are inundated with “unboxing” videos as soon as a highly anticipated camera starts shipping. After waiting a very long time for Nikon’s answer to the booming trend toward compact, fully featured mirrorless cameras, many of us have been eager to see what’s in the box, what kind of accessories we have to enhance our shooting, and—finally—what kinds of pictures we can take.
If you’re like me, the first thing you probably did when you first extracted your Z6 from the box, was attach one of the available lenses, power the beast up, and begin taking photos through a tentative trial-and-error process. Who has time to even scan a manual when you’re holding some of the most exciting technology Nikon has ever offered in your hands? If you’re a veteran Nikon shooter, you probably found many of the controls and menus very similar to what you’re used to, even though the camera itself is much more compact and lighter in weight than your previous Nikon.
But now that you’ve taken a few hundred (or thousand) photos with your new Nikon Z6, you’re ready to learn more. You’ve noted some intriguing features and adjustments that you need to master. Some aren’t available at all on other Nikon models, or are new features, such as focus-shift shooting found in the Z6 and the Z6’s 46-megapixel sibling the Z7, or their dSLR counterpart, the Nikon D850. Goodies packed inside your Z6 include diffraction correction, in-body five-axis vibration reduction, totally silent shooting, a high-resolution electronic viewfinder, and other enhanced capabilities.
Of course, on the other hand, you may be new to the Nikon world, or the Z6 may be your first advanced digital camera, and you need some guidance in learning to use all the creative options this camera has to offer. In either case, despite your surging creative juices, I recommend a more considered approach to learning how to operate the Nikon Z6. This chapter and the next are designed to get your camera fired up and ready for shooting as quickly as possible. And while it boasts both Auto and sophisticated Programmed Auto modes, the Z6 is not a point-and-shoot model; to get the most out of your camera, you’ll want to explore its capabilities fully.
So, to help you begin shooting as quickly as possible, I’m going to first provide a basic pre-flight checklist that you need to complete before you really spread your wings and take off. You won’t find a lot of detail in these initial two chapters. Indeed, I’m going to tell you just what you absolutely must understand, accompanied by some interesting tidbits that will help you become acclimated to your Z6. I’ll go into more depth and even repeat a little of what I explain here in the chapters that follow, so you don’t have to memorize everything you see. Just relax, follow a few easy steps, and then go out and begin taking your best shots—ever.
I hope that even long-time Nikon owners won’t be tempted to skip this chapter or the next one. No matter how extensive your experience level is with dSLRs, your new mirrorless camera has a lot of differences from what you may be used to. Yet, I realize you don’t want to wade through a manual to find out what you must know to take those first few tentative snaps. I’m going to help you hit the ground running with this chapter, which will help you set up your camera and begin shooting in minutes. Because some of you may already have experience with previous Nikon cameras, each of the major sections in this chapter will begin with a brief description of what is covered in that section, so you can easily jump ahead to the next if you are in a hurry to get started.

Note
In this book you’ll find short tips labeled My recommendation or My preference, each intended to help you sort through the available options for a feature, control, or menu entry. I’ll provide my preference, suitable for most people in most situations. I don’t provide these recommendations for every single feature, and you should consider your own needs before adopting any of them.
First Things First
This section helps get you oriented with all the things that come in the box with your Nikon Z6, including what they do. I’ll also describe some optional equipment you might want to have. If you want to get started immediately, skim through this section and jump ahead to “Initial Setup” later in the chapter.
The Nikon Z6 comes in an impressive black and Nikon-yellow box (and two more boxes inside if you purchased the body/24-70mm kit) filled with stuff, including a connecting cord, and lots of paperwork. The most important components are the camera and lens (if you purchased your Z6 with a lens), battery, battery charger, and, if you’re the nervous type, the neck strap. You’ll also need an XQD memory card, plus a spare, as they are not included.
The first thing to do is carefully unpack the camera and double-check the contents. While this level of setup detail may seem as superfluous as the instructions on a bottle of shampoo, checking the contents first is always a good idea. No matter who sells a camera, it’s common to open boxes, use a particular camera for a demonstration, and then repack the box without replacing all the pieces and parts afterward. Someone might have helpfully checked out your camera on your behalf—and then mispacked the box. It’s better to know now that something is missing so you can seek redress immediately, rather than discover two months from now that the HDMI/USB cable clip you thought you’d never use (but now must have for an important video project) was never in the box.
In the Box
At a minimum, the box should contain the following components:
- Nikon Z6 digital camera. It almost goes without saying that you should check out the camera immediately, making sure the back-panel LCD monitor and top-panel LCD control panel aren’t scratched or cracked, the memory and battery doors open properly, and, when a charged battery is inserted and lens mounted, the camera powers up and reports for duty. Out-of-the-box defects like these are very rare, but they can happen. It’s more common that your dealer played with the camera or, perhaps, it was a customer return. That’s why it’s best to buy your Z6 from a retailer you trust to supply a factory-fresh camera.
- Lens (optional). At its introduction the Z6 was available only as an unadorned body or in a kit with the Nikkor 24-70mm/f4 S-series lens. Nikon may offer other lenses as part of a kit in the future, even though only the kit lens and Nikkor 35mm f/1.8 S-series lens were available initially (with the Nikkor 50mm f/1.8 and 14-30mm f/4 following a few months later). As new lenses are introduced, most retailers will readily package this camera with the lens of your choice, often at a savings over buying them individually. The Nikon S-series “roadmap” listed some intriguing optics that were expected around the time this book is published—or shortly thereafter—including a fast 24-70mm f/2.8 lens and 70-200mm f/2.8 zoom.
- USB cable UC-E24. This is a Type-C cable (the easy-insert kind that doesn’t require a specific orientation). You can use this cable to transfer photos from the camera to your computer (I don’t recommend that because direct transfer uses a lot of battery power), to upload and download settings between the camera and your computer (highly recommended), and to operate your camera remotely using Nikon Camera Control Pro software (optional, and not included in the box).
My recommendation: This cable is a standard USB Type-C cord that works with a few other digital cameras that have adopted the USB Type-C interface. If you already own such a cable, you can use it as a spare. The UC-E24 cable is designed to work with the USB cable clip (described next). If you need a cable that’s longer than this two-foot connector, you can find them for much lower than this unit’s $34.95 list price online. I’ve tried several third-party cables and they work fine.
- USB and HDMI cable clip. This snaps onto fittings beneath the USB and HDMI port covers and holds the USB and optional HDMI cables snugly in place.
My recommendation: For occasional use of either cable, say, to transfer files from the camera to your computer over USB, or to temporarily route the Z6’s output to a TV/monitor, using the HDMI interface, you will not need these clips. The unadorned cables fit quite snugly. However, you’ll find the clips invaluable in other applications. For example, if you want to shoot tethered over USB while connected to a laptop running Camera Control Pro, Lightroom, or Capture One, or plan to direct HDMI output to a video recorder, high-definition monitor, or other device, you’ll want to use the clips to make sure your Z6 remains connected.
- Rechargeable Li-ion battery EN-EL15b. You’ll need to charge this 7.0V, 1900mAh (milliampere hour) battery before use, and then navigate immediately to the Setup menu’s Battery Info entry to make sure the battery accepted the juice and is showing a 100 percent charge. (You’ll find more on accessing this menu item in Chapter 13.) You’ll want a second EN-EL15b battery (about $60) as a spare (trust me), so buy one as soon as possible.
- Quick charger MH-25a. This charger comes with both a power cable and a power adapter that can be used instead of the cable to plug the charger directly into a wall outlet.
- AN-DC19 neck strap. Nikon provides you with a neck strap emblazoned with the Nikon Z logo. It’s not very adjustable, and, while useful for showing off to your friends exactly which nifty new camera you bought, the Nikon strap also can serve to alert observant unsavory types that you’re sporting a higher-end model that’s worthy of their attention.
My recommendation: I never attach the Nikon strap to my cameras, and instead opt for a more serviceable strap like the one shown in Figure 1.1. I strongly prefer this type over holsters, slings, chest straps, or any support that dangles my camera upside down from the tripod socket and allows it to swing around too freely when I’m on the run. Give me a strap I can hang over either shoulder, or sling around my neck, and I am happy.
I use the UPstrap shown in the figure, with a patented non-slip pad that keeps your Z6 on your shoulder, and not crashing to the ground. Inventor-photographer Al Stegmeyer (www.upstrap-pro.com) can help you choose the right strap for you.
Figure 1.1 Third-party neck straps like this UPstrap model are often preferable to the Nikon-supplied strap.
- BF-N1 body cap. The body cap keeps dust from infiltrating your camera when a lens is not mounted. Always carry a body cap (and rear lens cap) in your camera bag for those times when you need to have the camera bare of optics for more than a minute or two. (That usually happens when repacking a bag efficiently for transport, or when you are carrying an extra body or two for backup.) The body cap/lens cap nest together for compact storage.
- DK-29 eyepiece. This is the round rubber eyepiece that comes installed on the viewfinder of the Z6. It slides on and off the viewfinder. If you prefer, you can augment it or replace it with several accessories discussed in the next section.
- User’s manuals. Even if you have this book, you’ll probably want to check the user’s guide that Nikon provides, if only to check the actual nomenclature for some obscure accessory, or to double-check an error code. You’ll find both a printed User’s Manual and a SnapBridge Connection Guide leaflet in the package.
My recommendation: If you lose your printed books, just Google “Nikon Z6 manual PDF” to find a downloadable version that you can store on your laptop, on a USB stick, or other media in case you want to access this reference when the paper version isn’t handy. You’ll then be able to access the reference anywhere you are, because you can always find someone with a computer that has a USB port and Adobe Acrobat Reader available. Nikon also offers a “manual reader” app for Android and iOS smart devices you can use to read the factory manual. The Nikon app includes links to let you download manuals directly from their website, without needing to Google them.
- Warranty and registration card. Don’t lose these! You can register your Nikon Z6 by mail or online (in the USA, the URL is www.nikonusa.com/register), and you may need the information in this paperwork (plus the purchase receipt/invoice from your retailer) should you require Nikon service support.
Optional and Non-Optional Add-Ons
Don’t bother rooting around in the box for anything beyond what I’ve listed. There are a few things Nikon classifies as optional accessories, even though you (and I) might consider some of them essential. Here’s a list of what you don’t get in the box, but might want to think about as an impending purchase. I’ll list them roughly in the order of importance:
- Memory card. As I mentioned, the Z6 does not come with a memory card. That’s because Nikon doesn’t have the slightest idea of what capacity or speed card you prefer, so why charge you for one? The Nikon Z6 is likely to be purchased by photographers who have quite definite ideas about their ideal card. Perhaps you’re a wedding photographer who prefers to use 32GB cards (generally the smallest available in the XQD form factor) as a safety measure when capturing a nuptial event. Other photographers, especially sports shooters, instead prefer larger cards to minimize swapping during non-stop action. If you are shooting at high frame rates, or transfer lots of photos to your computer with a speedy card reader, you might opt for the speediest possible memory card.
My recommendation: The Z6’s 24-megapixel image files each amount to roughly 9.4 MB for JPEG Fine to 44.1 MB for uncompressed 14-bit NEF (RAW) files. I recommend Sony 64GB G-series cards as the best price/capacity compromise, although I also own Sony 128GB media. It’s better to have two 64GB cards available (one for overflow or backup) than depend on a single 128GB XQD card.
- Extra EN-EL15b battery. As a mirrorless model, the Z6’s sensor and electronic viewfinder and/or LCD monitor are energized anytime you are using the camera, so you may note that you are getting fewer shots per charge than you may be used to. Nikon says that if you shoot with the viewfinder only, you can expect to get 330 images before you’ll need to swap batteries; if using the less energy-hungry LCD monitor, around 400 shots should be possible. You should be able to capture 85 minutes worth of video with either display.
As a result, at least one extra battery is virtually mandatory. Fortunately, you can use the previous model EN-EL15a and EN-EL15 batteries originally introduced with the Nikon D7000 in 2011 and used in many subsequent models, with one caveat. The older versions of the EN-EL15 battery, marked with a Li-ion 01 designation to the left of the hologram on the cell’s bottom, are not fully compatible with the Z6, and will, in fact, show less capacity than they really contain when used. The newer EN-EL15 version (marked Li-ion 20) and latest EN-EL15a batteries do not have this problem. In addition, I have not found any third-party EN-EL15/EN-EL15a batteries that will work in the Z6 at all. (The camera reports a “dead” battery even if it’s fully charged.)
My recommendation: Buy an extra EN-EL15b or two. They have slightly higher capacity than the older versions, and are the only batteries that can be charged while in the camera using a USB-C cable connected to a power supply. Keep all your batteries charged, and free your mind from worry. Even though you might get 380 or more shots from a single battery, it’s easy to exceed that figure in a few hours of shooting sports at 12 fps. Batteries can unexpectedly fail, too, or simply lose their charge from sitting around unused for a week or two. Although third-party vendors may eventually reverse engineer the encoding required to allow their batteries to function in the Z6, I don’t recommend using them simply to save $60 or so with a camera that costs around $2,000.
- EH-7P charging AC adapter. Plug this small, square “wall wart” into an AC outlet and connect its non-removable Type-C USB connector cable to the USB port of the Z6 and you can recharge the battery of the camera internally while the camera is turned off. It cannot be used to supply power to the camera for taking pictures, however. It is an optional accessory priced at about $50.
My recommendation: You can pick up one of these if you feel the need, but you can do the same thing with any Type-C USB cable and an external USB power source that supplies 5V/3A juice.
- Nikon Capture NX-D or Nikon ViewNX-i software. You can download a free copy of these software utilities from Nikon’s website. Nikon no longer packs a CD-ROM with its cameras.
- Camera Control Pro 2 software. This is the utility you’ll use to operate your camera remotely from your computer. Nikon charges extra for this software, but you’ll find it invaluable if you’re hiding near a tethered, tripod-mounted camera while shooting, say, close-ups of hummingbirds. There are lots of applications for remote shooting, and you’ll need Camera Control Pro to operate your camera.
My recommendation: You may already own Adobe Lightroom, which does an excellent job for tethered shooting, or DxO Labs’ Capture One. Buy a suitably longer USB-C cable, too.
- Add-on Speedlight. Like all Nikon’s flagship full-frame cameras, the Z6 does not have a built-in electronic flash. If you do much flash photography at all, consider an add-on Speedlight as an important accessory.
My recommendation: An add-on flash can serve as the main illumination for your picture, diffused or bounced and used as a fill light, or, if you own several Speedlights, serve as a remote trigger for an off-camera unit. At around $220, the Nikon SB-500 has the most affordable combination of reasonable power, compact size, and features, including a built-in LED video light. If you need more power, the Speedlight SB-700, SB-910, or SB-5000 also offer more flexibility. For example, the SB-5000 can be triggered by radio control using another radio-compatible flash, or the WR-R10 transmitter. I’ll provide more information on electronic flash in Chapters 9 and 10.
- Remote control cable MC-DC2. You can plug this one-meter-long electronic release cable accessory into the accessory port on the side of the Z6, and then fire off the camera without the need to touch the camera itself. In a pinch, you can use the Z6’s self-timer to minimize vibration when triggering the camera. But when you want to take a photo at the exact moment you desire (and not when the self-timer happens to trip), or need to eliminate all possibility of human-induced camera shake, you need this release cord.
My recommendation: These sometimes get lost in a camera bag or are accidentally removed. I bought an extra MC-DC2 cable and keep it in a small box in the trunk of my car, along with an extra memory card. There are many third-party equivalent cables, but the Nikon-brand release costs only about $30 and sometimes it’s wise not to pinch pennies.
- BS-1 accessory shoe cover. This little piece of optional plastic protects the electrical contacts of the “hot” shoe on top of the Z6. You can remove it when mounting an electronic flash, Nikon GP-1/1a GPS device, or other accessory, and then safely leave it off for the rest of your life. I’ve never had an accessory shoe receive damage in normal use, even when not protected. The paranoid among you who use accessories frequently can keep removing/mounting the shoe cover as required. Note that Nikon also offers a BS-3 shoe cover ($10) with better weather sealing to protect the hot shoe if you’re working in damp environments.
My recommendation: Find a safe place to keep it between uses, or purchase replacements for this easily mislaid item. The previous low-cost source for these covers has gone out of business, so I’ve imported a stock of them, in both standard and bubble-level versions, which I’ll send you for a few bucks. (Visit www.laserfairepress.com for more details.)
- HDMI audio/video cable. The Z6 can be connected to a high-definition television, and can export its video output to an external recorder. You’ll need to buy a mini-HDMI C (high-definition multimedia interface) cable to do that. No HDMI cable is included with the camera.
- Nikon GP-1a global positioning system (GPS) device. This accessory attaches to the accessory shoe on top of the Nikon Z6 and captures latitude, longitude, and altitude information, which is embedded in a special data area of your image files. The “geotagging” data can be plotted on a map in Nikon ViewNX-i or other software programs.
- AC adapter EH-5b/EH-5c, EP-5b adapters. There are several typical situations where this AC adapter set for your Z6 can come in handy, such as when in the studio shooting product photos, portraits, class pictures, and so forth for hours on end; when using your Z6 for remote shooting as well as time-lapse photography; for extensive review of images on your standard-definition or high-definition television; or for file transfer to your computer. These all use significant amounts of power. The EH-5c and EH-5b power supplies each require the EP-5B adapter to connect to the camera.
My recommendation: Unless you regularly do time-lapse or interval photography for long periods of time, you can probably skip these expensive accessories. The included EH-7P adapter cannot be used as a substitute, however. It won’t power the Z6 when the camera is on, and only charges the battery while the camera is off.
- Multi-power battery pack MB-N10. This battery/grip was announced but still in development when the Z6 was introduced. Lots of photographers consider a battery pack/vertical grip to be an essential item. Nikon says the pack will hold two EN-EL15b batteries and increase the number of shots and video recording time by approximately 1.8X. It will provide the same level of environmental sealing as the Z6, and its internal batteries can be recharged using an external adapter. Your camera already has a removable battery door and two mounting holes on the bottom to accept it. You can bet that third-party suppliers are busy designing compatible grips, too.
My recommendation: Hold out for the MB-N10. Many people love third-party grips from Meike, Neewer, Vivitar, and others, at a cost of less than $70. I purchased a Meike grip for my D850 to test it out, and found it acceptable for occasional use. I expect a similar unit will be available for the Z6 by the time this book is published. However, most people like to clamp their add-on grips onto the camera and remove them only rarely. If you intend to make a battery grip part of your permanent setup, the Nikon model will be better made, more rugged, and guaranteed to work seamlessly with your camera.
- SC-28 TTL flash cord. Allows using Nikon Speedlights off-camera, while retaining all the automated features.
- SC-29 TTL flash cord. Similar to the SC-28, this unit has its own AF-assist lamp, which can provide extra illumination for the Z6’s autofocus system in dim light (which, not coincidentally, is when you’ll probably be using an electronic flash).
My recommendation: If you intend to work with an external flash extensively, you’ll definitely want to use it off camera. Either of these cables will give you that flexibility. Wireless flash operation (described in Chapter 10) is more versatile, but requires more setup and has a steeper learning curve. With a flash cord, you just connect the cable to your camera and flash and fire away.
Your XQD Cards
One of the early “controversies” (if you can call it that) about the Z6 is that it has a single card slot. Apparently, all professional or semi-professional cameras (often automatically applied to any model, such as the Z6, with an MSRP of $2,000 or more) must have the ability to use two card slots, for overflow or backup purposes. Those of us who made our living for a few decades using cameras that held just a single roll of film (which required after-the-fact processing to confirm that you got anything at all) are less upset. Of course, in those days it was common to wield two or more cameras per shoot, which provided for overflow (back when we depended on 36-exposure rolls of film) and a rudimentary form of interleaved backup.
After more than a decade of daily use of cameras with dual card slots, dating back to my Nikon D3, my take is that a second card slot is useful, but not really used that much for most shooting. I tend not to save to both cards simultaneously, as that can slow down continuous shooting, but I do spend some evenings copying my day’s shots to a second card for backup. If I still did weddings or daily newspaper photography, I’d probably be more inclined to need backup mode.
Dual memory cards in overflow mode come in especially handy for spot news and sports, as a photojournalist will frequent swap out a card that’s 80 percent (or slightly more) full for a fresh one to avoid missing something important during an inopportune trade. But most of the time I simply store my images on my fastest or largest memory card and treat the second slot as convenient insurance.
I am quite glad, however, that in choosing to provide only one card slot Nikon elected to go with the XQD form factor. Compact Flash media are on the way out. Secure Digital cards have a lower top-speed ceiling than XQD cards and typically don’t have the ruggedness and comforting larger size afforded by XQD that many advanced enthusiasts and professionals prefer. XQD and its up-and-coming sibling media CFexpress are the most robust and fastest storage options available for digital photography. In early January, 2019, Nikon announced that you will be able to use faster CFexpress cards in the future—which use the same form factor—with a firmware upgrade to your Z6.
XQD cards are available in speeds up to 440Mbs transfer rates with UHS-II-compliant cameras like the Z6. Keep in mind that different vendors (such as Lexar, which may re-enter the XQD market in the near future) use different specifications for speed (both “X” factors and megabytes per second), and that write speed means how fast the device can transfer an image file to storage, while read speed (which may be emphasized because it is faster) represents how quickly the image can be transferred to your computer though a sufficiently fast connection (such as a USB 3.1 link).
For that reason, I have standardized on Sony XQD G-series media for my Z6. They’re rated at 440Mbs/read and 400Mbs/write, fast enough to suck up images as quickly as the Z6’s (relatively small) buffer is able to deliver them. In read mode, the cards can feed images to my computer as fast as my Windows or Mac machines can receive them. (I use Sony USB 3.1 card readers to transfer images.)
My recommendation: I suggest sticking with Sony’s G-series memory cards, rather than their slower M series, because the Z6 can benefit from fast transfer. Sony has also introduced a more expensive “tough” version that resists bending, x-rays, magnetic fields, and other hazards in 120GB and 240GB capacities. While Lexar previously offered speedy memory cards, parent company Micron shut down Lexar in June 2017. The Lexar branding and trademark were acquired by Longsys, a Chinese flash memory company, in August 2017, and the “new” Lexar has not, at this writing, resumed manufacturing XQD media and the speed and quality of any new products they will offer is unknown as I write this. SanDisk, owned by Western Digital, also makes popular memory cards, but their popularity has led to widespread counterfeiting, with the fakes even slipping into the distribution channels of some major retailers. SanDisk does not support XQD cards in any event. Delkin offers some excellent “rugged” XQD cards in 64GB, 120GB, and 240GB capacities, and promises very fast replacement of cards that fail.
USB 3 FLUX
The conglomerate of corporations in charge of promoting the current USB specification (Hewlett-Packard, Intel, Microsoft, and NEC, among others, and cleverly named the USB 3.0 Promoter Group) keep meddling with the nomenclature, first merging the original USB 3.0 moniker with its successor the USB 3.1 (as USB 3.1 Gen 1 and USB Gen 2). There is now a USB 3.2 spec to accommodate the USB Type-C connector found on the Z6. Don’t panic; devices labeled with these variations are all compatible, differing only by top theoretical transfer speed and type of connector at the end that plugs into your device. If you see a card reader or other add-on labeled USB 3.0, it will work fine in any USB slot, even though, officially, USB 3.0 (as a name) no longer exists.
Initial Setup
This section familiarizes you with the three important controls most used to make adjustments: the multi selector and the main and sub-command dials. You’ll also find information on setting the clock, charging the battery, mounting a lens, and making diopter vision adjustments.
Once you’ve unpacked and inspected your camera, the initial setup of your Nikon Z6 is fast and easy. Basically, you just need to set the clock, charge the battery, attach a lens, and insert a memory card. If you already are confident you can manage these setup tasks without further instructions, feel free to skip this section entirely. While most buyers of a Z6 tend to be experienced photographers, I realize that some readers are ambitious, if inexperienced, and should, at a minimum, skim the contents of the next section, because I’m going to list a few options that you might not be aware of.
Mastering the Multi Selector and Command Dials
I’ll be saving descriptions of most of the other controls used with the Nikon Z6 until Chapter 3, which provides a complete “roadmap” of the camera’s buttons and dials and switches. However, you may need to perform a few tasks during this initial setup process, and most of them will require the MENU button and the multi/sub-selector buttons and pad. (See Figure 1.2.)
- MENU button. It requires almost no explanation; when you want to access a menu, press it. To exit most menus or to confirm and exit in some cases, press it again.
- Multi selector pad. This pad may remind you of the similar control found on many point-and-shoot cameras, and other digital cameras. It consists of a thumbpad-sized button with notches at the up, down, left, right, and diagonal positions.
The multi selector is used extensively for navigation, for example, to navigate among menus; to advance or reverse display of a series of images during picture review; or to change the kind of photo information displayed on the screen. It can also be used interchangeably with the sub-selector “joystick” (described later) to choose one of the user-selectable focus areas on the viewfinder and LCD monitor displays.

Figure 1.2 Location of the MENU and OK buttons and navigation controls.
- Multi selector center (OK) button. The center button (as well as the right directional button) can be used to select a highlighted item from a menu. (I find pressing the right button faster and easier.) The center button also can function as an OK/Enter key.
- Sub-selector button. The sub-selector can be moved like a joystick, or pressed as if it were a button. As a navigational control, the sub-selector joystick’s default function is as a convenient control for selecting the focus point only, as I’ll explain in Chapters 3 and 5. If you also want to use the joystick for menu navigation scrolling or playback functions, you can add those behaviors using Custom Setting f2: Custom Control Assignment, as described in Chapter 12.
The sub-selector center button, by default, can be pressed to lock focus or exposure (as an AE/AF lock button), but it can also be redefined to other behaviors with Custom Setting f2.
The main command dial and sub-command dial are located on the rear and front of the Z6, respectively. The main command dial is used to change settings such as shutter speed, while the sub-command dial adjusts an alternate or secondary setting. For example, in Manual exposure mode, you’d use the sub-command dial to change the aperture, while the main command dial is used to change the shutter speed. (In both cases, the dial is “active” for these adjustments only when the Z6’s exposure meter is on.) The meter will automatically go to sleep after an interval (you’ll learn how to specify the length of time in Chapter 12), and you must wake the camera (just tap the shutter release button) to switch the meter back on and activate the main and sub-command dials.
Touch Screen
The tilting LCD monitor supports a number of touch operations. For example, you can use it to navigate menus or make many settings. However, the touch screen can be especially useful during image playback and when shooting in live view. Here’s a list of things you can do:
- In Playback mode:
- Navigate among images. You can flick the screen to advance to other images during playback. (I’ll explain all the touch screen gestures shortly.)
- Zoom in or out. Double-tap on the touch screen to zoom in or out of an image under review.
- Relocate zoomed area. You can slide a finger around the monitor to reposition the zoomed area.
- View thumbnails and movies. You can navigate among index thumbnails and movies.
- In Photo shooting mode (when using the LCD monitor):
- Take pictures. In photo mode, when the monitor is active you can tap the touch screen to take a picture without pressing the shutter release. (However, you can’t begin video capture with a tap.)
- Select a focus point. In both Photo and Movie modes, you can tap a location on the touch screen to specify a focus point.
- Navigate menus. Personally, I find the touch screen clumsy for navigating menus. The menu bars and icons are a bit too small on the 3.2-inch screen to be tapped with precision. You still must press the MENU button to produce the menus, tap the main menu tab at the left of the screen, then tap the specific item, and then choose among its options. Most of the time the multi selector directional buttons are a lot faster.
- Enter text. When working with a text entry screen (for example, to enter copyright information in the Setup menu), you can tap the on-screen keyboard to enter your text. That’s much faster than the alternative—using the directional buttons to tediously move the highlighting from one character to another.
You can disable touch functions entirely or enable them for Playback functions only (and thus disabling touch menu navigation) in the Setup menu, as described in Chapter 13. You can also specify direction for full-frame playback “flicks” (left/right or right/left) using the Touch Controls entry. In addition, you can turn the Touch Shutter/AF feature off by tapping an icon that appears at the left side of the screen during live view and movie shooting.
When adjustments are available, a white rectangle is drawn around the indicator that can be accessed by touch. You will see up/down and left/right triangles used to adjust increments, or other icons for various functions. Available gestures include:
- Flick. Move a single finger a short distance from side to side across the monitor. Note that if a second finger or other object is also touching the monitor, it may not respond. During playback, a flick to right or left advances to the next or previous image.
- Slide. Move a single finger across the screen in left, right, up, or down directions. You can use this gesture during playback to rapidly move among subsequent or previous images in full-frame view, or to scroll around within a zoomed image. (See Figure 1.3, top left.)
- Stretch/pinch. Spread apart two fingers to zoom into an image during playback, or pinch them together to zoom out. (See Figure 1.3, bottom left.)
- Tap. Touch the screen with a single finger to make a menu adjustment. (See Figure 1.3, right.) For example, you can tap an up/down or left/right triangle to increment or decrement a setting, such as monitor brightness. When Touch Shutter is activated, tapping the screen locates the focus point at the tapped location and takes a picture when you remove your finger from the screen. When Touch Shutter is deactivated, tapping the screen simply relocates the focus point. (You’ll find a Touch Shutter on/off icon at the left side of the LCD monitor screen, as explained in Chapter 14.)
Figure 1.3 Flick or slide your finger across the touch screen to scroll from side to side or up or down (top left), pinch or spread two fingers to zoom in and out (bottom left). Tap menu tabs, entries, and settings to make adjustments (right).
A TOUCH OF SCREEN
Throughout this book, when telling you how to use a touch-compatible feature, I’m going to stick to referring to the physical buttons and dials, for the benefit of those who prefer to use the traditional controls. From time to time I’ll remind you that a particular function can also be accessed using the touch screen.
Nikon really needs to redesign the camera interface to take full advantage of the touch-screen capabilities. Cameras from other vendors, for example, use more slider controls instead of left/right touch arrows to make many adjustments. While some may find Nikon’s implementation helpful, it’s best when used with the Touch Shutter/AF feature, zooming in/out of a playback image, or, especially, when “typing” text rather than scrolling around with the directional buttons. Those functions are perfect for touch control.
Because the screen uses static electricity, it may not respond when touched with gloved hands, fingernails, or when covered with a protective film. I have a GGS glass screen over my Z6’s monitor and it works just fine; your experience may vary, depending on the covering you use. Don’t use a stylus, pen, or sharp object instead of a finger; if your fingers are too large, stick to the physical controls such as the buttons or dials. As you’ll learn in Chapter 13, you can enable or disable the touch controls or enable them only during playback, using an option in the Setup menu.
Setting the Clock
The Z6’s clock settings are stored in internal memory powered by a rechargeable battery that’s not accessible to the user. It is recharged whenever a removable battery is installed in the battery compartment, and two days of normal use will recharge the internal battery enough to power the clock for about a month. The Z6 is normally sold without its main battery installed, so you’ll probably see a Clock Not Set icon the first time you power it up. In addition, if you store your Z6 for a long period without a charged main battery, the “clock” battery may go dead and “forget” your time/date/zone settings. It will recharge when a fresh EN-EL15b battery is inserted, and you’ll need to set the clock again.
So, when you receive your camera, it’s likely that its internal clock hasn’t been set to your local time, so you may need to do that first. You’ll find complete instructions for setting the four options for the date/time (time zone, actual date and time, the date format, and whether you want the Z6 to conform to Daylight Savings Time) in Chapter 13. However, if you think you can handle this step without instruction, press the MENU button, use the multi selector (that thumb-friendly button I just described, located to the immediate right of the back-panel LCD monitor) to scroll down to the Setup menu, press the multi selector button to the right, and scroll down to Time Zone and Date choice, and press right again. The options will appear on the screen that appears next. Keep in mind that you’ll need to reset your camera’s internal clock from time to time, as it is not 100 percent accurate.
Battery Included
Your Nikon Z6 is a sophisticated hunk of machinery and electronics, but it needs a charged battery to function, so rejuvenating the EN-EL15b lithium-ion battery pack furnished with the camera, an EN-EL15a pack, or EN-EL15 battery (Li-ion 20 version, if you’re using an older EN-EL15 battery, please!) should be your first step. A fully charged power source should be good for approximately 380 shots, based on standard tests defined by the Camera & Imaging Products Association (CIPA) document DC-002. In the real world, of course, the life of the battery will depend on how much image review you do, and many other factors. You’ll want to keep track of how many pictures you are able to take in your own typical circumstances, and use that figure as a guideline, instead.
All rechargeable batteries undergo some degree of self-discharge just sitting idle in the camera or in the original packaging. Lithium-ion power packs of this type typically lose a few percent of their charge every few days, even when the camera isn’t turned on. Li-ion cells lose their power through a chemical reaction that continues when the camera is switched off. So, it’s very likely that the battery purchased with your camera is at least partially pooped out, so you’ll want to revive it before going out for some serious shooting.
Charging the Battery
When the battery is inserted into the MH-25a charger properly (it’s impossible to insert it incorrectly), a Charge light begins flashing, and remains flashing until the status lamp glows steadily indicating that charging is finished, in about 2.5 hours. You can use the supplied connector cable or attach a handy included plug adapter that allows connecting the charger directly to a wall outlet (both shown at top left in Figure 1.4). When the battery is charged, flip the lever on the bottom of the camera and slide the battery in, as shown at top right in Figure 1.4. As noted earlier, when the camera is powered down, you can also charge the battery in the camera using the EH-7P AC adapter (Figure 1.4, bottom). Check the Setup menu’s Battery Info entry as I recommended earlier to make sure the battery is fully charged. If not, try putting it in the charger again. One of three things may be the culprit: a.) the actual charging cycle sometimes takes longer than you (or the charger) expected; b.) the battery is new and needs to be “seasoned” for a few charging cycles, after which it will accept a full charge and deliver more shots; c.) you’ve got a defective battery. The last is fairly rare, but before you start counting on getting a particular number of exposures from a battery, it’s best to make sure it’s fully charged, seasoned, and ready to deliver.
Figure 1.4 Charge the battery before use, and then insert the battery in the camera; it only fits one way.
My recommendation: Because Li-ion batteries don’t have a memory, you can top them up at any time. However, their capacity when fully charged will eventually change over time. Once in a while, it’s a good idea to use a battery until it is fully discharged, and then recharge it beyond the normal charging time. (Don’t remove the battery from the charger until the light has gone out and the battery has fully cooled down.) It’s also best to not store a battery for long periods either fully discharged or completely charged in order to maintain its longevity. If you own several (as you should), you’ll probably want to rotate them to even the electronic wear and tear. I’ll show you how to monitor battery use in Chapter 13.
Final Steps
Your Nikon Z6 is almost ready to fire up and shoot. You’ll need to select and mount a lens, adjust the viewfinder for your vision, and insert a memory card. Each of these steps is easy, and if you’ve used any Nikon before, you already know exactly what to do. I’m going to provide a little extra detail for those of you who are new to the Nikon or digital camera worlds.
Mounting the Lens
As you’ll see, my recommended lens mounting procedure emphasizes protecting your equipment from accidental damage and minimizing the intrusion of dust. If your Z6 has no lens attached, select the lens you want to use and loosen (but do not remove) the rear lens cap. I generally place the lens I am planning to mount vertically in a slot in my camera bag, where it’s protected from mishaps, but ready to pick up quickly. By loosening the rear lens cap, you’ll be able to lift it off the back of the lens at the last instant, so the rear element of the lens is covered until then.
After that, remove the body cap by rotating the cap away from the release button. You should always mount the body cap when there is no lens on the camera, because it helps keep dust out of the interior of the camera. (Although the Z6’s sensor cleaning mechanism works fine, the less dust it has to contend with, the better.) The body cap also protects the sensor from damage caused by intruding objects (including your fingers, if you’re not cautious).
Once the body cap has been removed, remove the rear lens cap from the lens, set it aside, and then mount the lens on the camera by matching the alignment indicator on the lens barrel with the raised white bump on the camera’s lens mount. Rotate the lens toward the shutter release until it seats securely.
After you’ve mounted your lens properly (or think you have), you might find various error codes appearing on the control panel, viewfinder, and back-panel color LCD monitor. Here are the most common error codes, and what you should do next:
F --. Lens not mounted. Make sure the lens is securely seated.
[-E-]. No memory card inserted.
*Card Err (flashing). Some error has taken place with your memory card.
Err. A camera malfunction. Release the shutter, turn off the camera, remove the lens, and remount it. Try another lens. If the message persists, then there is a problem unrelated to your lens, and your Z6 may need service.
* For (flashing). Card has not been formatted.
Set the focus mode switch on the lens to A (autofocus). If the lens hood is bayoneted on the lens in the reversed position (which makes the lens/hood combination more compact for transport), twist it off and remount with the “petals” (found on virtually all lens hoods for newer Nikon optics) facing outward. (See Figure 1.5.) A lens hood protects the front of the lens from accidental bumps, and reduces flare caused by extraneous light arriving at the front element of the lens from outside the picture area.
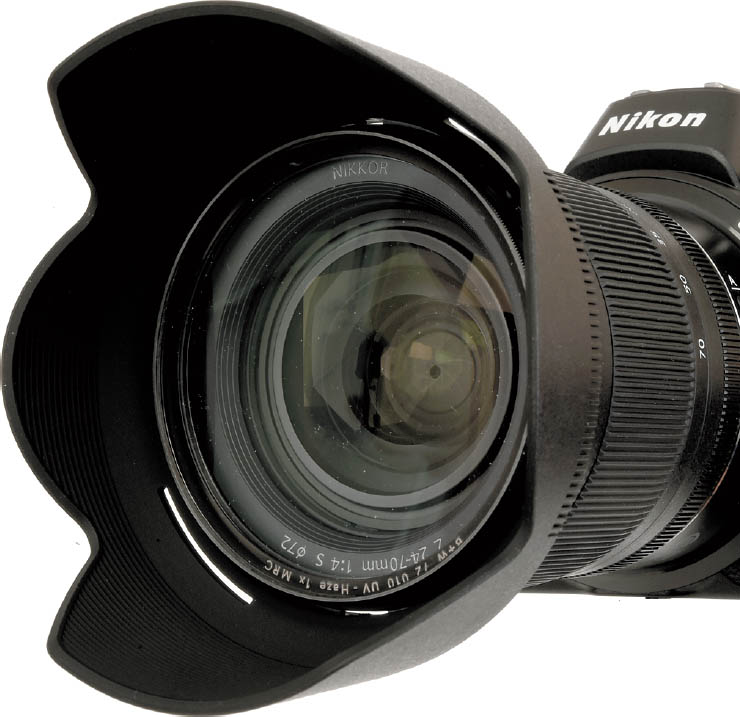
Figure 1.5 A lens hood protects the lens from extraneous light and accidental bumps.
Adjusting Diopter Correction
Those of us with less than perfect eyesight can often benefit from a little optical correction in the viewfinder. Your contact lenses or glasses may provide all the correction you need, but if you are a glasses wearer and want to use the Z6 without your glasses, you can take advantage of the camera’s built-in diopter adjustment, which can be varied from –4 to +2 correction. Pull out, then rotate the diopter adjustment control next to the viewfinder (see Figure 1.6) while looking through the viewfinder until the image of your subject is sharp. (The focus screen where your subject appears, and the indicators outside the image area are at slightly different “distances” optically, so you should use an actual image rather than the status indicators if you want to be able to evaluate focus through the viewfinder accurately.)
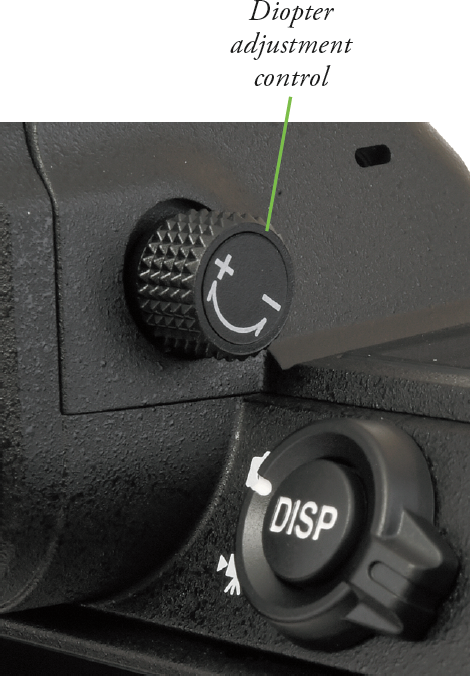
Figure 1.6 Viewfinder diopter correction from –4 to +2 can be dialed in.
If more than one person uses your Z6, and each requires a different diopter setting on the camera itself, you can save a little time by noting the number of clicks and direction (clockwise to increase the diopter power; counterclockwise to decrease the diopter value) required to change from one user to the other.
Inserting a Memory Card
You’ve probably set up your Z6 so you can’t take photos without a memory card inserted. (There is a Slot Empty Release Lock entry in the Setup menu that enables/disables shutter release functions when a memory card is absent—learn about that in Chapter 13.) So, your final step will be to insert a memory card. Slide the door on the back-right edge of the body toward the back of the camera to release the cover, and then open it. (You should only remove a memory card when the camera is switched off, or, at the very least, the yellow-green memory access light that indicates the camera is writing to the card is not illuminated.)

Figure 1.7 The memory card is always inserted with the label facing the back of the camera.
Insert the XQD card with the label facing the back of the camera, oriented so the edge with the contacts goes into the slot first. (See Figure 1.7.) Close the door, and, if necessary, format the card. The card can be removed just by pressing it inward; it will pop out far enough that you can extract it.
Formatting a Memory Card
There are three ways to create a blank memory card for your Z6, and two of them are wrong. Here are your options, both correct and incorrect:
- Transfer (move) files to your computer. When you transfer (rather than copy) all the image files to your computer from the memory card (either using a direct cable transfer or with a card reader), the old image files are erased from the card, leaving the card blank. Theoretically. Unfortunately, this method does not remove files that you’ve labeled as Protected (by pressing the i button during Playback and selecting Protect from the screen that pops up), nor does it identify and lock out parts of your memory card that have become corrupted or unusable since the last time you formatted the card. Therefore, I recommend always formatting the card, rather than simply moving the image files, each time you want to make a blank card. The only exception is when you want to leave the protected/unerased images on the card for a while longer, say, to share with friends, family, and colleagues.
- (Don’t) Format in your computer. With the memory card inserted in a card reader or card slot in your computer, you can use Windows or Mac OS to reformat the memory card. Don’t! The operating system won’t necessarily install the correct file system. The only way to ensure that the card has been properly formatted for your camera is to perform the format in the camera itself. The only exception to this rule is when you have a seriously munged memory card that your camera refuses to format. Sometimes it is possible to revive such a corrupted card by allowing the operating system to reformat it first, then trying again in the camera.
- Setup menu format. To use the recommended method to format a memory card, press the MENU button, use the up/down buttons of the multi selector to choose the Setup menu (which is represented by a wrench icon), navigate to the Format Memory Card entry with the right button of the multi selector, and select Yes from the screen that appears. Press OK to begin the format process.
My recommendation: I always use the Setup menu format before each shoot, as long as the images thereon have already been transferred to my computer. Nothing is worse than beginning a session and discovering that your memory card is almost full and contains images you don’t want to delete to make room for new shots. If you neglected to bring along an extra memory card, you may have some difficult decisions to make.