Unlike the Photo Shooting and Movie Shooting menu options, which you are likely to modify frequently as your picture-taking environment changes, Custom Settings are slightly more stable sets of preferences that let you tailor the behavior of your camera in a variety of different ways for longer-term use.
Some options are minor tweaks useful for specific shooting situations, or make the camera more convenient to use. Perhaps you’d like to assign a frequently used feature to the Fn button, or turn on the viewfinder grid display to make it easier to align vertical or horizontal shapes.
Best of all are the settings that improve the way the Z6 operates. Custom Setting b4, for example, provides a way to fine-tune the exposures your camera calculates for each of the metering modes: Matrix, Center-weighted, Spot, and Highlight-weighted. If you find that one or the other consistently over- or underexposes more than you like, it’s easy to dial in a permanent correction. Should you feel that the Z6 is taking a few pictures that are out of focus, Custom Settings a1 and a2 can be used to tell it not to fire until optimum focus is achieved.
This chapter concentrates on explaining all the options of the Custom Settings menu and, most importantly, when and why you might want to use each setting.
Custom Settings Menu Layout
There are more than four dozen different Custom Settings, arranged in seven different categories, as shown in Figure 12.1: Autofocus, Metering/Exposure, Timers/AE Lock, Shooting/Display, Bracketing/Flash, Controls, and Movie. Some of those may seem to be an odd match. What does bracketing have to do with flash? Oh, wait! You can bracket flash (as well as non-flash) exposures. The category system does have an advantage. Once you’re familiar with what settings are available within each category, you can select the Custom Settings menu, scroll down to the specific category you want, press the right button, and enter the Custom Settings system at that point, skipping the other entries.
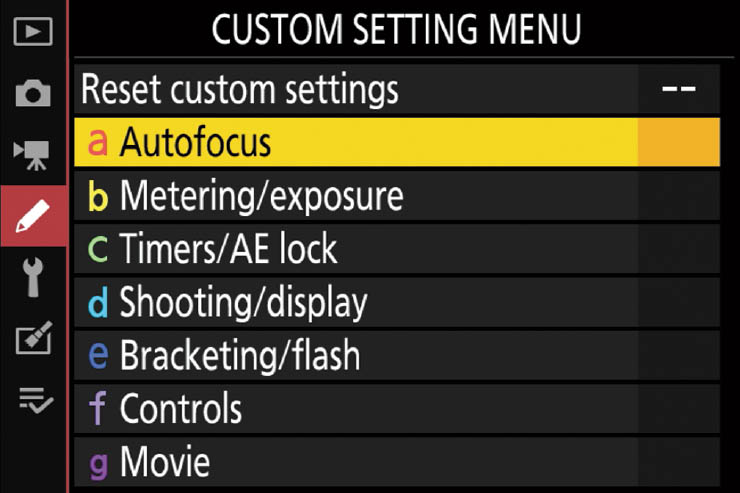
Figure 12.1 Entries are allocated among seven categories in the Custom Settings menu.
However, once you get past the main Custom Settings screen, the entries are one long scrolling list, so if you’ve guessed wrong about where you want to start, you can enter the list at any point and then scroll up or down until you find the entry you want. Or, press the left directional key to get back to the main screen, then move down to another entry point and re-enter. The Custom Settings menu items are all color- and letter-coded: a (red) for autofocus functions; b (yellow) for metering/exposure; c (green) for timers and AE lock features; d (light blue) for shooting/display functions; e (dark blue) for bracketing/flash; f (purple) for adjustments to the Z6’s controls; and g (magenta) to assign Movie mode functions to the i menu; the Fn1, Fn2, OK, AF-ON sub-selector, and shutter buttons; and the lens control ring.
For simplicity, in this book I have been consistently referring to the Custom Settings menu entries by their letter/names, so that you always know that when I mention Custom Setting a5, I am describing the fifth entry in the Autofocus menu: Focus Points Used. That terminology makes it easy to jump quickly to the specific entry. Note that for simplicity’s sake, in the figures that illustrate each of the separate Custom Settings categories in this chapter, that category’s entries are shown on as few screens as possible. In practice, as you scroll through the listings, the entries for a category may be spread over several different screens.
You can select a Custom Settings function as you do any menu entry, by pressing the multi selector right button, and navigating through the screen that appears with the up/down (and sometimes left/right) buttons. Confirming an option is usually done by pressing the OK button, pushing the multi selector right button, or sometimes by choosing Done when a series of related options have been chosen.
At the top level, you’ll see these entries:
- Reset Custom Settings
- a. Autofocus
- b. Metering/Exposure
- c. Timers/AE Lock
- d. Shooting/Display
- e. Bracketing/Flash
- f. Controls
- g. Movie
Reset Custom Settings
Options: Reset: Yes, No
My preference: N/A
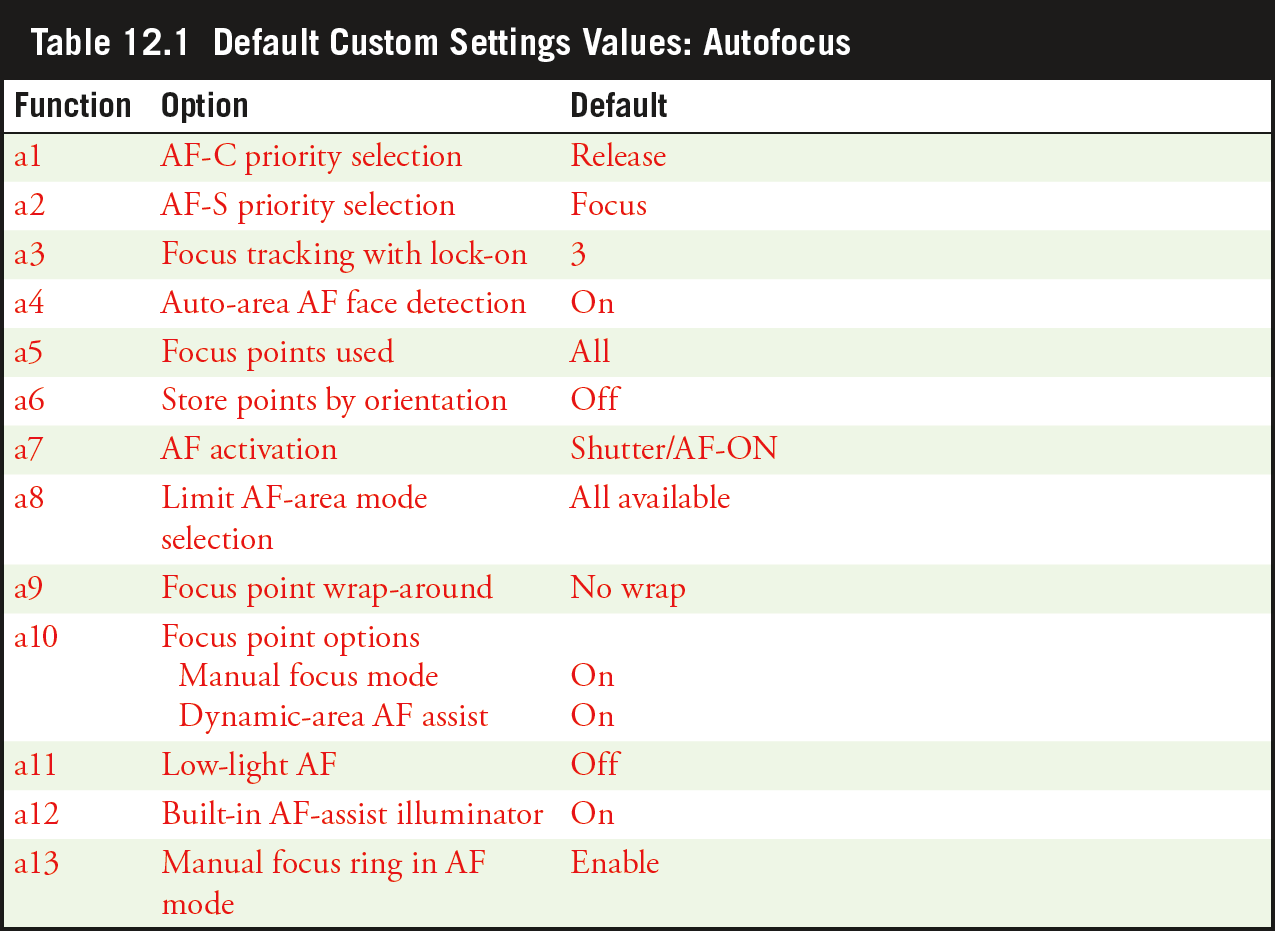
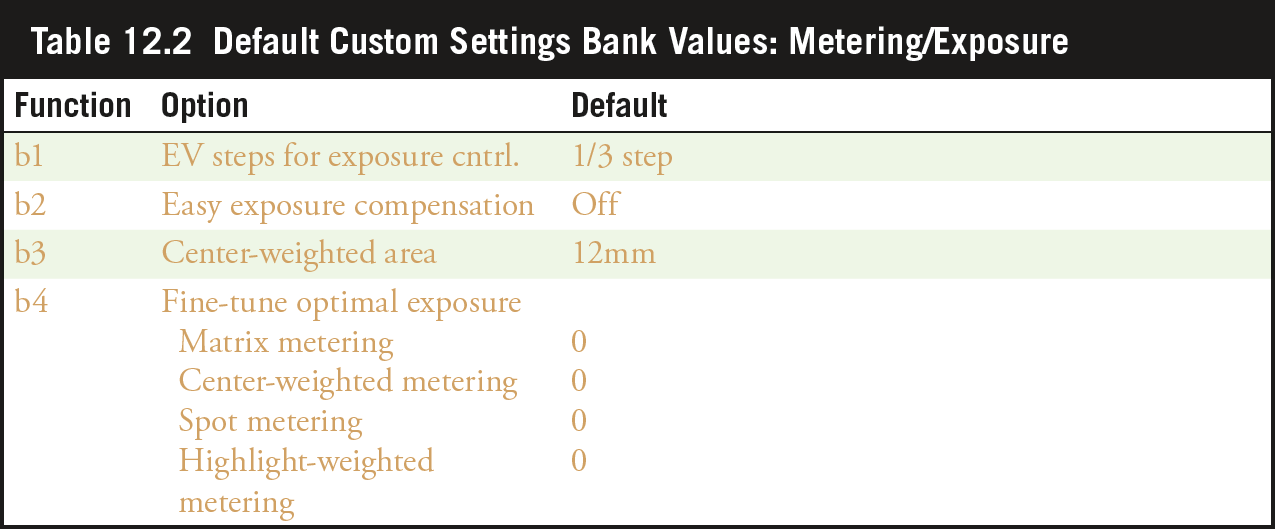
You can restore the settings of the Custom Settings banks to their default values. In Chapter 3, I provided a list of recommended Custom Settings menu bank settings for typical photo environments. Tables 12.1 to 12.7 show the default values as the Nikon Z6 comes from the factory, and after a reset. If you don’t know what some of these settings are, I’ll explain them later in this chapter. Be careful when changing any of your carefully tailored customized settings back to the defaults.

a. Autofocus
The red-coded Autofocus options (see Figure 12.2) deal with some of the potentially most vexing settings available with the Nikon Z6. After all, incorrect focus is one of the most damaging picture killers of all the attributes in an image. You may be able to compensate for bad exposure, partially fix errant color balance, and perhaps even incorporate motion blur into an image as a creative element. But if focus is wrong, the photograph doesn’t look right, and no amount of “I meant to do that!” pleas are likely to work. The Z6’s autofocus options enable you to choose how and when focus is applied (using the AF-S or AF-C focus mode you selected on the camera body), the controls used to activate the feature, and the way focus points are selected from the available zones.
a1 AF-C Priority Selection
Options: Release (default), Focus
My preference: Release
As you learned in Chapter 5, when not shooting movies, the Nikon Z6 has two primary autofocus modes, continuous-servo autofocus (AF-C) and single-servo autofocus (AF-S). (Movie mode adds a third: Full-time autofocus [AF-F].) This menu entry allows you to specify what takes precedence when you press the shutter release all the way down to take a picture: focus (called focus-priority) or the release button (called release-priority). You can choose from:
- Release. When this option is selected (the default), the shutter is activated when the release button is pushed down all the way, even if sharp focus has not yet been achieved. Because AF-C focuses and refocuses constantly when autofocus is active, you may find that an image is not quite in sharpest focus. Use this option when taking a picture is more important than absolute best focus, such as fast action or photojournalism applications. (You don’t want to miss that record-setting home run, or the protestor’s pie smashing into the Governor’s face.) Using this setting doesn’t mean that your image won’t be sharply focused; it just means that you’ll get a picture even if autofocusing isn’t quite complete. If you’ve been poised with the shutter release pressed halfway, the Z6 probably has been tracking the focus of your image.
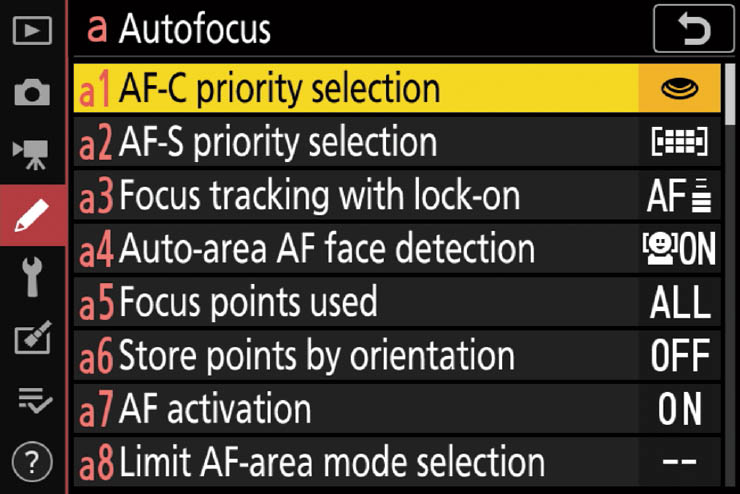
Figure 12.2 The Autofocus options menu.
- Focus. The shutter is not activated until sharp focus is achieved. This is best for subjects that are not moving rapidly. AF-C will continue to track your subjects’ movement, but the Z6 won’t take a picture until focus is locked in. You might miss a few shots, but you will have fewer out-of-focus images.
a2 AF-S Priority Selection
Options: Release, Focus (default)
My preference: Focus
This is the counterpart setting for single-servo autofocus mode.
- Release. The shutter is activated when the button is depressed all the way, even if sharp focus is not quite achieved. Keep in mind that, unlike AF-C, the Z6 focuses only once when AF-S mode is used. So, if you’ve partially depressed the shutter release, paused, and then pressed the button down all the way, it’s possible that the subject has moved and release-priority will yield more out-of-focus shots than release-priority with AF-C.
- Focus. This default prevents the Z6 from taking a picture until focus is achieved and the in-focus indicator in the viewfinder glows steadily. If you’re using single-servo autofocus mode, this is probably the best setting. Moving subjects really call for AF-C mode in most cases.
a3 Focus Tracking with Lock-on
Options: Blocked Shot AF Response: 5 (Delayed), 4, 3 (Normal) (default), 2, 1 (Quick)
My preference: Normal
Sometimes new subjects interject themselves in the frame temporarily. Perhaps you’re shooting an architectural photo from across the street and a car passes in front of the camera. Or, at a football game, a referee dashes past just as a receiver is about to make a catch. This setting lets you specify how quickly the Z6 reacts to these transient interruptions that would cause relatively large changes in focus before refocusing on the “new” subject matter. Using the Blocked Shot AF Response slider shown in Figure 12.3, you can specify a long delay, so that the interloper is ignored, or a shorter delay, so that the Z6 immediately refocuses when a new subject moves into the frame.
A setting of 5 (Delayed) causes the Z6 to ignore the intervening subject matter for a significant period of time. Use this setting when shooting subjects, such as sports, in which focus interruptions are likely to be frequent and significant. You can also choose a setting of 1 (Quick) which tells the Z6 to wait only a moment before refocusing. Very high continuous frame rates may work better when you allow refocusing to take place rapidly, without a lock-on delay. Intermediate settings from 2 to 4 provide different amounts of delay. The middle value, 3, offers an intermediate delay before the camera refocuses on the new subject. It’s often the best choice when shooting sports in either of the continuous shooting modes, as the long delay can throw off autofocus accuracy at higher frames per second settings.
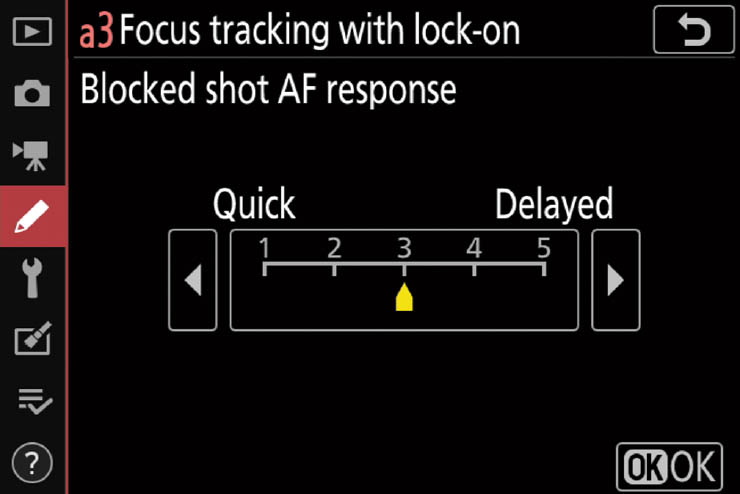
Figure 12.3 Options for Focus Tracking with Lock-On.
a4 Auto-Area AF Face-Detection
Options: On (default), Off
My preference: On when shooting candid portraits or stage performances
The Z6’s EXPEED 6 processor can analyze your image to find faces, allowing the camera to locate human subjects to autofocus on, and track them as they move. This is an incredibly powerful feature, especially for sports, stage performances, relentlessly moving children, and other action involving humans. I tend to use it for candid portraits and performances to speed up the autofocus process, and find it works best in single-shot mode or continuous frame rates in the 1–5 fps range. This menu entry allows you to turn face-detection on or off.
a5 Focus Points Used
Options: All (default), 1/2 Every other point
My preference: Depends on subject
You can choose the number of focus points available when you manually select a zone using the multi selector up/down and left/right buttons or the sub-selector joystick. You have two choices:
- All. This is the default. Up to 493 points are available. The exact number used varies by the active AF-area mode. Pinpoint AF uses all 493; Single Point works with an array of 19 × 11 focus zones (209 in all); Wide Area (Small) uses 153 zones in a 9 × 17 array, while Wide Area (Large) has just 9 zones in a 3 × 3 array. Note that the focus frames can overlap, producing more available focus areas than the array would indicate.
- 1/2 Every Other Point. The Z6 uses every other focus point/zone available for a given AF-area mode (with one exception). That’s a reduction of greater than 2/3 of the available points/zones in each case. This can be the best choice for faster focus point selection when taking pictures of relatively large, evenly illuminated subject matter such that choosing precise focus zones is not particularly beneficial. I often use Single Point AF and enable the Every Other Point option—the available focus areas are plenty and can be set quickly as action moves around the floor when photographing basketball games. The single exception? When using Wide-area AF (Large), the nine zones remain exactly the same when you select this option.
Reminder: Keep in mind that the actual number of points you can choose from will vary, depending on the AF-area mode you select, and the positions at which you can place the focus frame is even larger, because focus areas can overlap. For example, when using Pinpoint AF, the Z6 allows individually selecting 493 phase detect focus points embedded in the sensor, arranged in an array 29 sensors wide by 17 sensors tall. But the position of the focus frame can be adjusted horizontally and vertically more or less continuously, giving you several hundred horizontal columns and a proportionate number of vertical rows to specify—yes, I’ll say it—pinpoint focus. That can be too much precision. You’ll find complete coverage of autofocus topics in Chapter 5.
a6 Store Points by Orientation
Options: On, Off (default)
My preference: On
Here you can choose whether separate focus points can be selected for landscape and portrait orientations of the camera, and whether you can select different AF-area modes in these orientations, as explained in detail in Chapter 5.
When you choose Off, the focus point will maintain the same relative position as you rotate the camera, and the AF-area mode will remain the same. Select On, and you can choose a different focus point when the camera is set to horizontal orientation, rotated 90 degrees clockwise from horizontal, or rotated 90 degrees counterclockwise from horizontal.
This is a very cool feature, and best visualized using the illustrations I supplied in Chapter 5 where Store Points by Orientation is explained in detail.
a7 AF Activation
Options: Shutter/AF-ON (default), AF-ON Only: Out-of-focus release; Enable (default), Disable
My preference: AF-ON Only for anyone proficient in back button focus, described in Chapter 5
You can specify whether the camera focuses when the shutter release is pressed halfway, or disable that behavior. You’d want to disable shutter release AF activation if you elect to use back button focus.
- Shutter/AF-ON. Pressing the shutter release halfway or a button you have defined for AF activation (as described under Custom Control Assignment later in this chapter) always activates autofocus.
- AF-ON Only. Pressing the shutter release halfway does not activate autofocus. Instead, you can activate AF by pressing the button you’ve defined for that behavior using the Custom Controls commands described later, and in Chapter 5 under the back button focus section.
The Z6 allows additional fine-tuning of your AF-ON Only setting. When this option is highlighted, you can press the multi selector right button and choose from two Out-of-Focus Release options:
- Enable. The Z6 can take photos when the shutter release is pressed all the way down, even if you have not pressed the AF-ON button and focus has therefore not taken place. You might find this useful to enable grab shots that take place without warning, and you want a photo even if it may not be in perfect focus. You still have the option of activating AF by pressing the AF-ON button before you press the shutter release all the way, but if you do not, the photo will still be captured.
- Disable. You must activate AF by pressing the AF-ON button before using the shutter release to take a picture. It keeps the Z6 from taking a picture until after autofocus has been activated. This option applies only when focus-priority has been chosen for AF-C or AF-S and you are using an AF-area selection mode that allows the user to select the focus area or zones (in other words, all AF-area modes other than Auto-Area AF). This option will prevent you from accidentally taking out-of-focus pictures if you forget you are using AF-ON to activate autofocus and press the shutter release without remembering to initiate AF. This option is almost mandatory for new back button focus users, at least until pressing the AF-ON button before shooting becomes a reflex.
a8 Limit AF-Area Mode Selection
Options: Pinpoint, Single-point AF, Dynamic-area AF, Wide-area AF (Small), Wide-area AF (Large), Auto-area AF (Default is all available)
My preference: All available
AF-area modes are chosen by highlighting AF-area mode from the i menu, and rotating either command dial. If there are certain area modes that you don’t use, you can disable them using this menu item.
Single-point AF-area mode is always available, and cannot be disabled. However you can highlight any of the others and press the right directional button to remove the check box next to that mode’s label to disable it. You can thus enable Single-point AF, plus any combination of Dynamic-area AF, both Wide-area AF options, or Auto-area AF. I explained this feature in Chapter 5.
a9 Focus Point Wrap-Around
Options: Wrap, No Wrap (default)
My preference: No Wrap
This is the first entry on the second page of the Autofocus menu (see Figure 12.4). This setting is purely a personal preference parameter. When you press the multi selector left/right and up/down buttons to choose a focus point, the Z6 can be told to stop when the selection reaches the edge of the 51-point array—or, it can continue, wrapping around to the opposite edge, like Pac-Man leaving the playing area on one side or top/bottom to re-emerge on the other. (I hope I’m not revealing my age, here.) Your choices are simple; decide which behavior you prefer:
- Wrap. Pressing the left/right or up/down buttons when you’ve reached the edge of the focus point display wraps the selection to the opposite side, still moving in the same direction.
- No Wrap. The focus point selection stops at the edge of the focus zone array.
a10 Focus Point Options
Options: Manual Focus Mode: On (default), Off; Dynamic-area AF assist: On (default), Off
My preference: Manual Focus Mode: On; Dynamic-area AF assist: Off
How do you want the focus points displayed in the viewfinder? Your choices for focus point options include:
- Manual Focus mode. When you’re using manual focus instead of autofocus, the Z6 still monitors how well your image is in focus, using the active focus point. Here, you can choose how it is displayed.
- On. Active point illumination is always shown when using manual focus. Select this option if you like to know what focus point is being used.
- Off. Active point illumination is enabled during manual focus only during focus point selection as you move the point around the frame with the directional buttons or sub-selector.
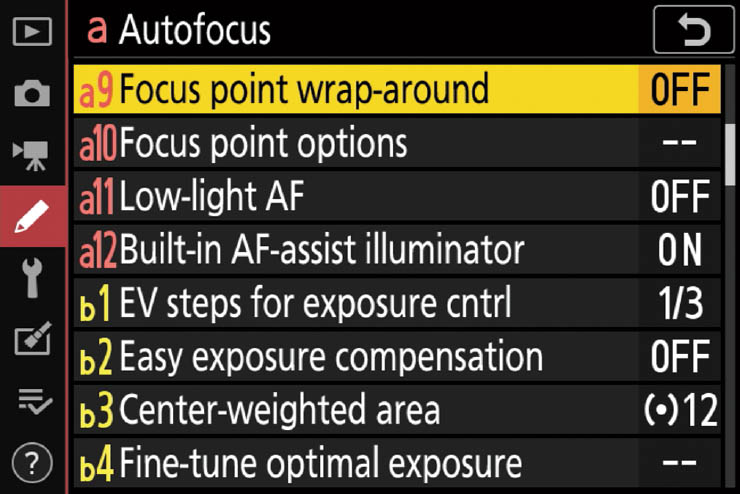
Figure 12.4 The next page of the Autofocus menu.
- Dynamic-area AF assist. Select On to display both the focus point selected and the surrounding focus points when using Dynamic-area AF. Choose Off, and only the selected focus point is shown. When you’re using Dynamic-area AF, you might want to choose On as a reminder that the cluster of points around the main focus point are active. However, once you become accustomed to using that AF-area mode, you can turn the display Off and slightly declutter your screen.
a11 Low-Light AF
Options: On, Off (default)
My preference: Off
Low-light AF allows the Z6 to focus more accurately under dim illumination when using AF-S. The camera boosts AF response slightly by decreasing the refresh rate of the display. Normally the display refreshes 60 times per second (that is, 60Hz), and those rapid changes limit the ability of the AF system to read the embedded phase detection pixels in the sensor and calculate focus. By slowing down the refresh rate to 30Hz, the Z6 can focus more easily under low-light conditions. Even so, autofocus may be slower when this mode is activated, so the camera warns you by showing “Low-light” on the display. The feature is disabled when you’ve rotated the mode dial to the Auto position. I tend to leave this setting at Off, because under truly low-light conditions I prefer to switch to manual focus and fine-tune the focus plane myself. You’ll find more detailed descriptions of Phase-detect AF and other autofocus aspects in Chapter 5.
a12 Built-in AF-Assist Illuminator
Options: On (default), Off
My preference: Off
There is an LED on the left front panel (as you hold the camera). It can illuminate to provide additional lighting to improve autofocus when using the AF-S focus mode. The illuminator is effective over a very narrow range (Nikon says 3’4” to 9’10”) and its anemic burst of light can be obstructed by any lens hood you have mounted, or even a stray finger. I usually disable this feature, because I shoot so many photos at concerts and other events where the AF-assist light is distracting (or even forbidden—choreographers have told me dancers may orient their twirling moves on theater lights they perceive during a spin).
a13 Manual Focus Ring in AF Mode
Options: Enable (default), Disable
My preference: Enable
This setting is one you can ignore most of the time, and Nikon makes that especially easy: it doesn’t appear on the menu at all unless you have one of the very few lenses that are compatible with it. At this writing, there are only six lenses in three different focal length capable of making this entry magically appear. They are the following AF-P optics that can be mounted on the Z6 using the FTZ adapter (I explained the difference between AF-P and AF-S lenses in Chapter 7.):
- AF-P Nikkor 10-20mm f/4.5-5.6G VR DX
- AF-P Nikkor 18-55mm f/3.5-5.6G DX (both VR and non-VR versions)
- AF-P Nikkor 70-300mm f/4.5-6.3G ED DX (both VR and non-VR versions)
- AF-P Nikkor 70-300mm f/4.5-5.6E ED VR
Note that all but the last are DX lenses. They’ll work fine on the Z6; the camera will automatically switch to 19.5 MP DX “crop” mode. Those lenses and the lone full-frame lens (so far) allow using this entry to enable (or disable) the ability to fine-tune focus manually with the focus ring when the Z6 is set to an autofocus mode.
All other autofocus lenses compatible with the Z6 provide this ability automatically. When enabled, you can press the shutter release halfway down to autofocus (or press your AF-ON button), and then fine-tune focus by rotating the lens’s focus ring. If at any time you want the Z6 to refocus automatically, release the shutter button or AF-ON button, and press again. You might want to disable this feature (when using an AF-P lens) to prevent accidentally straying from the Z6’s autofocus adjustment. In most cases, however, it’s a solution in search of a problem, and Nikon helpfully keeps this setting hidden.
b. Metering/Exposure
The yellow-coded Metering/Exposure Custom Settings (see Figure 12.5) let you define four different parameters that affect exposure metering in the Nikon Z6.

Figure 12.5 There are four metering/exposure options.
b1 EV Steps for Exposure Cntrl.
Options: 1/3 step (default), 1/2 step, 1 step
My preference: 1/3 step
This setting tells the Nikon Z6 the size of the “jumps” it should use when making exposure adjustments—either one-third or one-half stop. The increment you specify here applies to f/stops, shutter speeds, EV changes, and autoexposure bracketing. As with ISO sensitivity step value, you can select from 1/3 step (the default), 1/2 step, or 1 full step increments.
Choose the 1/3-stop setting when you want the finest increments between shutter speeds and/or f/stops. For example, the Z6 will use shutter speeds such as 1/60th, 1/80th, 1/100th, 1/125th, and 1/160th second, and f/stops such as f/5.6, f/6.3, f/7.1, and f/8, giving you (and the autoexposure system) maximum flexibility.
With 1/2-stop increments, you will have larger and more noticeable changes between settings. The Z6 will apply shutter speeds such as 1/60th, 1/125th, 1/200th, and 1/500th second, and f/stops including f/5.6, f/6.7, f/8, f/9.5, and f/11. These coarser adjustments are useful when you want more dramatic changes between different exposures.
b2 Easy Exposure Compensation
Options: On (Auto Reset), On, Off (default)
My preference: Off
This setting potentially simplifies dialing in EV (exposure value compensation) adjustments by specifying whether the Exposure Compensation button must be pressed while adding or extracting EV compensation. Because of the possibility of confusion or error, I tend to leave this setting turned off, which is the default. Your choices are as follows:
- On (Auto reset). This setting allows you to add or subtract exposure by rotating the subcommand dial when in Program (P) or Shutter-priority (S) exposure modes, or by rotating the main command dial when using Aperture-priority (A) mode. Rotating either dial has no effect in Manual (M) exposure mode. (If you’ve reversed the behavior of the command dials using Custom Setting f8, the “opposite” command dial must be used to make the changes.) Any adjustments you’ve made are canceled when the camera is shut off, or the meter-off time expires and the Z6’s exposure meters go back to sleep. That’s a useful mode, because most of us have made an EV adjustment and then forgotten about it, only to expose a whole series of improperly exposed photos. You can still have “sticky” EV settings when Easy Exposure Compensation is turned on: just hold down the Exposure Compensation button when you make your changes. You can also increase the standby timer interval (using Custom Setting c3, described shortly) to a longer period so your adjustment will remain in force for a longer period of time.
- On. This setting brings the Easy Compensation mode into conformance with the Z6’s behavior when the Exposure Compensation button is pressed: in either case, any EV modifications you make will remain until you countermand them. As I have mentioned several times, forgetting to “turn off” EV changes after you’ve moved on to a different shooting environment is a primary cause of over- and underexposure among those of us who are forgetful or who ignore the Z6’s flashing EV warnings.
- Off. With this default setting, you must always press the Exposure Compensation button while rotating the main command dial to add or subtract exposure. Use this choice when you don’t want any EV changes unless you deliberately make them by pressing the button.
b3 Center-Weighted Area
Options: 12mm (default), Average
My preference: 12mm
This setting changes the size of the Center-weighted exposure spot. Your choices include 12mm or full-frame average (which turns the metering mode from a center-weighted system to an old-fashioned averaging system). Check out Figure 4.6 in Chapter 4 to see the approximate area of the coverage. Note, if you’re migrating from F-mount, some Nikon dSLRs allow you to change the size of the Center-weighted spot, but the Z6 gives you only the 12mm and full-screen averaging options. The spot is “fuzzy” anyway, and I’ve found changing the size really has very little effect most of the time.
b4 Fine-Tune Optimal Exposure
Options: Default (none), Plus or minus one stop in 1/6-stop increments for: Matrix metering, Center-weighted metering, Spot metering, Highlight-weighted metering
My preference: N/A
This setting is a powerful adjustment that allows you to dial in a specific amount of exposure compensation that will be applied, invisibly, to every photo you take using each of the four metering modes. No more can you complain, “My Z6 always underexposes by 1/3 stop!” If that is actually the case, and the phenomenon is consistent, you can use this custom menu adjustment to compensate.
Exposure compensation is usually a better idea (does your camera really underexpose that consistently?), but this setting does allow you to “recalibrate” your Z6 yourself. However, you have no indication that fine-tuning has been made, so you’ll need to remember what you’ve done. After all, you someday might discover that your camera is consistently overexposing images by 1/3 stop, not realizing that your Custom Setting b4 adjustment is the culprit.
In practice, it’s rare that the Nikon Z6 will consistently provide the wrong exposure in any of the four metering modes, especially Matrix metering, which can alter exposure dramatically based on the Z6’s internal database of typical scenes. This feature may be most useful for Spot metering, if you always take a reading off the same type of subject, such as a human face or 18 percent gray card. Should you find that the gray card readings, for example, always differ from what you would prefer, go ahead and fine-tune optimal exposure for Spot metering, and use that to read your gray cards. To use this feature:
- 1. Select fine-tuning. Choose Custom Setting b4: Fine-tune Optimal Exposure from the Custom Settings menu.
- 2. Consider yourself warned. In the screen that appears, choose Yes after carefully reading the warning that Nikon insists on showing you every time this option is activated.
- 3. Select metering mode to correct. Choose Matrix, Center-weighted, Spot, or Highlight-weighted metering in the screen that follows by highlighting your choice and pressing the multi selector right button. (See Figure 12.6, left.)
- 4. Specify amount of correction. Press the up/down buttons to dial in the exposure compensation you want to apply. You can specify compensation up to +/– one stop, in increments of 1/6 stop, half as large a change as conventional exposure compensation. Compensation of up to one full stop (plus or minus) can be entered. This is truly fine-tuning. (See Figure 12.6, right.)
- 5. Confirm your change. Press OK when finished. You can repeat the action to fine-tune the other exposure modes if necessary.
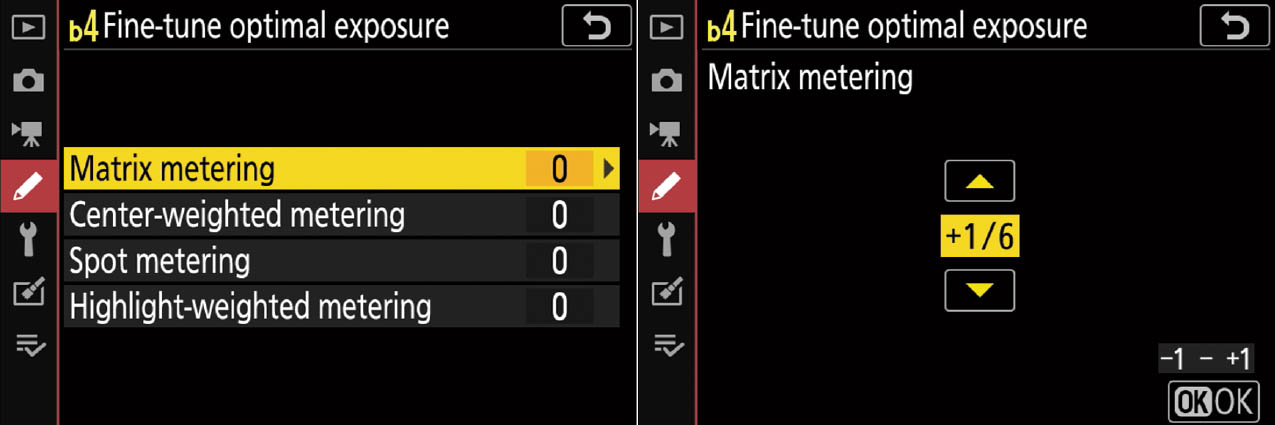
Figure 12.6 You can fine-tune any of four metering modes (left). Increments of 1/6 stop are available (right).
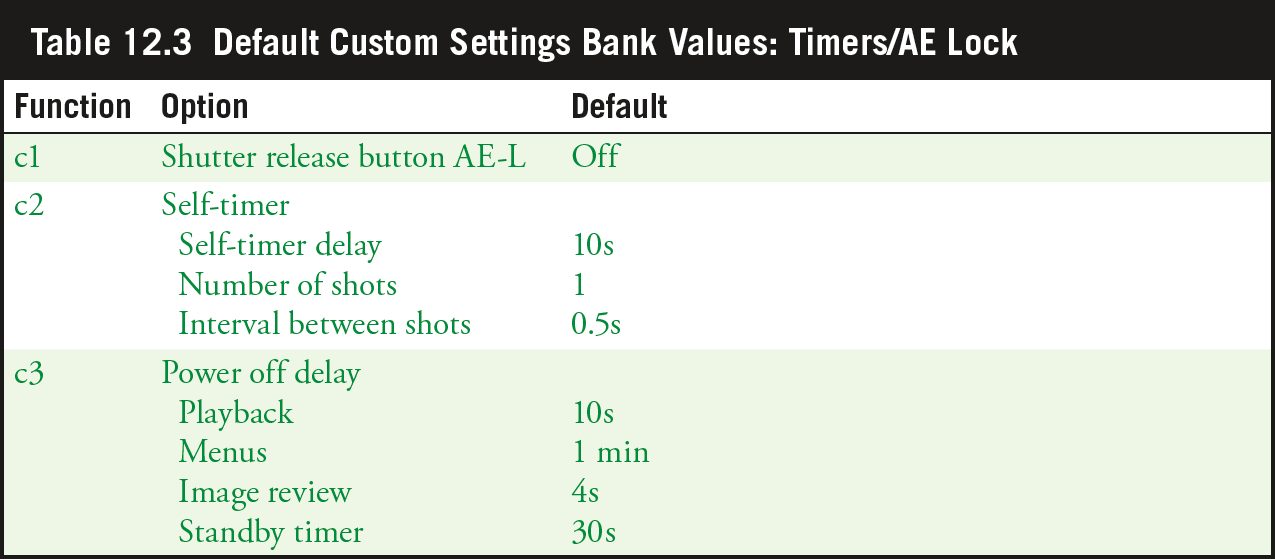
c. Timers/AE Lock
This category (see Figure 12.7) is a mixed bag of settings, covering how the shutter release and AE-L buttons interact (c1) and entries that adjust delay times (c2 and c3).
c1 Shutter-Release Button AE-L
Options: Off (default), On (half press), On (burst mode)
My preference: On when using back button focus, as described in Chapter 5
This is another of Nikon’s easily confusing options for controlling how and when autofocus and exposure are activated and locked. The intent is to allow you to separate autofocus and autoexposure activation and locking.
- Off. Exposure is locked only when the defined AE-L/AF-L button is pressed. This is the default. The shutter release does not lock exposure.
- On (half press). Exposure locks when either the shutter release button is depressed halfway or the designated AE-L/AF-L button is held down. If you always want exposure locked when the shutter release is pressed halfway, use this option. That makes the most sense when you are using back button focus.
- On (burst mode). Exposure locks when the shutter release button is pressed down all the way. You’d do this during continuous shooting, when you press the shutter release and hold it down while your series of shots is captured. This option locks the exposure for the first image, ensuring that all the other images in the sequence are given the same exposure.
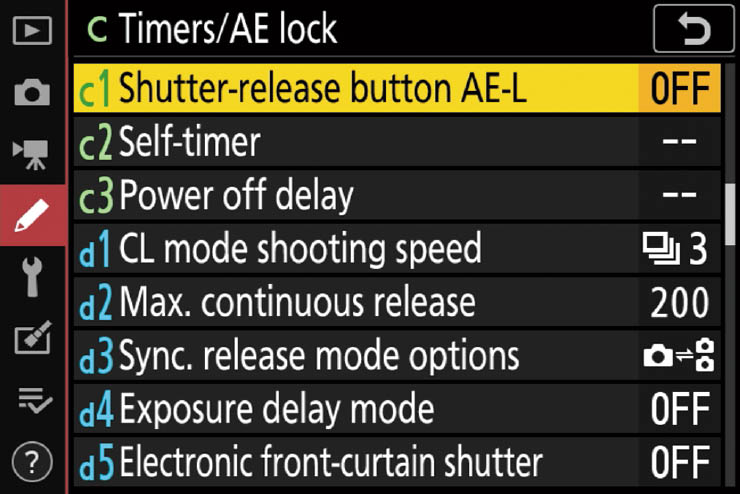
Figure 12.7 The Timers/AE Lock settings.
c2 Self-Timer
Options: Self-timer Delay (Default: 10 sec.), Number of Shots (Default: 1), Interval Between Shots (Default: 0.5 sec.)
My preference: N/A
This setting lets you choose the length of the self-timer shutter release delay.
Your options include:
- Self-timer delay. The default value is 10 seconds. You can also choose 2, 5, or 20 seconds. If I have the camera mounted on a tripod or other support and am too lazy to attach the MC-DC2 cable release (I have three, one for each camera bag, so I always have one available), I can set a 2-second delay that is sufficient to let the camera stop vibrating after I’ve pressed the shutter release. I use a longer delay time if I am racing to get into the picture myself and am not sure I can make it in 10 seconds.
- Number of shots. After the timer finishes counting down, the Z6 can take from 1 to 9 different shots. This is a godsend when shooting photos of groups, especially if you want to appear in the photo itself. You’ll always want to shoot several pictures to ensure that everyone’s eyes are open and there are smiling expressions on each face. Instead of racing back and forth between the camera to trigger the self-timer multiple times, you can select the number of shots taken after a single countdown. For small groups, I always take at least as many shots as there are people in the group—plus one. That gives everybody a chance to close their eyes.
- Interval between shots. If you’ve selected 2 to 9 as your number of shots to be snapped off, you can use this option to space out the different exposures. Your choices are 0.5 seconds, 1, 2, or 3 seconds. Use a short interval when you want to capture everyone saying “Cheese!” The 3-second option is helpful if you’re using flash, as 3 seconds is generally long enough to allow the flash to recycle and have enough juice for the next photo.
c3 Power Off Delay
Options: Separate settings for Playback, Menus, Image Review, Standby Timer
My preference: Varies
You can adjust the amount of time the control panel and camera EVF/LCD monitor displays remain on when no other operations are being performed. If the EH-7P Charging AC adapter is attached, the displays will remain on for the maximum amount, about 10 minutes. With the Z6, you can specify separate values for Playback (the default is 10 seconds); Menus (the default is 1 minute); Image review (default 4 seconds); and Standby Timer (default 30 seconds). Choosing a brief duration for all or each of these can help preserve battery power. However, the Z6 will always override the review display when the shutter button is partially or fully depressed, so you’ll never miss a shot because a previous image was on the screen.
Sports shooters and some others prefer a longer delay, because they can keep their camera always “at the ready” with no delay to interfere with taking an action shot that unexpectedly presents itself. Extra battery consumption is just part of the price paid. For example, when I am shooting football, a standby timer of 20 seconds is plenty, because the players lining up for the snap is my signal to get ready to shoot. But for basketball or soccer, I typically set the standby timer for 30 minutes, because action is virtually continuous. My Z6 has plenty of power, and I carry two sets of spare batteries. I rarely shoot much more than 1,000 to 1,200 shots at any sports event, so that’s often sufficient juice even with the standby timer set for 30 minutes or No Limit. The displays dim for a few seconds before the standby timer expires. Of course, if the standby timer has shut off, and the power switch remains in the On position, you can bring the camera back to life by tapping the shutter button.
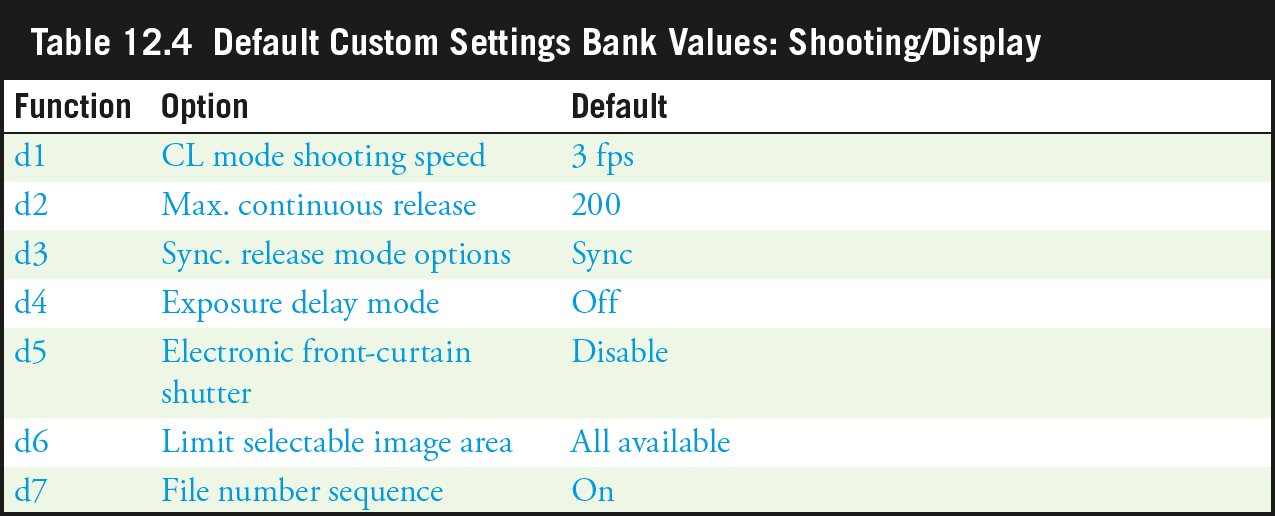
d. Shooting/Display
This menu section (see Figure 12.8) offers a variety of mostly unrelated shooting and display options not found elsewhere, but which are not frequently changed, making them suitable for a Custom Settings entry. The figure shows only the first eight entries; you must scroll down to see the last three.
d1 CL Mode Shooting Speed
Options: 1–5 fps (default: 3 fps)
My preference: Varies
You can specify the frames per second shooting rate for Continuous (Low) speed mode from 1 frame per second to 5 frames per second. Faster rates are better for sports action, such as the image shown in Figure 12.9.
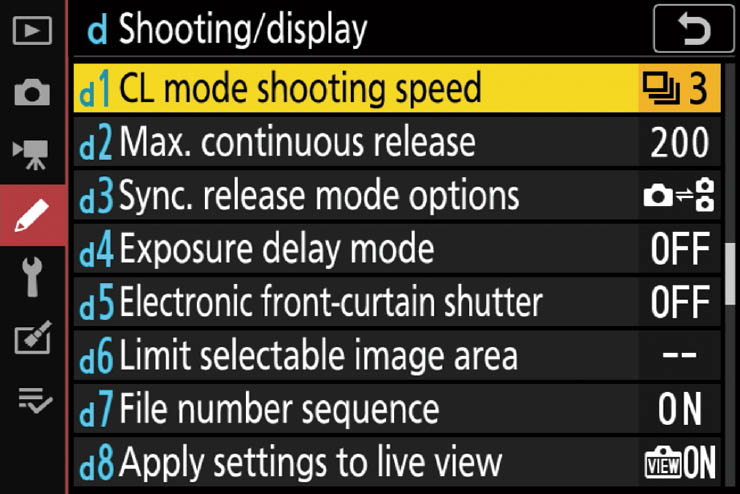
Figure 12.8 A mixed bag of entries is found in the Shooting/Display submenu.

Figure 12.9 High frame rates can capture a critical moment when shooting sports action.
Choose one of these firing speed ranges for Continuous (Low) from among those available that is suitable for the kind of shooting environment you’re in:
- Normal continuous shooting. I set my Z6 to the 1 fps rate most of the time, so that I can take multiple shots quickly without needing to press the shutter release repeatedly. A one-second rate isn’t so fast that I end up taking a bunch of shots that I don’t want, but it is fast enough that I can shoot a series.
- Bracketing. When I’m using bracketing, I generally have the Z6 set to shoot a bracketed set of three pictures: under, normal, and overexposure. With the camera set to 3 fps, I can press the shutter once and take all three bracketed shots, with basically the same framing, within about one second.
- HDR bracketing. On the other hand, if you’re bracketing to combine individual images in an image editor to produce a high dynamic range photo, you’ll want the exposures to be captured as quickly as possible. That will minimize any differences between the images, so they can be more easily aligned as they are merged.
- Slower action sequences. The 9 fps rate available for sports photography in Continuous High (Extended) mode often produces an embarrassing plethora of pictures that are a pain to wade through after the event is over. For some types of action, such as long-distance running, golf, swimming, or routine baseball plays, a rate of 3 to 5 fps might be sufficient. You can make this more reasonable speed available by defining it here as the continuous low speed frame rate.
- Faster action sequences. You can specify higher frame rates, up to 5 fps when you want to grab more images in a brief burst. However, in most cases, you’ll use Continuous Extra High mode for this type of photography. Dialing in a slightly slower speed here makes it easy to switch back and forth between high (5 fps) and higher (9 fps) just by changing the release mode dial from Continuous Low to Continuous High (Extended).
d2 Max. Continuous Release
Options: 1–200 shots; default 200
My preference: 200 shots
Use this setting to limit the number of consecutive shots that can be taken in one burst when using continuous shooting modes. Your choices are any value between 1 and 200. Realistically, if you’re shooting TIFF, Uncompressed 14-bit NEF, or RAW+JPEG, it’s quite unlikely that the Z6 will actually take as many shots as you specify here if you hold down the shutter button long enough. As your camera’s relatively small buffer fills, continuous shooting will slow down and eventually pause while the Z6 dumps pictures to the memory card. The Z6’s built-in memory buffer (which stores each shot until it is written to the XQD card) will fill up somewhere between 18 and 25 shots and your capture rate will slow down. Your buffer may fill even more quickly when shooting in JPEG Extra Fine format, when Auto Distortion Control is active, or at higher ISO settings (the extra step of noise reduction is being applied). Before you curse Nikon for providing such a small buffer, keep in mind that the camera captures 46 MP images. It must convert them from the original analog signal to digital, and create a JPEG file and/or NEF (RAW) version before shuttling them through the buffer and onto your memory card. The speeds you do get are impressive enough.
Indeed, as your buffer fills, continuous shooting will slow down drastically and eventually pause while the Z6 dumps pictures to the memory card. (Use of the electronic shutter, described shortly, also reduces continuous frame advance rates.) If you find yourself waiting for the memory card to store images during continuous shooting, you might want to set a lower number, say, 30 images, so you don’t have so many pictures stacked up that you’re unable to continue with a subsequent shot.
Note: If you have your heart set on shooting endless sequences, you can do so. Just use any shutter speed of 4 seconds or slower in Shutter-priority or Manual exposure modes. The frame rate for such exposures will be so slow that it’s effectively impossible to fill the Z6’s buffer, and your camera will happily poke along capturing images for as long as you hold down the shutter release button. Whatever Maximum Continuous Release value you’ve set will be ignored.

If you have unwanted shots (say, you’re shooting sports and you just shot a play that’s a dead-end, pictorially), you may be in a hurry for a full buffer to clear. Don’t panic! With the fastest available XQD cards, a full buffer will finish its dump about five seconds after you stop shooting. (It’s able to do this because, as I noted earlier, the Z6’s buffer is actually a little on the skimpy side, at least for a camera with a 9 fps maximum burst rate.) So, stop, wait a few seconds, and resume shooting. The old ploy of holding down the Trash button while turning the camera off to clear the buffer wouldn’t really save you much time.
d3 Sync. Release Mode Options
Options: Sync (default), No Sync
My preference: N/A
If you own multiple compatible Nikon cameras equipped with optional WR-1 or WR-R10 wireless remote controllers, you can configure them such that they all fire at the same time. One camera acts as a master, which controls the shutter release of the additional cameras. Sports photographers love this capability, because they can install remote cameras, say, above a basketball rim, and then position themselves along the baseline to shoot action in the paint. One click of the master camera produces shots from both angles simultaneously. (This is basically how I cover basketball games, except for the part about having a second, remote-controlled camera mounted high above the rim.)
This is a rather esoteric feature, available only to those who own, say, two or more Nikon Z6, D850, D850, or D5 cameras. Synchronized release is also available with some other models, including the D4 and D4s equipped with the optional WT-5 wireless transmitter. You can use this entry to activate or deactivate the feature, but it’s probably a better idea to use Custom Setting f2 and assign Sync. Release Selection to a control, such as the Fn 1 button.
d4 Exposure Delay Mode
Options: 3, 2, 1, 0.5, 0.2 seconds, Off (default)
My preference: Off
This is a marginally useful feature (and mildly annoying if you forget to turn it off) that you can use to force the Nikon Z6 to snap a picture about 0.2, 0.5, 1, 2, or 3 seconds (your choice) after you’ve pressed the shutter release button all the way. It’s useful when you are using shutter speeds of about 1/8th to 1/60th second hand-held and want to minimize the effects of the vibration that results when you depress the shutter button. It can also be used when the camera is mounted on a tripod, although the self-timer function, set to a two-second delay, is more useful in that scenario. When switched On, the camera will pause while you steady your steely grip on the camera, taking the picture about one second later. When turned Off, the picture is taken when the shutter release is pressed, as normal.
One interesting side-effect of this mode is that it separates the normally invisible pre-flash produced by any Z6’s external flash that’s connected with the delay. That can have an unwanted side-effect. For example, if you’re shooting living subjects (human or animal), and set the delay for one second, your subject may be startled by the initial flash and close their eyes just before the main flash fires 1,000 milliseconds later. Longer delays can produce incorrect exposures if you happen to accidentally (or intentionally) reframe or pan during the interval between when the pre-flash fires (and the Z6 calculates exposure) and the moment when the shutter opens/flash fires to take the actual picture.
d5 Electronic Front-Curtain Shutter
Options: Enable, Disable (default)
My preference: Disable
Your Nikon Z6 has an electronic front-curtain shutter that can be used to commence an exposure without the need for the (potentially) vibration-causing physical shutter curtain. Your e-curtain is available only when you’re using a shutter speed of 1/2,000th second or slower, and an ISO setting of 25600 or lower.
In use, the Z6 “dumps” the current image display on the EVF or LCD monitor, then begins exposure. The camera’s mechanical rear-curtain shutter terminates the exposure. So, while the electronic front-curtain shutter is quieter, this mode isn’t totally silent. Its chief benefit is avoiding a tiny amount of vibration that can occur from “shutter bounce.” (The mechanical front curtain isn’t totally damped after it descends.) If you really want to avoid any possibility of shutter vibration, choose the 0.2-second setting in Custom Setting d4: Exposure Delay Mode, described above.
For true silent operation, use the Silent Photography setting in the Photo Shooting menu, described in Chapter 11. With Silent Photography you can use any shutter speed—but cannot use flash (or long exposure noise reduction). In addition, the camera’s beep speaker is automatically turned off and your continuous-shooting frame rate will change. With the electronic front-curtain shutter, you can use flash, but have that 1/200th second top shutter speed limitation, and your beeper will sound if enabled.
I explained front- and rear-curtain shutter components in more detail in Chapter 9.
d6 Limit Selectable Image Area
Options: All available (default); Individually disable DX, 1:1, or 16:9 formats
My preference: FX, DX, and 16:9 only enabled
The Z6 may provide you with more image area formats than you ever need—but it also gives you the ability to make any of them (except the full-frame FX choice) invisible.
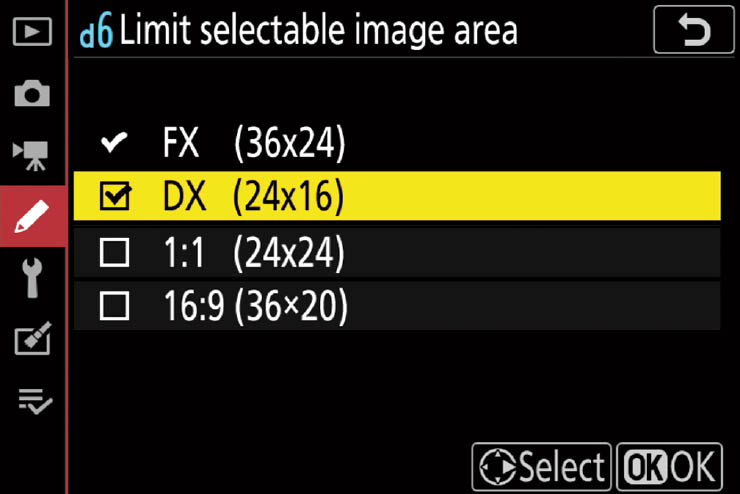
Figure 12.10 Choose which image area options are available.
Disabling or enabling one or more image area options is easy. Highlight any format (except FX, which cannot be disabled) and press the right directional button to mark or unmark your choice. (See Figure 12.10.) You must press OK to confirm. (If you exit the screen in any way, say, by tapping the shutter button or pressing the left directional button, your changes will not be saved.) I don’t use 1:1 image area much, so I disable it. I sometimes shoot in DX mode for sports to capture more compact 19.5 MP images with the DX format’s 1.5X field-of-view crop. When I am taking stills to use for movie storyboards, I prefer to shoot them using the same high-definition 16:9 proportions that the movie will be captured in, so I keep that available.
The image areas you specify can be selected using the Choose Image Area entry of the Photo Shooting and Movie Shooting menus. If you mount a Nikon F-mount DX (APS-C type) lens on the Z6 using the FTZ adapter, the camera automatically switches to DX mode (giving you an image with only 10 megapixels of resolution); indeed, the Choose Image Area options are not available. Unfortunately, that means you can’t manually change to FX mode for those lenses (some of them do cover the full frame at certain focal lengths). But when working with both Z-mount and F-mount full-frame lenses, you can choose one of the cropped image areas; the camera will enlarge the DX crop to fill the display and add black bars at top, bottom, or sides (as appropriate) to provide a visual reference for the other crops. (That’s a distinct advantage this mirrorless camera has over its dSLR siblings, which must use a mask to show the image area when using the optical viewfinder.)
d7 File Number Sequence
Options: On (default), Off, Reset
My preference: On
The Nikon Z6 will automatically apply a file number to each picture you take, using consecutive numbering for all your photos over a long period of time, spanning many different memory cards, starting over from scratch when you insert a new card or when you manually reset the numbers. Numbers are applied from 0001 to 9999, at which time the Z6 “rolls over” to 0001 again.
The camera keeps track of the last number used in its internal memory and, if File Number Sequence is turned On, will apply a number that’s one higher, or a number that’s one higher than the largest number in the current folder on the memory card inserted in the camera. You can also start over each time a new folder has been created on the memory card, or reset the current counter back to 0001 at any time. Here’s how it works:
- On. At this default setting, the Z6 will use the number stored in its internal memory any time a new folder is created, a new memory card is inserted, or an existing memory card is formatted. If the card is not blank and contains images, then the next number will be one greater than the highest number on the card or in internal memory (whichever is higher).
- Off. If you’re using a blank/reformatted memory card, or a new folder is created, the next photo taken will be numbered 0001. File number sequences will be reset every time you use or format a card, or a new folder is created (which happens when an existing folder on the card contains 5,000 shots).
- Reset. The Z6 assigns a file number that’s one larger than the largest file number in the current folder, unless the folder is empty, in which case numbering is reset to 0001. At this setting, new or reformatted memory cards will always have 0001 as the first file number.
HOW MANY SHOTS, REALLY?
The file numbers produced by the Z6 don’t provide information about the actual number of times the camera’s shutter has been tripped—called actuations. For that data, you’ll need a third-party software solution, such as the free Opanda iExif (www.opanda.com) for Windows or the non-free ($39.95) GraphicConverter for Macintosh (www.lemkesoft.com). These utilities can be used to extract the true number of actuations from the Exif information embedded in a JPEG file.
d8 Apply Settings to Live View
Options: On (default), Off
My preference: On, except when using studio flash
This entry tells the Z6 to provide a preview in the EVF and LCD monitor displays that reflects how your current settings of white balance, Picture Controls, and exposure compensation will affect your image when the photo is actually taken. It’s a good way to preview the “look” of your image as it is adjusted by your selected settings. In Manual exposure mode, you will even be able to preview how your exposure will change the image; the displays will actually lighten or darken to reflect exposure changes. Sounds like a good idea, right?
However, there are times when you don’t want to see the effects of the settings you’ve made on the screen/EVF. For example, when you are using flash in Manual exposure mode, the camera has no way of knowing exactly how much light will be illuminating your scene. You’ll especially want to change this setting to Off when working with “dumb” studio strobes connected using a hot-shoe adapter with an old-school PC/X connector. After all, that f/16 aperture may be ideal for a shot exposed by your studio strobes, but the Z6 will, when this entry is set to On, show you a preview based on the ambient light, rather than the flash. The result? Your viewfinder or LCD monitor image is very, very dim. You’ll want to select Off so the camera will display the electronic image to viewable levels.
However, in all other cases, at the default On setting, display in the EVF or the LCD monitor reflects the exact effects of any white balance, Picture Control, or exposure compensation settings you’ve made. In that mode, this allows for an accurate evaluation of what the photo will look like and enables you to determine whether the current settings will provide the effects you want.
The On option can be especially helpful when you’re using any of the Picture Controls, because you can preview the exact rendition that the selected effect and its overrides will provide. It’s also very useful when you’re setting some exposure compensation, as you can visually determine how much lighter or darker each adjustment makes the image. And when you’re trying to achieve correct color balance, it’s useful to be able to preview the effect of your white balance setting.
If you’d like to preview the image without the effect of settings visible, you can set this feature to Off. Naturally, the display will no longer accurately depict what your photo will look like when it’s taken. So, for most users, On is the most suitable option. Unfortunately, this setting has caused more than a few minutes of head-scratching among new users who switch to Manual exposure mode and find themselves with a completely black (or utterly white) screen. The black screen, especially, may fool you into thinking your camera has malfunctioned.
d9 Framing Grid Display
Options: On, Off (default)
My preference: Off
This entry is the first on the last page of the Shooting/Display menu (see Figure 12.11). The Z6 can display a grid of lines overlaid on the viewfinder, offering some help when you want to align vertical or horizontal lines, particularly for architectural or scenic photography. Note that the intersections of these lines do not follow the Rule of Thirds convention, and so are less useful for composition, assuming you want to follow the Rule of Thirds guideline in the first place. If you happen to subscribe to the Rule of Quarters, you’re all set. Your options for this grid display are On and Off (the default).
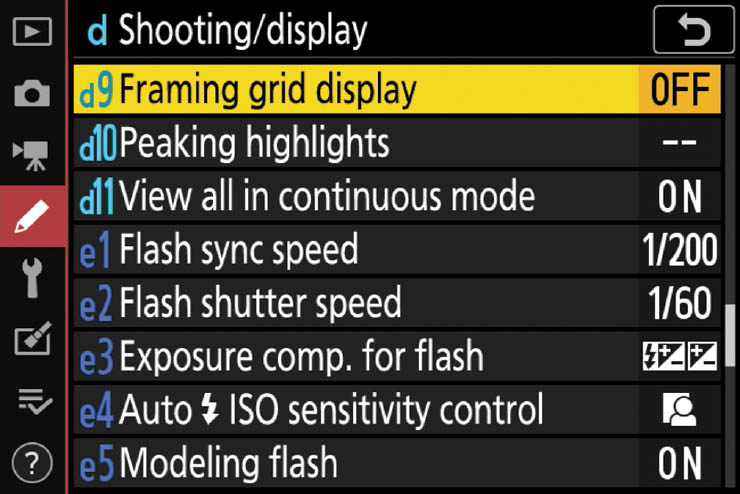
Figure 12.11 Last page of the Shooting/Display menu.
d10 Peaking Highlights
Options: Peaking Level: Off (default), Low, Standard, High; Peaking Color: Red (default), yellow, blue, white
My preference: N/A
Focus peaking is a focusing aid available to provide colored highlights around the edges of objects as they come into sharp focus. You can choose from among red, yellow, blue, or white. If your subject has a predominant color, you should select a peaking color that contrasts. For example, you might want to use yellow as your peaking tone when photographing red roses. You can change the Peak Level (sensitivity) to low, standard, or high. I explained how to use focus peaking and showed you what it looks like in action in Chapter 5.
d11 View All in Continuous Mode
Options: On (default), Off
My preference: On
This setting lets you specify whether full-frame playback is used during burst shooting live view when shooting with Continuous Low, Continuous High, and Quiet Continuous. If you select Off, the monitor playback display and the monitor backlight are turned off during continuous exposures.
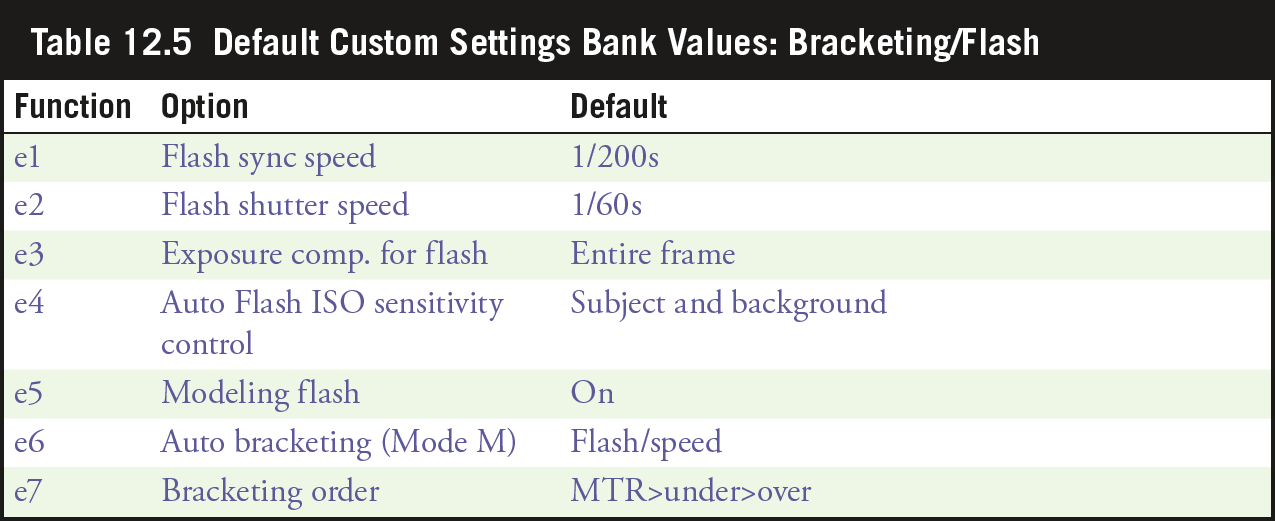
e. Bracketing/Flash
There are lots of useful settings in this submenu (see Figure 12.12) that deal with bracketing and electronic flash (hence the cleverly concocted name). I provided a thorough description of using bracketing in Chapter 4, and a complete rundown of flash options in Chapters 9 and 10. In this section, I’ll offer a recap of the settings at your disposal.
e1 Flash Sync Speed
Options: 1/200 s (Auto FP), 1/200 s–1/60 s (default 1/200th s)
My preference: 1/200 s (Auto FP)
As you learned in Chapter 9, the focal plane shutter in the Nikon Z6 must be fully open when the external flash fires; otherwise, you’ll image one edge or the other of the vertically traveling shutter curtain in your photo. Ordinarily, the fastest shutter speed during which the shutter is completely open for an instant is 1/200th second. However, there are exceptions when you can use faster shutter speeds with certain flash units (such as the Nikon SB-5000, SB-910, SB-700, and SB-R200) for automatic FP (focal plane) synchronization. This is called high-speed sync (usually abbreviated HSS). The HSS feature allows you to use higher shutter speeds to supply fill flash, say, outdoors, where a shutter speed of 1/500th second might be needed to enable a wider aperture for reduced depth-of-field.
There are also situations in which you might want to set flash sync speed to less than 1/200th second, say, because you want ambient light to produce secondary ghost images in your frame. (I’ll describe all these sync issues in Chapter 9.)
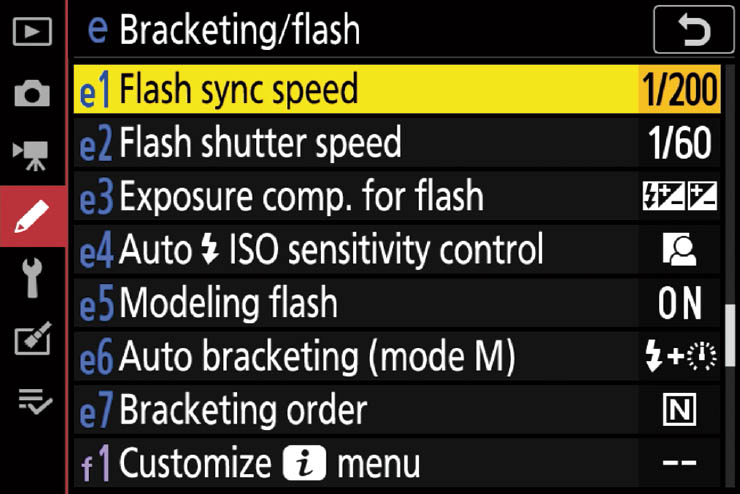
Figure 12.12 Bracketing and flash options are available in this menu.
To address your choice of flash sync speeds, you can choose from the following settings:
- 1/200 s (Auto FP). At this setting, you may use individual shutter speeds up to 1/200th second with any Nikon flash. However, you can also use faster shutter speeds with flash units compatible with high-speed sync (such as those mentioned above). If one of those units is mounted and powered up:
- P or A mode: The camera selects the shutter speed in both Program and Aperture-priority modes. With an HSS-compatible flash attached, the camera is free to select a shutter speed as fast as 1/8,000th second.
- S or M mode: In these modes, you select the shutter speed, and you can select one as fast as 1/8,000th second in high-speed sync mode.
- 1/200 s–1/60 s. You can specify a shutter speed from 1/200th second to 1/60th second to be used as the synchronization speed for flash units.
LOCKING FLASH SYNC
If you want to lock the shutter speed at the maximum sync speed you’ve specified, rotate the main control dial to choose the xnnn setting located after the 30 s, Bulb, and Time speeds. If you’ve chosen 1/200 (Auto FP), that setting will display x200; If you’ve used the 1/200 s–1/60 s option, the lock speed, the setting will be locked at x200 to x60.
e2 Flash Shutter Speed
Options: 1/60th second (default) to 30 seconds
My preference: 1/60th second
This setting determines the slowest shutter speed that is available for electronic flash synchronization in the PASM exposure modes when you’re not using a “slow sync” mode (described in Chapter 9). As you may know, when you’re using flash, the flash itself typically provides virtually all of the illumination that makes the main exposure, and the shutter speed determines how much, if any, of the ambient light contributes to that second, non-flash exposure. Indeed, if the camera or subject is moving, you can end up with two distinct exposures in the same frame: the sharply defined flash exposure, and a second, blurry “ghost” picture created by the ambient light.
If you don’t want that second exposure, you should use the highest shutter speed that will synchronize with your flash. This setting prevents Program or Aperture-priority modes (which both select the shutter speed for you) from inadvertently selecting a “too slow” shutter speed. You can select a value from 30 s to 1/60 s, and the Z6 will avoid using speeds slower than the one you specify with electronic flash (unless you’ve selected slow sync, slow rear-curtain sync, or red-eye reduction with slow sync, as described in Chapter 9). The “slow sync” modes do permit the ambient light to contribute to the exposure (say, to allow the background to register in night shots, or to use the ghost image as a special effect). For brighter backgrounds, you’ll need to put the camera on a tripod or other support to avoid the blurry ghosts that can occur from camera shake, even if the subject is stationary.
If you are able to hold the Z6 steady, a value of 1/30 s is a good compromise; if you have shaky hands, use 1/60 s. Those with extraordinarily solid grips, a tripod, or a lens with vibration reduction can try the 1/15 s setting (or slower when using a tripod). Remember that this setting only determines the slowest shutter speed that will be chosen by the camera, not the default shutter speed.
e3 Exposure Compensation for Flash
Options: Entire Frame (default), Background Only
My preference: Background Only
Use this to specify how the camera modifies the flash level when you apply exposure compensation. Keep in mind that your Z6 has separate ambient light exposure compensation and flash exposure compensation settings. They enable you to adjust one or the other, or both if you are using flash. If you remember that, you’ll know that this setting affects only exposure compensation (the ambient kind) when you are also using flash. It determines how ambient exposure compensation is applied when some of the illumination will also come from a flash unit:
- Entire frame. When you apply ambient exposure compensation (press the EV button on top of the camera to the right of the ISO button and rotate the main command dial), both ambient and flash exposure compensation are adjusted over the entire frame. That balances the exposure for the two elements. While this works in many situations, you may find that with backgrounds and subject matter that differ widely in brightness, your results may be less than optimum.
- Background only. When this option is selected only ambient exposure compensation is changed when you apply it; flash exposure compensation is unaffected. So, exposure compensation is applied only to the background areas of your image, which are typically illuminated by ambient light. Flash exposure compensation is not affected, but can be set separately. I prefer to use this setting and control each type of exposure compensation myself.
e4 Auto Flash ISO Sensitivity Control
Options: Subject and background (default), Subject only
My preference: Subject and background
This setting allows you to customize how Auto ISO sensitivity control makes its adjustments. If you choose Subject and Background, the Z6’s exposure meters will take into account both your subject matter and the background, and set the flash output for a level that is more likely to balance both. If you find a disparity between foreground and subject exposures, you can use Custom Setting e3 (above), select Background Only, and tweak exposure for foreground and background separately.
e5 Modeling Flash
Options: On (default), Off
My preference: On
The Nikon Z6, and certain compatible external flash units (like the SB-5000, SB-700, and SB-910/SB-900) have the capability of simulating a modeling lamp, which gives you the limited capability of previewing how your flash illumination is going to look in the finished photo. The modeling flash is not a perfect substitute for a real incandescent or fluorescent modeling lamp, but it does help you see how your subject is illuminated, and spot any potential problems with shadows.
When this feature is activated, pressing the button you have defined as the Preview (depth-of-field) button on the Z6 briefly triggers the modeling flash for your preview. (You can define a Preview button using Custom Setting f2: Custom Control Assignment, as described later in this chapter. The Z6, by default, does not have a depth-of-field preview control.)
Selecting Off disables the feature. You’ll generally want to leave it On, except when you anticipate using the depth-of-field preview button for depth-of-field purposes (imagine that) and do not want the modeling flash to fire when the flash unit is charged and ready. Some external flash units, such as the SB-5000 and SB-910, have their own modeling flash buttons.
e6 Auto Bracketing (Mode M)
Options: Flash/speed (default), Flash/speed/aperture, Flash/aperture, Flash only
My preference: Flash/speed
When you are using Manual exposure mode, the Z6 allows you to specify what exposure parameters—flash output, shutter speed, and aperture—are used to create the bracketed images. Here are your options, and reasons to select each of them. Remember that these apply only when you are bracketing in Manual exposure mode.
- Flash/speed. If you’ve selected AE Only in Auto Bracketing Set in the Photo Shooting menu, the camera will adjust only the shutter speed during bracketed exposures. If you selected AE & Flash, instead, the camera will also adjust the flash output level when flash is used. The aperture will remain the same, making this a good choice for HDR photos, or other subjects where you want to keep the same amount of depth-of-field in successive shots.
- Flash/speed/aperture. The camera can use both shutter speed and aperture when AE Only is selected, plus flash output level if AE & Flash was selected and flash is used. This gives the Z6 the maximum amount of flexibility in choosing exposure parameter combinations. That’s especially helpful when shooting bracket sequences of 7 or 9 shots (and/or with large increments, say, 3 stops, between shots). That’s because such extreme adjustments in exposure may be difficult to achieve with only one or two parameters available—particularly when ambient light only is being bracketed. (The flash is able to adjust its output over a very wide range.)
- Flash/aperture. The Z6 varies aperture only if AE Only is specified, or aperture and flash output if AE & Flash is selected in the Photo Shooting menu. Your selected shutter speed remains the same, so you would want to use this if retaining the same shutter speed is important (say, when shooting sports).
- Flash only. The camera varies the flash output only when AE & Flash is active. No ambient light bracketing is done.
e7 Bracketing Order
Options: MTR > Under > Over (default), Under > MTR > Over
My preference: Under > MTR > Over, which orders frames by increasing exposure
Use this setting to define the sequence in which bracketing is carried out. Your choices are the default: MTR > Under > Over (metered exposure, followed by the version receiving less exposure, and finishing with the picture receiving the most exposure) and Under > MTR > Over, which orders the exposures from least exposed to most exposed (for both ambient and flash exposures). The same order is applied to white balance bracketing, too, but the values are Normal > More Yellow > More Blue and More Yellow > Normal > More Blue. (Nikon actually calls “yellow” by the term “amber,” but I’ve found “yellow” easier to understand.)
This order works well if you are shooting at least three images in your sequence. If you set bracketing to just two exposures, the specified order is used, but one of the three is omitted. You’ll find lots more about bracketing in Chapter 4. When doing ADL bracketing with the Z6, this setting has no effect.
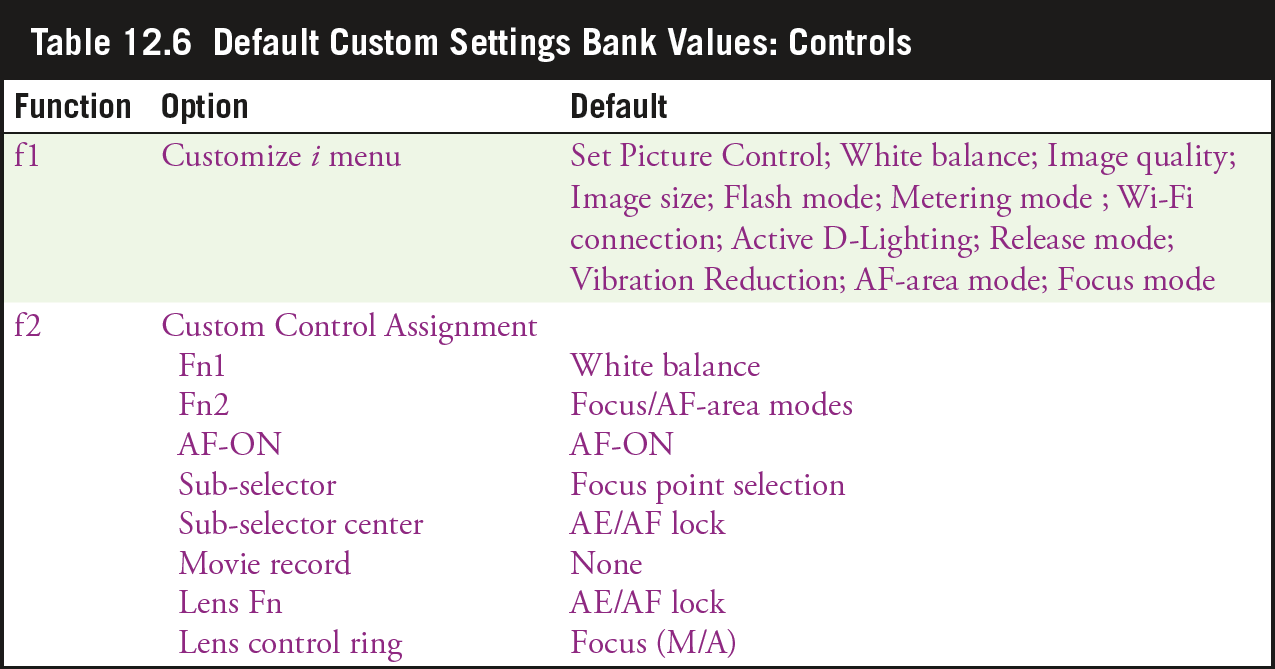
f. Controls
You can modify the way various control buttons and dials perform when shooting still photos by using the options in this submenu. You can even modify the twelve adjustments that appear in the i menu. The seven Controls entries are shown in Figure 12.13. Note that you can also make some control adjustments for Movie mode, and I’ll cover those in the section that follows this one.
f1 Customize i Menu
Options: Allows defining functions available from the i menu, including the 19 additional functions that you can use to replace or add to the 12 provided in the default version of the i menu.
My preference: Varies
If you’ve used previous Nikon cameras, you’ve probably noticed that the Z6 has fewer dedicated buttons than some of its stablemates. The D850, for example, has dedicated buttons for flash, image size/quality, metering mode, depth-of-field preview, bracketing, white balance, and focus modes, plus Help, Protect, and Picture Control functions. While two of these (white balance and focus modes) are assigned to the Z6’s pair of function buttons (Fn1 and Fn2), others are available only from the traditional menus or the i menu.
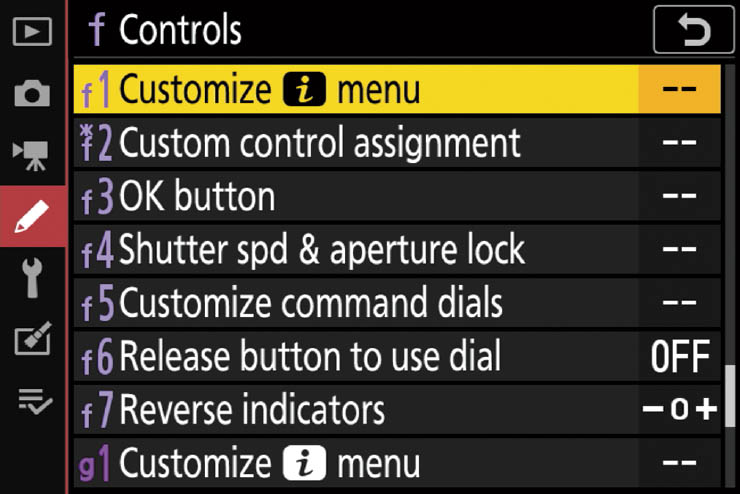
Figure 12.13 Modify the behavior of the Z6’s controls with these menu options.
The bad news is that the 12 default entries on the i menu may not be ones you use often. I don’t use the Z6’s wireless functions or Active D-Lighting feature very often, and when I do I am willing to dive into Menuland to implement them. The rest of the time, those two functions are a waste of i menu real estate. The good news is that if you would rather have some other tools available in the i menu, there’s a good chance you can replace your own “useless” i menu entries with those that are more to your liking. Your choices follow.
These 12 entries occupy the i menu by default. You can choose to keep these, move them, or replace them with other functions:
- Set Picture Control
- Image Quality
- Flash Mode
- Wi-Fi Connection
- Release Mode
- AF-area Mode
- White Balance
- Image Size
- Metering Mode
- Active D-Lighting
- Vibration Reduction
- AF/MF Focus Mode
These definable functions are already available using other direct controls on the camera. Note that White Balance, AF/MF Focus Mode, and AF-area mode buttons duplicate functions already on the default i menu roster. That means you can replace a redundant i menu or dedicated button function with another of your choice.
- White Balance (Fn1)
- AF/MF Focus Mode (Fn2+command dial)
- AF-Area Mode (Fn2+sub-command dial)
- AF-ON (AF-ON button)
- Focus Point Selection (Sub-selector joystick)
- AE/AF Lock (Sub-selector button)
These three functions are available from dedicated buttons on the camera, and need not be assigned to the i menu or a different button (unless that’s your preference):
- ISO Sensitivity
- Exposure Compensation
- Release Mode
These remaining functions are not, by default, available in the i menu or assigned to dedicated buttons. They are likely to be the best candidates to replace a function you don’t use regularly:
- Choose Image Area
- Color Space
- Long Exposure NR
- High ISO NR
- Flash Compensation
- Auto Bracketing
- Multiple Exposure
- HDR
- Silent Photography
- Custom Control Assignment
- Exposure Delay Mode
- Electronic Front-Curtain Shutters
- Apply Settings to Live View
- Split-Screen Display Zoom
- Peaking Highlights
- Monitor/Viewfinder Brightness
- Bluetooth Connection
As noted earlier, I don’t use the Wi-Fi Connection and Active D-Lighting functions very often, so I replaced them with Flash Compensation and Multiple Exposure, respectively. It was easy to do:
- 1. Choose f1 Customize i menu from the Custom Settings menu. The two default functions I decided to replace are highlighted by the green box at upper left in Figure 12.14.
- 2. Highlight the Wi-Fi connection icon in the top row and press OK. From the screen that appears, scroll to Flash Compensation. Press OK to select and confirm. (See Figure 12.14, upper right.)
- 3. Next, highlight the Active D-Lighting icon in the bottom row and press OK.
- 4. Navigate to the Multiple Exposure function shown in Figure 12.14, lower left, and press OK.
- 5. You’ll be returned to the Customize i menu screen, with your changes made in the menu, as shown in Figure 12.14, lower right. Note that I placed the Flash Compensation function right next to the default Flash function.
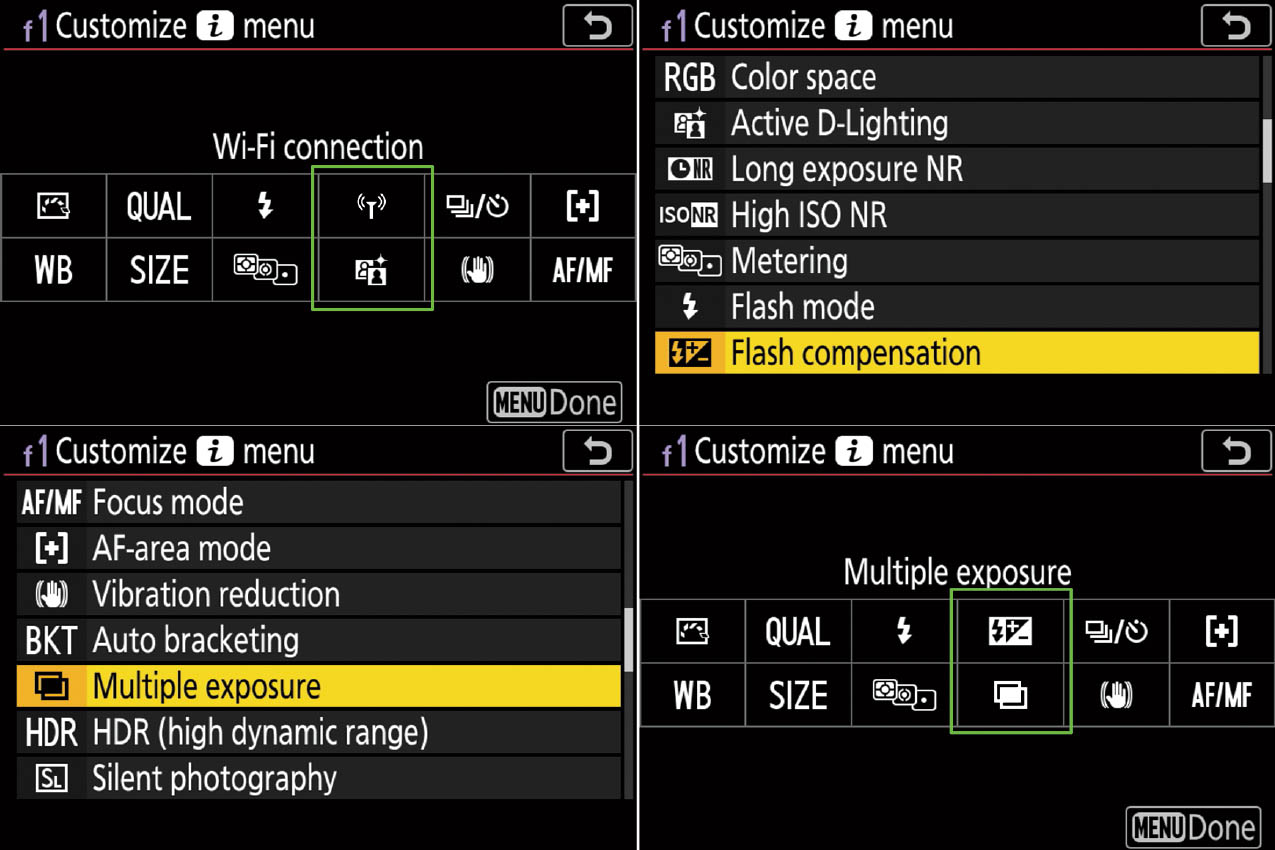
Figure 12.14 Two replaceable functions (upper left); adding Flash Compensation and Multiple Exposure (upper right and lower left); two new functions in place (lower right).
f2 Custom Control Assignment
Options: Allows defining functions for eight separate buttons
My preference: Varies
The programmable buttons are Fn1, Fn2, AF-ON, Sub-selector joystick, Center button of sub-selector, Movie Record, Lens control ring, and Lens Fn. The Lens Fn button is found only on certain Nikon lenses, generally high-end longer lenses, including the 400, 500, 600, and 800mm G and E lenses, the 200-400mm f/4G VR II, 200mm f/2G, and 300mm f/2.8G VR II.
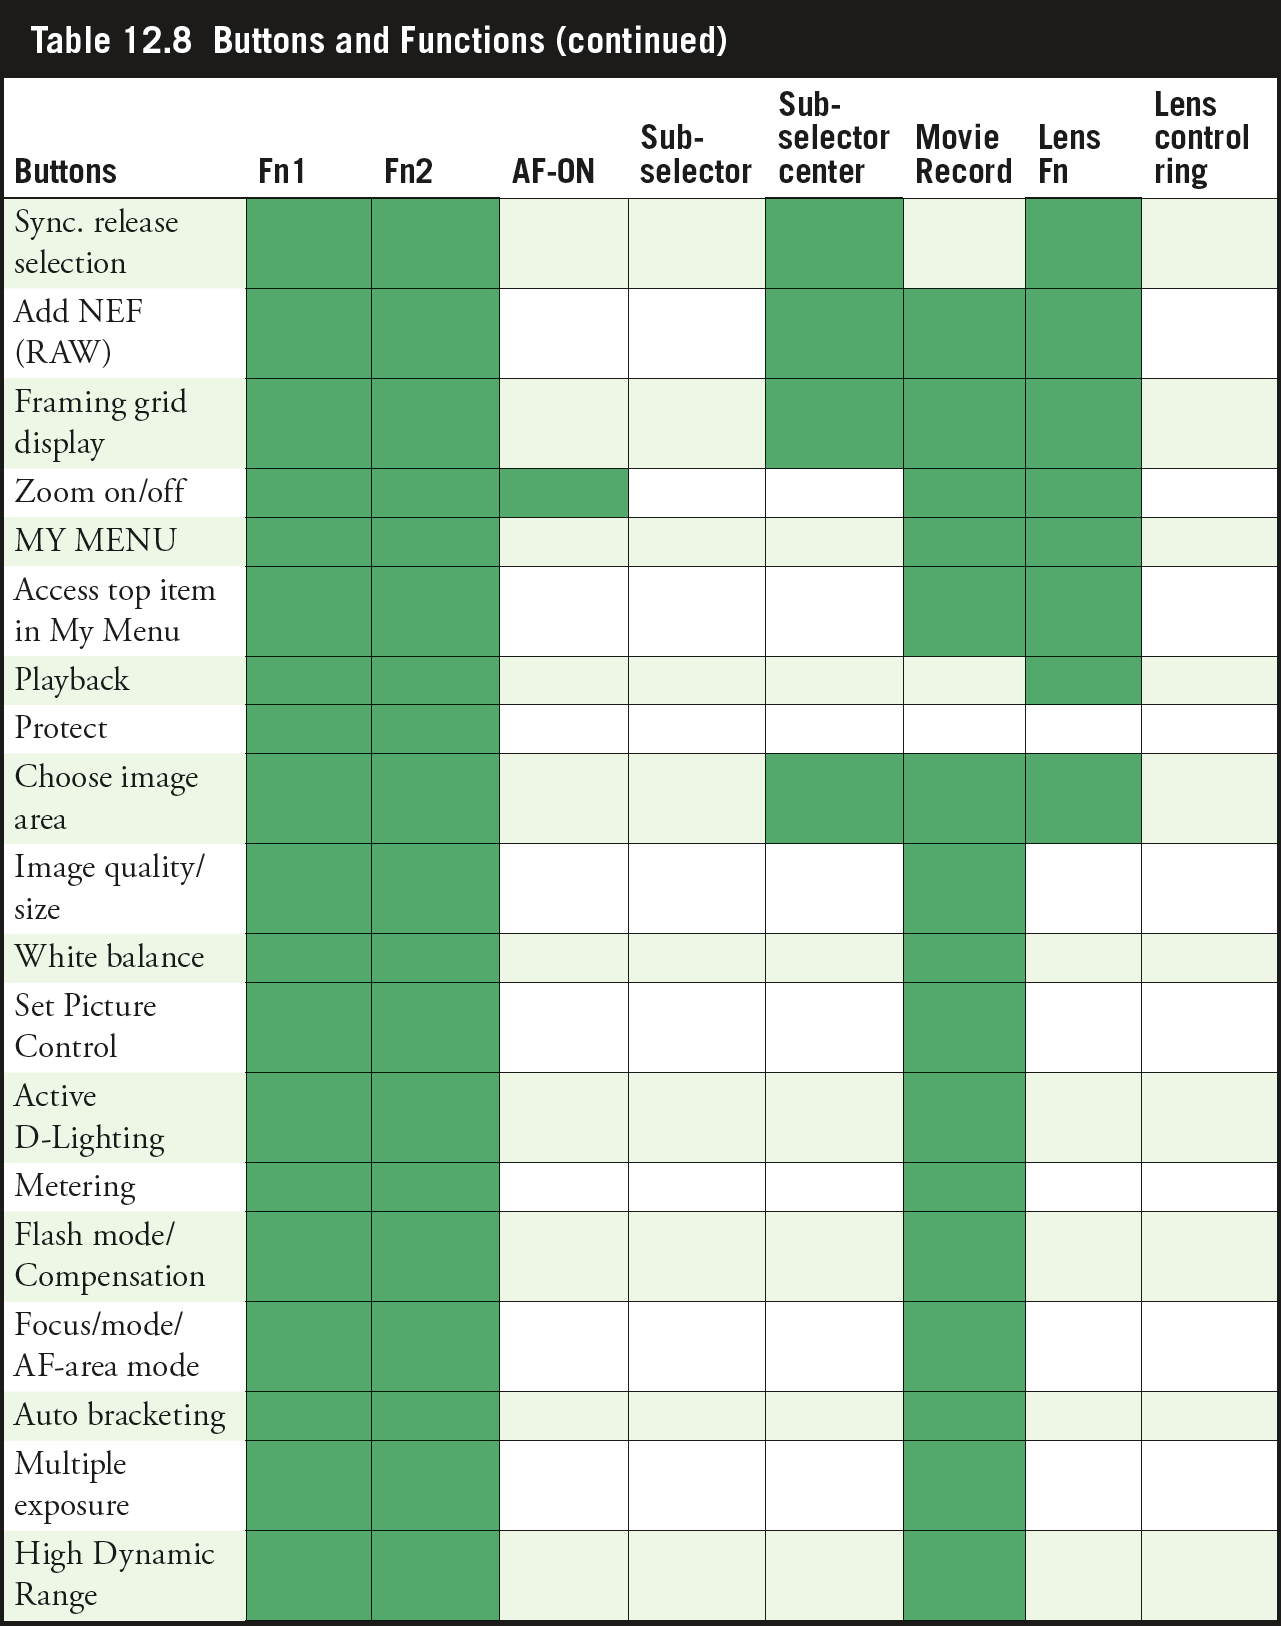
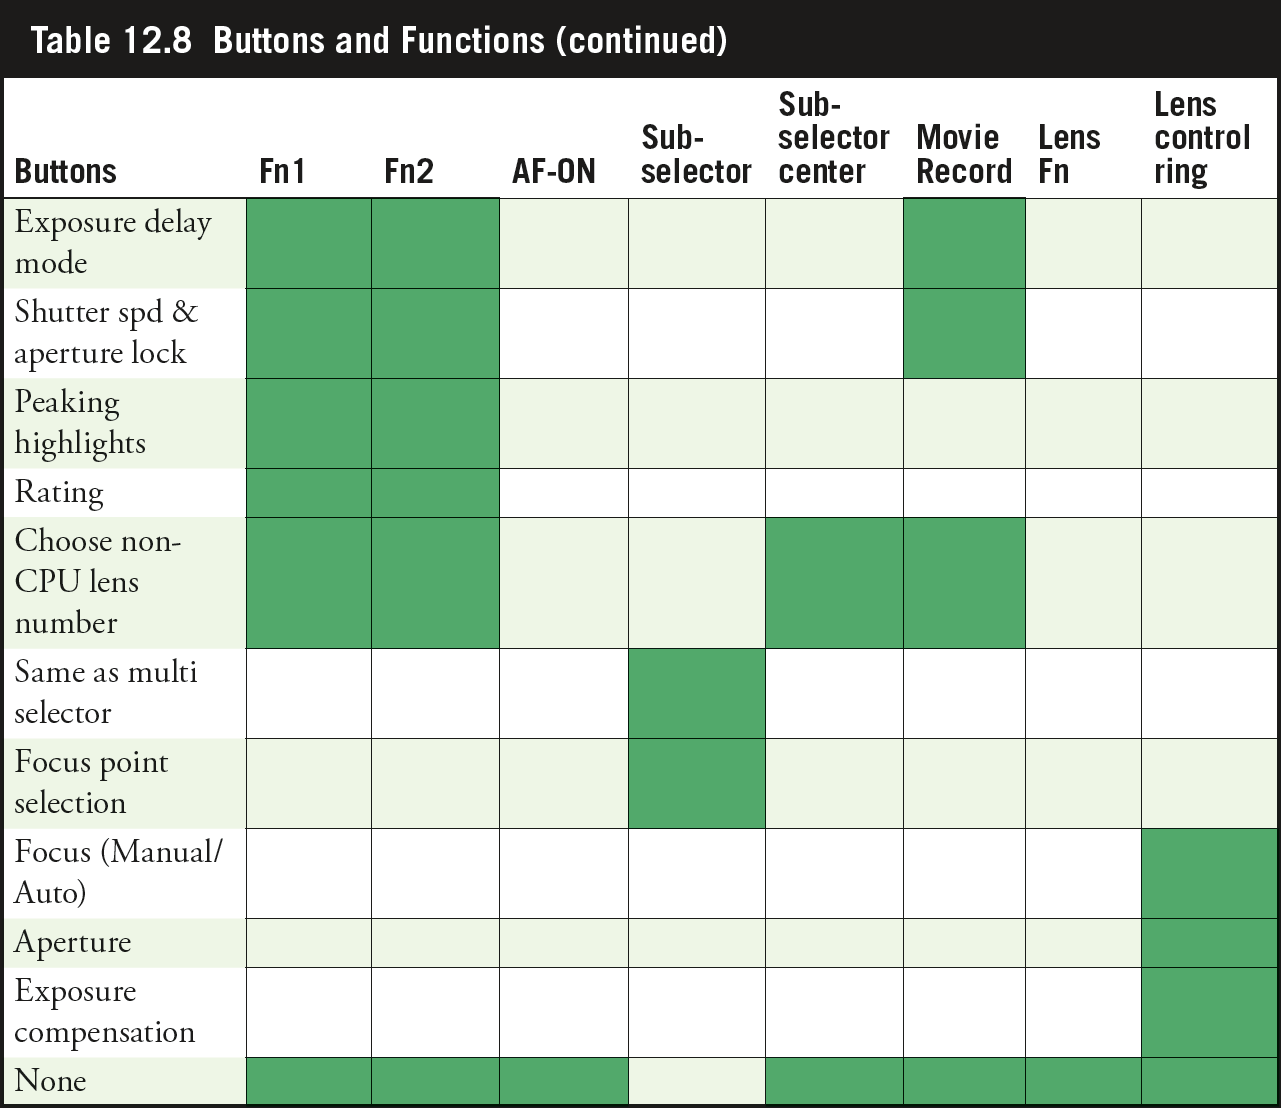
A total of 44 different actions can be programmed (plus None—no action), augmenting or replacing the button’s original function. Always consider the side-effects of choosing your own non-standard control configuration. Your custom settings can be a boon, or if you don’t remember the assignments you’ve made as you work, a hindrance. To apply a definition, highlight the button name on the screen shown at left in Figure 12.15.
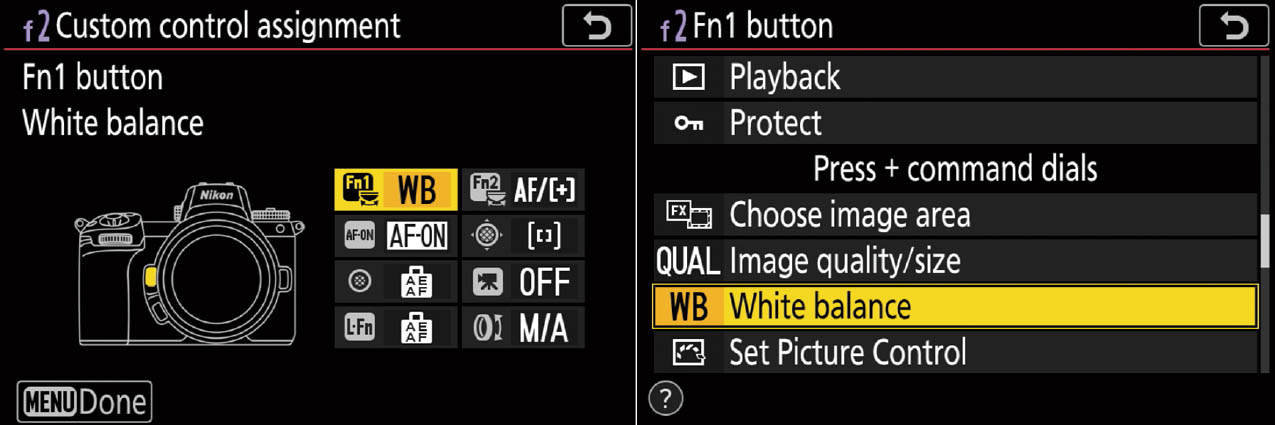
Figure 12.15 Highlight a control (left) and press OK to summon a list of possible definitions (right).
Then scroll through the list of available options, as shown at right in the figure. Some choices in the scrolling list are behaviors that require nothing more than a button press to activate. There are 22 of those in all. Nikon inserts a “Press” header at the start of the listing for those behaviors (AF-ON through Protect). For example, if a button is defined as Preview or Matrix Metering, you simply press and hold the button to activate the depth-of-field preview, or to switch from your current mode to Matrix Metering. When you release the defined button, the preview stops or the camera returns to your previous metering mode.
The other behaviors follow a header that reads “Press+Command Dials.” Those options include those listed from “Choose Image Area” to “Choose Non-CPU Lens Number.” Behaviors that do use the command dials produce a screen that displays the options for that behavior, plus an icon prompt representing a main or sub-command dial (or both), as seen in Figure 12.16. In that example, you’d press and hold the defined button and rotate the main command dial to change the flash sync mode, and the sub-command dial to add/subtract flash exposure compensation.
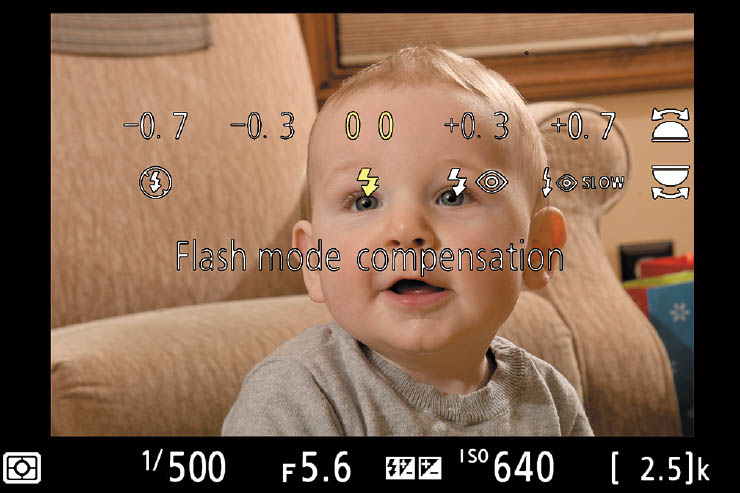
Figure 12.16 Some behaviors let you use the command dials for pairs of settings, such as flash mode and flash compensation.
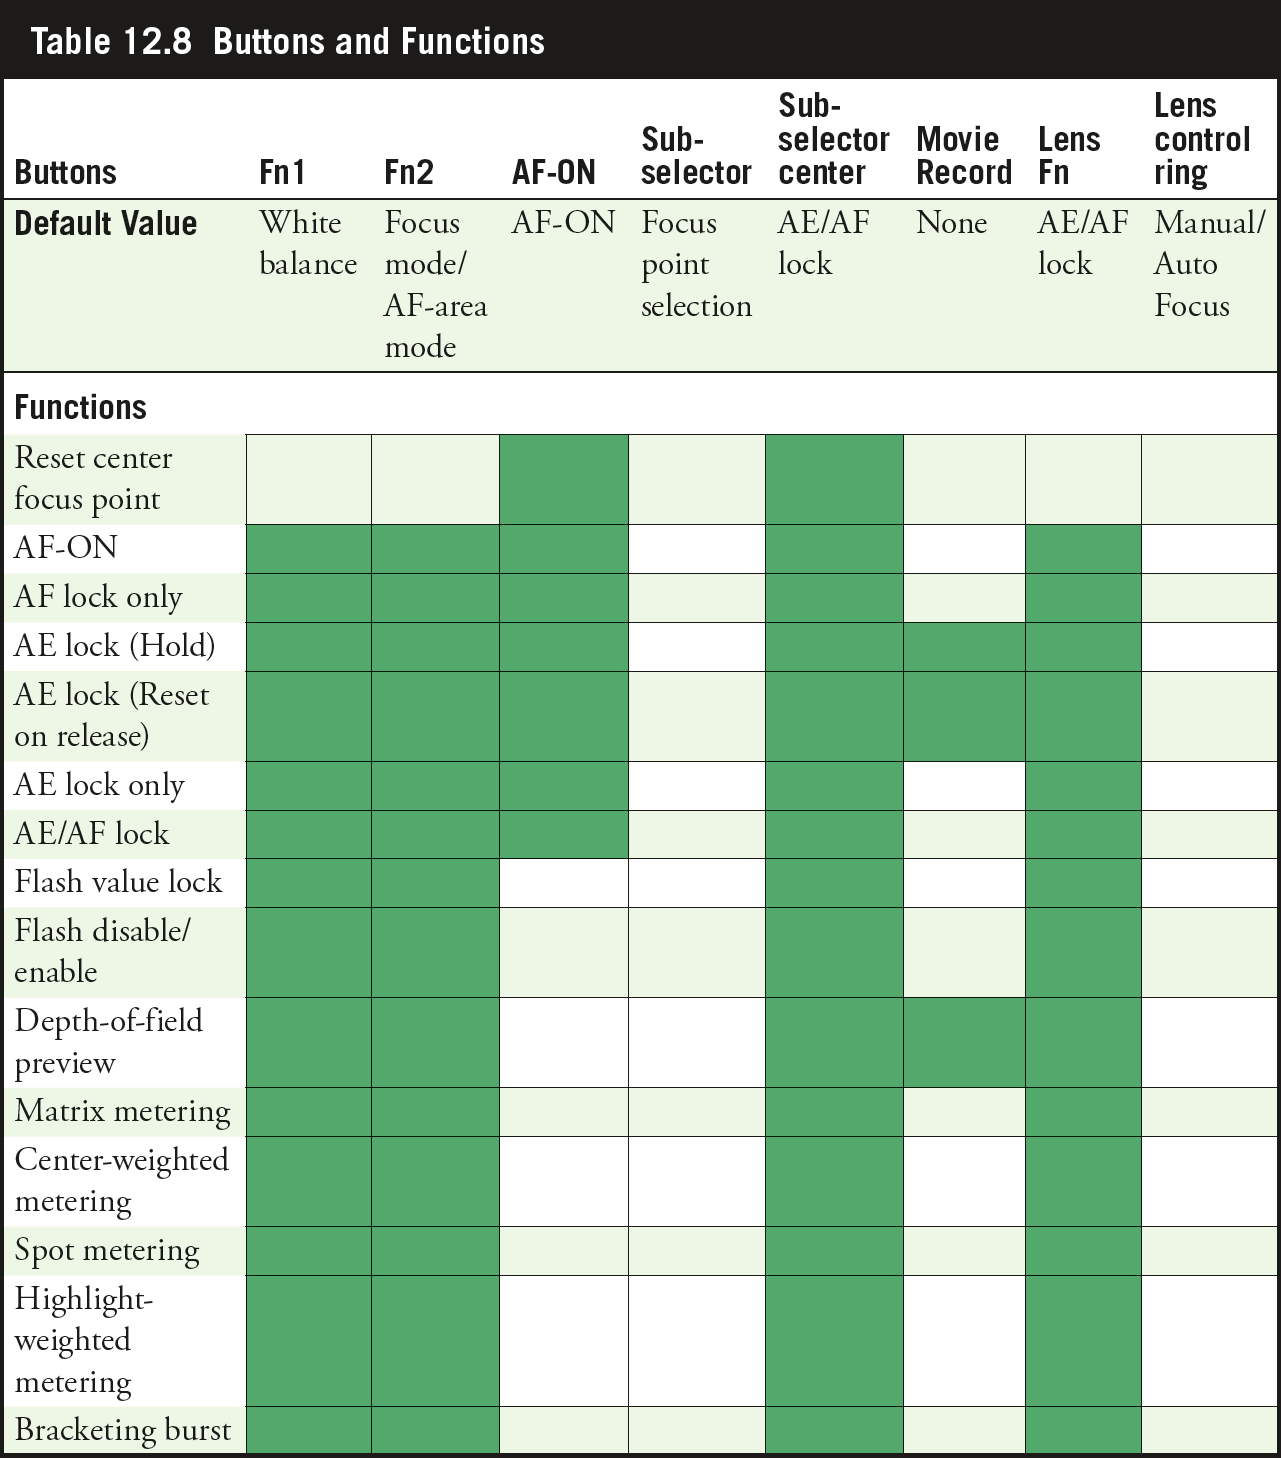
When you’ve selected the behavior you want, press the OK button to confirm and return to the Custom Control Assignment menu. The possible behaviors make up a complex matrix, so I’m going to present your choices in Table 12.8.
Assignment: Convenience
The definitions you assign to your controls are highly personal, and should be implemented to reflect the features you will most need to have available at the press of a button or spin of a dial. Remember, that once you re-assign a control from its default value, you must remember it in order to avoid becoming hopelessly confused. You’ll no longer be able to loan your camera to another Z6 owner without risking confusing them as well.
But wait, there’s more! The User Settings represented by the U1, U2, and U3 positions on the mode dial, can each be populated with their own separate control settings. So, your Fn1 button might summon the White Balance menu when using U2, but Image Size when using U3 (if you so choose to set up the camera that way). While the Z6 offers, in effect, the ultimate in flexibility in assigning your controls, you may find that having separate control behaviors for, say, sports, landscapes, and movie shooting may not be manageable.
Even so, this section will offer some suggestions on assignments that have been useful to me, and which you might consider for your own control layout.
- Quickly switch to an alternate focus mode or AF-area mode. You might use Auto-area AF most of the time to let the Z6 select a focus point for you, yet quickly switch to Single Point mode while you hold down the defined button. You can then move the focus point around within the frame with the directional controls. The Focus mode/AF-area mode behavior allows you to press a defined button and then rotate the main dial to choose a focus mode with the main command dial, and the AF-area mode with the sub-command dial.
- Switch metering modes. If you use Matrix metering mode most of the time and want to be able to use Spot metering when appropriate, just assign a button to that function.
- Disable/enable flash. You can leave your external flash attached and powered up, yet disable it quickly at the press of a defined button. That would allow you to intermingle photos taken by ambient light, and those in which flash illumination is added, on the fly.
- Bracketing burst. This option adds some versatility to exposure, flash, or ADL bracketing by telling the Z6 to take all the exposures in a bracketed set in one burst. You must have activated a bracketing program, as described in Chapter 4. Perhaps you’ve been shooting bracketed sequences in Single-shot mode (rather than continuous mode) and decide you want to capture an entire set at once. Define a key for the Bracketing Burst function and hold it down. Then, each time you press the shutter release an entire burst will be captured. If the release mode has already been set for a continuous mode or white balance bracketing has been selected, the Z6 will capture all the exposures in the set while the shutter release is held down.
- Add a RAW image while shooting only JPEGs. When the +RAW behavior is specified, pressing the defined key tells the Z6 to shoot an additional RAW image even if the current Image Quality setting is JPEG (only) while the button is held down. That will allow you to capture a NEF image if you think you might need one later, say, to adjust color balance for a picture taken under tricky illumination.
- Activate the framing grid. Even if you don’t use the alignment grid often, you can define a key to produce it at the press of a button.
- FAQs (Frequently Accessed Quickly). Have a menu entry you need to access quickly—and often? The Fn2 button can be defined to jump to the top item in your My Menu list (as described in Chapter 13), which can be that most-used entry. Or, you can define the Fn2 button to produce the My Menu list, which you can populate with your own personal most-used items.
- Choose Image Area. If you’re shooting in FX mode and decide you want to switch to one of the crop modes (perhaps you’re shooting sports and need some extra “reach”), a defined button+command dial definition can invoke the image area of your choice. Note that you can enable/disable any of the crop modes (but not FX mode) so that rotating the command dial switches among as many or as few modes as you want. I enable only DX mode when shooting sports, so I can switch quickly from FX to DX and back again.
- Other frequently used settings. Other button+command dial definitions can let you switch exposure modes, change white balance, access multiple exposure options, or control HDR settings quickly, too.
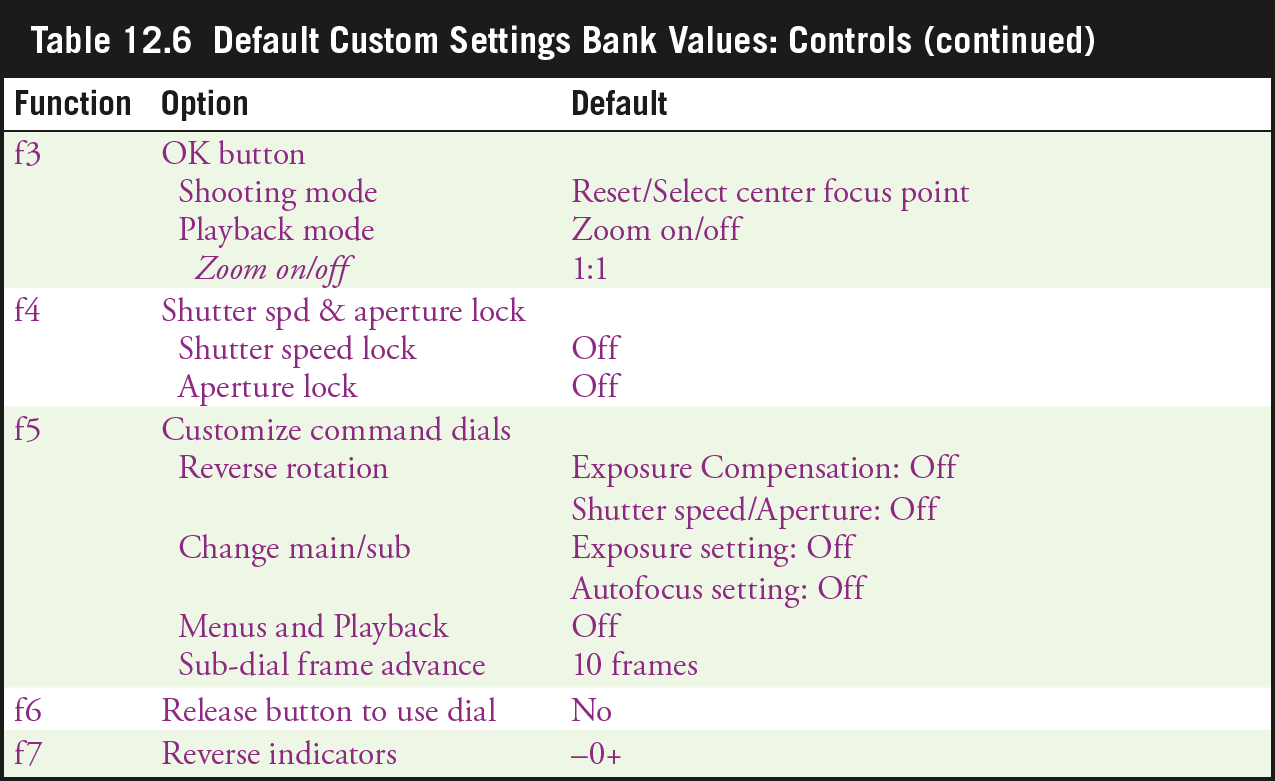
f3 OK Button
Options: Shooting mode: Reset/Select center focus point (default), Zoom on/off, None; Playback mode: Thumbnail on/off, View histograms, Zoom on/off (default), Choose folder;
My preference: Shooting mode: Reset/Select center focus point; Playback mode: Zoom on/off
There are two groups of options available here, one for use when the camera is in Shooting mode, and another when you’re reviewing images in Playback mode. In Shooting mode:
- Reset/Select center focus point. This setting lets you quickly select the center focus point in the viewfinder simply by pressing the multi selector center button.
- Zoom on/off. Use the OK button to zoom in on the area where the current focus point is located. (This would be especially useful for focusing manually.) Press a second time to return to full frame view. Press the right button to select the zoom ratio, from Low Magnification (50 percent), 1:1 (100 percent), and High Magnification (200 percent).
- None. Nothing happens when the OK button is pressed. If you find yourself sloppily pressing the OK button in the heat of the moment while shooting, use this setting to deactivate it and avoid unwanted actions.
In Playback mode:
- Thumbnail on/off. This setting alternates between full-frame and thumbnail playback.
- View histograms. When selected, a larger histogram is displayed while the OK button is pressed.
- Zoom on/off. Use the OK button to toggle between full-frame or thumbnail playback (whichever is active) and playback zoom. You can choose Low Magnification, Medium Magnification, and High Magnification.
- Choose folder. This mode pops up the folder selection screen. You can highlight a folder and press the OK button again to view the images in that folder.
f4 Shutter Spd & Aperture Lock
Options: Lock Shutter Speed/Aperture on or off (Default: Off for both)
My preference: Varies
There are times when you’ll want to lock the shutter speed at a particular value when using Shutter-priority or Manual exposure modes; and times when you want to lock down a particular f/stop when using Aperture-priority or Manual exposure modes. Use this entry to lock the shutter speed and/or aperture so it can’t be changed. I use this most in the studio, when I use Manual exposure and studio lights. Once I’ve set the exposure for a series of shots, I lock my Shutter Speed/Aperture Lock button and freeze the settings so I don’t have to worry about accidentally rotating a command dial.
If you think accessing this menu entry to lock shutter speed or aperture is needlessly complex, you’re right. It makes a lot more sense to define a physical button to provide this function, as described earlier under f2: Custom Control Assignment. I assigned the function to the Fn1 button. To lock the shutter speed and/or aperture, I first set either or both to the value I want. Then, I press the Fn1 button and rotate the main command dial to lock/unlock shutter speed, and the sub-command dial to lock/unlock aperture. An L symbol appears next to the locked setting on the top control panel and viewfinder/LCD monitor displays.
Note that when the camera is set to Shutter-priority, you are able to enable/disable only the Shutter Lock function. When set to Aperture-priority, only Aperture Lock is accessible. In Manual exposure mode, you can adjust either one, and in Program mode, neither can be locked.
f5 Customize Command Dials
Options: For main and sub-command dials: Reverse rotation, Change main/sub, Menus and Playback, Sub-dial Frame Advance
My preference: Varies
This menu entry can change the behavior of the command dials. Use the available tweaks to change the behavior of the dials to better suit your preferences, or if you’re coming to the Nikon world from another vendor’s product that uses a different operational scheme. Keep in mind that redefining basic controls in this way can prove confusing if someone other than yourself uses your camera, or if you find yourself working with other Nikon cameras that have retained the normal command dial behavior. The reason that the dials are set for their default directions is to match the direction of rotation of the aperture ring/sub-command dial (when changing the aperture). Turning any of the three to the left decreases exposure, while rotating to the right increases exposure. Your options include:
- Reverse rotation. This option allows you to reverse the rotation direction for Exposure Compensation and Shutter Speed/Aperture selection. You can reverse the direction for either or both. By default, rotating the main command dial counterclockwise causes shutter speeds to become shorter in Manual and Shutter-priority modes; rotating the sub-command dial counterclockwise selects larger f/stops. If you want to reverse the directional orientation of the dials (so you’ll need to rotate the main command dial clockwise to specify shorter shutter speeds, etc.), put a checkmark in the box next to Shutter Speed/Aperture. To reverse direction for Exposure Compensation, put a checkmark in that box. Uncheck the boxes to return to the original Z6 scheme of things.
- Change main/sub. This option doesn’t reverse directions: it swaps the functions of the two dials. You can swap the behaviors of the dials for Exposure Setting, Autofocus Setting, or both.
- Exposure setting. Choose On, and the main dial will set the aperture in Manual and Aperture-priority modes, and the sub-command dial will adjust the shutter speed in Manual and Shutter-priority modes. (The opposite of the default assignments for these dials.) You can also choose ON (Mode A) and the main command dial will be used to set aperture in Aperture-priority mode only. In Manual exposure mode, main command and sub-command dials keep their default shutter speed/aperture assignments (respectively).
- Autofocus setting. This option works in conjunction with any button you’ve assigned the Focus mode/AF-area mode function using Custom Setting f2. If you specify On, the focus mode can be selected with the sub-command dial, and AF-area mode with the main command dial.
- Menus and playback. You can change the orientation of the command dials when navigating menus and playback options, too. By default, the main command dial is used to select an image during full-frame playback; move the cursor left or right during thumbnail viewing, and move the menu highlighting up or down. The sub-command dial is used to display additional photo information in full-frame playback, to move the cursor up and down, and to move back and forth between menus and submenus. (Note that you can also use the multi selector directional buttons for these functions.) When set to On or On (Image Review Excluded), the functions assigned to the dials are reversed.
- Sub-dial frame advance. If you’ve turned the Menus and Playback option to On, you can set the sub-command dial so that while reviewing images in full-frame mode, the Z6 skips ahead either 10 or 50 frames, or allows you to select a folder.
f6 Release Button to Use Dial
Options: Yes, No (default)
My preference: Yes
Normally, any button used in conjunction with a command dial must be held down while the command dial or sub-command dial is rotated. Choose Yes for this option if you want to be able to press the button and release it, and then rotate the command dial. You can continue to make adjustments until the button is pressed again, the shutter release button is pressed halfway, or the standby timer elapses. This option can be applied to these functions:
- Choose Image Area
- Image Quality/Size
- White Balance
- Set Picture Control
- Active D-Lighting
- Metering
- Flash mode/Compensation
- Focus mode/AF-area mode
- Auto Bracketing
- Multiple Exposure
- HDR (High Dynamic Range)
- Exposure Delay Mode
- Shutter Spd & Aperture Lock
- Peaking Highlights
- Choose non-CPU Lens Number
- Microphone Sensitivity
Chose No to return to the Z6’s default behavior, which requires that the button be held down while the adjustment is made. I like to use the Yes option and avoid having to remember to hold down a button while I make my changes.
f7 Reverse Indicators
Options: Direction of exposure indicators: –0+ (default), +0–
My preference: –0 +
You can change the exposure indicators on the top control panel and information display so that the negative values are shown at the left (–0+) and positive values to the right, or the reverse (+0–). You might want to reverse indicators to match a “foreign” camera system you’re coming to the Nikon world from, or, if you use the aperture ring on lenses that have them, to match what happens when the ring is rotated. (Older Nikon lenses have the smallest aperture on the ring to the left, and the largest to the right, so rotating the aperture ring to the right increases exposure; to the left decreases exposure.) The current directional orientation is relatively new, so you might also prefer to reverse the indicators if you’re a veteran user of older cameras (Nikon D3s and before) and are disoriented by the change. My oldest camera still in frequent use is a Nikon D3200, and it uses the current scheme, so I’ve gone with the flow.
g. Movie
This submenu has only six settings, shown in Figure 12.17. Here you can set separately for movie shooting some of the button assignments available for still shooting. You’ll find more about movie shooting in Chapters 14 and 15.
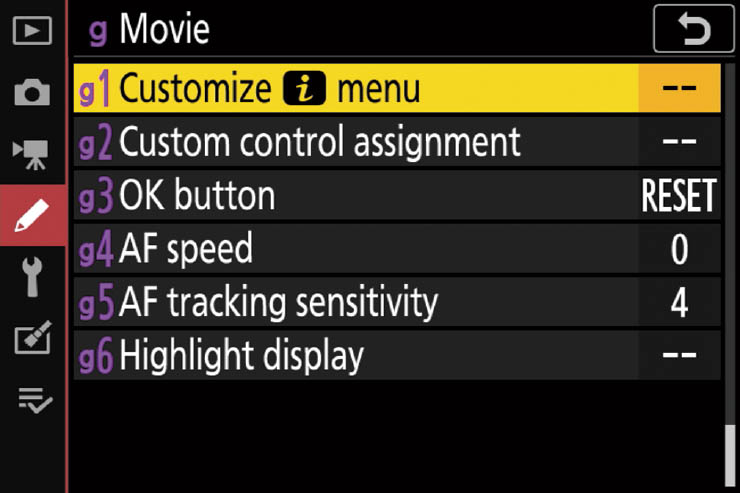
Figure 12.17 The Movie Shooting menu.
g1 Customize i Menu
Options: Allows defining functions available from the i menu. There are 22 different functions that you can use to replace or add to those provided in the default version of the i menu that’s active in Movie mode.
My preference: Varies
When in Movie mode, the i button summons its own version of the i menu, with a slightly different collection of settings. The Frame Size/Frame Rate, Choose Image Area, Electronic VR, and Microphone Sensitivity options replace the Image Quality, Flash, Release Mode, and Image Size options available in still shooting mode. You can replace any of the 12 default options using this entry. Your choices include the following (options that already are assigned to buttons are noted):
- Choose Image Area
- Frame Size and Rate/Image Quality
- Exposure Compensation
- ISO Sensitivity
- White Balance (Fn1)
- Set Picture Control
- Active D-Lighting
- Metering Mode
- AF/MF Focus Mode (Fn2+command dial)
- AF-Area Mode (Fn2+sub-command dial)
- Vibration Reduction
- Electronic VR
- Microphone Sensitivity
- Attenuator
- Frequency Response
- Wind Noise Reduction
- Headphone Volume
- Peaking Highlights
- Highlight Display
- Monitor/Viewfinder Brightness
- Bluetooth Connection
- Wi-Fi Connection
g2 Custom Control Assignment
Options: Definitions for Fn1, Fn2, AF-ON, Sub-selector button, Shutter release, button Lens control ring
My preference: N/A
You can define the action that any of these controls perform when pressed in Movie mode. Keep in mind that these settings are used only when capturing video and that the buttons not listed retain their still photography functions; in live view, the behaviors you’ve defined for still photography all apply (see Table 12.9).
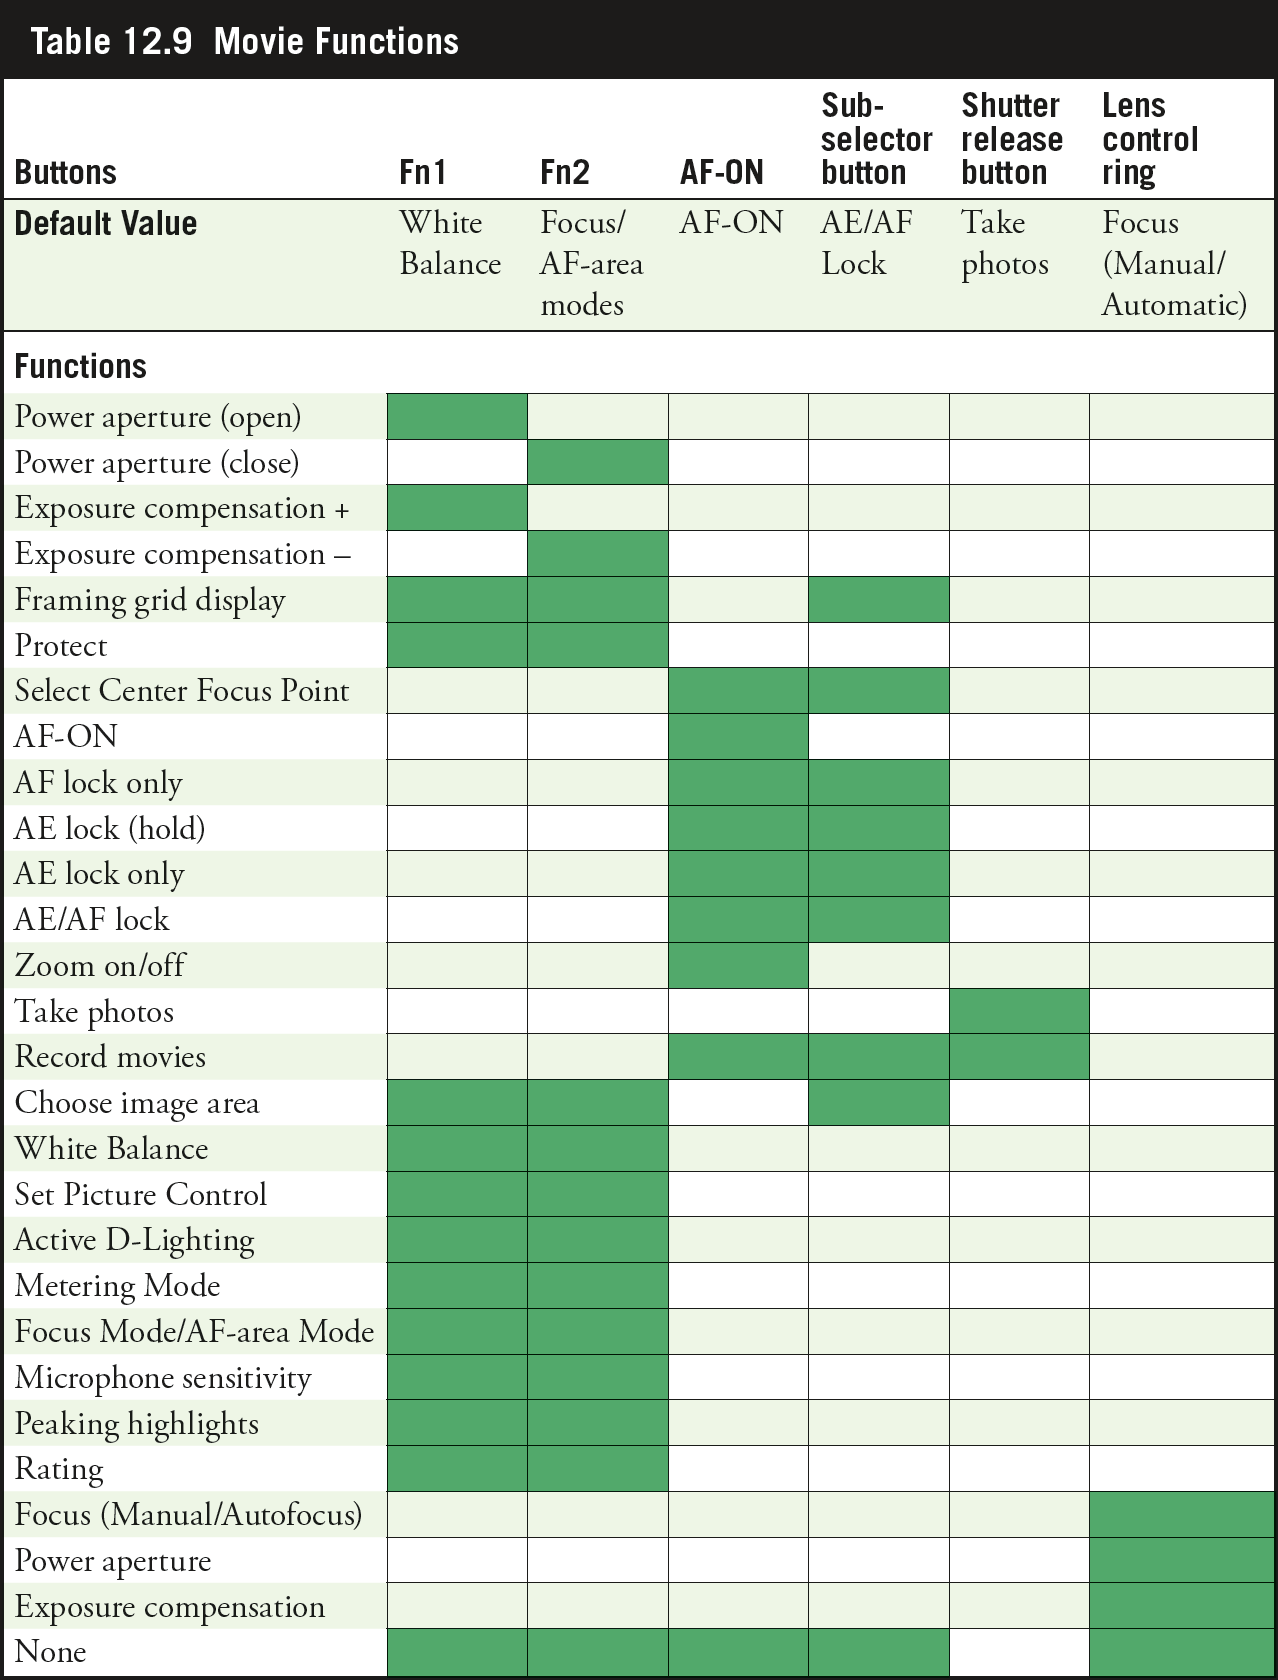
g3 OK Button
Options: Allows defining functions for Select center focus point (default), Zoom on/off, Record movies, or None
My preference: Varies
In Movie mode you can redefine the OK button to Select Center Focus Point, Zoom On/Off, or Record Movies, or None.
g4 AF Speed
Options: Autofocusing speed (+/–5) (default: 0), When to Apply (default): Always, Only While Recording
My preference: Varies
The speed with which the Z6 autofocuses takes on a different significance when you’re shooting movies, because any AF changes are recorded within the movie itself. You may want focus to change slowly as a scene unfolds and people or objects move within the frame, or the frame itself is recomposed. Or, during action sequences, you might prefer to have AF keep pace with subject and camera changes and focus rapidly. This entry lets you speed up or slow down focus speed in movie mode, using a slider moved via the touch screen or directional buttons. (See Figure 12.18.) The When to Apply option can be set to Always (in which case the camera’s autofocus will refocus constantly at the speed you select) or Only While Recording (so the focus speed is changed only when you’re actually capturing video). When using AF-F (full-time autofocus) you might prefer normal focusing speed (which is equivalent to +5—as fast as possible) as you compose your shot, and then have the camera switch automatically to a preferred slower speed once you start recording.

Figure 12.18 Setting AF Speed.
g5 AF Tracking Sensitivity
Options: 7 (low) to 1 (high)
My preference: Varies
This is roughly the movie equivalent of Custom Setting a3: Focus Tracking with Lock-on for still photography. It specifies how quickly the Z6’s AF system responds when the subject either exits the frame or something else intervenes—the referee at a football game is the classic example.
A setting of 7 (Low) causes the Z6 to ignore the intervening subject matter for a significant period of time. Use this setting when shooting subjects, such as sports, in which focus interruptions are likely to be frequent and significant. You can also choose a setting of 1 (High) which tells the Z6 to wait only a moment before refocusing. The middle value, 4 (default), offers an intermediate delay before the camera refocuses on the new subject.
g6 Highlight Display
Options: Display Pattern: Pattern 1 (forward diagonal lines), Pattern 2 (back-leaning diagonal lines), Off (default); Highlight Display Threshold: 255, 248 (default), 235, 224, 213, 202, 191, 180
My preference: 235
Video has its own version of the still photography’s Highlights display (“blinkies”), commonly known as Zebra display, because it uses contrasting stripes to represent blown highlights. It warns you when the brightest areas of your image may be overexposed when capturing video—but does so before you begin capture. Instead of solid flashing indicators, the camera displays one of two striped “zebra” patterns in the affected areas. The zebra stripes jump out at you and make it easy to identify exactly which highlights may be overexposed. You can then adjust exposure or lighting to bring the highlights under control. You can assign Highlight Display to one of the i menu spots or a defined key using Custom Settings g1 or g2, respectively.
This menu entry allows you to specify how bright a highlight must be to trigger the zebra effect, using one of eight different brightness levels from 255 (100% white) to 180 (a relatively light gray). Your choice will depend on how important highlights are.
So, exactly how bright is too bright? A value of 255 indicates pure white, so any Zebra pattern visible when using this setting indicates that your image is extremely overexposed. Any details in the highlights are gone, and cannot be retrieved. Settings from 213 to 235 can be used to make sure facial tones are not overexposed. As a general rule of thumb, Caucasian skin generally falls in the 235 range, with darker skin tones registering as low as 213, and very fair skin or lighter areas of your subject edging closer to 248. Once you’ve decided the approximate range of tones that you want to make sure do not blow out, you can set the camera’s Zebra pattern sensitivity appropriately and receive the flashing striped warning on the LCD of your camera. (See Figure 12.19.) The pattern does not appear in your final image, of course—it’s just an aid to keep you from blowing it, so to speak.
Figure 12.19 The flashing stripes show an area is overexposed.
Zebra patterns are a much more useful tool than “blinkies,” because you are given an alert before you take the picture, and can actually specify exactly how bright too bright is. The feature is not new: it has long been used in video equipment, dating back before the digital age. Veteran videographers will note that Nikon uses a section of the 0–255 brightness value scale, rather than the traditional IRE measure of a video signal level, in which numbers from 70 to 100/100+ are used. The Zebra feature has been a staple of professional video shooting for a long time, as you might guess from the moniker assigned to the unit used to specify brightness: IRE, a measure of video signal level, which stands for Institute of Radio Engineers.