If you consider the qualities that constitute the most important tools for creating an outstanding image, an appropriate exposure is easily in the top three, along with picture sharpness/focus, and framing/composition. Within this triumvirate, exposure potentially involves the largest number of variables and can improve (or hinder) the impact of your image in a variety of ways. That’s particularly true because how you achieve a particular exposure setting can have as much impact as what settings you select.
Think about it. Incorrect exposure can affect the tonal values in your image in a detrimental way, obscuring detail in shadows or washing out the highlights. But even exposure that’s theoretically satisfactory can still produce an image that is objectionably blurry because the shutter speed is too slow; or objectionably grainy looking because the ISO sensitivity has been set too high or lacks sufficient detail in some areas because depth-of-field is lacking. Nailing the right exposure involves more than just appropriate settings. You also need to understand how the elements of exposure affect your final photograph.
Your Z6 has an exceptional amount of intelligence when it comes to calculating a proper exposure for a wide variety of scenes. Even so, you are smarter—and have creative vision the camera lacks. The more you shoot, the more ways you’ll discover how to improve on your camera’s picture-taking decisions and, even when to ignore them when you want to create a particular look or effect. For example, when you shoot with the main light source behind the subject, you end up with backlighting, which can result in an overexposed background and/or an underexposed subject. The Nikon Z6 recognizes backlit situations nicely, and, in most cases, can properly base exposure on the main subject using the default Matrix metering mode, producing a decent photo.
But, as an inventive photographer, there will be many instances where you would rather not have automatic correction for backlighting. What if you want to underexpose the subject, to produce a silhouette effect? The Z6 does a poor job of exposing intentional silhouettes, and will end up producing unwanted detail in what should have been inky black areas of your image. Fortunately, the camera has metering modes and other exposure options that allow you to produce the image you are looking for. If you’re looking for an extensive exposure range, features like the Z6’s built-in HDR and Active D-Lighting can fine-tune your exposure as you take photos, preserving detail in the highlights and shadows as required. Your Nikon Z6 also has the capability of fine-tuning exposure separately for each of the metering modes, so you can consistently add or subtract a little exposure to suit your creative tastes.
In the next few pages, I’m going to give you a grounding in exposure concepts, either as an introduction or as a refresher course, depending on your current level of expertise. When you finish this chapter, you’ll understand most of what you need to know to take well-exposed photographs creatively in a broad range of situations.
Getting a Handle on Exposure
This section explains the fundamental concepts that go into creating an exposure. If you already know about the role of f/stops, shutter speeds, and sensor sensitivity in determining an exposure, you might want to skip to the next section, which explains how the Z6 calculates exposure.
In the most basic sense, exposure is all about light. Correct exposure brings out the detail in the areas you want to picture, providing the range of tones and colors you need to create the desired image. Poor exposure can cloak important details in shadow, or wash them out in glare-filled featureless expanses of white. However, getting the perfect exposure requires some intelligence—either that built into the camera or the smarts in your head—because digital sensors can’t capture all the tones we are able to see. If the range of tones in an image is extensive, embracing both inky black shadows and bright highlights, we often must settle for an exposure that renders most of those tones—but not all—in a way that best suits the photo we want to produce.
As the owner of a Nikon Z6, you’re probably well aware of the traditional “exposure triangle” of aperture (quantity of light, light passed by the lens), shutter speed (the amount of time the shutter is open), and the ISO sensitivity of the sensor—all working proportionately and reciprocally to produce an exposure. The trio is itself affected by the amount of illumination that is available to work with. So, if you double the amount of light, increase the aperture by one stop, make the shutter speed twice as long, or boost the ISO setting 2X, you’ll get twice as much exposure. Similarly, you can increase any of these factors while decreasing one of the others by a similar amount to keep the same exposure.
Working with any of the three controls always involves trade-offs. Larger f/stops provide less depth-of-field, while smaller f/stops increase depth-of-field and decrease sharpness through a phenomenon called diffraction. Shorter shutter speeds do a better job of reducing the effects of camera/subject motion, while longer shutter speeds make that motion blur more likely. Higher ISO settings increase the amount of visual noise and artifacts in your image, while lower ISO settings reduce the effects of noise. (See Figure 4.1.)
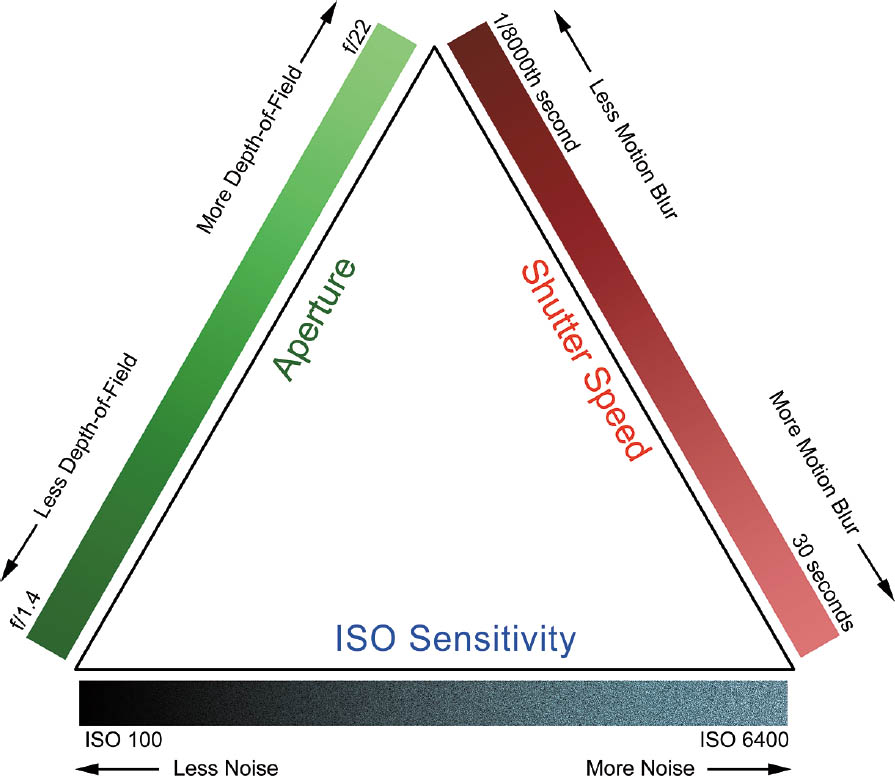
Figure 4.1 The traditional exposure triangle includes aperture, shutter speed, and ISO sensitivity.
To further understand exposure, you need to understand the six aspects of light that combine to produce an image. Start with a light source—the sun, an interior lamp, electronic flash, or the glow from a campfire—and trace its path to your camera, through the lens, and finally to the sensor that captures the illumination. Here’s a brief review of the things within our control that affect exposure, listed in “chronological” order (that is, as the light moves from the subject to the sensor):
- Light at its source. Our eyes and our cameras—film or digital—are most sensitive to that portion of the electromagnetic spectrum we call visible light. That light has several important aspects that are relevant to photography, such as color and harshness (which is determined primarily by the apparent size of the light source as it illuminates a subject). But, in terms of exposure, the important attribute of a light source is its intensity. We may have direct control over intensity, which might be the case with an interior light that can be brightened or dimmed, or electronic flash output that can be increased or decreased manually or automatically. In other cases, we might have only indirect control over intensity, as with sunlight, which can be made to appear dimmer by introducing translucent light-absorbing or reflective materials in its path.
- Light’s duration. We tend to think of most light sources as continuous. But, as you’ll learn in Chapter 8, the duration of light can change quickly enough to modify the exposure, as when the main illumination in a photograph comes from an intermittent source, such as an electronic flash.
- Light reflected, transmitted, or emitted. Once light is produced by its source, either continuously or in a brief burst, we are able to see and photograph objects by the light that is reflected from our subjects toward the camera lens; transmitted (say, from translucent objects that are lit from behind); or emitted (by a candle or television screen). When more or less light reaches the lens from the subject, we need to adjust the exposure. This part of the equation is under our control to the extent we can increase the amount of light falling on or passing through the subject (by adding extra light sources or using reflectors), or by pumping up the light that’s emitted (by increasing the brightness of the glowing object).
- Light passed by the lens. Not all the illumination that reaches the front of the lens makes it all the way through. Filters can remove some of the light before it enters the lens. Inside the lens barrel is a variable-sized diaphragm that produces an opening called an aperture that dilates and contracts to control the amount of light that enters the lens. You, or the Z6’s autoexposure system, can control exposure by varying the size of the aperture. The relative size of the aperture is called the f/stop. (See Figure 4.2.)
- Light passing through the shutter. Once light passes through the lens, the amount of time the sensor receives it is determined by the Z6’s shutter, which can remain open for as briefly as 1/8,000th of a second, or, for as long as 30 seconds—or even longer if you use the Bulb or Time settings (located past the 30-second speed as you rotate the command dial, and available only in Manual exposure mode).
- Light captured by the sensor. Not all the light falling onto the sensor is captured. If the number of photons reaching a particular photosite doesn’t pass a set threshold, no information is recorded. Similarly, if too much light illuminates a pixel in the sensor, then the excess isn’t recorded or, worse, spills over to contaminate adjacent pixels. We can modify the minimum and maximum number of pixels that contribute to image detail by adjusting the ISO setting. At higher ISOs, the incoming light is amplified to boost the effective sensitivity of the sensor.

Figure 4.2 Top row (left to right): f/4, f/5.6, f/8; bottom row: f/11, f/16.
If you’re really new to more advanced cameras (and I realize that a few ambitious amateurs do purchase the Z6 as their first serious camera), you might need to know that the lens aperture, or f/stop, is a ratio, much like a fraction, which is why f/2 is larger than f/4, just as 1/2 is larger than 1/4. However, f/2 is actually four times as large as f/4. (If you remember your high school geometry, you’ll know that to double the area of a circle, you multiply its diameter by the square root of two: 1.4.)
Lenses are usually marked with intermediate f/stops that represent a size that’s twice as much/half as much as the previous aperture. So, a lens might be marked: f/4, f/5.6, f/8, f/11, f/16, with each larger number representing an aperture that admits half as much light as the one before, as shown in Figure 4.2. Of course, you can also set intermediate apertures with the Nikon Z6, such as f/6.3 and f/7.1, which fall between f/5.6 and f/8.
Shutter speeds are actual fractions (of a second), but the numerator is omitted, so that 60, 125, 250, 500, 1,000, and so forth represent 1/60th, 1/125th, 1/250th, 1/500th, and 1/1,000th second. To avoid confusion, Nikon uses quotation marks to signify longer exposures: 2”, 2”5, 4”, and so forth representing 2.0-, 2.5-, and 4.0-second exposures, respectively.
Four of these factors—quantity of light, light passed by the lens, the amount of time the shutter is open, and the sensitivity of the sensor—all work proportionately and reciprocally to produce an exposure. That is, as I mentioned, if you double the amount of light, increase the aperture size by one stop, make the shutter speed twice as long, or double the ISO sensitivity, you’ll get twice as much exposure. Similarly, you can reduce any of these and reduce the exposure when that is preferable.
As we’ll see however, changing any of those aspects in P, A, or S mode does not change the exposure; that’s because the camera also makes adjustments when you do so, in order to maintain the same exposure. That’s why Nikon provides other methods for modifying the exposure in those modes.
Equivalent Exposure
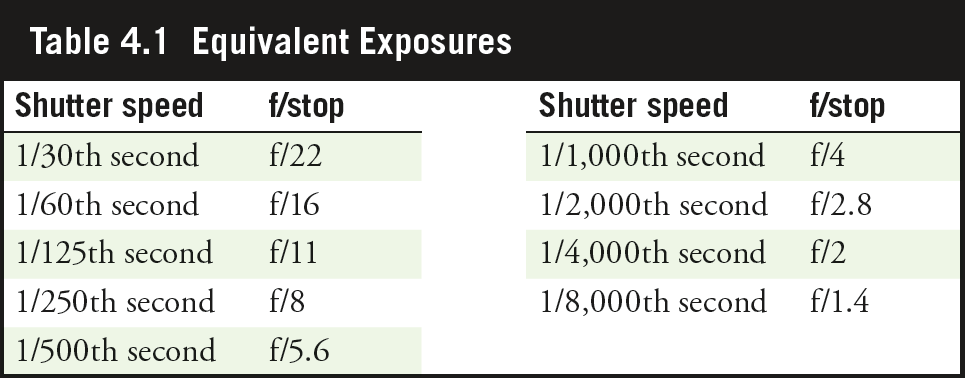
Most commonly, exposure settings are made using the aperture and shutter speed, followed by adjusting the ISO sensitivity, if it’s not possible to get the preferred exposure (that is, the one that uses the “best” f/stop or shutter speed for the depth-of-field or action stopping we want).
One of the most important aspects in this discussion is the concept of “equivalent exposure.” This term means that exactly the same amount of light will reach the sensor at various combinations of aperture and shutter speed. Whether we use a small aperture (large f/number) with a long shutter speed or a wide aperture (small f/number) with a fast shutter speed, the amount of light reaching the sensor can be exactly the same. Table 4.1 shows equivalent exposure settings using various shutter speeds and f/stops; in other words, any of the combination of settings listed will produce exactly the same exposure.
When the Z6 is set for P mode, the metering system selects the correct exposure for you automatically, but you can change quickly to an equivalent exposure by spinning the main command dial until the desired equivalent exposure combination is displayed, with an asterisk appearing next to the P when you’re using this “Flexible Program” feature. You can make Flexible Program adjustments more easily if you remember that you need to rotate the command dial toward the left when you want to increase the amount of depth-of-field or use a slower shutter speed; rotate to the right when you want to reduce the depth-of-field or use a faster shutter speed. The need for more/less DOF and slower/faster shutter speed are the primary reasons you’d want to use Flexible Program. This program shift mode does not work when you’re using flash.
In Aperture-priority (A) and Shutter-priority (S) modes, you can change to an equivalent exposure, but only by either adjusting the aperture with the sub-command dial in A mode (the camera chooses the shutter speed) or shutter speed with the main command dial in S mode (the camera selects the aperture). I’ll cover all these exposure modes later in the chapter.
F/STOPS VERSUS STOPS
In photography parlance, f/stop always means the aperture or lens opening. However, for lack of a current commonly used word for one exposure increment, the term stop is often used. In the past, EV (Exposure Value) served this purpose, and was used as a measure of the total sensitivity range of a device such as a light meter, but exposure value and its abbreviation have since been inextricably intertwined with its use in describing exposure compensation. In this book, when I say “stop” by itself (no f/), I mean one whole unit of exposure, and am not necessarily referring to an actual f/stop or lens aperture. So, adjusting the exposure by “one stop” can mean changing to the next shutter speed increment (say, from 1/125th second to 1/200th second) or the next aperture (such as f/4 to f/5.6). Similarly, 1/3-stop or 1/2-stop increments can mean either shutter speed or aperture changes, depending on the context. Be forewarned.
How the Z6 Calculates Exposure
Although it can make some good guesses based on how the brightness levels vary within a scene, your Z6 has no way of knowing for sure what it’s pointed at. So, it must make some assumptions and calculate the correct exposure based on its internal rules. One parameter is that the brightness of all—or part—of a scene will average down to a so-called middle gray tone. The conventional wisdom is that this tone is roughly 18 percent gray. Unfortunately, while the traditional 18 percent value is a middle gray in terms of what the eye sees, the Z6 is actually calibrated for a slightly darker tone. This section explains how your Z6 decides on an exposure in one of its semi-automatic (non-manual) modes.
The exposure is measured using a specific pattern of exposure measuring areas that you can select (more on that later). Exposure is calculated based on the assumption that each area being measured reflects about the same amount of light as a neutral gray card that reflects a “middle” gray of about 12 to 18 percent reflectance. (The photographic “gray cards” you buy at a camera store have an 18 percent gray tone. Your camera is calibrated to interpret a somewhat darker 12 percent gray; I’ll explain more about this later, too.) That “average” 12 to 18 percent gray assumption is necessary, because different subjects reflect different amounts of light. In a photo containing, say, a white cat and a dark gray cat, the white cat might reflect five times as much light as the gray cat. An exposure based on the white cat will cause the gray cat to appear to be black, while an exposure based only on the gray cat will make the white cat appear to be washed out.
This is more easily understood if you look at some photos of subjects that are dark (they reflect little light), those that have predominantly middle tones, and subjects that are highly reflective. The next few figures show a simplified scale with a middle gray 18 percent tone, plus black and white patches, along with a human figure (not a cat) to illustrate how different exposure measurements actually do affect an exposure.
Correctly Exposed
The image shown in Figure 4.3, left, represents how a photograph might appear if you inserted the patches shown at the bottom, and then calculated exposure by measuring the light reflecting from the middle gray patch, which, for the sake of illustration, we’ll assume reflects approximately 12 to 18 percent of the light that strikes it. The exposure meter in the Z6 sees an object that it thinks is a middle gray, calculates an exposure based on that, and the patch in the center of the strip is rendered at its proper tonal value. Best of all, because the resulting exposure is correct, the black patch at left and white patch at right are rendered properly as well.
When you’re shooting pictures with your Z6, and the meter happens to base its exposure on a subject that averages that “ideal” middle gray, then you’ll end up with similar (accurate) results. The camera’s exposure algorithms are concocted to ensure this kind of result as often as possible, barring any unusual subjects (that is, those that are backlit, or have uneven illumination). The Z6 has three metering modes (described shortly), each of which is equipped to handle certain types of unusual subjects, as I’ll outline.
Overexposed
At center in Figure 4.3 you can see would happen if the exposure were calculated based on metering the leftmost, black patch. The light meter sees less light reflecting from the black square than it would see from a gray middle-tone subject, and so figures, “Aha! I need to add exposure to brighten this subject up to a middle gray!” That lightens the “black” patch, so it now appears to be gray.
But now the patch in the middle that was originally middle gray is overexposed and becomes light gray. And the white square at right is now seriously overexposed and loses detail in the highlights, which have become a featureless white. Our human subject is similarly overexposed.
Underexposed
The third possibility in this simplified scenario is that the light meter might measure the illumination bouncing off the white patch, and try to render that tone as a middle gray. A lot of light is reflected by the white square, so the exposure is reduced, bringing that patch closer to a middle gray tone. The patches that were originally gray and black are now rendered too dark, as you can see at right in Figure 4.3. Clearly, measuring the gray card—or a substitute that reflects about the same amount of light—is the only way to ensure that the exposure is precisely correct.
Metering Mid-Tones
As you can see, the ideal way to measure exposure is to meter from a subject that reflects 12 to 18 percent of the light that reaches it. If you want the most precise exposure calculations, the solution is to use a stand-in. Any mid-tone subject—including green grass or a rich, medium-blue sky—also reflects about 12 to 18 percent of the light. Metering such an area should ensure that the exposure for the entire scene will be correct or close to correct for average subjects.
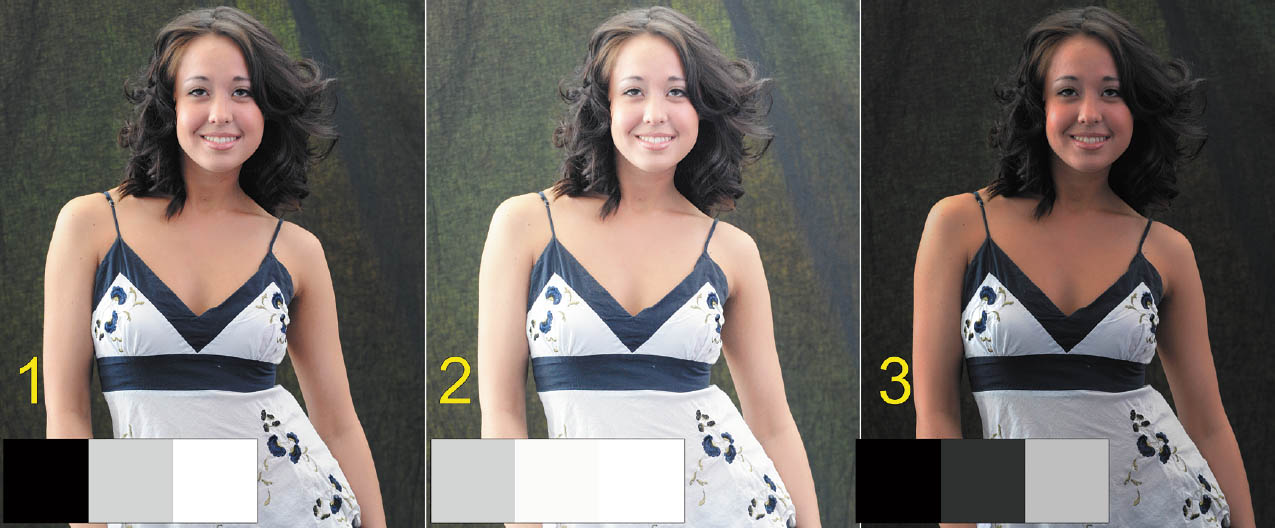
Figure 4.3 1.) Exposure calculated from the middle gray patch produces a correct exposure for all three patches and the subject. 2.) Exposure measured from the black patch yields an overexposed image. 3.) Exposure calculated from the white patch produces underexposure.
In some very bright scenes (like a snowy landscape or a lava field), you won’t have a mid-tone to meter. Another substitute for a gray card is the palm of a human hand (the backside of the hand is too variable). But a human palm, regardless of ethnic group, is even brighter than a standard gray card, so instead of one-half stop more exposure, you need to add one additional stop. That is, if your meter reading is 1/500th of a second at f/11, use 1/500th second at f/8 or 1/200th second at f/11 instead. (Both exposures are equivalent.)
Or, you might want to resort to using an evenly illuminated gray card mentioned earlier. Small versions are available that can be tucked in a camera bag. Place it in your frame near your main subject, facing the camera, and with the exact same even illumination falling on it that is falling on your subject. Then, use the Spot metering function (described in the next section) to calculate exposure.
But the standard Kodak gray card reflects 18 percent of the light while, as I noted, your camera is calibrated for a somewhat darker 12 percent tone. If you insisted on getting a perfect exposure, you would need to add about one-half stop more exposure than the value provided by taking the light meter reading from the card. Of course, in most situations, it’s not necessary to do this. Your camera’s light meter will do a good job of calculating the right exposure, especially if you use the exposure tips in the next section. But I felt that explaining exactly what is going on during exposure calculation would help you understand how your Z6’s metering system works.
ORIGIN OF THE 18 PERCENT ‘MYTH’
Why are so many photographers under the impression that camera light meters are calibrated to the 18 percent “standard,” rather than the true value, which may be 12 to 14 percent, depending on the vendor? You’ll find this misinformation in an alarming number of places. I’ve seen the 18 percent “myth” taught in camera classes; I’ve found it in books, and even been given this wrong information from the technical staff of camera vendors. (They should know better—the same vendors’ engineers who design and calibrate the cameras have the right figure.)
The most common explanation is that during a revision of Kodak’s instructions for its gray cards in 1977, the advice to open up an extra half stop was omitted, and a whole generation of shooters grew up thinking that a measurement off a gray card could be used as is. Kodak restored the proviso in 1997, it’s said, but by then it was too late.
EXTERNAL METERS CAN BE CALIBRATED
The light meters built into your Z6 are calibrated at the factory and can only be changed using the Fine Tune Optimal Exposure option (Custom Setting b4). But if you use a hand-held incident or reflective light meter, you can calibrate it, using the instructions supplied with your meter. Because a hand-held meter can be calibrated to the 18 percent gray standard (or any other value you choose), my rant about the myth of the 18 percent gray card doesn’t apply.
Call them modes or methods, the Nikon Z6 seems to have a lot of different sets of options that are described using similar terms. Here’s how to sort them out:
- Metering method. These modes determine the parts of the image within the sensor that are examined in order to calculate exposure. The Z6 may look at many different points within the image, segregating them by zone (Matrix metering); examining the same number of points, but giving greater weight to those located in the middle of the frame (Center-weighted metering); evaluating only a limited number of points in a limited area (Spot metering); or adjusting exposure to preserve detail in highlights (Highlight-weighted metering).
- Exposure method. These modes (Program, Aperture-priority, Shutter-priority, or Manual) determine which settings are used to expose the image. The Z6 may adjust the shutter speed, the aperture, or both, or even ISO setting (if Auto ISO is active), depending on the method you choose.
To meter properly you’ll want to choose both the metering method (how light is evaluated) and exposure method (how the appropriate shutter speeds and apertures are chosen). I’ll describe both in the following sections.
Choosing a Metering Method
The Z6 has four different schemes for evaluating the light received by its exposure sensors: Matrix, Center-weighted, Spot, and Highlight-weighted. Select the mode you want from the i menu (or you can assign the metering adjustment function to a custom control using Custom Setting f2, as noted in the sidebar below).
Your Z6 calculates exposure by measuring the light that passes through the lens and strikes the sensor. These pixels are said to be able to detect light over a range of –4 to +17 EV at ISO 100. That translates into exposures from sixteen minutes at f/16 to 1/2,000th second at f/16.
In everyday terms, 0 EV represents the illumination you might see outdoors at night under a full moon, while the brightest daytime scene you’re likely to encounter (a snow scene in full daylight) would be 16 EV. Your Z6 is able to detect photons under an extremely broad EV span—two stops dimmer than full moonlight, and one stop brighter than a daylight snow scene. However, your camera’s ability to capture images is limited to a much smaller range. Note that the sensor’s dynamic range (the tones it can preserve in your final image) is less than the full range of tones it can detect. It’s easy to get these two separate aspects confused.
If you frequently use one metering method, but occasionally like to switch to another method on the fly, you can redefine the Z6’s Fn1 or Fn2 buttons to shift to your alternate mode instantly. The buttons can be programmed to provide Matrix metering, Center-weighted metering, Spot metering, or Highlight-weighted metering (as well as other functions discussed in Chapter 12), using Custom Setting f2.
The really cool thing is that you can define one button for, say, Center-weighted metering, another one for Spot metering, and then set the main metering mode switch to Matrix, and thus be able to switch among those three on a whim. I’ve done this as a way to compare the exposure settings of the three metering methods while composing a single image in the viewfinder. I’ve also found the capability useful when I’m, say, working with Matrix metering and want to zero in on a particular area of the frame temporarily using Spot metering. The indicators in the viewfinder will help you remember what metering mode you’ve switched to. (See Figure 4.4.)
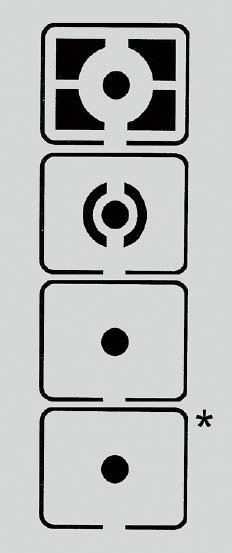
Figure 4.4 Top to bottom: Matrix, Center-weighted, Spot, and Highlight-weighted metering icons.
Matrix Metering
For Matrix metering mode, the Z6 reads the light falling on the sensor and compares the brightness of many areas using a matrix array. When Matrix metering is active, an icon indicator appears in the photo information screen, which you can summon by pressing the DISP button until it’s shown. Then, the Z6 evaluates the differences between the many zones, and compares them with a built-in database of 30,000 actual images to make an educated guess about what kind of picture you’re taking. For example, if the top sections of a picture are much lighter than the bottom portions, the algorithm can assume that the scene is a landscape photo with lots of sky. However, if there is a lighter area in the center of the frame, and the camera detects skin tones, the Z6 will assume that you’re shooting a portrait and not a landscape photo, and expose for the human subject. A typical image suitable for Matrix metering is shown in Figure 4.5. (The Matrix Metering icon is shown at upper left for reference; it does not appear overlaid on your image or in the viewfinder/monitor display!)
A Matrix metering mode can often recognize many types of bright scenes and automatically increase the exposure to reduce the risk of a dark photo. This will be useful when your subject is a snow-covered landscape or a close-up of a bride in white. Granted, you may occasionally need to use a bit of exposure compensation, but often, the exposure will be close to accurate even without it. In my experience, Matrix metering is most successful with light-toned scenes on bright days, and is especially good when humans are in the frame. When shooting in dark, overcast conditions, it’s more likely to underexpose a scene of that type.
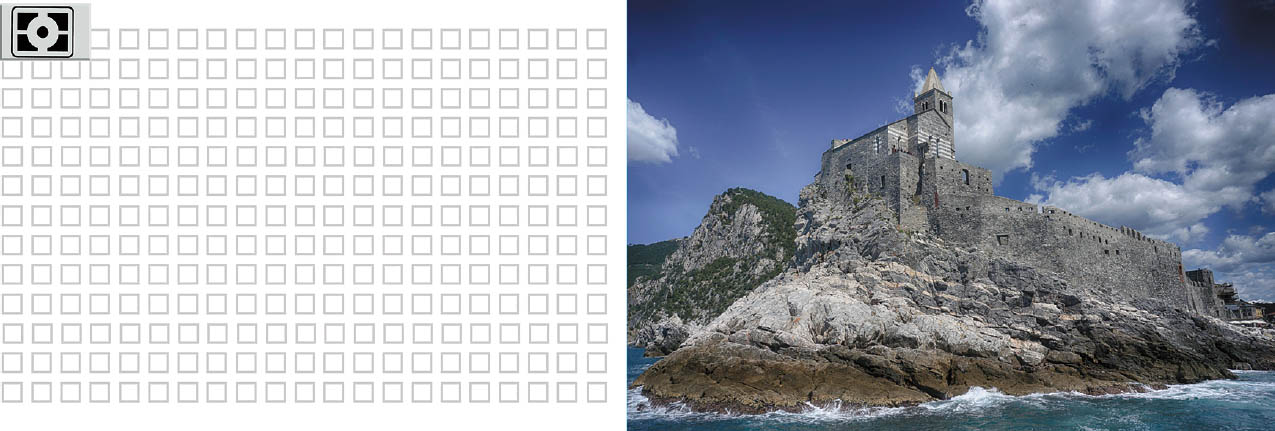
Figure 4.5 Complex scenes lend themselves to the exposure interpretation provided by Matrix metering.
Exposure meters have long used brightness to calculate correct exposure. The Nikon Z6’s advanced technology uses other information to make more intelligent settings. These factors include:
- Patterns. As mentioned earlier, the camera compares exposure across the entire sensor with a database of tens of thousands of picture types, looking for differences among pixels, and similarities to images in the database. When it finds a match, it uses that information as a basis for its recommended exposure. If the contrast in a scene is high enough that the sensor probably won’t be able to preserve detail in both highlights and shadows, in most cases, the Z6 will favor the highlights. As you’ll learn later in this chapter, once highlights are lost, they are gone forever, but it is sometimes possible to retrieve data in shadow areas. If you are shooting RAW, the exposure setting and other adjustments can often boost information in darker areas.
- Colors. The camera can enhance its readings based on the colors detected in the frame. Large areas of blue in the upper part of the image can be deemed to be sky, greens, foliage, and skin tones indicating human beings.
- Autofocus area. Whether you or the camera selects which autofocus zone is used, the exposure system assumes, logically, that the part of the image that is in focus contains your subject matter.
- Distance and focal length. The Z6 is able to use the distance and focal length supplied by your Z-mount lenses to better calculate what kind of scene you have framed. For example, if you’re shooting a portrait with a longer focal-length lens focused to about 5 to 12 feet from the camera, and the upper half of the scene is very bright, the camera assumes you would prefer to meter for the rest of the image, and will discount the bright area. However, if the camera has a wide-angle lens attached and is focused at infinity, the Z6 can assume you’re taking a landscape photo and take the bright upper area into account to produce better looking sky and clouds.
Matrix metering is best for most general subjects, because it is able to intelligently analyze a scene and make an excellent guess of what kind of subject you’re shooting a great deal of the time. The camera can tell the difference between low-contrast and high-contrast subjects by looking at the range of differences in brightness across the scene. Because the Z6 has a fairly good idea about what kind of subject matter you are shooting, it can underexpose slightly when appropriate to preserve highlight detail when image contrast is high. (It’s often possible to pull detail out of shadows that are too dark using an image editor, but once highlights are converted to white pixels, they are gone forever.)
CAUTION
If you’re using a strong filter, including a polarizing filter, split-color filter, or neutral-density filter (particularly a graduated neutral-density filter), you should switch from Matrix metering to Center-weighted, because the filter can affect the relationships between the different areas of the frame used to calculate a Matrix exposure. For example, a polarizing filter produces a sky that is darker than usual, hindering the Matrix algorithm’s recognition of a landscape photo. Extra-dark or colored filters disturb the color relationships used for color Matrix metering, too.
Center-weighted Metering
In this mode, the exposure meter emphasizes a zone measuring 12mm in the center of the frame to calculate exposure. This type of metering was the only available option with cameras some decades ago, and was considered an upgrade from averaging, which simply based exposure on an average of the illumination of the entire frame.
With Center-weighted metering, you end up with conventional metering without any “intelligent” scene evaluation. The light meter considers brightness in the entire frame but places the greatest emphasis on a large area in the center of the frame (shown in blue in Figure 4.6, left), on the theory that, for most pictures, the main subject will not be located far off-center.
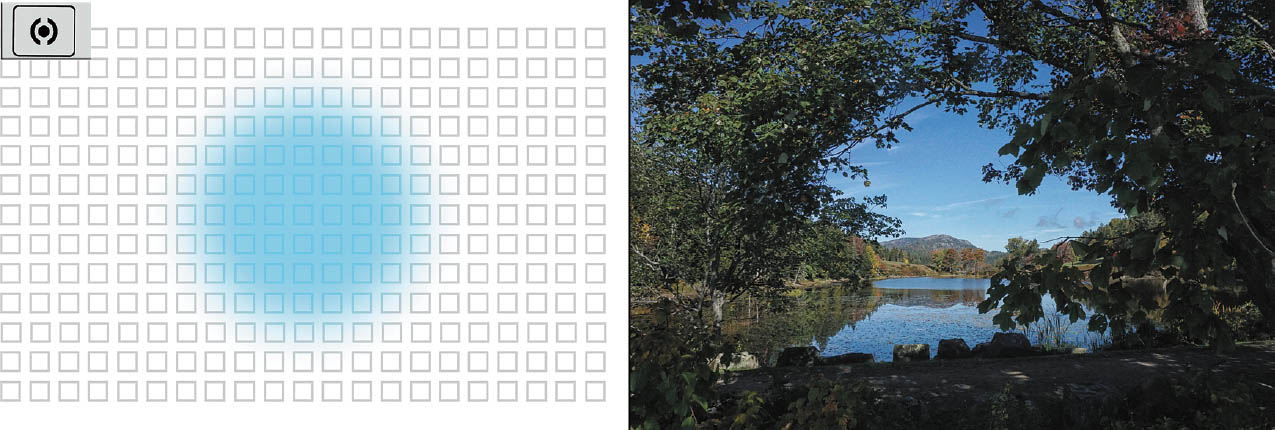
Figure 4.6 Scenes with the main subject in the center, surrounded by areas that are significantly darker or lighter, are perfect for Center-weighted metering.
About 75 percent of the exposure is based on the selected 12mm central area, and the remaining 25 percent of the exposure is based on the rest of the frame. So, if the Z6 reads the center portion and determines that the exposure for that region should be f/4 at 1/250th second, while the outer area, which is a bit darker, calls for f/16 at 1/250th second, the camera will give the center portion the most weight and arrive at a final exposure on the order of f/5.6 at 1/250th second.
Of course, Center-weighted metering is most effective when the subject in the central area is a mid-tone. Even then, if your main subject is surrounded by large, extremely bright or very dark areas, the exposure might not be exactly right. (You might need to use exposure compensation, a feature discussed shortly.) However, this scheme works well in many situations if you don’t want to use one of the other modes, for scenes like the one shown in Figure 4.6. This mode can be useful for close-ups of subjects like flowers, or for portraits. You can adjust the size of the area assigned the greatest weight using Custom Setting b3, as described in Chapter 12. You can select the default 12mm circle, or choose “Average” (which in effect, covers the entire screen to produce what is called Average metering). Since Center-weighted metering is “fuzzy” anyway, I find the default 12mm to be the best compromise.
Spot Metering
Spot metering is favored by those of us who have used a hand-held light meter to measure exposure at various points (such as metering highlights and shadows separately). However, you can use Spot metering in any situation where you want to individually measure the light reflecting from light, midtone, or dark areas of your subject—or any combination of areas.
This mode confines the reading to a limited 4mm area in the viewfinder, making up only 1.5 percent of the image, as shown by the blue circle in Figure 4.7, left. The circle is centered on the current focus point (which can be any of the available focus points, not just the center one shown in the figure), but is larger than the focus point, so don’t fall into the trap of believing that exposure is being measured only within the viewfinder indicators that represent the active focus point. This is the only metering method you can use to tell the Z6 exactly where to measure exposure. However, if you have selected Auto-area AF, only the center focus point is used to spot meter.
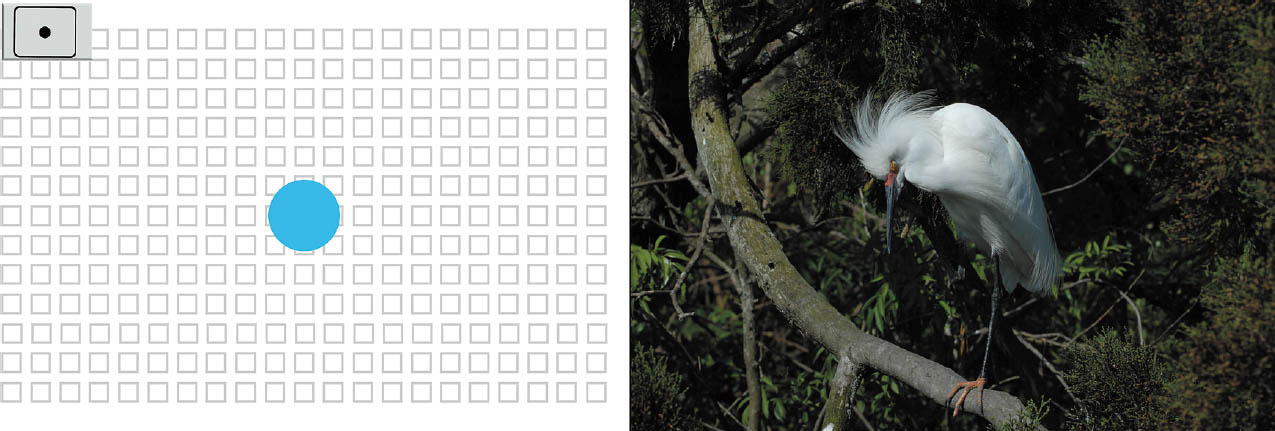
Figure 4.7 Spot metering calculates exposure based on a center spot that’s only 1.5 percent of the image area, centered around the current focus point.
You’ll find Spot metering useful when you want to base exposure on a small area in the frame. If that area is in the center of the frame, so much the better. If not, you’ll have to make your meter reading for an off-center subject using an appropriate focus point, and then lock exposure by pressing the shutter release halfway, or by pressing an AE-L/AF-L button you may have defined using Custom Setting f2. This mode is best for subjects where the background is significantly brighter or darker.
If you Spot meter a very light-toned area or a dark-toned area, you will get underexposure or overexposure, respectively; you would need to use an override for more accurate results. On the other hand, you can Spot meter a small mid-tone subject surrounded by a sky with big white clouds or by an indigo blue wall and get a good exposure. (The light meter ignores the subject’s surroundings so they do not affect the exposure setting.) That would not be possible with Center-weighted metering, which considers brightness in a much larger area.
Using Spot Metering
Matrix and Center-weighted metering basically have few options to worry about. They are both affected by exposure compensation changes and Custom Setting b4: Fine-Tune Optimal Exposure adjustments. Spot metering, on the other hand, can benefit from your input in selecting the spot used. Here are some considerations to keep in mind:
- Moving the spot. Remember that you don’t move the metering spot itself; the Z6 uses the current focus spot. So, you must be using an AF-area mode that allows changing the AF spot, which happens to be any of the AF-area modes except Auto-area AF. In that mode the center focus point is always used as the metering spot, and you cannot change it.
- Choosing a compatible AF-area mode. Use the i menu to cycle among the available AF areas, which differ depending on the focus mode you’ve chosen. All these AF-area modes will allow you to switch the AF point to any of the available focus areas in the display:
- AF-S focus mode: Pinpoint AF, Single-point-AF, Wide-area AF (Small), or Wide-area AF (Large). (Note: Dynamic-area AF is not available.)
- AF-C focus mode: Single-point-AF, Dynamic-area AF, Wide-area AF (Small), or Wide-area AF (Large). (Note: Pinpoint-AF is not available.)
- Manual focus mode: Only Single-point selection is available. Note: With Manual focus, the Z6 does not autofocus, of course; the position of the focus point is used only for the electronic rangefinder and Spot metering functions. You can find information on all the focus and AF-area modes in Chapter 5.
- Wrap around. You’ll use the sub-selector joystick or the multi selector’s directional buttons to move the AF point around within the display—and the metering spot with it. The focus point’s movement will stop at the left/right/top/bottom edges unless you’ve turned on focus point wraparound in Custom Setting a9.
- When using Auto-area AF. If you’ve selected Auto-area AF, the center focus point will always be used—even if the camera selects a different point for the autofocus function. That’s actually a positive: since in Auto-area AF mode you don’t know what the focus spot will be until you press the shutter release halfway, it’s good to know that the Z6 will be using the center spot. While Spot metering is most useful when not using Auto-area AF, it still functions, albeit in a less flexible way.
- Reminder: when the focus point moves, the spot metering point moves, too. If you’re using Dynamic-area AF and continuous autofocus (AF-C, described in Chapter 5), the Z6 may move the focus point you originally selected and base focus on the surrounding focus points. The metering area will tag along.
A good example of a scene where you might want to use Spot metering is shown in Figure 4.7, which shows an egret surrounded by very dark foliage. The illumination might have fooled both Matrix and Center-weighted metering (although Center-weighted might have come close), but Spot metering allowed taking a reading directly from the bird’s plumage. While I preferred Spot metering in this case, another option might have been Highlight-weighted metering, described next.
Highlight-weighted Metering
In this metering mode, the Z6 examines your entire scene, just as it does using Matrix metering. It is not a spot metering mode, despite its icon, which is the same as the Spot icon, with an asterisk added. With this mode, the camera’s Expeed 6 processor seeks out highlight areas of your image and bases exposure on a setting that will keep those highlights from being overexposed. Less emphasis (“weight”) is given to non-highlight areas. That’s why Highlight-weighted might have worked for the egret image above, but it’s actually better suited for images in which the highlights are spread over a larger area of the frame.
So, if you’re shooting spotlit performers on-stage at a concert or play, the Z6 is able to calculate the correct exposure using the performers, and ignoring, for the most part, the dark surroundings. You’d have your choice of measuring exposure in Spot mode, as described in the previous section, placing the metering spot on the dancer’s face or shirt, or, you could select Highlight-weighted metering and allow the camera to identify the performer when figuring exposure. Your results might be similar with either, depending on how well you “placed” the Spot area and how cleverly the Z6 sorts out your subject from the background. I tend to use Spot mode when the area I want to meter is clearly defined, and Highlight-weighted when there is a range of highlights that I’d like to preserve, as in the photo of Billy Zoom, from the LA punk band X, shown in Figure 4.8.
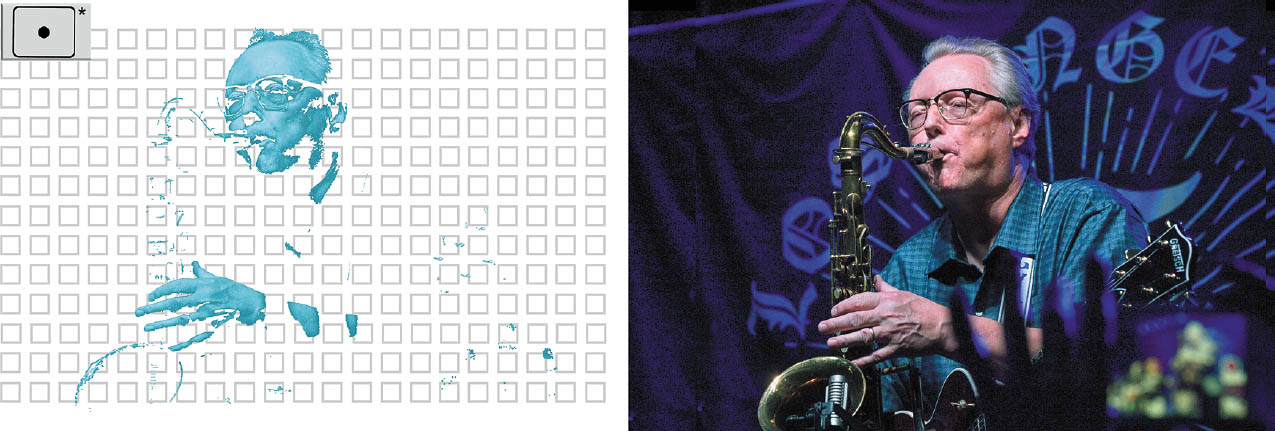
Figure 4.8 Highlight-weighted metering is especially useful for stage performances.
LOCKING EXPOSURE
An important tool when using any metering method is the ability to lock exposure once you’ve set shutter speed, aperture, and ISO to your satisfaction, allowing you to reframe your image before taking a picture. The default behavior of the sub-selector center button is AE-L/AF-L, which locks both exposure and autofocus. However, you can define another control for that function using Custom Setting f2: Custom Control Assignment, described in Chapter 12.
Your defined control can be set to function as an AE/AF lock, or AE Lock Only (which is useful if you’re using back button focus, described in the next chapter). The same custom setting can also be used to define a Shutter Speed and Aperture Lock button, which effectively locks exposure by freezing the shutter speed in Aperture-priority mode and aperture in Shutter-priority mode.
Choosing an Exposure Method
You’ll find four methods for choosing the appropriate shutter speed and aperture when using the semi-automatic/manual modes. You can choose among Aperture-priority, Shutter-priority, Program, or Manual options by pressing the mode dial release button on the top-left shoulder of the Z6 and rotating the mode dial. Your decision on which is best for a given shooting situation will depend on things like your need for lots of (or less) depth-of-field, a desire to freeze action or allow motion blur, or how much noise you find acceptable in an image. Each of the Z6’s exposure methods emphasizes one aspect of image capture or another. This section introduces you to all four.
Aperture-Priority
In Aperture-priority (A) mode, you specify the lens opening used, and the Z6 will set a suitable shutter speed appropriate for the aperture and the ISO sensitivity in use. If you change the aperture, from f/5.6 to f/11, for example, the camera will automatically set a longer shutter speed to maintain the same exposure, using guidance from the built-in light meter. (I discussed the concept of equivalent exposure earlier in this chapter and provided the equivalent exposure table.)
Aperture-priority is especially good when you want to use a particular lens opening to achieve a desired effect. Perhaps you’d like to use the smallest f/stop possible (such as f/22) to maximize depth-of-field (DOF) in a close-up picture. Or, you might want to work with a large f/stop to throw everything except your main subject out of focus, as in Figure 4.9. Maybe you’d just like to “lock in” a particular f/stop because it’s the sharpest available aperture with that lens. Or, you might prefer to use, say, f/2.8 on a lens with a maximum aperture of f/1.4, because you want the best compromise between shutter speed and sharpness.
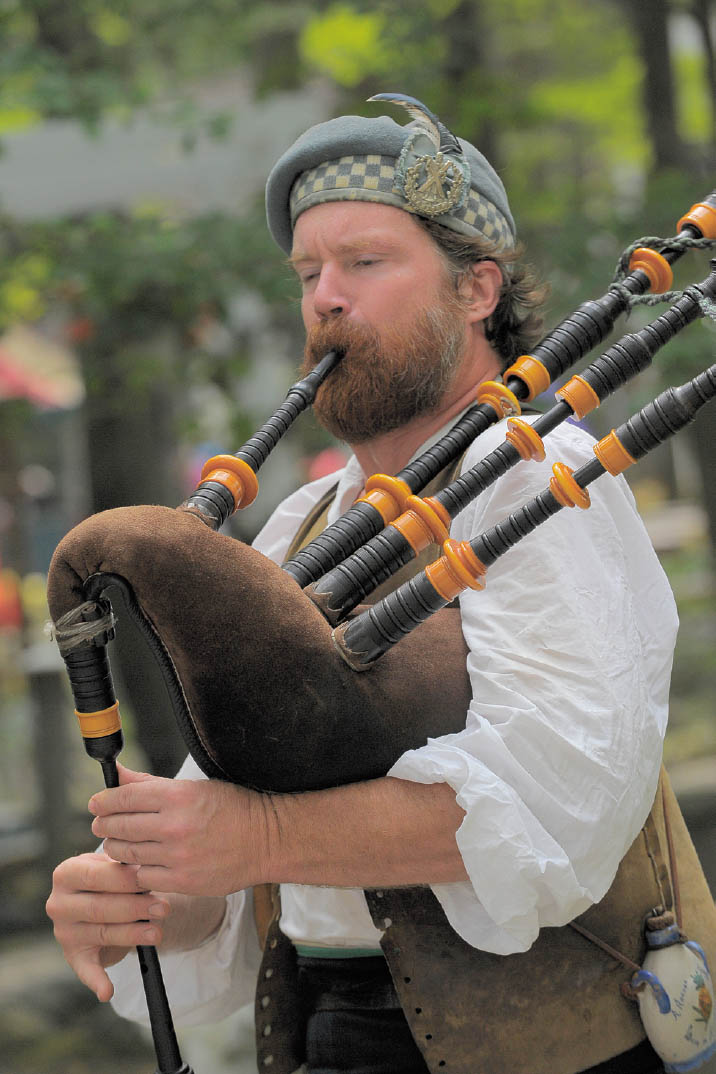
Figure 4.9 Use Aperture-priority to “lock in” a large f/stop when you want to blur distracting elements, or emphasize the main subject in the photo, in this case a Scottish bagpiper.
Aperture-priority can even be used to specify a range of shutter speeds you want to use under varying lighting conditions, which seems almost contradictory. But think about it. You’re shooting a soccer game outdoors with a telephoto lens and want a relatively high shutter speed, but you don’t care if the speed changes a little should the sun duck behind a cloud. Set your Z6 to A, and adjust the aperture until a shutter speed of, say, 1/1,000th second is selected at your current ISO setting. (In bright sunlight at ISO 400, that aperture is likely to be around f/11.) Then, go ahead and shoot, knowing that your Z6 will maintain that f/11 aperture (for sufficient depth-of-field as the soccer players move about the field), but will drop down to 1/640th or 1/500th second if necessary should the lighting change a little.
When the shutter speed indicator in the viewfinder and the top-panel monochrome LCD blink, that indicates that the Z6 is unable to select an appropriate shutter speed at the selected aperture and that over- or underexposure will occur at the current ISO setting. That’s the major pitfall of using A: you might select an f/stop that is too small or too large to allow an optimal exposure with the available shutter speeds. For example, if you choose f/2.8 as your aperture and the illumination is quite bright (say, at the beach or in snow), even your camera’s fastest shutter speed might not be able to cut down the amount of light reaching the sensor to provide the right exposure. Or, if you select f/8 in a dimly lit room, you might find yourself shooting with a very slow shutter speed that can cause blurring from subject movement or camera shake. Aperture-priority is best used by those with a bit of experience in choosing settings. Many seasoned photographers leave their Z6 set on A all the time. The exposure indicator scale in the control panel and viewfinder indicate the amount of under- or overexposure.
When to use Aperture-priority:
- General landscape photography. The Z6 is a great camera for landscape photography, of course, because its high resolution allows making huge, gorgeous prints, as well as smaller prints that are filled with eye-popping detail. Aperture-priority is a good tool for ensuring that your landscape is sharp from foreground to infinity, if you select an f/stop that provides maximum depth-of-field, as shown in Figure 4.10.
If you use A mode and select an aperture like f/11 or f/16, it’s your responsibility to make sure the shutter speed selected is fast enough to avoid losing detail to camera shake, or that the Z6 is mounted on a tripod. One thing that new landscape photographers fail to account for is the movement of distant leaves and tree branches. When seeking the ultimate in sharpness, go ahead and use Aperture-priority, but boost ISO sensitivity a bit, if necessary, to provide a sufficiently fast shutter speed, whether shooting hand-held or with a tripod.
- Specific landscape situations. Aperture-priority is also useful when you have no objection to using a long shutter speed, or, particularly, want the Z6 to select one. Waterfalls are a perfect example. You can use A mode, set your camera to ISO 100, use a small f/stop, and let the camera select a longer shutter speed that will allow the water to blur as it flows. Indeed, you might need to use a neutral-density filter to get a sufficiently long shutter speed. But Aperture-priority mode is a good start.
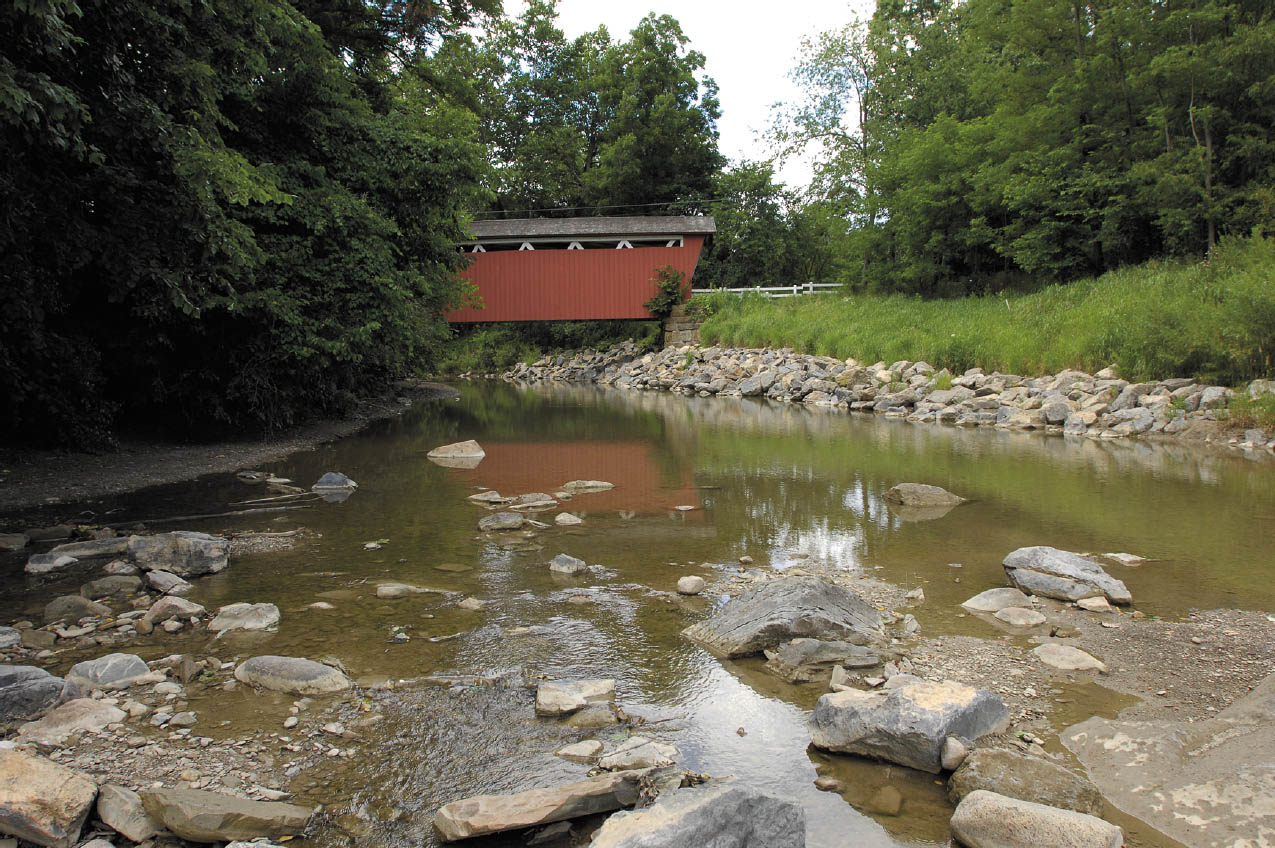
Figure 4.10 Extra depth-of-field came in handy when shooting this covered bridge.
- Portrait photography. Portraits are the most common applications of selective focus. A medium-large aperture (say, f/5.6 or f/8) with a longer lens/zoom setting (in the 85mm-135mm range) will allow the background behind your portrait subject to blur. A very large aperture (I frequently shoot wide open with my 85mm f/1.4G Nikkor) lets you apply selective focus to your subject’s face. With a three-quarters view of your subject, as long as his or her eyes are sharp, it’s okay if the far ear or her hair is out of focus.
- When you want to ensure optimal sharpness. All lenses have an aperture or two at which they perform best, providing the level of sharpness you expect from a camera with the resolution of the Z6. That’s usually about two stops down from wide open, and thus will vary depending on the maximum aperture of the lens.
- Close-up/Macro photography. Depth-of-field is typically very shallow when shooting macro photos, and you’ll want to choose your f/stop carefully. Perhaps you might want to use a wider stop to emphasize your subject. Or, you might need the smallest aperture you can get away with to maximize depth-of-field. Aperture-priority mode comes in very useful when shooting close-up pictures, too. Because macro work is frequently done with the Z6 mounted on a tripod, and your close-up subjects, if not living creatures, may not be moving much, a longer shutter speed isn’t a problem. Aperture-priority can be your preferred choice.
Shutter-Priority
Shutter-priority (S) is the inverse of Aperture-priority: you choose the shutter speed you’d like to use, and the camera’s metering system selects the appropriate f/stop. Perhaps you’re shooting action photos and you want to use the absolute fastest shutter speed available with your camera; in other cases, you might want to use a slow shutter speed to add some blur to an action photo that would be mundane if the action were completely frozen. Shutter-priority mode gives you some control over how much action-freezing capability your digital camera brings to bear in a particular situation.
Take care when using a slow shutter speed such as 1/8th second or slower, because you’ll get blurring from camera shake unless you’re using a lens with vibration reduction (described in Chapter 7), or have mounted the Z6 on a tripod or other firm support.
You’ll also encounter the same problem as with Aperture-priority when you select a shutter speed that’s too long or too short for correct exposure under some conditions. As in A mode, it’s possible to choose an inappropriate shutter speed. If that’s the case, the shutter speed indicator in the viewfinder and control panel LCD will blink.
When to use Shutter-priority:
- To reduce blur from subject motion. Set the shutter speed of the Z6 to a higher value to reduce the amount of blur from subjects that are moving. The exact speed will vary depending on how fast your subject is moving and how much blur is acceptable. You might want to freeze a basketball player in mid-dunk with a 1/1,000th second shutter speed, or use 1/200th second to allow the spinning wheels of a motocross racer to blur a tiny bit to add the feeling of motion.
- To add blur from subject motion. There are times when you want a subject to blur, say, when shooting waterfalls with the camera set for a one- or two-second exposure in Shutter-priority mode.
- To add blur from camera motion when you are moving. Say you’re panning to follow a pair of relay runners. You might want to use Shutter-priority mode and set the Z6 for 1/60th second, so that the background will blur as you pan with the runners. The shutter speed will be fast enough to provide a sharp image of the athletes, while reducing their distracting background to a blur. For Figure 4.11, I was panning to follow the great blue heron taking flight, and shot at 1/30th second to allow the waterfall in the background to blur.
- To reduce blur from camera motion when you are moving. In other situations, the camera may be in motion, say, because you’re shooting from a moving train or auto, and you want to minimize the amount of blur caused by the motion of the camera. Shutter-priority is a good choice here, too.
- Landscape photography hand-held. If you can’t use a tripod for your landscape shots, you’ll still probably want the sharpest image possible. Shutter-priority can allow you to specify a shutter speed that’s fast enough to reduce or eliminate the effects of camera shake. Just make sure that your ISO setting is high enough that the Z6 will select an aperture with sufficient depth-of-field, too.
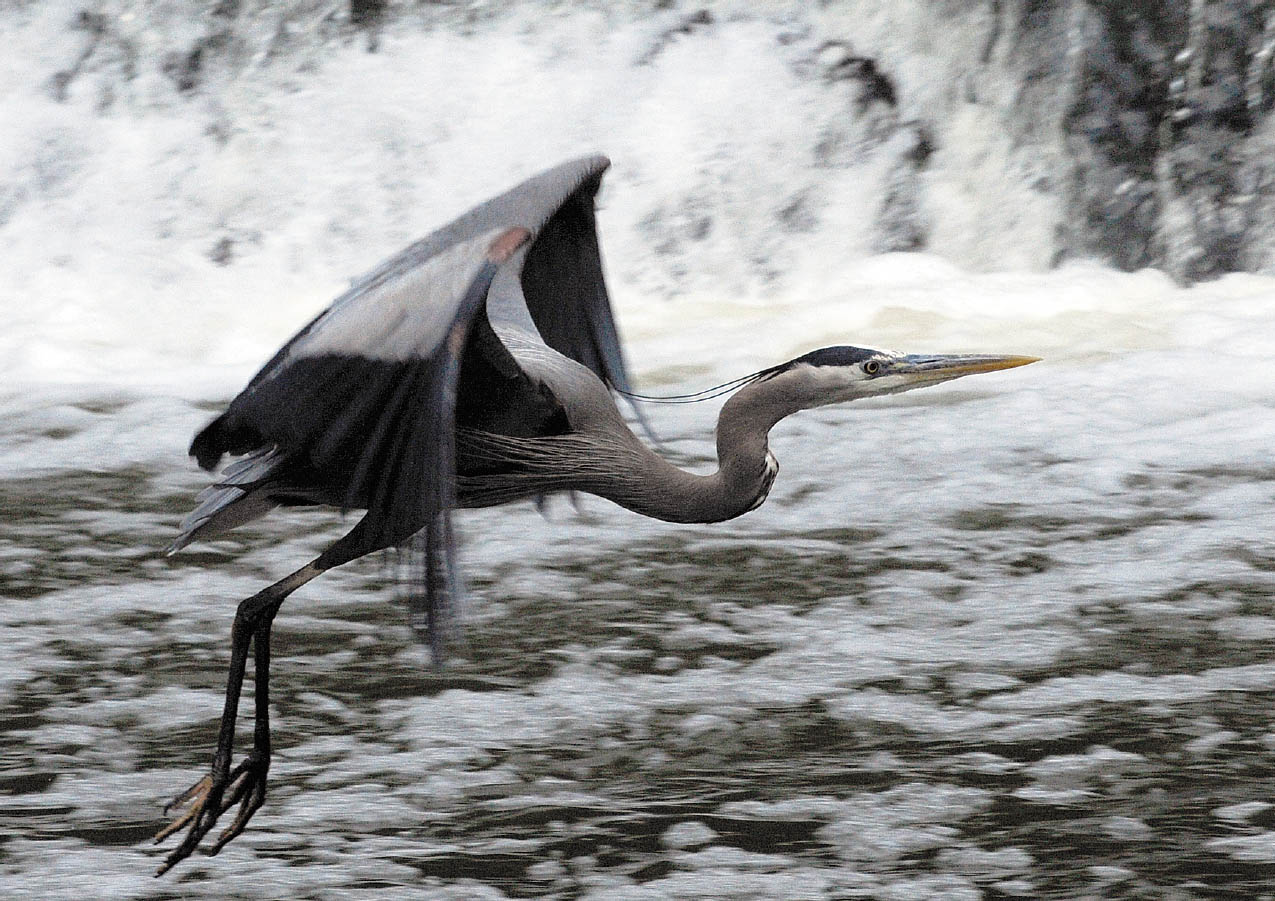
Figure 4.11 Shutter-priority allows you to specify a speed that will render a moving subject like this heron reasonably sharp as you pan.
- Concerts and stage performances. I shoot a lot of concerts with my 70-200mm f/2.8 VR Nikkor lens, using the FTZ adapter if I elect to work with my Z6, and have discovered that, when vibration reduction is taken into account, a shutter speed of 1/160th second is fast enough—along with vibration reduction—to eliminate camera shake that can result from hand-holding the Z6 with this lens, and also to avoid blur from the movement of all but the most energetic performers. I use Shutter-priority and set the ISO so the camera will select an aperture in the f/4-5.6 range.
Program Mode
Program mode (P) uses the Z6’s built-in smarts to select the correct f/stop and shutter speed using a database of picture information that tells it which combination of shutter speed and aperture will work best for a particular photo. If the correct exposure cannot be achieved at the current ISO setting, the shutter speed and aperture will blink in the viewfinder and control panel. You can then boost or reduce the ISO to increase or decrease sensitivity.
The Z6’s recommended exposure can be overridden if you want. Use the EV (exposure value) setting feature (described later, because it also applies to S and A modes) to add or subtract exposure from the metered value. And, as I mentioned earlier in this chapter, in Program mode you can rotate the main command dial to change from the recommended setting to an equivalent setting (as shown previously in Table 4.1) that produces the same exposure, but using a different combination of f/stop and shutter speed.
This is called “Flexible Program” by Nikon. Rotate the main command dial left to reduce the size of the aperture (going from, say, f/4 to f/5.6), so that the Z6 will automatically use a slower shutter speed (going from, say, 1/200th second to 1/125th second). Rotate the main command dial right to use a larger f/stop, while automatically producing a shorter shutter speed that provides the same equivalent exposure as metered in P mode. An asterisk appears next to the P in the viewfinder/monitor display so you’ll know you’ve overridden the Z6’s default program setting. Your adjustment remains in force until you rotate the main command dial until the asterisk disappears, or you switch to a different exposure mode, or turn the Z6 off.
MAKING EV CHANGES
Sometimes you’ll want more or less exposure than indicated by the Z6’s metering system. Perhaps you want to underexpose to create a silhouette effect, or overexpose to produce a high-key look. It’s easy to use the Z6’s exposure compensation system to override the exposure recommendations. Press the exposure compensation (EV) button on the top of the camera (just southeast of the shutter release). Then rotate the main command dial left to add exposure, and right to subtract exposure. The EV change you’ve made remains for the exposures that follow, until you manually zero out the EV setting. The EV plus/minus icon appears in the viewfinder and control panel to warn you that an exposure compensation change has been entered. You can increase or decrease exposure over a range of plus or minus five stops. (If you’ve activated Easy Exposure Compensation using Custom Setting b2, as described in Chapter 12, you don’t have to hold down the EV button; rotating the main or sub-command dials alone changes the EV value when using Program, Aperture-priority, Shutter-priority, or Manual exposure modes.)
When to use Program mode:
- When you’re in a hurry to get a grab shot. The Z6 will do a pretty good job of calculating an appropriate exposure for you, without any input from you.
- When you hand your camera to a novice. Set the Z6 to P, hand the camera to your friend, relative, or trustworthy stranger you meet in front of the Eiffel Tower, point to the shutter release button and viewfinder, and say, “Look through here, and press this button.” I like this option more than using Auto mode, because I can make slight adjustments to suit before handing over my camera.
- When no special shutter speed or aperture settings are needed. If your subject doesn’t require special anti- or pro-blur techniques, and depth-of-field or selective focus aren’t important, use P as a general-purpose setting. You can still make adjustments to increase/decrease depth-of-field or add/reduce motion blur with a minimum of fuss.
Manual Exposure
Part of being an experienced photographer comes from knowing when to rely on your Z6’s automation (with P mode), when to go semi-automatic (with S or A), and when to set exposure manually (using M). Some photographers actually prefer to set their exposure manually, as the Z6 will be happy to provide an indication of when its metering system judges your manual settings provide the proper exposure, using the analog exposure scale at the bottom of the viewfinder.
Manual exposure can come in handy in some situations. You might be taking a silhouette photo and find that none of the exposure modes or EV correction features give you exactly the effect you want. Set the exposure manually to use the exact shutter speed and f/stop you need. Or, you might be working in a studio environment using multiple flash units. The additional flash are triggered by slave devices (gadgets that set off the flash when they sense the light from another flash unit, or, perhaps from a radio or infrared remote control). Your camera’s exposure meter doesn’t compensate for the extra illumination, so you need to set the aperture manually.
Because, depending on your proclivities, you might not need to set exposure manually very often, you should still make sure you understand how it works. Fortunately, the Z6 makes setting exposure manually very easy. Just press the mode dial lock release and rotate the mode dial to M to change to Manual mode, and then turn the main command dial to set the shutter speed, and the sub-command dial to adjust the aperture. Press the shutter release halfway or press your defined AE lock button, and the exposure scale in the viewfinder shows you how far your chosen setting diverges from the metered exposure.
METERING WITH OLDER LENSES
Older lenses that lack the CPU chip that tells the Nikon Z6 what kind of lens is mounted can be used with Aperture-priority and Manual exposure modes only, assuming you’ve entered the Non-CPU Lens information in the Setup menu, as described in Chapter 7. If the Z6 knows the maximum aperture of the lens, you can set the aperture using the lens’s aperture ring, and, in A mode, the camera will automatically select an appropriate shutter speed. In Manual mode, you can set the aperture, and the analog exposure scale in the viewfinder will indicate when you’ve set the correct shutter speed manually.
- When working in the studio. If you’re working in a studio environment, you generally have total control over the lighting and can set exposure exactly as you want. The last thing you need is for the Z6 to interpret the scene and make adjustments of its own. Use M, and shutter speed, aperture, and (as long as you don’t use ISO-Auto) the ISO setting are totally up to you.
- When using non-dedicated flash. The Nikon Creative Lighting System (CLS) and the new Advanced Lighting System (ALS, introduced with the SB-5000) are cool, and can even be used to coordinate use of your Z6 with external compatible dedicated flash units, like the SB-5000 or SB-910. But if you’re working with non-CLS flash units, particularly studio flash plugged into the Z6’s PC/X connector, the camera has no clue about the intensity of the flash, so you’ll have to dial in the appropriate aperture manually.
- If you’re using a hand-held light meter. The appropriate aperture, both for flash exposures and shots taken under continuous lighting, can be determined by a hand-held light meter, flash meter, or combo meter that measures both kinds of illumination. With an external meter, you can measure highlights, shadows, backgrounds, or additional subjects separately, and use Manual exposure to make your settings.
- When you want to outsmart the metering system. Your Z6’s metering system is “trained” to react to unusual lighting situations, such as backlighting, extra-bright illumination, or low-key images with murky shadows. In many cases, it can counter these “problems” and produce a well-exposed image. But what if you don’t want a well-exposed image? Manual exposure allows you to produce silhouettes in backlit situations, wash out all the middle tones to produce a luminous look, or underexpose to create a moody or ominous dark-toned photograph.
- When you want to select shutter speed and aperture. Aperture- and Shutter-priority give you autoexposure while allowing you to lock in a preferred shutter speed or aperture—but not both at the same time. Manual exposure makes it possible to specify both and retain autoexposure capabilities. All you have to do is activate ISO Auto. The Z6 will keep the shutter speed and aperture you want, but raise or lower the sensitivity setting to provide an appropriate exposure.
- When you want extra-long exposures. None of the semi-automatic modes will give you an exposure longer than 30 seconds. In Manual mode, however, you can spin the command dial past 30 seconds to Time or Bulb and achieve exposures as long as you want. For example, I used a three-minute exposure (and an Aurora Aperture PowerND 16-stop neutral-density filter) to capture the scene shown in Figure 4.12. I’ll give you some more uses for time and bulb exposures in Chapter 6.
Figure 4.12 A three-minute exposure (using a neutral-density filter) yielded this unusual shot.
Adjusting Exposure with ISO Settings
As I mentioned above, another way of adjusting exposures is by changing the ISO sensitivity setting. Sometimes photographers forget about this option, because the common practice is to set the ISO once for a particular shooting session (say, at ISO 200 for bright sunlight outdoors, or ISO 800 when shooting indoors) and then forget about ISO. ISOs higher than ISO 200 or 400 are seen as “bad” or “necessary evils.” However, changing the ISO is a valid way of adjusting exposure settings, particularly with the Nikon Z6, which produces good results at ISO settings that create grainy, unusable pictures with some other camera models.
Indeed, I find myself using ISO adjustment as a convenient alternate way of adding or subtracting EV when shooting in Manual mode, and as a quick way of choosing equivalent exposures when in Program or Shutter-priority or Aperture-priority modes. For example, I’ve selected a Manual exposure with both f/stop and shutter speed suitable for my image using, say, ISO 200. I can change the exposure in 1/3-stop increments by holding down the ISO button located on the top-right shoulder of the camera, and spinning the main command dial one click at a time. The difference in image quality/noise at ISO 200 is negligible if I dial in ISO 160 or ISO 125 to reduce exposure a little, or change to ISO 250 or 320 to increase exposure. I keep my preferred f/stop and shutter speed, but still adjust the exposure. (And, as I noted earlier, if ISO Auto is active, I can even allow the Z6 to set the exposure automatically using the f/stop and shutter speed I want.)
Or, perhaps, I am using S mode and the metered exposure at ISO 200 is 1/500th second at f/11. If I decide on the spur of the moment I’d rather use 1/500th second at f/8, I can press the ISO button and spin the main command dial to switch to ISO 100. Of course, it’s a good idea to monitor your ISO changes, so you don’t end up at ISO 6400 accidentally. An ISO indicator appears in the control panel and in the viewfinder to remind you what sensitivity setting has been dialed in.
ISO settings can, of course, also be used to boost or reduce sensitivity in particular shooting situations. The Z6 can use ISO settings from Lo 1 (ISO 50 equivalent) and thence to ISO 100 up to ISO 51200, plus Hi 1 to Hi 2 (equivalent to ISO 102,400 and 204,800). The camera can also adjust the ISO automatically as appropriate for various lighting conditions. When you choose the Auto ISO setting in the Photo Shooting menu, as described in Chapter 11, the Z6 adjusts the sensitivity dynamically to suit the subject matter, based on minimum shutter speed and ISO limits you have prescribed. As I note in Chapter 13, you should use Auto ISO cautiously if you don’t want the Z6 to use an ISO higher than you might otherwise have selected.
Fortunately, the Z6 includes several useful wrinkles in its Auto ISO arsenal. You can set limits, specifying both a maximum sensitivity (for both ambient exposures and flash) and a minimum shutter speed. If Auto ISO is active (it will be indicated in the viewfinder, control panel, and photo information display on the monitor), the camera will never select an ISO you deem to be too high. Moreover, if your exposure will result in a speed slower than the minimum you set (thereby risking blur from subject motion and/or camera movement), the Z6 will switch to a higher ISO setting to allow using the minimum shutter speed or faster.
However, as I’ll explain in Chapter 13, buried in the Photo Shooting menu within the Minimum Shutter Speed option in the Auto ISO settings is an additional Auto setting that allows you to specify how quickly the camera reacts to counter that longer shutter speed. Select Slower, and the Z6 will delay raising the ISO (useful if you want to keep a constant shutter speed, even if slow, to maintain a consistent “look” in a series of photos). Choose Faster, and the camera responds more quickly to reduce the possibility of image blur. Nikon has given the enthusiast photographers a useful tool that allows you to fine-tune your Z6’s behavior so it works the way you want it to in a wider variety of circumstances.
Dealing with Noise
Visual image noise is that random grainy effect that some like to use as a special effect, but which, most of the time, is objectionable because it robs your image of detail even as it adds that “interesting” texture. Noise is caused by two different phenomena: high ISO settings and long exposures.
High ISO noise commonly appears as you increase your camera’s ISO setting, which causes the Z6 to amplify the base signal (captured at ISO 100). In the other direction, you can easily capture relatively low-noise images at ISO 800 and above. However, some noise may become visible at ISO 1600, and is often fairly noticeable at ISO 6400. At ISO 25600 and above, noise is often quite bothersome, although I have used ISO 25600 when photographing subjects that are fairly low in contrast. Nikon tips you off that settings higher than ISO 51200 may be tools used in special circumstances only by labeling them Hi 0.3 through Hi 2. You can expect noise and increase in contrast in any pictures taken at these lofty ratings.
High ISO noise appears as a result of the amplification needed to increase the sensitivity of the sensor. While higher ISOs do pull details out of dark areas, they also amplify non-signal information randomly, creating noise. You’ll find a High ISO NR choice in the Photo Shooting menu, where you can specify High, Normal, or Low noise reduction, or turn the feature off entirely. Because noise reduction tends to soften the grainy look while robbing an image of detail, you may want to disable the feature if you’re willing to accept a little noise in exchange for more details.
A similar noisy phenomenon occurs during long time exposures, which allow more photons to reach the sensor, increasing your ability to capture a picture under low-light conditions. However, the longer exposures also increase the likelihood that some pixels will register random phantom photons, often because the longer an imager is “hot,” the warmer it gets, and that heat can be mistaken for photons. There’s also a special kind of noise that CMOS sensors like the one used in the Z6 are potentially susceptible to. CMOS imagers contain millions of individual amplifiers and A/D converters, all working in unison. Because these circuits don’t necessarily all process in precisely the same way all the time, they can introduce something called fixed-pattern noise into the image data.
Fortunately, Nikon’s electronics geniuses have done an exceptional job minimizing noise from all causes in the Z6. Even so, you might still want to apply the optional long exposure noise reduction that can be activated using Long Exp. NR in the Photo Shooting menu, where the feature can be turned On or Off. This type of noise reduction involves the Z6 taking a second, blank exposure, and comparing the random pixels in that image with the photograph you just took. Pixels that coincide in the two represent noise and can safely be suppressed. This noise reduction system, called dark-frame subtraction, effectively doubles the amount of time required to take a picture, and is used only for exposures longer than one second. Noise reduction can reduce the amount of detail in your picture, as some image information may be removed along with the noise. So, you might want to use this feature with moderation.
You can also apply noise reduction to a lesser extent using Photoshop, and when converting RAW files to some other format, using your favorite RAW converter, or an industrial-strength product like Noise Ninja (www.picturecode.com) to wipe out noise after you’ve already taken the picture.
Bracketing
Bracketing is a method for shooting several consecutive exposures using different settings, as a way of improving the odds that one will be exactly right. Alternatively, bracketing can be used to create a series of photos with slightly different exposures (or white balances) in anticipation that one of the exposures will be “better” from a creative standpoint. For example, bracketing can supply you with a normal exposure of a backlit subject, one that’s “underexposed,” producing a silhouette effect, and a third that’s “overexposed” to create still another look.
Before digital cameras took over the universe, it was common to bracket exposures, shooting, say, a series of three photos at 1/125th second, but varying the f/stop from f/8 to f/11 to f/16. In practice, smaller than whole-stop increments were used for greater precision, and lenses with apertures that were set manually commonly had half-stop detents on their aperture rings, or could easily be set to a mid-way position between whole f/stops. It was just as common to keep the same aperture and vary the shutter speed, although in the days before electronic shutters, film cameras often had only whole increment shutter speeds available.
Today, cameras like the Z6 can bracket exposures much more precisely, and bracket white balance and Active D-Lighting (described later in this chapter) as well. While WB bracketing is sometimes used when getting color absolutely correct in the camera is important, autoexposure bracketing is used much more often. When this feature is activated, the Z6 takes a series of consecutive photos: starting with the metered “correct” exposure, then progressing to shots with less exposure, and additional shots with more exposure, using an increment of your choice up to +3/–3 stops. In A mode, the shutter speed will change, while in S mode, the aperture will change as the bracketed exposures are made.
Setting up autoexposure bracketing parameters is trickier than it needs to be, but you can follow these steps:
- 1. Choose type of bracketing. First, select the type of bracketing you want to do, using Auto Bracketing Set within the Auto Bracketing entry in the Photo Shooting menu, as explained in Chapter 11. You can select autoexposure and flash, autoexposure only, flash only, white balance only, and ADL bracketing.
If you plan on shooting in Manual exposure mode, you can specify how bracketing is performed using Custom Setting e6. Your choices there are flash+shutter speed, flash+shutter speed+aperture, flash+aperture, or flash only. White balance and ADL bracketing are not available in Manual exposure mode.
- 2. Choose bracketing order. With Custom Setting e7 you can select MTR > Under > Over or Under > MTR > Over bracket orders. I prefer the latter order, as it makes it easier to have the frames of certain types of manual HDR exposures in order of increasing exposure.
- 3. Select number of bracketed exposures. In the Auto Bracketing entry of the Photo Shooting menu, select Number of Shots and use the multi selector left/right buttons or touch screen, pressing left to choose the number of shots in the sequence, 0 (which turns bracketing off), –2, +2, –3, or +3. Press the right button to specify 3-, 5-, 7-, or 9-shot bracket sets centered around the metered exposure.
- 4. Choose bracket increment. Next, select Increment, and use the left/right buttons or touch screen to choose the exposure increment: 1/3, 2/3, 1, 2, or 3 EV. Note: If you select an increment of 2 EV or 3 EV, then the number of shots in the bracketed set that you specified in Step 4 is limited to 5. If you had chosen 7 or 9 shots in Step 4, the Z6 will automatically change the setting to 5 shots.
- 5. Frame and shoot. As you take your photos, the camera will vary exposure, flash level, or white balance for each image, based on the bracketing “program” you selected, and in the order you specified in Custom Setting e7. In Single-frame mode, you’ll need to press the shutter release button the number of times you specified for the exposures in your bracketed burst. I’ve found it easy to forget that I am shooting bracketed pictures, stop taking my sequence, and then wonder why the remaining pictures in my defined burst are “incorrectly” exposed. To avoid that, I often set the Z6 to one of the two continuous shooting modes, so that all my bracketed pictures are taken at once.
- 6. Turn bracketing off. When you’re finished bracketing shots, remember to return to the Auto Bracketing entry and change Number of Shots to 0, and the BKT indicator is no longer displayed, as the setting remains in effect when you power down the camera and subsequently turn it on again.
ACTIVATING BRACKETING
Once you’ve set up the type of bracketing you want to use, as described next, taking a bracketed set of exposures is easy. When bracketing is active, to initiate exposing a set, just press the Bracketing Burst button. (Use Custom Setting f2 as described in Chapter 12 to assign the Bracketing Burst behavior to a button.) Once the button is pressed, all shots in the set will be taken each time you press the shutter release button once.
White Balance Bracketing
When you choose white balance bracketing, the Z6 does not take three different exposures (even if you’ve defined a Bracketing Burst button, only one shot will be taken). There’s no need, if you think about it. The camera always takes a RAW exposure first, no matter whether the camera is set to JPEG, RAW, or RAW+JPEG. If you’ve selected JPEG-only mode, the camera converts the initial RAW exposure to JPEG format using the settings you’ve opted for in the camera, and then discards the RAW data. In RAW mode, the camera stores the RAW data as a NEF file, and also creates a Basic JPEG version of the image that is embedded in the RAW file as a thumbnail. That thumbnail is what you’re actually looking at on the back-panel LCD monitor when you review your pictures; you never actually see the RAW file itself until you import it into your image editor. Your computer may also use the embedded JPEG file when it displays a RAW image. Finally, if you save in RAW+JPEG, you end up with two files: the NEF RAW file (with its embedded JPEG image) and a separate JPEG file at the quality level you specify (Fine, Normal, or Basic).
Since the RAW file that the camera initially captures contains all the digital information captured during exposure, when you specify white balance bracketing, the Z6 needs to take only one picture—and then save a JPEG file at each of the required white balance settings. One snap, and you get either two or three JPEG files at the quality level you specified, bracketed as you directed. Very slick. As you might guess, WB bracketing is applied only to JPEG files; you can’t specify WB bracketing if you’ve chosen RAW or RAW+JPEG. RAW files created are always unmodified, and will be converted according to the white balance settings you opted for in the camera when the photo is imported into your image editor (if you make no white balance changes during importation).
White balance bracketing produces JPEG files that vary, not by f/stops (which is the case with exposure bracketing), but by units called mireds (micro reciprocal degrees) that are used to specify color temperature. You don’t really need to understand mireds at all, other than to know that WB bracketing varies the color temperature of your images by 5 mireds for each shot taken in the bracket set. Changes are made only in the amber-blue range; bracketing isn’t applied to the green-magenta color bias.
To activate White Balance bracketing, just follow these steps:
- 1. JPEG only. Make sure you’ve selected a JPEG-only setting in the Image Quality entry of the Photo Shooting menu.
- 2. Specify WB Bracketing. In the Auto Bracketing entry of the Photo Shooting menu, choose WB Bracketing as your bracketing set.
- 3. Choose number of shots. In the Auto Bracketing screen, after you’ve chosen WB Bracketing, scroll down to Number of Shots and select how many bracketed exposures you want. You can choose two different ways:
- Select 0, 3, 5, 7, or 9 (use the right directional button) and the Z6 will take the specified number of shots, in the amber and blue directions, equally spread on either side of the zero point of the amber-blue scale. For example, if you choose 5 as your number of shots, the sequence will include one neutral shot, plus two biased by 5 and 10 mireds in both amber and blue directions. With 0 as your number of shots, bracketing is disabled, just as it is with exposure bracketing.
- Select B2, A2, B3, A3 bias (using the left directional button) and the Z6 will take either two or three shots biased in the blue or amber directions. For example, B3 would include shots biased 5, 10, and 15 mireds only in the blue direction.
ADL Bracketing
To initiate Active D-Lighting bracketing, select it from the Photo Shooting menu’s Auto Bracketing Set menu entry and select number of shots and amount, as described next. As with exposure bracketing, you can trigger a burst with one press of the shutter release if you’ve defined a Bracketing Burst button.
- 0 (Number of shots). Active D-Lighting bracketing is disabled. Only bracketing is turned off. If you’ve turned basic Active D-Lighting on in the Shooting menu, then each shot you take will have the amount of ADL applied that you specified (Auto, Extra High, High, Normal, or Low).
- 2 (Number of shots). Only two shots will be taken, one Off (ADL turned Off, your control, so to speak) and one at the setting you specify. Scroll down to the Amount box. You can select OFF/Auto (No ADL, plus Auto ADL), Off/Extra High, Off/High, Off/Normal, or Off/Low.
- 3-5 (Number of shots). You can choose 3, 4, or 5 shots. One will be Off (ADL disabled) and the others will be taken at the settings indicated in the Amount box. (You cannot choose the ADL settings in the Amount box when 3, 4, or 5 shots are taken.)
- 3 shots: Off, plus Low and Normal.
- 4 shots: Off, plus Low, Normal, and High.
- 5 shots: Off, plus Low, Normal, High, and Extra-High.
As with exposure, flash, and WB bracketing, remember to turn off ADL bracketing when you no longer want to use it. Once set, it is automatically invoked each time you take a picture until disabled.
Working with HDR
High Dynamic Range (HDR) photography is quite the rage these days, and entire books have been written on the subject. It’s not really a new technique—film photographers have been combining multiple exposures for ages to produce a single image of, say, an interior room while maintaining detail in the scene visible through the windows.
It’s the same deal in the digital age. Suppose you wanted to photograph a dimly lit room that had a bright window showing an outdoors scene. Proper exposure for the room might be on the order of 1/60th second at f/2.8 at ISO 200, while the outdoors scene probably would require f/11 at 1/400th second. That’s almost a 7 EV step difference (approximately 7 f/stops) and well beyond the dynamic range of any digital camera, including the Nikon Z6.
Until camera sensors gain much higher dynamic ranges (which may not be as far into the distant future as we think), special tricks like Active D-Lighting and HDR photography will remain basic tools. With the Nikon Z6, you can create in-camera HDR exposures, or shoot HDR the old-fashioned way—with separate bracketed exposures that are later combined in a tool like Photomatix or Adobe’s Merge to HDR image-editing feature. I’m going to show you how to use both.
Auto HDR
The Z6’s in-camera HDR feature is simple, not particularly flexible, but still surprisingly effective in creating high dynamic range images. It’s also remarkably easy to use. Although it combines only two images to create a single HDR photograph, in some ways it’s as good as the manual HDR method I’ll describe in the section after this one. For example, it allows you to specify an exposure differential of three stops/EV between the two shots, the same as when shooting bracketed exposures.
As I noted, with digital camera sensors, it’s often tricky to capture detail in both highlights and shadows in a single image, because the number of tones, the dynamic range of the sensor, is limited. The solution, in this particular case, was to resort to the Z6’s Auto HDR feature, in which the two exposures were combined in the camera to produce a final image.
Figure 4.13 illustrates how the two shots that the Z6’s HDR feature merges might look. There is a three-stop differential between the underexposed image at left, and the overexposed image at center. The in-camera HDR processing is able to combine the two to derive an image similar to the one shown in Figure 4.13, right, which has a much fuller range of tones.
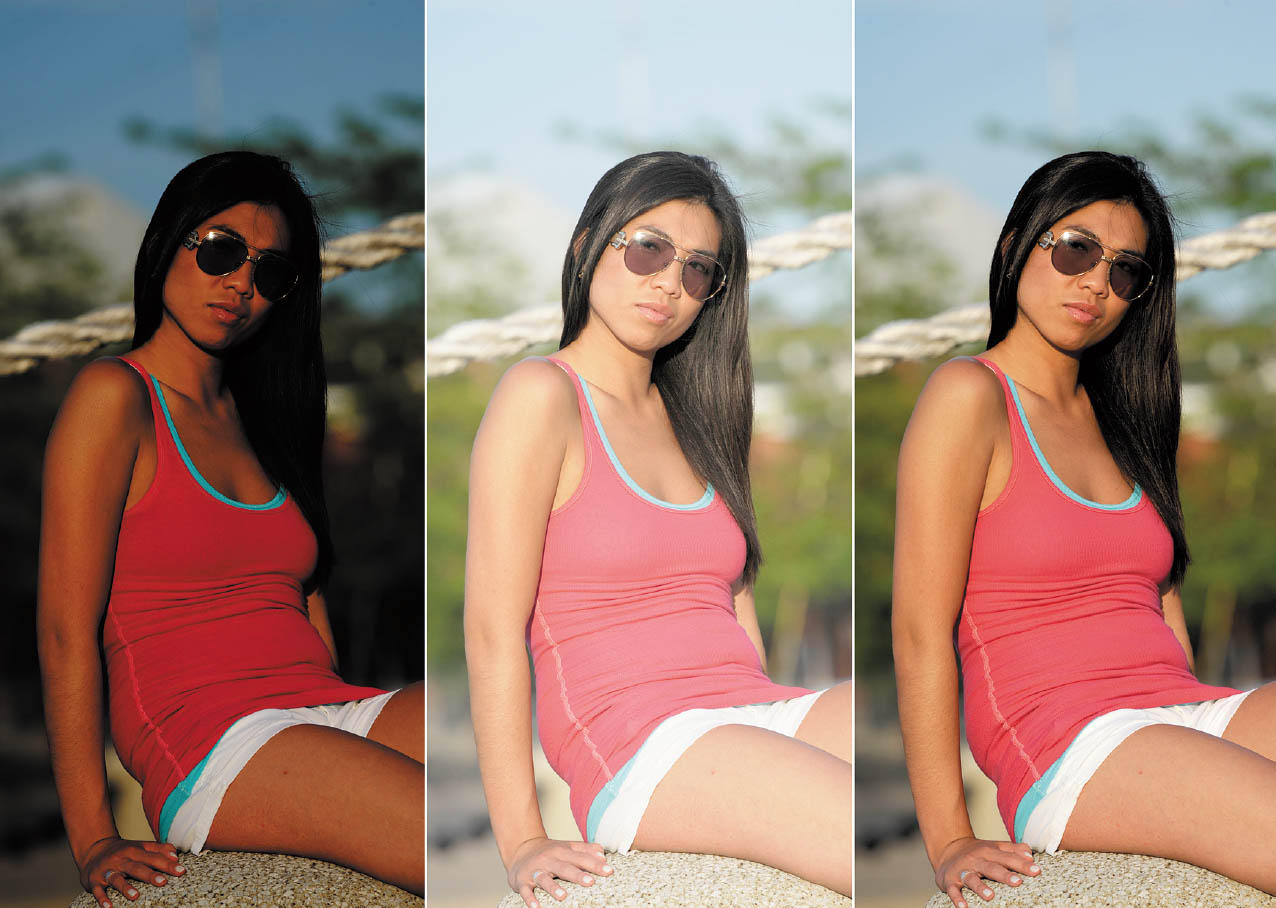
Figure 4.13 The underexposed image (left) can be combined with the overexposed image (center) to produce the merged HDR image (right).
To use the Z6’s HDR feature, just follow these steps. The feature does not work if you have selected RAW or RAW+JPEG formats, and cannot be used simultaneously with bracketing features, multiple exposure, or time-lapse photography.
- 1. Activate the menu. Press the MENU button and navigate to the Photo Shooting menu, represented by a camera icon. (If you need more help using the Z6’s menu system, you’ll find an introduction at the beginning of Chapter 11.)
- 2. Scroll down to HDR. Press the right multi selector button. A screen appears with four choices: HDR Mode, Exposure Differential, Smoothing, and Save Individual Images (NEF). (See Figure 4.14, upper left.)
- 3. Turn on HDR. Choose HDR Mode, press right, and select either On (series) if you want to shoot multiple HDR photos consecutively or On (single photo) to take a single HDR image and then shut the feature off. Choose OFF to disable the feature. Press OK to confirm. (See Figure 4.14, upper right.)
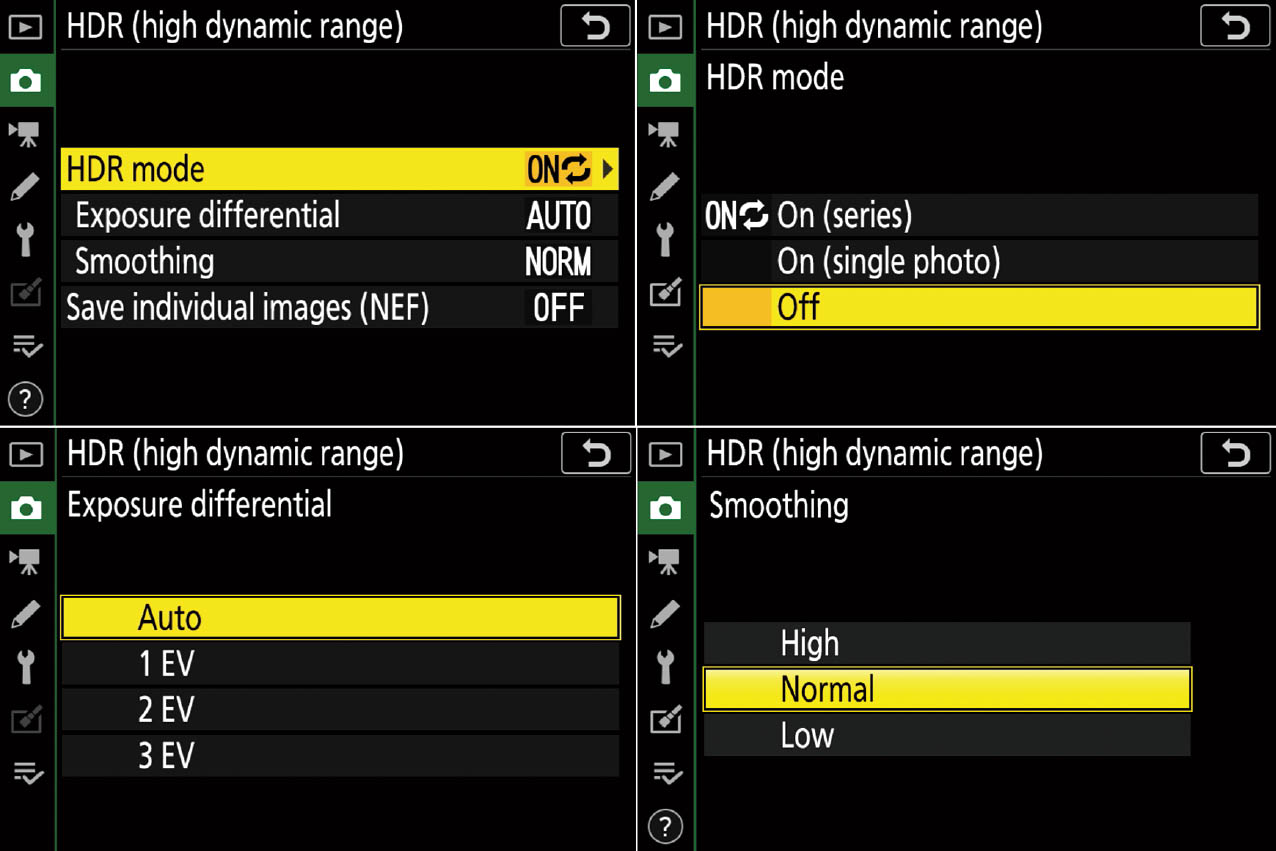
Figure 4.14 Choose HDR parameters.
- 4. Set amount. Choose Exposure Differential, press the right button, and select Auto (the Z6 chooses the differential based on how contrasty it deems your scene to be), 1 EV, 2 EV, or 3 EV. Auto is a good choice for your initial experiments. Or, select a higher EV strength for higher-contrast subjects, and a lower value for lower-contrast subjects. Press OK to confirm. (See Figure 4.14, lower left.)
- 5. Choose smoothing. HDR can cause haloing around the boundaries of areas within an image. You can control the effect by choosing a Smoothing value of High, Normal, or Low. (See Figure 4.14, lower right.)
- 6. Save Individual Images (optional). Ordinarily, the Z6 captures two images, combines them to produce an HDR shot, and then deletes the individual images. Turn Save Individual Images (NEF) on, and the camera will store a Large RAW version of each shot (even if you have not selected RAW or Large image quality/size). You’ll have the intermediate images available for editing/tweaking on your computer.
- 7. Set Aperture-priority mode. You want the camera to adjust the exposure by changing the f/stop, rather than using a different aperture, in order to keep your depth-of-field the same for each shot.
- 8. Take your shot. Set your camera to Aperture-priority mode. Although you can shoot HDR hand-held, you’ll get the best results with the Z6 mounted on a tripod, and with subjects that don’t display a lot of motion. Waterfalls are a poor choice. While the Z6 is combining your two shots, the message “Job” and HDR will flash in the monochrome status control panel. Note that because the camera tries to align shots, even if there is slight camera movement, some portion of the images at the edges will be cropped out. You’re better off using a tripod for Auto HDR, even though it does a decent job handheld.
Bracketing and Merge to HDR
If your credo is “If you want something done right, do it yourself,” you can also shoot HDR manually, without resorting to the Z6’s HDR mode. Instead, you can shoot individual images either by manually bracketing or using the Z6’s auto bracketing modes, described earlier in this chapter.
While my goal in this book is to show you how to take great photos in the camera rather than how to fix your errors in Photoshop, the Merge to HDR Pro feature in Adobe’s flagship image editor is too cool to ignore. The ability to have a bracketed set of exposures that are identical except for exposure is key to getting good results with this Photoshop feature, which allows you to produce images with a full, rich dynamic range that includes a level of detail in the highlights and shadows that is almost impossible to achieve with digital cameras.
When you’re using Merge to HDR Pro, you take several pictures, some exposed for the shadows, some for the middle tones, and some for the highlights. The exact number of images to combine is up to you. Four to seven is a good number. Then, use the Merge to HDR Pro command to combine all of the images into one HDR image that integrates the well-exposed sections of each version. Here’s how.
The images should be as identical as possible, except for exposure. So, it’s a good idea to mount the Z6 on a tripod, use a remote release like the MC-DC2, and take all the exposures in one burst. Just follow these steps:
- 1. Set up the camera. Mount the Z6 on a tripod.
- 2. Set the camera to shoot a bracketed burst with an increment of 2 EV or 3 EV. This was described earlier in this chapter.
- 3. Choose an f/stop. Set the camera for Aperture-priority and select an aperture that will provide a correct exposure at your initial settings for the series of manually bracketed shots. And then leave this adjustment alone! As I noted earlier, you don’t want the aperture to change for your series, as that would change the depth-of-field. You want the Z6 to adjust exposure only using the shutter speed.
- 4. Choose manual focus. You don’t want the focus to change between shots, so set the Z6 to manual focus, and carefully focus your shot.
- 5. Choose RAW exposures. Set the camera to take RAW files, which will give you the widest range of tones in your images.
- 6. Take your bracketed set. Press the button on the remote (or carefully press the shutter release or use the self-timer) and take the set of bracketed exposures.
- 7. Continue with the Merge to HDR Pro steps listed next. You can also use a different program, such as Photomatix, if you know how to use it.
DETERMINING THE BEST EXPOSURE DIFFERENTIAL
How do you choose the number of EV/stops to separate your exposures? You can use histograms, described at the end of this chapter, to determine the correct bracketing range. Take a test shot and examine the histogram. Reduce the exposure until dark tones are clipped off at the left of the resulting histogram. Then, increase the exposure until the lighter tones are clipped off at the right of the histogram. The number of stops between the two is the range that should be covered using your bracketed exposures. You can learn more about histograms in the section following this one.
The next steps show you how to combine the separate exposures into one merged HDR image. The sample images in Figure 4.15 (left) show the results you can get from a three-shot bracketed sequence.
- 1. Copy your images to your computer. If you use an application to transfer the files to your computer, make sure it does not make any adjustments to brightness, contrast, or exposure. You want the real raw information for Merge to HDR Pro to work with.
- 2. Activate Merge to HDR Pro. Choose File > Automate > Merge to HDR Pro.
- 3. Select the photos to be merged. Use the Browse feature to locate and select your photos to be merged. You’ll note a check box that can be used to automatically align the images if they were not taken with the camera mounted on a rock-steady support. This will adjust for any slight movement of the camera that might have occurred when you changed exposure settings.
- 4. Choose parameters (optional). The first time you use Merge to HDR Pro, you can let the program work with its default parameters. Once you’ve played with the feature a few times, you can read the Adobe help files and learn more about the options than I can present in this non-software-oriented camera guide.
- 5. Click OK. The merger begins.
- 6. Save. Once HDR merge has done its thing, save the file to your computer.
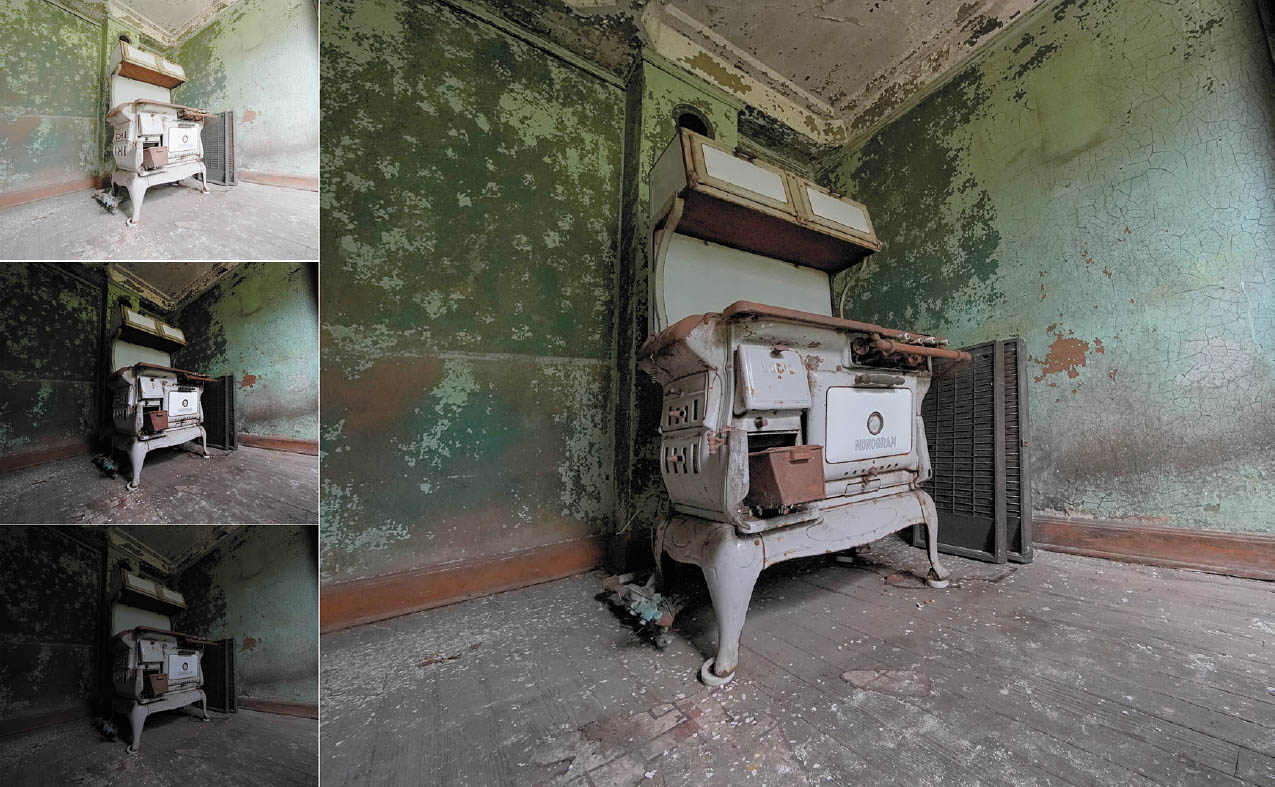
Figure 4.15 Left: Three bracketed photos should look like this. Right: You’ll end up with an extended dynamic range photo like this one.
If you do everything correctly, you’ll end up with a photo like the one shown in Figure 4.15 (right).
What if you don’t have the opportunity, inclination, or skills to create several images at different exposures, as described? If you shoot in RAW format, you can still use Merge to HDR, working with a single original image file. What you do is import the image into Photoshop several times, using Adobe Camera Raw to create multiple copies of the file at different exposure levels.
For example, you’d create one copy that’s too dark, so the shadows lose detail, but the highlights are preserved. Create another copy with the shadows intact and allow the highlights to wash out. Then, you can use Merge to HDR to combine the two and end up with a finished image that has the extended dynamic range you’re looking for. (This concludes the image-editing portion of the chapter. We now return you to our alternate sponsor: photography.)
Fixing Exposures with Histograms
While you can often recover poorly exposed photos in your image editor, your best bet is to arrive at the correct exposure in the camera, minimizing the tweaks that you have to make in post-processing. However, you can’t always judge exposure just by simply looking at the preview image on your Z6’s display before the shot is made, nor the review image in Playback. Ambient light may make the monitor difficult to see, and the brightness level you’ve set for the monitor and viewfinder in the Setup menu can affect the appearance of the image.
Instead, you can use a histogram, which is a chart shown on the Z6’s display that shows the number of tones that have been captured at each brightness level. Histograms are available in real time on your display as you shoot and in the review image during playback, but they are available only when enabled. To view histograms in live view or playback mode, press the DISP button until a screen with the histogram appears.
- Photo and Movie modes. For still and movie shooting, the histogram can be activated by choosing On for Custom Setting d8: Apply Settings to Live View (see Chapter 12). In addition, if you’re capturing multiple exposures, you must choose On for Overlay Shooting in the Multiple Exposure entry in the Photo Shooting menu (as discussed in Chapter 11). The histogram appears at lower right, as seen in Figure 4.16.
- Playback. To see histograms during image review, check the Histogram box in the Playback Display Options entry of the Playback menu (discussed in Chapter 11). The Z6 offers four histogram variations in two screens: one histogram that shows overall brightness levels for an image (see Figure 4.17, left) and an alternate version that also shows brightness (also called luminance), but offers additional histograms that separate the red, green, and blue channels of your image into separate graphs (see Figure 4.17, right).
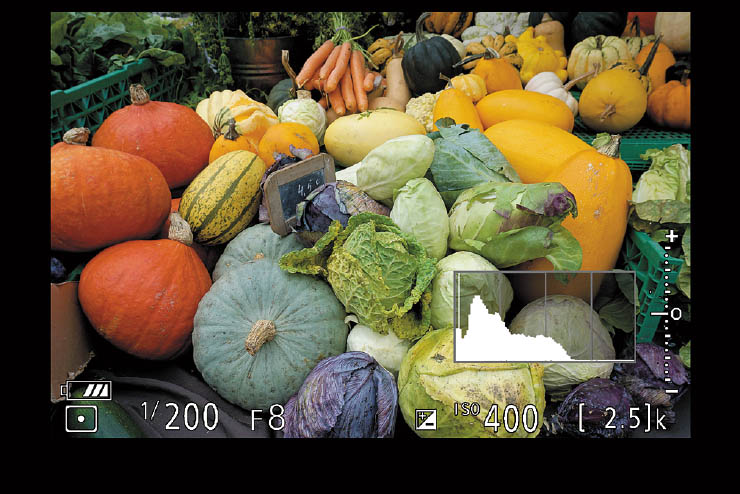
Figure 4.16 In Photo and Movie shooting modes the histogram appears in your live view image when enabled.
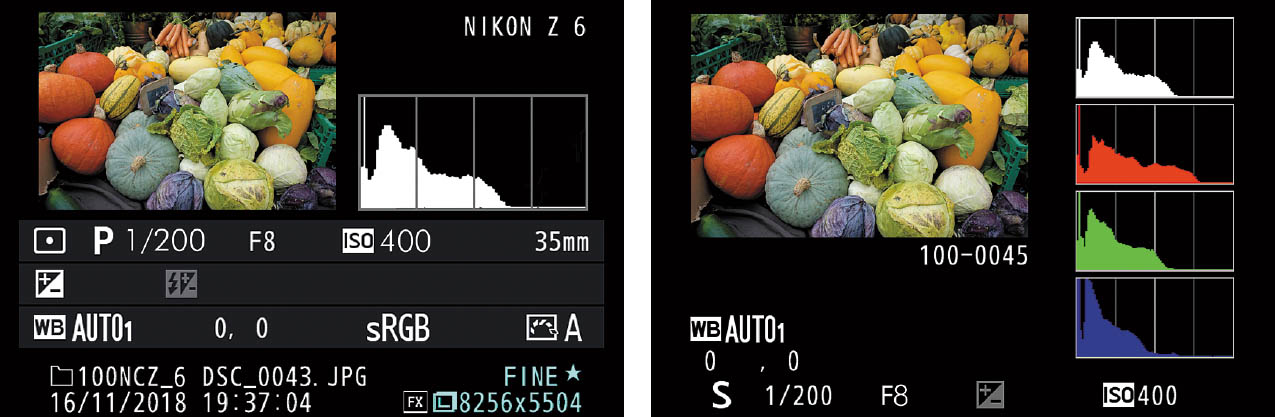
Figure 4.17 Histograms are available on two different screens during playback.
Tonal Range
Histograms help you adjust the tonal range of an image, the span of dark to light tones, from a complete absence of brightness (black) to the brightest possible tone (white), and all the middle tones in between. Because all values for tones fall into a continuous spectrum between black and white, it’s easiest to think of a photo’s tonality in terms of a black-and-white or grayscale image, even though you’re capturing those tones in three separate color layers of red, green, and blue.
Because your images are digital, the tonal “spectrum” isn’t really continuous: it’s divided into discrete steps that represent the different tones that can be captured. Figure 4.18 may help you understand this concept. The gray steps shown range from 100 percent gray (black) at the left, to 0 percent gray (white) at the right, with 20 gray steps in all (plus white).
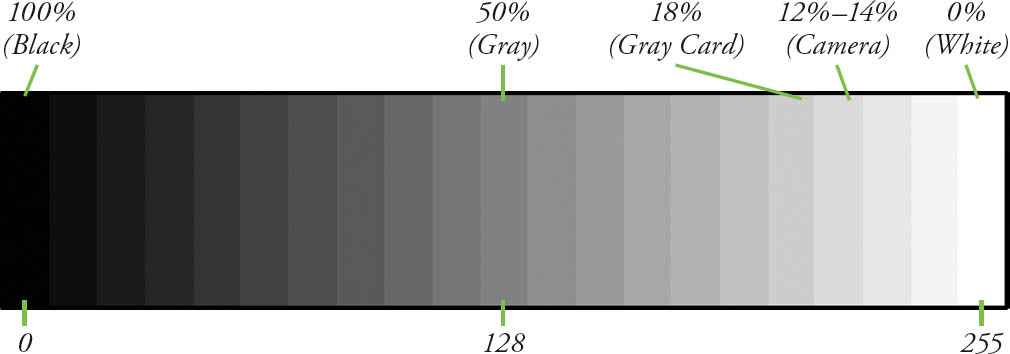
Figure 4.18 A tonal range from black (left) to white (right) and all the gray values in between.
Along the bottom of the chart are the digital values from 0 to 255 recorded by your sensor for an image with 8 bits per channel. (8 bits of red, 8 bits of green, and 8 bits of blue equal a 24-bit, full-color image.) Any black captured would be represented by a value of 0, the brightest white by 255, and the midtones would be clustered around the 128 marker. The actual information captured may be “finer” and record say, 0 to 4,094 for an image captured when the Z6 is set to 14 bits per channel in the NEF (RAW) Recording Bit Depth setting of the Photo Shooting menu (see Chapter 11 for more detail on that option).
Grayscale images (which we call black-and-white photos) are easy to understand. Or, at least, that’s what we think. When we look at a black-and-white image, we think we’re seeing a continuous range of tones from black to white, and all the grays in between. But, that’s not exactly true. The blackest black in any photo isn’t a true black, because some light is always reflected from the surface of the print, and if viewed on a screen, the deepest black is only as dark as the least-reflective area a computer monitor can produce. The whitest white isn’t a true white, either, because even the lightest areas of a print absorb some light (only a mirror reflects close to all the light that strikes it), and, when viewing on a computer monitor, the whites are limited by the brightness of the display’s LCD or LED picture elements. Lacking darker blacks and brighter, whiter whites, that continuous set of tones doesn’t cover the full grayscale tonal range.
The full scale of tones becomes useful when you have an image that has large expanses of shades that change gradually from one level to the next, such as areas of sky, water, or walls. Think of a picture taken of a group of campers around a campfire. Since the light from the fire is striking them directly in the face, there aren’t many shadows on the campers’ faces. All the tones that make up the features of the people around the fire are compressed into one end of the brightness spectrum—the lighter end.
Yet, there’s more to this scene than faces. Behind the campers are trees, rocks, and perhaps a few animals that have emerged from the shadows to see what is going on. These are illuminated by the softer light that bounces off the surrounding surfaces. If your eyes become accustomed to the reduced illumination, you’ll find that there is a wealth of detail in these shadow images.
This campfire scene would be a nightmare to reproduce faithfully under any circumstances. If you are an experienced photographer, you are probably already wincing at what is called a high-contrast lighting situation. Some photos may be high in contrast when there are fewer tones and they are all bunched up at limited points in the scale. In a low-contrast image, there are more tones, but they are spread out so widely that the image looks flat. Your digital camera can show you the relationship between these tones using a histogram.
Histogram Basics
Your Z6’s histograms are a simplified display of the numbers of pixels at each of 256 brightness levels, producing an interesting “mountain range” shape in the graph. Although separate charts may be provided for brightness and the red, green, and blue channels, when you first start using histograms, you’ll want to concentrate on the brightness histogram.
Each vertical line in the graph represents the number of pixels in the image for each brightness value, from 0 (black) on the left to 255 (white) on the right. The vertical axis measures that number of pixels at each level.
Although histograms are most often used to fine-tune exposure, you can glean other information from them, such as the relative contrast of the image. Figure 4.19, top, is a simplified rendition of the upper half of the Overview screen, with an image having normal contrast. In such an image, most of the pixels are spread across the image, with a healthy distribution of tones throughout the midtone section of the graph. That large peak at the right side of the graph represents all those light tones in the sky. A normal-contrast image you shoot may have less sky area, and less of a peak at the right side, but notice that very few pixels hug the right edge of the histogram, indicating that the lightest tones are not being clipped because they are off the chart.

Figure 4.19 Top: This image has fairly normal contrast, even though there is a peak of light tones at the right side representing the sky. Center: This low-contrast image has all the tones squished into one section of the grayscale. Bottom: A high-contrast image produces a histogram in which the tones are spread out.
With a lower-contrast image, like the one shown in Figure 4.19, center, the basic shape of the previous histogram will remain recognizable, but gradually will be compressed together to cover a smaller area of the gray spectrum. The squished shape of the histogram is caused by all the grays in the original image being represented by a limited number of gray tones in a smaller range of the scale.
Instead of the darkest tones of the image reaching into the black end of the spectrum and the whitest tones extending to the lightest end, the blackest areas of the scene are now represented by a light gray, and the whites by a somewhat lighter gray. The overall contrast of the image is reduced. Because all the darker tones are actually a middle gray or lighter, the scene in this version of the photo appears lighter as well.
Going in the other direction, increasing the contrast of an image produces a histogram like the one shown in Figure 4.19, bottom. In this case, the tonal range is now spread over the entire width of the chart, but, except for the bright sky, there is not much variation in the middle tones; the mountain “peaks” are not very high. When you stretch the grayscale in both directions like this, the darkest tones become darker (that may not be possible) and the lightest tones become lighter (ditto). In fact, shades that might have been gray before can change to black or white as they are moved toward either end of the scale.
The effect of increasing contrast may be to move some tones off either end of the scale altogether, while spreading the remaining grays over a smaller number of locations on the spectrum. That’s exactly the case in the example shown. The number of possible tones is smaller and the image appears harsher.
Understanding Histograms
The important thing to remember when working with the histogram display in your Z6 is that changing the exposure does not change the contrast of an image. The curves illustrated in the previous three examples remain exactly the same shape when you increase or decrease exposure. I repeat: The proportional distribution of grays shown in the histogram doesn’t change when exposure changes; it is neither stretched nor compressed. However, the tones as a whole are moved toward one end of the scale or the other, depending on whether you’re increasing or decreasing exposure. You’ll be able to see that in some illustrations that follow.
So, as you reduce exposure, tones gradually move to the black end (and off the scale), while the reverse is true when you increase exposure. The contrast within the image is changed only to the extent that some of the tones can no longer be represented when they are moved off the scale.
To change the contrast of an image, you must do one of four things:
- Change the Z6’s contrast setting using the menu system. You’ll find these adjustments in your camera’s Picture Controls menus, as explained in Chapter 11.
- Use your camera’s shadow-tone “booster.” As previously discussed, Active D-Lighting (or plain old D-Lighting applied after the fact from the Retouch menu) can also adjust contrast.
- Alter the contrast of the scene itself, for example, by using a fill light or reflectors to add illumination to shadows that are too dark.
- Attempt to adjust contrast in post-processing using your image editor or RAW file converter. You may use features such as Levels or Curves (in Photoshop, Photoshop Elements, and many other image editors), or work with HDR software to cherry-pick the best values in shadows and highlights from multiple images.
Of the four of these, the third—changing the contrast of the scene—is the most desirable, because attempting to fix contrast by fiddling with the tonal values is unlikely to be a perfect remedy. However, adding a little contrast can be successful because you can discard some tones to make the image more contrasty. However, the opposite is much more difficult. An overly contrasty image rarely can be fixed, because you can’t add information that isn’t there in the first place.
What you can do is adjust the exposure so that the tones that are already present in the scene are captured correctly. Figure 4.20, top, shows the histogram for an image that is badly underexposed. You can guess from the shape of the histogram that many of the dark tones to the left of the graph have been clipped off. There’s plenty of room on the right side for additional pixels to reside without having them become overexposed. So, you can increase the exposure (either by changing the f/stop or shutter speed, or by adding an EV value) to produce the corrected histogram shown in Figure 4.20, center.
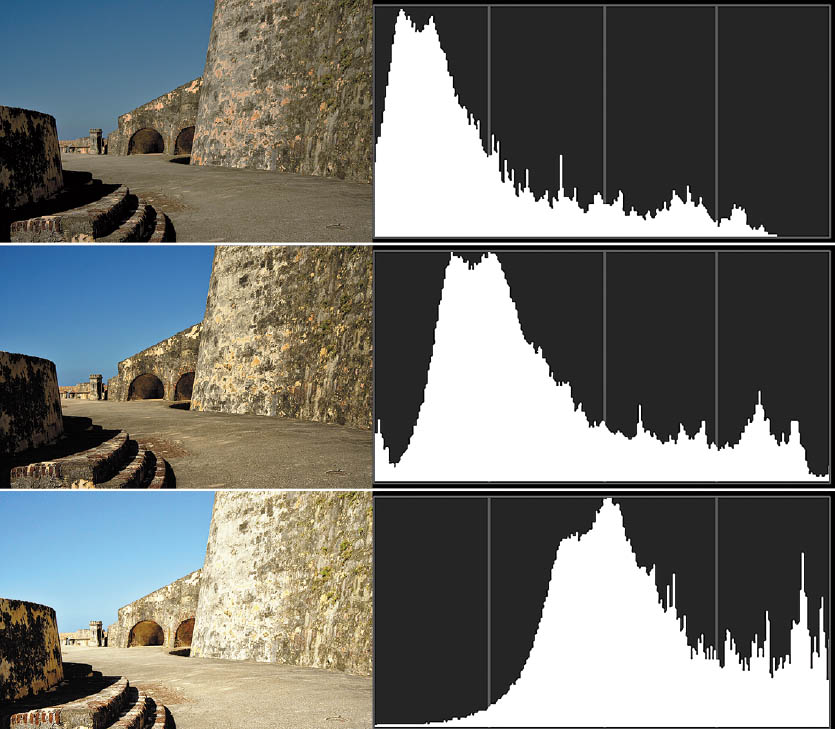
Figure 4.20 Top: A histogram of an underexposed image may look like this. Center: Adding exposure will produce a histogram like this one. Bottom: A histogram of an overexposed image will show clipping at the right side.
Conversely, if your histogram looks like the one shown in Figure 4.20, bottom, with bright tones pushed off the right edge of the chart, you have an overexposed image, and you can correct it by reducing exposure. In addition to the histogram, the Z6 has its Highlights option, which, when activated, shows areas that are overexposed with flashing tones (often called “blinkies”) in the review screen. Depending on the importance of this “clipped” detail, you can adjust exposure or leave it alone. For example, if all the dark-coded areas in the review are in a background that you care little about, you can forget about them and not change the exposure, but if such areas appear in facial details of your subject, you may want to make some adjustments.
In working with histograms, your goal should be to have all the tones in an image spread out between the edges, with none clipped off at the left and right sides. Underexposing (to preserve highlights) should be done only as a last resort, because retrieving the underexposed shadows in your image editor will frequently increase the noise, even if you’re working with RAW files. A better course of action is to expose for the highlights, but, when the subject matter makes it practical, fill in the shadows with additional light, using reflectors, fill flash, or other techniques rather than allowing them to be seriously underexposed.
A traditional technique for optimizing exposure is called “expose to the right” (ETTR), which involves adding exposure to push the histogram’s curve toward the right side but not far enough to clip off highlights. The rationale for this method is that extra shadow detail will be produced with a minimum increase in noise, especially in the shadow areas. It’s said that half of a digital sensor’s response lies in the brightest areas of an image, and so require the least amount of amplification (which is one way to increase digital noise). ETTR can work, as long as you’re able to capture a satisfactory amount of information in the shadows.
Exposing to the Right
It’s easier to understand exposing to the right if you mentally divide the histogram into fifths (unfortunately, the Z6’s histogram uses quarters instead). And, for the sake of simplicity and smaller numbers, assume you’re shooting in 14-bit RAW. Any 14-bit image can record a maximum of 16,383 different tones per channel. However, each fifth of the histogram does not encompass 3,277 tones (one-fifth of 16,383).
Instead, the right-most fifth, the highlights, shown in Figure 4.21, accounts for 8,192 different captured tones. Moving toward the left, the next fifth represents 4,096 levels, followed by 2,048 levels, 1,024 levels, and, in the left-most section where the deepest shadows reside, only 512 different tones are captured. When processing your RAW file, there are only 512 tones to recover in the shadows, which is why boosting/amplifying them increases noise. (The effect is most noticeable in the red and blue channels; your sensor’s Bayer array has twice as many green-sensitive pixels as red or blue.)
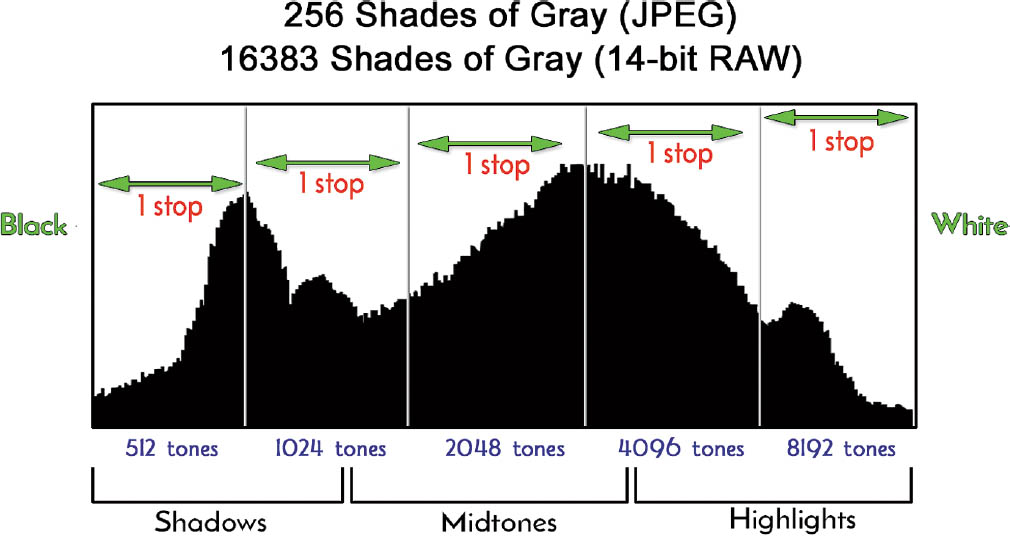
Figure 4.21 Tones are not evenly allocated throughout a histogram.
Instead, you want to add exposure—as long as you don’t push highlights off the right edge of the histogram—to brighten the shadows. Because there are 8,192 tones available in the highlights, even if the RAW image looks overexposed, it’s possible to use your RAW converter’s Exposure slider (such as the one found in Adobe Camera Raw) to bring back detail captured in that surplus of tones in the highlights. This procedure is the exact opposite of what was recommended for film of the transparency variety—it was fairly easy to retrieve detail from shadows by pumping more light through them when processing the image, while even small amounts of extra exposure blew out highlights. You’ll often find that the range of tones in your image is so great that there is no way to keep your histogram from spilling over into the left and right edges, costing you both highlight and shadow detail. Exposing to the right may not work in such situations. A second school of thought recommends reducing exposure to bring back the highlights, or “exposing to the left.” You would then attempt to recover shadow detail in an image editor, using tools like Adobe Camera Raw’s Exposure slider. But remember, above all, that this procedure will also boost noise in the shadows, and so the technique should be used with caution. In most cases, exposing to the right is your best bet.
Dealing with Channels
The more you work with histograms, the more useful they become. One of the first things that histogram veterans notice is that it’s possible to overexpose one channel even if the overall exposure appears to be correct. For example, flower photographers soon discover that it’s really, really difficult to get a good picture of a red rose, like the one shown at left in Figure 4.22. The exposure looks okay—but there’s no detail in the rose’s petals. Looking at the histogram (see Figure 4.22, right) shows why: the red channel is blown out. If you look at the red histogram, there’s a peak at the right edge that indicates that highlight information has been lost. In fact, the green channel has been blown, too, and so the green parts of the flower also lack detail. Only the blue channel’s histogram is entirely contained within the boundaries of the chart, and, on first glance, the white luminance histogram at top of the column of graphs seems fairly normal.
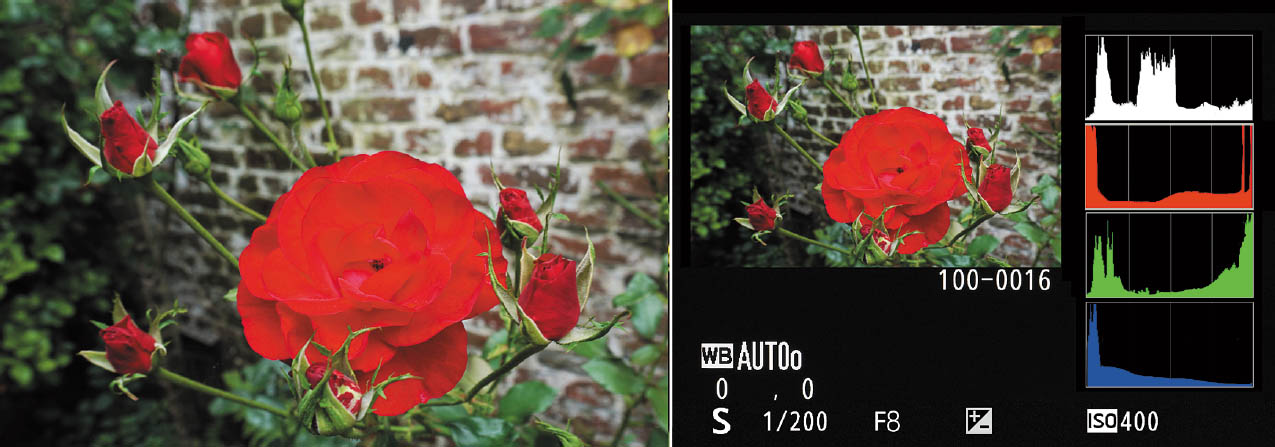
Figure 4.22 It’s common to lose detail in bright red flowers because the red channel becomes overexposed even when the other channels are properly exposed (left). The RGB histograms show that both the red and green channels are overexposed, with tones extending past the right edge of the chart (right).
Any of the primary channels—red, green, or blue—can blow out all by themselves, although bright reds seem to be the most common problem area. More difficult to diagnose are overexposed tones in one of the “in-between” hues on the color wheel. Overexposed yellows (which are very common) will be shown by blowouts in both the red and green channels. Too-bright cyans will manifest as excessive blue and green highlights, while overexposure in the red and blue channels reduces detail in magenta colors. As you gain experience, you’ll be able to see exactly how anomalies in the RGB channels translate into poor highlights and murky shadows.
The only way to correct for color channel blowouts is to reduce exposure. As I mentioned earlier, you might want to consider filling in the shadows with additional light to keep them from becoming too dark when you decrease exposure. In practice, you’ll want to monitor the red channel most closely, followed by the blue channel, and slightly decrease exposure to see if that helps. Because of the way our eyes perceive color, we are more sensitive to variations in green, so green channel blowouts are less of a problem, unless your main subject is heavily colored in that hue. If you plan on photographing a frog hopping around on your front lawn, you’ll want to be extra careful to preserve detail in the green channel, using bracketing or other exposure techniques outlined in this chapter.
Fine-Tuning Exposure
When all else fails—that is, when you find your camera consistently over- or underexposes when using a particular exposure mode—you can recalibrate the Z6 to produce images more to your liking. This setting is a powerful adjustment that allows you to dial in a specific amount of exposure adjustment that will be applied, invisibly, to every photo you take using each of the three metering modes. No more can you complain, “My Z6 always underexposes by 1/3 stop!” If that is actually the case, and the phenomenon is consistent, you can use this custom menu adjustment to compensate.
Exposure compensation is usually a better idea (does your camera really underexpose that consistently?), but this setting does allow you to adjust your Z6’s behavior yourself. Your dialed-in modifications will survive a two-button reset. However, you have no indication that fine-tuning has been made, so you’ll need to remember what you’ve done. After all, you someday might discover that your camera is consistently overexposing images by 1/3 stop, not remembering that you’ve made the adjustment.
In practice, it’s rare that the Nikon Z6 will consistently provide the wrong exposure in any of the three metering modes, especially Matrix metering, which can alter exposure dramatically based on the Z6’s internal database of typical scenes. This feature may be most useful for Spot metering, if you always take a reading off the same type of subject, such as a human face or gray card. Should you find that the gray card readings, for example, always differ from what you would prefer, go ahead and fine-tune optimal exposure for Spot metering, and use that to read your gray cards.
I explain how to use the Z6’s menus at the beginning of Chapter 11, and won’t repeat those instructions here. You can jump ahead to that explanation, or, if you’re comfortable working with the camera’s menu system, you can fine-tune your exposure now:
- 1. Select fine-tuning. Choose Custom Setting b4: Fine-Tune Optimal Exposure from the Custom Settings menu.
- 2. Consider yourself warned. In the screen that appears, choose Yes after carefully reading the warning that Nikon insists on showing you each and every time this option is activated. The screen shown in Figure 4.23, left, appears.
- 3. Select metering mode to correct. Choose Matrix metering, Center-weighted metering, Spot metering, or Highlight-weighted metering by highlighting your choice and pressing the multi selector right button.
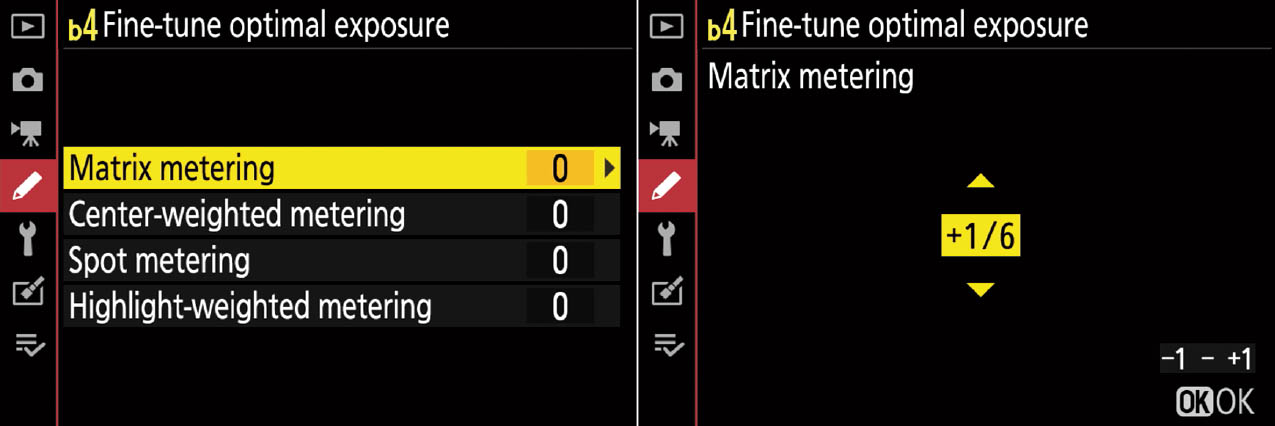
Figure 4.23 Fine-tune optimal exposure.
- 4. Specify amount of correction. Press the up/down buttons to dial in the exposure compensation you want to apply. (See Figure 4.23, right.) You can specify compensation in increments of 1/6 stop, half as large a change as conventional exposure compensation. This is truly fine-tuning.
- 5. Confirm your change. Press OK when finished. You can repeat the action to fine-tune the other two exposure modes if you wish. To return your settings to your defaults, simply repeat the process and dial in 0 correction for the desired mode.