Your Z6 has several convenient direct-access buttons (such as the ISO button on the top-right panel of the camera) and a customizable Information Edit screen that appears when you press the i button. However, many adjustments and settings require a trip to the Z6’s extensive menu system, which has nearly 170 individual top-level entries and dozens of additional options tucked away in sub-menus. But under that thicket of choices is the kind of versatility that makes the Nikon Z6 one of the most customizable, tweakable, and fine-tunable cameras Nikon has ever offered. If your camera doesn’t behave in exactly the way you’d like, chances are you can make a small change in the menus that will tailor the Z6 to your needs.
However, just telling you what your options are and what they do doesn’t really give you the information you need to use your camera to its fullest. What you really want to know is why you would want to choose a particular option, and how making a particular change will help improve your photographs in a given situation. That’s a big job, and I’m going to devote three entire chapters to demystifying the Z6 menu choices for you.
This chapter will help you sort out the settings for the Playback, Photo Shooting, and Movie Shooting menus, which determine how the Z6 displays images on review, and how it uses many of its shooting features to capture photos and videos. The following chapters will focus on the Custom Settings menu (Chapter 12), and Setup, Retouch, and My Menu options (Chapter 13).

While each entry in the Z6’s menus will be summarized in Chapters 11, 12, and 13, some complex functions, such as flash and autofocus options, require longer explanations and step-by-step instructions. I included those descriptions in previous chapters and will not repeat that information.
As I’ve mentioned before, this book isn’t intended to replace the Nikon manual available for your Z6, nor have I any interest in rehashing its contents. There is, however, some unavoidable duplication between the Nikon manual and the next three chapters, because, like the Nikon manual, I’m going to explain all the key menu choices and the options you may have in using them. You should find, though, that I will give you the information you really require in a much more helpful format, with plenty of detail on why you should make some settings that are particularly cryptic. Throughout, I’ll indicate my personal setting preference for many of the entries.
I’m not going to waste a lot of space on some of the more obvious menu choices in these chapters. For example, you can probably figure out what the Format Card entry in the Setup menu does, and it has only two options: Yes and No. In this chapter, I’ll devote no more than a sentence or two to the blatantly obvious settings and concentrate on the more confusing aspects of the Z6 setup, such as automatic exposure bracketing. I’ll start with an overview of using the Z6’s menus themselves.
Anatomy of the Nikon Z6’s Menus
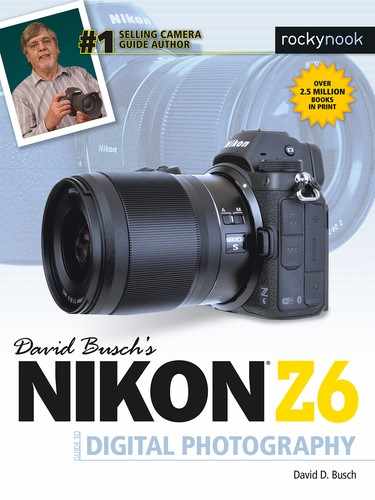
If you used any Nikon digital SLR before you purchased your Nikon Z6, you’re probably already familiar with the basic menu system. The menus consist of a series of screens with entries, as shown in the illustration of the Playback menu (discussed next) in Figure 11.1.
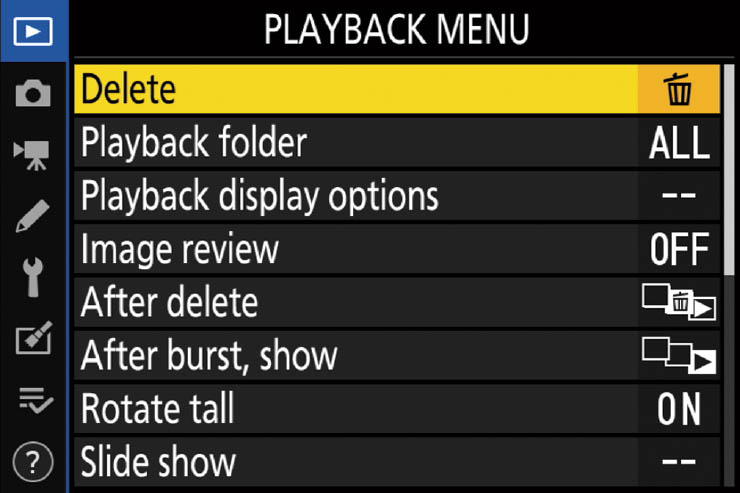
Figure 11.1 The multi selector’s navigational buttons are used to move among the various menu entries shown here.
Navigating among the various menus is easy and follows a consistent set of rules:
- View menu. Press the MENU button on the lower-right corner of the camera to display the main menu screens.
- Navigate main menu headings. Use the multi selector’s left/right/up/down buttons to navigate among the menu entries to highlight your choice. Moving the highlighting to the left column lets you scroll up and down among the seven top-level menus. From the top in Figure 11.1, they are Playback, Photo Shooting, Movie Shooting, Custom Settings, Setup, Retouch, and My Menu, with Help access (when available) represented by a question mark at the bottom of the column.
- Choose a top-level menu. A highlighted top-level menu’s icon will change from black-and-white to yellow highlighting. Use the multi selector’s right button to move into the column containing that menu’s choices. The selected top-level menu’s icon will change from yellow to a color associated with that menu (blue for Playback, green for Photo Shooting, yellow-green for Movie Shooting, red for Custom Settings, orange for Setup, purple for Retouch, and gray for My Menu). The currently selected option will be highlighted in yellow, as shown in the figure. Note: You can also press the OK button of the multi selector to move into a top-level menu’s entries, but it’s usually simpler to just press the right button, because you’ll be using the multi selector’s directional buttons to navigate the menus anyway.
- Select a menu entry. Use the up/down buttons to scroll among the entries. If more than one screen full of choices is available, a scroll bar appears at the far right of the screen, with a position slider showing the relative position of the currently highlighted entry.
- Choose options. To work with a highlighted menu entry, press the OK button, the multi selector center button, or, more conveniently, just press the right button on the multi selector. Any additional screens of choices will appear. You can move among them using the same multi selector movements.
- Confirm your choice. You can activate a selection by pressing the OK button or, frequently, by pressing the right button on the multi selector once again. Some functions require scrolling to a Done menu choice, or include an instruction to set a choice using some other button.
- Exit menus. Pressing the multi selector left button usually backs you out of the current screen, and pressing the MENU button again usually does the same thing. You can exit the menu system at any time by tapping the shutter release button.
- Returning to an entry. The Nikon Z6 “remembers” the top-level menu and specific menu entry you were using (but not any submenus) the last time the menu system was accessed, so pressing the MENU button brings you back to where you left off. So, if you were working with an entry in the Custom Settings menu’s Metering/Exposure section, then decided to take a photo, the next time you press the MENU button the Custom Settings menu and the Metering/Exposure entry will be highlighted, but not the specific submenu (b1 through b4) that you might have selected.
- Accessing a frequently used entry. If you use the same menu items over and over, you can create a My Menu listing of those entries. Or, if you’d rather have a rotating listing of the last 20 menu items you accessed, you can convert My Menu to a Recent Settings menu instead. I’ll show you exactly how to do that in Chapter 13.
Playback Menu Options
The blue-coded Playback menu, shown in Figure 11.1, has 9 entries where you select options related to the display, review, transfer, and printing of the photos you’ve taken. The choices you’ll find include the entries that follow. The last entry, Rating, is not pictured in Figure 11.1, and does not appear until you scroll the listing on the screen to the bottom.
- Delete
- Playback Folder
- Playback Display Options
- Image Review
- After Delete
- After Burst, Show
- Rotate Tall
- Slide Show
- Rating
Delete
Options: Selected, Select Date, All (default)
My preference: N/A
Choose this menu entry and you’ll be given three choices, shown in Figure 11.2, left: Selected (to choose individual images to delete); Date (to remove all photos taken on a particular day); or All (to remove all images in the folder currently selected for playback). (See Playback Folder entry, next.)

Figure 11.2 Choose selection method (left); Select individual images (right).
To select specific images or dates, follow these instructions:
- 1. Choose Selected or Date. Selection screens appear to allow you to choose which images to delete. To select by date, skip to Step 3.
- 2. Mark individual Selected images. Scroll through the thumbnails of the images displayed using the multi selector’s directional buttons. Hold down the Zoom In button to enlarge the highlighted thumbnail to full-screen view. Press the Zoom Out/Index button to mark a highlighted image for deletion, or to unmark one that has already been marked. A trash can icon is overlaid on the thumbnail when an image is marked for removal. (See Figure 11.2, right.) When finished marking, press OK to delete. Choose Yes from the Delete? screen that appears, or No to cancel.
- 3. Select dates. A list of dates on which pictures were taken appears. Press the right button to checkmark a date, or to unmark a date that has been selected. Once you’ve highlighted one or more dates, if you’re sure you want to delete all those images, press OK, and give the Z6 the go-ahead to continue on the confirmation screen that pops up.
If you want to double-check your images before removing them, press the Zoom Out/Index button to confirm your choices, and a scrollable screen of thumbnails displaying the images for the selected dates will be shown. You can press the Zoom In button to view a full-screen version of any highlighted image. When finished, press OK to return to the previous screen. Press OK again and choose Yes from the Delete All Images Taken on Selected Date screen, or No to cancel.
- 4. Exit Delete menu. To back out of the selection screens, press the MENU button.
Using this menu to delete images will have no effect on images that have been marked with an overlaid key icon when protected using the Protect option available from the i menu that appears when you press the i button during Playback. Keep in mind that deleting images in this way is slower than just wiping out the whole card with the Format command, so using Format is generally much faster than choosing Delete: All, and also is a safer way of returning your memory card to a fresh, blank state.
Playback Folder
Options: NCZ_6, All (default), Current
My preference: N/A
Your Nikon Z6 will create folders on your memory card to store the images that it creates. It assigns the first folder a number, like 100NCZ_6, and when that folder is filled, the camera automatically creates a new folder numbered one higher, such as 101NCZ_6. A folder is completely full when it contains 5,000 images, or a picture numbered 9999. If you use the same memory card in another camera, that camera will also create its own folder. Thus, you can end up with several folders on the same memory card, until you eventually reformat the card and folder creation starts anew.
This menu item allows you to choose which folders are accessed when displaying images using the Z6’s Playback facility. Your choices are as follows:
- NCZ_6. The camera will use only the folders on your memory card created by the Z6 and ignore those created by other cameras. Images in all the Z6’s folders will be displayed. This is the default setting. You can rename these folders using the Storage Folder > Rename entry in the Photo Shooting menu. Personally, I feel that the space between NCZ and 6 in the folder name is a waste of good ASCII, and will recommend some alternatives later in this chapter, using the Storage Folder entry of the Photo Shooting menu.
- All (Default). All folders containing images that the Z6 can read will be accessed, regardless of which camera created them. You might want to use this setting if you swap memory cards among several cameras and want to be able to review all the photos (especially when considering reformatting the memory card). You will be able to view images even if they were created by a non-Nikon camera if those images conform to the Design Rule for Camera File system (DCF) specifications.
- Current. The Z6 will display only images in the current folder. For example, if you have been shooting heavily at an event and have already accumulated more than 5,000 shots in one folder (or an image has been stored that’s numbered 9999) and the Z6 has created a new folder for the overflow, you’d use this setting to view only the most recent photos, which reside in the current folder. You can change the current folder to any other folder on your memory card using the Active Folder option in the Photo Shooting menu, described later in this chapter.
Playback Display Options
Options: Basic photo info: Focus Point; Additional Photo info: Exposure Info, Highlights, RGB Histogram, Shooting Data, Overview, None (Image only)
My preference: N/A
You’ll recall from Chapter 3 that a great deal of information, available on multiple screens, that can be cycled through by pressing the DISP button when reviewing images. This menu item helps you reduce/increase the clutter by specifying which information and screens will be available. To activate or deactivate an info option, scroll to that option and press the right multi selector button to add a checkmark to the box next to that item. Press the right button to unmark an item that has previously been checked. If no boxes are checked, only the default view—the image with basic information shown at the bottom of the frame—is displayed. Your additional info options include:
- Focus point. Activate this option to display the active focus point(s) with red highlighting.
- Exposure info. Shows only frame number and basic exposure information, including release mode, shutter speed, aperture, exposure compensation, and ISO sensitivity.
- Highlights. When enabled, overexposed highlight areas in your image will blink with a black border during picture review. That’s your cue to consider using exposure compensation to reduce exposure, unless a minus EV setting will cause loss of shadow detail that you want to preserve. You can read more about correcting exposure in Chapter 4.
- RGB histogram. Displays both luminance (brightness) and RGB histograms on a screen that can be displayed using the up/down multi selector buttons, as shown in Chapter 3. I explained the use of histograms in Chapter 4.
- Shooting Data. Activates the pages of shooting data shown in Chapter 3.
- Overview. Activates the overview screen shown in Chapter 3. You must scroll down the list to access this option.
- None. A screen with the image only and no photo information will be displayed.
Image Review
Options: On, On (Monitor only), Off (default)
My preference: N/A
There are certain shooting situations in which it’s useful to have the picture you’ve just shot pop up on the monitor automatically for review. Perhaps you’re fine-tuning exposure or autofocus and want to be able to see whether your most recent image is acceptable. Or, maybe you’re the nervous type and just want confirmation that you actually took a picture. Instant review has saved my bacon a few times when I accidentally made an inappropriate setting (such as specifying ISO 25600 when it really wasn’t needed or desirable).
A lot of the time, however, it’s a better idea to not automatically review your shots to conserve battery power (the LCD monitor and EVF are two of the major juice drains in the camera) or to speed up or simplify operations. For example, if you’ve just fired off a burst of eight shots during a football game, do you really need to have every frame display as the camera clears its buffer and stores the photos on your memory card? This menu operation allows you to choose which mode to use. You can elect to have the review image always appear, appear on the LCD monitor only, or never appear. Unfortunately, Nikon neglected to give us an On (Viewfinder Only) option for image review, but I’m going to give you several workarounds.
- On. Image review is automatic after every shot is taken, and your image will appear in the viewfinder or on the LCD monitor (depending on which you are using).
- On (Monitor only). Image review is displayed only on the rear-panel LCD monitor, and then only if you are not currently looking through the viewfinder; to see image review, move the camera away from your eye.
- Off. Images are displayed only when you press the Playback button. Nikon, in its wisdom, has made this the default setting.
When I am shooting concerts and performances where the audience area is darkened, I don’t want the LCD monitor lighting up after every shot and annoying people. Even so, I may want to review my images and would like them to appear immediately—just not on the monitor. There are several ways to activate that behavior.
- If you select ON with this menu entry, if your Limit Monitor Mode Selection option (in the Setup menu, and described in Chapter 13) is set to activate Automatic Selection, as long as you keep your eye up to the viewfinder, the image preview will not appear on the monitor.
- A better choice is to disable Automatic Selection, and enable just Viewfinder Only or Monitor Only options. Then you can manually toggle between the viewfinder and monitor using the VF/Monitor button on the left side of the Z6’s pentaprism. Your image review will appear only on the currently selected screen.
- If you absolutely want to prevent having your image review appear on the monitor, visit the Limit Monitor Mode Selection entry and disable everything but Viewfinder Only.
- A compromise is to use the Monitor Brightness entry in the Setup menu and set Manual Brightness to –5. This produces a very dark screen, which is unlikely to annoy those around you. It also makes it difficult to judge exposure from the monitor alone. (That’s what the histogram is for!)
After Delete
Options: Show Next (default), Show Previous, Continue as Before
My preference: Show Next
When you’ve deleted an image, you probably will want to do one of three things: have the Z6 display the next picture (in the order shot); show the previous picture; or show either the next or previous picture, depending on which way you were scrolling during picture review. Your Z6 lets you select which action to take:
- Show next. It’s likely that you’ll want to look at the picture taken after the one you just deleted, so Nikon makes this the default action.
- Show previous. I use this setting a lot when shooting sports with a continuous shooting setting. After the sequence is taken, I press the Playback button to see the last picture in the series and sometimes discover that the whole sequence missed the boat. I sometimes go ahead and press the Trash button twice to delete the offending image, then continue moving backward to delete the five or six or eleven other pictures in the wasted sequence. You’ll often find yourself with time on your hands at football games, and feel the urge to delete a stinker series of shots to save your time reviewing back at the computer (plus freeing up a little space on your card).
- Continue as before. This setting makes a lot of sense: if you were scrolling backward or forward and deleting photos as you go, you might want to continue in the same direction weeding out bad shots. Use this setting to set your Nikon Z6 to behave that way.
After Burst, Show
Options: First Image in Burst, Last Image in Burst (default)
My preference: Last Image in Burst
This menu choice allows you to determine which image is shown after a continuous series of shots are captured, when Image Review is turned off. In practice, the Z6 will not display any images on the LCD monitor while you are shooting a burst, allowing the camera to capture frames and store them on your memory card at maximum speed. However, when the burst is complete, one image will then be shown on the screen—either the first image of the series or the last image captured. I prefer to view the final image; if it’s okay in terms of exposure and focus, I can assume the others in the series are similar, and move on to initiate another burst immediately if I want. Select First Image in Burst, instead, if you want to see the initial shot and then, perhaps, continue checking subsequent photos.
Rotate Tall
Options: On (default), Off
My preference: Off
When you rotate the Z6 to photograph vertical subjects in portrait (tall), rather than landscape (wide) orientation, you probably don’t want to view them tilted onto their sides later, either on the camera monitor and viewfinder or within your image viewing/editing application on your computer. The Z6 has a directional sensor built in that can detect whether the camera was rotated when the photo was taken and hide this information in the image file itself.
The orientation data is applied in two different ways. It can be used by the Z6 to automatically rotate images when they are displayed on the camera’s monitor and viewfinder (when On is enabled), or you can ignore the data and let the images display in non-rotated fashion when Off is selected (so you have to rotate the camera to view them in their proper orientation). As mentioned earlier, your image-editing application can also use the embedded file data to automatically rotate images on your computer screen.
This menu choice deals only with whether the image should be rotated when displayed on the camera LCD monitor or in the electronic viewfinder. (If you de-activate this option, your image-editing software can still read the embedded rotation data and properly display your images.) When Rotate Tall is turned off, the Nikon Z6 does not rotate pictures taken in vertical orientation. The image is large on your display, but you must rotate the camera to view it upright.
When Rotate Tall is turned on, the Z6 rotates pictures taken in vertical orientation on the monitor screen so you don’t have to turn the camera to view them comfortably. However, this orientation also means that the longest dimension of the image is shown using the shortest dimension of the monitor, so the picture is reduced in size (see Figure 11.3).
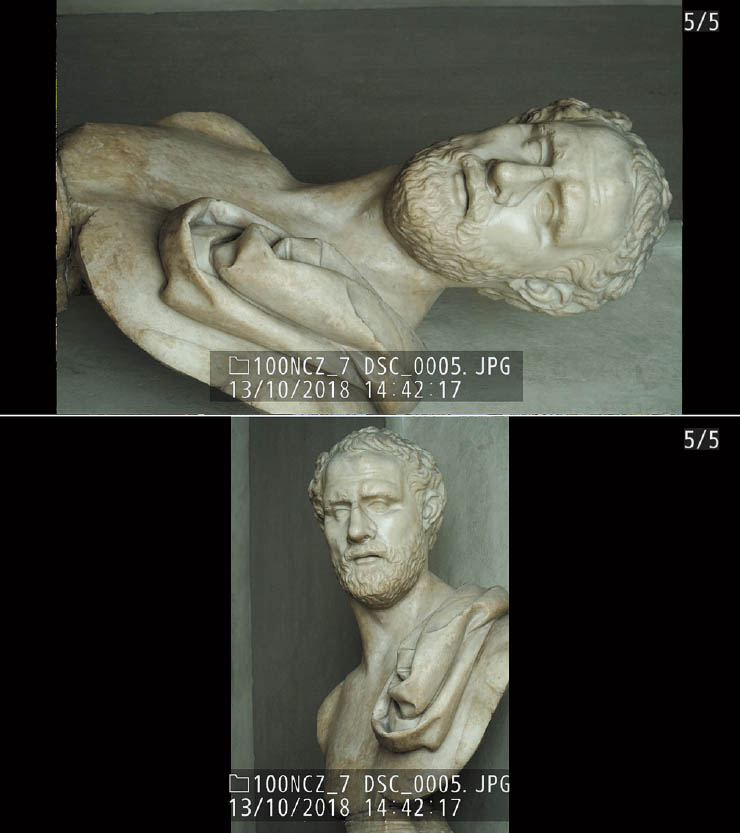
Figure 11.3 Rotate Tall: Off (top); Rotate Tall: On (bottom).
So, turn this feature On if you’d rather not turn your camera to view vertical shots in their natural orientation, and don’t mind the smaller image. Turn the feature Off if, as I do, you’d rather see a larger image and are willing to rotate the camera to do so. Rotating the camera is no big deal, and worth the trouble in order to see the largest possible review image on the display.
Slide Show
Options: Start; Image Type: Still Images and Movies (default), Still Images Only, Movies Only, By Rating; Frame Interval: 2 (default), 3, 5, 10 seconds
My preference: N/A
The Z6’s Slide Show feature is a convenient way to review images in the current playback folder one after another, without the need to manually switch between them. Re-direct the output of your camera’s video to an HDTV television, and you’ve got an instant camera-based large-screen audiovisual extravaganza. Your options include:
- Start. To activate a slide show, just choose Start from this entry in the Playback menu. During playback, you can press the OK button to pause the “slide show.” When the show is paused, a menu pops up with choices to restart the show (by pressing the OK button again), change the interval between frames, or to exit the show entirely.
- Image Type. You can choose to display both still images and movies, still images only, movies only, or images with one to five Rating stars (or none at all). The Ratings feature means you can award a “star” value to images as you shoot, or at any later time, and then activate a slide show that displays only the images with a particular rating—or images with several ratings, say, both five-star and four-star photos. I’ll explain Ratings in the next section. The default value is both stills and movies.
- Frame Interval. If you like, you can choose Frame Interval before commencing the show in order to select an interval of 2, 3, 5, or 10 seconds between “slides.” The default value is 2 seconds.
As the images are displayed, press the up/down multi selector buttons to change the amount of information presented on the screen with each image. For example, you might want to review a set of images and the settings used to shoot them. During the show:
- Change information. At any time during the show, press the up/down buttons until the informational screen you want is overlaid on the images.
- Manually change frames. As the slide show progresses, you can press the left/right multi selector buttons to move back to a previous frame or jump ahead to the next one. The slide show will then proceed as before.
- Pause. Press the OK button. Highlight Restart and press OK again to resume.
- Change playback volume (for movie images only). Press the Zoom In button to increase volume, or Zoom Out to decrease.
- Exit to Playback menu. Press the MENU button to exit the slide show and return to the Playback menu. Use this option when you want to change slide show parameters.
- Exit to Playback mode. Returns to previous playback mode (full frame or thumbnail).
- Exit to Shooting mode. Tap the shutter release button.
- Restart/Adjust. At the end of the slide show, as when you’ve paused it, you’ll be offered the choice of restarting the sequence, changing the frame interval, or exiting the Slide Show feature completely.
Rating
Options: Zero to five stars
My preference: N/A
The Rating option allows applying a star rating from zero to five stars for individual images. I love this feature, and not because my work is so variable that my images customarily range in quality from zero-star stinkers to five-star exhibition-worthy shots. In practice, you can use the Rating system to categorize your photos any way you choose, using a variety of parameters.
Select this menu item and the image selection window will appear. You can use the left/right directional buttons or touch screen to scroll among your images to highlight one you want to rate. To view a highlighted image full frame, press and hold the Zoom In button. Rate a highlighted image using the up/down buttons to apply a rating from zero to five stars, or tap the thumbnail on the monitor display one to five times. Press the down button to decrement stars, or to select the Trash icon to mark the picture for later deletion. Ratings cannot be applied to protected images. Press OK or tap Return to confirm and exit.
Images can also be rated during playback. When an image is shown on the screen as you review it, press the i button to show playback options (Rating, Select to Send to Smart Device/Deselect, Retouch, Choose Folder). Select Rating, and then use the controls to apply a rating as described above. Press OK or tap Return to confirm and exit.
I’m keen on the Rating feature because this capability is much more versatile than you might think. The stars don’t have to relate to relative image quality. You can invent any other “code” you might like to apply. For example, if you like, one star can represent photos containing animals; two stars pictures with family members; three stars photos of landscapes; and so forth. Then, with the ratings applied, you can quickly access particular types of pictures.
Or, you could mark your photos to create five different slide shows (as described earlier) on a single memory card. On a lengthy European vacation, you could assign your best shots in Spain a single star; designate shots in France with two stars; those in Italy with three; Greece, four; and Germany, five stars. Then, choose By Rating as your Image Type for your Slide Show, and then activate a show using only images with a particular number of stars. Or, you could specify a show with, say, only one-star and three-star images to display a series of Spain and Italy photographs.
Photo Shooting Menu Options
The i menu allows you to make many of the most common adjustments, including image quality, image size, autofocus mode, white balance, AF mode, and flash settings, and can be customized to include other entries of your choice. You’ll find some of these settings duplicated in the Photo Shooting menu (the first page of which is shown in Figure 11.4), along with options that you access second-most frequently when you’re using your Nikon Z6, such as specifying noise reduction for long exposures or high ISO settings. You might make such adjustments as you begin a shooting session, or when you move from one type of subject to another. Nikon makes accessing these changes very easy.

Figure 11.4 Common shooting settings can be changed in the Photo Shooting menu.
This section explains the options of the Photo Shooting menu and how to use them. The options you’ll find in these green-coded menus include:
- Reset Photo Shooting Menu
- Storage Folder
- File Naming
- Choose Image Area
- Image Quality
- Image Size
- NEF (RAW) Recording
- ISO Sensitivity Settings
- White Balance
- Set Picture Control
- Manage Picture Control
- Color Space
- Active D-Lighting
- Long Exposure NR
- High ISO NR
- Vignette Control
- Diffraction Compensation
- Auto Distortion Control
- Flicker Reduction Shooting
- Metering
- Flash Control
- Flash Mode
- Flash Compensation
- Focus Mode
- AF-Area Mode
- Vibration Reduction
- Auto Bracketing
- Multiple Exposure
- HDR (High Dynamic Range)
- Interval Timer Shooting
- Time-lapse Movie
- Focus Shift Shooting
- Silent Photography
Reset Photo Shooting Menu
Options: Yes, No
My preference: N/A
The Nikon Z6 has, in effect, four different kinds of resets. This is one of them.
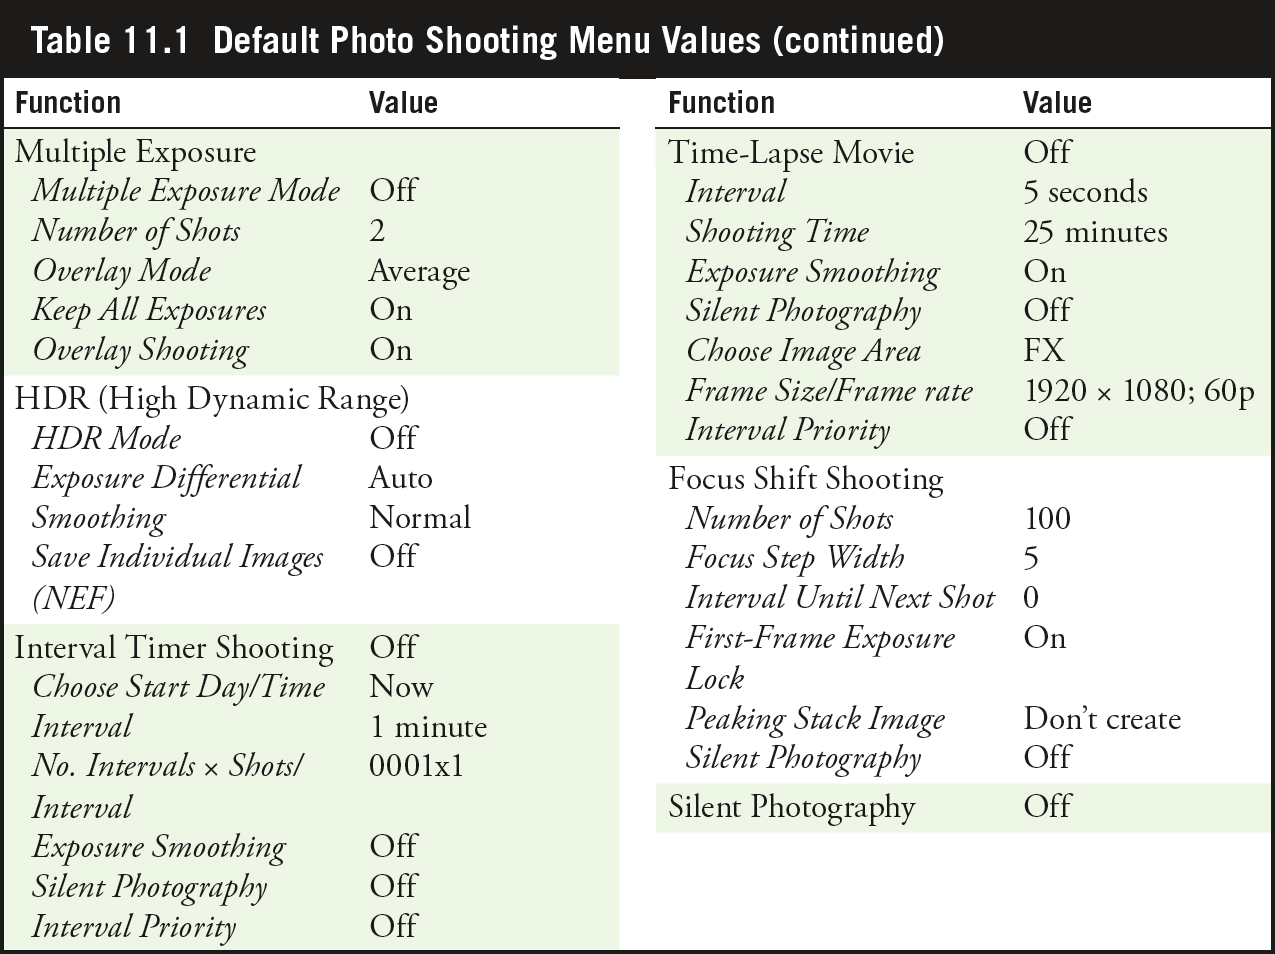
- Photo Shooting menu reset. Use this option to reset the values of the current Photo Shooting menu to the values shown in Table 11.1.
- Movie Shooting menu reset. The Movie Shooting menu has its own settings, which are reset separately, as described later in this chapter.
- Custom Settings menu reset. This option, which I’ll describe in Chapter 12, is used to reset the Custom Settings entries. It has no effect on camera settings or Photo Shooting menu banks.
- Setup menu reset. This option resets all settings except for Language and Time Zone/Date to their default values. Use this option with caution, as it even erases copyright information and your user settings (described in Chapter 13). In that chapter I’ll also show you how to save/load settings so you can retrieve settings you saved, even after you’ve used the Setup menu reset.
Table 11.1 shows the default values that are set using Reset Photo Shooting Menu. If you don’t know what some of these settings are, I’ll explain them later in this section.
Storage Folder
Options: Rename: NCZ_6 (default); Select Folder by Number: 100 (default); Select Folder from List
My preference: I use the Select Folder by Number option frequently to organize images by topic or time frame.
If you want to store images in a folder other than the one most recently created and selected by the Nikon Z6, you can switch among available folders on your memory card, or create your own folder. Remember that any folders you create will be deleted when you reformat your memory card.
Why create your own folders? Perhaps you’re traveling and have a high-capacity memory card and want to store the images for each day (or for each city that you visit) in a separate folder. Maybe you’d like to separate those wedding photos you snapped at the ceremony from those taken at the reception. As I mentioned earlier, the Nikon Z6 automatically creates a folder on a newly formatted memory card with a name like 100NCZ_6, and when it fills with 5,000 images (an increase from the limitation of 999 images in most previous Nikon cameras) or a picture numbered 9999, it will automatically create a new folder with a number incremented by one (such as 101NCZ_6).
Folders are always identified using a three-digit number, followed by a five-character folder name. Although the default characters are NCZ_6, you can specify a name of your choice. To create your own folder or select an existing folder:
- 1. Access active folder entry. Choose Storage Folder in the Photo Shooting menu, and press the right multi selector button. The screen shown at left in Figure 11.5 appears.
- 2. Choose function. Three options are listed: Rename, Select Folder by Number, and Select Folder from List.
- Rename. Highlight and select Rename and you’ll be taken to a screen similar to the one shown at right in Figure 11.5, but with only five spaces to enter information for the naming scheme. Only numbers from 0 to 9, uppercase alpha characters, and an underline can be selected. Note that you can only change the name of your folder scheme—existing folders cannot be renamed. I like to name my folders using the scheme “NIKZ6.” It does not provide any extra information beyond that of the default “NCZ_6,” but it does make it very easy to differentiate between photos taken with my Z6, and those taken by another Z6 (most likely another photographer). See the next section, “Entering Text on the Nikon Z6” for a primer on using the on-screen keyboard.
- Select Folder by Number. If you’ve chosen this option, a screen appears with three digits representing the possible folder numbers from 100 to 999. (See Figure 11.6.) Use the left/right multi selector buttons to move between the digits, and the up/down buttons to increase or decrease the value of the digit. If a folder already exists with the number you dial in, an icon appears showing the folder is empty, partially full, or it has 5,000 images or a picture numbered 9999 (and can contain no more images).
Press OK to create the new folder and make it the active folder. You’d want to use this option to create a new folder or when you don’t know whether a folder by a particular number already exists. If a folder with that number already resides on the memory card, you can use it (if it is not full); if it doesn’t exist, you can create it.
- Select Folder from List. From among the available folders shown, scroll to the one that you want to become active for image storage and playback. This feature is handy when you want to display a slide show located in a particular folder. Use this option if you know that the folder you want to use already resides on the memory card. Press OK to confirm your choice and make the folder active.

Figure 11.5 Change your folder naming scheme, create a new folder, or select an existing folder number.
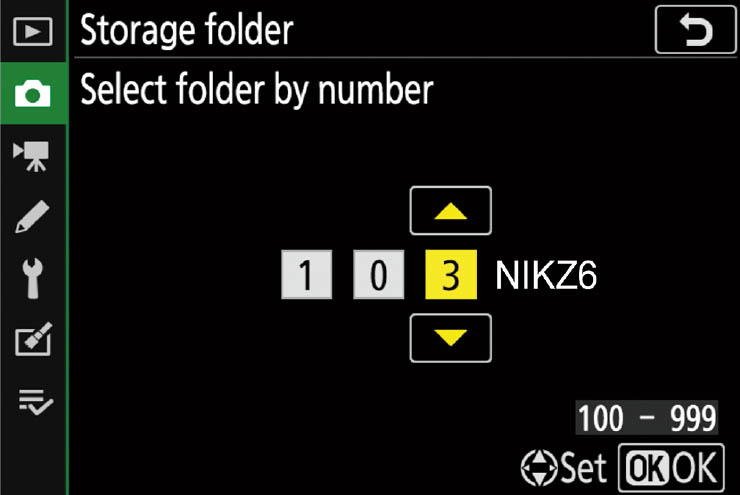
Figure 11.6 Select a folder by number.
- 3. Exit menus. Press the MENU button or tap the shutter release to exit.
Entering Text on the Nikon Z6
Your Z6 offers several opportunities to enter text, so you can change folder names, insert your name as “Artist” or provide copyright information. The Nikon Z6 uses a fairly standardized text-entry screen to name files, rename Picture Controls, create new folder names, and enter image comments and other text. You’ll be using text entry with other functions that I’ll describe later in this book. The screen looks like the one shown earlier in Figure 11.5, right, with some variations (for example, some functions have a less diverse character set, or offer more or fewer spaces for your entries). To enter text, just use the touch screen to “type” your characters or, alternatively, use the multi selector navigational buttons to scroll around within the array of alphanumerics. (I invariably use the touch screen for this, unless I am outdoors, wearing gloves, and really, really need to enter text.)
- Highlight a character. Use the touch screen or multi selector keys to scroll around within the array of characters.
- Insert highlighted character. Tap the character or press the multi selector OK button to insert the highlighted character. The cursor will move one place to the right to accept the next character.
- Non-destructively move forward/backspace. Use the main command dial to move the cursor within the line of characters you’ve entered. This allows you to skip ahead or backspace and replace a character without disturbing the others you’ve entered. Although it’s a bit more difficult for the ham-handed, you can also tap the left/right triangles on the screen located to the immediate left of the text entry area to move the cursor.
- Erase a highlighted character. To remove a character you’ve already input, move the cursor to highlight that character, and then press the Trash button or tap the trash can icon at the bottom of the screen.
- Confirm your entry. When you’re finished entering text, press the Zoom In button to confirm your entry, then press the MENU button to return to the Photo Shooting menu, or twice (or just tap the shutter release) to exit the menu system entirely.
File Naming
Options: Choose three-letter prefix. Default: DSC
My preference: NZ6
The Nikon Z6, like other cameras in the Nikon product line, automatically applies a name like _DSC0001.jpg or DSC_0001.nef to your image files as they are created. You can use this menu option to change the names applied to your photos, but only within certain strict limitations. In practice, you can change only three of the eight characters, the DSC portion of the file name. The other five are mandated either by the Design Rule for Camera File System (DCF) specification that all digital camera makers adhere to or to industry conventions.
DCF limits file names created by conforming digital cameras to a maximum of eight characters, plus a three-character extension (such as .jpg, .nef, or .wav in the case of audio files) that represents the format of the file. The eight-plus-three (usually called 8.3) length limitation dates back to an evil and frustrating computer operating system that we older photographers would like to forget (its initials are D.O.S.), but which, unhappily, lives on as the wraith of a file-naming convention.
Of the eight available characters, four are used to represent, in a general sense, the type of camera used to create the image. By convention, one of those characters is an underline, placed in the first position (as in _DSCxxxx.xxx) when the image uses the Adobe RGB color space (more on color spaces later), and in the fourth position (as in DSC_xxxx.xxx) for sRGB and RAW (NEF) files. That leaves just three characters for the manufacturer (and you) to use. Nikon, Sony, and some other vendors use DSC (which may or may not stand for Digital Still Camera, depending on who you ask), while Canon prefers IMG. The remaining four characters are used for numbers from 0000 to 9999, which is why your Z6 “rolls over” to DSC_0000 again when the 9999-number limitation is reached.
When you select File Naming in the Photo Shooting menu, you’ll be shown the current settings for both sRGB (and RAW) and Adobe RGB. Press the right multi selector button, and you’ll be taken to the (mostly) standard Nikon text entry screen described above and allowed to change the DSC value to something else. In this version of the text entry screen, however, only the numbers from 0 to 9 and characters A–Z are available; the file name cannot contain other characters. As always, press the Zoom In button to confirm your new setting.
Because the default DSC characters don’t tell you much, don’t hesitate to change them to something else. I use NZ6 for my Z6 and 850 for my Nikon D850. If you don’t need to differentiate between different camera models, you can change the three characters to anything else that suits your purposes, including your initials (DDB_ or JFK_, for example), or even customize for particular shooting sessions (EUR_, GER_, FRA_, and JAP_ when taking vacation trips). You can also use the file name flexibility to partially overcome the 9999-numbering limitation. You could, for example, use the template Z61_ to represent the first 10,000 pictures you take with your Z6, and then Z62_ for the next 10,000, and Z63_ for the 10,000 after that.
That’s assuming you don’t rename your image files in your computer. In a way, file naming verges on a moot consideration, because they apply only to the images as they exist in your camera. After (or during) transfer to your computer, you can change the names to anything you want, completely disregarding the 8.3 limitations (although it’s a good idea to retain the default extensions). If you shot an image file named DSC_4832.jpg in your camera, you could change it to Paris_EiffelTower_32.jpg later. Indeed, virtually all photo transfer programs allow you to specify a template and rename your photos as they are moved or copied to your computer from your camera or memory card.
I usually don’t go to that bother (I generally don’t use transfer software; I just drag and drop images from my memory card to folders I have set up), but renaming can be useful for those willing to take the time to do it.
Choose Image Area
Options: FX (36 × 24) (default); DX (24 × 16); 1:1 (24 × 24); 16:9 (36 × 20)
My preference: FX (36 × 24)
Here you can specify how the Z6 uses the available image area:
- Choose Image Area. You can manually specify the image area to be used, which the Z6 will apply regardless of what type of lens is mounted on the camera. Use this option to force the image area issue (as when you’re using a DX-format lens that the Z6 can’t detect automatically), or to use a particular image area for all your shots in a session. Your choices include:
- FX format (36 × 24). This is the full FX image format area, roughly 36mm × 24mm, producing a 24 MP image when Large is selected using the Image Size entry described shortly.
- DX format (24 × 16). This fills the image frame with the image in the center 24mm × 16mm of the sensor, creating a 1.5X crop factor. (See Chapter 7 for more about the crop factor and lenses.) Your final image will be about 19.5 MP.
- 1:1 (24 × 24). An image cropped to a square may be useful to emphasize a centered image, such as a close-up of a flower, when you want to direct the eye to the middle of the frame, rather than have it roam around within your image. The resulting 30 MP photo still has outstanding resolution even though you’re discarding pixels at left and right of the frame.
- 16:9 (36 × 20). This is a useful cropping that allows you to take still photos using the same 16:9 proportions as a high-definition movie frame. I like this crop when I’m producing storyboards for video productions, as my still image compositions will match the aspect ratio of the movies.
Image Quality
Options: NEF (RAW)+JPEG (Fine*, Fine, Normal*, Normal, Basic*, Basic), NEF (RAW), JPEG (Fine*, Fine, Normal*, Normal [default], Basic*, Basic), TIFF (RGB)
My preference: NEF (RAW)+JPEG Fine* for everyday shooting; JPEG Fine* for sports
As I noted in Chapter 3, you can choose the image quality settings used by the Z6 to store its files. You can use this menu entry, or, opt for the quickest way by pressing the i button, selecting the Image Quality entry (by default the second from the left in the top row), and either rotating the command dial or pressing the OK button to select quality from a screen of choices.
You can choose NEF (RAW) (only), NEF+ six different JPEG quality levels (Fine*, Fine, Normal*, Normal, Basic*, and Basic), or any of those six JPEG quality levels alone (with no NEF captured). TIFF (RGB) is also available. When you elect to store only JPEG versions of the images you shoot, you can save memory card space as you bypass the larger RAW files. Or, you can save your photos as RAW files, which consume more than twice as much space on your memory card. Or, you can store both at once as you shoot.
Many photographers choose to save both JPEG and a RAW, so they’ll have a JPEG version that might be usable as is, as well as the original “digital negative” RAW file in case they want to do some processing of the image later. You’ll end up with two different versions of the same file: one with a .jpg extension, and one with the .nef extension that signifies a Nikon RAW file.
To choose the combination you want using the menu system, access the Photo Shooting menu, scroll to Image Quality, and select it. Screens similar to the ones shown in Figure 11.7 (left and right) will appear. Scroll to highlight the setting you want, and either press OK or push the multi selector right button to confirm your selection.
In practice, you’ll probably use the JPEG Fine* and RAW+JPEG Fine* (with the “extra quality” star) selections most often. Why so many choices, then? There are some limited advantages to using some of the higher compression and lower resolution options. Settings that are less than max allow stretching the capacity of your memory card so you can shoehorn quite a few more pictures onto a single memory card. That can come in useful when on vacation and you’re running out of storage, or when you’re shooting non-critical work that doesn’t require 24 megapixels of resolution (such as photos taken for real estate listings, web page display, photo ID cards, or similar applications). Some photographers like to record RAW+JPEG Basic so they’ll have a moderate-quality JPEG file for review only and no intention of using for editing purposes, while retaining access to the original full-resolution/uncompressed RAW file for serious editing.

Figure 11.7 You can choose RAW, JPEG, or RAW+JPEG formats here.
For most work, using lower resolution and extra compression is false economy. You never know when you might need that extra bit of picture detail. Your best bet is to have enough memory cards to handle all the shooting you want to do until you have the chance to transfer your photos to your computer or a personal storage device.
TIFF (RGB)
The TIFF format is a lossless uncompressed 8-bit format (at least, in its Nikon incarnation) that is preferred for some applications, such as stock photography. TIFFs are several times larger than RAW files, more than 60MB each when shot using the Large image size. And it takes a long time to store a TIFF file on a memory card (a second or two, at least), so most photographers don’t create TIFFs in the camera. It’s often a better idea to produce a TIFF file from a RAW file, because RAW/NEF files can contain up to 14 bits of information with potentially a wider range of colors captured. Nikon’s TIFF format files are reduced from the 12-bit or 14-bit image captured by the sensor to just 8 bits of information per color channel. One key advantage of capturing TIFF in the camera is that the file is noncompressed, with minimal camera processing, giving you the best ready-to-use image quality outside of a RAW file.
Optimal Quality or Optimal Size?
Nikon has merged the JPEG-oriented “Optimal Quality” and “Optimum Size” options offered with previous cameras into the Image Quality entry. The difference:
- Optimal Quality (marked with a star). Choose this option if you want to maintain the best image quality possible at a particular JPEG setting and don’t care if the file size varies. Because the Z6 will use only the minimum amount of compression required at each JPEG setting, file size will vary depending on scene content, and your buffer may hold fewer images during continuous shooting. If you’re not shooting continuously, this setting will provide optimum image quality. Figure 11.8 shows a cropped portion of an image recorded with Optimal Quality (top) and one in which Size Priority was used to provide extra compression (bottom).
- Size Priority (no star). When this option is selected, the Z6 will create files that are fairly uniformly sized JPEG images. Because some photos have content that is more easily compressible (for example, plain areas of sky can be squeezed down more than areas filled with detail), to maintain the standard file size the camera must apply more compression to some images, and less to others. As a result, there may be a barely noticeable loss of detail in the more heavily compressed images. The uniform file size also means that the Z6’s buffer will hold the maximum number of shots during continuous shooting, allowing you to shoot longer sequences without the need to pause and wait for some images to be written to the memory card. In practice, you may find you can shoot continuously until the memory card fills.

Figure 11.8 At low levels of JPEG compression, the image looks sharp even when you enlarge it enough to see the actual pixels (top); when using extreme JPEG compression (bottom), an image obviously loses quality.
JPEG vs. RAW
You’ll sometimes be told that RAW files are the “unprocessed” image information your camera produces, before it’s been modified. That’s nonsense. RAW files are no more unprocessed than your camera film is after it’s been through the chemicals to produce a negative or transparency. A lot can happen in the developer that can affect the quality of a film image—positively and negatively—and, similarly, your digital image undergoes a significant amount of processing before it is saved as a RAW file. Nikon even applies a name (EXPEED 6) to the digital image processing (DIP) chip used to perform this magic.
A RAW file is more similar to a film camera’s processed negative. It contains all the information, captured in 12-bit or 14-bit channels per color (and stored in a 16-bit space), with no sharpening and no application of any special filters or other settings you might have specified when you took the picture. Those settings are stored with the RAW file so they can be applied when the image is converted to a form compatible with your favorite image editor. However, using RAW conversion software such as Adobe Camera Raw or Nikon Capture NX-D, you can override those settings and apply settings of your own. You can select essentially the same changes there that you might have specified in your camera’s picture-taking options.
RAW exists because sometimes we want to have access to all the information captured by the camera, before the camera’s internal logic has processed it and converted the image to a standard file format. Even Compressed RAW doesn’t save as much space as JPEG. What it does do is preserve all the information captured by your camera after it’s been converted from analog to digital form.
So, why don’t we always use RAW? Some photographers avoid using Nikon’s RAW NEF files on the misguided conviction that they don’t want to spend time in post-processing, forgetting that, if the camera settings you would have used for JPEG are correct, each RAW image’s default attributes will use those settings and the RAW image will not need much manipulation. Post-processing in such cases is optional, and overwhelmingly helpful when an image needs to be fine-tuned.
Although some photographers do save only in RAW format, it’s more common (and frequently more convenient) to use RAW plus one of the JPEG options, or, if you’re confident about your settings, just shoot JPEG and eschew RAW altogether. In some situations, working with a RAW file can slow you down a little. RAW images take longer to store on the memory card, and must be converted from RAW to a format your image editor can handle, whether you elect to go with the default settings in force when the picture was taken, or make minor adjustments to the settings you specified in the camera.
As a result, those who depend on speedy access to images or who shoot large numbers of photos at once may prefer JPEG over RAW. Wedding photographers, for example, might expose several thousand photos during a bridal affair and offer hundreds to clients as electronic proofs for inclusion in an album. Wedding shooters take the time to make sure that their in-camera settings are correct, minimizing the need to post-process photos after the event. Given that their JPEGs are so good, there is little need to get bogged down shooting RAW.
Sports photographers also avoid RAW files. I recently photographed an air show that was an all-day affair, and, to make sure I didn’t miss any peak moments as the aircraft flyovers, military sky-divers, and other action unfolded, I set my camera at the maximum rate and fired away. I managed to shoot 7,200 photos in a single day. I certainly didn’t have any plans to do post-processing on very many of those shots, so carefully exposed and precisely focused JPEG images were my file format of choice that day.
JPEG was invented as a more compact file format that can store most of the information in a digital image, but in a much smaller size. JPEG predates most digital SLRs and was initially used to squeeze down files for transmission over slow dial-up connections. Even if you were using an early dSLR with 1.3 MP files for news photography, you didn’t want to send them back to the office over the telephone line communications that were common before high-speed Internet links became dominant.
HIDDEN JPEGS
You may not be aware that your RAW file contains an embedded JPEG file, hidden inside in the JPEG Basic format. It’s used to provide thumbnail previews of JPEG files, which is why you may notice an interesting phenomenon when loading a RAW image into a program like Nikon Capture NX or Adobe Lightroom. When the software first starts interpreting the RAW image, it may immediately display this hidden JPEG view which has, as you might expect, all the settings applied that you dialed into the camera. Then, as it finishes loading the RAW file, the application (Lightroom in particular) uses its own intelligence to fine-tune the image and display what it thinks is a decent version of the image, replacing the embedded JPEG. That’s why you may see complaints that Lightroom or another program is behaving oddly: the initial embedded JPEG may look better than the final version, so it looks as if the application is degrading the image quality as the file loads. Of course, in all cases, once the RAW file is available, you can make your own changes to optimize it to your taste.
There is a second use for these hidden JPEG files. If you shoot RAW without creating JPEG files and later decide you want a JPEG version, there are dozens of utility programs that will extract the embedded JPEG and save it as a separate file. (Google “JPEG extractor” to locate a freeware program that will perform this step for your Mac, PC, or other computer.)
But, as I noted, JPEG provides smaller files by compressing the information in a way that loses some image data. JPEG remains a viable alternative because it offers several different quality levels. At the highest quality Fine level, you might not be able to tell the difference between the original RAW file and the JPEG version.
In my case, I shoot virtually everything at RAW+JPEG Fine*. Most of the time, I’m not concerned about filling up my memory cards as I usually have my 128GB Sony G XQD memory cards, and several more Sony G and Lexar 64GB XQD cards with me. I also use a MacBook Air with an external 1TB hard drive. When shooting sports, I’ll shift to JPEG Fine (with no RAW file) to squeeze a little extra speed out of my camera’s continuous shooting mode, and to reduce the need to wade through eight-photo bursts taken in RAW format.
Image Size
Options: JPEG/TIFF: Large (default), Medium, Small; NEF (RAW): RAW L, RAW M, RAW S
My preference: Large
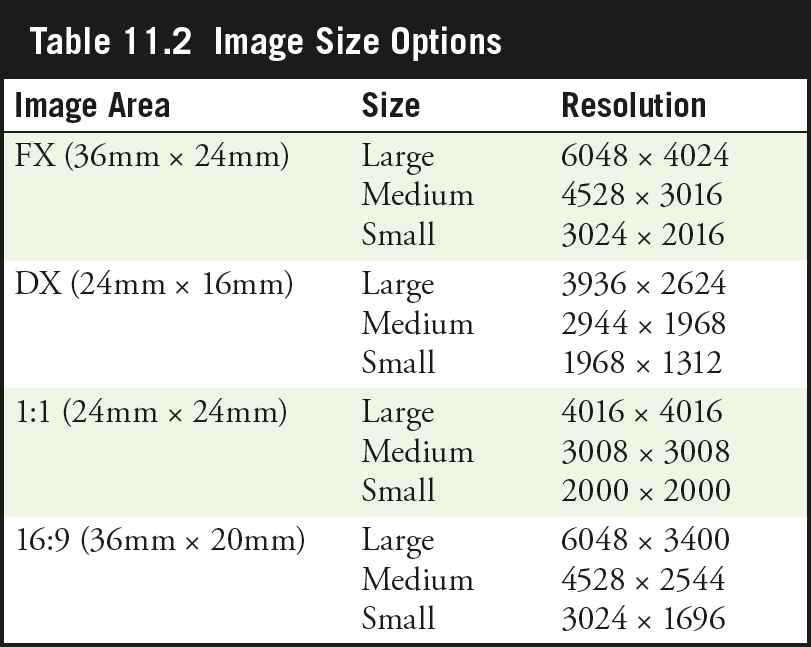
The next menu command in the Photo Shooting menu lets you select the resolution, or number of pixels captured as you shoot with your Nikon Z6. You can specify those sizes separately for both JPEG/TIFF files and 12-bit lossless compressed NEF (RAW) files. (Other RAW formats are available only in Large size.) Your choices and the resolutions are shown in Table 11.2.
Select image sizes using this menu entry or by pressing the i button and accessing the Image Size option (located by default in the second row underneath the Image Quality setting). Rotate either command dial or press OK to select size from a screen.
NEF (RAW) Recording
Options: NEF (RAW) Compression: Lossless compressed (default), Compressed, Uncompressed; NEF (RAW) Bit Depth: 12 bit, 14 bit (default)
My preference: Lossless compressed, 14 bit
When you’ve selected any NEF (RAW) setting for Image Quality, you can choose the type (amount) of compression applied to NEF (RAW) files as they are stored on your memory card, and whether the images are stored using 12-bit or 14-bit depth. The default values for type (Lossless compressed) and color depth (14 bit) work best for most situations, but there are times when you might want to use one of the other choices, as I’ll explain later in this section. (Figure 11.7, earlier, shows the options available in the long, scrolling list.)
Compression is a mathematical technique for reducing the size of a collection of information (such as an image; but other types of data or even programs can be compressed, too) in order to reduce the storage requirements and/or time required to transmit or transfer the information. Some compression algorithms arrange strings of bits that are most frequently used into a table, so that a binary number like, say, 1001011011100111 (16 digits long) doesn’t have to be stored as two 8-bit bytes every time it appears in the image file. Instead, a smaller number that points to that position in the table can be used. The more times the pointer is used rather than the full number, the more space is saved in the file. Such a compression scheme can be used to reproduce exactly the original string of numbers, and so is called lossless compression.
Other types of compression are more aggressive and actually discard some of the information deemed to be redundant from a visual standpoint, so that, theoretically, you won’t notice that details are missing, and the file can be made even more compact. The Nikon Z6’s RAW storage routines can use this kind of size reduction, which is called lossy compression, to reduce file size by up to about half with very little effect on image quality. JPEG compression can be even more enthusiastic, resulting in images that are 15X smaller (or more) and which display noticeable loss of image quality. You can choose NEF (RAW) compression and NEF (RAW) bit depth (see Figure 11.9, left).
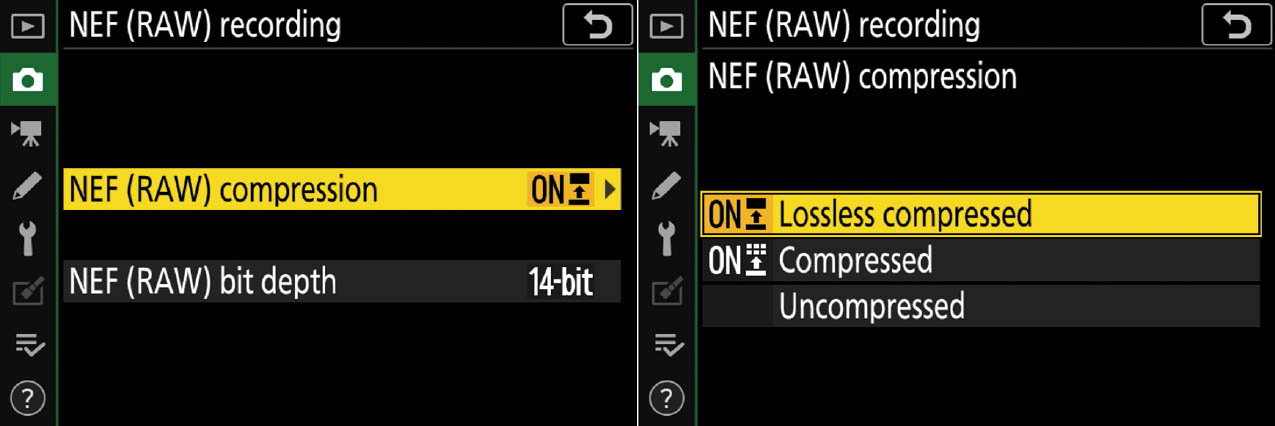
Figure 11.9 Your Image Quality choices occupy two scrolling screens.
Under Type in the NEF (RAW) Recording menu, you can select from (see Figure 11.9, right):
- Lossless compressed. This is the default setting, and uses what you might think of as reversible algorithms that discard no image information, so that the image can be compressed from 20 to 40 percent for a significantly smaller file size. The squeezed file can always be restored to its original size precisely, with no effect on image quality.
- Compressed. Use this setting if you want to store more images on your memory card and are willing to accept a tiny potential loss in image quality in the highlights, after significant editing. (I’ve never been able to detect any effect at all.) The Z6 can achieve from 40 to 55 percent compression with this option. It uses a two-step process, first grouping some very similar tonal values in the mid-tone and lighter areas of the image together, and then storing each group as a single value, followed by a lossless compression scheme that is applied to the dark tones, further reducing the file size. The process does a good job of preserving tones in shadow areas of an image, with only small losses in the midtone and lighter areas. The differences may show up only if you perform certain types of extensive post-processing on an image, such as heavy image sharpening or some types of tonal corrections.
- Uncompressed. NEF images are stored without any compression applied. These files are larger and take longer to write to your memory card. In practice, there is little benefit from using this option.
The Bit Depth setting is another option that looks good on paper but, in the real world, is less useful than you might think. For most applications, the default value that produces 14-bit image files is probably your best choice, especially if you’re exposing images that will be combined using HDR (high dynamic range) software later. In that case, you can definitely gain some extra exposure “headroom” using 14-bit processing. The 12-bit setting saves some space and speeds up processing, but costs you a detectable amount of highlight detail.
As you may know, bit depth is a way of measuring the amount of color data that an image file can contain. What we call “24-bit color” actually consists of three channels of information—red, green, and blue—with one 8-bit bit assigned to each channel, so a 24-bit image contains three 8-bit channels (each with 256 different shades of red, green, or blue). A 24-bit color image can contain up to 16.8 million different colors (256 × 256 × 256; you do the math). Because each of the red, green, and blue channels always is stored using the same number of bits, it’s become the custom to refer only to the channel bit depth to describe the amount of color information that can be collected.
So, when we’re talking about 12-bit color, what we really mean are three 12-bit RGB channels, each capable of recording colors from 000000000000 to 111111111111 hues in a particular channel (in binary), or 4,096 colors per channel (decimal), and a total of 68,719,476,736 (68.7 billion) different hues. By comparison, 14-bit color offers 16,384 colors per channel and a total of 4,398,046,391,104 (4.4 trillion) colors.
The advantage of having such a humongous number of colors for an image that will, in the end, be boiled down to 16.8 million hues in Photoshop or another image editor is that, to simplify things a little, there is a better chance that the mere millions of colors you end up with have a better chance of being the right colors to accurately represent the image. For example, if there are subtle differences in the colors of a certain range of tones that represent only, say, 10 percent of a channel’s colors, there would be only 26 colors to choose from in an 8-bit channel, but 410 colors in a 12-bit channel, and a whopping 1,638 colors in a 14-bit channel. The larger number of colors improves the odds of ending up with accurate hues.
It’s not quite that simple, of course, because bit depth also improves the chances of having the right number of colors to choose from after the inevitable loss of some information due to noise and other factors. But in the real world, the difference between 26 colors and 410 colors is significant (which is why digital cameras always capture at least 12 bits per channel), and the difference between 12 bits and 14 bits (410 and 1,638 colors, respectively, in our example) is less significant. Because there is a penalty in terms of file size and the amount of time needed to process the image as it is recorded to your memory card, 14 bits per channel is not always your best option. Your two choices look like this:
- 12 bit. Images are recorded at 12 bits per channel in the RAW file, and end up with 12 bits of information per channel that is translated during conversion for your image editor either into 12 bits within a 16-bits-per-channel space or interpreted down to 8 bits per channel.
- 14 bit. This is the default bit depth for the Nikon Z6. At this setting, the Z6 grabs 16,384 colors per channel instead of 4,096, ending up as 14 bits in a 16-channel space or reduced to 256 colors by the RAW conversion software that translates the image for your image editor. You’ll find that such 14-bit files end up almost one-third larger than 12-bit files. 14-bit images are great for HDR photography.
ISO Sensitivity Settings
Options: ISO sensitivity: 100–51200, plus Lo 1 to Lo 0.3 and Hi 0.3 to Hi 2; Auto ISO Sensitivity Control: Maximum Sensitivity, Maximum Sensitivity with Flash, and Minimum Shutter Speed
My preference: Varies by subject type
You can make direct ISO settings without resorting to this menu entry. Just press the ISO button, located just south of the shutter release, and then rotate the front control dial to switch between Auto ISO and fixed ISO settings, and the rear dial to select specific ISO values.
This menu entry has two parts, which give you more flexibility through its ISO Sensitivity and Auto ISO Sensitivity Control adjustments. The former is simply a screen that allows you to specify the ISO setting, just as you would by spinning the main command dial while holding down the ISO button on the top-right panel of the Z6. The available settings range from Lo 1 (ISO 50 equivalent) through ISO 100–51200 to Hi 1–Hi 2 (ISO 204,800 equivalent). The available settings are determined by the size of the increment you’ve specified in Custom Setting b1: 1/3-, 1/2-, or 1-step values. Use the ISO Sensitivity menu when you find it more convenient to set ISO using the color LCD monitor.
The Auto ISO Sensitivity Control menu entry lets you specify how and when the Z6 will adjust the ISO value for you automatically under certain conditions. This capability can be potentially useful, although experienced photographers tend to shy away from any feature that allows the camera to change basic settings like ISO that have been carefully selected. But you needn’t fear Auto ISO. You can set some firm boundaries so the Z6 will use this adjustment in a fairly intelligent way.
When Auto ISO is activated, the camera can bump up the ISO sensitivity, if necessary, whenever an optimal exposure cannot be achieved at the current ISO setting. Of course, it can be disconcerting to think you’re shooting at ISO 400 and then see a grainier ISO 6400 shot during LCD review. While the Z6 provides a flashing ISO-Auto alert in the viewfinder and control panel, the warning is easy to miss. Here are the important considerations to keep in mind when using the options available for this feature:
- Off. Set Auto ISO Sensitivity Control to Off, and the ISO setting will not budge from whatever value you have specified. Use this setting when you don’t want any ISO surprises, or when ISO increases are not needed to counter slow shutter speeds. For example, if the Z6 is mounted on a tripod, you can safely use slower shutter speeds at a relatively low ISO setting, so there is no need for a speed bump. On the other hand, if you’re hand-holding the camera and the Z6, set for Program (P) or Aperture-priority (A) mode, wants to use a shutter speed slower than, say, 1/30th second, it’s probably a good idea to increase the ISO to avoid the effects of camera shake. If you’re using a longer lens, a shutter speed of 1/125th second or higher might be the point where an ISO bump would be a good idea. In that case, you can turn the automatic ISO sensitivity control on, or remember to boost the ISO setting yourself.
- Maximum sensitivity/Maximum sensitivity with flash. Use these parameters to indicate the highest ISO setting you’re comfortable having the Z6 set on its own. You can choose the max ISO setting the camera will use from ISO 200 up to ISO 51200, plus the two “expanded” settings all the way up to Hi 2. Use a low number if you’d rather not take any photos at a high ISO without manually setting that value yourself. Dial in a higher ISO number if getting the photo at any sensitivity setting is more important than worrying about noise. When using the Maximum Sensitivity with Flash setting, you can specify Same As Without Flash, so the camera will perform similarly both with and without an optional flash.
I’ve gotten surprisingly good results at ISO 25600; you should try it out yourself before ruling out this seemingly extreme ISO setting. Note that if you’ve selected an ISO setting that is higher than the Maximum Sensitivity you specify here, the Z6 will use the higher ISO value instead.
- Minimum shutter speed. This setting allows you to tell the Z6 how slow the shutter speed must be before the ISO boost kicks in, within the range of 30 seconds to 1/4,000th second. The default value is Auto. When Auto is highlighted, press the right multi selector button, and a screen appears allowing you to fine-tune Auto to respond Slower or Faster.
If you set a value manually, 1/30th second is a good choice, because for most shooters in most situations, any shutter speed longer than 1/30th is to be avoided, unless you’re using a tripod, monopod, or looking for a special effect. If you have steady hands, or the camera is partially braced against movement (say, you’re using that monopod), a slower shutter speed, down to 1 full second, can be specified. Similarly, if you’re working with a telephoto lens and find even a relatively brief shutter speed “dangerous,” you can set a minimum shutter speed threshold of 1/250th second. When the shutter speed is faster than the minimum you enter, Auto ISO will not take effect.
Your Z6 is one smart camera in Auto ISO mode. For example, if you accidentally set a minimum shutter speed that is faster or slower than you’ve specified in Custom Setting e1 (Flash Sync Speed) or Custom Setting e2 (Flash Shutter Speed), the camera will instead use a minimum shutter speed that is within the range set by e1 and e2. (You’ll find more on these Custom Settings in Chapter 12.)
You’ll recall that Program and Aperture-priority modes can adjust the camera’s shutter speed. When Auto ISO is active, the camera will adjust the ISO setting only if the minimum shutter speed specified here would produce underexposure. In all other cases, the Z6 will simply adjust the shutter speed to produce an appropriate exposure and not touch the ISO setting.
In addition, the camera is clever enough to try to use faster shutter speeds with telephoto lenses (which are more subject to camera-motion blur). This feature works only with autofocus lenses; older manual focus lenses not equipped with a CPU chip (described in Chapter 7) are not compatible with this extra function.
White Balance
Options: Auto: AUTO0 Keep White (default); AUTO1 Keep Overall Atmosphere; AUTO2 Keep Warm Lighting Colors; Presets: Natural Light Auto, Direct Sunlight, Cloudy, Shade, Incandescent, Fluorescent (seven types), Flash, Choose Color Temperature, Preset Manual
My preference: AUTO0 (Keep White)
This setting is the first on the next page of the Photo Shooting menu. (See Figure 11.10.) It lets you tweak the white balance setting the Z6 applies to JPEG images, and which it embeds in the RAW image for interpretation by your image editor when the NEF file is imported. Your camera has a bewildering array of white balance settings, including three Auto modes, and, in practice, all of them are, at best, a little bit wrong. However, many are close enough that you may not notice the difference; all the presets can be adjusted by you using white balance fine-tuning (as described in Chapter 8); and, when importing RAW files, you have even greater flexibility.
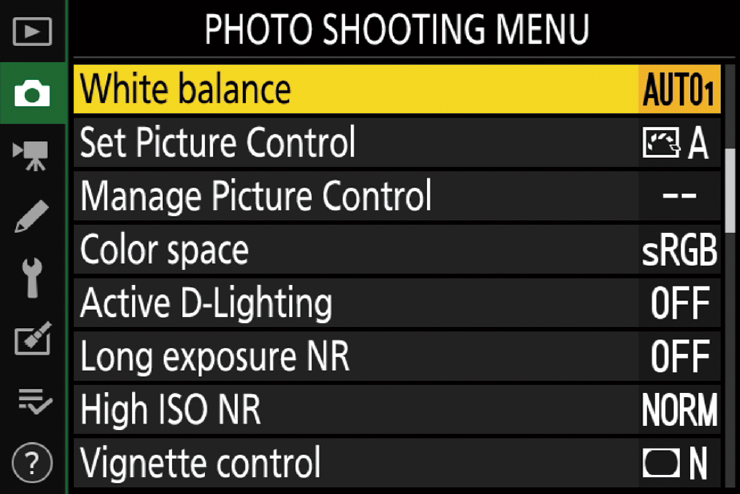
Figure 11.10 The next page of the Photo Shooting menu.
In addition to three varieties of full Auto white balance, this menu entry allows you to choose Natural Light Auto, Direct Sunlight, Cloudy, Shade, Incandescent, seven types of Fluorescent illumination, Flash, a specific color temperature of your choice, a preset value taken from an existing photograph, or a measurement you make. Some of the settings you make here can be duplicated using the Fn1 button on the front of the camera and main and sub-command dials, but the menus offer even more choices. Your white balance settings can have a significant impact on the color rendition of your images, as you can see in Figure 11.11.
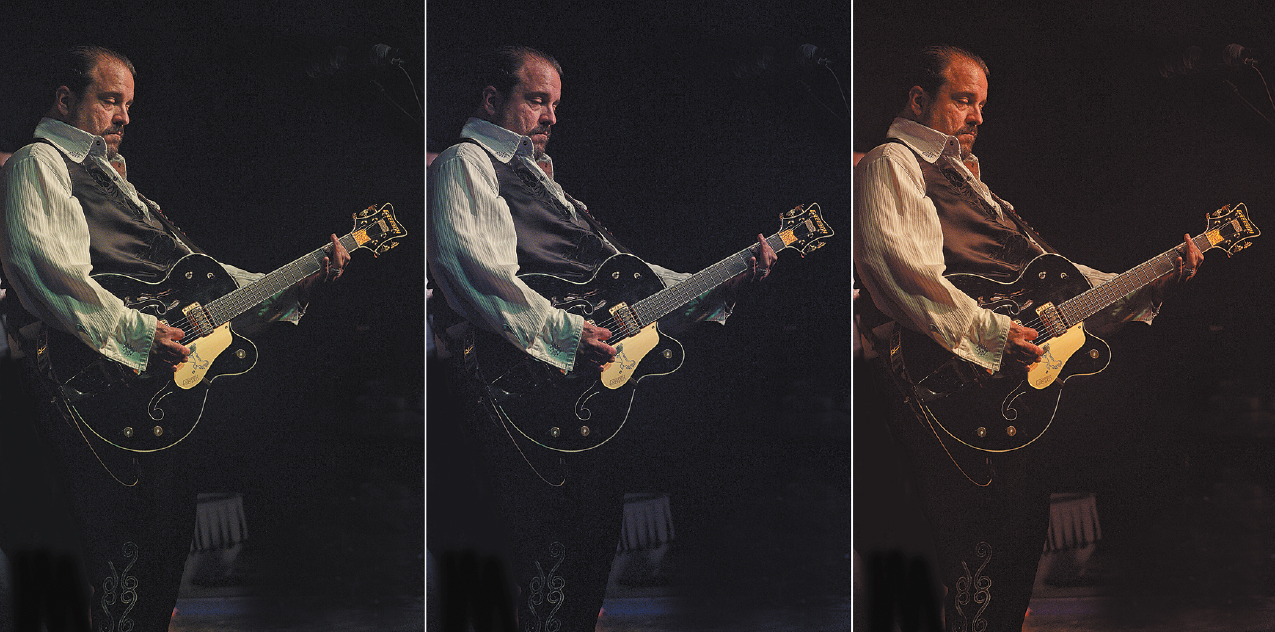
Figure 11.11 Adjusting color temperature can provide different results of the same subject at settings of 3,400K (left), 5,000K (middle), and 2,800K (right).
The fastest way to change white balance settings is to use direct setting controls. Hold down the Fn1 button, then rotate the main command dial to choose one of the main settings. Your choices appear on the LCD monitor as you dial. When Auto, Fluorescent, K (Choose Color Temperature), or PRE (Preset Manual) are shown, you can also select a sub-option by holding down the Fn1 button and rotating the sub-command dial. You can also press the i button, select the White Balance icon (by default the first entry on the left of the second row), and rotate the main command dial and sub-command dial, as described above. I’ll explain your options next.
This menu entry offers additional options, including fine-tuning presets and ability to capture and store custom preset color temperatures. Select the White Balance entry on the Photo Shooting menu, and you’ll see an array of choices like those shown in Figure 11.12. (Three additional choices: Flash, K (Choose Color Temp.), and PRE Preset Manual are not visible until you scroll down to them.) If you choose Fluorescent, you’ll be taken to another screen that presents seven different types of lamps, from sodium-vapor through warm-white fluorescent down to high-temperature mercury-vapor. If you know the exact type of non-incandescent lighting being used, you can select it, or settle on a likely compromise.
The Choose Color Temp. selection allows you to select from an array of color temperatures in degrees Kelvin (more on this in Chapter 8) from 2,500K to 10,000K, and then further fine-tune the color bias using the fine-tuning feature described below. Select Preset Manual to record or recall custom white balance settings suitable for environments with unusual lighting or mixed lighting, as described later in this section.
For all other settings, highlight the white balance option you want, then press the multi selector right button to view the fine-tuning screen shown in Figure 11.13 (and which uses the Auto setting as an example). The screen shows a grid with two axes, an amber-blue axis extending left/right, and a green-magenta axis extending up and down the grid. By default, the grid’s cursor is positioned in the middle, and a readout to the right of the grid shows the cursor’s coordinates on the A-B axis (yes, I know the display has the end points reversed) and G-M axis at 0,0.
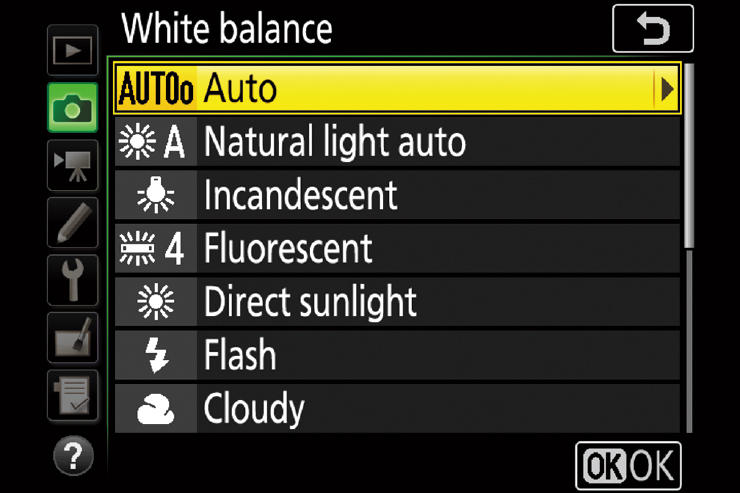
Figure 11.12 The White Balance menu has predefined values, plus the option of setting color temperature and presets you measure yourself.
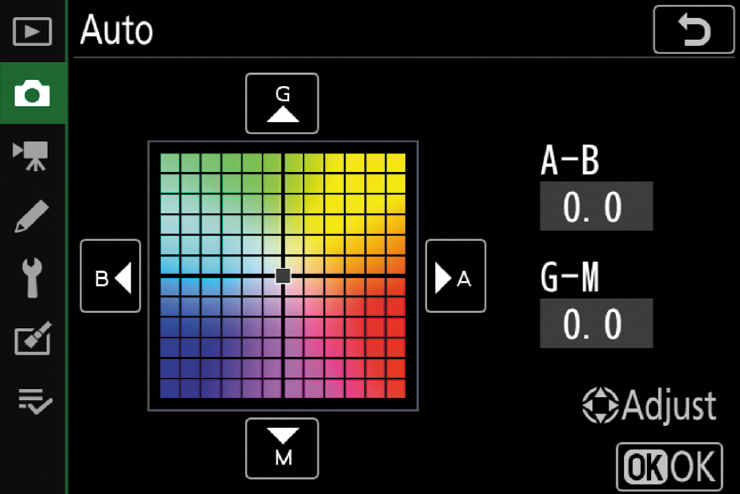
Figure 11.13 Specific white balance settings can be fine-tuned by changing their bias in the amber-blue or magenta-green directions—or along both axes simultaneously.
You can use the multi selector’s up/down and right/left buttons to move the cursor to any coordinate in the grid, thereby biasing the white balance in the direction(s) you choose. The amber-blue axis makes the image warmer or colder (but not actually yellow or blue). Similarly, the green-magenta axis preserves all the colors in the original image, but gives them a tinge biased toward green or magenta. Each increment equals about five mired units, but you should know that mired values aren’t linear; five mireds at 2,500K produces a much stronger effect than five mireds at 6,000K. If you really want to fine-tune your color balance, you’re better off experimenting and evaluating the results of a particular change.
When you’ve fine-tuned white balance, either using the Photo Shooting menu options or the defined WB button (Fn1 is the default), left/right triangles appear in the white balance section of the control panel at lower right to remind you that this tweaking has taken place.
Using Preset Manual White Balance
If automatic white balance or one of the predefined settings available aren’t suitable, you can set a custom white balance using the Preset Manual menu option. You can apply the white balance from a scene, either by shooting a new picture on the spot and using the resulting white balance (Direct Measurement) or using an image you have already shot (Copy from Existing Photograph). To use an existing preset or perform direct measurement from your current scene using a reference object (preferably a neutral gray or white object), follow these steps:
- 1. Use gray or white reference. Place the neutral reference, such as a white piece of paper or a gray card, under the lighting you want to measure. You can also use one of those white balance caps that fit on the front of your lens like a lens cap.
- 2. Choose Preset Manual. Press the i button, choose White Balance, and rotate the main command dial until Preset Manual (PRE) is selected.
- 3. To use an existing preset value: Rotate the main command dial until the white balance you have previously stored is highlighted (“slots” d-1 to d-6). (See Figure 11.14.)
- 4. To define a new preset: Rotate the main command dial until the slot (d-1 to d-6) you want to use as your white balance register is highlighted. (See Figure 11.15, left.) Press and hold OK until the PRE icons in the shooting display and control panel start to flash. A white balance target frame will appear. (See Figure 11.15, right.)
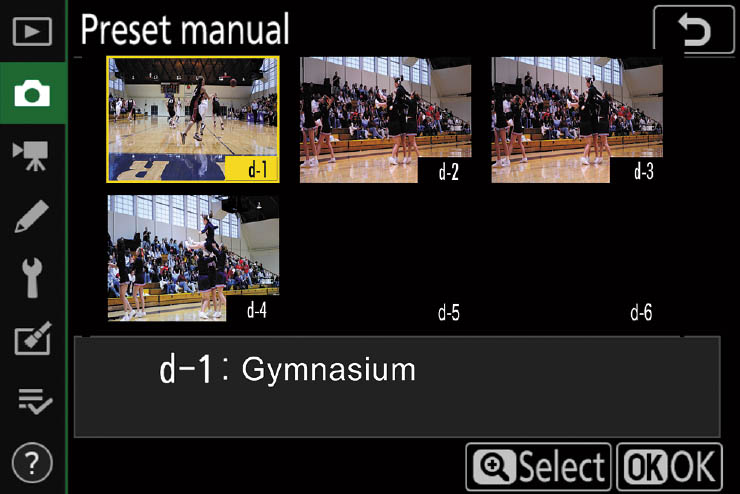
Figure 11.14 When you capture a scene’s white balance, it will be stored in the selected slot.
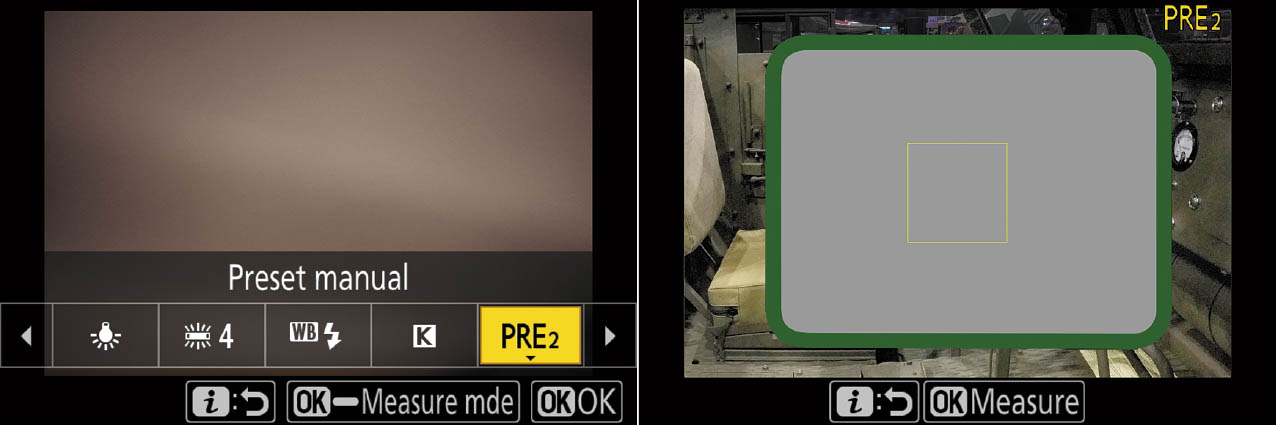
Figure 11.15 To define a new preset, highlight the slot (d-1 to d-6), left. Then capture a neutral white or gray target (right).
- 5. Measure White Balance. Tap the touch screen at the point where your gray or white reference appears, or use the multi selector to move the target frame over that area. (Note that you can’t relocate the frame if a flash is attached.) Then press OK again or press the shutter release down all the way.
- 6. Success? If the Z6 was able to capture the white balance information, a message Data Acquired appears. If it was unable to measure white balance, you’ll be asked to try again. (Try using a different target if you fail on successive attempts.)
The preset value you’ve captured will remain in the slot until you replace that white balance with a new captured value. It can be summoned at any time (use the i button menu or Fn1) and when PRE is chosen with the main command dial, select your preset by rotating the sub-command dial until the desired white balance slot is displayed on the control panel. You can also choose an existing image or protect a captured white balance from being over-written:
- 1. Choose Preset Manual from the White Balance menu.
- 2. A screen of thumbnails appears, showing the six “slots” numbered d-1 to d-6. Use the multi selector buttons to highlight one of the thumbnail slots, and press the multi selector center button.
- 3. The next screen that appears (see Figure 11.16) has four options: Fine-tune, Edit Comment, Select Image, and Protect.
- Choose Fine-tune to fine-tune the amber/blue/magenta/green white balance of an image already stored in one of the four user slots.
- Choose Edit Comment to add or change the comment applied to d-1 to d-6. The comment can be used as a label to better identify the white balance information in the slot, with terms like Gymnasium Daytime or Rumpus Room. (The standard Z6 text editing screen shown earlier in this chapter appears.)
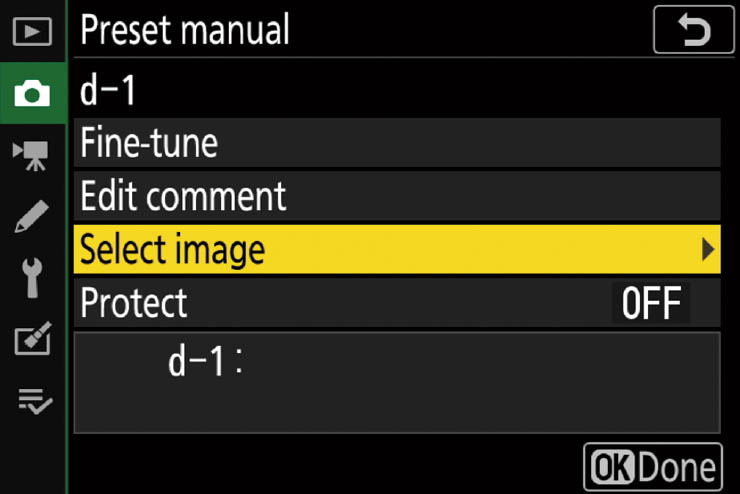
Figure 11.16 The Preset Manual screen lets you fine-tune preset white balance settings, label them with a comment, select an image to use as a white balance reference, and protect captured settings.
- Choose Select Image to view the Z6’s standard image selection screen and highlight and choose the existing image you want to use. Press the Zoom In button to confirm your choice and copy the white balance of the selected image to the slot you selected in Step 2.
- Choose Protect to lock the white balance setting currently stored in the selected slot. Use this to preserve a captured white balance setting.
- 4. Press OK to confirm your white balance setting.
A WHITE BALANCE LIBRARY
Consider dedicating a memory card to stow a selection of images taken under a variety of lighting conditions. If you want to “recycle” one of the color temperatures you’ve stored, insert the card and load one of those images into your choice of preset slots d-1 to d-6, as described above. XQD cards are a bit pricey to make a dedicated memory card, but I have some old 16GB cards and a compatible card reader that I use for this. (Some newer card readers can’t handle the original XQD media.)
Set Picture Control
Options: Auto (Default), Standard, Neutral, Vivid, Monochrome, Portrait, Landscape, Flat; Creative Picture Controls (01–20): Dream, Morning, Pop, Sunday, Somber, Dramatic, Silence, Bleached, Melancholic, Pure, Denim, Toy, Sepia, Blue, Red, Pink, Charcoal, Graphite, Binary, and Carbon
My preference: Standard: I can select other styles during RAW processing. Flat when extended dynamic range without HDR processing is needed.
Nikon has considerably expanded its Picture Control roster, adding 20 Creative Picture Controls that add special effects to your images as you shoot. The Picture Control styles allow you to choose your own sharpness (in three different ways, as I’ll explain shortly), plus adjust contrast, color saturation, and hue settings applied to your images when using P, S, A, and M modes. The three types of Picture Controls available:
- Original Picture Controls. Your Z6 has seven predefined styles, which it calls Original Picture Controls: Standard, Neutral, Vivid, Monochrome, Portrait, Landscape, and Flat. There is also an Auto setting, which examines your image and applies one of these seven controls as appropriate. Flat is a relatively new option, with an extended, low-contrast dynamic range that lends itself to fine-tuning in an image editor. Movie shooters who plan to process their clips also love the versatility of the Flat setting, which allows preserving detail in highlights and shadows when correcting (or “grading”) video in advanced movie-editing software.
Note that each of the seven predefined styles has its own default settings for Sharpening (with four different sharpening modes), Contrast, Brightness, Saturation, and Hue. (Monochrome does not have Saturation or Hue settings.) For example, the default Sharpening is +4 for Vivid and Landscape; +3 for Standard and Monochrome; +2 for Neutral and Portrait; and +1 for Flat. The other settings available for the preset styles have their own defaults. Any changes you make are edits of the default values defined for that particular style.
- Creative Picture Controls. These are 20 new special effects styles, each assigned a number from 1 to 20. Nikon has given a fanciful name to each Creative Picture Control that more or less provides a hint to how the effect modifies your image. The available creative styles include Dream, Morning, Pop, Sunday, Somber, Dramatic, Silence, Bleached, Melancholic, Pure, Denim, Toy, Sepia, Blue, Red, Pink, Charcoal, Graphite, Binary, and Carbon. These 20 additional Creative Picture Controls offer the same parameter adjustments as Original Picture Controls, plus an Effect Level slider for specifying the amount of the special effects provided, on a scale from 0 to 100 in increments of 11 steps. You can edit the parameters of these Picture Controls, too. I’ll explain Creative Picture Controls shortly.
- User Controls. You can define up to nine Picture Controls of your own, numbered C-1 to C-9. Each User Control is based on one of the 27 predefined styles (any of the 7 Original or 20 Creative Controls). You’ll use the Manage Picture Control entry (which follows this one).
While all the canned Original and Creative Picture Controls have their preset parameters, their most valuable trait is your ability to edit the settings of any of those 27 styles so they better suit your taste. You can adjust the existing styles, in which case an asterisk appears next to their name in the menus, or save your adjustments as a User Control. But wait, there’s more! You can copy these styles to a memory card, edit them on your computer, and reload them into your camera at any time. So, effectively, you can have several sets of custom Picture Control styles available: those currently in your camera, as well as a virtually unlimited library of user-defined styles that you have stored on memory cards or create using Capture NX-D or ViewNX-i (a Windows program).
Moreover, Nikon insists that these styles have been standardized to the extent that if you re-use a style created for one camera (say, your Z6) and load it into a different compatible camera (such as a Nikon D850), you’ll get substantially the same rendition. In a way, Picture Control styles are a bit like using a particular film. Do you want the look of Kodak Ektachrome or Fujifilm Velvia? (Even if you’ve never used these films, you’ve probably seen the results they produced.) Load the appropriate style created by you—or Google to find styles created by someone else.
As I’ve noted, using and fully managing Picture Control styles is accomplished using two different menu entries. This entry, Set Picture Control, has two functions: it allows you to choose an existing Original or Creative style and to edit any of those predefined styles that Nikon provides. The Photo Shooting menu entry that follows this one, Manage Picture Control, gives you the capability of creating and editing user-defined styles, using one of the canned Original or Creative Picture Controls as a foundation.
Choosing a Picture Control Style
To choose from one of the predefined Original or Creative styles or to select a user-defined style you’ve created, (numbered C-1 to C-9), follow these steps:
- 1. Choose Set Picture Control from the Photo Shooting menu. The screen shown in Figure 11.17 appears. Remember that Picture Controls that have been modified from their standard settings have an asterisk next to their name.
- 2. Scroll down to the Picture Control you’d like to use. Initially, only the seven shown appear on the screen. As you scroll down, the final Original control, Flat, appears, followed by the Creative Controls, and, at the tail end of several screens, any User Controls you have created.
- 3. Press OK to activate the highlighted style. (Although you can usually select a menu item by pressing the multi selector right button; in this case, that button activates editing instead.)
- 4. Press the MENU button or tap the shutter release to exit the menu system.

Figure 11.17 You can choose from Auto or the six predefined Picture Controls shown here, as well as the Flat predefined control, the Creative Picture Controls, and the User Controls located farther down the scrolling list.
Editing a Picture Control Style
You can change the parameters of any of Nikon’s predefined Original Picture Controls (including Auto), Creative Picture Controls, or any of the (up to) nine user-defined styles you create. You are given the choice of using the quick-adjust/fine-tune facility to modify a Picture Control with a few sliders. You can edit these controls using this Set Picture Control entry in the Photo Shooting menu, and can also edit them when you access a style from the i menu. To make quick adjustments to any Picture Control except the Monochrome style, follow these steps:
- 1. Choose Set Picture Control from the Photo Shooting menu.
- 2. Scroll down to the Picture Control you’d like to edit.
- 3. Press the multi selector right button to produce an adjustment screen similar to the one shown in Figure 11.18.
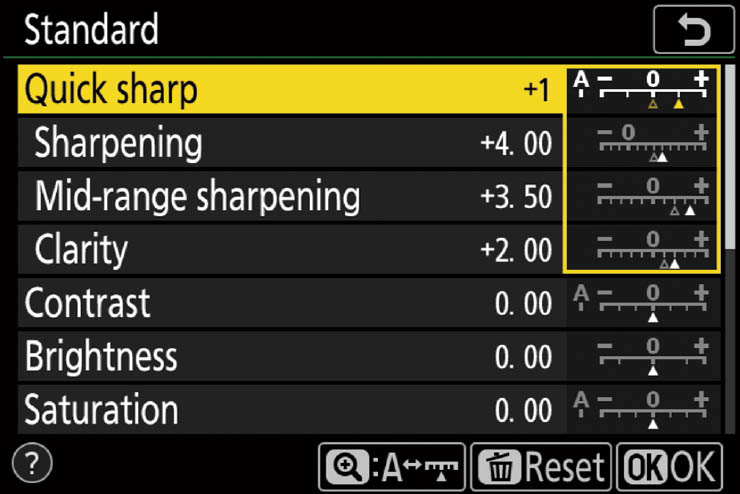
Figure 11.18 Sliders can be used to make quick adjustments to your Picture Control styles.
- 4. Use the Quick Sharp slider and the left/right buttons to change the three individual Sharpening adjustments (Sharpening, Mid-Range Sharpening, and Clarity) simultaneously. Alternatively, scroll down to each of those three adjustments and tweak Sharpening, Mid-Range Sharpening, or Clarity independently. (See the next section, “Super Sharpness,” for an explanation of the latter parameter.)
- 5. Next, scroll down to the Contrast, Brightness, Saturation, and Hue sliders with the multi selector up/down buttons, then use the left/right buttons to decrease or increase the effects. A gray triangle will appear under the original setting in the slider as you make a change. (Saturation and Hue cannot be adjusted for Monochrome.)
TIP
You can adjust the Auto Picture Control, but each of your modifications are applied on top of the Auto adjustments. That is, in Auto Picture Control mode, the Z6 will automatically adjust, say, Contrast, and then apply any contrast adjustments you have specified, in the range Auto–2 to Auto+2.
- 6. Instead of making changes with the slider’s scale, when you’re working with the Contrast and Saturation adjustments, you can move the cursor to the far left and choose A (for Auto) and the Z6 will adjust these parameters automatically, depending on the type of scene it detects.
- 7. Press the Trash button to reset the values to their defaults.
- 8. Press OK when you’re finished making adjustments.
PICTURE CONTROLS WITH THE i MENU
You can also perform the exact same functions just described using the i menu. Just press the i button, navigate to the Set Picture Control icon (located by default as the first icon in the top row) and rotate the main command dial if all you want to do is select a Picture Control from a scrolling list. If you’d like to edit the control, press OK. The scrolling list appears as at left in Figure 11.19. When you’ve highlighted the control you want to edit, press the down button to produce a screen like the one seen in Figure 11.19, right. The column at the far right contains all the parameters listed in Steps 4 and 5 above, while the adjustment slider for the currently highlighted parameter appears at the bottom. Once you’ve made your edits, press OK to confirm and exit, or the i button to exit without making changes.
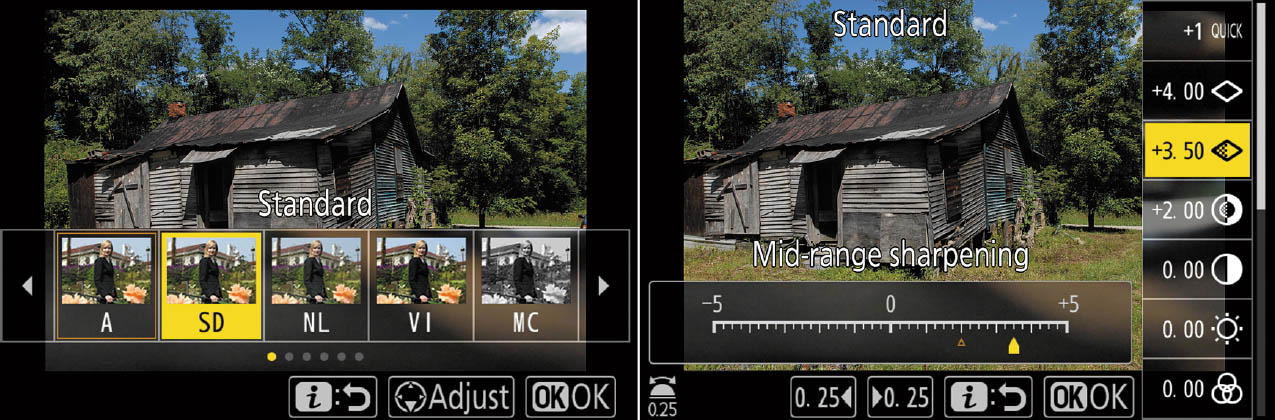
Figure 11.19 Picture Controls can be accessed and edited from the i menu.
Super Sharpness
Amateur photographers like to be told that their pictures will be “clear and sharp,” a simplification of picture quality that is likely to satisfy most of them. As an enthusiast, you know that many other factors also are part of image quality, including color, tonal range, and contrast. Indeed, sharpness itself is more complex than you might expect. Other parameters, such as Contrast, Brightness, Saturation, and Hue are virtually self-explanatory, because you’ve probably worked with them many times in Photoshop or another image editor.
When it comes to the adjustments you can make with the Z6 in terms of sharpness, there are three different parameters, and multiple ways of controlling them. The Z6’s Picture Controls have separate sliders for all three, plus a fourth slider, Quick Sharp, which adjusts all of the three simultaneously.
- Sharpening. This control affects the appearance of fine details and patterns, because it modifies the sharpness of the contours (edges) of your subjects. The lower the number, the softer those outlines will be; higher numbers produce more distinct details.
- Mid-range sharpening. Adjusts overall sharpness according to the fineness of patterns and lines in the mid-tones adjusted by the Sharpening and Clarity controls. In Movie mode, this parameter works only when Movie Quality has been set to High in the Movie Shooting menu.
- Clarity. This adjusts the overall sharpness of the image and the sharpness of thicker outlines without affecting brightness or dynamic range. Think of Clarity as a type of sharpening/enhancing effect applied to the mid-tones of an image. While sharpening generally adjusts only the contours of your subject matter, Clarity makes details sharper while maintaining the gradation of highlight and shadow areas. High values produce contrasty and vivid images with darkened colors and improved detail in the midtones. Low values reduce midtone detail and flatten colors. You might want to apply Clarity to make hazy or fog-clouded subjects look more clear without losing details, or when you want to soften hard-edge subjects. Your best bet is to play with the control to see how you like the results. The Z6 applies +1 Clarity by default to Standard, Vivid, Landscape, and Monochrome Picture Controls.
Editing the Monochrome Picture Control
Editing the Monochrome style is similar to customizing the other styles, except that the parameters differ slightly. Sharpening, Contrast, and Brightness are available, but, instead of Saturation and Hue, you can choose a filter effect (Yellow, Orange, Red, Green, or none) and a toning effect (black-and-white, plus seven levels of Sepia, Cyanotype, Red, Yellow, Green, Blue Green, Blue, Purple Blue, and Red Purple). (Keep in mind that once you’ve taken a JPEG photo using a Monochrome style, you can’t convert the image back to full color.) To adjust Filters or Toning:
- 1. Choose Set Picture Control from the Photo Shooting menu.
- 2. Scroll down to the Monochrome Picture Control.
- 3. Press the multi selector right button to produce an adjustment screen similar to the one shown in Figure 11.20.
- 4. Set Sharpening, Contrast, and Brightness exactly as you would with the other Picture Controls.
- 5. Optionally, scroll down to Filter Effects or Toning (which appears after Filter Effects in the scrolling list and is shown at the bottom of the figure).
- 6. When Filter Effects is highlighted, you can choose Off, Yellow, Orange, Red, or Green. Press OK to finish or Trash to reset to the original values.
- 7. When Toning is highlighted, you can press the left/right buttons to choose a tone: Black/White, Sepia, Cyanotype, Red, Yellow, Green, Blue Green, Blue, Purple Blue, or Red Purple. Once you’ve selected a tone (other than Black/White), press the down button to move to the intensity control, then use the left/right buttons to set a toning strength from +1 to +7. Press OK to confirm, or Trash to reset.
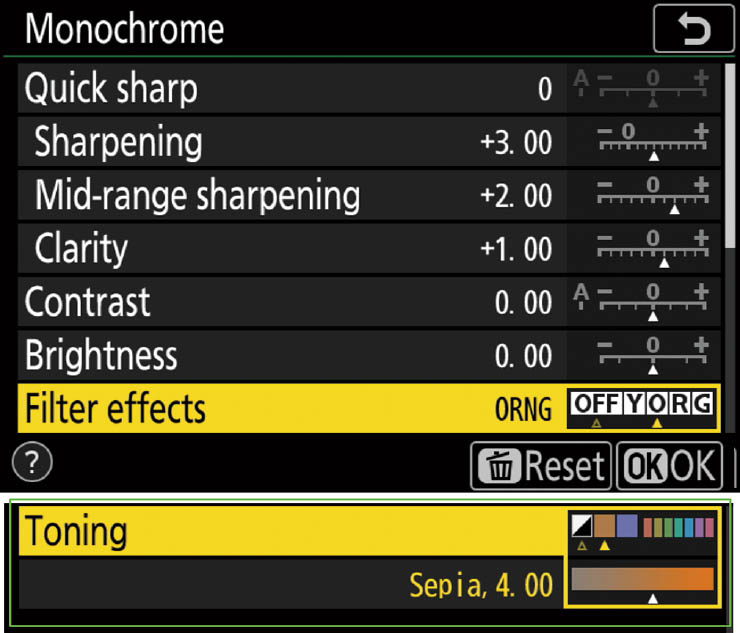
Figure 11.20 Editing Monochrome Picture Style parameters.
FILTERS VS. TONING
Although some of the color choices seem to overlap, you’ll get very different looks when choosing between Filter Effects and Toning. Filter Effects add no color to the monochrome image. Instead, they reproduce the look of black-and-white film that has been shot through a color filter. That is, Yellow will make the sky darker and the clouds will stand out more, while Orange makes the sky even darker and sunsets more full of detail. The Red filter produces the darkest sky of all and darkens green objects, such as leaves. Human skin may appear lighter than normal. The Green filter has the opposite effect on leaves, making them appear lighter in tone. Figure 11.21 at left shows the same scene shot with no filter, then Yellow, Green, and Red filters.
The Sepia, Blue, Green, and other toning effects, on the other hand, all add a color cast to your monochrome image. Use these when you want an old-time look or a special effect, without bothering to recolor your shots in an image editor. Toning is shown at right in Figure 11.21.
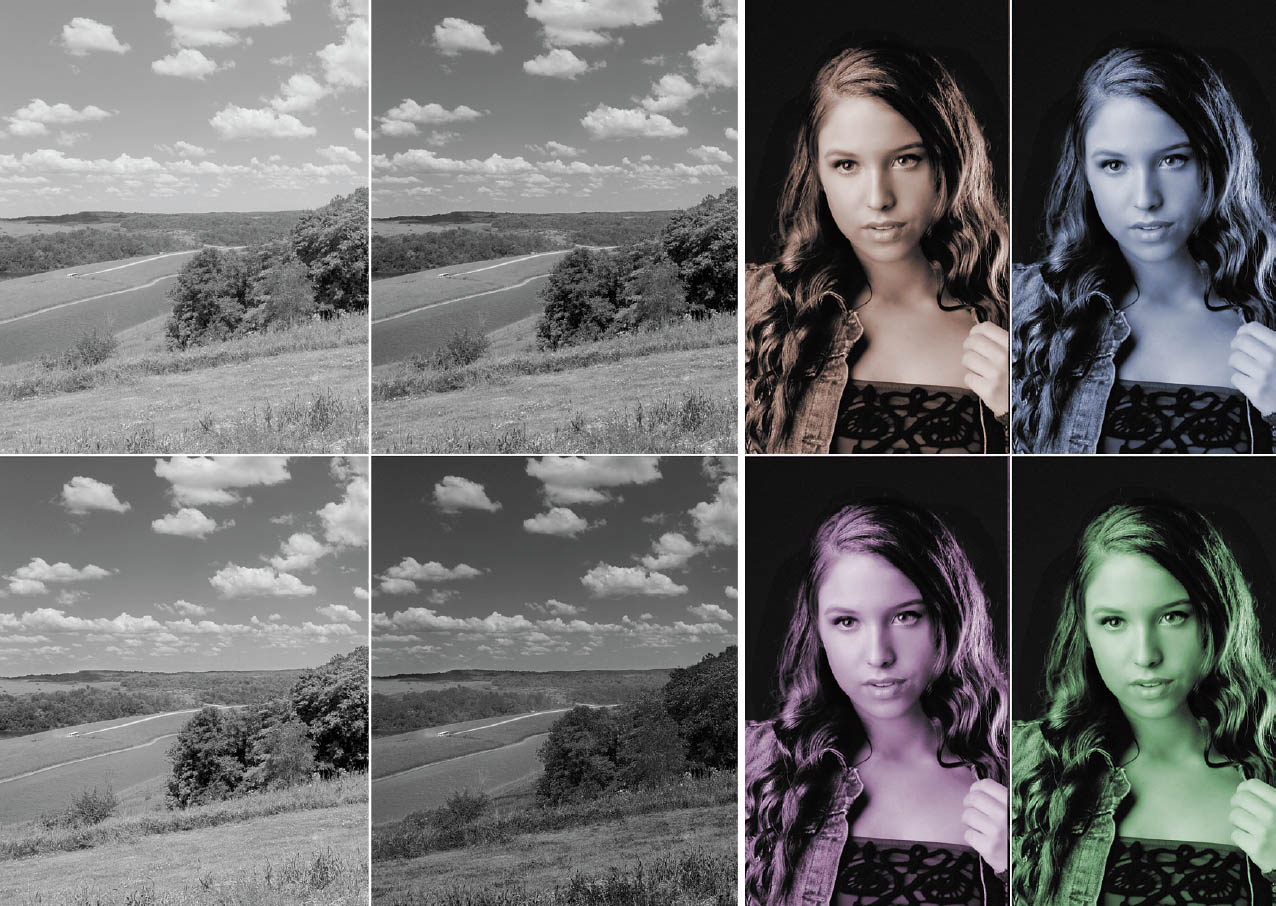
Figure 11.21 Left: Color filter effects: No filter (upper left); yellow filter (upper right); green filter (lower left); and red filter (lower right). Right: Toning effects: Sepia (upper left); Purple Blue (upper right); Red Purple (lower left); and Green (lower right).
Editing Creative Picture Controls
The Creative Picture Controls, located farther down the scrolling list after the predefined controls, have approximately the same adjustments found in the Original Picture Controls. However, you’ll probably find adjusting them to be trickier, because it can be difficult to see how a particular parameter applies to a particular special effect. For example, you know that the Vivid original style emphasizes color saturation but what, exactly, goes into making, say, the Dream creative style? Simply looking at samples with a particular effect applied may not help, as you can see in Figure 11.22. The differences between many of the controls is subtle. Charcoal, Graphite, Binary, and Carbon may differ primarily in amount of contrast, for example.
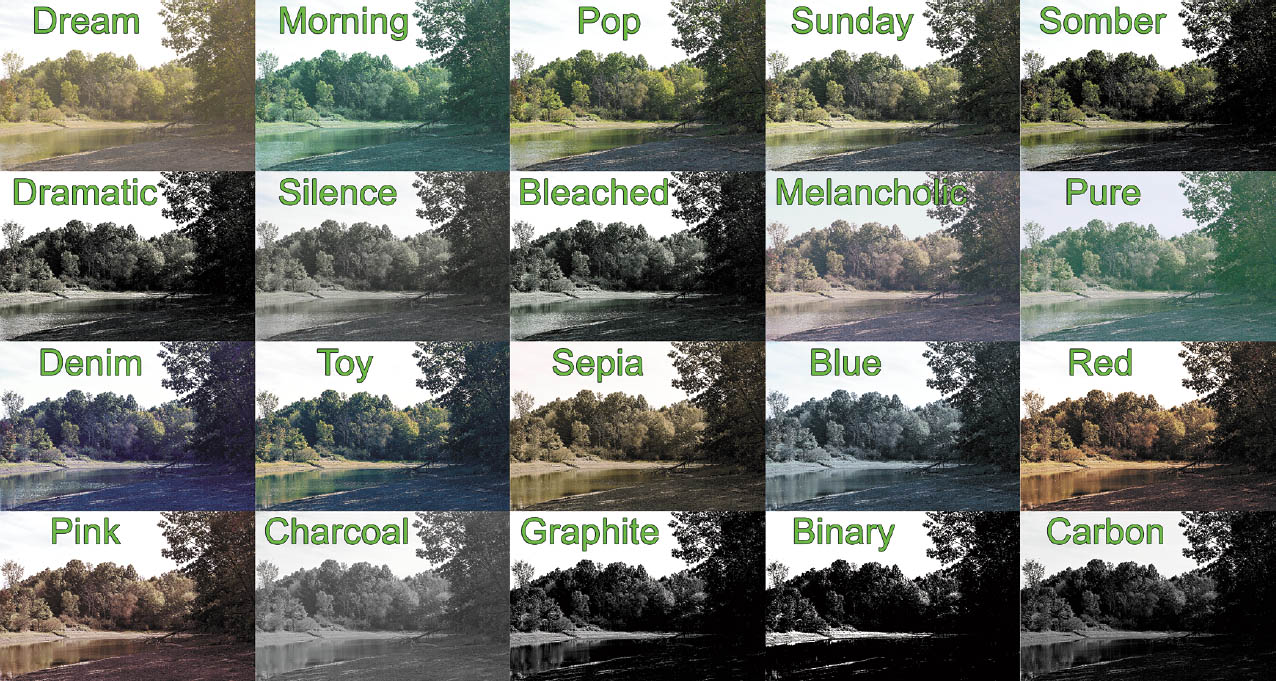
Figure 11.22 Creative Picture Controls.
Nikon provides some simplified descriptions, which may seem a little vague, like a New Age song title, forcing us poor users to evoke our own mental images with only fuzzy visual references. Nikon’s summaries are along these lines (for what it’s worth):
- Dream. Lightness, warmth, pale orange brightening darker areas with smooth edges and a soft appearance.
- Morning. Atmosphere of fresh morning air, dark areas brightened, with bluish tones with a sense of transparency. Refreshing image.
- Pop. Highest degree of saturation for more colorful tones and textures, even with brighter images.
- Sunday. Open atmosphere as if the image were captured on a Sunday afternoon. Increased contrast, blown highlights, for a stronger impression.
- Somber. Melancholic, calm atmosphere, like after a rain, with increased saturation and suppressing brightness.
- Dramatic. Profound expression emphasizing light and shade, suitable for dramatic expression of light.
- Silence. Transient and lonely contemplative feeling; tranquil, soft images with reduced saturation.
- Bleached. Serious impression with greenish, low-saturation images and metallic feel. Minutely rendered details with tasteful silvery tone.
- Melancholic. Retro expression with slightly melancholic atmosphere, magenta tinged, restrained sharpness and saturation.
- Pure. Soft image, as if viewed through a veil, with soft bluish tone, tranquil ambience.
- Denim. Deep tone, strong blue shifted toward cyan, high saturation.
- Toy. Inspired by toy cameras, but deeper and calmer impression, with high saturation, blue shifted toward indigo.
- Sepia. First of the true “color-influenced” Creative Picture Controls, provides sepia images with faded colors, similar to a colorized monochrome picture.
- Blue. Yet more melancholy, this time with a quiet, bluish tone, similar to cyanotypes.
- Red. Retro images with heavy red tone.
- Pink. No relation to Alecia Beth Moore (P!nk), but still able to deliver soft, gentle romantic tone with a pinkish atmosphere.
- Charcoal. Gentle, monochrome images resembling black-and-white drawings with minimal loss of detail in shadows and highlights, but softer edge sharpness.
- Graphite. Sharpened edges and lustrous blacks with crisp, accentuated contrast.
- Binary. Two-tone images for crisp black-and-white.
- Carbon. Stable, deep, dignified images with strong black-based gradation.
As the names and descriptions of each of these 20 Creative Picture Controls don’t adequately describe their effects, my recommendation is to evaluate each individually, and use the controls to tweak them to your preferences. The Dream style is shown in Figure 11.23 as an example. You can always adjust these styles and save them under a new name as a User Control, as I’ll describe in the Manage Picture Control section that follows.
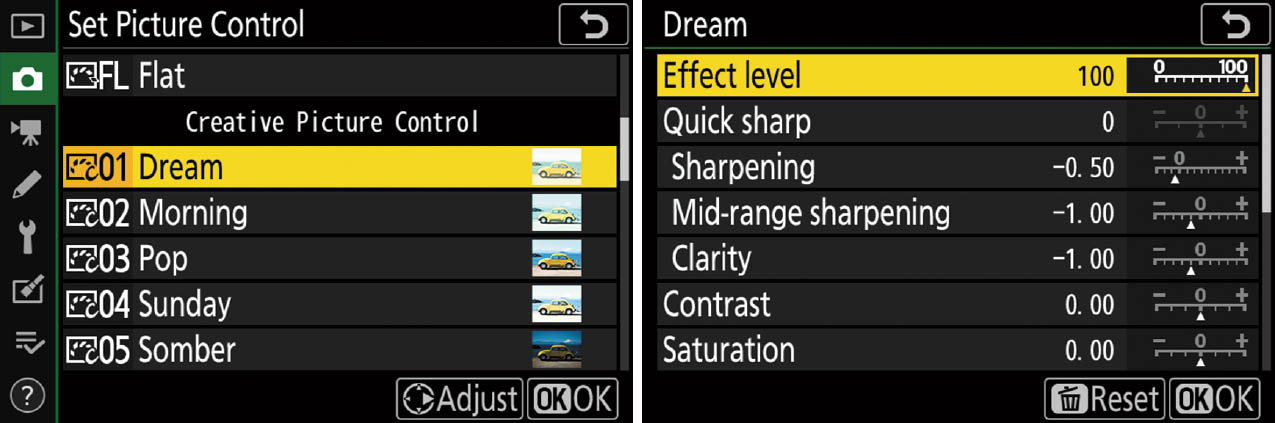
Figure 11.23 Adjusting Creative Picture Controls.
Manage Picture Control
Options: Save/Edit, Rename, Delete, Load/Save
My preference: N/A
The Manage Picture Control menu entry can be used to create new styles, edit existing styles, rename or delete them, and store/retrieve them from the memory card. Here are the basic functions of this menu item, which can be found on the Photo Shooting menu directly below the Set Picture Control entry:
- Make a copy. Choose Save/Edit (see Figure 11.24, left), select from the list of available Picture Controls, and press OK to store that style in one of the user-defined slots C-1 to C-9 (with slots C-1 to C-2 shown already occupied in Figure 11.24, right).
- Save an edited copy. Choose Save/Edit, select from the list of available Picture Controls, and then press the multi selector right button to edit the style, as described in the previous section. Press OK when finished editing, and then save the modified style in one of the user-defined slots C-1 to C-9.
- Rename a style. Choose Rename, select from the list of user-defined Picture Controls (you cannot rename the default styles), and then enter the text used as the new label for the style, using the standard Z6 text entry screen shown earlier in this chapter in Figure 11.5. You may use up to 19 characters for the name.
- Remove a style. Select Delete, choose from the list of user-defined Picture Controls (you can’t remove one of the default styles), press the multi selector right button, then highlight Yes in the screen that follows, and press OK to remove that Picture Control.
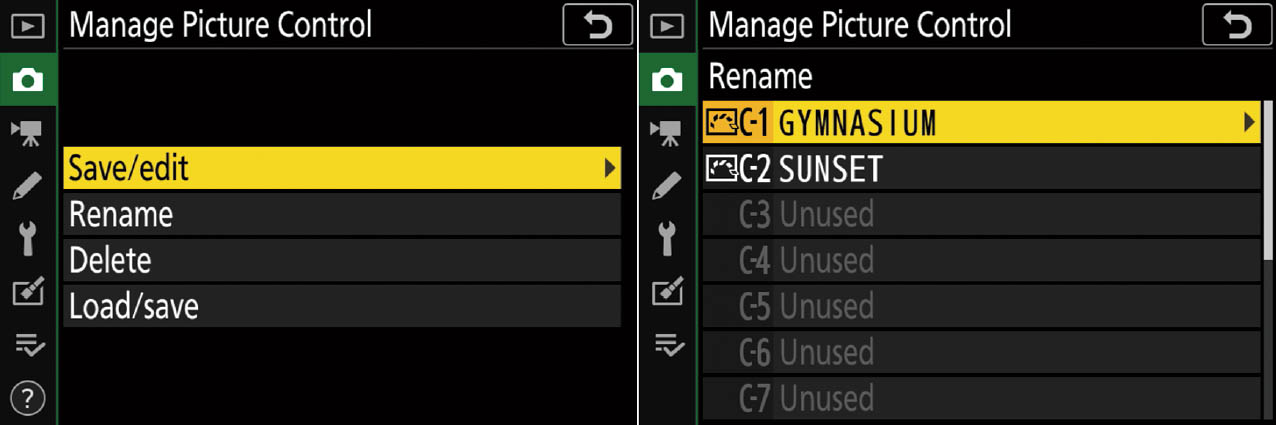
Figure 11.24 You can save, edit, rename, delete, or load and save Picture Controls (left). Picture Controls that you define can be stored in your Z6’s settings (right).
- Store/retrieve style on card. Choose Load/Save, then select Copy to Camera to locate a Picture Control on your memory card and copy it to the Z6; Delete from Card to select a Picture Control on your memory card and remove it; or Copy to Card to duplicate a style currently in your camera onto the memory card. This last option allows you to create and save on your Slot 1 card Picture Controls in excess of the nine that can be loaded into the camera at one time, for a maximum of 99 custom Picture Controls. Once you’ve copied a style to your memory card, you can modify the version in the camera, give it a new name, and, in effect, create a whole new Picture Control.
Color Space
Options: sRGB (default), Adobe RGB
My preference: Adobe RGB
The Nikon Z6’s Color Space option gives you two different color spaces (also called color gamuts), named Adobe RGB (because it was developed by Adobe Systems in 1998), and sRGB (supposedly because it is the standard RGB color space). These two color gamuts define a specific set of colors that can be applied to the images your Z6 captures.
You’re probably surprised that the Nikon Z6 doesn’t automatically capture all the colors we see. Unfortunately, that’s impossible because of the limitations of the sensor and the filters used to capture the fundamental red, green, and blue colors, as well as that of the phosphors used to display those colors on the LEDs in your camera and computer monitors. Nor is it possible to print every color our eyes detect, because the inks or pigments used don’t absorb and reflect colors perfectly.
On the other hand, the Z6 does capture quite a few more colors than we need. A basic 12-bit RAW image contains a possible 4.3 billion different hues (4,096 colors per red, green, or blue channel), which are condensed down to a mere 16.8 million possible colors when converted to a 24-bit (eight bits per channel) image. While 16.8 million colors may seem like a lot, it’s a small subset of 4.3 billion captured, and an even smaller subset of all the possible colors we can see. A 14-bit RAW image has even more possible colors—16,384 per color channel, or 281 trillion hues.
The set of colors, or gamut, that can be reproduced or captured by a given device (scanner, digital camera, monitor, printer, or some other piece of equipment) is represented as a color space that exists within the larger full range of colors. That full range is represented by the odd-shaped splotch of color shown in Figure 11.25, as defined by scientists at an international organization back in 1931. The colors possible with Adobe RGB are represented by the black triangle in the figure, while the sRGB gamut is represented by the smaller white triangle. The location of the corners of each triangle represent the position of the primary red, green, and blue colors in the gamut.
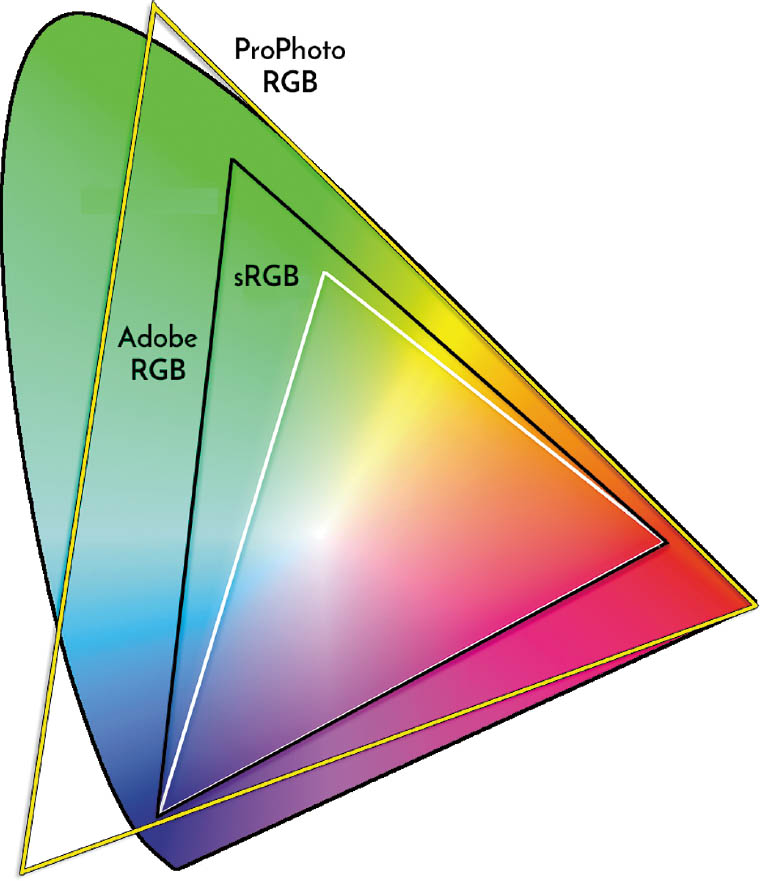
Figure 11.25 The outer curved figure shows all the colors we can see; the outlines show the boundaries of Adobe RGB (black triangle), sRGB (white triangle), and ProPhoto RGB (yellow triangle).
A third color space, ProPhoto RGB, represented by the yellow triangle in the figure, has become more popular among professional photographers as more and more color printing labs support it. While you cannot save images using the ProPhoto gamut with your Z6, you can convert your photos to 16-bit ProPhoto format using Adobe Camera RAW when you import RAW photos into an image editor. ProPhoto encompasses virtually all the colors we can see (and some we can’t), giving advanced photographers better tools to work with in processing their photos. It has richer reds, greens, and blues, although, as you can see from the figure, its green and blue primaries are imaginary (they extend outside the visible color gamut). Those with exacting standards need not use a commercial printing service if they want to explore ProPhoto RGB: many inkjet printers can handle cyans, magentas, and yellows that extend outside the Adobe RGB gamut.
Regardless of which triangle—or color space—is used by the Z6, you end up with some combination of 16.8 million different colors that can be used in your photograph. (No one image will contain all 16.8 million! To require that many, only about two pixels of any one color could be the same in a 36-megapixel image!) But, as you can see from the figure, the colors available will be different.
Adobe RGB, like ProPhoto RGB, is an expanded color space useful for commercial and professional printing, and it can reproduce a wider range of colors. It can also come in useful if an image is going to be extensively retouched, especially within an advanced image editor, like Adobe Photoshop, which has sophisticated color management capabilities that can be tailored to specific color spaces. As an advanced user, you don’t need to automatically “upgrade” your Z6 to Adobe RGB, because images tend to look less saturated on your monitor and, it is likely, significantly different from what you will get if you output the photo to your personal inkjet. (You can profile your monitor for the Adobe RGB color space to improve your on-screen rendition using widely available color-calibrating hardware and software.)
While both Adobe RGB and sRGB can reproduce the exact same 16.8 million absolute colors, Adobe RGB spreads those colors over a larger portion of the visible spectrum, as you can see in the figure. Think of a box of crayons (the jumbo 16.8 million crayon variety). Some of the basic crayons from the original sRGB set have been removed and replaced with new hues not contained in the original box. Your “new” box contains colors that can’t be reproduced by your computer monitor, but which work just fine with a commercial printing press. For example, Adobe RGB has more “crayons” available in the cyan-green portion of the box, compared to sRGB, which is unlikely to be an advantage unless your image’s final destination are the cyan, magenta, yellow, and black inks of a printing press.
The other color space, sRGB, is recommended for images that will be output locally on the user’s own printer, as this color space matches that of the typical inkjet printer fairly closely. You might prefer sRGB, which is the default for the Nikon Z6 and most other cameras, as it is well suited for the range of colors that can be displayed on a computer screen and viewed over the Internet. If you plan to take your image file to a retailer’s kiosk for printing, sRGB is your best choice, because those automated output devices are calibrated for the sRGB color space that consumers use.
BEST OF BOTH WORLDS
If you plan to use RAW+JPEG for most of your photos, go ahead and set sRGB as your color space. You’ll end up with JPEGs suitable for output on your own printer, but you can still extract an Adobe RGB version from the RAW file at any time. It’s like shooting two different color spaces at once—sRGB and Adobe RGB—and getting the best of both worlds.
Of course, choosing the right color space doesn’t solve the problems that result from having each device in the image chain manipulating or producing a slightly different set of colors. To that end, you’ll need to investigate the wonderful world of color management, which uses hardware and software tools to match or calibrate all your devices, as closely as possible, so that what you see more closely resembles what you capture, what you see on your computer display, and what ends up on a printed hardcopy. Entire books have been devoted to color management, and most of what you need to know doesn’t directly involve your Nikon Z6, so I won’t detail the nuts and bolts here.
To manage your color, you’ll need, at the bare minimum, some sort of calibration system for your computer display, so that your monitor can be adjusted to show a standardized set of colors that is repeatable over time. (What you see on the screen can vary as the monitor ages, or even when the room light changes.) I use the Spyder5 Pro monitor color correction system from Datacolor (www.datacolor.com) for my computer’s three 26-inch wide-screen LCD displays. The unit checks room light levels every five minutes, and reminds me to recalibrate every week or two using a small sensor device, which attaches temporarily to the front of the screen and interprets test patches that the software displays during calibration. The rest of the time, the sensor sits in its stand, measuring the room illumination, and adjusting my monitors for higher or lower ambient light levels.
If you’re willing to make a serious investment in equipment to help you produce the most accurate color and make prints, you’ll want a more advanced system (up to $500) like the various other Spyder products from Datacolor or Colormunki from X-Rite (www.colormunki.com).
Active D-Lighting
Options: Auto, Extra High, High, Normal, Low, Off (default for most modes)
My preference: Off
Active D-Lighting is a feature that improves the rendition of detail in highlights and shadows when you’re photographing high-contrast scenes. It’s closely related to D-Lighting, which is a “non-active” internal retouching option available from the Z6’s Retouch menu (and described in Chapter 13). Active D-Lighting, unlike the Retouch menu post-processing D-Lighting feature, applies its tonal improvements while you are actually taking the photo. That’s good news and bad news. It means that, if you’re taking photos in a contrasty environment, Active D-Lighting can automatically improve the apparent dynamic range of your image as you shoot, without additional effort on your part. However, you’ll need to disable the feature once you leave the high-contrast lighting behind, and the process does take some time. You wouldn’t want to use Active D-Lighting for continuous shooting of sports subjects, for example. There are many situations in which the selective application of D-Lighting using the Retouch menu is a better choice.
You have six choices: Auto, Extra High, High, Normal, Low, and Off (the default). You may need to experiment with the feature a little to discover how much D-Lighting you can apply to a high-contrast image before the shadows start to darken objectionably. Note that when this feature is activated, brightness and contrast Picture Control settings cannot be changed. Figure 11.26 shows a “before and after” example of Active D-Lighting applied to improve shadow detail. By the time the sample images shown have been half-toned and rendered to the printed page, the differences may be fairly subtle.
For best results, use your Z6’s Matrix metering mode, so the Active D-Lighting feature can work with a full range of exposure information from multiple points in the image. Active D-Lighting works its magic by subtly underexposing your image so that details in the highlights (which would normally be overexposed and become featureless white pixels) are not lost. At the same time, it adjusts the values of pixels located in midtone and shadow areas so they don’t become too dark because of the underexposure. Highlight tones will be preserved, while shadows will eventually be allowed to go dark more readily. Bright beach or snow scenes, especially those with few shadows (think high noon, when the shadows are smaller) can benefit from using Active D-Lighting.
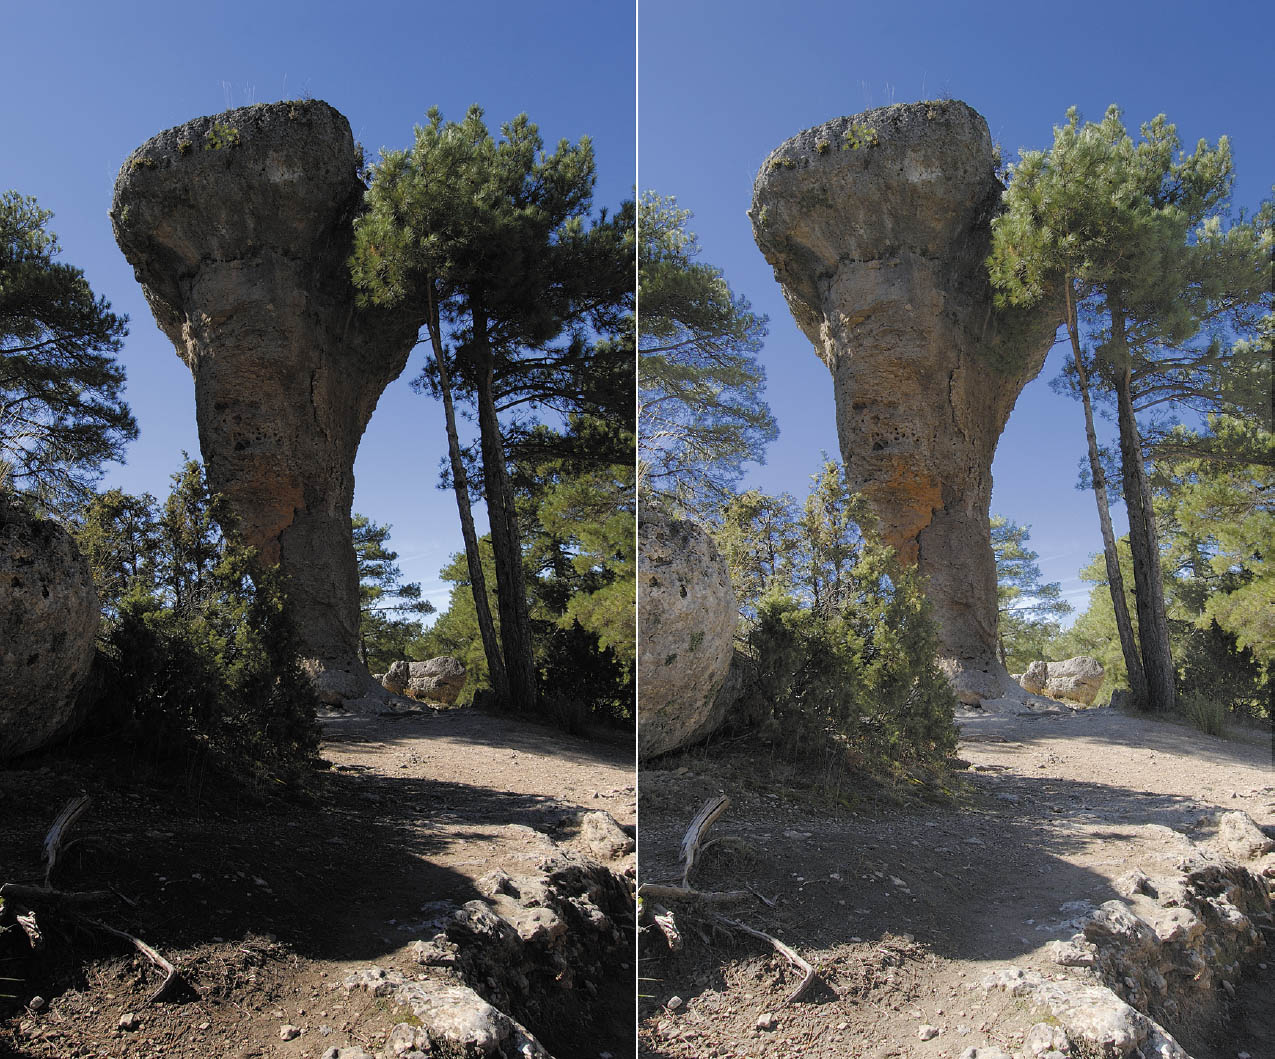
Figure 11.26 No D-Lighting (left); and high (right).
It’s important to always keep in mind that Active D-Lighting not only adjusts the contrast automatically of your image, it modifies exposure for both existing light and flash as well, as I’ve noted. Exposure for both is reduced from about 1/3 stop (at the Low setting) to as much as 1 full stop less at the Extra High setting.
In Manual exposure mode, Active D-Lighting does not adjust the exposure of your image; it simply shifts the center (zero) point of the analog exposure indicator in the viewfinder/control panel.
Nikon gives you a lot of flexibility in using Active D-Lighting. You can choose the setting yourself, or let the camera vary the amount of tweaking by using Active D-Lighting Bracketing. You’ll find this is a useful feature, if used with caution.
Long Exposure NR
Options: Off (default), On
My preference: Off. I prefer to apply noise reduction when processing the RAW file.
Visual noise is that awful graininess caused by long exposures and high ISO settings, and which shows up as multicolored specks in images. This setting helps you manage the kind of noise caused by lengthy exposure times. In some ways, noise is like the excessive grain found in some high-speed photographic films. However, while photographic grain is sometimes used as a special effect, it’s rarely desirable in a digital photograph. There are easier ways to add texture to your photos.
Some noise is created when you’re using shutter speeds longer than eight seconds to create a longer exposure. Extended exposure times allow more photons to reach the sensor, but increase the likelihood that some photosites will react randomly even though not struck by a particle of light. Moreover, as the sensor remains switched on for the longer exposure, it heats, and this heat can be mistakenly recorded as if it were a barrage of photons. This menu setting can be used to activate the Z6’s long exposure noise-canceling operation performed by the EXPEED 6 digital signal processor.
- Off. This default setting disables long exposure noise reduction. Use it when you want the maximum amount of detail present in your photograph, even though higher noise levels will result. This setting also eliminates the extra time needed to take a picture caused by the noise reduction process. If you plan to use only lower ISO settings (thereby reducing the noise caused by ISO amplification), the noise levels produced by longer exposures may be acceptable. For example, you might be shooting a waterfall at ISO 100 with the camera mounted on a tripod, using a neutral-density filter and a long exposure to cause the water to blur. (Try exposures of 2 to 16 seconds, depending on the intensity of the light and how much blur you want.) (See Figure 11.27.) To maximize detail in the non-moving portions of your photos for the exposures that are one second or longer, you can switch off long exposure noise reduction.
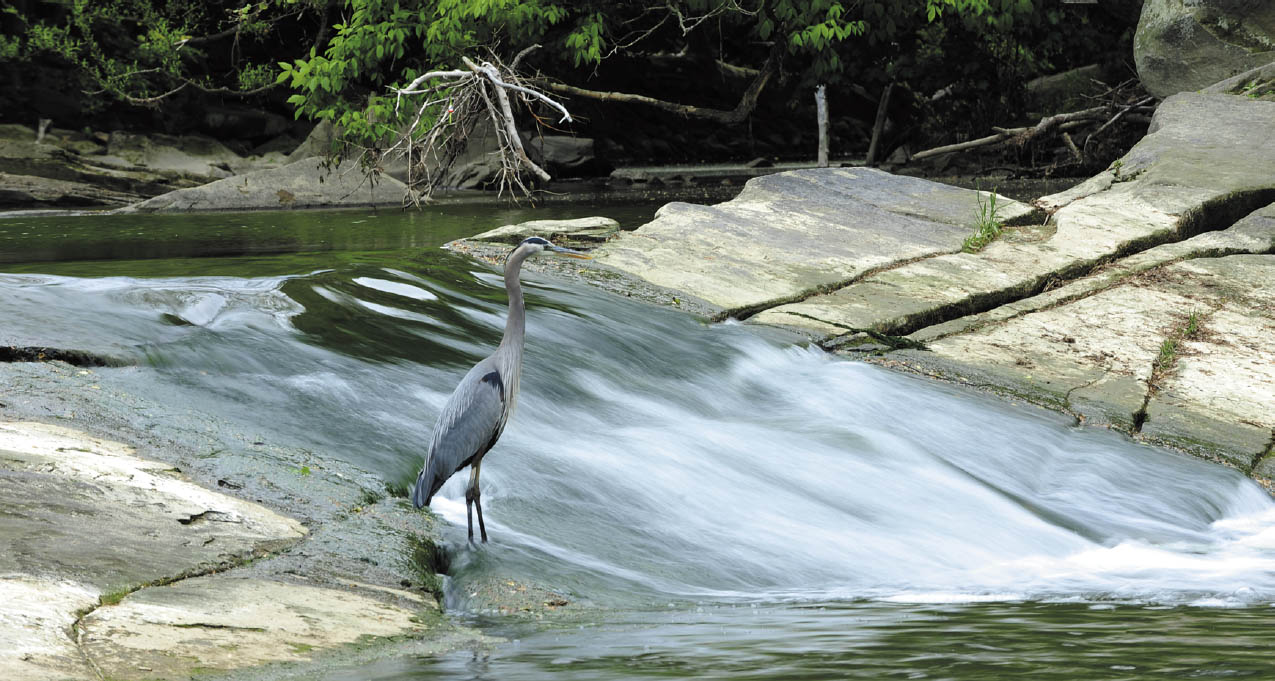
Figure 11.27 A long exposure with the camera mounted on a tripod produces this traditional moving-water photo.
- On. When exposures are longer than one second, the Nikon Z6 takes a second, blank exposure to compare that to the first image. Noise (pixels that are bright in a frame that should be completely black) in the “dark frame” image is subtracted from your original picture, and only the noise-corrected image is saved to your memory card. Because the noise-reduction process effectively doubles the time required to take a picture, you won’t want to use this setting when you’re rushed. Some noise can be removed later, using tools like the noise reduction features built into Adobe Camera Raw.
High ISO NR
Options: High, Normal (default), Low, Off
My preference: Normal
Noise can also be caused by higher ISO sensitivity settings. The Nikon Z6 offers direct settings up to ISO 51200 and extended settings that go even higher, up to Hi 2 (the equivalent of ISO 204,800). Although it costs you some detail, High ISO noise reduction, which can be set with this menu option, may be a good option in many cases. You can choose Off when you want to preserve detail at the cost of some noise graininess, and the Z6 will apply high ISO NR only at the highest settings. Or, you can select Low, Normal, and High noise reduction, which is applied when ISO sensitivity has been set to ISO 800 or higher.
The effects of high ISO noise are something like listening to a CD in your car, and then rolling down all the windows. You’re adding sonic noise to the audio signal, and while increasing the CD player’s volume may help a bit, you’re still contending with an unfavorable signal-to-noise ratio that probably mutes tones (especially higher treble notes) that you really want to hear.
The same thing happens when the analog image signal is amplified: You’re increasing the image information in the signal, but boosting the background fuzziness at the same time. Tune in a very faint or distant AM radio station on your car stereo. Then turn up the volume. After a certain point, turning up the volume further no longer helps you hear better. There’s a similar point of diminishing returns for digital sensor ISO increases and signal amplification as well.
As the captured information is amplified to produce higher ISO sensitivities, some random noise in the signal is amplified along with the photon information. Increasing the ISO setting of your camera raises the threshold of sensitivity so that fewer and fewer photons are needed to register as an exposed pixel. Yet, that also increases the chances of one of those phantom photons being counted among the real-life light particles, too.
Fortunately, the Nikon Z6’s CMOS sensor and its EXPEED 6 digital processing chip are optimized to produce the low noise levels, so ratings as high as ISO 12800 can be used routinely (although there will be some noise, of course), and even ISO 6400 can generate good results. I regularly shoot concerts at ISO 3200, and indoor sports at ISO 6400 with my Z6. I’ve even been impressed with results I get at ISO 25600 when High ISO NR is applied. Some kinds of subjects may not require this kind of noise cancellation, particularly with images that have a texture of their own that tends to hide or mask the noise.
Vignette Control
Options: High, Normal (default), Low, Off
My preference: Normal
Some lenses may not be up to the challenge of covering the frame evenly, producing darkening in the corners of your images at certain focal lengths. If you consistently encounter vignetting, this option may help. You can choose from High, Normal, Low, and Off. It’s difficult to quantify exactly how much corner-brightening each setting provides. Your best bet is to shoot some blank walls of a single color with lenses that seem to have this problem, and try a few at each of the settings. Then select the value that best seems to counter vignetting with your particular lenses.
Diffraction Compensation
Options: On (default), Off
My preference: On
This is the first entry on the next page of the Photo Shooting menu. (See Figure 11.28.) Diffraction is a phenomenon that reduces the sharpness of your image when working at smaller f/stops, especially f/22 or f/32 (if your lens has those apertures available). It can be especially acute with cameras, like the Z6, that have exceptionally high resolution. This feature attempts to counteract that effect, and works well enough that I leave it enabled by default. Unfortunately, Nikon doesn’t deign to tell you what diffraction actually is, or how much it affects your photographs.
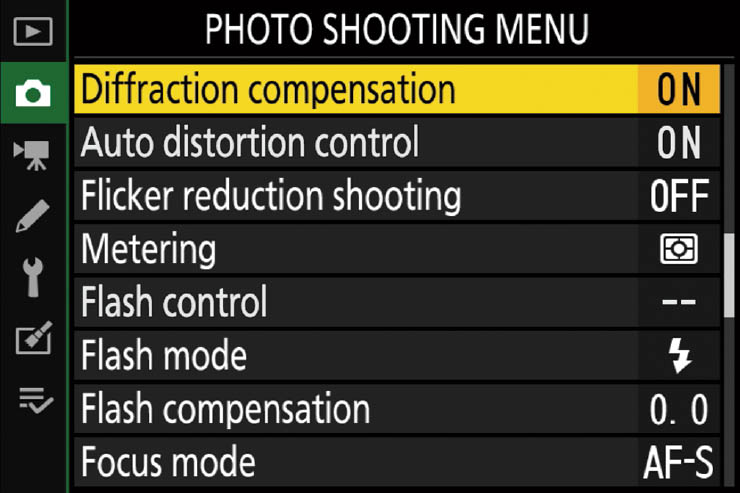
Figure 11.28 The next page of the Photo Shooting menu.
Introductory photo courses hammer into budding photographers the idea that smaller f/stops increase sharpness by extending depth-of-field and optimizing the optical effects of particular lenses. In practice, while few lenses are their sharpest wide open, most achieve their maximum sharpness stopped down two or more f/stops; beyond that, diffraction kicks in, and can actually help reduce apparent sharpness, due to scattering and interference of individual photons as they pass through smaller lens openings. In effect, the edges of your lens aperture affects proportionately more photons as the f/stop grows smaller. The relative amount of space available to pass freely decreases, and the amount of edge surface that can collide with incoming light increases.
So, an f/stop of f/11 may produce a slight loss of overall sharpness compared to an opening of f/8 (although depth-of-field will increase); and f/16 will be less sharp than f/11. With the Z6, images are softened by an almost undetectable amount at every aperture—including wide open—but diffraction becomes more noticeable only at f/stops smaller than f/11. The difference is very slight.
Theoretically, this limit on sharpness should be independent of the resolution of the sensor, or the size of the sensor. The effects of diffraction should be the same at, say, f/11, regardless of what type of sensor is being used. However, in practice, smaller pixels do show the effects of diffraction more readily. The diffraction produces a multi-ringed pattern called an airy disk (it has nothing to do with air; the phenomenon was named after scientist George Airy), and when the peak area of this disk is large enough, compared to the pixel size of the sensor, or if two disks overlap, an effect may be visible in the image.
Typically, this happens at a particular f/stop with a particular pixel size, and that f/stop is said to be the diffraction limit for that camera/sensor. Point-and-shoot cameras, with their tiny sensors, may begin to show diffraction effects at f/5.6; a cropped-sensor camera at f/11; a lower-resolution full-frame camera (like the 20MP Nikon D5) at f/16; and a camera with extremely small pixels, like the Nikon Z6 at f/11.
Is the sharpness lost to diffraction more objectionable than the reduced range of sharpness produced by less depth-of-field at wider apertures? That’s up to you. For example, most of the “product” shots in this book were taken with my old Nikon D4s at f/22 or f/32, even though that camera’s small pixels also are prone to diffraction effects. Given the size the images are reproduced in these pages, I felt that the increased depth-of-field of the smaller apertures was worth the possible loss of sharpness from diffraction. In other words, even though more of my subjects were in focus, the overall sharpness of the sharpest parts of the image may be less.
The photons striking the edges of the diaphragm are disrupted from their paths, and begin to interfere with those passing through the center of the lens. While this phenomenon takes place at all apertures, it is most pronounced at smaller f/stops, when the edges of the iris are proportionately larger compared to the entire lens opening.
The best analogy I can think of is a pond with two floating docks sticking out into the water, as shown in Figure 11.29. Throw a big rock in the pond, and the ripples pass between the docks relatively smoothly if the structures are relatively far apart (top). Move them closer together (bottom), and some ripples rebound off each dock to interfere with the incoming wavelets. In a lens, smaller apertures produce the same effect.
Other than the Diffraction Compensation algorithms Nikon has included in the Z6, there’s no “cure” for diffraction-limited images, other than to use larger f/stops, or to apply some sharpening of the image in your editor (which is likely to be a losing cause). It is important, then, to be aware of the effects of diffraction on images captured with the Z6, and take them into account before choosing a small aperture.
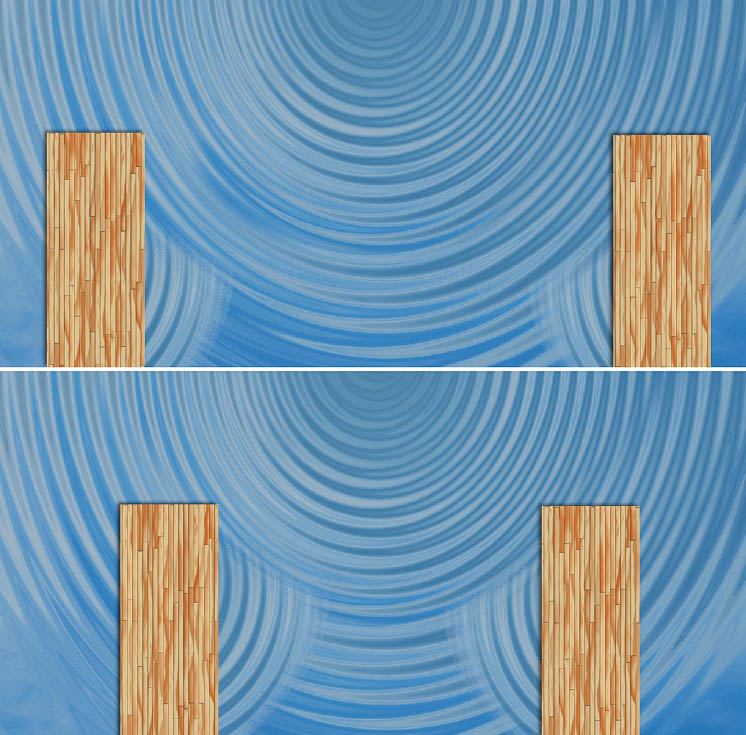
Figure 11.29 Diffraction interference can be visualized as ripples on a lake.
Auto Distortion Control
Options: On (default), Off
My preference: On
As I explained in Chapter 7, wide-angle lenses are prone to barrel distortion, in which straight lines appear to bow outward, especially near the edges of the frame. Telephoto lenses often have the opposite problem: lines may bend inward, producing pincushion distortion. Both of these types of distortion can be easily corrected in your image editor, but your Z6’s digital image processing chip has similar algorithms built in and can do the job for you. Your choices are easy: just select On or Off to enable or disable this feature. Note that with some lenses, On is chosen by default and this menu entry is grayed out and unavailable.
For the process to work, the lenses must be of a type that can communicate electronically with the camera to let the Z6 know what type of lens it is working with, so that means you should be using a G- or D-type optic. The camera will warp the photo before saving it to your memory card, cropping a bit if necessary to exclude some areas of the image.
Flicker Reduction Shooting
Options: On, Off (default)
My preference: Use as needed
This option allows you to reduce or eliminate the banding, flickering, or alternate light/dark exposures that can appear when photographing under certain types of lighting, such as fluorescent or mercury-vapor sources. I find this effect quite vexing when shooting indoor sports such as basketball and volleyball in gymnasiums. During continuous shooting I often end up with frames that alternate between too dark and too light.
This flicker reduction feature uses the exposure meter to detect light flicker in the 100 and 120 Hz frequencies. When enabled, the camera delays shutter release timing a tiny bit to avoid the “dim” cycle of the light source, and giving you a frame that’s evenly lit and fully illuminated. If you’re taking photos continuously (a common mode when capturing sports), the Z6 adjusts both the release timing and frame rate so you can capture each shot during the light source’s maximum output. You may notice a slight shutter lag, and a reduction in frame rate, but both are trade-offs that pay back with more usable images under these conditions.
The feature may not work well for scenes with dark backgrounds, decorative or especially bright lighting, and is not effective when making Bulb, or Time exposures, other shutter speeds slower than 1/100th second, and HDR, exposure delay mode, silent photography, and Continuous H (extended) burst shooting.
Metering
Options: Matrix (default), Center-weighted, Spot, Highlight-weighted metering
My preference: Matrix
This menu entry is a slower alternative to setting the metering mode using the i menu. It exists primarily so you can assign this menu entry to a custom key using the Custom Setting f2: Custom Control Assignment menu entry (explained in Chapter 12).
For example, if you tend to change metering mode frequently, even a visit to the i menu can be bothersome. Define, say, the Fn1 button to Metering, and each time you press that button you’ll be able to rotate the command dial to flip among the four choices. Note that you can also define a button to immediately switch to a specific metering mode, so you can, for example, set Matrix as your default mode, then toggle to Spot while holding down the defined button.
I explained how to use each of these Metering modes in Chapter 4, and won’t repeat that information here.
Flash Control
Options: Flash control mode, Flash compensation (TTL), Wireless Flash options, Remote flash control, Group flash options, Radio remote flash info.
My preference: N/A
This entry is available only when the Nikon SB-5000, SB-500, SB-400, or SB-300 Speedlights are connected to the Z6 and powered up. I explained how to use the available options in Chapters 9 and 10 and will not duplicate that information here. All other Nikon electronic flash units, including the SB-600, SB-700, SB-800, SB-900, and SB-910 must be adjusted using the controls on the flash itself.
Before you howl “planned obsolescence!” you should know that all Nikon pro bodies that lacked a built-in flash have always required making most settings on the optional flash. The Z6’s Flash Control feature is a relatively recent addition to the Nikon line, made possible by features built into the four (fairly) recent flash units cited, so you’re actually gaining capability. If you connect any of the other Speedlights (I own all of them, and I tried), the Flash Control entry is grayed out.
Flash Mode
Options: Fill Flash (default), Red-eye Reduction, Rear-curtain sync, Flash Off
My preference: N/A
This setting specifies whether the Z6 uses Fill Flash, Red-eye Reduction, Rear-curtain sync, or disables the flash entirely. I explained when and why to use each of these in Chapter 9, and won’t repeat that information here.
Flash Compensation
Options: +3.0 to –1.0 stops of exposure; Default: 0.0
My preference: N/A
As I explained in Chapter 9, you can use flash exposure compensation to adjust the flash output to balance the brightness of the main subject illuminated by the flash, compared to the background. Don’t confuse this entry with Custom Setting e2: Exposure Compensation for Flash (described in Chapter 12), which tells the Z6 to apply flash exposure compensation to the background only, or to the entire frame. The two options work together to let you effectively balance your flash output between the two.
Focus Mode
Options: AF-S (default), AF-C, Manual Focus
My preference: N/A
This entry is a slower alternative to using the i menu to switch from one focus mode to another, as explained in Chapter 5. It can be assigned to a custom key if you need fast access to this setting.
AF-Area Mode
Options: Pinpoint AF, Single-point AF (default), Dynamic-area AF, Wide-area AF (Small), Wide-area AF (Large), Auto-area AF
My preference: N/A
This is the first entry on the next page of the Photo Shooting menu (see Figure 11.30). Like several entries discussed above, it duplicates its i menu counterpart, and can be assigned to a custom key for direct access. This menu entry is a slower alternative to using the i menu to switch from one focus mode to another, as explained in Chapter 5.
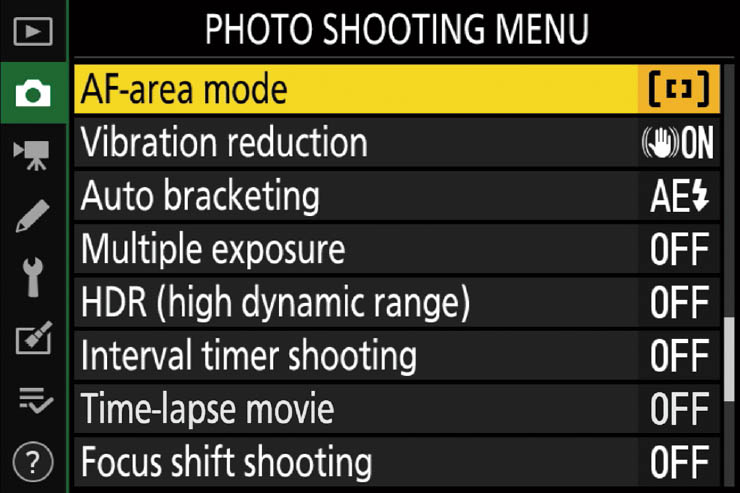
Figure 11.30 The next page of the Photo Shooting menu.
Vibration Reduction
Options: On (or Normal) (default), Spt (Sport), Off
My preference: N/A
This setting is available only with certain lenses that have vibration reduction available, and the options may vary between lenses. When VR is enabled, an indicator appears at the left side of the viewfinder or LCD monitor. Use On (or Normal; the nomenclature varies depending on the lens) for subjects that are not moving to counter camera shake or photographer jitteriness. The Sport setting is recommended for fast and unpredictably moving subjects, especially if you’re panning the camera to follow their movements. In that case, in Sport mode the Z6’s vibration reduction ignores side-to-side movement and corrects only camera shake in other directions. Use Off if the camera is locked down on a tripod. If you will be swiveling the camera on the tripod or using a monopod, then turning VR off is not required. If you use this setting frequently, you can assign the function to an i menu position using Custom Setting f1: Customize i menu. While the Z6 has on-sensor in-body image stabilization (as described earlier in Chapter 7), you can also use F-mount lenses with the FTZ adapter, including those that have their own vibration reduction. When using an adapted lens without VR, use this menu entry to make VR adjustments for the camera. If the adapted lens does have VR, then the switches on the adapted lens overrides any setting you make here.
In that case, the adjustments you can make must be made using the lens switches, and will vary by the type of F-mount lens you are using. If the adapted VR lens has Off, Normal, and Sport settings (the same as found in this menu entry) then VR adjustments can only be made using the lens switches. If the adapted lens has an Active setting, and you set the lens switch to Active, the Z6 uses the Normal VR setting instead.
Auto Bracketing
Options: Auto Bracketing Set (default: AE & Flash), Number of Shots (default: 0), Increment (default: 1.0)
My preference: N/A
This entry allows you to set up bracketing, a useful technique explained in detail in Chapter 4. I won’t repeat the step-by-step instructions here. To recap, your options are as follows:
- Auto Bracketing Set. Autoexposure and Flash bracketing, Autoexposure Bracketing (only), Flash bracketing (only), White balance bracketing, Active D-Lighting bracketing.
- Number of shots. Use the left/right directional buttons or the touch screen to specify the number of shots in your bracket set (or 0 to disable bracketing entirely). Up to nine can be selected, and you can choose whether to group them around overexposure or underexposure, as described in Chapter 4.
- Increment. From 0.3- (one-third stop) to 3.0-stop increments between bracketed exposures.
Multiple Exposure
Options: Multiple Exposure Mode: On (Series), On (Single Photo), Off; Number of Shots: 2 to 10; Overlay Mode: Add, Average, Lighten, Darken; Keep All Exposures: On, Off, Select First Exposure (NEF)
My preference: Multiple Exposure Mode: On (Series); Number of Shots/Overlay Mode, varies
This option lets you combine from 2 to 10 exposures into one image without the need for an image editor such as Photoshop, and it can be an entertaining way to return to those thrilling days of yesteryear, when complex photos were created in the camera itself. In truth, prior to the digital age, multiple exposures were a cool, groovy, far-out, hep/hip, phat, sick, fabulous way of producing composite images. Today, it’s more common to take the lazy way out, snap two or more pictures, and then assemble them in an image editor like Photoshop.
You can turn the Multiple Exposure feature off, direct the camera to continue taking multiple exposures until you turn it off (Series), or revert to non-multiple exposure mode after taking one picture (Single Photo). You can elect to keep all exposures, or discard all but the combined multiple exposure, and use a NEF (RAW) image on your memory card as the base photo on which subsequent pictures are overlaid. I provided a complete set of directions for using these multiple exposure features in Chapter 6, along with another example of the kind of results you can get.
You should keep in mind that some of Nikon’s previous implementations of multiple exposure allowed you to choose between combining the exposures of each image to produce the final shot, or dividing the exposures equally among the shots. The Z6 has additional options, and calls the array of choices “Overlay Mode.” Here’s the difference:
- Add. In this mode, each new exposure is added to the previous shots. I use this when photographing a subject that is moving against a dark background. A series of renditions, each fully exposed, appears in the overlaid image to track the subject’s movement. (See Figure 11.31, left.)
- Average. In this mode, the camera divides the overall exposure by the number of shots in the series, and gives each shot that fraction of the overall exposure. That is, for a four-shot multiple series, the specified exposure for each is set at 1/4 of the total amount. I use this when shooting subjects with a great deal of overlap. (See Figure 11.31, right.)
- Lighten. The Z6 compares pixels in the same position in each exposure, and uses only the brightest. This effect is similar to the Lighten blending mode in Photoshop, Lightroom, and other image-editing software.
- Darken. Similar to the Lighten blending mode, only just the darkest pixel is saved. You can use both Lighten and Darken overlay modes to create special effects like those you get in image editors.
The Z6 adds a useful feature, Keep All Exposures, which, as you might expect, tells the camera to save the individual photos used to create the multiple exposure in separate files. This capability can be useful in several ways. First, you may find that one specific frame of your multiple exposure might have made an excellent stand-alone image in its own right. When Keep All Exposures is active, you can retrieve that frame and use it as you like. In addition, having all the shots of the multiple exposure available means you can use them to create your own multi-shot image in Photoshop or your favorite image editor. I do this most often when I discover that one frame doesn’t “work” for a given multiple exposure image, but the others meld together well. I can create my own version manually, adjusting brightness, contrast, or other parameters as I go, to “fine-tune” what started out as an automated multiple exposure.
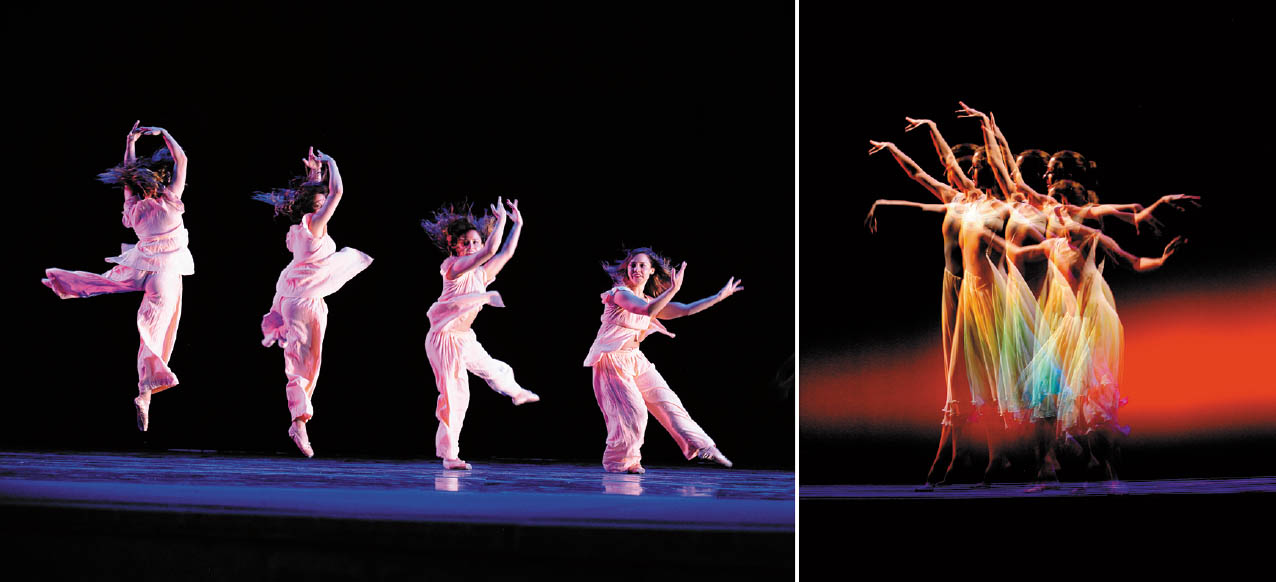
Figure 11.31 Multiple Exposures using Add (left) and Average (right) overlay modes.
Brand new is the Select First Exposure (NEF) option. If you want to overlay all your subsequent multiple exposures on top of an existing image already on your memory card (say, a background that you’d like to merge with your sequence), you can choose this setting. You’ll be taken to the Z6’s standard image selection screen and offered the choice of any NEF image available on your card. This is a cool way of replacing boring one-color backgrounds with something more interesting.
HDR (High Dynamic Range)
Options: HDR mode: On (Series), On (Single Photo), Off (default); Exposure Differential: Auto (default), 1 EV, 2 EV, 3 EV; Smoothing: High, Normal, Low; Save individual Images (NEF)
My preference: HDR mode: On (Series); Exposure Differential: Auto; Smoothing: No preference
I was surprised at how well Nikon has solved the hand-held auto HDR problem, because there are two stumbling blocks that, at least theoretically, should lead to less-than-awesome results. First, when your camera can perform HDR for you on the fly, there is the tendency to put the feature to work under non-optimal conditions; specifically, impromptu hand-held situations. If you’ve done any traditional HDR, you know that the technique works best when the camera is mounted on a tripod, so that the bracketed exposures are virtually identical except for the exposure itself. Although all HDR software can correct for slight camera movement and align images that are slightly out of register, the results I’ve gotten have not been great. I expected hand-held HDR to be comparable. However, Nikon’s implementation, especially in the Z6, does an excellent job.
The second theoretical weakness of the Z6’s HDR feature is the limitation of combining just two shots to arrive at the final image. The best traditional HDR photos I’ve produced have involved at least three shots, and more frequently five or more, each separated by a stop of exposure. The Z6 takes two shots, total, and combines them. Despite these speed bumps, I’ve been pleased with my results. I outlined the steps in Chapter 4, and won’t repeat them here.
Interval Timer Shooting
Options: Start; Start Options: Now, Choose Start Day and Start Time; Interval; No. of Intervals × Shots/Interval; Exposure Smoothing: On/Off; Silent Photography: On/Off; End Day/Time; Interval Priority: On/Off; Starting Storage Folder: New Folder, Reset File Numbering
My preference: N/A
Nikon Z6’s built-in time-lapse photography feature allows you to take pictures for up to 999 intervals in bursts of as many as nine shots, with a delay of up to 23 hours and 59 minutes between shots/bursts, and an initial start-up time of as long as 23 hours and 59 minutes from the time you activate the feature. That means that if you want to photograph a rosebud opening and would like to photograph the flower once every two minutes over the next 16 hours, you can do that easily. If you like, you can delay the first photo taken by a couple hours so you don’t have to stand there by the Z6 waiting for the right moment. The options are shown in Figure 11.32, and I explained how to use them in Chapter 6.
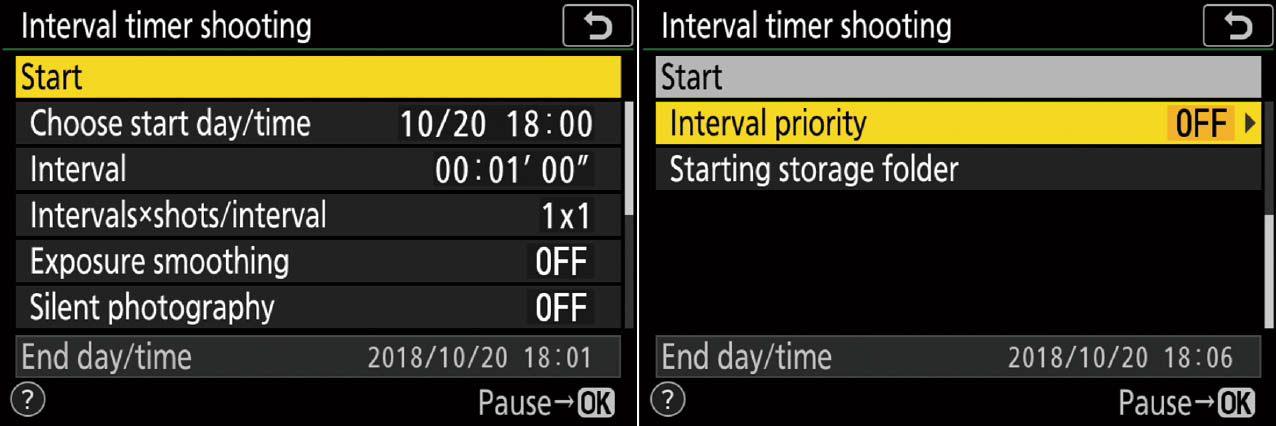
Figure 11.32 Interval timer shooting options.
Or, you might want to photograph a particular scene every hour for 24 hours to capture, say, a landscape from sunrise to sunset to the following day’s sunrise again. I will offer two practical tips right now, in case you want to run out and try interval timer shooting immediately: use a tripod, and for best results over longer time periods, plan on connecting your Z6 to an external power source!
4K/8K MOVIES?
One cool thing to do with interval timer captures is to assemble the individual shots into a video with 4K or faux 8K resolution using a video image editor. I explained this feature, too, in Chapter 6.
Time-Lapse Movie
Options: Start, Interval, Shooting Time, Exposure Smoothing, Silent Photography, Image Area, Frame size/frame rate, Interval priority
My preference: None
As I said in Chapter 6, Time-Lapse movies correspond to interval timer shooting, described previously, but allow shooting video clips instead of still photographs (or a series of still photographs). The Z6 automatically creates a silent time-lapse movie at the frame resolution and rate you’ve selected in the Movie Shooting menu. Nikon recommends using a white balance other than Auto, and covering the eyepiece opening to prevent light from entering the viewfinder and affecting exposure. And, of course, you’ll want to use a tripod and either a fully charged battery or optional AC adapter. While you can shoot 4K time-lapse video, the maximum length sequence you can capture is three minutes.
The options are very similar to those of interval timer shooting:
- Start. Unlike the similar Interval Timer found in the Photo Shooting menu, Time-Lapse Photography has no Start Options. Make your other settings, select Start, and time-lapse photography will begin about three seconds later.
- Interval. Select an interval between frames; use a longer value for slow-moving action (such as a flower bud unfolding), and a shorter value for movies, say, depicting humans moving around at a comical pace. You can select an interval from one second to 10 minutes.
- Shooting time. You can specify time-lapse movie duration.
- Exposure smoothing. You can turn exposure smoothing on or off. When activated, the camera adjusts the exposure of each frame to match that of the previous frame in P, S, or A mode. Smoothing can also be used in Manual mode, but, of course, the Z6 won’t vary either the shutter speed or aperture. You must have set ISO Sensitivity to Auto. Press OK to confirm.
- Silent photography. Silences the shutter sound for unobtrusive or stealth video capture.
- Image Area. Select FX-based movie format or DX-based movie format (see Chapter 15). You can also turn Auto DX crop on or off, so the Z6 will recognize DX lenses and crop appropriately.
- Frame size/frame rate. Here you can select the frame size and frames per second setting for your time-lapse movie. You can choose from 3840 × 2160 30/15/24p; 1920 × 1060 60/50/30p (in both High Quality and Normal modes, also explained in Chapter 15); and 1280 × 720 60/50p formats.
- Interval priority. This setting is similar to its intervalometer counterpart, as explained previously. It takes care of situations in which the shutter speed automatically selected in Program or Aperture-priority ends up being longer than the interval between shots. When enabled, the Z6 captures the movie frame at the specified interval, even if a shorter shutter speed must be used, causing underexposure. You can activate Auto ISO Sensitivity, and select a minimum shutter speed that is shorter than the interval time. When disabled, the camera increases the interval you specified to allow correct exposure.
Focus Shift Shooting
Options: Start, Number of Shots, Focus Step Width, Interval until Next Shot, First-Frame Exposure Lock, Peaking Stack Image, Silent Photography, Starting Storage Folder
My preference: N/A
Focus stacking is a great technique that allows combining a series of photos each taken using a different plane of focus, so that they can be combined in an image editor to produce a single image with greatly enhanced depth-of-field. Macro photographers (in particular) have long used focus stacking in their work. The Z6’s Focus Shift Shooting feature greatly simplifies capture of the individual shots, which can include up to 300 different images. I covered this feature in detail in Chapter 6 and will not repeat that information here.
Silent Photography
Options: On, Off (Default)
My preference: N/A
Because the Z6 has no mirror one of the ker-plunks that punctuate dSLR picture taking is eliminated. However, the camera’s mechanical shutter still produces its characteristic noise as it opens and closes for each shot. Silent Photography takes advantage of the Z6’s electronic shutter by relying on that component alone to capture an image. In use, the camera “dumps” the current live view image from the sensor, then activates the sensor for the interval specified by the selected shutter speed. Because the physical shutter does not open or close, the process is entirely silent. In addition, the lack of shutter motion and mirror motion means that the camera vibrates less during the actual exposure. On and Off are your only options. When active, continuous shooting is reduced in speed, and flash, the camera’s beeper, long exposure noise reduction, and electronic front-curtain shutter are disabled. You may notice distortion in moving objects, especially when panning because of the Z6’s “rolling shutter.” (I’ll tell you more about rolling shutter effects in Chapter 15.) You may also see flicker, banding, or distortion under fluorescent, mercury-vapor, or sodium lamps.
Movie Shooting Menu
Some of the Movie Shooting menu’s entries duplicate the entries in the Photo Shooting menu but apply specifically to video shooting. Others are unique to movie making. For entries that overlap those used for still photography, I’ll simply refer to the relevant description earlier in this chapter. Many of the movie-related choices are discussed in more detail in Chapters 14 and 15 of this book.
- Reset Movie Shooting Menu
- File Naming
- Choose Image Area
- Frame Size/Frame Rate
- Movie Quality
- Movie File Type
- ISO Sensitivity Settings
- White Balance
- Set Picture Control
- Manage Picture Control
- Active D-Lighting
- High ISO NR
- Vignette Control
- Diffraction Compensation
- Auto Distortion Control
- Flicker Reduction
- Metering
- Focus Mode
- AF-area Mode
- Vibration Reduction
- Electronic VR
- Microphone Sensitivity
- Attenuator
- Frequency Response
- Wind Noise Reduction
- Headphone Volume
- Timecode
Reset Movie Shooting Menu
Options: Yes, No
My preference: N/A
Restores Movie Shooting menu options (only) to their default values (see Table 11.3). This is the first entry in the Movie Shooting menus (see Figure 11.33, left).
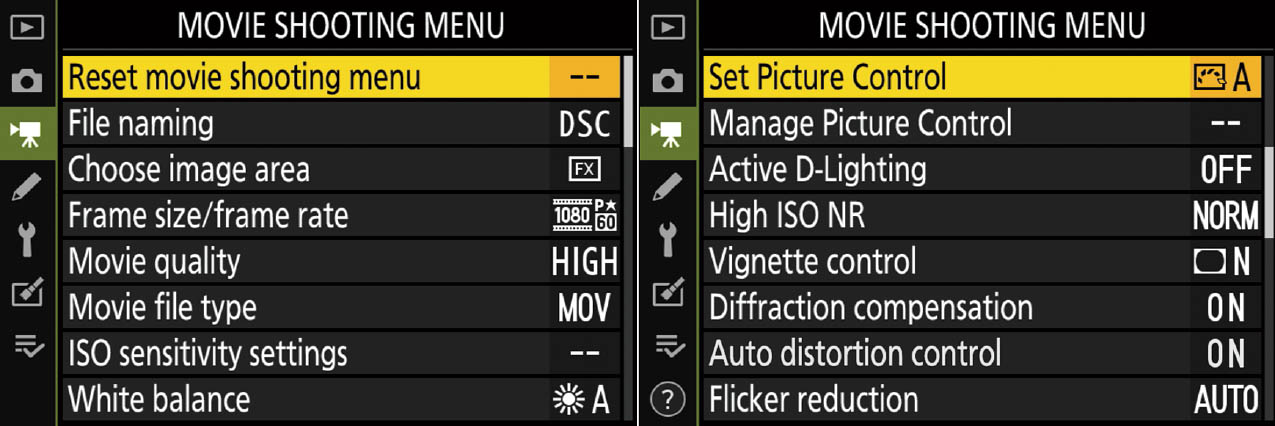
Figure 11.33 The first two Movie Shooting menus.

File Naming
Options: Three-character prefix; DSC is the default
My preference: None
You can specify substitutes for the DSC characters in file names created for movie files, separately from the naming format you elect for still photos. The limitations and instructions are the same as for the File Naming entry in the Photo Shooting menu.
Choose Image Area
Options: FX (default), DX
My preference: FX
As you’ll learn in Chapter 15, the movies the Z6 captures are cropped from the full sensor image, to fit each movie frame into the 19:6 proportions of high-definition video. This entry determines the image area used to crop the frame while in Movie Shooting mode. (See Figure 11.34.) It is independent of the setting you specify in the Photo Shooting menu. You have two options, FX and DX:
- FX. In this mode, the Z6’s 35.9mm × 23.9mm sensor area is cropped at top and bottom to fit the 19:6 aspect ratio of HD video, so the actual movie capture area measures 35.9 × 20.2mm, and represented by the outer area in Figure 11.34. The FX-based movie format means that no “lens multiplier” is applied, and, say, a 100mm lens has its normal field of view. (I explained the “multiplier” misnomer in Chapter 7.) As I’ll explain in Chapter 15, the pixels are sub-sampled to produce the final 1920 × 1080. When shooting 4K video, a central area within the frame measuring 3840 × 2160 pixels is used instead.
- DX. When using the DX-based movie format, the image capture area measures 23.5mm × 13.2mm portion of the sensor, represented by the yellow box in the figure. This smaller field of view produces a cropped, telephoto effect. Your 100mm lens has the effective field of view of a 150mm lens. Note that Electronic VR (discussed later in this chapter) crops the image a tiny bit more.

Figure 11.34 FX- and DX-based movie formats.
Frame Size/Frame Rate
Options: 4K Ultra High Definition: 3840 × 2160, 30/25p, 24p; Full HD: 1920 × 1080, 60/50p (default), 30/25p, 24p; 1920 × 1080 30/25p X4 slow-mo; 1920 × 1080 24p X5 slow-mo
My preference: Varies
Here you can select several different Ultra High Definition, Full High Definition, or Standard High Definition video formats. Ultra HD is available at 3840 × 2160 in 30/25/24 frames per second; Full HD at 1920 × 1080 resolution at 60/50/30/25/24 frames per second. As I’ll explain in Chapter 15, 50/25 fps are used for PAL video systems used overseas, while the others are compatible with the NTSC system used in the USA, Japan, and some other areas. Chapter 15 will provide more information on how to select the most appropriate frame size and transfer rate, and explain your options for shooting silent slow-motion movies as well.
Movie Quality
Options: High Quality (default), Normal
My preference: High Quality when using a fast memory card
Select High Quality or Normal Quality. Your choice affects the sharpness/detail in your image and also the maximum bit rate that can be sustained and length of the movies you can record. You’ll find more information on this parameter in Chapter 15.
Movie File Type
Options: MOV (default), MP4
My preference: MP4
The Z6 can use either MOV or MP4 movie formats. MP4 format is an industry standard for video. MOV, the default, is common on Macs. Most video editors can translate MP4 files into MOV and back again as long as the same codec was used for both. Your camera uses the standard H.264/MPEG-4 codec (“coder-decoder”) using IPB (I-frame/P-frame/B-frame) Standard and Light. I prefer MP4, because it has better support for computers running operating systems other than MacOS. I’ll explain file type considerations in more detail in Chapter 15.
ISO Sensitivity Settings
Options: Maximum Sensitivity, ISO Sensitivity (Mode M), Auto ISO control (Mode M)
My preference: Varies by light levels
Similar to the ISO settings in the Photo Shooting menu, this version allows you to select a fixed ISO setting for Manual exposure mode, from ISO 100 to Hi 2. That allows you greater control over the ISO used. When shooting movies in P, A, and S exposure modes, Auto ISO sensitivity is always used.
However, if you want to use Auto ISO in Manual exposure mode, you can turn it on or off here, and specify the maximum ISO that will be selected automatically, from ISO 200 to Hi 2. Note: Using Auto ISO in Manual exposure mode effectively gives you autoexposure even though you’re shooting in manual exposure mode. I’ll show you how to put this feature to work in Chapter 15.
White Balance
Options: Same as Photo Settings (default); Auto1, Incandescent, Fluorescent, Direct Sunlight, Flash, Cloudy, Shade, Choose Color Temperature, Preset Manual
My preference: Same as Photo Settings
Here you can select the white balance used to shoot movies; you can select from:
- Same As Photo Settings. The Z6 will use whatever white balance setting you’ve specified in the Photo Shooting menu, and apply it to your videos.
- Any of the other White Balance options. The selection will apply only to video. If you’re shooting still photographs in RAW format, you might not care about the white balance setting, as you can choose any color balance you want when the file is imported into your image editor. Movie clips, on the other hand, aren’t so easy to adjust (think of them as moving JPEGs which, in a sense, they are), so you might want to set a specific white balance in this menu entry.
Set Picture Control
Options: Same as Photo Settings (default); Original Picture Controls: Auto, Standard, Neutral, Vivid, Monochrome, Portrait, Landscape, Flat; Creative Picture Controls (01–20): Dream, Morning, Pop, Sunday, Somber, Dramatic, Silence, Bleached, Melancholic, Pure, Denim, Toy, Sepia, Blue, Red, Pink, Charcoal, Graphite, Binary, and Carbon
My preference: Same as Photo Settings
This is the first entry on the next page of the Movie Shooting menu. (See Figure 11.33, right, shown earlier.) You can specify Same as Photo Settings, or independently specify a Picture Control to be used only when shooting movies. The procedures for selecting and modifying a Picture Control in this menu entry is otherwise exactly the same as described earlier in this chapter. Check out the still photo discussion of Picture Controls for a complete explanation of this feature.
Manage Picture Control
Options: Save/Edit, Rename, Delete, Load/Save
My preference: N/A
This entry includes the Save/Edit, Rename, Delete, and Load/Save options that operate the same as the corresponding control in the Photo Shooting menu, described earlier in this chapter.
- Make a copy. Choose Save/Edit, select from the list of available Original or Creative Picture Controls, and press OK to store that style in one of the user-defined slots C-1 to C-9.
- Save an edited copy. Choose Save/Edit, select from the list of available Picture Controls, and then press the multi selector right button to edit the style, as described in the previous section. Press OK when finished editing, and then save the modified style in one of the user-defined slots C-1 to C-9.
- Rename a style. Choose Rename, select from the list of user-defined Picture Controls (you cannot rename the default styles), and then enter the text used as the new label for the style. You may use up to 19 characters for the name.
- Remove a style. Select Delete, choose from the list of user-defined Picture Controls (you can’t remove one of the default styles), press the multi selector right button, then highlight Yes in the screen that follows, and press OK to remove that Picture Control.
- Store/retrieve style on card. Choose Load/Save, then select Copy to Camera to locate a Picture Control on your memory card and copy it to the Z6; Delete from Card to select a Picture Control on your memory card and remove it; or Copy to Card to duplicate a style currently in your camera onto the memory card.
Active D-Lighting
Options: Same as Photo Settings (default), Extra High, High, Normal, Low, Off (default)
My preference: Same as Photo Settings
Here you can specify Active D-Lighting used exclusively for movie shooting, or you can choose Same as Photo Settings (the default value) when your still and movie shooting is under similar conditions.
High ISO NR
Options: High, Normal (default), Low, Off
My preference: Normal
Movie shooting doesn’t involve long exposures, so the Movie Shooting menu includes only a High ISO Noise Reduction entry. You can set it to High, Normal, Low, or Off. See the entry for this feature under the Photo Shooting menu, earlier in this chapter.
Vignette Control
Options: Same as Photo Settings; High, Normal (default), Low, Off
My preference: Normal
Set up this option using the same settings in the Photo Shooting menu, or choose your own.
Diffraction Compensation
Options: On (default), Off
My preference: On
This entry works the same as its Photo Shooting menu counterpart.
Auto Distortion Control
Options: On (default), Off
My preference: On
This entry also works the same as its Photo Shooting menu counterpart. With some lenses, On is activated automatically and this setting is grayed out and unavailable.
Flicker Reduction
Options: Auto (default), 50Hz, 60Hz
My preference: Auto
The flicker reduction parameters in movie shooting are slightly different from their still photography counterparts. Because movie capture is always continuous, and at 60/50/30/25/24 frames per second, the Z6 needs to know the frequency at which the light source is flickering. You can choose Auto to let the camera sense the frequency (this may be the best idea if you are unsure about the local power supply), or specify 50Hz or 60Hz as appropriate.
Alternatively, you can eschew this feature, shoot using Manual exposure, and select a shutter speed that may sync best with the light source’s power (that is 1/125th, 1/60th, or 1/30th second for 60Hz and 1/50th or 1/25th second for 50Hz). I’ll have additional caveats about choosing a shutter speed for movie making in Chapter 15.
Metering
Options: Matrix metering (default), Center-weighted metering, Highlight-weighted metering
My preference: Matrix metering
This is the first entry on the next page of the Movie Shooting menu. (See Figure 11.35, left.) Note that Spot metering is not available in movie mode, but this entry otherwise has exactly the same options as its counterpart in the Photo Shooting menu.
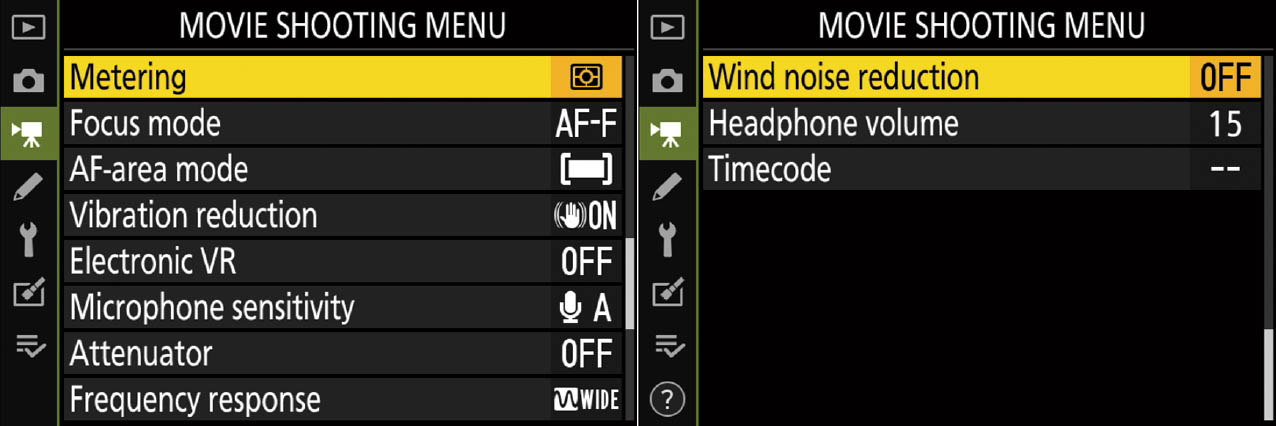
Figure 11.35 The next two pages of the Movie Shooting menu.
Focus Mode
Options: AF-S, AF-C, AF-F (full-time AF) (default), and MF
My preference: AF-F
For movie shooting, Nikon adds a full-time autofocus option (AF-F) to the AF-S, AF-C, and Manual focus modes used for still photography. You might consider it the opposite of AF-C: with AF-C, the Z6 starts focusing as soon as you press the shutter release halfway down, and continues until you press the release all the way down to take the picture. With AF-F, the camera starts focusing immediately, as soon as you rotate the still/movie switch next to the viewfinder to the Movie position. The Z6 then continues to adjust focus if you or your subject changes location, or you reframe the image. Focus is locked when you press the shutter release halfway. You can then reframe, or press the Movie button on top of the camera to begin capturing video using the focus setting you locked.
In effect, AF-F is full-time only prior to begin capture. If you want the camera to refocus during capture, use AF-C instead.
AF-Area Mode
Options: Single-point AF, Wide-area AF (Small), Wide-area AF (Large), Auto-area AF (default)
My preference: Auto-area AF
The autofocus area modes available during video capture are similar to those used for still photography as described in Chapter 5, except that Pinpoint AF and Dynamic Area AF are disabled.
Vibration Reduction
Options: Same as Photo Settings (default), On (Normal), Spt (Sport), Off
My preference: Same as Photo Settings
If you want to use the same settings specified for still photography, you can keep the default setting. However, if you exclusively shoot video with the camera mounted on a tripod, you can save time by disabling VR here, and activating it only when needed.
Electronic VR
Options: On, Off (default)
My preference: Off
Electronic VR is a type of anti-shake technology that has long been provided in pro and amateur camcorders. It’s available only when shooting conventional 1080p, and not when shooting 1080p slow-mo or 2160p 4K video. In use, the camera reduces the frame size by about 10 percent when shooting in FX mode. It then examines successive frames looking for movement by comparing pixels that are in common between frames, and noting when the pixels representing stationary objects appear to move. It then uses the extra border area outside the frame to counteract the motion by realigning the video frames so that pixels of parts of the image that don’t move between frames (such as the background when you’re shooting without any intentional panning movement) match. No trimming is necessary when shooting in DX mode, as the Z6 can use the area outside the crop to align the image.
If you’re shooting with the Z6 mounted on a tripod, or connected to a gimbal, shoulder, hand-held, or other type of video camera stabilizer, you can safely turn this feature off. Disable electronic VR as well when you actually want a shaky, cinéma vérité look.
Microphone Sensitivity
Options: Auto Sensitivity (default), Manual Sensitivity, Microphone Off
My preference: Varies
This entry has three options that control your Z6’s built-in microphone or any external microphone you attach. You can choose Auto Sensitivity; Manual Sensitivity, to set recording levels yourself (with a handy volume meter on screen showing the current ambient sound levels); or turn the microphone off entirely if you’re planning to record silent video, use another sound recording source, or add sound in post-production.
Attenuator
Options: Enable, Disable (default)
My preference: Varies
When working in noisy environments, choose Enable to reduce the microphone gain and minimize audio distortion from background sounds.
Frequency Response
Options: Wide Range (default), Vocal Range
My preference: Varies
Select from Wide Range frequency response to record a broad range of sounds, or Vocal Range to optimize audio recording for vocals. You’ll find an entire section on recording sound in Chapter 15.
Wind Noise Reduction
Options: On, Off (default)
My preference: Varies
This is the first entry on the last page of the Movie Shooting menu (see Figure 11.35, right, shown earlier). Wind blowing across your microphone can be distracting. This setting reduces wind noise (and may also affect other sounds, so use it carefully) for the built-in microphones only. Your external microphone, like the Nikon ME-1, may have its own wind noise reduction filter on/off switch.
Headphone Volume
Options: 15 (default); Values 0–30
My preference: N/A
Use this entry in Movie mode to adjust the volume of headphones you’ve plugged into the Z6’s headphones jack.
Timecode
Options: Record timecodes: On, On with HDMI Output, Off; Count-up method: Record Run, Free Run; Timecode origin: Reset, Enter Manually, Current Time; Drop frame: On, Off
My preference: N/A
Advanced video shooters find SMPTE (Society of Motion Picture and Television Engineers)-compatible time codes embedded in the video files to be an invaluable reference during editing. To oversimplify a bit, the time system provides precise hour:minute:second:frame markers that allow identifying and synchronizing frames and audio. The time code system includes a provision for “dropping” frames to ensure that the fractional frame rate of captured video (remember that a 24 fps setting actually yields 23.976 frames per second while 30 fps capture gives you 29.97 actual “frames” per second) can be matched up with actual time spans.
As I noted in the introduction to this book, I won’t be covering the most technical aspects of movie shooting in great detail (including detailed use of time codes, raw HDMI streaming, etc.). If you’re at the stage where you’re using time codes, you don’t need a primer, anyway. However, the Time Code submenu does include the following options:
- Record Timecodes. Turn timecodes off or on. You can select On, or On with HDMI Output to append the time code to the HDMI video output, or Off to not use timecodes.
- Count up. Choose Rec Run, in which the time code counts up only when you are actually capturing video, or Free Run (also known as Time of Day), which allows the time code to run up even between shooting clips. The latter is useful when you want to synchronize clips between multiple cameras that are shooting the same event. When using Free Run, even if the cameras record at different times, you’ll be able to match the video that was captured at the exact same moment during editing. When Free Run is selected, the time code will always be recorded to the movie file (except for HFR clips).
- Timecode Origin. Normally, the Z6 uses the camera’s internal clock to specify the hours:minutes:seconds, with frames set to :00 when you begin shooting. This entry allows you to manually enter any hour:minute:second:frame of your choice, or to Reset the start time to 00:00:00:00.
- Drop Frame. The 30 fps setting yields 29.97 actual frames per second, 60 fps gives you 59.95 frames per second, and 120 fps provides 119.9 fps, causing a discrepancy between the actual time and the time code that’s recorded. Enable and the camera will skip some time code numbers in drop-frame mode at intervals to eliminate the discrepancy. When disabled (non-drop frame mode), you may notice a difference of several seconds per hour.