The Nikon Z6 is compatible with a long list of Nikon SB-series Speedlights, dating back to the company’s original professional-level flash unit, the SB-800, which was introduced in 2003. All Speedlights introduced since then use the Nikon Creative Lighting System (CLS), which allows efficient through-the-lens metering of flash exposures and wireless off-camera strobes for versatile multi-flash lighting. Although virtually everything else about the Z6 is new—from sensor to lens mount—it benefits from the availability of these mature, well-tested array of electronic flash options, including the latest SB-5000 unit, which can be triggered remotely through optical or radio links.
Some consider electronic flash a necessary evil, providing supplementary illumination that is often harsh or less natural looking, as well as difficult to use. However, what they are deriding is bad flash photography, as applied by photographers who don’t understand how to use strobes properly, or are too lazy to fully apply the creative versatility flash offers. They may feel that Speedlights are too expensive.
Fortunately, it’s easy to become adept at using electronic flash, and fully featured Nikon units like the SB-500—which I’ll describe later in this chapter—can cost as little as $250. Most settings can be adjusted using the menus built into your Z6, and even multi-flash shooting (covered in Chapter 10) can be mastered with only a few hours’ practice.
Electronic flash has become the studio light source of choice for many pro photographers, because it’s more intense (and its intensity can be varied to order by the photographer using the strobe’s power adjustment features) and freezes action. Flash frees you from the need for a tripod (unless you want to use one to lock down a composition), and has a snappy, consistent light quality that matches daylight. (While color balance changes as the flash duration shortens, some Nikon flash units can communicate to the camera the exact white balance provided for that shot.) And even pros will cede that an external flash mounted on the Nikon Z6 needn’t be used in direct-flash mode, and has essential applications as an adjunct, particularly to fill in dark shadows or to serve as a wireless trigger for additional, off-camera strobes.
But electronic flash isn’t as inherently easy to use as continuous lighting. As I noted in Chapter 8, electronic flash units do require a modest investment, don’t show you exactly what the lighting effect will be (unless you use a second source or mode called a modeling light for a preview), and the exposure of electronic flash units is more difficult to calculate accurately.
This chapter and the next will show you how to manage all the creative and technical challenges, using optional external flash units. First, we’ll look at the basics of working with flash, and then in Chapter 10, we’ll explore the world of wireless flash photography.
Electronic Flash Basics
Electronic flash illumination is produced by photons generated by an electrical charge that is accumulated in a component called a capacitor and then directed through a glass tube containing xenon gas, which absorbs the energy and emits the burst of light. In automatic mode (which Nikon calls iTTL), the main flash is preceded by one or more mini-bursts which allow the Z6 to gauge how much light is bouncing back from your subject and background, and to communicate with other external flash units linked wirelessly. In practice, external strobes can be linked to the Z6 in several different ways:
- Camera mounted/hardwired external dedicated flash. Units offered by Nikon or other vendors that are compatible with Nikon’s Creative Lighting System—CLS—can be clipped onto the accessory “hot” shoe on top of the camera or linked through a wired system such as the Nikon SC-28/SC-29 cables. I’ll describe CLS later in this chapter.
- Wireless dedicated flash. A CLS-compatible unit can be triggered by signals produced by a pre-flash (before the main flash burst begins), which offers two-way communication between the camera and flash unit. The triggering flash can be a CLS-compatible flash unit in Master mode, or a wireless non-flashing accessory, such as the Nikon SU-800, which does nothing but “talk” to the external flashes. You’ll find more on this mode in Chapter 10.
- Wired, non-intelligent mode. The Z6 does not have a dedicated old-style PC/X connector built in, but you can add one easily by sliding the Nikon AS-15 Sync Terminal adaptor into the hot shoe on top of the camera. The PC/X connector is a non-intelligent camera/flash link that sends just one piece of information, one way: it tells a connected flash to fire. There is no other exchange of information between the camera and flash. The PC/X connector can be used to link the Nikon Z6 with non-dedicated/non-CLS-friendly strobes, which can be studio flash units, manual non-CLS flash, flash units from other vendors that can use a PC cable, or even Nikon-brand Speedlights that you elect to connect to the Z6 in a non-CLS, “unintelligent” mode.
- Radio/Infrared transmitter/receivers. Another way to link flash units to the Z6 is through a radio transmitter/receiver system, using either a dedicated radio-compatible flash unit, such as the Nikon SB-5000 (see Figure 9.1), or an add-on wireless infrared or radio transmitter, like a PocketWizard, Radio Popper, or the Godox X wireless system. These are generally mounted on the accessory shoe of the Z6, and emit a signal when the Z6 sends a command to fire through the hot shoe. The simplest of these function as a wireless PC/X connector, with no other communication between the camera and flash (other than the instruction to fire). However, sophisticated units have their own built-in controls and can send additional commands to the receivers when connected to compatible flash units. I use one to adjust the power output of my Alien Bees studio flash from the camera, without the need to walk over to the flash itself.

Figure 9.1 The Nikon SB-5000 offers radio control and built-in light modifiers like the bounce card shown.
- Simple slave connection. In the days before intelligent wireless communication, the most common way to trigger off-camera, non-wired flash units was through a slave unit. These can be small external triggers connected to the remote flash (or built into the flash itself), and set off when the slave’s optical sensor detects a burst initiated by the camera. When it “sees” the main flash, the slave flash units are triggered quickly enough to contribute to the same exposure. The main problem with this type of connection—other than the lack of any intelligent communication between the camera and flash—is that the slave may be fooled by any pre-flashes that are emitted by the other strobes, and fire too soon. Modern slave triggers have a special “digital” mode that ignores the pre-flash and fires only from the main flash burst.
The Moment of Exposure
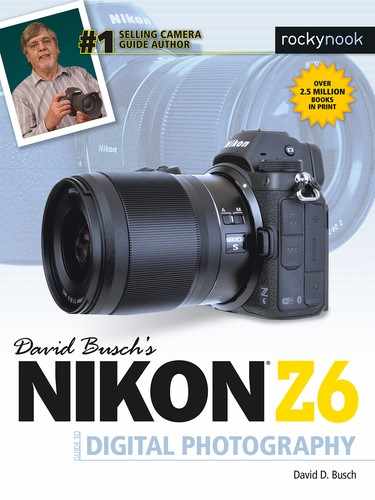
The Z6 has a vertically traveling shutter that consists of two curtains. Just before the flash fires, the front (first) curtain opens and moves down to the opposite side of the frame, at which point the shutter is completely open. The flash can be triggered at this point (so-called front-curtain sync), making the flash exposure. Then, after a delay that can vary from 30 seconds to 1/200th second (or faster when high-speed sync, discussed later, is used), a rear (second) curtain begins moving down the sensor plane, covering up the sensor again. If the flash is triggered just before the rear curtain starts to close, then rear-curtain sync is used. In both cases, though, a shutter speed of 1/200th second is the maximum that can be used to take a photo, unless you’re using the high-speed 1/200th (Auto FP) sync setting.
Figure 9.2 A focal plane shutter has two curtains, the lower, or front (first) curtain, and an upper, rear (second) curtain.
Figure 9.2 illustrates how this works, with a fanciful illustration of a generic shutter (your Z6’s shutter does not look like this). Both curtains are tightly closed at upper left. At upper right, the front curtain begins to move downward, starting to expose a narrow slit that reveals the sensor behind the shutter. At lower left, the front curtain moves downward farther until, as you can see at lower right in the figure, the sensor is fully exposed.
Here’s a more detailed look at what transpires when you take a photo using electronic flash, all within a few milliseconds of time. The following list assumes you are using iTTL exposure mode.
- 1. Flash Sync mode. After you’ve selected a shooting mode, choose the flash sync option available. You can access the Flash Mode entry in the Photo Shooting menu, press the i button, and navigate to the Flash Mode, which will be located third from the left in the top row (unless you’ve customized your i menu). If you change flash sync mode frequently, you can also define a button to summon the adjustment using Custom Setting f2: Custom Control Assignment (described in Chapter 12). I’ll explain your sync options shortly.
- 2. Metering method. Choose the metering method you want, from Matrix, Center-weighted, Spot, or Highlight-weighted metering.
- 3. Activate flash. Mount an external flash (or connect it with a cable) and turn it on. A ready light appears in the viewfinder and on the back of the dedicated flash when the unit is ready to take a picture (although the flash might not be fully charged when the indicator first appears).
- 4. Check exposure. Select a shutter speed when using Manual, Program, or Shutter-priority modes; select an aperture when using Aperture-priority and Manual exposure modes.
- 5. Preview lighting. If you want to preview the lighting effect, assign the Preview behavior to a button (Fn1 or Fn2 are the traditional choices). Press that button to produce a modeling flash burst.
- 6. Lock flash setting (if desired). Optionally, if the main subject is located significantly off-center, you can frame so the subject is centered, lock the flash at the exposure needed to illuminate that subject, and then reframe using the composition you want. Lock the flash level using the Flash Value (FV) Lock button you designate (many assign the Fn1 or Fn 2 button to this function, using Custom Settings f2). Press the FV lock button, and the flash will emit a monitor pre-flash to determine the correct flash level, and then the Z6 will lock the flash at that level until you press the FV lock button again to release it. FV lock icons appear in the monochrome control panel and the viewfinder.
- 7. Take photo. Press the shutter release down all the way.
- 8. Z6 receives distance data. Z-mount lenses, as well as F-mount E-, D-, or G-series lenses attached using the FTZ adapter, now supply focus distance to the Z6.
- 9. Pre-flash emitted. The external flash sends out several pre-flash bursts. One series of bursts can be used to control additional wireless flash units in Commander mode, while another is used to determine exposure. The pre-flashes happen in such a brief period before the main flash that they are virtually undetectable.
- 10. Exposure calculated. The pre-flash bounces back and is measured at the sensor. It calculates brightness and contrast of the image to calculate exposure. If you’re using Matrix metering (more on metering modes shortly), the Z6 evaluates the scene to determine whether the subject may be backlit (for fill flash), a subject requires extra ambient light exposure to balance the scene with the flash exposure, or classifies the scene in some other way. The camera-to-subject information as well as the degree of sharp focus of the subject matter is used to locate the subject within the frame. If you’ve selected Spot metering, only standard i-TTL (without balanced fill flash) is used. (See the sidebar i-TTL Flash Control.)
- 11. Front curtain opens. The exposure by ambient light begins when the physical shutter curtain is fully open.
- 12. Flash fired. At the correct triggering moment (depending on whether front or rear sync is used), the camera sends a signal to one or more flashes to start flash discharge. The flash is quenched as soon as the correct exposure has been achieved.
- 13. Shutter closes. The shutter closes and the live view from the sensor resumes. You’re ready to take another picture. Remember to press the defined FV lock button (if used) again to release the flash exposure if your next shot will use a different composition.
- 14. Exposure confirmed. Ordinarily, the full charge in the flash may not be required. If the flash indicator in the viewfinder blinks for about three seconds after the exposure, that means that the entire flash charge was required, and it could mean that the full charge wasn’t enough for a proper exposure. Be sure to review your image on the monitor to make sure it’s not underexposed, and, if it is, make adjustments (such as increasing the ISO setting of the Z6) to remedy the situation.
CLS-compatible flash units include up to several Flash Control modes, depending on the model. (I’ll explain them all later in this chapter.) With the one you’ll use most often, TTL mode, the camera calculates and sets flash exposure (but applies any flash exposure compensation you dial in, as explained later). In Manual mode, you adjust the output level of the flash.
In TTL mode, the camera selects one of two variations:
- i-TTL balanced fill-flash. The Z6 analyzes the preflash reflection from all areas of the frame, and adjusts the output to provide a balance between the main subject of your image and the background lighting.
- Standard i-TTL fill-flash. The brightness of the background is not considered in setting the flash output. This mode tends to emphasize the main subject, even if some background detail is lost. You can force the Z6 to select Standard i-TTL fill-flash by switching to Spot Metering mode. Use flash exposure compensation to adjust the main subject/background balance as required.
UNIFIED FLASH CONTROL
Nikon electronic flash units have their own sets of controls, so Nikon has implemented a feature called unified flash control, which simply means that with compatible CLS flash, you can change duplicated settings on either the flash unit or camera (or remotely using the optional Camera Control 2 software), and the adjustments are automatically made on the other device. You don’t have to worry about accidentally overriding your own settings. Currently, the flash units implementing unified flash control are the SB-300, SB-400, SB-500, and SB-5000.
A Tale of Two Exposures
Calculating the proper exposure for an electronic flash photograph is a bit more complicated than determining the settings for continuous light. The right exposure isn’t simply a function of how far away your subject is (which the camera can figure out based on the autofocus distance that’s locked in just prior to taking the picture). Various objects reflect more or less light at the same distance so, obviously, the camera needs to measure the amount of light reflected back and through the lens.
That measurement is complicated by two things: a picture taken using flash is actually two separate exposures: the exposure produced by the flash itself, and the exposure that results from the continuous, ambient light that is also illuminating your subject. If the Z6’s calculations are correct, the plane in which your main subject resides will be properly exposed. However, anything more than slightly in front of or behind that plane will be overexposed or underexposed (respectively), thanks to the inverse square law I mentioned in Chapter 8. To recap, the intensity of the light is inversely proportional to the square of the distance. In practice, that means a light source that is 12 feet away from a subject provides only one-quarter as much illumination as the same source located 6 feet away. In f/stop terms, you need to open up two stops whenever the distance doubles. (See Figure 9.3.)
So, as you shoot, you need to consider “depth-of-light” (the range in which a subject is acceptably illuminated in front of and behind the plane used to calculate the exposure) in addition to depth-of-field. Fortunately, in many flash photography situations, the main subject is the closest thing to the camera, so there often won’t be a problem with overexposed foreground objects.
Backgrounds, however, are another story. In daylight situations, balancing the flash and ambient illumination more or less takes care of itself automatically. Photographers generally let the daylight provide most of the exposure, and use the flash only to fill in shadows.
However, if you’re photographing indoors or at night, the background, not illuminated by the flash, will appear darker than the foreground subject. Fortunately, every flash picture consists of two exposures, the exposure produced by the flash, and a second exposure that results from the background illumination. For the flash exposure, the shutter speed is more-or-less irrelevant, as long as you’re using a shutter speed slower than the synchronization speed of the camera—1/200th second in the case of the Nikon Z6. The f/stop selected and the power output of the flash determine the exposure.
The ambient light exposure is more “normal,” using both the shutter speed and aperture. Slower shutter speeds allow more ambient light to reach the sensor, and higher shutter speeds allow less. If you want to minimize the ambient portion of the exposure, use a higher shutter speed, up to 1/200th second when not using High-Speed Sync (discussed later in this chapter). To maximize the ambient exposure, use a slower shutter speed. The Z6 has a special Slow Sync shutter setting that automatically uses these slower speeds to balance flash/ambient exposures, but you can also use Custom Setting e2: Flash Shutter Speed to specify the slowest/fastest shutter speed used under normal conditions.

Figure 9.3 A light source that is twice as far away provides only one-quarter as much illumination.

Figure 9.4 Electronic flash illuminated the foreground, and incandescent lighting illuminated the background in this mixed-lighting example.
There are several complications involved in balancing flash and ambient light exposures. So-called “mixed” lighting is one of them. Your flash is balanced for daylight, while ambient light is often incandescent or some other “warm” illumination. This mixture is exaggerated in Figure 9.4, which shows the Plaza Mayor in Segovia, Spain, with the city’s cathedral in the background lit by incandescent lamps, with the foreground illuminated by flash. The solution in this case would be to install an orange-tinted “warming” filter on the flash (many Nikon Speedlights include them) to balance the flash illumination with the incandescent background.
The second problem that arises stems from the fact that while the flash exposure is concluded in an instant (typically 1/1,000th to 1/50,000th of a second), the ambient light continues for the entire time the shutter is open. So, you end up with two images produced by the dual exposures. If the subject is moving, the additional ambient light exposure produces a “ghost” image. The best way of handling that conundrum is to adjust the sync setting of the camera, and I’m going to explain how to do that shortly.
Measuring Exposure
By this time, you should be wondering how the Nikon Z6 measures the flash, as the flash burst isn’t available for evaluation until it’s triggered, when you press the shutter release down all the way to take the picture. The solution is to fire the flash multiple times. The first pulse is a monitor preflash that can be analyzed, then followed virtually instantaneously by a series of pulses (if required) to communicate wirelessly with any optically triggered remote flash units. (You’ll find more on advanced wireless lighting in Chapter 10.) Only then is the main flash triggered, which (when shooting in autoflash mode) emits exactly the calculated intensity needed for a correct exposure. (All these pulses happen so quickly that they may appear to you to be a single burst.)
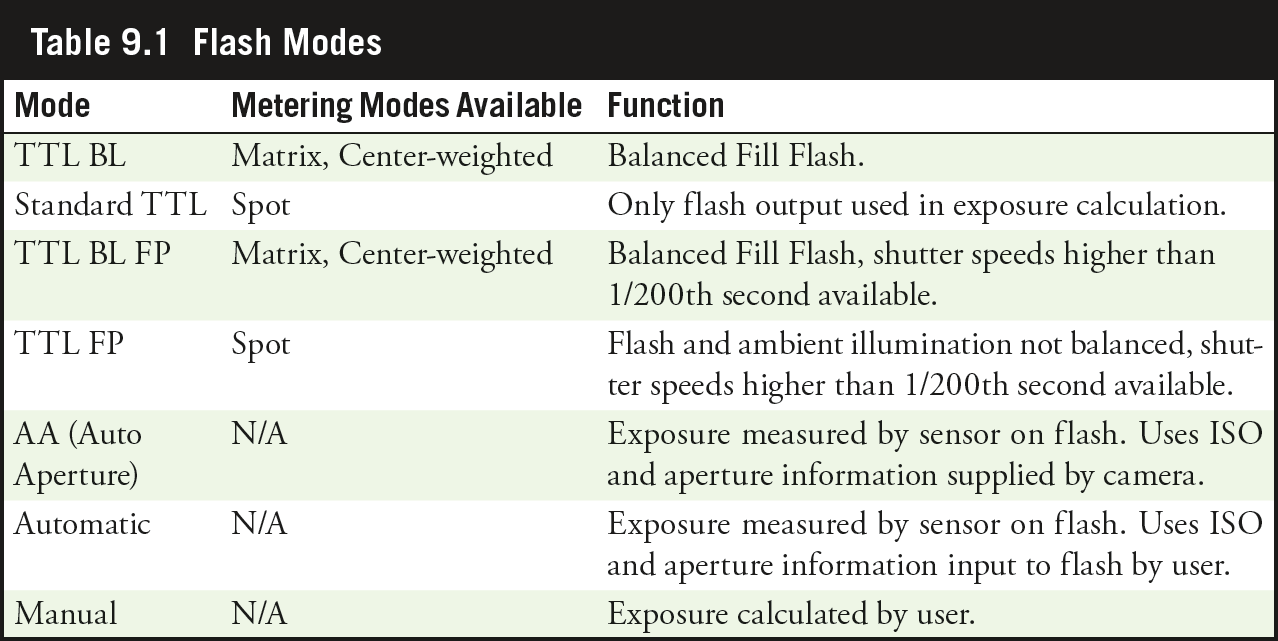
Because of the exposure calculations, the primary flash may be longer in duration for distant objects and shorter in duration for closer subjects, depending on the required intensity for exposure. This default through-the-lens evaluative flash exposure system is called i-TTL BL (for intelligent Through The Lens, Balanced Fill Flash), and can operate whenever you have attached a Nikon dedicated flash unit to the Z6. There are additional modes that will be discussed later, and not all modes are available with every flash unit, but all the modes are listed in Table 9.1. These modes are set using your particular electronic flash’s controls, as described in your unit’s manual.
The amount of light emitted by the flash is changed in an interesting way—interrupting the flash as the charge flows from the capacitor through the flash tube. When full power is required, either to supply the correct exposure in automatic modes or because you’re using the flash in Manual mode at the full power (1/1) setting, then all the energy in the capacitor flows through the flash tube. However, if less than full power is needed, the energy is stopped partway through the exposure by opening the circuit with a solid-state switch. In the olden days this was always done using a component called a thyristor, but today a component called an insulated-gate bipolar transistor, or IGBT, is more common.
Because the current is interrupted before the full power of the capacitor is used, the resulting burst becomes shorter as the power output is reduced. For example, with some Nikon flash units you might see a burst lasting about 1/1,000th second at full power, but only a little longer than 1/10,000th second at 1/16th power, or 1/40,000th second at 1/128th power. (The SB-5000 adds a 1/256th power option, providing a 1/30,800th second exposure.) This behavior is nifty when you want to freeze really fast action, such as falling water droplets—just use a lower power output level and/or work extremely close to your subject.
Because the full contents of the capacitor are not used with these partial flashes, the Speedlight is able to recycle more quickly, or even use the retained energy to fire multiple times in Repeating flash mode (described later in this chapter). The only downside is that shorter flash exposures tend to take on a bluish tinge as the duration decreases. That’s because the burst starts out with a very cool color temperature and ends up much warmer at the end of the burst, averaging out to a hue that’s pretty close to daylight in color balance. When you trim off the reddish end of the flash, your resulting image may be noticeably more blue. That’s why the Flash color balance of the Z6 doesn’t always produce a pleasing color rendition. You may have to fine-tune the white balance, as described in Chapter 11, or shoot RAW and correct in your image editor.
Those of you using studio flash units may be interested to know that your non-automatic strobes produce their varying power levels in a different way. With the typical studio flash, the capacitor is always fully discharged each time you take a picture, and then recharged to the level you specify for the next shot. It happens very quickly because you’re using AC power or a high-voltage battery pack instead of low-capacity alkaline or rechargeable cells.
If you set the flash for 1/2 power, the capacitor (or capacitors—studio flash may use several of them) is charged only half-filled; at 1/4 power it’s only replenished to 25 percent of its capacity. Then, when you take the photo, the full contents of the capacitor are sent through the flash tube. That’s why you need to “dump” your studio flash when you reduce the power output from a higher level. The capacitor retains the charge that was in there before, and can’t fire at the reduced capacity you want until the existing power is dumped and then replenished to the level you specify. Because of the way studio flash store and release their power, they can be designed to be more consistent at different power levels than your typical Nikon flash unit. Of course, wild color variations from flash units aren’t a huge problem, but just something you should be aware of.
So, to summarize, with CLS-compatible flash units, your automatic exposure is calculated by measuring a pre-flash and determining an appropriate exposure from that. There are other exposure modes than i-TTL available from Nikon external flash units, and I’ll get into them later in this chapter, but this section has described the process in a nutshell.
Guide Numbers
Guide numbers, usually abbreviated GN, were originally developed as a way of calculating exposure manually, but today are more useful as a measurement of the power of an electronic flash unit. A GN is usually given as a pair of numbers for both feet and meters that represent the range at ISO 100. For example, the Nikon SB-910 has a GN in i-TTL mode of 48/157 (meters/feet) at ISO 200 when using the coverage needed for a 35mm lens (the flash has a zoom head to spread/narrow the light for a range of focal lengths). To calculate the right exposure at that ISO setting, you’d divide the guide number by the distance to arrive at the appropriate f/stop.
Using the SB-5000 as an example, at ISO 100 with its GN of 113, if you wanted to shoot a subject at a distance of 10 feet, you’d use f/11.3 (or, f/11). At 5 feet, an f/stop of f/22 would be used. Some quick mental calculations with the GN will give you any particular electronic flash’s range. Many years ago Nikon offered a 45mm GN lens that could couple the f/stop setting of the lens with the focus distance. You specified the guide number of the flash using a scale on the lens itself, and as you focused closer or farther away the f/stop was reduced or increased to match. Today, guide numbers are most useful for comparing the power of various flash units, rather than actually calculating what exposure to use.
Choosing a Flash Sync Mode
In addition to the flash modes mentioned earlier, the Nikon Z6 has five flash sync modes, plus a sixth (High-Speed Sync, described later) that comes into play in some circumstances. The five main modes, plus Off (which disables the flash) are selected with the i menu or the Photo Shooting menu’s Flash Mode entry. (See Figure 9.5 for the icons.) Those modes (which I’ve listed in logical order, so the explanation will make more sense, rather than the order in which they appear during the selection cycle) are as follows:
- Fill flash/Front-curtain sync (available in PSAM modes). This setting, available in all exposure modes, should be your default setting. In this mode the flash fires as soon as the front curtain opens completely. The shutter then remains open for the duration of the exposure, until the rear curtain closes. If the subject is moving and ambient light levels are high enough, the movement will cause that secondary “ghost” exposure that appears in front of the flash exposure.
- Rear-curtain sync (available in PSAM modes). With this setting, which can be used with Program, Shutter-priority, Aperture-priority, or Manual exposure modes, the front curtain opens completely and remains open for the duration of the exposure. Then, the flash is fired and the rear curtain closes. If the subject is moving and ambient light levels are high enough, the movement will cause a secondary “ghost” exposure that appears behind the flash exposure (trailing it). You’ll find more on “ghost” exposures next. In Program and Aperture-priority modes, the Z6 will combine rear-curtain sync with slow shutter speeds (just like slow sync, discussed below) to balance ambient light with flash illumination. (It’s best to use a tripod to avoid blur at these slow shutter speeds.)
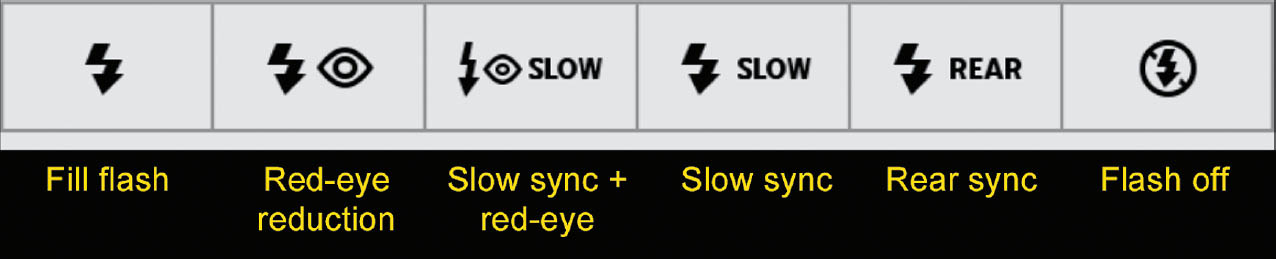
Figure 9.5 Icons for flash sync modes include fill flash/front-curtain sync, red-eye reduction, red-eye reduction with slow sync, slow sync, rear sync/slow rear-sync, and flash off.
- Red-eye reduction (available in PSAM modes). In this PSAM-compatible mode, there is a one-second lag after pressing the shutter release before the picture is actually taken, during which the Z6 uses the attached flash unit’s red-eye reduction feature, causing the subject’s pupils to contract (assuming they are looking at the camera), and thus reducing potential redeye effects. Don’t use with moving subjects or when you can’t abide the delay.
- Slow sync (available in P or A modes). This setting allows the Z6 in Program and Aperture-priority modes to use shutter speeds as slow as 30 seconds with the flash to help balance a background illuminated with ambient light with your main subject, which will be lit by the electronic flash. You’ll want to use a tripod at slower shutter speeds, of course.
- Slow rear-curtain sync (available in P or A modes). With this setting, which can be used with Program or Aperture-priority modes, the front curtain opens completely and remains open for the duration of the exposure. Then, the flash is fired and the rear curtain closes. Exposures as long as 30 seconds can be used to capture background lighting under low-light conditions. The indicator is the same as Rear Sync, but when you release the flash button “Slow” appears on the monitor.
- Red-eye reduction with slow sync (available in P or A modes). This mode combines slow sync with the Z6’s external flash red-eye reduction behavior when using Program or Aperture-priority modes.
- Flash off. The flash does not fire, even if powered on.
Ghost Images
The difference might not seem like much, but whether you use front-curtain sync (the default setting) or rear-curtain sync (an optional setting) can make a significant difference to your photograph if the ambient light in your scene also contributes to the image. At faster shutter speeds, particularly 1/200th second, there isn’t much time for the ambient light to register, unless it is very bright. It’s likely that the electronic flash will provide almost all the illumination, so front-curtain sync or rear-curtain sync isn’t very important.
However, at slower shutter speeds, or with very bright ambient light levels, there is a significant difference, particularly if your subject is moving, or the camera isn’t steady. In any of those situations, the ambient light will register as a second image accompanying the flash exposure, and if there is movement (camera or subject), that additional image will not be in the same place as the flash exposure. It will show as a ghost image and, if the movement is significant enough, as a blurred ghost image trailing in front of or behind your subject in the direction of the movement.
As I mentioned earlier, when you’re using front-curtain sync, the flash goes off the instant the shutter opens, producing an image of the subject on the sensor. Then, the shutter remains open for an additional period (which can be from 30 seconds to 1/200th second). If your subject is moving, say, toward the right side of the frame, the ghost image produced by the ambient light will produce a blur on the right side of the original subject image. That makes it look as if your sharp (flash-produced) image is chasing the ghost (see Figure 9.6, top), which looks unnatural to those of us who grew up with lightning-fast Justice League–style superheroes (rather than modern dancers) who always left a ghost trail behind them (see Figure 9.6, bottom).
So, Nikon provides rear-curtain sync to remedy the situation. In that mode, the shutter opens, as before. The shutter remains open for its designated duration, and the ghost image forms. If your subject moves from the left side of the frame to the right side, the ghost will move from left to right, too. Then, about 1.5 milliseconds before the rear shutter curtain closes, the flash is triggered, producing a nice, sharp flash image ahead of the ghost image.
EVERY WHICH WAY, INCLUDING UP
Note that, although I describe the ghost effect in terms of subject matter that is moving left to right in a horizontally oriented composition, it can occur in any orientation, and with the subject moving in any direction. (Try photographing a falling rock, if you can, and you’ll see the same effect.) Nor are the ghost images affected by the fact that modern shutters travel vertically rather than horizontally. Secondary images are caused between the time the front curtain fully opens, and the rear curtain begins to close. The direction of travel of the shutter curtains, or the direction of your subject, does not matter.
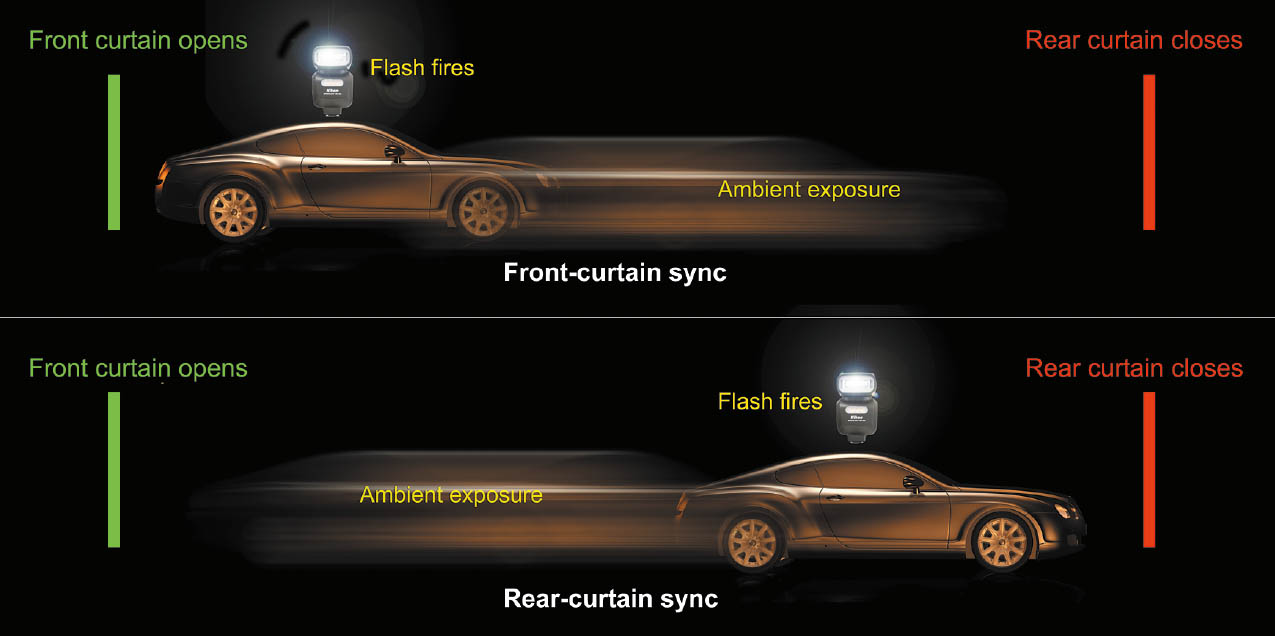
Figure 9.6 Front-curtain sync produces an image that trails in front of the flash exposure (top), while rear-curtain sync creates a more “natural-looking” trail behind the flash image (bottom).
Avoiding Sync Speed Problems
Using a shutter speed faster than 1/200th second can cause problems. Triggering the electronic flash only when the shutter is completely open makes a lot of sense if you think about what’s going on. To obtain shutter speeds faster than 1/200th second, the Z6 exposes only part of the sensor at one time, by starting the second curtain on its journey before the first curtain has completely opened, as shown in Figure 9.7. That effectively provides a briefer exposure as a slit of the shutter passes over the surface of the sensor. If the flash were to fire during the time when the front and rear curtains partially obscured the sensor, only the slit that was actually open would be exposed.
You’d end up with only a narrow band, representing the portion of the sensor that was exposed when the picture is taken. For shutter speeds faster than 1/200th second, the rear curtain begins moving before the front curtain reaches the bottom of the frame. As a result, a moving slit, the distance between the front and rear curtains, exposes one portion of the sensor at a time as it moves from the top to the bottom. Figure 9.7 shows three views of our typical (but imaginary) focal plane shutter. At left is pictured the closed shutter; in the middle version you can see the front curtain has moved down about 1/4 of the distance to the top; and in the right-hand version, the rear curtain has started to “chase” the front curtain across the frame toward the bottom.
If the flash is triggered while this slit is moving, only the exposed portion of the sensor will receive any illumination. You end up with a photo like the one shown in Figure 9.8. Note that a band across the bottom of the image is black. That’s a shadow of the rear shutter curtain, which had started to move when the flash was triggered. Sharp-eyed readers will wonder why the black band is at the bottom of the frame rather than at the top, where the rear curtain begins its journey. The answer is simple: your lens flips the image upside down and forms it on the sensor in a reversed position. You never notice that, because the camera is smart enough to show you the pixels that make up your photo in their proper orientation during picture review. But this image flip is why, if your sensor gets dirty and you detect a spot of dust in the upper half of a test photo, if cleaning manually, you need to look for the speck in the bottom half of the sensor.
I generally end up with sync speed problems only when shooting in the studio, using studio flash units rather than my Nikon-dedicated Speedlights. That’s because if you’re using “smart” flash (like one of the Nikon Speedlights), the camera knows that a strobe is attached, and remedies any unintentional goof in shutter speed settings. If you happen to set the Z6’s shutter to a faster speed in S or M mode, the camera will automatically adjust the shutter speed down to 1/200th second as soon as you turn on the flash (or prevent you from choosing a faster speed if the flash is already powered up). In A or P modes, where the Z6 selects the shutter speed, it will never choose a shutter speed higher than 1/200th second when using flash. In P mode, shutter speed is automatically set from 1/60th to 1/200th second when using flash.
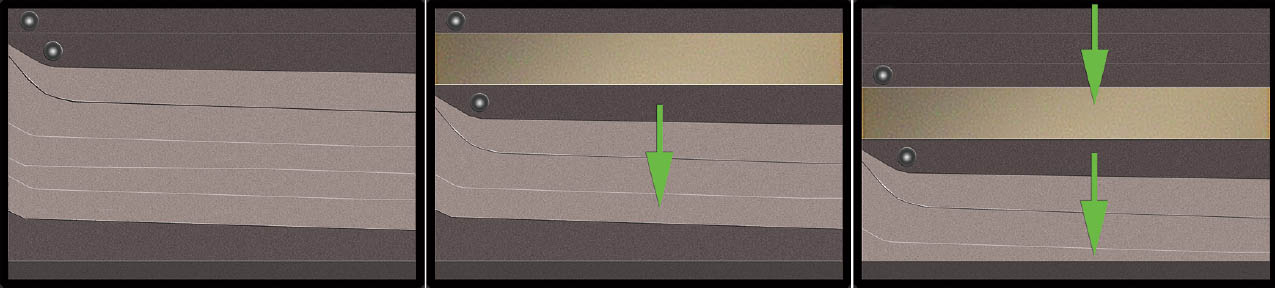
Figure 9.7 A closed shutter (left); partially open shutter as the front curtain begins to move downward (middle); only part of the sensor is exposed as the slit moves (right).
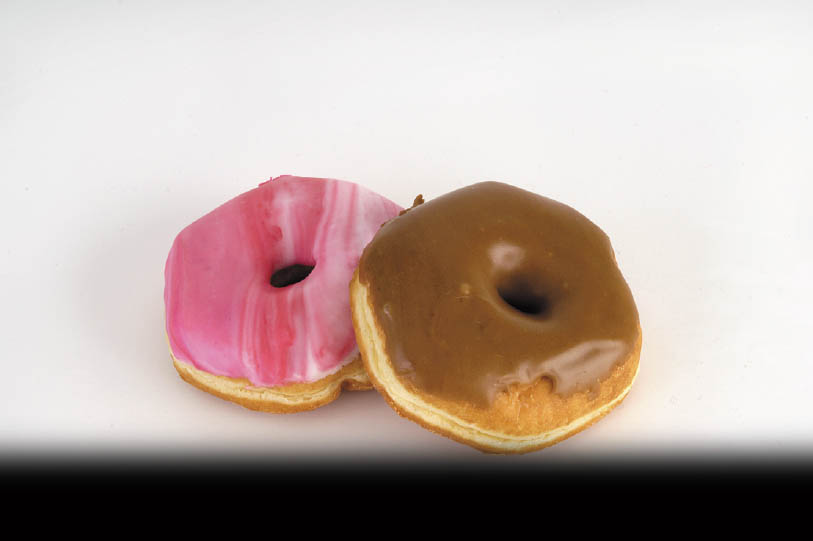
Figure 9.8 If a shutter speed faster than 1/200th second is used, you can end up photographing only a portion of the image.
But when using a non-dedicated flash, such as a studio unit plugged into an adapter mounted on the accessory shoe, the camera has no way of knowing that a flash is connected, so shutter speeds faster than 1/200th second can be set inadvertently. To avoid that problem with studio flash, I strongly recommend setting your camera to Manual exposure, and using the x200 shutter speed, which is located past the Bulb speed when rotating the main command dial all the way to the left. You won’t have to worry as much about accidentally changing the shutter speed to an unusable setting; there is no speed beyond x200th second, and if you nudge the main command dial to the right, in Manual exposure mode, you’ll get a Bulb or Time exposure, which will immediately become evident.
High-Speed Sync
Note that the Z6 can use a feature called high-speed sync that allows shutter speeds faster than 1/200th second with certain external dedicated Nikon flash units. When using high-speed sync, the flash fires a continuous series of bursts at reduced power for the entire duration of the exposure, so that the illumination is able to expose the sensor as the slit moves. HS sync is set using the controls that adjust the compatible external flash. You don’t need to make any special settings on the flash; the Z6 takes care of the details for you, as I’ll describe in this section.
As I said earlier, triggering the electronic flash only when the shutter is completely open makes a lot of sense if you think about what’s going on. To obtain shutter speeds faster than 1/200th second, the Z6 exposes only part of the sensor at one time, by starting the rear curtain on its journey before the front curtain has completely opened. That effectively provides a briefer exposure as a slit of the shutter passes over the surface of the sensor. If the flash were to fire during the time when the front and rear curtains partially obscured the sensor, only the area defined by the slit that was actually open would be exposed.
This technique is most useful outdoors when you need fill-in flash, but find that 1/200th second is way too slow for the f/stop you want to use. For example, at ISO 200, an outdoors exposure is likely to be 1/200th second at, say, f/14, which is perfectly fine for an ambient/balanced fill-flash exposure if you don’t mind the extreme depth-of-field offered by the small f/stop. But, what if you’d rather shoot at 1/1,600th second at f/5.6? High-speed sync will let you do that, and you probably won’t mind the reduced flash power, because you’re looking for fill flash, anyway. This sync mode offers more flexibility than, say, dropping down to ISO 100.
High-speed sync is also useful when you want to use a larger f/stop to limit the amount of depth-of-field. Select a shutter speed higher than 1/200th second, and the faster-sync speed automatically reduces the effective light of the flash, without other intervention from you.
To use Auto FP sync with units like the Nikon SB-5000, SB-910/SB-900, SB-700, SB-500, SB-R200 units and a few discontinued Speedlights like the SB-800 and SB-600, there is no setting to make on the flash itself. You need to use Custom Setting e1 to specify 1/200 s (Auto FP). When using P or A exposure modes, the shutter speed will be set to 1/200th second when a compatible external flash is attached. Higher shutter speeds than 1/200th second—all the way up to 1/8,000th second—can then be used with full synchronization, at reduced flash output. There are also situations in which you might want to set flash sync speed to less than 1/200th second, say, because you want ambient light to produce secondary ghost images in your frame. You can choose the following settings:
- 1/200 s (Auto FP). This similar setting allows using the compatible external flash units with high-speed synchronization at 1/200th second or faster, and activates auto FP sync when the camera selects a shutter speed of 1/200th second or faster in programmed and Aperture-priority modes. Other flash units will be used at speeds no faster than 1/200th second.
- 1/200 s. At this default setting, only shutter speeds up to 1/200th second can be used with flash. Note: To lock in shutter speed at 1/200th second, rotate the main control dial in M or S modes to choose the x200 setting located after the 30 s (and Time and Bulb in Manual exposure) speeds. You’d use this when working with “dumb” studio flash units.
- 1/200 s–1/60 s. You can also specify a specific shutter speed from the range of speeds 1/200th second to 1/60th second to be used as the synchronization speed for external flash units. Forcing a slower shutter speed produces a “slow sync” effect. For example, when 1/60th second has been set as the maximum flash shutter speed, ambient light is more likely to contribute to the exposure. (See Figure 9.9.) That can help balance the flash exposure with available light falling on the background (use a tripod or VR to minimize ghost images). Or, that slow shutter speed can help generate ghost images when you intentionally want them to appear in your image, say, to create a feeling of motion.

Figure 9.9 At 1/60th second, the ambient light behind the actor provided detail in the background (left). With a shutter speed of 1/200th second, the background is dark (right).
Using External Flash
In this section, we’ll deal with the Nikon Creative Lighting System (CLS), which was introduced in July 2003, when the company unveiled the Speedlight SB-800, a flash unit compatible with early professional digital SLRs, such as the Nikon D2h/D2hs, and, within a few months, more affordable models like 2004’s Nikon D70 and all subsequent dSLRs from the company. CLS has the following features, although not all of these are supported by every Nikon camera:
- i-TTL. Intelligent through-the-lens exposure control calculates exposure based on a monitor pre-flash that is fired a fraction of a second before the main burst, and then evaluated by the same RGB exposure sensor used for continuous light measurements. The system’s intelligence allows sophisticated adjustments, such as balancing the flash exposure with the ambient light exposure, say, when you shoot in full daylight to fill in the shadows.
- Advanced wireless lighting. AWL is a system that uses the same pre-flash concept to communicate triggering and exposure information to external flash units that aren’t physically linked to the camera, and located within a reasonable distance (say, about 30 feet). You may be able to divide multiple flash units into up to three different “groups,” and communicate with them using your choice of any of four “channels” (to avoid having your flash units triggered by the master flash of another Nikon photographer in the vicinity). I’ll explain AWL in more detail in Chapter 10.
- FV Lock. A flash value locking system allows you to fix in place the current flash exposure so that you can, for example, measure flash exposure for a subject that is not in the center of the frame, and then reframe while using that value for subsequent exposures. You can define the Fn button to perform this function, as described in Chapter 12. When FV lock is activated, the Z6 meters only a center area measuring 8mm even if Matrix metering has been selected, when the flash is mounted in the hot shoe. In wireless modes, metering is done using the average of the entire frame.
- Auto FP high-speed sync. Focal plane HS sync allows synchronizing an external flash while using shutter speeds faster than 1/200th second. With a compatible flash and a camera like the Z6, shutter speeds up to 1/8,000th second can be used, although only a part of the flash’s illumination is used and flash range is reduced (sometimes to as little as a few feet).
- Focus assist. Although the Z6 has focus assist illumination built-in, the CLS system also allows including wide-area AF-assist illumination to be built into the front of the flash unit, or into a flash connecting cable. Auxiliary focus assist illumination offers wider and/or more distant coverage.
- Zoom coverage. Some CLS-compatible flash units have a powered zoom head built in to allow changing the area covered by the flash to match the focal length of the lens in use, as communicated by the camera to the flash itself. Zooming can also be done manually.
- Flash color information communication. The exact color temperature of the light emitted by a CLS-compatible flash can vary, based on the duration of the flash burst. The flash is initially rather blue in color, and becomes redder as the burst continues. The Speedlight is able to send information to the camera to allow adjusting white balance in AWB mode based on the true color information of the flash exposure.
If you want to temporarily disable a flash that’s attached and powered up, a handy way to do this is to assign the Flash Disable/Enable function to the Fn1 or Fn2 buttons, using Custom Setting f2, as described in Chapter 12. Then, when you press the button, any external flash attached and powered up will not fire while the button is held down. This is useful if you want to temporarily disable the flash, say, to take a picture or two by available light, and then return to normal flash operation.
Using Flash Exposure Compensation
If the exposure produced by your flash isn’t satisfactory, you can manually add or subtract exposure to the flash exposure calculated by the Z6. You can use the Flash Compensation entry in the Photo Shooting menu, or assign Flash Mode/Flash Compensation to a button, such as Fn1, using Custom Setting f2: Custom Control Assignment, as explained in Chapter 12. When assigned to a button, you can adjust Flash Mode by pressing the button and rotating the main command dial, and Flash Compensation by holding the button and rotating the sub-command dial. You can make adjustments from –3 EV to +1 EV in 1/3 EV increments.
As with ordinary exposure compensation, the adjustment you make remains in effect until you zero it out by pressing the Flash button and rotating the sub-command dial until 0 appears on the monochrome control panel and in the viewfinder. To view the current flash exposure compensation setting, press the Flash button. When compensation is being used, an icon will be displayed in the viewfinder and on the control panel.
As also described in Chapter 12, you can use Custom Setting e3: Exposure Compensation for Flash to balance ambient light and flash exposure over the entire frame, or just take into account the background. The option specifies how the camera modifies the flash level when you apply exposure compensation. (The Z6 has separate ambient light exposure compensation and flash exposure compensation settings.) You can adjust one or the other, or both if you are using flash. This setting affects only exposure compensation (the ambient kind) when you are also using flash. It determines how ambient exposure compensation is applied when some of the illumination will also come from a flash unit.
- Entire frame. When you apply ambient exposure compensation (press the EV button on top of the camera to the right of the ISO button and rotate the main command dial), both ambient and flash exposure compensation are adjusted over the entire frame. That balances the exposure for the two elements.
- Background only. When this option is selected only ambient exposure compensation is changed when you apply it; flash exposure compensation is unaffected. So exposure compensation is applied only to the background areas of your image, which are typically illuminated by ambient light. Flash exposure compensation is not affected.
EXPOSURE COMPENSATION COMBINES
An important thing to remember is that any ambient light and flash exposure compensation you specify are combined. So, if you select +2 EV using the Exposure Compensation button on the top of the camera (to the right of the ISO button), and then choose +2 flash exposure compensation, you end up with +4 EV added and, probably, an overexposed image.
Specifying Flash Shutter Speed
This is another way of specifying the shutter speed the Z6 will use when working with flash. Unlike Custom Setting e1: Flash Sync Speed described earlier, this setting determines the slowest shutter speed that is available for electronic flash synchronization when you’re not using a “slow sync” mode. When you want to avoid ghost images from a secondary exposure, you should use the highest shutter speed that will synchronize with your flash. This setting prevents programmed or Aperture-priority modes (which both select the shutter speed for you) from selecting a shutter speed that captures ambient light along with the flash.
With Custom Setting e2: Flash Shutter Speed, select a value from 30 s to 1/60 s, and the Z6 will avoid using speeds slower than the one you specify with electronic flash if you don’t override that decision by deliberately choosing slow sync, slow rear-curtain sync, or red-eye reduction with slow sync. If you think you can hold the Z6 steady, a value of 1/30 s is a good compromise; if you have shaky hands, use 1/60 s or higher. Those with extraordinarily steady grips or who are using vibration reduction can try the 1/15 s setting. Remember that this setting only determines the slowest shutter speed that will be used, not the default shutter speed, which is set with Custom Setting e1.
Previewing Your Flash Effect
The Nikon Z6’s compatible external units, including the SB-5000, SB-910, SB-700, and some earlier models, can simulate a modeling light, in the form of a set of repeated bursts of light that allow you to pre-visualize the effect the strobe will provide when fired for the main exposure. This modeling flash, turned on or off using Custom Setting e5, is not a perfect substitute for a real incandescent or fluorescent modeling lamp, as it lasts only for a short period of time and is not especially bright. However, it does assist in seeing how your subject will be illuminated, so you can spot any potential problems with shadows.
When this feature is activated, if you’ve assigned the Preview (depth-of-field) behavior to a custom button, pressing that control briefly triggers the modeling flash for your preview. Selecting Off disables the feature. You’ll generally want to leave it On, except when you anticipate using the depth-of-field preview button for depth-of-field purposes (imagine that) and do not want the modeling flash to fire when the flash unit is charged and ready. Some external flash units, such as the SB-5000 and SB-910, have their own modeling flash buttons.
Flash Control
As I noted earlier, newer Nikon electronic flash units, such as the Nikon SB-5000, SB-500, SB-400, or SB-300 Speedlights are compatible with the unified flash control system, and can be adjusted by the Flash Control setting in the Photo Shooting menu. All other Nikon electronic flash units, including the SB-600, SB-700, SB-800, SB-900, and SB-910 must be adjusted using the controls on the flash itself. Not all of the options next can be accessed by every one of the Speedlights listed. For example, with the SB-400, you can only choose between TTL and Manual exposure, plus manual output levels. Unavailable options will be grayed out. To use the Flash Control menu entry, the flash must be mounted on the Z6’s hot shoe, powered up, and not set in a Remote mode.
The exact options available from the Flash Control screen will vary, depending on the capabilities of the flash unit you are using. The initial screen may include some or all of the options shown in Figure 9.10, left. The Flash Control Mode screen for the SB-5000 is shown in Figure 9.10, right. I’ll discuss each of the adjustments available, whether they are chosen from the Flash Control menu or using the flash unit’s own controls, in the sections that follow. Consult your flash unit’s manual for the exact procedures used to make the adjustments described.
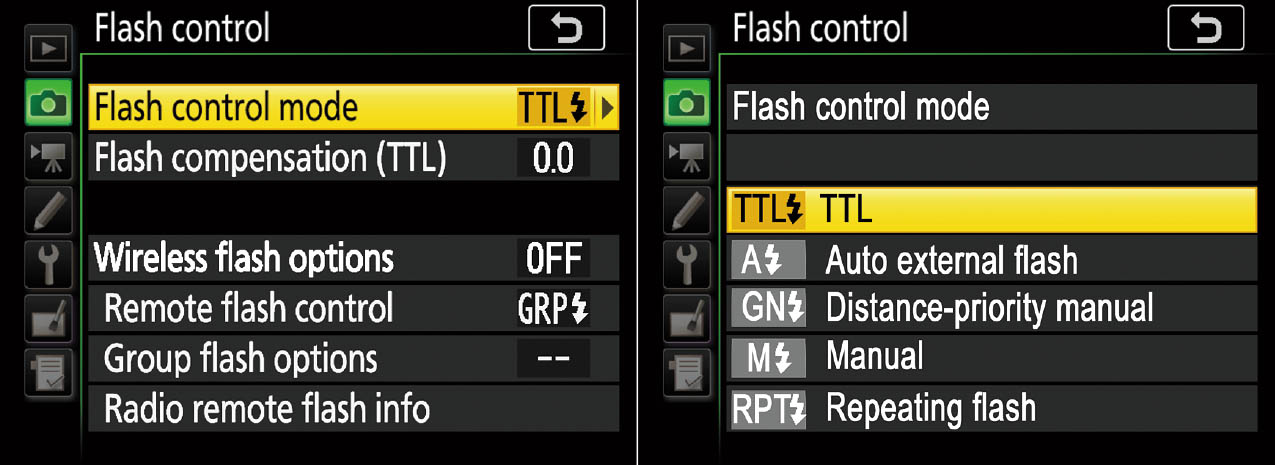
Figure 9.10 Flash Control menu (left); setting flash modes (right).
Working with Nikon Flash External Units
Nikon offers a wide range of external flash units that are compatible with CLS, ranging from the top-of-the-line SB-5000 to the entry-level SB-300, and will probably introduce more Speedlights during the life of this book. In addition, there are a number of older units that have been officially or unofficially discontinued, such as the SB-600, SB-400, SB-800, and SB-910/SB-900, which are still available, in both new and used condition. I’m going to concentrate on the most recent in the following sections.
Nikon SB-300
This entry-level Speedlight, at about $150, is the smallest and most basic of the Nikon series of Speedlights. The SB-300 has a limited, easy-to-use feature set suited for point-and-shoot photography and some slightly more advanced techniques. Do note however that it does not support wireless off-camera flash. The SB-300 has a moderate guide number of 18/59 at ISO 100. Its main advantage, then, is to provide some additional elevation of the flash above the camera to provide an improved coverage angle and less chance of red-eye effects. Its flash head tilts up to 120 degrees, with click stops at 120, 90, 75, and 60 degrees when the flash is pointed directly ahead. It has a zoom flash head. The SB-300 is lighter in weight at 3.4 ounces than the SB-400 it replaces, and uses two AAA batteries.
Nikon SB-400
Recently discontinued, but still widely available new from many retailers, this entry-level Speedlight (see Figure 9.11) was, until the SB-300 was unveiled, the smallest and most basic of the series. The SB-400 has a limited, easy-to-use feature set suited for point-and-shoot photography and some slightly more advanced techniques. Do note however that, like the SB-300, it does not support wireless off-camera flash. The 4.5-ounce SB-400 has a moderate guide number of 21/69 at ISO 100 when the zooming head (which can be set to either 18mm or 27mm) is at the 18mm position. It tilts up to 90 degrees, allowing you to bounce the light off of a ceiling, but it cannot be rotated to the side.
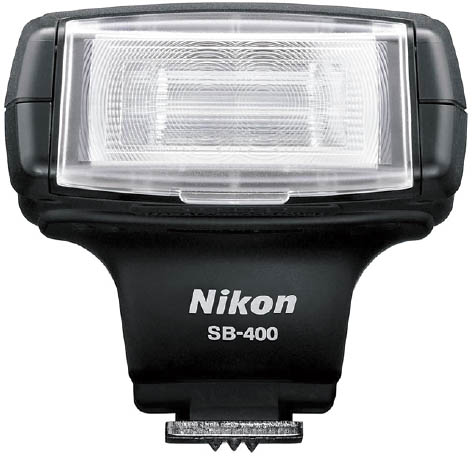
Figure 9.11 The Nikon SB-400 is an entry-level flash best suited for Nikon’s entry-level dSLRs.

Figure 9.12 The Nikon SB-500 attached to an optional bracket.
Nikon SB-500
This Nikon flash unit ($250) has a guide number of 24/79 at ISO 100, a speedy recycle time of about 3.5 seconds, and runs on 2 AA batteries for up to 140 flashes. It includes a built-in LED video light with three output levels, and can also be used for still photography as fill light, especially at the brightest setting. It’s perfect for wireless mode (discussed in Chapter 10), with four wireless channels and two groups available in Commander mode. The SB-500’s head tilts up to 90 degrees, with click-stops at 0, 60, 75, and 90. It rotates horizontally 180 degrees to the left and right, for flexible bounce-flash lighting. If you need a zoom head to adjust flash output to better distribute light at various focal lengths, you’re better off with the SB-700 even with its limited zoom range (described next); this unit lacks zooming capabilities.
Figure 9.12 shows the SB-500 fastened to the optional Nikon SK-7 bracket, and linked to a Nikon Z6 through the available SC-28 cable. There are a couple advantages to this configuration. First, the side-mounting moves the flash even farther from the axis of the lens, providing additional redeye protection. You can still tilt the flash for bounce effects. I find this setup easier to hold, and not as awkward because you don’t have a top-heavy flash unit mounted above the camera.
But, best of all, it’s easy to uncouple the flash/SC-28 from the bracket and use both off-camera. There’s no need to fuss with wireless modes, channels, groups, or other settings; the flash thinks that it’s still connected directly to the Z6—which it is, of course. Another nine-foot cable, the SC-29, is available and has a built-in focus assist illuminator. I own both, but I like having the SC-29’s focus-assist lamp on top of the camera, so that it is aimed at my subject should the Z6 need a bit of extra illumination for focusing. Although the SB-500 has its own focus lamp, it may or may not be pointed at your subject when it comes time to use it.
Nikon SB-700
This affordable (about $330) unit has a guide number of 28/92 (meters/feet) at ISO 100 when set to the 35mm zoom position. It has many of the top-model SB-910’s features, including zoomable flash coverage equal to the field of view of 24-120mm settings with a full-frame camera, and extra-wide 14mm coverage with a built-in diffuser panel. It has a built-in modeling flash feature, and a wireless Commander mode.
But the SB-700 lacks some important features found in the SB-910 and SB-5000. Depending on how you use your Speedlight, these differences may or may not be important to you. They include:
- No repeating flash mode. You can’t shoot interesting stroboscopic effects with the SB-700, as you can with the SB-5000 or older SB-910/900 units.
- No port for external power pack. Using an external battery pack, like those available from Quantum and others, can be important for wedding and event photographers who want to fire off a bunch of shots quickly, while avoiding frequent changes of the AA batteries the SB-700 uses. An external pack has another benefit: more exposures before the Speedlight slows down to prevent overheating. External batteries don’t generate heat inside the flash as internal batteries do.
- No external PC/X sync socket. This option, not found on the SB-700, is of limited use for those who want to attach an off-camera flash to the camera, which does have a PC/X contact.
- Limited zoom range. The SB-700’s zoom head is limited to 24-120mm, plus 14mm with the diffuser panel. The ability to match the zoom head to the focal length you’re using can match the coverage to the field of view, so the flash’s output isn’t wasted illuminating areas that aren’t within the actual frame.
Nikon SB-R200
One oddball flash unit in the Nikon line is the SB-R200. This $165 unit is a specialized wireless-only flash that’s especially useful for close-up photography, and is often purchased in pairs for use with the Nikon R1 and R1C1 Wireless Close-Up Speedlight systems. Its output power is low at 10/33 (meters/feet) for ISO 100 as you might expect for a unit used to photograph subjects that are often inches from the camera. It has a fixed coverage angle of 78 degrees horizontal and 60 degrees vertical, but the flash head tilts down to 60 degrees and up to 45 degrees (with detents every 15 degrees in both directions). In this case, “up” and “down” has a different meaning, because the SB-R200 can be mounted on the SX-1 Attachment Ring mounted around the lens, so the pair of flash units are on the sides and titled toward or away from the optical axis. It supports i-TTL, D-TTL, TTL (for film cameras), and Manual modes.
Nikon SB-910
The Nikon SB-910 was the flagship of the Nikon flash lineup until the SB-5000 model was unveiled. However, the SB-910 remains one of the most-used Nikon flash units (along with its predecessor, the SB-900), so I’ll continue to include it in my coverage of Speedlights for the foreseeable future. It’s still widely available new or used for about $400, and has a guide number of 34/111.5 (meters/feet) when the “zooming” flash head (which can be set to adjust the coverage angle of the lens) is set to the 35mm position. It includes Commander mode, repeating flash, modeling light, and selectable power output, along with some extra capabilities.
The SB-910 was basically a slight reboot of the older SB-900, which gained a bad reputation for overheating and then shutting down after a relatively small number of consecutive exposures (as few as a dozen or so shots). The SB-910 also can overheat, but features a different thermal protection system. Instead of disabling the flash as it begins warming up, the SB-910 increases the recycle time between flashes, giving the unit additional time to cool a bit before the next shot. While this “improvement” is not a real fix, it does encourage you to slow your shooting pace a bit to stretch out the number of flashes this Speedlight produces before it must be shut down for additional cooling.
Nikon estimates that you should be able to get 190 flashes from the SB-910 when using AA 2600 mAh rechargeable batteries, if firing the Speedlight at full output once every 30 seconds, with a minimum recycling time of 2.3 seconds (which gradually becomes longer as the flash heats up and the thermal protection kicks in). To get the maximum number of shots from your batteries, Nikon figures that AF-assist illumination, power zoom, and the LCD panel illumination are switched off.
There are some improvements, such as illuminated buttons and a restyled soft case, but, in general, the SB-910 is very similar to the SB-900 that we Nikon photographers have learned to know and fear. For example, you can angle the flash and rotate it to provide bounce flash. It includes additional, non-through-the-lens exposure modes, thanks to its built-in light sensor, and can “zoom” and diffuse its coverage angle to illuminate the field of view of lenses from 8mm to 200mm.
The SB-910/SB-900 also has its own powerful focus assist lamp to aid autofocus in dim lighting, and has reduced red-eye effects simply because the unit, even when attached to the Z6 and not used off-camera, is mounted in a higher position that tends to eliminate reflections from the eye back to the camera lens.
SB-5000
This $600 Speedlight, introduced at the same time as the D5 and Z6, is the new flagship of the Nikon flash lineup. While it resembles the SB-910 and has a virtually identical guide number (34.5 meters, 113 feet), it more or less solves the overheating problem that plagued its top-line predecessors. A novel internal cooling system purportedly allows up to 90 consecutive shots, or 120 shots at five-second intervals without overheating. (Wedding photographers will love this.)
However, the big news is the addition of radio control to the optical triggering available with previous Nikon flash units that could be operated wirelessly. Radio control allows triggering the flash from a distance of nearly 100 feet—without requiring a line-of-sight connection. Best of all, you don’t need to purchase two of these to use the SB-5000 wirelessly. Nikon already has a radio trigger in its product line, the WR-R10 wireless remote adapter that I have been using for years as a remote shutter release. As a trigger-only device, the WR-R10 has a longer range than the SU-800 commander used for optical wireless operation. The SB-5000 retains compatibility with Nikon’s earlier optical wireless system, so your current flash units can be used with it in non-radio mode.
I power my SB-5000 (and all my other Speedlights) with Panasonic (formerly Sanyo) Eneloop AA nickel metal hydride batteries. These are a special type of rechargeable battery with a feature that’s ideal for electronic flash use. The Eneloop cells, unlike conventional batteries, don’t self-discharge over relative short periods of time. Once charged, they can hold onto most of their juice for a year or more. That means you can stuff some of these into your Speedlight, along with a few spares in your camera bag, and not worry about whether the batteries have retained their power between uses. There’s nothing worse than firing up your strobe after not using it for a month, and discovering that the batteries are dead.
Note that the SB-5000 and many other Nikon flash units, like your camera, contains firmware that can be updated. The custom settings readouts on the flash itself will tell you what firmware version you currently have. If an update is required, you’ll need to download the firmware module from the Nikon website. Load it onto a memory card, and then mount the flash on your Z6 and power it up. You’ll find a fourth entry in the Firmware section of the Setup menu, marked S (for Speedlight or Strobe). The SB-910’s firmware can be updated through the camera/flash connection just like the camera’s own firmware.
Light Modifiers
The top-line Speedlights have a better array of included light-modifying tools than other Speedlights in the Nikon line. The standard pop-up white “card” slides out of the flash head, as shown earlier in Figure 9.1, and from another angle in Figure 9.13, left. The card reflects a little fill illumination toward your subject when the flash is tilted to bounce off a ceiling or rotated and tilted to bounce off a wall or other surface. A wide-angle diffuser also slides out and rotates to cover the front of the flash and spread the light to cover lenses with focal lengths as wide as 12mm. The included diffuser dome (see Figure 9.13, center) provides softer illumination for direct flash, with the flash pointed at your subject, or something of a “bare bulb” effect when pointed upward. (The “bare bulb” concept dates back to film days when an electronic flash, flashbulb (!), or even an incandescent lamp was used without a reflector or shade to provide a flood of soft illumination that spread out in all directions from the source.)
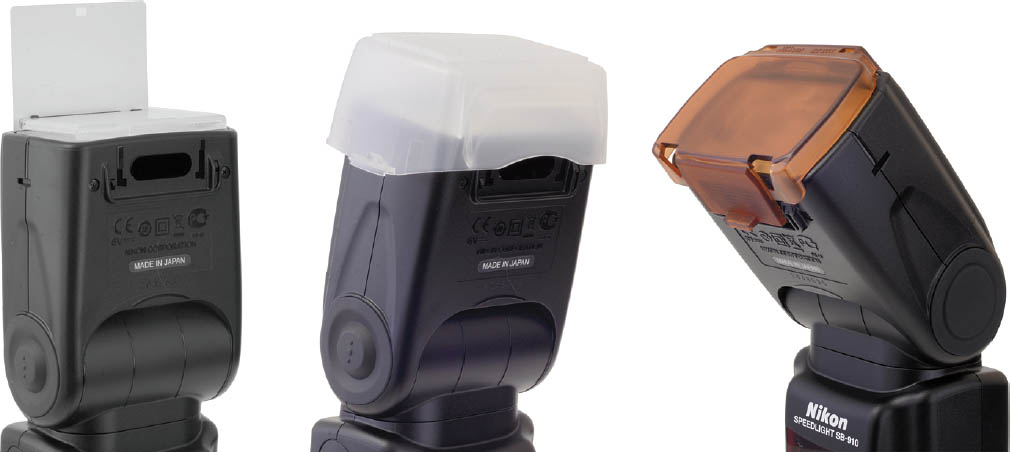
Figure 9.13 Left: The slide-out bounce card adds a kicker of light to fill in shadows or provide a catch light in the eyes of humans (or others). Center: The included diffuser dome produces a soft, flattering light. Right: The SZ-2TN incandescent filter warms the flash’s illumination to match tungsten lighting.
Various filters are available for Nikon strobes to change the color of the light source. Two are included with the SB-910 and SB-5000, the SZ-2TN incandescent filter (shown in Figure 9.13, right) and the SZ-2FL fluorescent filter. The SJ-3 color filter set ($28) is 20 gelatin filters in eight different colors, including blue, yellow, red, and amber. The incandescent filter is most useful, because it changes the Speedlight’s illumination to match typical indoor lamps, so you can use both to light a scene without encountering a nasty mixed lighting situation. The nifty thing about the SZ-series filters is that they include a type of bar code that can be read by a sensor underneath the unit’s flash head, so the strobe (and your Z6) “knows” that a particular filter has been fitted.
Other Accessories
The top-end flash units come with the AS-21 Speedlight Stand, which lets you give the strobe a broad “foot” that can rest on any flat surface when working in wireless mode. The stand has a tripod-type socket underneath, so you can also mount the flash on a tripod or light stand without needing to purchase a special adapter.
Not included are things like the WG-AS3 Water Guard, a $35 shield used when the flash is mounted on the Z6, to protect the hot shoe contact from moisture or (more likely) driving rain in sports photography situations. Well-heeled photographers who shoot weddings or events and don’t already own a Quantum battery pack may be interested in the SD-9 High Performance Battery pack ($255), which holds up to eight AA batteries; or the (now discontinued) SK-6 Power Bracket, which could be outfitted with four AA batteries and provides a side-mounted handle as well as an auxiliary power source.
Using Zoom Heads
External flash zoom heads can adjust themselves automatically to match lens focal lengths in use reported by the Z6 to the flash unit, or you can adjust the zoom head position manually if you want to use a setting that doesn’t correspond to the automatic setting the flash will use. With older flash units, like the discontinued SB-600, automatic zoom adjustment wastes some of your flash’s power, because the flash unit assumes that the focal length reported comes from a full-frame camera. Because of the 1.5X crop factor when the Z6 is used in DX mode, the flash coverage when the flash is set to a particular focal length will be wider than is required by the Z6’s cropped image.
You can manually adjust the zoom position yourself, using positions built into the flash unit that more closely correspond to your Z6’s field of view when using the SB-5000, SB-910, and SB-900, (which do not automatically take into account the difference between FX/full-frame and DX/APS-C coverage).
Flash Modes
I introduced flash modes (as well as flash sync modes) earlier in this chapter. External flash units have various flash modes included, which are available or not available with different camera models, including both the latest model dSLRs, some really ancient digital SLRs, and even more aged film cameras. A table showing most of the groups is included in the manuals for the external flash units, but the table is irrelevant for Z6 users (unless you happen to own an older digital or film SLR, as well). All you really need to know is that the Z6 is fully compatible with the Nikon SB-800 and all flashes introduced since that model debuted.
To change flash mode with the SB-5000, press the rotary multi selector right button to highlight the flash mode, then rotate the multi selector to choose the mode you want. Press the center OK button to confirm. With the SB-910 or SB-900, press the MODE button on the back-left edge, then release it and rotate the selector dial until the mode you want appears on the LCD. The TTL automatic flash modes available are described next. (The SB-700 has a sliding mode selector switch to the left of the Speedlight’s LCD with positions for TTL, Manual, and GN settings. Those are the only modes available with that flash when you’re using it as a Master. However, when the SB-700 is used as a remote flash triggered by a Master Commander flash, it can operate in Repeating mode.)
- iTTL Automatic Balanced Fill Flash. In both Matrix and Center-weighted camera exposure modes, the camera and flash balance the exposure so that the main subject and background are well-exposed. A TTL BL indicator appears on the LCD. However, if you switch to Spot metering, the flash switches to standard iTTL, described next.
- Standard iTTL. In this mode, activated when Spot metering is selected (or if you’ve fixed the flash exposure using FV Lock), the exposure is set for the main subject, and the background exposure is not taken into account. Only the flash exposure is measured and used to determine exposure. A TTL indicator appears on the LCD. In either iTTL Automatic Balanced Fill Flash or Standard iTTL modes, if the full power of the flash is used, the ready-light indicator on the flash and in the camera viewfinder will blink for three seconds. This is your cue that perhaps even the full power of the flash might not have been enough for proper exposure. If that’s the case, an EV indicator will display the amount of underexposure (–0.3 to –3.0 EV) on the LCD while the ready-light indicator flashes.
- AA: Auto Aperture flash. An A indicator next to an icon representing a lens opening/aperture is shown on the LCD when this mode is selected. The SB-5000 or SB-910/SB-900 uses a built-in light sensor to measure the amount of flash illumination reflected back from the subject, and adjusts the output to produce an appropriate exposure based on the ISO, aperture, focal length, and flash compensation values set on the Z6. This setting on the flash can be used with the Z6 in Program or Aperture-priority modes. Like the A and GN modes described next, this option is a hold-over to provide compatibility with some older Nikon cameras, and not really useful for the Z6.
- A: Non-TTL auto flash. In this mode, the Speedlight’s sensor measures the flash illumination reflected back from the subject, and adjusts the output to provide an appropriate exposure, without the feedback about the aperture setting of the camera that’s used with AA mode. This setting on the flash can be used when the Z6 is set to Aperture-priority or Manual modes. You can use this setting to manually “bracket” exposures, as adjusting the aperture value of the lens will produce more or less exposure; the flash has no idea what aperture you’ve changed to.
- GN: Distance priority manual. You enter a distance value, and the SB-5000 or SB-910/SB-900 adjusts light output based on distance, ISO, and aperture to produce the right exposure in either Aperture-priority or Manual exposure modes. You can choose this option from the Flash Control menu with the SB-5000. With the SB-910/SB-900, press the MODE button on the flash and rotate the selector dial until the GN indicator appears (the GN option appears only when the flash is pointed directly ahead, or is in the downward bounce position). Then press the OK button to confirm your choice. After that, you can specify a shooting distance by pressing the Function 2 button, and then rotating the selector dial until the distance you want is indicated on the LCD. Press the OK button to confirm. The SB-5000 or SB-910/SB-900 will indicate a recommended aperture, which you then set on the lens mounted on the Z6 in Manual exposure mode.
- M: Manual flash. The flash fires at a fixed output level. Press the MODE button and rotate the selector dial until M appears on the LCD panel. Press the OK button to confirm your choice. Choose the power output level you want, down to 1/256th power with the SB-5000 and 1/128th power with most other Nikon Speedlights. Calculate the correct f/stop to use, either by taking a few test photos, with a flash meter, or by the seat of your pants. Then, set the Z6 to Aperture-priority or Manual exposure and choose the f/stop you’ve decided on.
- RPT: Repeating flash. The flash fires repeatedly to produce a multiple flash strobing effect. To use this mode, set the Z6’s exposure mode to Manual. Then set up the number of repeating flashes per frame, frequency, and flash output level, as described in Chapter 12.
Repeating Flash
Repeating flash is a function that can be used with external flashes like the SB-5000, SB-910, and SB-900. Check your manual for the exact buttons to press to make the following settings using Manual exposure mode:
- 1. Set flash for RPT mode. With the SB-5000, use the rotary multi selector right button (MODE button) to highlight mode, and then rotate the dial to select repeating flash. With the SB-910/SB-900, press the MODE button and rotate the selector dial until RPT is shown at upper left on the LCD. Then press the OK button to confirm.
- 2. Choose Flash Output Level. With these flash units, you must specify the power level of the flash. That level will determine the range of the number of flashes you can expect from the capacitor’s charge. Use the flash mode controls on the SB-5000 to set output level. With the SB-910/SB-900, press the Function 2 button (on the SB-910) or the Function 1 button (on the SB-900) until the number of flashes is highlighted on the LCD (to the immediate right of the RPT indicator), and rotate the selector dial. Choose a power level from 1/8th to 1/128th power.
- 3. Select number of shots. Next, choose the number of shots in your series. With the SB-5000, use the Times setting to determine how many flashes to emit. With the SB-910, highlight the option by pressing the Function 3 button; it’s the Function 2 button on the SB-900. The number of shots you can specify varies depending on the shutter speed and firing frequency (specified next).
- 4. Choose frequency: how many shots per second. This determines how quickly the series is taken. With the SB-5000, use the Hz setting. With the SB-910, highlight the option by pressing the Function 3 button; it’s the Function 2 button on the SB-900.
The maximum number of shots in a series varies, depending on the shutter speed, output level, and frequency you select. The multiple flashes can be emitted only while the shutter is completely open, so a faster shutter speed limits the number of bursts that can be fired off at a given frequency. High output levels and high frequency settings both deplete the capacitor more quickly. So, the number of possible bursts will depend on the combination you choose. With the SB-910 or SB-5000, the maximum number of shots you can expect is about 90 (at 1/64th or 1/128th power), and frequencies of from 1 to 3 bursts per second. That’s a large number of firings over a long period of time (30 seconds or more).
If you want very rapid bursts, expect fewer total flashes: the SB-5000 and SB-910 will give you 24 firings at 1/128th power and 20 to 100 firings per second. Still, that’s quite a bit of flexibility if you think about it. You can get 24 bursts in just a bit more than one second at the 20Hz setting, or over five seconds at the 100Hz setting. I needed only four bursts to capture the plummeting lime seen in Figure 9.14. One thing you’ll notice is that as moving objects slow or speed up, the distance between one “shot” in a series varies.
When using repeating flash with the SB-910/SB-900, SB-700, SB-5000, or any large number of consecutive flashes in any mode (more than about 15 shots at full power), allow the flash to cool off (Nikon recommends a 10-minute time out) to avoid overheating the flash. The SB-5000 increases the recycling time to extend the useful period, while the SB-910/SB-900, SB-700, or SB-500 will signal you when it’s time for a cooling-off period. The flash will actually disable itself, if necessary, to prevent damage.
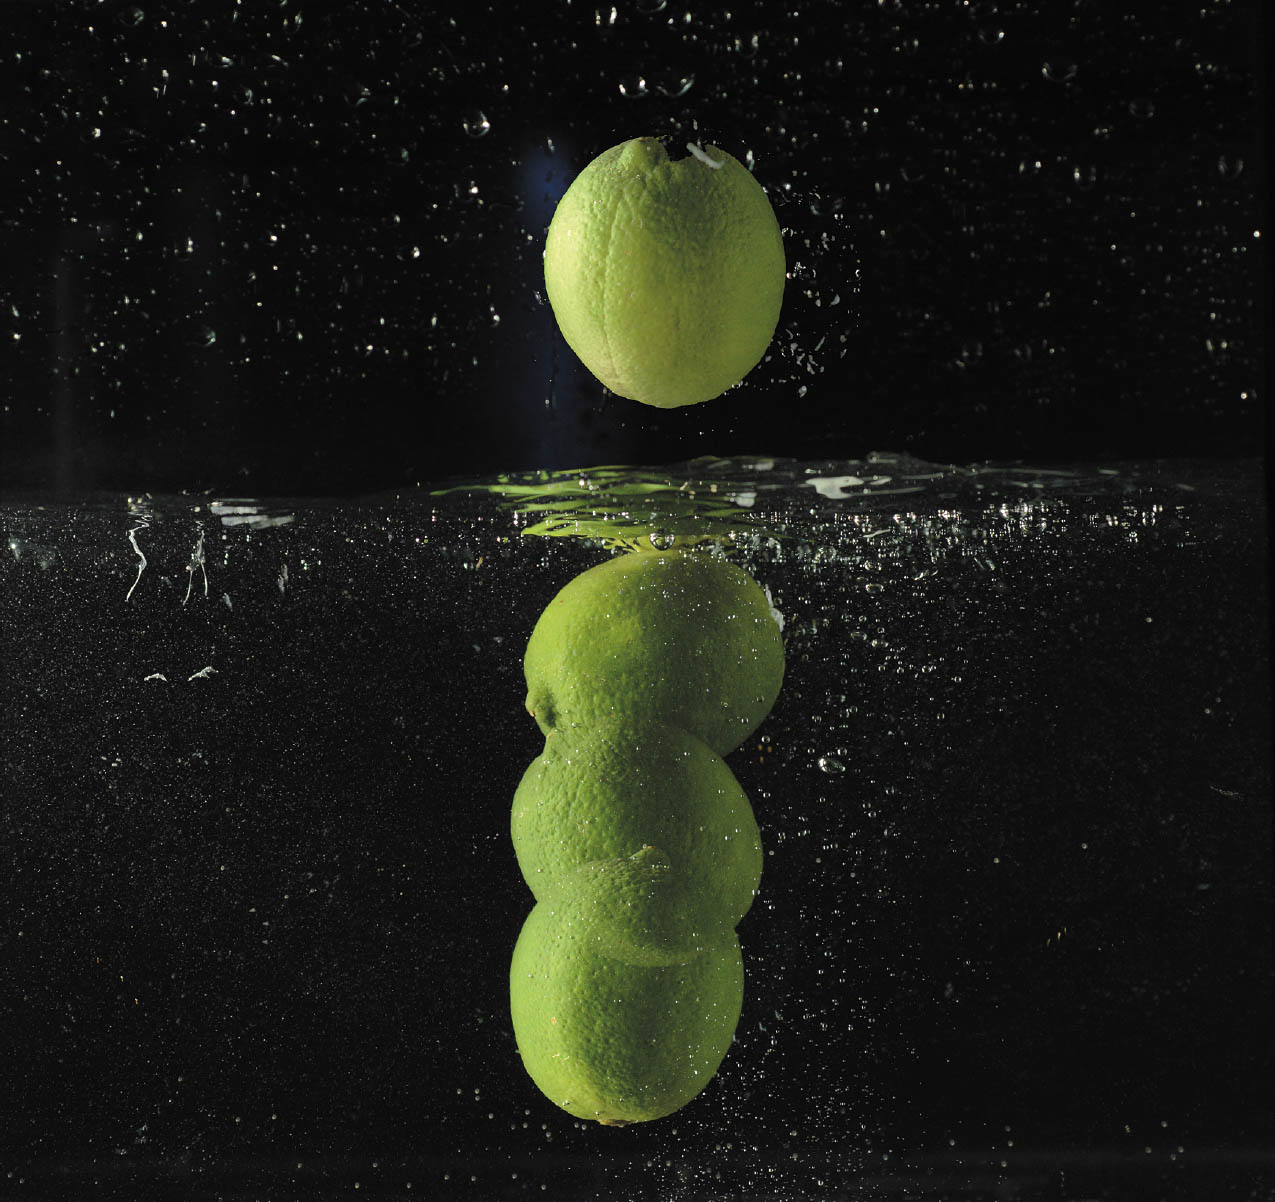
Figure 9.14 Capturing a lime as it plunges into a half-filled fish tank.