Exercise 32:
STAMP CARVING TUTORIAL
IN THIS EXERCISE, YOU WILL CREATE SIMPLE STEMMED FLORA CUT FROM RUBBER BLOCKS. YOU’LL LEARN HOW TO CARVE YOUR OWN STAMP AND TRULY UNDERSTAND POSITIVE AND NEGATIVE SPACE. YOUR STAMPS CAN BE USED OVER AND OVER AGAIN TO CREATE A VARIETY OF WORKS.
MATERIALS
Newspaper or large craft paper
Soft lead pencil
Tracing paper or copy paper
Carbon paper (optional)
Bone folder or wooden spoon (optional)
Rubber carving block or linoleum block (linoleum blocks provide more detail)
Permanent marker
Cutting mat
Linoleum cutting tool with tips 1 through 5
Craft knife (optional)
Plexiglass (optional)
Art brush
White, black, gray, or tan lightweight or heavy cardstock
Artist tape
Scrap paper
Plastic spoon
Block printing ink
Palette
Palette knife
Brayer
Ink pad (optional, for less cleanup)
1. Cover your work space with newspaper or large craft paper.
2. Set up two work areas: one with a cutting mat to cut the block and one for inking and printing.
3. Find a reference from nature or in a book, such as a leaf.

4. Using a soft lead pencil, draw your leaf design onto tracing paper or copy paper. (See A.)
5. Transfer the design onto your carving block. Here are the options:
OPTION 1: Place the carbon paper between the tracing paper drawing and the block. Trace over your drawing with a pencil to transfer the design onto the block.
OPTION 2: Place your tracing paper, sketch side down, onto the rubber block. Using a bone folder or a wooden spoon, rub the back of the paper to transfer the design onto the block.
OPTION 3: If you used copy paper, flip your drawing over and with a soft lead pencil, cover the wrong side of your sketch with shading. Hold the drawing wrong side up to a window and use it as a lightbox. Smooth the graphite lightly with a tissue. Place the paper, drawing side up, on the block and trace over your drawing with a pencil to transfer the design onto the block.
6. Draw over your transferred design with a permanent marker, because bits of the pencil drawing may disappear with handling.
7. Place the block on top of your cutting mat and cut into the design with the cutting tools. Always cut away from your body. Keep your fingers behind your cutting instrument, not in front.
8. Remember that what you cut away will be the negative space, and the raised part of block will print the design, so the image will appear in reverse when printed. There is no right or wrong way, but if you carve words, you need to work in reverse. I learned this the hard way!

9. Use the V-shaped tip for detail and use the U-shaped tip for carving away large areas. (See B.)
10. Keep the large rectangular or square block shape, as it is easier to handle for printing. Be sure to cut away excess rubber around the design so it is raised and only the shape touches paper when printing.
11. An alternative approach is to completely cut around the design with a craft knife, leaving the shape free to handle. It can then be adhered to a piece of plexiglass for easier handling. Commercial stamps have a wooden or plexiglass backing for this purpose.
12. Brush away excess cuttings on the stamp using a clean, dry art brush, or rinse it with mild soap and warm water, then pat dry with a lint-free towel and air-dry. If rinsing, the block needs to be completely dry before printing.
13. Secure the paper to your work space with tape. Gather scrap paper to test your stamp.
14. Place a spoonful or two of block printing ink on a palette. Warm up your ink by flipping it over with the palette knife.
15. Load the brayer completely and evenly with ink. Roll up, down, and crisscross, and then up and down again. (I do this a few times.) When you hear tackiness in the ink, it is ready to apply to the cut block.
16. Place the cut block on your newspaper, design side up, and roll the brayer over your stamp design. Roll on a few thin layers of paint. Cover the block evenly.
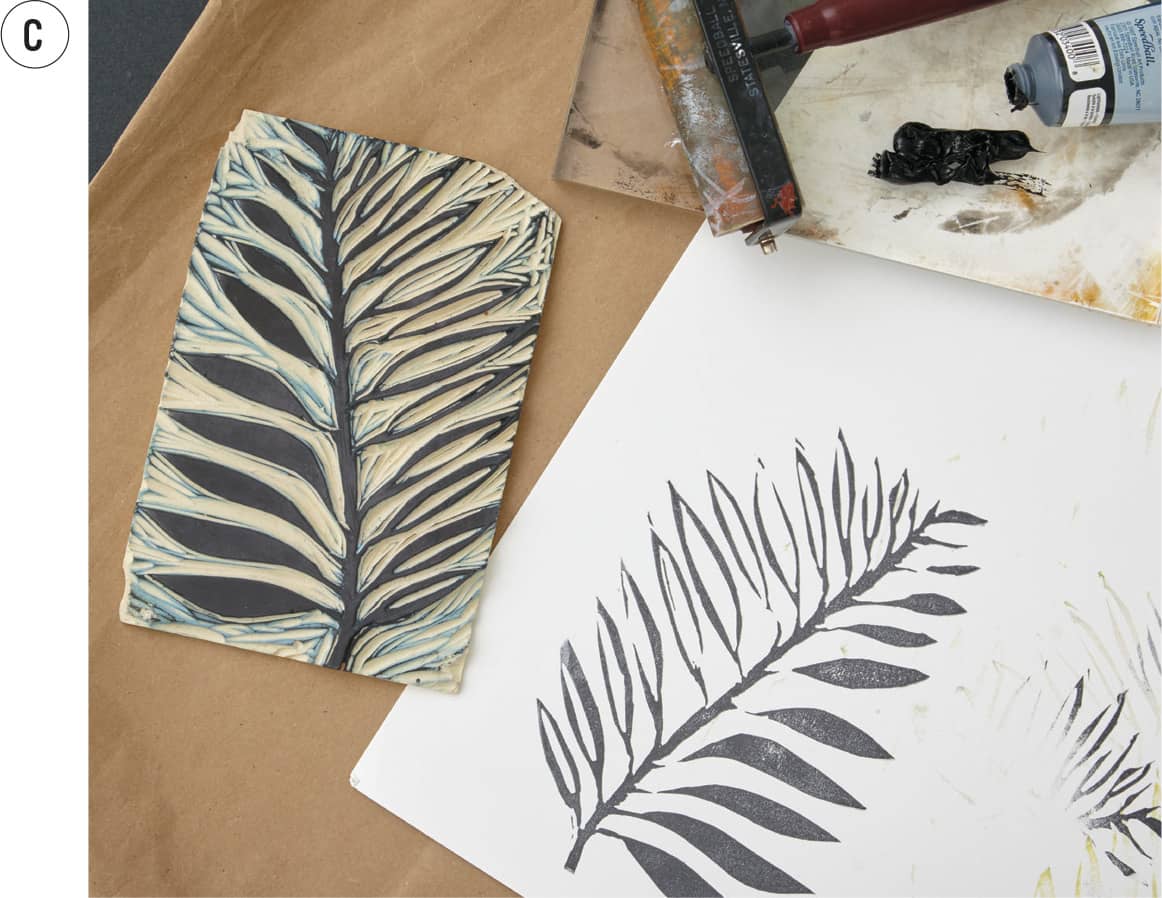
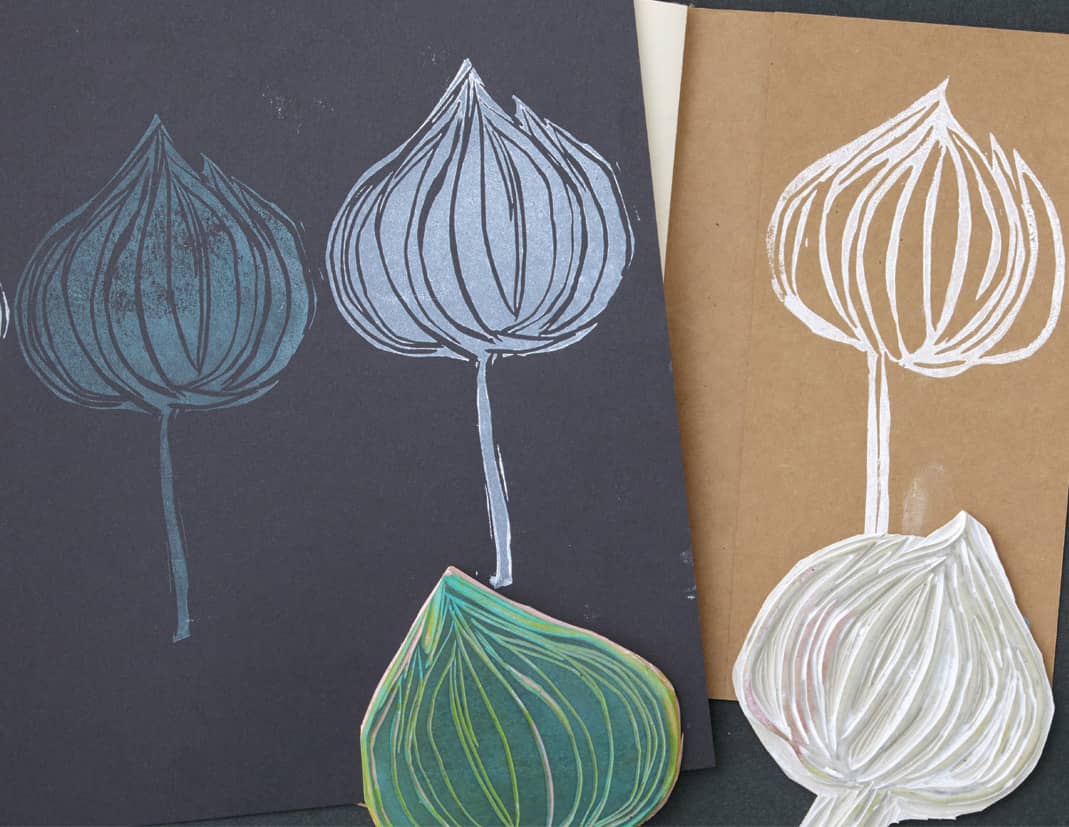
17. Test prints on the scrap paper to see if there are any stray marks from spots not cut away or not cut deep enough. If needed, make adjustments to your stamp and test again. (See C.)
18. Place the design on your art paper. For small stamps, apply pressure with your palm. For larger stamps, I use a piece of plexiglass to apply even pressure. You can also use a book, if needed.
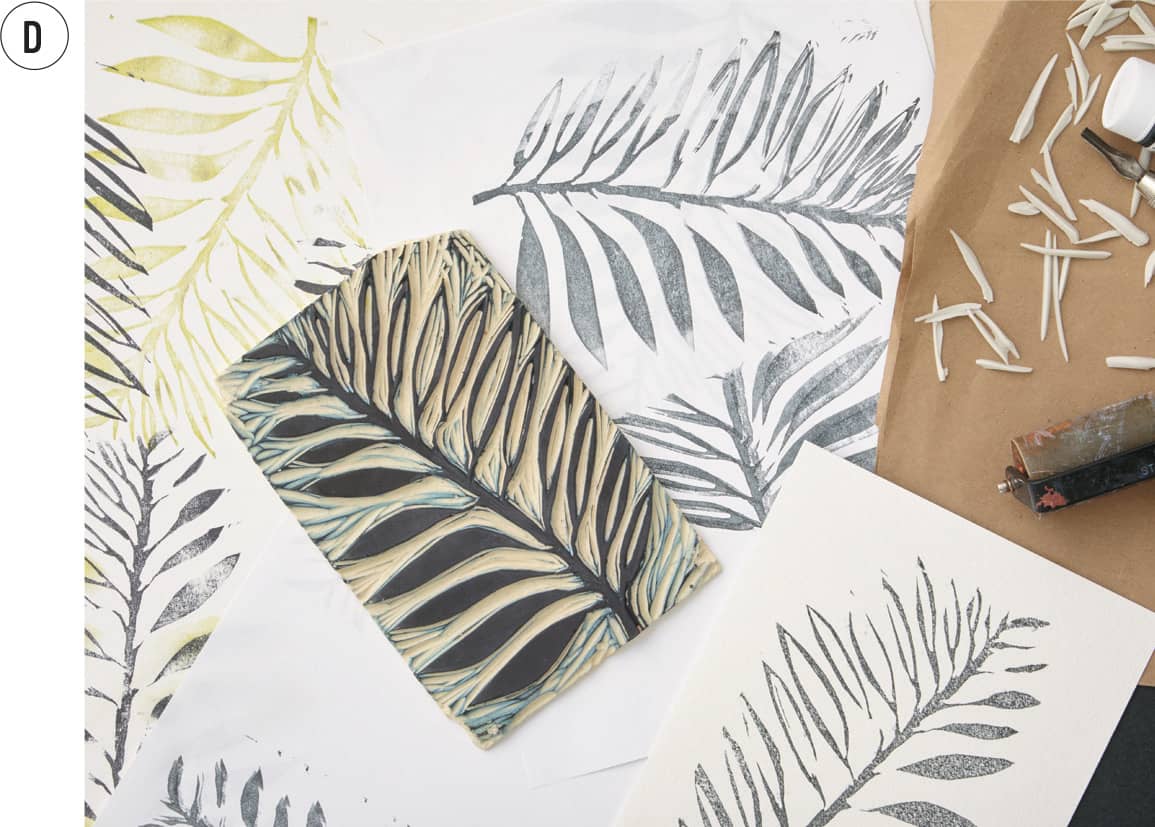
19. Reapply ink to the block as you continue to print your design to fill a page. (See D.)
20. If you choose to use an ink pad instead, press the ink pad, ink side down, all around the block for full coverage. With small blocks you can hold the block, design side down, and press into the ink pad. Continue to ink up your stamp and stamp your design on your paper. Re-ink between applications.
21. Experiment with the pressure you apply to the stamp. If you vary the pressure, you can make the design appear rustic and worn. With solid, even pressure the look is more graphic and clean.
22. To clean up, rinse the block in warm water and mild soap. Pat dry with a lint-free towel and let air-dry.
What you carve away becomes the negative space.