
Forms follow function, to paraphrase the old saying. On the Web, many of the most advanced and interactive features you can add to a Web page require forms to collect information from users — information that can then be used in a variety of ways. Forms are commonly used to create guest books, contact forms, search engine entry fields, chat rooms, and discussion areas.
When you design a form, Dreamweaver makes it relatively easy to create check boxes, radio buttons, text boxes, and other common form elements. You'll also find options in Dreamweaver for specifying text box sizes, character limits, and other features. After you build your form, you may want to consider formatting options, such as CSS (Cascading Style Sheets), to make it look good.
But if you want your form to actually do something, you have to pair it with a program on your Web server. One of the most confusing aspects of working with HTML forms is that they don't do much until you've connected them to a script. Most forms are processed by Common Gateway Interface (CGI) scripts or some other program. These scripts can be written in different programming languages, including C, C#, Java, and Perl. CGI scripts are far more complex than simple HTML files, and even experienced Web designers often purchase third-party solutions or hire experienced programmers to develop CGI scripts for them, especially for complex features, such as discussion boards or shopping carts.
Fortunately for those who don't have a computer science degree or a huge budget for programmers, many free and low-priced scripts are available on the Web. Search the Internet for CGI scripts and you'll find an impressive collection of ready-to-use programs, many of them free. Be aware, however, that when you download a program, you could be creating a security risk for your server (so look for trustworthy scripts with good reviews and support).
You also have to know how to configure and install any script you download on your Web server, which may require special access. How you install a script on your server depends on how your server is set up. Unfortunately, in this book, I can't show you everything there is to know about working with all the different kinds of scripts available on the Web on all the different kinds of servers, but I do try to give you an idea of what's involved in working with CGI scripts and what you'll need to do in Dreamweaver to make sure your HTML form will work with a script.
The first part of this chapter includes instructions for creating the common elements in an HTML form, from radio buttons to text boxes. In the last part of the chapter, I include instructions for configuring a form to work with a common CGI that you can use to send the contents of a form to any specified e-mail address. The steps and features covered in the final exercise also help you with other kinds of CGI scripts.
Note
You also need to create forms when you build dynamic Web sites using Dreamweaver's ColdFusion, ASP.NET, or PHP features. If you're creating a dynamic or database-driven site, use the features specific to those technologies, which are covered in Chapters 14 and 15. In this chapter, you find out how to create the HTML forms in Dreamweaver.
The basic elements of HTML forms — radio buttons, check boxes, and text areas, for example — are easy to create with Dreamweaver. The following steps walk you through creating an HTML form. Start with an open page — either a new page or an existing page to which you want to add a form:

The Forms Insert bar displays all the common form elements. An empty
<form>tag is inserted in your document and is displayed as a rectangle outlined by a red dotted line like the one shown in the Document area in Figure 12-1. This dotted line defines the boundaries of a form in the HTML code.Tip
You can control the display of invisible elements, such as
<form>tags. Choose Edit
Click the red outline to select the
<form>tag and display the<form>tag options in the Property inspector (as shown in the bottom of Figure 12-1).In the Form ID text box, type a name.
You can choose any name for this field as long as you don't use spaces, special characters, or punctuation. With your basic HTML form set up, you're ready to add elements to it, as explained in the following sections.

Tip
Before you begin filling your form with options, keep the following tips in mind:
The best way to get your form fields to line up nicely is to use CSS. By creating styles that control the spacing and padding of form elements, you can make all your fields, buttons, and other elements line up neatly. Chapters 5 and 6 cover CSS.
After you design your form, your work isn't quite done; your form won't do anything unless you configure it to work with a script. Although Dreamweaver doesn't provide any scripts, it does make linking your HTML forms to a script or database relatively easy. The section "Understanding How CGI Scripts Work" later in this chapter offers more details on making your form work with a script.
Note
Most of the fields displayed in the Property inspector when the
<form>tag options are displayed should be set based on the CGI script or other program that's used to collect and process the data from the form. You find instructions for filling in these fields in the "Configuring your form to work with a script" section, at the end of this chapter.
Making forms accessible
You can make your forms much easier to use and more accessible to all your visitors by using the label tag and other accessibility attributes with form items. Dreamweaver makes this easy by including an Input Tag Accessibility Attributes dialog box, as shown in the figure. For this dialog box to appear when you insert a form item, such as a radio button or a check box, you must have accessibility features turned on in Dreamweaver's Preference settings. To turn on these features, choose Edit
With the accessibility options turned on, when you insert a form item (such as a radio button or a text box), the Input Tag Accessibility Attributes dialog box opens automatically. Use this dialog box to specify the following options:

ID: Use the ID field to assign a name to a form element. You can leave this field blank, and Dreamweaver won't enter a name automatically. The name is important because it can be used to refer to the field in JavaScript. The ID is also used if you choose Attach Label Tag Using 'For' Attribute option under the Style options.
Label: Enter a name that corresponds to the radio button or check box. This is the name that's read by a screen reader.
Style: Check one of these three options to specify how the label should be included with the radio button or text box in the HTML code. The option Attach Label Tag Using 'For' Attribute is recommended as the best option for accessibility. If you choose this option, most browsers will associate a focus rectangle to the check box or radio button. This enables a user to select the check box and radio button by clicking anywhere in the text associated with it, instead of clicking precisely inside the check box or radio button.
Position: Check the corresponding box to specify whether the label should appear before or after each form item.
Access Key: This attribute enables you to create a keyboard shortcut for each of your form items. You can enter any letter in this field, and your users can select the form item by holding down the Alt key (Windows) or the Control key (Macintosh) and typing the letter you specify. For example, if you enter Q as the Access Key, visitors to your site who use a Windows computer could press Alt+Q to select the form item.
Tab Index: By default, you can use the Tab key to move from one form field to another when you view a form on the Web. With the Tab Index, you can specify the order in which the Tab key progresses from one form item to another. This is especially helpful if you have links and other form items on a page, and you want the user to be able to tab through them in a specific order. To control the order, assign a number to each form.
Radio buttons and check boxes make filling in a form easy for viewers of your site. Rather than make users type a word, such as yes or no, you can provide radio buttons and check boxes so that users can simply click boxes or buttons.
What's the difference between radio buttons and check boxes? Radio buttons enable users to select only one option from a group. Thus, radio buttons are good for either/or options or situations in which you want users to make only one selection. Check boxes, on the other hand, enable users to make multiple choices, so they're good for choose-all-that-apply situations or for situations that require approval, such as "Check this box if. . ."
To create radio buttons on a form, follow these steps:
Click to place your cursor inside the boundary of the
<form>tag where you want to add a radio button.If you haven't yet inserted the
<form>tag, follow the steps in the section "Creating HTML Forms," earlier in this chapter.
You can also choose Insert
If you have accessibility options turned on in Preferences, the Input Tag Accessibility Attributes dialog box opens. (See the sidebar "Making forms accessible," to find out more about these options.)
Repeat Step 2 until you have the number of radio buttons you want.
Select one of the radio buttons on the form to reveal the radio button's properties in the Property inspector, as shown in Figure 12-2.
In the Radio Button text box on the far left of the Property inspector, type a name.
All radio buttons in a group should have the same name so that the browser associates them with one another and prevents users from selecting more than one. If you want users to be able to choose more than one item from a list, use check boxes, as described in the following section.
In the Checked Value text box, type a name.
Each radio button in a group should have a different Checked Value name so that it can be distinguished from the others. Naming radio buttons for the thing they represent is often a good practice; for example, yes when the choice is yes and no when it's no. If you're asking users about their favorite ice cream flavors, you might use as values the flavor each button represents. This name is usually included in the data you get back when the form is processed and returned to you (it can be returned in an e-mail message or sent directly to a database). How the data is returned depends on the CGI script or other programming used to process the form. If you're looking at the data later, interpreting it is easier if the name is something that makes sense to you.
For the Initial State option, select Checked or Unchecked.
These two options determine whether the radio button on your form appears already selected when the Web page loads. Select Checked if you want to preselect a choice. You should set only one radio button option to be preselected and remember that the user can always override this setting by selecting another radio button.
Select the other radio buttons one by one in the main design area and repeat Steps 5–7 to specify the properties in the Property inspector for each one.

Note
If you want to create a series of radio buttons, you'll find some advantages to using the Radio Group button in the Insert Form panel. Dreamweaver automatically creates IDs for each radio button. If you want to change these IDs, you may find it easier to change them in Code view. You can split the screen between code and design views by clicking on the Split view button at the top of the workspace.
If you want to format your form with CSS styles, you can create tag styles for the form, radio button, and other tags, or you can create class styles and apply them to any or all of your tags using the Class drop-down list in the Property inspector, You find more information about creating and applying styles in Chapters 5 and 6.
If your form is complete, jump ahead to the "Finishing your form with Submit and Reset buttons" section, later in this chapter.
To create check boxes, follow these steps:
Click to place your cursor inside the boundary of the
<form>tag where you want to add a check box.If you haven't yet inserted a
<form>tag, follow the steps in the "Creating HTML Forms" section, earlier in this chapter.
You can also choose Insert
If you have accessibility options turned on in Preferences, the Input Tag Accessibility Attributes dialog box opens. (See the sidebar "Making forms accessible," to find out more about these options.)
Repeat Step 2 to place as many check boxes as you want.
Select one of the check boxes on your form to reveal the check box properties in the Property inspector, as shown in Figure 12-3.
In the Checkbox Name text box, type a name.
Use a distinct name for each check box because users can select more than one check box, and you want to ensure that the information submitted is properly associated with each individual check box.
In the Checked Value text box, type a name.
Each check box in a group should have a different Checked Value name so that the CGI script can distinguish it. Naming them for the things they represent is a good practice. As with radio buttons, the checked value is usually included in the data you get back when the form is processed and returned to you. If you're looking at the data later, interpreting it is easier if the name is something that makes sense to you.
For the Initial State option, select Checked or Unchecked.
This option determines whether the check box appears already selected when the Web page loads. Select Checked if you want to preselect a choice. A user can always override this preselection by clicking the text box again to deselect it.
Select the other check boxes one by one and repeat Steps 5–7 to set the properties in the Property inspector for each one.

Note
If you want to create a series of check boxes, you'll find some advantages to using the Checkbox Group button in the Insert Form panel.
If your form is complete, jump ahead to the "Finishing your form with Submit and Reset buttons" section, later in this chapter.
When you want users to enter text, such as a name, an e-mail address, or a comment, use a text field. To insert text fields, follow these steps:
Click to place your cursor inside the
<form>tag where you want to add a text field.If you haven't yet inserted a
<form>tag, follow the steps in the "Creating HTML Forms" section, earlier in this chapter.
You can also choose Insert
If you have accessibility options turned on in Preferences, the Input Tag Accessibility Attributes dialog box opens. (See the sidebar "Making forms accessible," to find out more about these options.)
On the form, click to place your cursor next to the first text field and type a question or other text prompt.
For example, you may want to type E-mail Address: next to a text box where you want a user to enter an e-mail address.
Select the text field on your form to reveal the Text Field properties in the Property inspector, as shown in Figure 12-4.
In the TextField text box, type a name.
Each text area on a form should have a different text field name so that the CGI script can distinguish it. Naming text areas for the things they represent is usually best, but don't use any spaces or special characters (other than the hyphen or underscore). In Figure 12-4, you can see that I named the text field hat_size. Many scripts return this name next to the contents of the text field a visitor enters at your Web site. If you're looking at the data later, you can more easily interpret it if the name corresponds to the choice.
In the Char Width box, type the number of characters you want visible in the field.
This setting determines the width of the text field that appears on the page. In the example shown here, I've set the character width to 50 to create a text box that is more than wide enough for most e-mail addresses. How wide you make your text boxes depends on the amount of information you expect users to enter and the constraints of your design.
In the Max Chars box, type the maximum number of characters you want to allow.
If you leave this field blank, users can type as many characters as they choose, even if they exceed the physical length of the text box specified in the Char Width field.
Note
I usually limit the number of characters only if I want to maintain consistency in the data. For example, I like to limit the State field to a two-character abbreviation. Creating drop-down lists, which require users to make a selection rather than risking that they might make a typo, is an even better way to ensure consistent data. You find instructions for creating drop-downs in the exercise that follows.
Tip
You can set the Char Width field to be longer or shorter than the Max Chars field. If users type more characters than can appear in the text field, the text scrolls so that users can still see all the text they enter, even if it can't be displayed in the text field all at once.
Next to Type, select one of the following options:
Single Line creates a one-line text box, such as the kind I created for the hat size field shown in Figure 12-4.
Multi Line gives users space to enter text. (Note that if you select Multi Line, you also need to specify the number of lines you want the text area to cover by typing a number in the Num Lines field, which appears as an option when you choose Multi Line.)
Password is used if you're asking users to enter data that they might not want to display on-screen. This type of field causes entered data to appear as asterisks and disables copying from the field.
Use the Class drop-down list to apply any class CSS styles that may be defined in the site.
You can create class styles for many purposes, including formatting form elements. You can read more about creating and applying class styles in Chapters 5 and 6.
In the Init Val text box, type any text you want displayed when the form loads.
For example, you can include
Add comments hereon the form in the text field under Comments. Users can delete the Init Val text or leave it and add more text in the same text field.If you're creating a multiline text area, specify the Wrap options.
The Wrap field controls how the users' data is displayed if it exceeds the length of the text field. Selecting Off or Default prevents the users' text from wrapping to the next line. (Note this option is available only for multiline text boxes.)
Select the other text areas one by one and repeat Steps 5–9 to set the properties in the Property inspector for each one.

If your form is complete, jump ahead to the "Finishing your form with Submit and Reset buttons" section, later in this chapter.
When you want to give users a multiple-choice option but don't want to take up lots of space on the page, drop-down lists are an ideal solution. To create a drop-down list with Dreamweaver, follow these steps:
Click to place your cursor inside the
<form>tag where you want to add a drop-down list.If you haven't yet created a
<form>tag, follow the steps in the "Creating HTML Forms" section, earlier in this chapter.
You can also choose Insert
If you have accessibility options turned on in Preferences, the Input Tag Accessibility Attributes dialog box opens. (See sidebar "Making forms accessible," to find out more about these options.)
Click to place your cursor next to the List field and enter a question or other text prompt.
I typed What state do you live in?
Select the field that represents the list on your page to reveal the List/Menu properties in the Property inspector, as shown at the bottom of Figure 12-5.
In the List/Menu text box, type a name.
Each list or menu on a form should have a different name so that you can differentiate the lists when the form data is returned.
Next to Type, select the Menu or List option.
This step determines whether the form element is a drop-down list or a scrollable list. If you select List, you can specify the height and control of how many items are shown at a time. You can also specify whether a user can select more than one item. If you select Menu, these options aren't available.
Click the List Values button, in the upper right of the Property inspector.
The List Values dialog box appears, as shown in Figure 12-6.
Enter the choices you want to make available.
Click the plus sign (+) to add an item label and then type the label text you want in the text box that appears in the dialog box. Item labels appear on the menu or list on the Web page in the order in which you enter them. Use the minus sign (–) to delete a selected option.
Press the Tab key to move the cursor to the Value side of the dialog box, where you can enter a value. Values are optional, but if present, they're sent to the server instead of the label text. This provides a way of including information that you don't want to display on the drop-down list. For example, if you enter Alabama as a label on the left, you can enter the abbreviation AL as a value on the right. If you enter Alaska as a label, you can enter AK as a value, and so on. That way, you visitors can select from a list that displays the full name of each state, but your script can collect only the two-letter abbreviations. If you don't enter a value, the label is used as the submitted data when the form is processed.
Tip
The first label entered in the List Values dialog box is the only one that's displayed on the page until a user clicks the drop-down arrow. Thus, it's good practice to include an instruction in this space, such as Choose a State, as shown in the example in Figures 12-5 and 12-6.


For your users to be able to send their completed forms to you, create a Submit button, which, when clicked, tells the user's browser to send the form to the CGI script or other program that processes the form. You may also want to add a Reset button, which enables users to erase any information they've entered if they want to start over.
Warning
Many developers don't use the Reset button because they find that it can be confusing to visitors (and annoying if it means they accidentally erase all the information they just entered). Because visitors can always leave a page before clicking the Submit button if they choose not to complete a form, the simplest way to avoid this problem is to avoid using a Reset button.
To create a Submit, Reset, or other button in Dreamweaver, follow these steps:
Click to place your cursor inside the
<form>tag where you want to add a button.If you haven't yet inserted the
<form>tag (which appears as a red dotted line around your form), follow the steps in the earlier section "Creating HTML Forms" before continuing with these steps. You might also want to enter at least one text field or other field option. There's not much point in having a Submit button if you don't provide any fields where a user can enter data to be submitted.
You can also choose Insert
If you have accessibility options turned on in Preferences, the Button Accessibility Attributes dialog box opens. (See sidebar "Making forms accessible," to find out more about these options.)
A Submit button appears.
Click to select the button.
The Property inspector changes to reveal the form button properties, as shown in Figure 12-7. You can change the button to a Reset button or other kind of button by altering the attributes in the Property inspector, as shown in the remaining steps.
Next to Action, click the Submit Form or Reset Form option.
The Submit Form option invokes an action, such as sending user information to an e-mail address. The Reset Form option returns the page to the way it was when the page loaded. You can also select the None option, which creates a button that can be used for many purposes by combining it with a script.
In the Value text box, type the text you want to display on the button.
You can type any text you want for the label, such as Search, Go, Clear, or Delete.

Note
Clicking a Submit button in a form doesn't do much unless you've configured the form to work with a CGI script or other program to collect or process user-entered data.
Many designers use jump menus as navigational elements because they can provide a list of links in a drop-down list without taking up lots of room on a Web page. You can also use a jump menu to launch an application or start an animation sequence.
To create a jump menu, follow these steps:
Click to place your cursor inside the
<form>tag where you want to add a jump menu.Alternatively, you can create a jump menu anywhere on a page. If there is no form tag in place, Dreamweaver automatically adds one around the jump menu tag.

You can also choose Insert
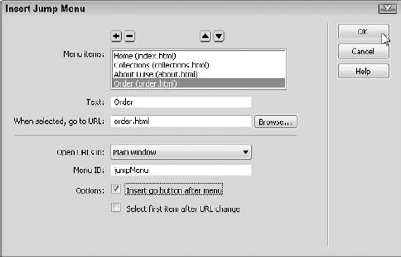
In the Text field, under Menu Items, type the name you want to display in the drop-down list.
Click the plus sign (+) to add more items. As you type items in the Text field, they appear in the Menu Items list, as shown in Figure 12-8.
Click the Browse button to locate the page you want to link to or type the URL for the page in the When Selected, Go to URL field.
You can link to a local file or enter any URL to link to a page on another Web site, and you can use the Browse button to specify the URL you want to link to.
If you're using frames, use the Open URLs In field to specify a target.
If you're not using frames, the default is Main Window. When the user selects an option, the new page replaces the page he or she is viewing. (I explain how to target links in frames in Chapter 8.)
If you want to enter a unique identifier for this menu, use the Menu ID field.
This option can be useful if you have multiple jump menus on a page. You can use any name you want, but you can't use spaces, special characters, or punctuation.
If you want to force users to click a button to activate the selection, select the Insert Go Button after Menu option.
If you don't add a Go button, the linked page loads as soon as the user makes a selection. The Go button works like a Submit button for the jump menu options.
Common Gateway Interface (CGI) scripts are programs written in a programming language, such as Perl, Java, C++, ASP, or PHP. They work in tandem with your Web server to process the data submitted by a user. Think of CGI scripts as the engine behind an HTML form and many other automated features on a Web site. These scripts are much more complex to create than HTML pages, and these languages take much longer to figure out than HTML. CGI scripts reside and run on the server and are usually triggered by an action a user takes, such as clicking the Submit button on an HTML form.
A common scenario with a script may go like this:
A user loads a page, such as a guest book, fills out the HTML form, and clicks the Submit button.
The browser gathers all the data from the form and sends it to the Web server in a standard format.
The Web server takes the incoming data and hands it off to the CGI script, which unpacks the data and does something with it, such as placing the data in an e-mail message and sending the message to a specified e-mail address or adding the data to a Web page where guest book comments are posted.
The CGI script then sends instructions or a block of HTML back to the browser through the Web server to report on the outcome of the script and to complete any final actions, such as displaying a Thank You page.
After you create a form using the features covered in the previous sections of this chapter, configure the form to work with a CGI script or a program. To help you understand how this process works, I use the common formmail.pl script in the following exercise. This clever little script is designed to collect data entered into an HTML form and send it to a specified e-mail address. You can find out more about formmail.pl at www.scriptarchive.com (a great place to find lots of free CGI scripts).
Every script is different, and the details of how you install and configure each script depend on the program and how your server is set up.
If your service provider doesn't offer a form mail script, you can download and configure the script if you have the right access on your server and knowledge of how your server is configured. Ask your service provider for more information. If your service provider doesn't provide the interactive scripts you want, you may want to consider moving your site to a hosting service that does provide CGI scripts you can use.
The following exercise shows you how to use Dreamweaver with the formmail.pl script. This gives you a good introduction to how you'd set up any form to work with any script, but be aware that you may have to alter some of the steps to work with the program you're using:
Select the
<form>tag that surrounds your form by clicking anywhere on the red dotted line that represents the boundary of the<form>tag or by clicking the<form>tag in the tag selector at the bottom of the work area, as shown in Figure 12-9.With the
<form>tag selected, the Property inspector changes to feature the form tag options. Note: All HTML forms must be enclosed by the<form>tag. If your script doesn't have a<form>tag, add one around the entire contents of your form by following the steps in the "Creating HTML Forms" section found earlier in this chapter.Tip
To select the
<form>tag in Dreamweaver, place your cursor anywhere in the body of your form and then use the tag selector at the bottom of the work area to select the<form>tag. Make sure you've selected the<form>tag and not just one of the form elements, such as the text box I created in this form for comments.In the Property inspector, give your form a name.
Dreamweaver automatically gives each form you create a distinct name (form1, form2, and so on), but I prefer to change the name to something that has more meaning, such as contact for this contact form. You can name your form whatever you like but don't use spaces or special characters.
Specify the action for the form.
For the
formmail.plscript used in this example (as well as many other scripts you might use), the action is simply the path to the script's location on your server. In Figure 12-10, you can see that I've entered the address/cgi-bin/formmail.pl. The address you enter depends on your service provider, but a common convention is to call the folder where CGI scripts are storedcgi-bin. The last part of the address (formmail.pl) is the name of the script. In this case, it's a Perl script, indicated by the.plextension.Note
You can only use the Browse button (the yellow folder icon in the Property inspector) to automatically enter an address in the Action field if you're working on a live server and Dreamweaver has identified the location of your script, or if you have the script on your local system in the same directory structure that exists on your server. In most cases, however, it's simplest just to ask your service provider or programmer for the address and type it in the Action field.
In the Method field, use the drop-down arrow to choose Get, Post, or Default.
Again, what you choose depends on your script, but Dreamweaver's default is Post. If you're using a script, such as
formmail, which is featured in the final sections of this chapter, the best option is Post.Note
The Get option is generally used for nondestructive, safe form transactions that may be repeated, such as a search engine. Transactions with the Get option are generally stored in the log files on a server and in a browser's history files, so this option isn't recommended for sensitive data, such as financial information. The Post option is generally used for transactions that occur only once, such as sending an e-mail with the data from a form, registering for a service, or unsubscribing to a newsletter. Post can also handle larger chunks of data than Get.
Click the Target option to specify what the browser does when the submit action is completed.
If you choose _blank, the results page opens in a new browser window. If you leave this field blank, the browser window is simply replaced with the results page. A results page is usually a simple HTML page with a message, such as Thanks for playing, delivered when the Submit button is clicked.
Use the Enctype field to specify how the data is formatted when it's returned (see Figure 12-11).
For example, if you're using a form mail script, the Enctype field determines how the text appears in your e-mail when the contents of the form are sent to you. By default, this field in blank.
Use the Class field at the far right of the Property inspector to apply a CSS style to the form.
In this example, I applied CSS to some of the elements in the form, such as the text, but not to the entire form.


That takes care of all the options in the Property inspector. You still need to insert a hidden form field into this form to make it work with the formmail.pl script, as shown in the next exercise.
Using hidden fields
Many scripts, including the formmail.pl script, require the use of hidden fields. Hidden fields are used for data you want associated with a form but not shown to visitors to a site, such as the e-mail address to which a form is sent when a visitor clicks the Submit button. To insert and use a hidden field, follow these steps:
Click to place your cursor inside the
<form>tag.If you haven't yet inserted the
<form>tag (which appears as a red dotted line around your form), follow the steps in the first exercise in the "Creating HTML Forms" section before continuing with this exercise.Warning
Even though the hidden field doesn't appear in the form area, make sure that it's inside the
<form>tag before you add a hidden field. Placing your cursor at the top or bottom of the form area before inserting a hidden field is a good option because it makes the hidden field easier to find in the HTML code.After the hidden field is inserted into the
<form>tag, the Property inspector changes to feature the hidden field options.In the Property inspector, enter a name.
If you're using
formmai.pl, you'd enter recipient as the name and the e-mail address where you want the form data sent as the value. You can even enter more than one e-mail address, separated by commas. So, for example, I could enter [email protected], [email protected] in the Value field, and the data from the form would be e-mailed to both these e-mail addresses when a user clicks the Submit button. See Figure 12-12.
Figure 12-12. The Hidden Field properties.
Click to place your cursor inside the
<form>tag and then click the Hidden Field icon in the Forms Insert Bar to add another hidden field to create a subject line.In the Property inspector, enter the name subject; in the Value field, include a subject line you want inserted into the e-mail message automatically when a user submits the form.
In this example, I entered Contact Information from
DigitalFamily.comas the value.Note
You can add many other hidden fields to a form, depending on the script you're using and how much you want to customize the results.
That's it. Assuming all fields are filled in correctly and the formmail.pl (or a similar) script is properly installed and configured on your server, you should receive via e-mail any data a user enters into your form and submits.
There are so many reasons to create forms on the Web, but e-mailing the contents of a contact form is one of the most common. I hope this little exercise has helped to give you an idea of what you need to do to make your HTML forms interact with a CGI script on your server.
Remember, most service providers offer a collection of scripts you can use for common tasks, such as discussion boards and guest books. All you have to do is create the HTML part of the form and then specify the form fields to interact with the script on your server. Check the Web site of your Web hosting service for instructions specific to the scripts available on your server.