
In This Chapter
Taking a look at the panels
Covering the recordset basics
Getting dynamic with your data
Creating master-detail page sets
Looking at more ways to use database-driven sites
If you've never used the dynamic development capabilities of Dreamweaver, get familiar with the windows and inspectors covered at the beginning of this chapter before you start creating your first project. In the rest of this chapter, you find out how these elements work together to create a Web site with dynamic features.
For the purpose of illustration, I use a simple Contacts database file, created with Microsoft Access, that features information about a few people — names, addresses, and pictures. If your site features another type of data, such as product descriptions or articles, don't worry — you'll add product names and descriptions to a Web page in much the same way I add names and titles from this Contacts database. Consider this a simple introduction to Dreamweaver's dynamic site features and remember that you can use these same steps to create any kind of dynamic Web site.
Note
Make sure your test server is running and, because this chapter assumes that you're using Internet Information Server (IIS) or Peer Web Services (PSW) for Windows, make sure that you save all the pages as ASP pages (filename.asp) so that the server parses the code correctly. If you haven't already set up the application server and established a connection to your database in Dreamweaver, go to Chapter 14 and follow the instructions for these crucial preliminary steps before you do the exercises in this chapter.
In Dreamweaver, the most fundamental elements of creating a dynamic Web site are in the Application panel, which includes the Databases, Bindings, Components, and Server Behaviors panels. In this section, I introduce you to these panels to give you an overview of how these panels work together to help you create a dynamic site.
The Databases panel lets you look at the databases on your application server. In the Databases panel, you can view your entire database structure within Dreamweaver — tables, fields, views, and stored procedures — without needing to use separate database software.
Tip
You can find the Databases panel by choosing Window
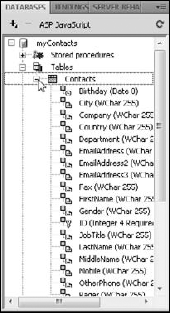
In Figure 15-1, you see that a connection has been established to the Contacts database and that you can view all the fields in that database by clicking the plus (+) sign next to Contacts.
If you have not yet established a connection to a database, go to Chapter 14 where you find instructions for creating a connection with a Custom Connection String using the Databases panel.
The Bindings panel enables you to add and remove dynamic content data sources from your document. The number and kinds of available data sources can vary depending on whether you use ASP, JSP, or any other server technology. A data source is where you get information to use on your dynamic Web page. An example of a data source is a recordset from a database, which you explore further in the next few sections of this chapter. A recordset is used to hold a collection of data from a database. After you create a recordset, the data can be displayed on a Web page.
Tip
If you don't see the Bindings panel, you can open it by choosing Window
With the Bindings panel, you can access data sources in several ways. You can find out what data source objects you have available by clicking the plus sign (+) in the Bindings panel to display the Add Bindings pop-up menu (see Figure 15-2).
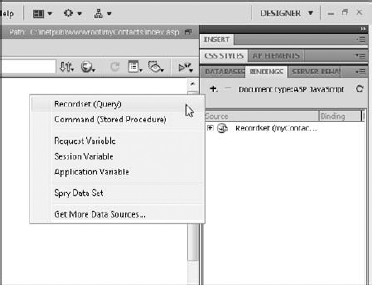
The Add Bindings pop-up menu has the following options:
Recordset (Query): A recordset stores data from your database for use on a page or set of pages. I explain recordsets in more detail later in this chapter.
Command (Stored Procedure): Commands, or stored procedures, are reusable database items that contain SQL (Structured Query Language) code and are commonly used to modify a database (insert, update, or delete records).
Request Variable: Commonly used wherever a search is involved, a request variable carries information from one page to another. When you use a form to submit data to another page, a request variable is created.
Session Variable: Session variables store and display information for the duration of a user's session (or visit). A different session is created on the server for each user and is kept in use either for a set period of time or until a specific action on the site terminates the session (such as a logging out).
Application Variable: Application variables store and display information that must be present for all users and is constant throughout the lifetime of an application. These types of variables are commonly used for page counters or date and time counters. Application variables are available only for ASP and ColdFusion pages, not for PHP and JSP.
Spry Data Set: Spry data sets link existing XML files to display with any of the various Spry widgets.
Get More Data Sources: Use this option to open Dreamweaver Exchange in your browser. You can use Exchange to download extensions for Dreamweaver. You find instructions for downloading and installing extensions in Chapter 10.
Server behaviors are server-side scripts that perform some type of action. Through the Server Behaviors panel, you can add server-side scripts, such as user authentication and record navigation, to your pages. Server behaviors available to you vary depending on the server technology you use.
Tip
You can get to the Server Behaviors panel by choosing Window
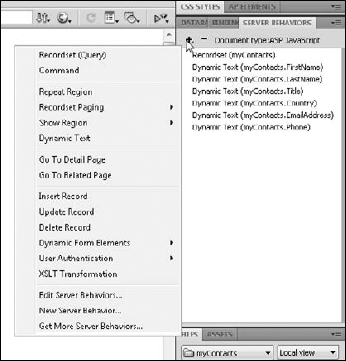
You can view the available server behaviors by clicking the plus sign (+) in the Server Behaviors panel to get the Server Behaviors pop-up menu (see Figure 15-3).
The Server Behaviors pop-up menu has the following options:
Recordset (Query): A recordset stores data from your database for use on a page or set of pages. I explain recordsets in more detail later in this chapter.
Command: Commands are reusable database items that contain SQL code and are commonly used to modify a database (insert, update, or delete records).
Repeat Region: This server object displays multiple records on a page. Repeat Region is most commonly used on HTML tables or HTML table rows. You can find out more about this behavior later in this chapter.
Recordset Paging: If you have to display a large number of records and want them to appear a page at a time, this set of behaviors allows you to navigate from page to page or from record to record.
Show Region: With this set of server behaviors, you can show or hide record navigation based on the records displayed. For instance, if you have Next and Previous links on the bottom of every page and your user is on the first page or first record of the recordset, you can set a behavior to display only the Next link. The same is true if the user is on the last page or record — you can set the behavior to hide the Next link and display only the Previous link.
Dynamic Text: This option enables you to display information from your recordset anywhere on the page.
Go to Detail Page: With this behavior, you can link each record in your repeated region to a detail page for that particular record. The behavior also tells the detail page which record's information to display.
Go to Related Page: You can use this behavior to link a particular dynamic page to another page that contains related information, passing the parameters of the first page to the related page.
Insert Record: Use this behavior on a page to add new records to a database via a Web browser.
Update Record: Use this behavior on a page to update existing records in a database via a Web browser.
Delete Record: Use this behavior on a page to permanently delete a record from a database via a Web browser.
Dynamic Form Elements: This set of server behaviors turns text fields, list or menu fields, radio buttons, or check boxes into dynamic form elements, which you can set to retrieve and display particular information from a recordset.
User Authentication: The User Authentication set of behaviors allows you to log in a user, log out a user, check a username against the information in your database, and restrict access to a page.
XSLT Transformation: Extensible Stylesheet Language Transformation (XSLT) is a language that displays XML data on a Web page after transforming it into HTML.
Edit Server Behaviors: Use this option to customize or remove existing server behaviors. Unless you're very comfortable with coding or SQL, I advise you to not mess with this option. (If you're curious about SQL, see SQL For Dummies, 6th Edition, by Allen G. Taylor; Wiley Publishing, Inc.)
New Server Behavior: Use this option to create new server behaviors and add them to the list of existing behaviors. Again, this option is for more advanced users who are comfortable with coding.
Get More Server Behaviors: Use this option to open Dreamweaver Exchange in your browser. You can use Exchange to download extensions for Dreamweaver. You find instructions for downloading and installing extensions in Chapter 10.
A recordset holds data from your database for use on a page or set of pages. A query gathers information from a database to be used on a page, selecting only the records matching the fields and conditions of the particular query. The queries for a recordset are built with SQL, but you don't need to know SQL to get the job done. Dreamweaver writes it all for you.
All you really need to understand is that you can't add data from your database to your Web pages until you've created a recordset.
Note
Before you can create a recordset, you must first connect to a database. Chapter 14 includes instructions for creating a Custom Connection String, which you must do before you can create a recordset.
To define a recordset in Dreamweaver:
Open the ASP page that will use the recordset.
In the Bindings panel, click the plus sign and select Recordset (Query).
In the Name box, enter a name for your recordset.
Usually, adding rs to the beginning of the name is recommended to distinguish it as a recordset in your code, but it isn't necessary. I used myContacts, as shown in Figure 15-4.
In the Connection drop-down list, select your connection.
This list includes any data connections defined from the Databases panel. Chapter 14 explains how to create a connection.
In the Table drop-down list, choose a database table where the data for your recordset will be collected.
You can select all the columns or only specific columns of data to be displayed.
(Optional) If you want the available information to show only records that meet specific criteria, select a filter in the Filter area.
(Optional) If you want to change the sort order of the displayed records, use the Sort drop-down list to specify the field by which you want the records sorted (Name, Phone Number, and so on) and then specify Ascending or Descending.
If you want to tweak the results further and you feel comfortable working with SQL, you can click the Advanced button to edit the SQL statement directly.
To test the connection to the database, click the Test button.
Note
You can find the Databases panel by choosing Window

If the test is successful, you see a window with the data in the recordset
Click OK to close the Test screen.
Click OK to complete the Recordset dialog box.
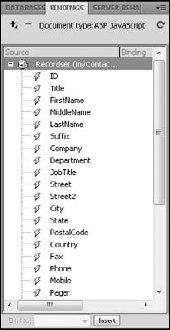
The Bindings panel appears displaying the contents of the recordset. You can expand it by clicking the plus sign next to the recordset, as shown in Figure 15-5.

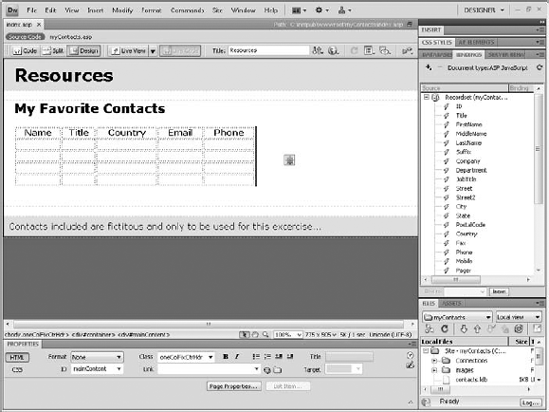
After you create a recordset, you can place the information on your page as you want. For this example, I designed a basic page with a table that has room to list the name, title, country, e-mail address, and phone number of each contact in the database. In Figure 15-6, you see my simple page with headings across the top of the table, but no content displayed in the table cells.
After you set up the document the way you want it, you can drag and drop each data source from the recordset to the place on the page where you want the data displayed. To add data from the recordset to your Web page, follow these steps:
From the Bindings panel, select your first data source, such as First Name, and drag it onto your page, dropping it where you want it to go.
The name of the dynamic text appears inside curly brackets, as shown in Figure 15-7.
Tip
You can format dynamic text just as you would format any other text on the page.
Test the result by clicking the Live View button.
The first record of your database appears in place of the dynamic text, as shown in Figure 15-8.
Tip
To display more than just the first record in a Web page, define and repeat a region, which you find out how to do in the next sections.

One of the greatest advantages of creating a dynamic site like this is the ability to display any combination of content from more than one record at a time on a page. You can do this by applying a server behavior to your region. Server behaviors are code blocks that let you add dynamic capabilities to your Web site.
Note
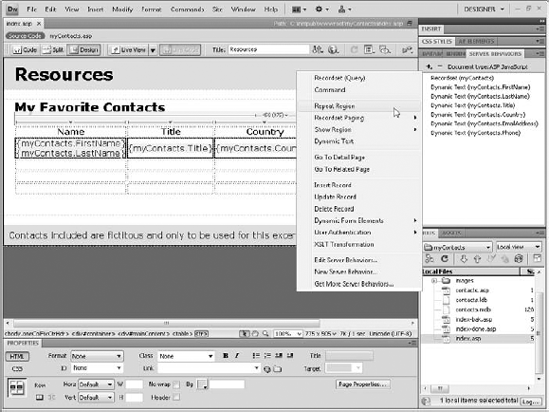
A region is any area of a page that displays information from a database on your page. After you define your region, you can apply a Repeat Region server behavior, which causes that area to be written to the page over and over, displaying every record, or as many records as you tell it to on as many pages as needed to display all the contents of the database (or whatever subset of the database you want displayed). The Repeat Region is most commonly used on HTML tables or table rows.
To add a Repeat Region server behavior to your page:
Select the area on your page that you want to define as a region.
Click the Server Behaviors panel, click the plus sign (+), and select Repeat Region from the menu that appears (see Figure 15-9).
The Repeat Region dialog box appears (see Figure 15-10).
Select the number of records that you want to appear on the page and then click OK (see Figure 15-10).
In this example, I chose to have ten records displayed on the page. If you follow the steps in the section "Adding Navigation to a Dynamic Page," later in this chapter, you can set up your pages to automatically display any number of records per page and then to automatically link to the next and previous pages as pages are created until all the records in the database are displayed.
Click the Live View button to see the results.

If your database only contains text, the preceding section covers all that you need to do to display content on your pages. But if you're like most Web designers, you probably want to include photos of the people in your Contacts database or images of each product. To do that, you need to do a little prep work and then bind an image to a recordset so that you can add it to the page.
Before you bind an image so you can add it dynamically, take care of these preliminary steps:
Make sure that you have a field for each record in your database that lists the actual path of the image for that record.
For example, if your images reside in an images folder, one level above your dynamic page, enter the following in the image field in your database: images/imagename.gif, remembering to replace the imagename.gif part with the actual filename for each image.
Make sure your images are in your site root folder in your wwwroot folder or, if you're testing your work on a remote server, make sure that you've uploaded the images to the root folder on the server.
Place a placeholder image in the spot where you want an image to appear for all the records.
Note
You can use any of the images in your image folder as a placeholder or choose Insert
After you insert the placeholder image, you can bind images in two easy ways — with the Bindings panel or the Property inspector.
Follow these steps to bind images with the Bindings panel:
Select your placeholder image in the open document.
Click the plus sign (+) to expand your recordset. (On a Mac, click the triangle.)
Select the Picture field in your recordset that contains the name of the image file.
Click the Bind button at the bottom of the Bindings panel.
The image changes to a tree with a lightning bolt along its side, and the Src field is automatically filled in the Property inspector.
After an image is bound, the Bind button changes to the Unbind button, as shown in Figure 15-11.

Figure 15-11. Use the Bindings panel to bind an image field to an image placeholder in your Web page.
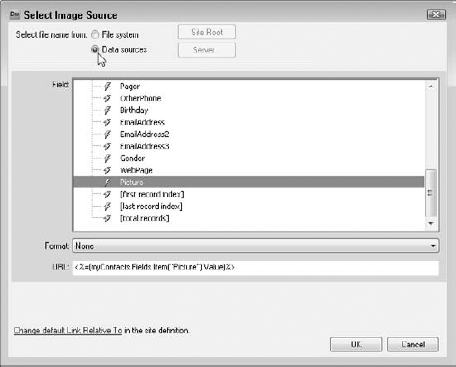
Follow these steps to bind images with the Property inspector:
Click to select the placeholder image in the open document.
In the Property inspector, click the Browse button (which looks like a folder) next to the Src field.
The Select Image Source dialog box appears.
At the very top of the Select File Name From section, click the radio button to select the Data Sources option, as shown in Figure 15-12.
The Recordset appears in the Field area (see Figure 15-12).
Click to select the field that contains your image information.
Dreamweaver automatically fills in the URL field at the bottom of the Select Image Source dialog box.
Click OK.
The image changes to a tree with a lightning bolt along its side, and the Src field is automatically filled in the Property inspector.
After performing either of these two methods to bind your images to the page, click the Live View button to check the results and the images, which are displayed in Dreamweaver.
If your database contains many records, you'll likely want to show only a few records per page so that you don't overwhelm the user. You'll probably also want to create a series of pages, linked together, so that it's easy for visitors to view all the records by clicking through a series of pages.
To help you easily automate the creation of a series of pages like this, the Server Behaviors panel includes features you can use to add navigation to your pages so that visitors can move forward or backward through all the pages that display the records from your database.
The first step is to set up a Repeat Region, which I cover in the section, "Repeating a Region," earlier in this chapter. Add navigation only if you've set up the Repeat Region and you want have enough data to warrant creating multiple pages with navigation that will help users move through multiple pages. Assuming you have more records than you want on each page, you can add button images or text links at the bottom of each page to provide navigation, such as Previous Page and Next Page links. With the buttons in place, you can activate them by using the Server Behaviors panel.
To add Next and Previous links, follow these steps:
Add text with the words you want to use for your links to the page with the Repeat Regions.
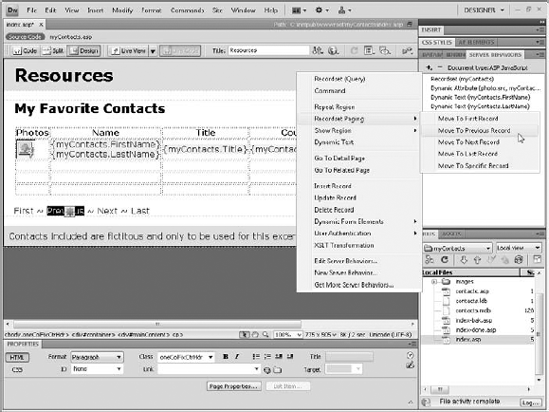
For this example, I simply typed in text, separated by the tilde button, like this: First ~ Previous ~ Next ~ Last, as shown in Figure 15-13.
Click the Server Behaviors tab to open the Server Behaviors panel.
Note
Alternatively, you can open the Server Behaviors panel by choosing Window
Click and drag to select the text you want to serve as a link.
In this example, as shown in Figure 15-13, I've selected Previous.
At the top of the Server Behaviors panel, click the plus sign (+) and select Recordset Paging from the menu.
From the Recordset Paging submenu, choose the appropriate navigation option.
In the example shown in Figure 15-13, you can see that I've selected the text Previous and am applying the Recordset Paging option, Move to Previous Record.
The Move to Record dialog box appears and, in most cases, you can just click OK because Dreamweaver automatically fills in the fields based on the option you selected.
Follow Steps 1–5 for each navigation link.
Choose File
Preview in Browser to test the links.Assuming you have your test server set up properly (see Chapter 14 for instructions), the page displays in a browser with the dynamic content and links in place, and you can page through your records.
That's a pretty nifty trick. Did you notice that on the first page, the Previous Page button or link still appears, even though there's no previous page? Not to worry — a server behavior tells the navigation button when to show up:
Click the Previous Page button in the Document window to select it.
Click the plus sign (+) in the Server Behaviors panel and then choose Show Region from the menu.
If you're working with the Previous Page button, choose Show Region if Not First Record. If you're working with the Next Page button, choose Show Region if Not Last Record.
The Show Region dialog box appears. The Move to Record dialog box appears and, in most cases, you can just click OK because Dreamweaver automatically fills in the fields based on the option you selected.
Choose File
Preview in Browser to display your pages and test these new dynamic features.Notice that now when you're on the first page of records, the Previous Page button doesn't appear; when you're on the last page, the Next Page button doesn't appear.
Now that you know how to add navigation to your recordsets, you can get fancy and add buttons to go to the first or last record. So if you have, say, 100 pages of records, you can jump from page 1 to page 100 without clicking Previous Page or Next Page through countless other pages of records. The server behaviors for those two are Move to Record
A master page displays a list of records and a link for each record. When a user clicks a particular link, a detail page appears with more information about that record.
A list of records determined by you: Users can't alter the list of records on this page; they can only click to view more information about those records displayed.
A dynamically-created master page: A good example of this type of master page is a search results page that appears when a user performs a search for specific records.
A detail page is the page that appears when a user clicks a particular link from a master page. This page can either display more information about a record (such as providing a more detailed description of a product in an online catalog), or it can be set up for administrative purposes to provide a way for users to update or delete a record.
Tip
Systems like these that enable users to add or remove records are great ways to make it easy for many people to update a Web site, but they're generally restricted to users who have been given password access to a protected section of a site.
Creating a master-detail page requires just a few clicks of the mouse. Using the functions described earlier in this chapter, create a page that you will use to list all your contacts, and name it something like contacts.asp. This is your master page. Next, create the page you use as the detail page in the same way and call it something like contactDetails.asp. Now you're ready to create the master-detail page set:
Open the
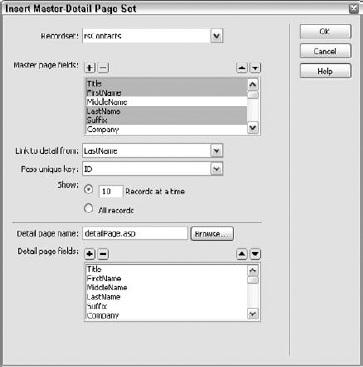
contacts.asppage you created as the master page and choose InsertData ObjectsMaster Detail Page Set.The Insert Master-Detail Page Set dialog box opens (see Figure 15-14). The top part of the dialog box is where you define the properties of the master page. The bottom part is where you define the detail page.
In the Recordset drop-down list, select the recordset that you use for your master page.
Next to Master Page Fields, use the plus sign (+) and minus sign (–), respectively, to add or remove fields from the master page.
Select the field from which you want to provide a link to the detail page for each record.
For example, if you list a bunch of contacts, you can use each contact's name as a link to its detail.
In the Pass Unique Key drop-down list, the default is usually correct; if it isn't, select the unique identifier that you want to pass on to the detail page.
Select the number of records you want to show at one time on the master page.
Note
Showing only a partial listing is okay because you can add navigation to view more records.
In the Detail Page Name box, type the filename for the detail page or click the Browse button to search for the file.
Just as with the Master Page Fields section, use the plus and minus signs (respectively) to add or remove fields that you want or don't want to appear on the detail page.
Click OK.
Dreamweaver automatically adds all the necessary recordset information and SQL code for you to begin using your master-detail page set. Everything from navigation to record status is in there.
Note
After you create the master and detail pages, you may want to rearrange and format the fields. (Dreamweaver just plops the stuff onto the pages, creating a generic look.) For example, you can change the column labels to text that has more meaning and is friendlier to your visitors. You can also format the font, color, and size as well as add padding to the table cells and change the order of the columns.
This chapter and Chapter 14 were designed to give you a basic introduction to what's involved with creating dynamic Web sites and the range of features you'll find in Dreamweaver that can help make it easier to create dynamic Web pages.
If you've spent much time on the Web, you know there are many other ways to create pages with dynamic data, from shopping carts to blogging tools. Yep, that's right; the same basic concepts illustrated in these two chapters are used to create programs like TypePad or WordPress for blogging or to create elaborate e-commerce sites.
Creating such advanced dynamic features requires far more instruction and experience than I can provide in this book about Dreamweaver, but you should know that you can go far beyond what I've covered here in the world of Web development.
Tip
You should also know that you don't need to reinvent the wheel, as they say. Many of the most common dynamic site features, such as shopping carts, can be purchased, or rented, from people and companies who have spent far more time building them than you've probably spent reading this book.
Before you attempt to create your own shopping cart, for example, you might want to consider creating a Web store at Amazon.com and simply linking it to the site you've created in Dreamweaver. Similarly, Google now offers a simple Google Checkout button as well as a more elaborate shopping system. You'll find many other shopping cart and e-commerce systems with just a little searching on the Web.
Similarly, if you want to set up and manage an online publication and expect to have many writers and editors, you may want to consider purchasing a good content management system (CMS). Every blogging program is essentially a CMS, but you'll find content management systems that range from the attractive price of free (for example, www.drupal.org), to prices that might surprise you because you can literally spend more than seven figures on a customized, high-end CMS, the likes of which publications like The New York Times rely on.
Note
If you're excited about creating your own dynamic Web site, I encourage you to keep learning because there's so much you can do with Dreamweaver. I also want to make sure you know that you can turn to lots of places to find high-end features, such as shopping cards, without creating them all yourself. To help you keep up with the ever-changing range of options out there, I've created a resource guide on my Web site, which I update regularly with cool programs, services, and such. You'll find my resource list as well as many other tips and tutorials at www.DigitalFamily.com/dreamweaver.