
In This Chapter
Opening an existing Web site
Creating a new Web site
Making new pages
Inserting and formatting text
Creating links
If you're ready to dive in and start building a Web site, you've come to the right place. If you're working on an existing site and need to make changes, this is also the place to start because in this chapter, you discover an important preliminary step — the site definition process, which enables Dreamweaver to keep track of the images and links in your site. After you've completed the site definition process, you're ready to create Web pages, insert text and images, set links, and more. (You discover how to do all those things later in this chapter, too.) But whatever you do, don't skip the first step of defining a site — it only takes a minute or two.
Tip
Although you can use Dreamweaver without doing this initial site definition, you run the risk of breaking links when you upload your site, and then many of Dreamweaver's features, such as automated link checking and the Library, won't work at all.
The first thing to understand about the site definition process is that you need to store all your site's resources in one local root folder on your hard drive and identify the folder in Dreamweaver. That's because all the elements of your site must remain in the same relative location on your hard drive as they are on your Web server in order for your links, images, and other elements to work properly.
As you go through the site definition process, you can create a new folder on your hard drive and designate that as your local root folder or you can identify an existing folder.
Tip
The Site Definition dialog box also contains a category where you can set up your site to use Dreamweaver's file transfer features, including its FTP (File Transfer Protocol) capabilities. (FTP is a common method of copying files to and from computers connected across a network, such as the Internet.) To keep things simple for now, you can skip those file transfer feature settings (as well as Dreamweaver's other publishing and site management features in the Site Definition dialog box). In Chapter 4, you find detailed instructions for using Dreamweaver's publishing features as well as instructions for downloading an existing Web site hosted on a remote server.
Note
As a general rule, you first create a Web site on your computer's hard drive, where you use Dreamweaver's preview options to test the site before it's visible on the Internet. Then when you're ready to publish the completed site, transfer it to a Web server. A Web server is a computer with a permanent connection to the Internet and special software that enables it to communicate with Web browsers, such as Internet Explorer and Firefox. Find detailed instructions for publishing a Web site in Chapter 4.
If the site definition process seems a little confusing at first, don't worry; it's a quick, relatively painless process that you have to do only once for each site.
Whether you're creating a new site or working on an existing site, the following steps walk you through the process of defining a root site folder.
Choose Site

The Site Definition dialog box appears.
Click the Advanced tab.
The Advanced window appears, as shown in Figure 2-1. If you prefer, you can use the Basic Wizard that steps you through the setup process, but I find it faster and easier to view all the options at once with the advanced option.
In the Category box on the left, make sure that the Local Info category is selected.
In the Site Name text box, type a name for your site.
You can call your site whatever you like; this name is used only to help you keep track of your sites in Dreamweaver. Many people work on more than one Web site, and the name you enter here is the name also listed in the Files panel. To switch from working on one site in Dreamweaver to another, you select the site's name from the drop-down list in the Files panel. Similarly, to edit any of the Site Definition settings for a site, you select its name from the Manage Sites dialog box, which you can open by choosing Site

If you're working on an existing site, select the folder that contains the files for that site. If you're creating a new site, you can create a new folder as you go through this process by using the Create New Folder icon at the top of the dialog box in Windows or the New Folder button at the bottom of the dialog if you're using a Mac.
The point is to simply select the folder so that Dreamweaver can identify where all the files and folders for your site will be stored.
Specify the Default Images folder by entering the location or by using the Browse icon to locate it.
This works just like the previous step, you simply want to browse to the images folder and select it so that Dreamweaver can identify the location.
Tip
Although you don't have to identify an images folder, this is another way Dreamweaver helps keep track of things for you. You can store images in more than one folder in your site, but I still recommend that you identify a main image folder. If you're setting up a new site, you can create a new folder inside your site folder and identify that as your images folder, even if it's empty.
For Links Relative To, leave the Document option selected unless you know that you want your links to be set up relative to the root of your site.
This setting controls how the path is set in links. If you're working on a site with other developers and you're not sure, check with your colleagues. If you're working alone on your own site, Links Relative to Document is the simplest option to manage. (You can read more about relative versus root links in the section "Setting Links," later in this chapter.)
In the HTTP Address text box, type the URL of your Web site.
The HTTP address is the URL, or Web address, that your site will have when published on a Web server. If you don't yet know your site's Web address or don't plan to publish the site on a Web server, you can leave this box blank. Include the
http://at the beginning.Select the Use Case-Sensitive Link Checking box.
Unless you know for sure that you don't have to worry about the case of your filenames, checking this box means Dreamweaver ensures that the case matches for all your site's links (which many Web hosting services require).
Select the Enable Cache option.
Dreamweaver creates a local cache of your site to quickly reference the location of files in your site. The local cache speeds up many site management features of the program and takes only a few seconds to create.
Click OK to close the Site Definition dialog box and save your settings.
If the folder you selected as your local site folder already contains files or folders, they're automatically cached and all the files and folders in your site are displayed in the Files panel. As you see in Figure 2-2, my newly-created Lions site contains only an empty images folder.
If you haven't checked the Enable Cache option, a message box appears asking whether you want to create a cache for the site. Choose Yes to speed up Dreamweaver's site management features.

You can define as many sites as you like in Dreamweaver and change from one site to another by selecting the site name in the Files panel. To load a different site into the Files panel, use the drop-down arrow next to the site name and choose the name of the site you want to display.
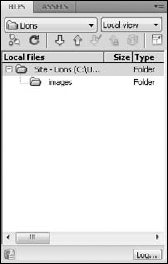
Figure 2-2. When site setup is complete, the files and folders in an existing site are displayed in the Files panel.
In Figure 2-3, I'm selecting the DigitalFamily.com site from a list of defined sites. Having the site you're working on selected in the Files panel is always best.
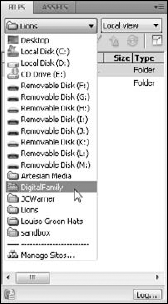
Figure 2-3. You can define multiple sites and change the active site by selecting its name in the Files panel.
After you complete the site definition process covered in the preceding exercise, you can make changes and additions to a site definition by choosing Site
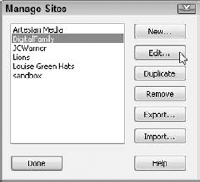
In Figure 2-4, I selected the DigitalFamily.com site to edit. You can use this dialog box to define a new site, remove an existing site, duplicate a site, and import or export a site. Note that when you remove a site from the Manage Sites dialog box, you don't delete the site's files or folders from your hard drive; you simply remove the site definition in Dreamweaver.
Every Web site begins with a single page. Visitors are first greeted by the front page — or home page — of your site, and that's usually a good place to start building. Dreamweaver makes creating new pages easy: You can work from the Welcome screen or use the New Document window. The following sections explain both methods, and you find details about naming those new pages, too.
When the program opens, you're greeted by a Welcome screen with shortcuts to many handy features for creating new pages in a variety of formats:
If you want to create a simple, blank Web page, choose HTML from the Create New list in the middle column (see Figure 2-5).
If you're creating a dynamic site, choose ColdFusion, PHP, or one of the other dynamic site options. (If you don't even know what those options mean, you probably won't need to use them yet, but you can find some information about these advanced options in Part IV.)
Tip
If you prefer not to use the Welcome screen, you can turn it off by selecting the Don't Show Again box in the bottom-left corner.
You can also create a new page by using the New Document window available from the File menu, as you see in the following the steps:
Choose File
The New Document window opens.
From the left side of the screen, select Blank Page.
From the Page Type list, select HTML and then choose Create.
From the Layout section, choose <none>.
Choose File
You find many other options in the Dreamweaver New Document window, including a wide range of predesigned layouts and templates. For now, I start with a simple blank page. You find instructions for customizing CSS layouts in Chapter 6 and for working with templates in Chapter 9.
Tip
Get in the habit of saving new Web pages in your main root Web site folder as soon as you create them, even though they're still blank. As you create links or add images to your pages, Dreamweaver needs to be able to identify the location of your page. Although Dreamweaver sets temporary links until your page is saved, saving a page first is always best.
Over the years, I've received many e-mail messages from panicked Web designers because of broken links caused by filename conflicts. Because these problems usually don't occur until after a Web site is published on a server, they can be especially confusing and difficult to understand. If you're publishing your Web site to a Web server that runs on Mac or Windows, the following may not apply to you; but if you're using a Web server that runs Unix or Linux (which is what many commercial Web hosting companies use), the following instructions are especially important. If you're not sure, follow these rules when you save Web pages, images, and other files on your site to be safe:
Include an extension at the end to identify the file type (such as
.htmlfor HTML files or.giffor GIF images). Dreamweaver automatically adds the.htmlfile extension to the end of HTML files (which works for most Web servers), but you can change the extensions in Dreamweaver's preference dialog box if necessary for your Web server. See the "Showing file extensions in Windows" sidebar on viewing file extensions in Windows.Don't use spaces or special characters in the filename. For example, don't name a Web page with an apostrophe, such as
cat's page.html. If you want to separate words, you can use the underscore (_) or the hyphen (-). For example,cat-page.htmlis a fine filename. Numbers are okay in most cases, and capital letters don't generally matter.
Note
The reason for all this fuss? Filenames are especially important in Web sites because they're included in the HTML code when you set links. Links with spaces and special characters work just fine when you test pages on a Mac or a PC computer, but the software programs used on many of the Web servers on the Internet don't understand spaces or special characters in links. Thus, links that don't follow these rules may get broken when you publish the site to a Web server. By following these rules, you ensure that the filename and the code in the link match.
Showing file extensions in Windows
Unless you change the settings, you won't see the file extension of your gifs, jpegs, or html pages on a Windows computer (although these extensions will be displayed in the Files panel in Dreamweaver).
To change these settings, open the Folder Options dialog box, as shown in the following figure, choose the View tab, and then deselect the Hide Extensions for Known File Types option. How you open the Folder Options dialog box depends on which version of Windows you're using; but if you search for Folder Options in the Help section, you can find it easily.

Another confusing rule, and one of the most important, is that the main page (or the front page) of your Web site must be called index.html (on some Windows-based servers, the first page should be named default.html). That's because most servers are set up to serve the index.html page first.
Essentially, when a Web browser comes to a domain name, such as DigitalFamily.com, the first page that opens is index.html. Similarly, when a Web browser is directed to a subfolder within a site, it also displays the index page first. As a result, if you create a books subfolder, for example, and inside that subfolder you include an index page as the main page, you can tell visitors to your site to simply enter www.DigitalFamily.com/books to arrive at the books page within your site. If you name the first page anything else, such as books.html, visitors have to type www.DigitalFamily.com/books/books.html to open the page.
The rest of the pages in your site can be named anything you like, as long as the names don't include any spaces or special characters (except the hyphen or underscore).
Tip
When you create new pages, adding a page title right away is also good practice. You can add a page title by changing the text in the Title box at the top of the workspace. It's an easy detail to forget, but page titles are important because they play a role in the appearance of your site as well as behind the scenes:
The title won't appear in the main part of your Web page, but it does appear at the top of a browser window, usually just to the right or left of the name of the browser. Pages on the Web look unfinished when the untitled document appears at the top of the browser window.
The page title is also the text that appears in a user's Favorites or Bookmarks list.
Many search engines give special priority to the words that appear in the title of a Web page.
Many people are pleasantly surprised by how easily they can create a basic Web page in Dreamweaver.
If you're ready to plunge right in, create a page and click to insert your cursor at the top of the blank page. (See the previous section, "Creating New Pages," if you need to start from the beginning.) Type some text on the page, anything you like; you just need something to get started. In the example in Figure 2-6 (a little later in this chapter), I typed the text "I gotcha where I want ya." I'll use this as a headline in the simple page I'm creating to go with my lion photo.
Tip
In this chapter, I use a mix of CSS and HTML formatting options, although I mostly use HTML. In Chapter 5, you find more detailed instructions for creating CSS to control and manage formatting.
One of the best formatting options for headlines is the collection of heading tags. In HTML, there are many advantages to using heading tags (<h1>, <h2>, and so forth) to format text that serves as a title or headline. That's because heading tags are designed to be displayed in relative sizes, with <h1> the largest, <h2> smaller, <h3> smaller still, and so on through <h6>. That's valuable because no matter what the default text size is for a Web page (and text sizes can vary because of things like browser settings and computer platform), any text formatted with an <h1> tag is always larger than text formatted with <h2>.
Tip
Many search engines also give priority to keywords in text formatted with an <h1> tag because that tag is perceived to be the most important text on a page.
To format text with a heading tag, follow these steps:
Highlight the text you want to format.
In the Property inspector, at the bottom of the workspace, make sure the HTML button on the left side of the inspector is selected.
Use the Format drop-down list to select a heading option (see Figure 2-6).
When heading tags are applied, the text automatically changes to display the heading's formatting options in design view.
Tip
In general, I find the Property inspector the easiest way to apply basic formatting, but you can also find these HTML formatting options under the Format drop-down list.
When you create page designs for the Web, you must work within many limitations that may seem confusing at first. Web design and print design are fundamentally different, and that can make even seemingly simple tasks more complicated than you might expect. How you create paragraph and line breaks is a good example.
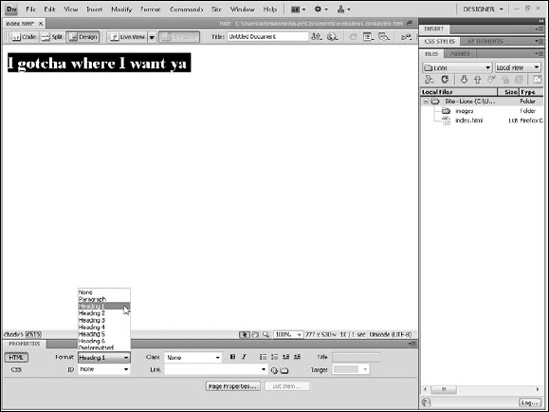
Figure 2-6. With HTML selected, the Property inspector provides easy access to common HTML formatting features, such as the heading tags.
If you're working in design view in Dreamweaver and press the Enter key (Windows) or the Return key (Mac), Dreamweaver inserts a paragraph tag, or <p>, in the code, which creates a line break followed by a blank line. If you want a line break without the extra blank line, hold down the Shift key while you press Enter (or Return) to get Dreamweaver to insert the <br /> tag into the code, creating a single line break.
If you want to add a lot of space, you're best option is to use CSS to create a page layout with the spacing and alignment options you desire. (I cover CSS in Chapters 5 and 6.)
Note
If you're working in code view and add space using the Enter or Return key, you add blank space within the code. Extra space in HTML code can be useful because extra space can make code easier to read, but it doesn't affect the way a page displays in design view or in a Web browser.
Dreamweaver gives you many options to maintain formatting when you copy and paste text from another program. You can change the default for how Dreamweaver handles formatting when you choose Edit
Text Only: Dreamweaver strips any formatting and inserts plain text.
Text with Structure: Dreamweaver includes paragraphs, lists, tables, and other structural formatting options.
Text with Structure Plus Basic Formatting: Dreamweaver includes structural formatting as well as basic formatting, such as bold and italic.
Text with Structure Plus Full Formatting: In addition to the previous options, Dreamweaver includes formatting created by style sheets in programs, such as Microsoft Word.
Retain Line Breaks: Line breaks are preserved, even if you don't keep other formatting options.
Clean Up Word Paragraph Spacing: This option addresses a common problem with the way Microsoft Word's paragraph spacing is converted when content is pasted into an HTML file.
I cover formatting text in Chapter 5 because you need to understand some basics about CSS to best format text in a Web site. You find instructions for adding other content, such as images and links, to your page, in the upcoming sections.
Now for the fun part. Adding an image to your Web page may seem almost magical at first because it's so simple with Dreamweaver. The challenge with Web graphics isn't adding them to your pages but creating good-looking images that load quickly in your viewer's browser. You need another program, such as Photoshop or Fireworks, to create, convert, and edit images. Dreamweaver just lets you place the images on your page.
For more information on finding and creating images, as well as keeping file sizes small, see Chapter 3. For now, I assume that you have a GIF or a JPEG image file ready and that you want to insert your image into your page. The two most common image formats you can use on your Web page are GIF and JPEG (which is often shortened to JPG), but the PNG file is increasingly used today because it's superior to the GIF format. Warning: PNG isn't fully supported in very old versions of some Web browsers. For the exercise that follows, you can use any image in GIF, JPEG, or PNG format.
Note
If you don't have an image handy, you can download free images from my Web site at www.DigitalFamily.com/free. (You find instructions for downloading the free images on the site.)
Before inserting an image into a Web page, it's good practice to save the image inside your local root folder (the one you should have identified in the site definition process described in the "Defining a Web site in Dreamweaver" section, earlier in this chapter). Saving your image in your Web site's local root folder is important because you need to keep Web pages and images in the same location relative to each other in your Web site, or you risk broken image links when you publish your site to a server. Whether you save your images in an images folder or in any other place in the root folder is up to you, but it's common practice to save images in a folder called images.
If you insert an image into a page and the image isn't saved in the local root folder, Dreamweaver copies the image into the root folder of your site (directly into the images folder if you identified one during the site definition process). This happens automatically as Dreamweaver inserts the image into the page and the original image is left unchanged.
Many designers create an images folder so they can keep all their image files in one place. If you're working on a very large site, you may want to create multiple image folders to better organize your files.
Tip
To avoid breaking links or image references, always use the Files panel to move or rename files. When you do so, Dreamweaver automatically fixes the links. If you move or rename a file or folder outside Dreamweaver, the links break. You find more detailed instructions on testing and fixing links in Chapter 4.
Okay, assuming you've saved your page and the image you want to insert into your page is saved within your main root site folder (or you're ready to let Dreamweaver copy an image that is saved on your hard drive into your local root folder for you), you're ready for the easy part. Follow these steps to add an image on your Web page:
Place your cursor on the page where you want to add the image.
I inserted my cursor under the headline at the beginning of the first paragraph.
Double-click the Insert panel at the top right of the workspace to open it.
Note: The location of the Insert panel varies depending on the Workspace layout you've selected. These instructions assume you're using the designer layout option, which is the default when you first start Dreamweaver. Choose Window
Click the Images icon, located in the Common section of the Insert panel or click the small arrow to the right of the icon and then choose Image from the drop-down list.
The Select Image Source dialog box opens, displaying files and folders on your hard drive.
Navigate to the folder that has the image you want to insert and double-click to select the image you want to insert into your page.
Enter alternate text in the Image Tag Accessibility Attributes dialog box.
If you have Accessibility options turned on in Preferences (the default), the Image Tag Accessibility Attributes dialog box appears. It's good practice to always add alternate text in this dialog box. To do so, simply enter text in the Alternate Text field. You can type any text in this field; it's meant to provide a description of the image. Alternate text won't appear on your Web page unless the image isn't visible, but it will appear in Internet Explorer when a user holds the cursor over the image. Alternate text is also important for Web surfers who use screen readers, or browsers that "read" Web pages to them, such as those with limited vision. For this reason, alternate text is required for accessibility compliance. A long description is considered optional under most accessibility guidelines. You can enter the address of a Web page with a longer description of the image in this field. You can also add or edit alternate text in the Property inspector after clicking to select the inserted image.
Click OK.
The image automatically appears on the Web page.
Click to select the image on your Web page.
Image options are displayed automatically in the Property inspector at the bottom of the page.
Use the Property inspector to specify image attributes, such as alignment, spacing, and alternate text.
In the example shown in Figure 2-7, I set the alignment to Right, using the Align option at the very bottom right of the Property inspector. That's how I got the text to wrap to the left of the image. I've also added ten pixels of space with the H Space field to create a margin between the image and the text.
Tip
CSS makes it possible to create more precise formatting options. For example, H Space inserts space on both the left and right sides of an image. With CSS, you can create a style that applies margin space on any or all sides of an image.
With an image selected, the Property inspector enables you to specify many attributes for an image. Table 2-1 describes those attributes. If you don't see all the attributes listed in the table on your screen, click the triangle in the bottom-right corner of the Property inspector to expand the inspector and reveal all the image options.
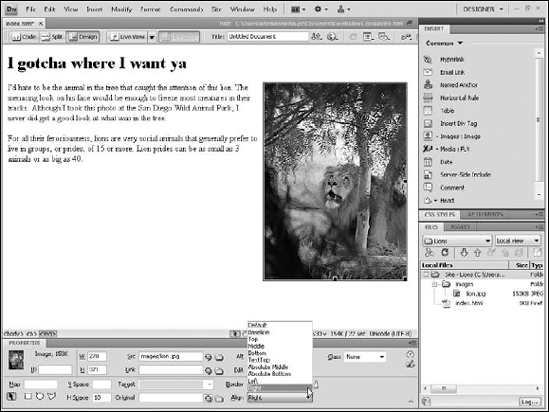
Figure 2-7. When an image is selected, the Property inspector provides easy access to common image attributes, such as alignment and spacing.
Table 2-1. Image Attributes in the Property Inspector
Attribute | Function | |
|---|---|---|
Image | N/A | Specifies the file size. |
ID | Name | Identifies image uniquely on the page — an important detail if you use behaviors or other scripts that target an image. Can be left blank. |
Map | Map Name | Assigns a name to an image map. All image maps require a name. |
Hotspot tools | Image Map Coordinates | Use the Rectangle, Oval, and Polygon icons to create image map hotspots for links. (See Chapter 3 to find out how to create an image map.) |
W | Width | Dreamweaver automatically specifies the width of the image based on the actual size of the image dimensions. |
H | Height | Dreamweaver automatically specifies the height of the image based on the actual size of the image dimensions. |
Src | Source | Required. The source is the filename and path from the current document to the desired image. Dreamweaver automatically sets this when you insert the image. |
Link | Hyperlink | This field displays the address or path if the image is used as a link. (For more about creating links, see "Setting Links" later in this chapter.) |
Alt | Alternate Text | Use this field to add or edit alternate text. |
Edit | Icons for Edit, Image Editing Settings, and Update from Original | Click the Edit icon to launch the image editor associated with Dreamweaver (you can change these settings in Dreamweaver's preferences dialog box). Use the Image Editing Settings icon to launch the Image Preview dialog box where you can make basic edits to an image. Choose the Update from Original icon to ensure that edits are made using the original image. Note: This setting works only if you've used an associated Adobe image editor to edit the image before inserting the image into the page. |
Vertical Space | Measured in pixels, this setting inserts blank space above and below the image. | |
H Space | Horizontal Space | Measured in pixels, this setting inserts blank space to the left and right of the image. |
Target | Link Target | Use this option when the image appears in a page where you want to control the target, such as when a page is part of an HTML frameset. If you want a link to open a new browser window, choose _blank. For instructions on targeting frames, see Chapter 8. |
Border | Image Border | Measured in pixels, this attribute enables you to add a border around an image. I nearly always set the image border to |
Icons for | Crop, Resample, Brightness and Contrast, and Sharpen | Use any of these icons to make minor alterations to an image in Dreamweaver. Note: Any changes made using these options permanently alter the image when the page is saved. |
Class | CSS Setting | The Class field enables you to apply any class styles defined in Dreamweaver. To use this option, select any element in the workspace and then select any class style you want to apply from the drop-down list. |
Warning
Although you can resize an image in Dreamweaver by clicking and dragging the edge of the image or by changing the Height and Width values in the Property inspector, I don't recommend you change an image size this way. Changing the height and width in the Property inspector doesn't actually change the size of the image, just the way it appears on the page. That's a problem for two reasons. First, using this option to make an image look larger or smaller can make the image look distorted. Second, using this option to make an image look smaller requires your visitor to download a larger file than necessary. If you do resize an image in Dreamweaver, a small circular icon appears to the right of the height and width fields. Click this icon, and Dreamweaver alters the HTML to return the image display to the actual size.
Dreamweaver is truly a dream when it comes to setting links. The most important thing to keep in mind is that a link is essentially an address (a URL) that tells a viewer's browser what page to go to when the viewer clicks the text or image containing the link.
To link to a page within your Web site, you can create a relative link that includes a path describing how to get from the current page to the linked page within your main root folder. A relative link doesn't need to include the domain name of the site, just instructions for a browser to get from one page within your site to another. Here's an example of what the code looks like for the relative link from the home page on my Web site at www.DigitalFamily.com to the Dreamweaver page in the books section, which is contained in a books folder:
<A HREF="books/dreamweaver.html">Dreamweaver Books</A>
Note
If you select the Root option instead of Relative in the Site Definition dialog box, this address would begin with a forward slash (as you see here) instructing the browser to begin at the root level:
<A HREF="/books/dreamweaver.html">Dreamweaver Books</A>
If you link to a page on a different Web site, create an absolute, or external, link. An absolute link includes the full Internet address of the other site. Here's an example of what the code would look like behind an absolute link if you created a link from your site to the Dreamweaver page in my books section:
<A HREF="http://www.digitalfamily.com/books/dreamweaver.html">Janine's Books</A>
If all that HREF code stuff looks like Greek to you, don't worry. The following section shows you how Dreamweaver sets links like this for you so you don't even have to look at this code if you don't want to. (I include these tips because I think it's helpful to have a little understanding of what's happening behind the scenes.)
Linking from one page to another page in your Web site is easy. The most important thing to remember is to save your pages in your site's root folder (as described in the "Defining a Web site in Dreamweaver" section, previously in the chapter) before you start setting links. Here's how you create a link from one page in a Web site to another:
In Dreamweaver, open the page where you want to create a link.
Select the text or image that you want to serve as the link (meaning the text or image that a user licks to trigger the link).
Click and drag to highlight text or click once to select an image. In this example, I selected the photo of the lion and I linked it to a page named
prey.htmllocated in the same folder.
Alternatively, you can set a link by clicking the Browse button (the icon that looks like a file folder) just to the right of the Link field in the Property inspector.
And yet another alternative, you can click the Point to File icon (which looks like a circle with a dot in the middle) and then drag your cursor over the name of any file in the Files panel. When you click and drag, Dreamweaver extends a line from the link field to the file in the Files panel. Note, the file must be visible in the Files panel, thus you may need to open a subfolder to reveal the file before you can set a link this way.

The Select File dialog box opens.
Click the filename to select the page that you want your image or text to link to, and then click OK (Windows) or Choose (Mac).
The link is set automatically, and the dialog box closes. Note that to test your links, you have to view your page in a browser, a process I cover in the "Previewing Your Page in a Browser" section, later in this chapter.
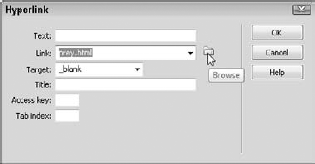
Tip
You can use the Target field in the Hyperlink dialog box, as shown in Figure 2-8, to "target" where your linked page opens. For example, the _blank option causes the linked page to open in a new browser window. The other options are most important when working with frames, which I cover in Chapter 8.
Setting links to named anchors makes it possible to link to elements within the same page. A named anchor link is an HTML tag that can be inserted anywhere on a page to add a Name, which can serve as a target for a link. You can use a named anchor to link from an image or a text string on one page to another place on the same page, or to link from one page to a specific part of a different page. To create a named anchor link, sometimes called a jump link, first insert a named anchor in the place that you want to link to and then include that anchor in the link to direct the browser to that specific part of the page when a viewer follows the link.
Suppose that you want to set a link from the word Tigers at the top of a page to a section lower on the page that starts with the headline Lions are Cooler than Tigers. First insert a named anchor at the Lions are Cooler than Tigers headline and then link the word Tigers from the top of the page to that anchor.
To insert a named anchor and set a link to it, follow these steps:
Open the page on which you want to insert the named anchor.
Place your cursor next to the word or image that you want to link to on the page.
You don't need to select the word or image; you just need a reference point that appears when the link is selected. For this example, I placed the cursor to the left of the headline Lions are Cooler than Tigers.
Choose Insert
Enter a name for the anchor.
You can name anchors anything you want (as long as you don't use spaces or special characters). Just make sure that you use a different name for each anchor on the same page. Then be sure that you remember what you called the anchor because you have to either type the anchor name to set the link or select it from the drop-down list in the Hyperlink dialog box, as you see in Step 8. In this example, I chose tiger as the anchor name because it's easy for me to remember.
The dialog box closes, and a small anchor icon appears on the page where you inserted the anchor name. You can move an anchor name by clicking the anchor icon and dragging it to another location on the page.
If you're curious about what this named anchor looks like in HTML, here's the code that appears before the headline in my example:
<A NAME="tiger" id="tiger"></A>
Note
Remember that Dreamweaver creates XHTML code, which is a strict version of HTML and requires that all code be in lowercase letters.
To set a link to the named anchor location, select the text or image that you want to link from.
You can link to a named anchor from anywhere else on the same page or from another page. In my example, I linked from the word Tiger that appears at the top of the page to the anchor I made next to the headline.

In the Hyperlink dialog box, use the small arrow to the right of the Link box to select the anchor.
Alternatively, you can set a jump link by using the Property inspector by typing a pound sign (#) followed by the anchor name.

In my example, I typed #tiger in the Link text box. The HTML code for this line looks like this:
<A HREF="#tiger">Tiger</A>
If you want to link to an anchor named tiger on another page with the filename
coolcats.html, type coolcats.html#tiger in the Link text box.
Linking to a page on another Web site — called an external link — is even easier than linking to an internal link. All you need is the URL of the page to which you want to link, and you're most of the way there.
To create an external link, follow these steps:
In Dreamweaver, open the page from which you want to link.
Select the text or image that you want to act as a link.
In the Link text box in the Property inspector, type the URL of the page you want your text or image to link to.
The link is set automatically. In the example in Figure 2-9, I created a link using the text San Diego Wild Animal Page to link to the park's Web site at
www.sandiegozoo.org.
Tip
Although, you don't have to type the http:// or even the www. at the beginning of a Web site address to get to a site in most browsers, you must always use the full URL, including the http://, when you create a link to another Web site in HTML. Otherwise, the browser can't find the correct external site address, and the visitor will probably end up on an error page.
Another common link option goes to an e-mail address. Visitors can send you messages easily with e-mail links. I always recommend that you invite visitors to contact you because they can point out mistakes in your site and give you valuable feedback about how you can further develop your site. Setting a link to an e-mail address is just as easy as setting a link to another Web page. All you need to know is the e-mail address you want to link to and what text or image you want to use when you set the link.
When you create an e-mail link with the Link field in the Property inspector, the e-mail links must begin with the code mailto: (no //). For example, if you typed a link to my e-mail address into the Property inspector, you'd need to type mailto:[email protected]. Here's what the full line of code behind that e-mail link would look like:
<A HREF="mailto:[email protected]">Send a message to Janine</A>
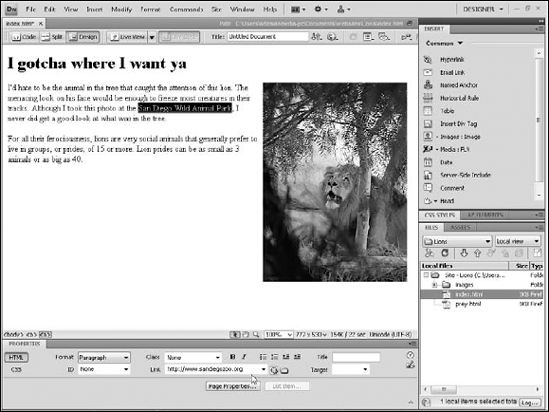
Figure 2-9. To set a link to another Web site, highlight the text or image you want to link and type the URL in the Link text box.
Tip
When visitors to your Web site click an e-mail link, their computer systems automatically launch their e-mail program and create a blank e-mail message to the specified e-mail address. This is a cool trick, but it can be disconcerting to your users if they don't expect it to happen, and it won't work if they don't have e-mail programs on their computers. That's why I always try to let users know when I use an e-mail link. For example, instead of just linking the words Contact Janine, I link the words E-mail Janine. Even better, I often link the actual e-mail address.
Warning
When you create an e-mail link on a Web page that will be displayed on the public Internet, you open yourself to spammers, some of whom use automated programs to "lift" e-mail addresses off Web pages.
Tip
Spam is the reason many sites don't include e-mail links, but instead use text, such as Send e-mail to Janine at jcwarner.com. Another alternative is to use the AddressMunger Web site to create e-mail links that include special code to hide them from spammers. Visit www.AddressMunger.com to read more. You can also use a form to get around this potential problem. By setting up a form with a script that delivers the form's contents to an e-mail address, you can shield your e-mail address from spammers while still making it easy for visitors to your site to send comments. You find instructions for creating forms in Chapter 12.
You can change many individual elements on a page in the Property inspector, but if you want to make changes that affect the entire page, such as changing the background color of the entire page or changing the way links and text are formatted, use the Page Properties dialog box.
As shown in Figure 2-10, the Page Properties dialog box includes a list of categories on the left. Each of these reveals different options for specifying page settings. Some of these options are covered in other parts of the book, such as the Tracing Image feature (Chapter 9), and the Background Image feature (Chapter 3).
For now, to keep things simple, this section focuses only on changing the background and the text colors available from the Appearance categories, as shown in Figure 2-10, and the options in the Links (CSS) category. Note that the CSS options are recommended over HTML options. When you use the Appearance (CSS) options, Dreamweaver automatically creates corresponding styles for the Body tag.

Figure 2-10. The Appearance (CSS) category in the Page Properties dialog box enables you to specify the text color, font face, font size, background, and margins.
Note
Although you can apply global settings, such as text size and color, in the Page Properties dialog box, you can override those settings with other formatting options in specific instances. For example, you could set all your text to Helvetica in Page Properties and then change the font for an individual headline to Arial with the Font field in the Property inspector.
To change the font settings, the background and text colors, and the page margins for an entire page, follow these steps:
Choose Modify
The Appearance (CSS) category of the Page Properties dialog box appears (see Figure 2-10).
In the Page Font drop-down list, specify the fonts you want for the text on your page.
In this example, I set the font face to the collection that begins with the Georgia font. If you don't specify a font, your text appears in the font specified in your user's browser, which is usually Times.
If you want all the text on your page to appear bold or italic, click the B or I, respectively, to the right of the Page Font drop-down list.
If you select one of these options, all your text appears bold or italic in the page.
In the Size drop-down list, specify the font size you want for the text on your page.
Again, you can override these settings for any text on the page.
Click the Text Color swatch box to reveal the color palette. Choose any color you like.
The color you select fills the color swatch box but won't change the text color on your page until you click the Apply or OK button.
Click the Background Color swatch box to reveal the color palette. Choose any color you like.
The color you selected fills the color swatch box. The color doesn't fill the background until you click the Apply or OK button.
If you want to insert a graphic or photograph into the background of your page, click the Browse button next to the Background Image box and select the image in the Select Image Source dialog box.
When you insert a background image, it automatically repeats or tiles across and down the page unless you choose the No-Repeat option from the Repeat drop-down list or use CSS to further define the display.
Use the margin options at the bottom of the dialog box to change the left, right, top, or bottom margins of your page.
Entering 0 in all four of these fields removes the default margin settings that automatically add margin space at the top and left of a Web page, enabling you to create designs that begin flush with the edge of a browser.
Click the Apply button to see how the colors look on your page.
Click OK to finish and close the Page Properties dialog box.
Tip
When you change the background, text, or link colors, make sure the colors look good together and that your text is still readable. As a general rule, a light background color works best with dark text color and vice versa.
To change the link color and underline options, follow these steps:
Choose Modify
The Page Properties dialog box appears.
In the Category list, select the Links (CSS) option.
The Links (CSS) category is displayed, as shown in Figure 2-11.
Specify the font face and size you want for the links on your page.
If you don't specify a font, your links appear in the same font and size specified for the text of your document.
To the right of the Link Font drop-down list, click the B or I if you want all the links on your page to appear bold or italic, respectively.
If you select one of these options, all your links appear bold or italic unless you specify other formatting in the page.
Specify a color for any or all link states.
The color you selected is applied to links on your page based on the link state. There are four link states, and all can be displayed in the same or different colors:
Link Color: This option controls the color in which a link appears when it is first displayed on a page.
Visited Links: This option controls the color of links that a visitor has already clicked (or visited).
Rollover Links: A link changes to this color when a user rolls a cursor over the link (also known as hovering).
Active Links: A link changes to this color briefly while a user is actively clicking it.
In the Underline Style drop-down list, specify whether you want your links underlined.
By default, all links on a Web page appear underlined in a browser, but many designers find the underline distracting and prefer to turn off underlining by selecting Never Underline. You can also choose Show Underline Only on Rollover to make the underline appear when a user moves a cursor over a link. Hide Underline on Rollover causes the underline to disappear when a user moves a cursor over a link.
Click the Apply button to see your changes automatically applied to any linked text or other elements on your page.
Click OK to finish and close the Page Properties dialog box.

Note
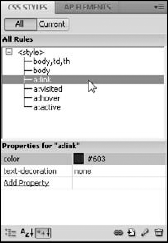
When you change the link options and other settings in the Page Properties dialog box, Dreamweaver automatically creates styles corresponding to these settings and saves them in the CSS Styles panel, as shown in Figure 2-12. I cover Dreamweaver's CSS Styles panel in greater detail in Chapters 5 and 6.
If you've heard of Meta tags, you probably associate them with search engines, and you'd be right. Meta tags are used for a variety of things, but one of the most common uses is to provide special text that doesn't appear on your page but is read by crawlers, bots, and other programs that scour the Web cataloging and ranking Web pages for Yahoo!, Google, and a long list of other search-related sites.
Some search engines read the Meta tags for keywords and descriptions. The first enables site designers to include a list of keywords they would like used to make their Web site a match when someone types the same keywords into a search engine. Unfortunately, Meta keywords have been so abused by Web designers attempting to mislead visitors about the true content of their Web pages that most search engines ignore the Meta keyword tag. Some search engines continue to recognize Meta keywords, however, and it won't hurt your ranking with any search engines if you use this Meta tag.
The Meta description tag is more widely used and is definitely worth using. This tag is designed to let you include a written description of your Web site and is often used by search engines as the brief description that appears in search results pages. If you don't include your own text in a Meta description tag, many search engines use the first several words that appear on your front page or some other collection of text from your page, usually based on formatting or placement on the page. Depending on your design, the first few words may not be the best description of your site, and you'll be better served by including your own Meta description.
Follow these steps to fill in the Meta description tag:
Open the page where you want to add a Meta description.
You can use Meta descriptions on any or all pages on your Web site. (Many people using search engines to find your site may end up directly at internal pages if the content matches the search.)
Choose Insert
The Description dialog box appears.
In the Description text box, enter the text you want for your page description.
Click OK.
The description text you entered is inserted into the Head area at the top of the page in the HTML code. Meta content doesn't appear in the body of the page.

If you want to add keywords, repeat Steps 1–4, choosing Insert
Although Dreamweaver displays Web pages much like a Web browser, not all interactive features work in Dreamweaver. To test links, for example, preview your work in a Web browser.
Tip
The simplest way to preview your work is to save the page you're working on and then click the Preview/Debug in Browser icon located at the top right of the workspace, as shown in Figure 2-14 (it looks like a small globe). You can also choose File
When you install Dreamweaver, it automatically finds all the browsers installed on your computer and sets them up so that you can easily select them to preview your pages. It's always a good practice to test your pages in more than one Web browser because page display can vary. How many browsers you test your pages on depends on the audience you expect to visit your Web site, but most good Web designers test their pages on at least the latest two or three versions of Internet Explorer and Firefox. It's also good practice to preview your pages on both Macintosh and Windows computers because the page display might differ.
If you install more browsers on your computer, you can add them to the Browser Preview list by choosing Edit
