9. Backup/Recovery
One of the key jobs of a system administrator is to back up and recover systems and data. It is also one of the more vexing areas. Nothing gets an administrator in trouble faster than lost data. In this chapter, we discuss the key categories of backup and recovery, and we look at some important areas of concern.
The first distinction between backup types is remote versus local backups. Local backups to media are typically faster, but the incremental cost of adding media storage to every system becomes expensive quickly. The second option is to use a remote system as a backup server. This approach slows the backups somewhat and increases network bandwidth usage, but the backups typically happen in the middle of the night when most systems are quiet. This distinction is not a major focus of the chapter, but it is a fact of backup and recovery life and must be mentioned.
The main issues addressed in the chapter include backup media and the types of backup devices available, backup strategies, the benefits and limitations of different utilities, and ways to troubleshoot failing tape backups.
Media
Even if the data from a computer is backed up across the network, it must at some point be stored on some form of media. The three basic media for archiving data from computer systems are magnetic tape, optical disk, and hard drive. We deal with magnetic tape in the most depth because it is the most common method for backup and recovery.
Magnetic Tape
Magnetic tape was originally used for audio recordings but was later adapted to computer data. It is typically a magnetizable medium that moves with a constant speed past a recording head. Most modern tape drives use multiple heads offset into different tracks. The heads can also be skewed at angles to decrease the space that separates the tracks. This space is needed so that the signal recorded in one track does not interfere with the signal in another track.
The early tape drives were usually open-spooled half-inch magnetic tape (also known as reel to reel; see Figure 9-1). The amount of data on a particular tape was determined by the length of the tape, the number of tracks, tape speed, and the density at which the data was written onto the tape. Half-inch tape length was from 50 to 2400 feet. It was wound on reels up to 10.5 inches in diameter. It originally had seven tracks (six for data and one for parity), and later versions had nine tracks (eight for data and one for parity). Aluminum strips were glued several feet from the ends of the tape to serve as logical beginning and end of tape markers. A removable plastic ring in the back of the tape reels would write-protect the tape. A gap between records allowed the mechanism time to stop the tape when it was originally running. Table 9-1 provides a summary of the characteristics of a typical half-inch 2400-foot tape.
Figure 9-1. A half-inch magnetic open reel tape
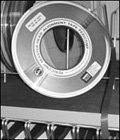
Table 9-1. Characteristics of Half-Inch 2400-Foot Tape

Tape systems later migrated to a closed cartridge format. This format was easier to load and store. A new technology also emerged to rival linear track tapes. Sony invented helical scan tape technology originally for video recording, but it was adapted for computer data. It records data using tracks that are at an angle to the edge of the tape (see Figure 9-2). Helical scan tapes can typically record at a higher density and have a longer life due to lower tape tension, lower tape speeds, and less back and forth traversal wear on the tape and the drive.
Figure 9-2. Helical scan and linear recording methods
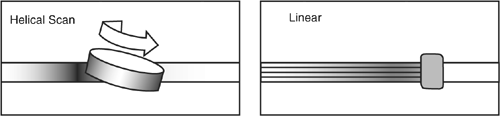
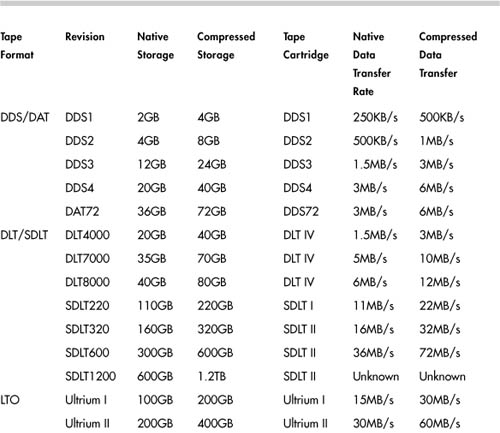
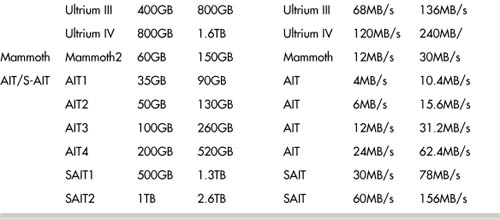
Table 9-2 provides a comparison of the most common tape format types today.
Table 9-2. Comparison of Tape Formats
How do you identify the tape drive originally you have? There are three places to start. You can look in /proc/scsi/, the syslog, or dmesg output. Looking in /proc/scsi/scsi is probably the best strategy.
# cat /proc/scsi/scsi
Attached devices:
Host: scsi1 Channel: 00 Id: 03 Lun: 00
Vendor: HP Model: Ultrium 2-SCSI Rev: F48D
Type: Sequential-Access ANSI SCSI revision: 03
If you look in /proc/scsi/scsi and you don’t see the tape drive listed, there are several steps to take. The first is to confirm that the SCSI card shows up in lspci.
# lspci
00:00.0 Host bridge: Broadcom CMIC-HE (rev 22)
00:00.1 Host bridge: Broadcom CMIC-HE
00:00.2 Host bridge: Broadcom CMIC-HE
00:00.3 Host bridge: Broadcom CMIC-HE
00:02.0 System peripheral: Compaq Computer Corporation Integrated Lights
Out Controller (rev 01)
00:02.2 System peripheral: Compaq Computer Corporation Integrated Lights
Out Processor (rev 01)
00:03.0 VGA compatible controller: ATI Technologies Inc Rage XL (rev 27)
00:0f.0 ISA bridge: Broadcom CSB5 South Bridge (rev 93)
00:0f.1 IDE interface: Broadcom CSB5 IDE Controller (rev 93)
00:0f.2 USB Controller: Broadcom OSB4/CSB5 OHCI USB Controller (rev 05)
00:0f.3 Host bridge: Broadcom CSB5 LPC bridge
00:10.0 Host bridge: Broadcom CIOB30 (rev 03)
00:10.2 Host bridge: Broadcom CIOB30 (rev 03)
00:11.0 Host bridge: Broadcom CIOB30 (rev 03)
00:11.2 Host bridge: Broadcom CIOB30 (rev 03)
01:01.0 RAID bus controller: Compaq Computer Corporation Smart Array
5i/532 (rev 01)
02:02.0 Ethernet controller: Intel Corporation 82546EB Gigabit Ethernet
Controller (Copper) (rev 01)
02:02.1 Ethernet controller: Intel Corporation 82546EB Gigabit Ethernet
Controller (Copper) (rev 01)
02:1e.0 PCI Hot-plug controller: Compaq Computer Corporation PCI
Hotplug Controller (rev 14)
06:01.0 Ethernet controller: Intel Corporation 82546EB Gigabit Ethernet
Controller (Copper) (rev 01)
06:01.1 Ethernet controller: Intel Corporation 82546EB Gigabit Ethernet
Controller (Copper) (rev 01)
06:02.0 SCSI storage controller: LSI Logic / Symbios Logic 53c1030 PCI-X
Fusion-MPT Dual Ultra320 SCSI (rev 07)
06:02.1 SCSI storage controller: LSI Logic / Symbios Logic 53c1030 PCI-X
Fusion-MPT Dual Ultra320 SCSI (rev 07)
06:1e.0 PCI Hot-plug controller: Compaq Computer Corporation PCI
Hotplug Controller (rev 14)
0a:01.0 RAID bus controller: Compaq Computer Corporation Smart Array
5300 Controller (rev 02)
0a:02.0 Ethernet controller: Broadcom Corporation NetXtreme BCM5701
Gigabit Ethernet (rev 15)
The dual-port SCSI controller is listed originally in the previous example at 06:02.0 and 06:02.1. If your SCSI card does not appear in the lspci output, you need to load the appropriate driver with modprobe.
After the SCSI card appears in the lspci output, you must confirm that the SCSI tape driver is loaded. You can do this by running lsmod.
# lsmod |grep st
# modprobe st
# lsmod |grep st
st 31524 0
scsi_mod 115240 5 [sr_mod sg st cciss mptscsih sd_mod]
Autoloader/Tape Libraries
Backup software originally must perform two common tasks beyond the actual backup. These tasks are to move tapes around inside a tape library and to manage tapes when they are inside the tape drive. The mtx command moves tapes around within a tape library, and the mt command ejects, rewinds, and otherwise manages tapes inside the drive.
Autoloaders and tape libraries are mechanisms for managing larger backups that span multiple tapes. These devices typically are used only on central backup servers because of their cost. The devices range from a single tape drive unit that can switch up to six tapes to a huge tape silo with hundreds of tape drives and thousands of tapes. The common denominator is the concept of the drive, the slot, and the changer mechanism. The drive is obviously the tape drive. The slot is where a tape is stored in the unit when it is not being moved and is not in a drive. The changer is the robotic mechanism that moves the tapes. You can use any normal backup software to write to the drive when it has a tape in it, but most backup software doesn’t have the capability to control the slots and the changer. The most common software that can control a changer under Linux is mtx, which is available from http://mtx.badtux.net. This Web page provides the following definition of mtx:
mtx is a set of low-level driver programs to control features of SCSI backuprelated devices such as autoloaders, tape changers, media jukeboxes, and tape drives. It can also report much data, including serial numbers, maximum block sizes, and TapeAlert™ messages that most modern tape drives implement (to tell you the exact reason why a backup or restore failed), as well as do raw SCSI READ and WRITE commands to tape drives (not important on Linux, but important on Solaris due to the fact that the Solaris tape driver supports none of the additional features of tape drives invented after 1988). mtx is designed to be a low-level driver in a larger scripted backup solution, such as Amanda. mtx is not supposed to itself be a high-level interface to the SCSI devices that it controls.
The first mistake most people make when using mtx is trying to use it against the device driver for the tape drive rather than the device file for the changer mechanism. Issuing the command
mtx -f /dev/st2 inquiry
results in the following error message in the messages file:
st2: Write not multiple of tape block size.
The changer device file is typically of the /dev/sgX format. The /dev/sgX denotes a generic SCSI device. These are also sometimes known as passthrough devices because they pass through the SCSI command issued from software programs such as mtx to the hardware. The correct command is:
mtx -f /dev/sga inquiry
Product Type: Tape Drive
Vendor Id: HP
Product ID: C1561A
One other common problem is that the changer mechanism never shows up. This sometimes indicates that the tape drive is stuck in “stacker mode.” You must consult the drive’s documentation on how to change it from “stacker mode” into a mode that enables you to control the changer. “Stacker mode” is also sometimes referred to as “sequential mode.”
With mtx, if you want to set the default device file for the changer, you can run:
export CHANGER=/dev/sgc
This code can be prepended to a script or run from the command line, which saves the repetition of typing the option -f /dev/sgX for every command.
Another common problem is the lack of LUN support. You need to use or make a kernel with CONFIG_SCSI_MULTI_LUN=y in the CONFIG file. The kernel must probe for SCSI LUNs on boot.
An example of loading a tape from slot 1 to drive 2 is:
mtx load 1 2
An example of gathering an inventory of the drives and slots is:
mtx inventory
The following is more detail on the available commands from the man page:
COMMANDS
--version
Report the mtx version number (e.g. mtx 1.2.8) and exit.
inquiry
Report the product type (Medium Changer, Tape Drive, etc.), Vendor ID,
Product ID, Revision, and whether this uses the Attached Changer API
(some tape drives use this rather than reporting a Medium Changer on a
separate LUN or SCSI address).
noattach
Make further commands use the regular media changer API rather than the
_ATTACHED API, no matter what the "Attached" bit said in the Inquiry
info. Needed with some brain-dead changers that report Attached bit but
don't respond to _ATTACHED API.
inventory
Makes the robot arm go and check what elements are in the slots. This is
needed for a few libraries like the Breece Hill ones that do not
automatically check the tape inventory at system startup.
status
Reports how many drives and storage elements are contained in the device.
For each drive, reports whether it has media loaded in it, and if so,
from which storage slot the media originated. For each storage slot,
reports whether it is empty or full, and if the media changer has a bar
code, MIC reader, or some other way of uniquely identifying media without
loading it into a drive, this reports the volume tag and/or alternate
volume tag for each piece of media. For historical reasons drives are
numbered from 0 and storage slots are numbered from 1.
load <slotnum> [ <drivenum> ]
Load media from slot <slotnum> into drive <drivenum>. Drive 0 is assumed
if the drive number is omitted.
unload [<slotnum>] [ <drivenum> ]
Unloads media from drive <drivenum> into slot <slotnum>. If <drivenum>
is omitted, defaults to drive 0 (as do all commands). If <slotnum> is
omitted, defaults to the slot that the drive was loaded from. Note that
there's currently no way to say 'unload drive 1's media to the slot it
came from', other than to explicitly use that slot number as the
destination.
[eepos <operation>] transfer <slotnum> <slotnum>
Transfers media from one slot to another, assuming that your mechanism is
capable of doing so. Usually used to move media to/from an import/export
port. 'eepos' is used to extend/retract the import/export tray on certain
mid-range to high end tape libraries (if, e.g., the tray was slot 32, you
might say 'eepos 1 transfer 32 32' to extend the tray). Valid values for
eepos <operation> are 0 (do nothing to the import/export tray), 1, and 2
(what 1 and 2 do varies depending upon the library, consult your
library's SCSI-level documentation).
first [<drivenum>]
Loads drive <drivenum> from the first slot in the media changer. Unloads
the drive if there is already media in it. Note that this command may not
be what you want on large tape libraries -- e.g. on Exabyte 220, the
first slot is usually a cleaning tape. If <drivenum> is omitted, defaults
to first drive.
last [<drivenum>]
Loads drive <drivenum> from the last slot in the media changer. Unloads
the drive if there is already a tape in it.
next [<drivenum>]
Unloads the drive and loads the next tape in sequence. If the drive was
empty, loads the first tape into the drive.
SEE ALSO
mt(1),tapeinfo(1),scsitape(1),loaderinfo(1)
One other commonly scripted task is to eject the tape. This task can be accomplished with the following command:
mt –f /dev/st0 offl
This command can be used with a standalone tape drive or a tape library that requires manual tape ejection before the changer can grab the tape.
Hardware Versus Software Compression
Backups are typically compressed to save space and sometimes to limit the bandwidth sent to the backup device. Two forms of compression are commonly used: hardware and software compression. Software compression is easier to troubleshoot and gauge than hardware compression.
You should use either hardware or software compression but not both. Using both methods creates a backup that is larger than the data when compressed only once.
Software compression typically comes from utilities such as gzip, bzip, and so on. It uses compression algorithms to compress a file.
For example, the following command uses tar to compress the /etc directory and write it to /dev/st0 after passing the tar file through gzip.
tar cvzf /dev/st0 /etc
Another consideration is that binary data such as compiled binaries, audio, pictures, videos, and so on cannot be compressed as much as text.
Hardware compression uses a compression algorithm that is hard-coded into the chipset of the tape drive. Most modern tape drives support hardware compression. It is important to determine whether you are using hardware compression, and if so, you should stop using software compression. Hardware compression is typically enabled by default on most tape drives today. It can be disabled with a custom device file or on the tape device (either by dip switches or a front panel). If you back up a directory of already compressed files (such as gzipped files), you should expect little compression; in fact, the files could become bigger. You should also expect little or no compression when backing up a filesystem full of binary files.
Rewind Versus No-Rewind Devices
When backing up, you have the choice of backing up to a rewind or a no-rewind device. This is just as it sounds, but why would you want to back up to a no-rewind device? This is typically done with utilities such as dump, where you have only one filesystem per backup. You could then append each filesystem backup to the end of a tape through the no-rewind device instead of having to use multiple tapes. This approach uses the tape space more efficiently. The device file specifies whether to rewind the tape. For example, /dev/nst0 is a no-rewind device, and /dev/st0 is a rewind device. A rewind device rewinds the tape to its beginning on close, whereas a no-rewind tape device does not rewind on close. The device files show a different minor number, which controls the device characteristics:
# file /dev/nst0
/dev/nst0: character special (9/128)
# file /dev/st0
/dev/st0: character special (9/0)
Figure 9-3. Multiple dumps on one tape
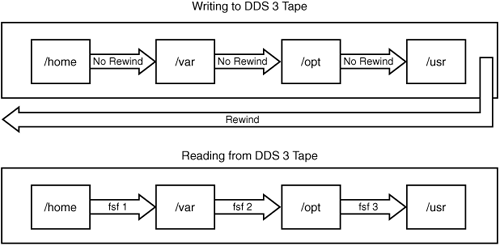
Using mt to Control the Tape Drive
As we stated earlier, controlling tapes is a task that backup software must perform. Tapes must be rewound and ejected before they can be moved to a slot with mtx. They also must be positioned at the correct archive if you are putting multiple archives on one tape using a no-rewind device.
Here is an excerpt from the mt man page that shows the options you can use to control the tape drive:
The available operations are listed below. Unique abbreviations are
accepted. Not all operations are available on all systems, or work on all
types of tape drives. Some operations optionally take a repeat count,
which can be given after the operation name and defaults to 1.
eof, weof Write count EOF marks at current position.
fsf Forward space count files. The tape is positioned on
the first block of the next file.
bsf Backward space count files. The tape is positioned
on the first block of the next file.
eom Space to the end of the recorded media on the tape
(for appending files onto tapes).
rewind Rewind the tape.
offline, rewoffl Rewind the tape and, if applicable, unload the tape.
status Print status information about the tape unit.
retension Rewind the tape, then wind it to the end of the
reel, then rewind it again.
erase Erase the tape.
eod, seod Space to end of valid data. Used on streamer tape
drives to append data to the logical end of tape.
setdensity (SCSI tapes) Set the tape density code to count.
The proper codes to use with each drive should be
looked up from the drive documentation.
seek (SCSI tapes) Seek to the count block on the tape.
This operation is available on some Tandberg and
Wangtek streamers and some SCSI-2 tape drives.
tell (SCSI tapes) Tell the current block on tape. This
operation is available on some Tandberg and Wangtek
streamers and some SCSI-2 tape drives.
densities (SCSI tapes) Write explanation of some common density
codes to standard output.
Datcompression (some SCSI-2 DAT tapes) Inquire or set the
compression status (on/off). If the count is one the
compression status is printed. If the count is zero,
compression is disabled. Otherwise, compression is
enabled. The command uses the SCSI ioctl to read and
write the Data Compression Characteristics mode page
(15). ONLY ROOT CAN USE THIS COMMAND.
If you want to position the tape to read the second archive on a tape, run:
# mt –t /dev/st1 rew; mt –t /dev/st1 fsf 1
If you want to rewind the tape drive to the beginning, run:
# mt –t /dev/st0 rew
If you want to eject the tape from the drive, run:
# mt –t /dev/st0 offline
Cleaning Tape Versus Built-in Cleaning
One of the most overlooked elements of good tape backups is a good cleaning routine. It is imperative that you purchase cleaning tapes and routinely run them through the tape drive. I even recommend this for “self-cleaning” drives such as the DLT. It is just too easy for magnetic tapes to put trash on the tape heads. I typically run a cleaning tape through four times in a row every few days to once a week. I know this might seem like overkill, but it is worth the time and expense. I would also keep a log of how many times each tape and each cleaning tape has been used and make sure to destroy and replace them at the recommended interval of the manufacturer.
Optical Disk
The second medium is optical disk. This term used to refer to WORM and optical disks, but now it more frequently refers to DVD or CD media. This method has recently become more cost effective for backing up smaller systems. The one downside of optical media when compared to tape is that some backup utilities write backup files to disk and then burn them to media instead of writing them directly to the optical disk. Backing up to CD can be handled by writing a backup to disk and then transferring that backup to CD using a utility such as cdrecord. The other alternative is to use a utility such as k3b to write files and directories to CD, but this method is uncommon except for one-off backups of particular files. Neither is well suited to whole-system backups. The only way to consistently write backups to CD is to use a utility such as mondo, which is discussed further in the “Bare Metal Recovery” section.
Hard Disk
The third medium is hard disk. This typically means one of three possibilities:
• Disk arrays with RAID or disk mirroring
• High-end disk arrays with business copy
• Removable USB disk storage
The first downside to this option is cost. The second (with the exception of USB disk storage) is the inability to have offsite backups. An offsite backup is vital. If a disaster destroys your datacenter, and you do not have offsite media storage, the disaster destroys all your backups. Offsite backups can be as simple as taking a briefcase of tapes home with you each day or as complex as shipping tapes daily to a hardened and secure third party. The one major exception to this limitation is mirroring data to a remote disk array. Most high-end disk array vendors offer this feature, but it is very expensive.
Backup Scope
Storage media has a cost, and the time available to perform a backup is finite. To minimize both factors, administrators have come up with strategies for limiting the scope of backups as much as possible. There are two common strategies: backing up only files that have changed since the last backup, and backing up only dynamic data files.
The first strategy is also called incremental backups. Assume that you have a directory with four files on day one (11/1):
File1 Last modified 10/1 size 1GB
File2 Last modified 10/1 size 10KB
File3 Last modified 10/4 size 1MB
File4 Last modified 9/22 size 2MB
On the first day, you complete a full backup, which backs up all the files on the system. In this example, it backs up all four files. The next day (11/2), you could complete a level one backup, which would back up all the files that had been modified since the last backup at the previous backup level. In this example, that would be the full backup completed on 11/1. A listing of the files at backup time on 11/2 shows:
File1 Last modified 10/1 size 1GB
File2 Last modified 11/2 size 10KB
File3 Last modified 10/4 size 1MB
File4 Last modified 11/2 size 2MB
This means that for the level one backup, only two files (File2 and File4) are backed up. This approach saves the time and space of backing up File1 and File3. It is not necessary because they haven’t changed since the previous backup.
The downside to this method is that restoring data involves using as many tapes as you have backup levels. If you had to restore the directory from this example, you would need to recover the last full backup and the last level one backup to return to the most recently backed-up files.
You can also use the modified Towers of Hanoi method from http://en.wikipedia.org/wiki/Towers_of_Hanoi:
The Tower of Hanoi (also called Towers of Hanoi) is a mathematical game or puzzle. It consists of three pegs, and a number of discs of different sizes which can slide onto any peg. The puzzle starts with the discs neatly stacked in order of size on one peg, smallest at the top, thus making a conical shape.
One recommended scheme is documented in the dump man page:
After a level 0, dumps of active file systems are taken on a daily basis,
using a modified Tower of Hanoi algorithm, with this sequence of dump
levels:
3 2 5 4 7 6 9 8 9 9...
For the daily dumps, it should be possible to use a fixed number of tapes
for each day, used on a weekly basis. Each week, a level 1 dump is
taken, and the daily Hanoi sequence repeats beginning with 3. For weekly
dumps, another fixed set of tapes per dumped file system is used, also on
a cyclical basis.
The second method is to do a full system backup and then to only back up directories that contain constantly changing data (such as application directories). This method also limits the time and size of backups, but it has two problems. The first is that even seemingly static directories have changes from time to time. It would be easy to miss backing up a change to a configuration file if it were not in a common directory. The second issue is that if you don’t back up system logs, it would be possible to have them rotate off the system, leaving you without historic data to which to refer.
Basic Backup and Recovery Commands
An enormous number of open source and proprietary backup utilities is available. Each has its own positive and negative points. Table 9-3 highlights some of these areas. It is important to test each utility and pick the one that best suits your needs.
Table 9-3. Positive and Negative Qualities of Backup Utilities

tar
tar is very easy to use and is the most common utility for moving and distributing files and directories to other computers. It is less useful as a system-level backup command, though. It can only create files of limited size, it has limited capability for incremental backups (using mtime only), and it lacks integrated capability to use the find command in the way that cpio does. tar is also very unforgiving of media errors. tar must also search an entire volume to find a file to recover, so it is bad for very large archives. Examples of compressing, listing, and extracting a tar archive follow.
In the following example, we compress files into a tar archive. The cvzf switches denote create archive (c), verbose output (v), compress the output file (z), and specified device file (f):
# tar cvzf /dev/st0 /work
tar: Removing leading '/' from member names
/work/
/work/lost+found/
/work/vmware/
/work/vmware/state/
/work/vmware/installer.sh
/work/vmware/config
/work/vmware/locations
/work/vmware/vmnet1/
/work/vmware/vmnet1/dhcpd/
/work/vmware/vmnet1/dhcpd/dhcpd.conf
/work/vmware/vmnet1/dhcpd/dhcpd.leases~
/work/vmware/vmnet1/dhcpd/dhcpd.leases
/work/vmware/vmnet8/
/work/vmware/vmnet8/nat/
/work/vmware/vmnet8/nat/nat.conf
/work/vmware/vmnet8/dhcpd/
/work/vmware/vmnet8/dhcpd/dhcpd.conf
/work/vmware/vmnet8/dhcpd/dhcpd.leases~
/work/vmware/vmnet8/dhcpd/dhcpd.leases
In the following example, we list files in a tar archive. The tvzf switches denote list archive (t), verbose output (v), compress the output file (z), and specified device file (f):
# tar tvzf /dev/st0
drwxr-xr-x root/root 0 2005-11-19 14:36:23 work/
drwx------ root/root 0 2005-11-19 14:35:51 work/lost+found/
drwxr-xr-x root/root 0 2005-11-19 14:36:23 work/vmware/
drwxr-xr-x root/root 0 2005-11-19 14:36:23 work/vmware/state/
-r-xr-xr-x root/root 36011 2005-11-19 14:36:23
work/vmware/installer.sh
-rw-r--r-- root/root 264 2005-11-19 14:36:23 work/vmware/config
-rw-r--r-- root/root 4987 2005-11-19 14:36:23 work/vmware/locations
drwxr-xr-x root/root 0 2005-11-19 14:36:23 work/vmware/vmnet1/
drwxr-xr-x root/root 0 2005-11-19 14:36:23
work/vmware/vmnet1/dhcpd/
-r--r--r-- root/root 743 2005-11-19 14:36:23
work/vmware/vmnet1/dhcpd/dhcpd.conf
-rw-r--r-- root/root 0 2005-11-19 14:36:23
work/vmware/vmnet1/dhcpd/dhcpd.leases~
-rw-r--r-- root/root 417 2005-11-19 14:36:23
work/vmware/vmnet1/dhcpd/dhcpd.leases
drwxr-xr-x root/root 0 2005-11-19 14:36:23 work/vmware/vmnet8/
drwxr-xr-x root/root 0 2005-11-19 14:36:23
work/vmware/vmnet8/nat/
-r--r--r-- root/root 1251 2005-11-19 14:36:23
work/vmware/vmnet8/nat/nat.conf
drwxr-xr-x root/root 0 2005-11-19 14:36:23
work/vmware/vmnet8/dhcpd/
-r--r--r-- root/root 771 2005-11-19 14:36:23
work/vmware/vmnet8/dhcpd/dhcpd.conf
-rw-r--r-- root/root 0 2005-11-19 14:36:23
work/vmware/vmnet8/dhcpd/dhcpd.leases~
-rw-r--r-- root/root 417 2005-11-19 14:36:23
work/vmware/vmnet8/dhcpd/dhcpd.leases
In the following example, we extract files from a tar archive. The tvzf switches denote extract archive (x), verbose output (v), compress the output file (z), and specified device file (f):
# rm /work/vmware/installer.sh
# tar xvzf /dev/st0 work/vmware/installer.sh
work/vmware/installer.sh
# ll /work/vmware/installer.sh
-r-xr-xr-x 1 root root 36K 2005-11-20 10:53 /work/vmware/installer.sh
cpio
cpio is the most versatile backup command. cpio is more complicated to use, but it offers a high degree of flexibility. cpio does a great job of handling media errors and tries to skip bad spots on restore. cpio reads and writes files and directories to be backed up through stdin and stdout, which gives you incredible flexibility. Typically, you pipe find commands through cpio, but you can also run find with the -cpio option to direct the output to cpio. cpio also easily spans multiple tapes. You must use custom scripting to create incremental backups with cpio because the command doesn’t have built-in support for backups. However, this scripting can be done without too much pain. cpio also forces the user to read the entire tape to find a file, so it might be less useful for larger backups.
An example of cpio in action follows:
# find find /work -print |cpio -ovH newc >/dev/st0
/work
/work/lost+found
/work/vmware
/work/vmware/state
/work/vmware/installer.sh
/work/vmware/config
/work/vmware/locations
/work/vmware/vmnet1
/work/vmware/vmnet1/dhcpd
/work/vmware/vmnet1/dhcpd/dhcpd.conf
/work/vmware/vmnet1/dhcpd/dhcpd.leases~
/work/vmware/vmnet1/dhcpd/dhcpd.leases
/work/vmware/vmnet8
/work/vmware/vmnet8/nat
/work/vmware/vmnet8/nat/nat.conf
/work/vmware/vmnet8/dhcpd
/work/vmware/vmnet8/dhcpd/dhcpd.conf
/work/vmware/vmnet8/dhcpd/dhcpd.leases~
/work/vmware/vmnet8/dhcpd/dhcpd.leases
# cpio -itv < /dev/st0
drwxr-xr-x 4 root root 0 Nov 19 14:36 /work
drwx------ 2 root root 0 Nov 19 14:35 /work/lost+found
drwxr-xr-x 5 root root 0 Nov 19 14:36 /work/vmware
drwxr-xr-x 2 root root 0 Nov 19 14:36 /work/vmware/state
-r-xr-xr-x 1 root root 36011 Nov 19 14:36
/work/vmware/installer.sh
-rw-r--r-- 1 root root 264 Nov 19 14:36
/work/vmware/config
-rw-r--r-- 1 root root 4987 Nov 19 14:36
/work/vmware/locations
drwxr-xr-x 3 root root 0 Nov 19 14:36
/work/vmware/vmnet1
drwxr-xr-x 2 root root 0 Nov 19 14:36
/work/vmware/vmnet1/dhcpd
-r--r--r-- 1 root root 743 Nov 19 14:36
/work/vmware/vmnet1/dhcpd/dhcpd.conf
-rw-r--r-- 1 root root 0 Nov 19 14:36
/work/vmware/vmnet1/dhcpd/dhcpd.leases~
-rw-r--r-- 1 root root 417 Nov 19 14:36
/work/vmware/vmnet1/dhcpd/dhcpd.leases
drwxr-xr-x 4 root root 0 Nov 19 14:36
/work/vmware/vmnet8
drwxr-xr-x 2 root root 0 Nov 19 14:36
/work/vmware/vmnet8/nat
-r--r--r-- 1 root root 1251 Nov 19 14:36
/work/vmware/vmnet8/nat/nat.conf
drwxr-xr-x 2 root root 0 Nov 19 14:36
/work/vmware/vmnet8/dhcpd
-r--r--r-- 1 root root 771 Nov 19 14:36
/work/vmware/vmnet8/dhcpd/dhcpd.conf
-rw-r--r-- 1 root root 0 Nov 19 14:36
/work/vmware/vmnet8/dhcpd/dhcpd.leases~
-rw-r--r-- 1 root root 417 Nov 19 14:36
/work/vmware/vmnet8/dhcpd/dhcpd.leases
94 blocks
The following is an example of removing and restoring a file with cpio:
# rm /work/vmware/installer.sh
# cpio -i "*installer.sh" < /tmp/foo3.out
94 blocks
# ll /work/vmware/installer.sh
-r-xr-xr-x 1 root root 36K 2005-11-20 10:53 /work/vmware/installer.sh
A common mistake with cpio is illustrated next:
# find -print /etc/hosts |cpio –ov > /tmp/foo2.out
find: paths must precede expression
Usage: find [-H] [-L] [-P] [path...] [expression]
0 blocks
find /etc/hosts -print |cpio -ov >/tmp/foo2.out
/etc/hosts
2 blocks
# find /etc/hosts -print |cpio -ov /tmp/foo2.out
Usage: cpio {-o |--create} [-0acvABLV] [-C bytes] [-H format] [-M message]
[-O [[user@]host:]archive] [-F [[user@]host:]archive]
[--file=[[user@]host:]archive] [--format=format] [--message=message]
[--null] [--reset-access-time] [--verbose] [--dot] [--append][--block-
size=blocks] [--dereference] [--io-size=bytes] [--quiet][--force-local]
[--rsh-command=command] [--help] [--version] < name-list [> archive]
dump and Restore
dump only backs up a whole filesystem, so it is not a good choice for backing up just a few files or directories. dump supports up to nine levels of backups. It can restore files, directories, or the entire filesystem. dump does not produce a live index while backing up, but it has very easy interactive recovery capabilities. It is less easily recovered on other versions of UNIX than cpio and tar because it is more closely tied to the source filesystem type of an archive.
dump also has a much more complicated archive layout than cpio or tar. cpio and tar treat a backup not as a whole archive but rather as strings of file and directory records. dump writes a table of contents at the beginning of the archive, which is why recovery is faster with dump. This is also why you can use the interactive shell (including ls and cd) with dump.
# /sbin/dump -0uf /tmp/foo4.out /work
DUMP: WARNING: no file '/etc/dumpdates', making an empty one
DUMP: Date of this level 0 dump: Sat Nov 19 14:37:02 2005
DUMP: Dumping /dev/mapper/vg00-test (/work) to /tmp/foo4.out
DUMP: Label: none
DUMP: Writing 10 Kilobyte records
DUMP: mapping (Pass I) [regular files]
DUMP: mapping (Pass II) [directories]
DUMP: estimated 89 blocks.
DUMP: Volume 1 started with block 1 at: Sat Nov 19 14:37:02 2005
DUMP: dumping (Pass III) [directories]
DUMP: dumping (Pass IV) [regular files]
DUMP: Closing /tmp/foo4.out
DUMP: Volume 1 completed at: Sat Nov 19 14:37:02 2005
DUMP: Volume 1 90 blocks (0.09MB)
DUMP: 90 blocks (0.09MB) on 1 volume(s)
DUMP: finished in less than a second
DUMP: Date of this level 0 dump: Sat Nov 19 14:37:02 2005
DUMP: Date this dump completed: Sat Nov 19 14:37:02 2005
DUMP: Average transfer rate: 0 kB/s
DUMP: DUMP IS DONE
dd
dd is not a backup command per se, but it can be used to copy a raw device to tape or to a file. It is not flexible at all, and the only way to restore is to perform a full restore. An example of backing up a device with dd is:
dd if=/dev/hda1 of=/dev/st0 bs=10k
To recover this data, you reverse the command and write from the tape drive to the disk device, which overwrites any contents.
dd if=/dev/st0 of=/dev/hda1 bs=10k
As you can see, dd is not the most flexible utility. It is commonly used either to back up raw data partitions for databases or to clone an entire disk.
mkisofs
mkisofs creates an ISO file, which is in CD/DVD format. This file can then be written to CD/DVD. mkisofs is usually paired with cdrecord to write the ISO file to CD/DVD. One option is to turn the files or directories directly into an ISO and burn it to CD/DVD.
# mkisofs -o home_backup.iso -JRVv /home/
# cdrecord -v -eject -multi speed=8 dev=0,1,0 home_backup.iso
Another possibility is to use tar to zip up the files or directories first and then make them into an ISO and burn them to CD/DVD.
# tar -cvzWf /tmp/home_backup.tar.gz /home/
# mkisofs -o home_backup.iso -JrVv /m_backup.tar.gz
# cdrecord -v -eject -multi speed=8 dev=0,1,0 home_backup.iso
rsync
rsync is an incredible command. It is typically used to synchronize two directories. The rsync man page states:
DESCRIPTION
rsync is a program that behaves in much the same way that rcp does, but
has many more options and uses the rsync remote-update protocol to
greatly speed up file transfers when the destination file already exists.
The rsync remote-update protocol allows rsync to transfer just the
differences between two sets of files across the network link, using an
efficient checksum-search algorithm described in the technical report
that accompanies this package.
Some of the additional features of rsync are:
o support for copying links, devices, owners, groups and
permissions
o exclude and exclude-from options similar to GNU tar
o a CVS exclude mode for ignoring the same files that CVS
would ignore
o can use any transparent remote shell, including rsh or ssh
o does not require root privileges
o pipelining of file transfers to minimize latency costs
o support for anonymous or authenticated rsync servers (ideal
for mirroring)
rsync is typically used to mirror data between two servers. Here are two examples:
•
rsync -e ssh -av
[email protected]_domain.com::/home/Backup/xfer/*
/destination/xfer
•
rsync -avz --delete HomeServer::/home/* /Backup/destination
Bare Metal Recovery
A bare metal backup and recovery utility enables you to make bootable recovery media. Four common utilities are available for Linux:
• mondo / mindi
• partimage
• systemimager
• g4u (Ghost for UNIX)
These utilities are great for a base-level backup but are not good for a day-to-day backup utility. The most likely scenario would be to use a bare metal backup utility once a month and then do dump backups daily. If you lost the system, you could quickly restore the bare metal backup and then do a quicker restore from the dump tapes. This differs from “bootable recovery media” such as Knoppix, GRUB boot media, and so on. Those tools are used to boot a system and perform maintenance. Bare metal recovery utilities back up a system and then recover it by writing the image to the hard disk.
I Have a Tape, and I Don’t Know What It Is . . .
From time to time, an administrator is asked to pull data from a tape by a user. Occasionally the user might not know how the tape was created. How do you satisfy this request? First, you can try to use dd to read the first four records of a tape and then try to use file to identify it.
# dd if=/dev/st0 of=/tmp/foo5.out bs=1k count=4
4+0 records in
4+0 records out
4096 bytes (4.1 kB) copied, 0.000115 seconds, 35.6MB/s
# file /tmp/foo5.out
/tmp/foo5.out: new-fs dump file (little endian), This dump Sat Nov 19
14:37:02 2005, Previous dump Wed Dec 31 19:00:00 1969, Volume 1, Level
zero, type: tape header, Label none, Filesystem /work, Device
/dev/mapper/vg00-test, Host linux, Flags 3
You can also use file on files of an unknown type in a filesystem.
# file starwatch
starwatch: Zip archive data, at least v1.0 to extract
# file *gz
cllinux: gzip compressed data, was "crossl.tar", from Unix
How Can I Tell Whether My Tape Problem Is Hardware or Software?
When you have backup or recovery issues, the first step is to identify whether it is a software or hardware problem. For recovery problems, you can use od -c to read the beginning of a tape or archive file and make sure it is still in a readable format. This approach does not work if software compression is used.
Table 9-4 describes the file record layout for tar.
Table 9-4. File Record Layout for tar
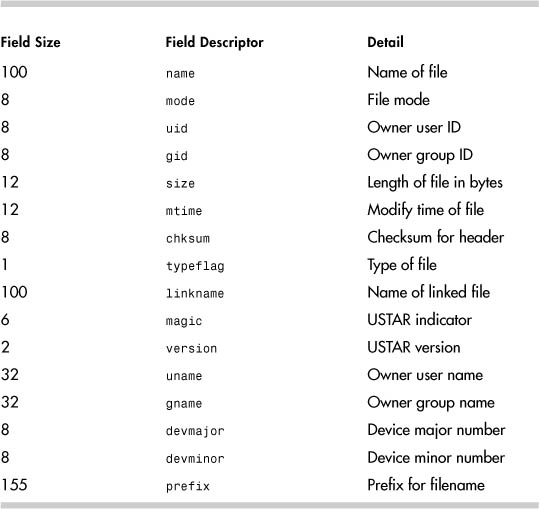
The following is the tar file header (USTAR format):
# od -c /dev/st0 |more
0000000 w o r k / � � � � � � � � � � �
0000020 � � � � � � � � � � � � � � � �
*
0000140 � � � � 0 0 0 0 7 5 5 � 0 0 0 0
0000160 0 0 0 � 0 0 0 0 0 0 0 � 0 0 0 0
0000200 0 0 0 0 0 0 0 � 1 0 3 3 7 6 7 7
0000220 2 6 7 � 0 1 0 5 6 0 � 5 � � �
0000240 � � � � � � � � � � � � � � � �
*
0000400 � u s t a r � r o o t � � �
0000420 � � � � � � � � � � � � � � � �
0000440 � � � � � � � � � r o o t � � �
0000460 � � � � � � � � � � � � � � � �
*
0001000 w o r k / v m w a r e / � � � �
0001020 � � � � � � � � � � � � � � � �
*
0001140 � � � � 0 0 0 0 7 5 5 � 0 0 0 0
0001160 0 0 0 � 0 0 0 0 0 0 0 � 0 0 0 0
0001200 0 0 0 0 0 0 0 � 1 0 3 4 0 1 1 6
0001220 0 2 5 � 0 1 2 0 2 7 � 5 � � �
# dd if=/dev/st0 of=/tmp/foo.out bs=1k count=4; file /tmp/foo.out
/tmp/foo.out: POSIX tar archive
As you can see, the first field is the file or directory name, as you would expect. All the other fields including magic look intact.
The same can be done with cpio, as shown in Table 9-5.
Table 9-5. File Record Layout for cpio
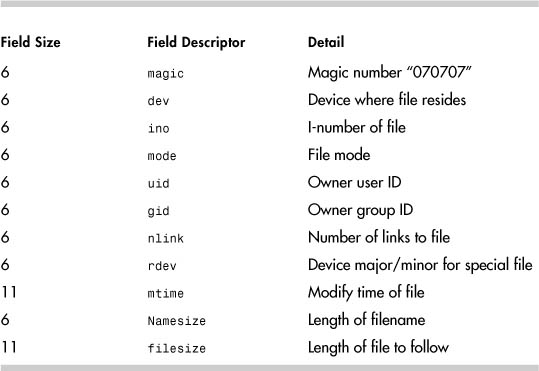
The ASCII cpio file header looks like this:
# od -c /dev/st0
0000000 0 7 0 7 0 1 0 0 0 0 4 d b b 0 0
0000020 0 0 8 1 a 4 0 0 0 0 0 0 0 0 0 0
0000040 0 0 0 0 0 0 0 0 0 0 0 0 0 1 4 2
0000060 d d 6 2 4 e 0 0 0 0 0 0 3 0 0 0
0000100 0 0 0 0 f d 0 0 0 0 0 0 0 0 0 0
0000120 0 0 0 0 0 0 0 0 0 0 0 0 0 0 0 0
0000140 0 0 0 0 1 1 0 0 0 0 0 0 0 0 / e
0000160 t c / r e s o l v . c o n f � �
# dd if=/dev/st0 of=/tmp/foo.out bs=1k count=4; file /tmp/foo.out
/tmp/foo.out: ASCII cpio archive (SVR4 with no CRC)
That technique does not work as well with dump because the tape format is more complicated. You can still use dd to read the header and then run file against it, though.
# dd if=/dev/st0 of=/tmp/foo.out bs=1k count=4; file /tmp/foo4.out
/tmp/foo4.out: new-fs dump file (little endian), This dump Sat Nov 19
14:37:02 2005, Previous dump Wed Dec 31 19:00:00 1969, Volume 1, Level
zero, type: tape header, Label none, Filesystem /work, Device
/dev/mapper/vg00-test, Host linux, Flags 3
Another common problem is when you can read a tape on your system but not on others. This problem is usually caused by misalignment of the tape heads on the drive. The tracks are readable and writable on your drive because they align. When the tape is taken to another system, the heads are not aligned with the tracks, so the tape is unreadable. An additional problem results when you have the tape drive fixed. This makes the tapes unreadable to your drive.
Backup failures due to hardware issues are much easier to diagnose than software problems. If a tar to a device fails, you can try a cpio. If both fail, the problem is typically hardware. The one exception to this would be a problem with the device file.
If a problem is diagnosed as hardware, I usually follow these steps:
- Try multiple tapes.
- Run the cleaning tape through five times.
- Try a new tape.
If the backups still fail, it is most likely a bad drive.
If you replace a tape drive, and it fails again after a short period of time, it can be maddening. What are the chances of two bad tape drives in a row? Oddly enough, it is most likely your tapes that have ruined the second drive. Tape drive failures are very commonly caused by damaged or fouled heads. These damaged drives can then damage or foul the tapes. If you replace the tape drive, and you still have dirty or damaged tapes, they can destroy the new tape drive. If you have a second drive failure in a row, then you should replace the drive and replace all the tapes.
Summary
This chapter addressed several facets of backup and recovery, including backup media and the types of backup devices available, backup strategies, the benefits and limitations of different utilities, and ways to troubleshoot failing tape backups. Of course, one of the primary duties of the system administrator is protecting data, and this chapter should help you do it successfully.