Lesson 12 Using Selection Options on Data Entry Fields
This lesson describes the procedure for attaching selection options to data entry fields on initial screens, search screens, and multiple selection screens.
Selection options are conditional indicators that mark the limits of the codes in data entry fields. To explain this definition, we offer two examples from the initial screen of the IW29 transaction, which displays a list of notifications1 for a maintenance-plant manager.
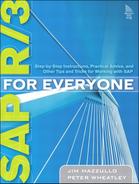
For our first example, we set up the initial screen of the IW29 transaction to generate a list of all completed notifications for equipment 100500 that were created in 2004 by doing the following (Figure 12.1):
![]() We selected the Completed option (A) in the Notification status field area.
We selected the Completed option (A) in the Notification status field area.
![]() We entered the object code 100500 in the first of the two Equipment fields (B).
We entered the object code 100500 in the first of the two Equipment fields (B).
![]() We entered 01/01/2004 and 12/31/2004 in the Created on fields (C).
We entered 01/01/2004 and 12/31/2004 in the Created on fields (C).
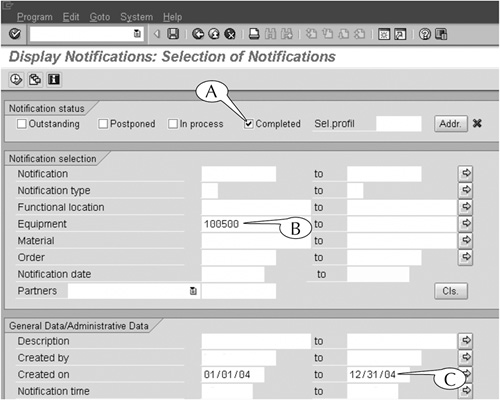
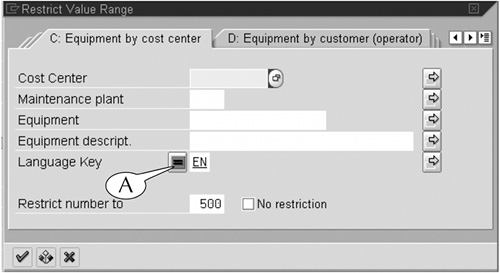
For our second example, we set up the initial screen to generate a list of all completed notifications for equipment 100500 that were created before the year 2004 by doing the following (Figure 12.2):
![]() We again selected the Completed option (A) in the Notification status field area.
We again selected the Completed option (A) in the Notification status field area.
![]() We again entered the object code 100500 in the first of the two Equipment fields (B).
We again entered the object code 100500 in the first of the two Equipment fields (B).
![]() We entered 01/01/2004 in the first of the two Created on fields, then attached the green less than selection option to the field. This option is indicated by the less than (<) symbol to the left of the field (C). This entry alerts the system that there is a condition to the transaction: We want to generate a list of only those notifications with dates less than—that is, prior to—January 1, 2004.
We entered 01/01/2004 in the first of the two Created on fields, then attached the green less than selection option to the field. This option is indicated by the less than (<) symbol to the left of the field (C). This entry alerts the system that there is a condition to the transaction: We want to generate a list of only those notifications with dates less than—that is, prior to—January 1, 2004.
Figure 12.2 The initial screen of the IW29 transaction, set up for the second example, which includes a selection option on the Created on field.
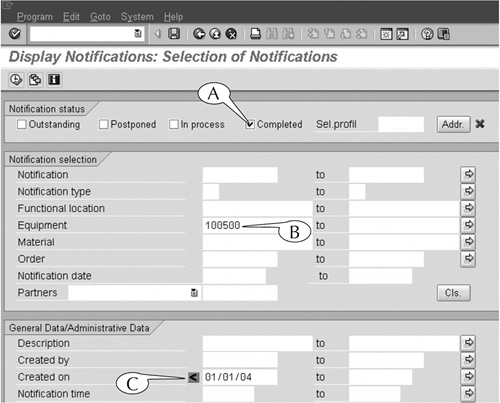
You can attach selection options to many data entry fields on many initial screens, as well as those on search screens and multiple selection screens. You select the desired option from the Maintain Selection Options popup screen, which you call up by double-clicking inside a data entry field.
The Maintain Selection Options screen displays a menu of six green-colored selection options by default (Figure 12.3). It also has two menu buttons directly below this menu (A):
![]() Select, which displays the menu of green selection options
Select, which displays the menu of green selection options
![]() Exclude from selection, which displays an alternative menu of six red-colored selection options on the Exclude Initial Value from Selection screen (Figure 12.4)
Exclude from selection, which displays an alternative menu of six red-colored selection options on the Exclude Initial Value from Selection screen (Figure 12.4)
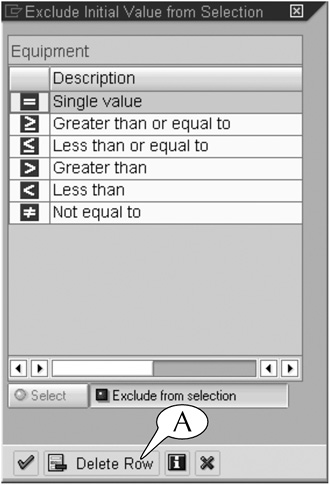
Both menus contain six selection options:
![]() Single value, which is represented by the = symbol
Single value, which is represented by the = symbol
![]() Greater than or equal to, which is represented by the > symbol
Greater than or equal to, which is represented by the > symbol
![]() Less than or equal to, which is represented by the < symbol
Less than or equal to, which is represented by the < symbol
![]() Greater than, which is represented by the > symbol
Greater than, which is represented by the > symbol
![]() Less than, which is represented by the < symbol
Less than, which is represented by the < symbol
![]() Not equal to, which is represented by the ≠ symbol
Not equal to, which is represented by the ≠ symbol
Procedure
Attaching a Selection Option to a Data Entry Field
Step 1. Double-click inside the field to call up the Maintain Selection Options screen.
Step 2. Select either the red or green menu with the menu buttons (Figure 12.3A).
Step 3. Double-click a selection option in the menu. The Maintain Selection Options screen is erased, and the symbol for the selected option is added to the data entry field on the initial screen.
End Procedure
Procedure
Removing a Selection Option From a Data Entry Field
Step 1. Double-click inside the field to call up the Maintain Selection Options screen.
Step 2. Click the Delete row button (e.g., Figure 12.4A) at the bottom of the screen.
Step 3. Hit the Enter key on the keyboard to save your change.
End Procedure
We attach green selection options to the Equipment fields of the initial screen of the IW29 transaction to explain and illustrate their functions.
The green single value selection option causes this transaction to impact only the object whose code is entered in the first Equipment field. For example, the initial screen in Figure 12.5 is set to generate a list of notifications for only the single piece of equipment with the object code 100500.
There is really no purpose to attaching this selection option to any data entry field, because it is implicit that any transaction impacts the objects whose codes are entered in the fields of its initial screen. Nonetheless, you will find that it is automatically attached to some fields, particularly on search screens and multiple selection screens (for example, Figure 12.6A).
The green greater than or equal to selection option causes this transaction to impact only those objects whose code is equal to or greater than the code in the first Equipment field. For example, the initial screen in Figure 12.7 is set to generate a list of notifications for all equipment with the object codes 100500 and higher.
The green less than or equal to selection option causes this transaction to impact only those objects whose code is equal to or less than the code in the first Equipment field. For example, the initial screen in Figure 12.8 is set to generate a list of notifications for all equipment with the object code 100500 and lower.
The green greater than selection option causes this transaction to impact only those objects whose code is greater than the code in the first Equipment field, but not the object with that code. For example, the initial screen in Figure 12.9 is set to generate a list of notifications for all equipment with object codes greater than 100500, but not the equipment with that same code.
The green less than selection option causes this transaction to impact only those objects whose code is less than the code in the first Equipment field, but not the object with that code. For example, the initial screen in Figure 12.10 is set to generate a list of notifications for all equipment with object codes less than 100500, but not the equipment with that same code.
The green not equal to selection option causes the transaction to exclude the object whose code is entered in a field.
We don’t recommend using this selection option on any initial or search screen: If you don’t want to include an object in a transaction, don’t enter its code on the screen. We also don’t recommend its use on multiple selection screens, where you have two red-lighted subscreens for entering the codes of objects to be excluded from a transaction.
The red selection options have exactly the opposite impact of the green ones.
For example, the red greater than or equal to selection option causes the transaction to ignore those objects whose code is equal to or greater than the code in a data entry field. For example, the initial screen in Figure 12.11 is set to ignore the notifications for all equipment with object codes 100500 and higher.
Once again, we don’t recommend the use of the red selection options on most screens for the same reason that we don’t recommend the use of the green not equal to selection option. The exception to this generalization is filter screens, which are discussed in Lesson 14.
1. A notification is a record in the SAP database that equipment needs maintenance work because it is malfunctioning or not operating at its optimal level.