
Expressions open up a whole new realm of functionality in After Effects by enabling you to link elements of your project together and apply logic and bits of math to the connections.
Here is where the standard disclaimer is usually added about how artists don't like logic and bits of math and where I promise to shield you from it as much as possible. But I don't buy the underlying assumption that because you are a visual artist, you don't want to be bothered with pesky numerical data, technical details, logic, or math.
Admit it: You deal with that stuff all the time. Of course you do, you're an After Effects user. The job of expressions is, generally speaking, to make logical connections easier and to automate the tedious parts of animating. So it's not like you get out of having to deal with this just because you don't fully understand expressions—you still have the problem, just with a less-elegant solution.
There is one thing about expressions, however, that strikes the majority of After Effects users as inelegant: They require the use of code. To harness the power of expressions, you have to examine, think about, and occasionally type little bits of code.
In this chapter, I will try to make the case that it's worth dealing with a little bit of code—often just one line in these examples, all or part of which can be entered automatically—to get the flexibility and power of expressions. If you're still not convinced to at least give it a try, realize that you have condemned yourself to spending more time piecing together solutions in the UI to perform operations that expressions are designed to do.
With that out of the way, let's look at an overview of what is possible with expressions. Some of the most typical things you might do are
Create a one-to-one relationship between data from two different animation channels (whether from the same layer, separate layers, or even separate compositions)
Scale and offset keyframe values
Link values to a slider control for easy access
“Mute” keyframe values by replacing them with a constant value
Loop
Destabilize or smooth camera moves or any animation data (while the source data remains in place)
Use time and index values to progress animation data and specifically, to remove noise from a locked shot when it is too prominent for the Remove Grain effect
Create a conditional statement that causes something to happen when specified criteria are met and specifically, to trigger a film dissolve using comp markers
Emulate 3-D tracking (in case you don't have access to a third-party 3D tracker)
In looking at that list, you may see things that you've always wanted to do in After Effects and things you'd never thought of doing. If you can get the hang of how these examples work, you'll be able to apply the same principles to similar but unique situations on your own.
Rather than taking you step by step through learning expressions from scratch, this chapter outlines and deconstructs useful applications of expressions to demonstrate how they work, moving from the simplest to the most complicated examples. I'll do my best to fill in the gaps for you, and at the end of the chapter, I'll touch on what to do to go beyond what's here.
There are only two components to learning how to use expressions:
You must be able to reason out the solution you are pursuing in a methodical, step-by-step fashion.
You must translate this ordinary language methodology to the logic and syntax of expressions into lines of code.
Expressions really do only one thing: translate data values. Granted, that's a little bit like saying your computer's hard drive only has ones and zeros on it, but it's useful to think of this.
Fundamentally, there are three types of data with which expressions work:
Numbers
Booleans (True/False or Yes/No)
Text strings
Expressions can either link to these values where they are found among data in After Effects or fabricate the data using criteria that you, the user, specify. And generally, text is used as only a label for a layer or effect, not as an input/output value—so text almost doesn't count.
So where do these numbers come from? Almost anywhere. They can derive from the basic transform data (position, rotation, scale, opacity, anchor point) of a layer, the current position on the timeline, the number in which the layer appears in the composition, the pixel dimensions of the source footage, whether or not a layer has a parent, and on and on. Pretty much every piece of numerical or Boolean data that exists in your After Effects project is accessible to expressions and can be used to create animations.
Expressions cannot evaluate certain types of data:
Pixel values
Audio waveforms
Mask data
Nor csn they handle certain complex effects data, such as effects channels that can be keyframed but whose keyframe values are not made up of four or fewer numerical values. For example, expressions work with RGBA data—red, green, blue, and alpha channel values normalized between 0 and 1—but they can't handle the Channel Range color control in Hue/Saturation.
Creative Accounting
There are, of course, workarounds to the limitations of expressions. The commonly used Levels effect, for example, has an Individual Controls version that was created expressly (pun intended) for use with expressions.
For sampling sound, Trapcode (www.trapcode.com) offers Sound Keys, which can translate waveforms into numerical data suitable for expressions.
As for such unreachable data as mask vertices, it is theoretically possible to sample and adjust them using scripting. I've just never known anyone geeky enough to try it.
So, although you can change the pixel values and audio levels of a layer using expressions, you can't sample a given pixel's RGB values, the decibel level of a soundtrack, or the position of a mask point.
One other major limitation is that expressions are incapable of compounding data over time. In other words, calculations that involve a progression from frame to frame cause expressions to recalculate all frames prior to the current one as each new frame is loaded; in such cases, the further you get down the timeline, the longer frames require to render. For example, in After Effects 5.5 Magic (New Riders Publishing), I demonstrated drawing a spirograph shape over time using the Write On effect to add a series of dots to make a line. Each successive dot took longer to calculate its position than the one previous, because it had to know the positions of all of the dots up to that point to know what came next. If that still sounds confusing, don't worry about it; until you find yourself writing an expression that increments with time, you won't likely run up against it.
How many times have I heard someone wish for the ability to temporarily disable keyframes in After Effects? You can do this with just about the simplest expression it is possible to write. Not only is disabling keyframes useful when working with an element that is meant to be barely or only occasionally visible (say, one with a keyframed Opacity level below 10%), but you can also use this trick for any property that will let you set an expression. This method of applying expressions is so elementary, there is no excuse for anyone not to use it.
Consider the opacity example: You have an element that is flickering at low opacity, that is blinking, or that for some other reason has Opacity keyframes assigned. You don't want to lose these keyframes, but they prevent you from properly seeing the layer for setup.
The expressions solution for this is trivially easy, and it doesn't require an understanding of JavaScript. It might even help you understand something basic about expressions, especially if you've ever tried to decipher one and wondered where the value is held.
Note
The After Effects expressions language is based on JavaScript, a scripting language that was originally devised for Web browsers. Many functions that are fundamental to JavaScript, such as the ability to perform mathematical operations, work identically with expressions. Of course, many other functions from JavaScript are specific to the Web and interactivity, and have no application in After Effects. Likewise, After Effects adds its own keywords, functions, and attributes; these use the same basic syntax and rules of JavaScript but would not be recognized by it.
With keyframes already set to the Opacity of a layer, set an expression for Opacity. There are several ways to do this once you've selected the property to receive the expression. For example, you can use the Animation menu or a keyboard shortcut (Alt+Shift+=/Option+Shift+=), but it's usually done by Alt-clicking (Option-clicking) on the stopwatch of the property (in this case, Opacity).
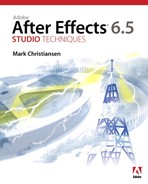
Before solving the example's problem, take a quick look at what occurs when you set an expression (Figure 10.1). Note the equals sign toggle that appears next to the stopwatch; you can use this to turn the expression on and off. Also, note that After Effects adds a new line below the property. This line contains text that is automatically highlighted directly after you apply the expression. In this case, the text reads opacity, and the cursor blinks to indicate that the text is live. This is useful, because the first thing you want to do is usually to replace or augment this text.

Figure 10.1. With the default expression activated for the Opacity channel, the opacity value of 100% turns red and a new cursor with an equals sign appears next to the stopwatch; this toggles the expression on and off. The following line, revealed by the twirly arrow, contains the expression itself along with icons for the graph, pickwhip, and keywords.
That one word, “opacity,” is an expression. It tells After Effects to look at the layer's Opacity channel for its value, which is, of course, what happens under normal circumstances. Nothing about the functionality has changed. If you moved opacity over to an expression on the Rotation property, however, then Rotation would get its value from the layer's Opacity value, including any keyframes and expressions, as well. But I'm getting ahead of myself.
Replace opacity with 100 and either press Enter (not Return) or just click outside the text area. Now, instead of looking back at its own keyframe data, Opacity looks at this one value, 100, on every frame of the composition (Figure 10.2). The keyframes have effectively been “muted,” replaced with a constant value.
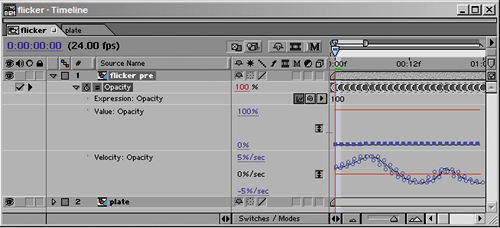
Figure 10.2. If Opacity (or any property) has keyframes set, a number in the expressions field overrides them and sets it to that value. The flat red line in the graph shows you what's going on.
Toggle the Expressions button (the equals sign next to the stopwatch) to enable/disable the keyframes. The only danger here is that you'll forget to turn this expression off when you're done with it, but that's not really the fault of expressions, now is it? You can optionally delete the expression instead, the same way that you set it—by Alt/Option-clicking on the stopwatch.
Things work a little differently with properties that contain more than one value, such as Position. These are called arrays and are detailed in the next section.
It's good to start simple, but the bread and butter job of expressions is to link animation data when, for whatever reason, the other means of linking data will not do. Other linking methods all have their place, but have their limitations as well:
Parenting is a great way to link translation data between layers, but not if you want to exclude part of the data—for example, to include position but not rotation—or if you want to link translation data to properties, such as brushes and effects positions, that are tied to effects rather than the layer itself.
Pre-composing allows you to group layers, but not to link their actual data in more sophisticated ways.
Copying and pasting keyframes is possible and will even allow you to copy data from one property over to a completely different property, but the link is not “live.” If anything changes with the source, you have to recopy to the target, and you cannot easily scale or offset the result, nor go from a one-channel to a multiple-channel property or vice versa. Furthermore, this method has a high possibility of user error and is largely outmoded by the expressions pickwhip (Figure 10.3).
None of these methods lets you do more complex relationships, such as setting up a nonlinear relationship between two sets of values (for example, doubling or squaring the keyframe values).
Following are some practical examples of linking data via expressions, with explanations of what is really going on so that you can devise your own practical applications. These examples save you from having to type code by leveraging use of the pickwhip, a nifty tool for grabbing bits of data and turning them effortlessly into useful bits of code (which you've already seen used with Parenting and Post Render Actions).
Chapters 7, “Rotoscoping and Paint,” and 8, “Effective Motion Tracking,” alluded to a method for combining paint tools and the tracker. The problem is a simple one: How to apply tracker data to a brush to automatically paint out an element in motion?
The only one of the above alternatives to expressions that could work in this case would be copying the attach point of the tracker, highlighting the Position value of the brush in question, and pasting, but what if the result doesn't look quite right and you need to retrack it?
The simpler, more flexible solution is to use the pickwhip, and in cases where you are setting up a one-to-one relationship between two properties, that is all you need. I'll show you some less straightforward cases in a minute.
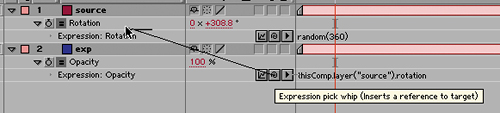
Figure 10.4 shows a clip of a plane landing in the distance; let's say that this plane needs to be painted out to be replaced with a 3D model of a flying saucer. The Track Type could be set to Raw because I'm applying the tracking data via expressions only. The attach point can be offset so that it sits at the center of the airplane, although offsetting it is also simple, as you'll see.
Figure 10.4. A raw track of the plane has been generated. The dips and swirls in the motion are due to the shot having been taken with a hand-held camera. The camera Track Type is set to Raw.
Having tracked the plane, I return to the first frame and use the Clone Stamp tool to eliminate the plane on that frame by painting over it with surrounding cloud cover (any adjacent area of the same frame works). I can use a nice big brush (100 or more pixels) to eliminate the plane by clicking once in roughly the same place as I placed the attach point (the center of the airplane). Best in this case is to clone out the unwanted object in one stroke, so that you only have to join the tracker to that one, but it's possible to repeat this step.
With the layer highlighted in the timeline, I press UU to expose the tracker and brush data. I set an expression on the Position of the brush, then drag the pickwhip—the swirly icon in the center of the three—up to where I see the words, “attach point.”
Geek Alert: Unpacking Syntax
Okay, so you're not satisfied until you understand that little piece of code you just grabbed, although you're wary of delving into code. Take a closer look at the syntax of that brush stroke:
motionTracker("Tracker 1")("Track Point 1"). attachPoint
This works similarly to how pathnames work in Unix or Windows: Starting at the left, motionTracker contains Tracker 1, which has a Track Point 1, which in turn contains the property you're after, the attach point.
What's up with the parentheses, the quotations, and the dot? Parentheses in JavaScript contain arguments, which are specifics needed to clarify settings, in this case, telling After Effects which point, in which tracker, you're after. The motionTracker property is unusual in that it needs two sets of arguments, each in its own set of parentheses. The dot works the same way a forward slash would in Unix (or a back slash in Windows): It identifies the next level down in the hierarchy, like looking inside a folder.
Keywords in expressions use inter-caps, so that a keyword is made of two words with no spaces. For example, motion tracker and attach point, end up as motionTracker and attachPoint, respectively.
Done. The resulting expression looks something like
motionTracker("Tracker 1")("Track Point 1"). attachPoint
But why sweat the syntax? I've just set up an automatic link between these two properties, and with the pickwhip, I can always grab available data in this manner.
Now let's say that instead of painting out the plane, I want to add a flying saucer tracking it from a higher altitude and left of frame. I could apply the tracker to a null and parent the repositioned element to that, but it would be simpler to offset the same expression I just used, now applied to the Position value of the saucer. To start, I again pickwhip from the saucer's Position to the track's attach point.
Offsets are quite intuitive even to people who don't understand JavaScript very well. Perhaps you want to offset a value by –100. What would you add at the end of the default expression text? That's right, –100. Try it on a Position value and it works—kind of. The object moves 100 pixels, but on the X axis only.
Position is an array, a property with multiple values. A 2D Position property has two values, X and Y, and a 3D layer's Position would add a third (as would Anchor Point and Rotation, which otherwise has one value). So while offsetting and scaling values is simple—you use the basic math operators (+, -, *, /)—things get slightly less straightforward with arrays—but only slightly.
An array value is written in expressions as [x, y] for a 2D value or [x, y, z] for 3D. So if you want to mute a Position keyframe at the center of a 720, 540 frame, you enter [360, 270] (half each value), and if you want to offset each value by negative one hundred (-100), you add -[100, 100] after the pickwhip data to add the offset (Figure 10.5). If you needed to mix a positive and negative offset of 100, that would be simple too: instead, add + [-100, 100] or +[100, -100] and so on.
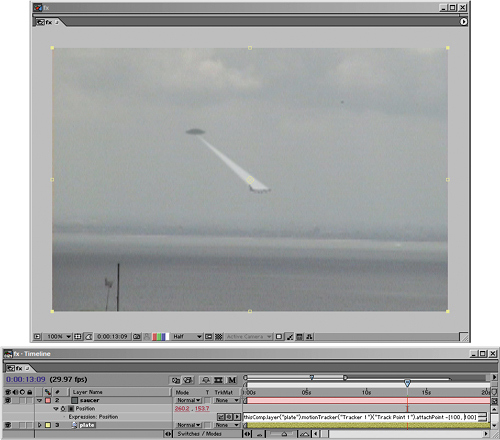
Figure 10.5. The Position value of a Paint stroke is a two-dimensional array; the highlighted text shows how to perform a simple offset of such an array.
Yes, this is quick and dirty; the goal here is to offer you the low-hanging fruit, the things you do all the time with expressions that are easy to pick up. A more elegant way of setting a constant position at the center of the frame would be
[thisComp.width/2, thisComp.height/2]
because this expression would adjust itself to any composition size. There are typically many ways to write any expression; the simplest (with the fewest lines or operations) that applies to the greatest number of variables (such as changes in the comp size) is typically the preferable one, as with all coding.
Okay, now suppose you need to link something on one axis only: say, heads-up display pointers that move up and down along the left and bottom edges of the frame, tracking the enemy craft (not a typical effects scenario, but one that easily demonstrates what I'm after). This time what you want to do is keep the value of one axis in a static position, and to apply your track to the other axis.
This gives you the opportunity to learn a useful new bit of syntax. You know how to write an array, but how do you identify one portion of the array? Like this
[position[0], position[1]]
Whoa, more brackets. Once again, you're expressing position as two values separated by a comma in brackets, but the values themselves are identified by trailing numbers in brackets. The numerical order starts at 0, not 1, because this is how programming languages generally work.
So, to keep the existing value on the X axis and the track on the Y axis, you would enter position[0] (or a static value, like 400) before the comma and pickwhip the Y value to the Y value of the attach point. That's right, not only can you pickwhip to the attach point, but if you drag the pickwhip instead to just one of its values—the second one, in this case—you get the code linking you only to that value (Figure 10.6). Once again, the pickwhip has saved you from typing in some gnarly code, but you need to know the simple stuff.
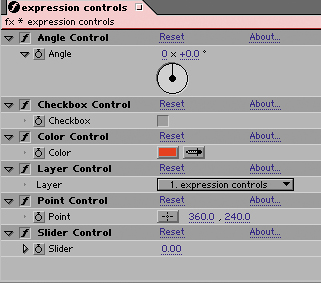
Figure 10.6. You can pickwhip from a single channel of an array (a property with multiple values) to the corresponding single channel of a separate array.
To do the same on the other axis, just reverse the steps, pick-whipping before the comma and entering position[1] following it.
This rather trivial example has hopefully elucidated a powerful concept, of using expressions to apply data to one channel only. This is the first example we've examined that would truly be impossible without expressions—none of the alternative methods offer a method to apply animation data to only one channel of a property.
Here's another really cool, really basic thing you can do with expressions: link effects controls to properties to allow you to control them in the Effects Control window. It's incredibly simple, too.
The effects found within the Expression Controls sub-category don't do anything until you attach an expression to them. That's all they're for, to offer you a user interface for adjusting your expressions values on the fly. The one you'll most often use is likely Slider Control, but look carefully at the other five, as each produces a different result (Figure 10.7).

Figure 10.7. Here's the full array of available expression controls, all applied to a single layer. These look familiar because they are standard to other effects as well. Each generates a unique type of data: Angle generates radians and degrees, Checkbox is a Boolean, Color three values between 0 and 255, Layer a layer in the current comp, and Point an array of two values. Only Slider generates a single floating point number.
Anyhow, for now, say you want to make yourself a zoom control slider for a 3D camera. You may never have needed to do this, but it hardly matters—it won't be long before you think of another property you want to attach to a slider, and once you see how easy it is, you'll be actively looking for opportunities to use this.
You can't apply effects to a camera, so you need to apply the slider to a different layer, and it hardly matters which one. The slider will affect only a layer containing an expression pointing to it. The normal method would be to put it on a null or adjustment layer named Controls or something similar so that it's easy to find later.
To the Controls layer you apply Slider Control. Now to be really organized you might as well rename this control something intuitive and unique, such as Zoomer, by highlighting the effect name and pressing the Return key, then typing in the new name. It's important to do all of your renaming before applying an expression, because, lamentably, expressions do not auto-update their contents to reflect changed target names, so they will break, generate an error, and disable themselves.
Now the easy part: Apply an expression to the Zoom property of the camera, and pickwhip to the Zoomer property. You can even pickwhip up to the Effects Control window instead of revealing it in the timeline. The zoom will snap to the value shown on the slider, which by default is 0, so your camera position now needs to be adjusted.
You can raise the slider to zoom in, but the 0 to 100 range is probably not going to be sufficient. This can be changed by context-clicking on the Zoomer value, choosing Edit Value, and then setting new Slider Range values (Figure 10.8).
Figure 10.8. Slider range values can be set anywhere between the specified maximum and minimum values, not only for the Expression Slider but any effect.
In this case, however, there's an alternative. Say that you want the zoom to increment logarithmically, by powers of 2. That means the slider value is multiplied by itself, and you probably now know how to set the expression to do this. You take the existing pickwhip path, copy it, add a * symbol directly after the original version, and then paste in the copy. Voila, it's multiplied by itself, and the zoom control feels more like a real zoom.
Maybe the coolest feature unique to expressions (one that users often wish was built into the After Effects user interface) is the ability to loop a set of keyframes. It's so easy to learn and powerful, however, that once you understand it, you might even like it.
Note
What's up with spaces? Typing “x * x” or “x*x” in an expression has the same result. In fact, you can put as many spaces as you want between the operator (*) and its operands (x). It's purely a matter of what you prefer to look at. Where you get into trouble is in adding spaces where they don't belong, such as in the middle of a name; valueX is not the same as value X. If there are spaces in a name you pickwhip, the name appears in parentheses, for example:
motionTracker ("Tracker 1") ("Track Point 1").
Much of the time, you just can replace your source expression text with one of the default loop expressions and be done. These are found in the Property submenu of the Expressions menu (Figure 10.9).
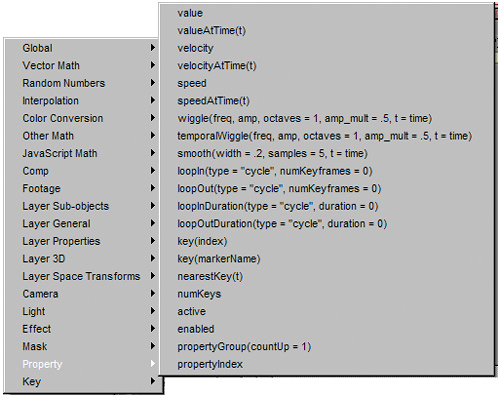
Figure 10.9. Try not to be overwhelmed. The expressions menu is a well organized cheat sheet of After Effects keywords. Once you understand a little bit about how it's organized and where the most useful items are located, you can open this with confidence. The Property submenu, shown here, might be the one you visit most often because it contains several essential functions.
The loop effects have two arguments, the settings found in parentheses after the command. The first one is mandatory; you have to specify the type of loop you're requesting by choosing one of the three loop types. The second is optional and, in some cases, unavailable.
Expressions Menu and Hierarchy
The Expressions menu is a bit overwhelming to the uninitiated—nearly two dozen submenus with several entries each. How do you know where to find anything?
Two significant observations can make this menu less daunting:
Most of the entries don't do anything, technically speaking, other than point to a value that you can sample.
The menus are organized hierarchically, from most global to most local. So at the top is the Global submenu, which has shortcuts to areas of After Effects that are available on the broadest or most global level. At the other end of the menu are Property and Key, which work on an individual property of an individual effect applied to an individual layer in an individual comp. In other words, these are the most nested expressions.
So don't worry, it's not as gnarly as you might think.
I'll start with a basic example and then detail out the various permutations, and then show you a specific problem that looping solves.
I'll use the example of a blinking light that is animated via keyframes to its Opacity control. To blink, these keyframes, which turn it on and off, must repeat. Begin by creating one cycle of this animation, start to finish. For example, it could be a burst of light (100% Opacity) followed by a hold and a decay at or near the beginning of the composition or wherever you want it to begin (Figure 10.10).
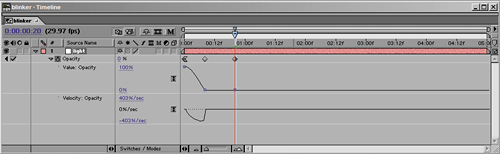
Figure 10.10. Opacity of this light decays over ten frames, with an ease added out of the first frame, followed by a hold between frame 10 and 20, at which point you are in need of a loop.
Now set an expression for Opacity, and with the default expression still highlighted, choose
loopOut(type = "cycle", numKeyframes = 0)
Press the Enter key or click outside the text area. Your keyframes now loop.
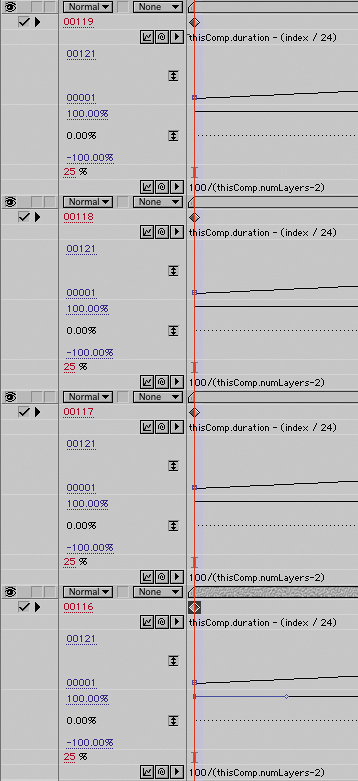
Specifically, the loop acts as if the first keyframe followed one frame after the last keyframe; this is always how it works. So, if for timing purposes you want a pause at the end, you build that into your keyframe pattern. Figure 10.11 shows the animation with a hold at 0 Opacity added at the end.
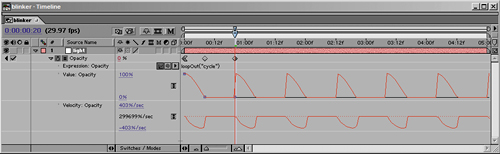
Figure 10.11. A loop has been added to the animation in Figure 10.10. The default expression (chosen from the menu in the instructions) would work, but unnecessary arguments have been removed here to shorten it (see the sidebar, “Extraneous Verbiage”).
How can two expressions
loopOut(type = "cycle", numKeyframes = 0)
loopOut("cycle")
achieve the exact same result? Here's a quick explanation: Expressions don't do a lot of hand-holding in terms of telling you what to enter and where, but the default settings sometimes come with extra keywords that are totally optional; their only purpose is to remind you what the values are for. In the case of this example, not only are the keywords “type =” and “numKeyframes =” optional, but the whole second argument will default to 0 if it's missing.
Now how the heck would you know this? After a while, you start to anticipate it because it's somewhat standard. As you begin, however, the only way to know it is to read it in a book like this one. Sad but true.
Before looking at the other loops available, check out the other arguments you can set for this expression. For example, numKeyframes specifies how many keyframes before the final one are used in the loop; set to the default of 0, it uses all keyframes. You can get rid of this argument altogether in such a case (see the sidebar, “Extraneous Verbiage”); in fact, the expression would work the same if it read loopOut("cycle"). Set numKeyframes to a value of 2 and it uses the last three keyframes for the loop, ignoring the first hold keyframe (Figure 10.12).
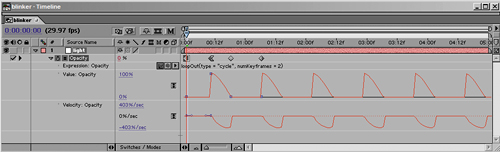
Figure 10.12. The hold keyframe, added at the beginning, is ignored because of the numKeyframes = 2 argument, which limits the loop to the two keyframes preceding the final one (which, as you may have noticed, the loop ignores, using it only as a placeholder for the first keyframe of a new loop).
The more useful argument is probably the first one, because it changes the fundamental type of loop, and there are three possible arguments:
loopOut("cycle")
loopOut("pingpong")
loopOut("continue")
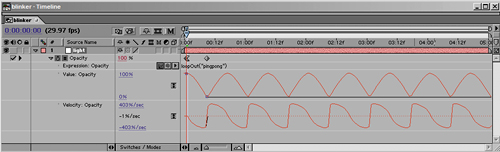
You've seen the results of cycle, and I will cover continue in the next section. The pingpong option is like cycle except that it alternates looping the keyframes forward, then backward, then forward to ping-pong them back and forth (Figure 10.13).
Chapter 8 contains tips for continuing a motion track using a simple loop expression. What if your footage needs both a loopIn("continue") and a loopOut("continue") to extrapolate the track not only beyond the end but before the beginning of the keyframe data?
You could do this with conditionals, telling expressions to execute loopIn before a certain frame and loopOut after a certain frame, but a simpler way if you're just getting comfortable with expressions would be to split the layer at the beginning or end of the keyframe data and apply loopIn to the first portion and loopOut to the second portion.
Remember that this trick only works if the first (loopIn) or final (loopOut) two frames accurately represent a steady state at which the layer should continue animating. It only typically holds up for a few frames.
As for the other loop types available, loopIn("cycle") works identically to loopOut with one exception; the loop is created prior to the existing keyframes, rather than following. Both loopOutDuration() and loopInDuration() enable you to specify an interval, in seconds, between loops. For example, loopOutDuration("cycle", 2) cycles a loop every two seconds.
Chapter 8 alluded to methods for smoothing and destabilizing a camera that are preferable to the Smoother and the Wiggler, After Effects' built-in solutions that pre-date expressions. As with looping, these are pretty easy to learn and will expand your capabilities quite a bit.
There are effects applications out there with specific effects for smoothing or destabilizing the camera, and I've seen at least one other author claim that After Effects has no tools for camera stabilization and destabilization. I'd like to disprove that assertion right now.
If you followed the steps in Chapter 8 for using a 3D camera to motion track a scene in such a way that the track is applied only to the layer and camera, you're ready to proceed. If not, please review that section briefly if you want an idea of how the setup can be applied to a motion-tracked camera. Using wiggle to destabilize a camera will work without tracking data (see Figure 10.14).
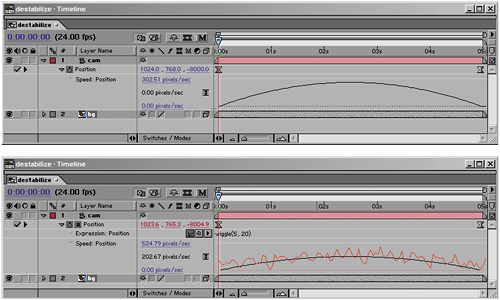
Figure 10.14. Contrast a simple camera push with an ease (top) with the result of applying a modest Wiggle operation to it (bottom: overlaid in red on the curve).
Once again, application of the expression is easy. Given a set of keyframes, you can smooth them—averaging them against the closest adjacent keyframes (you control how many)—or give them more noise and jitter, by applying one of the following expressions:
smooth()
wiggle(freq, amp)
There are, actually, more default parameters than I've included here, but I'm hoping that presenting them this way will make them appear easier to use than they do with the menu defaults, which are nonetheless explained below.
You can apply smooth as is, and you can clearly view the result without ever previewing any animation, just by looking at the velocity graph showing the source animation curve (in black) and the result of the smooth operation (in red). This graph is an additional advantage to applying smoothing with an expression (Figure 10.15).
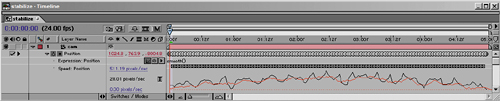
Figure 10.15. Camera jitter, smoothed. The delta (change over time) of the smoothed motion (in red) is much less than that of the source (in black).
You can of course tweak the amount of smoothing using the parameters shown in the default expression:
smooth(width = .2, samples = 5, t = time)
These are the same settings as in the example above, with no arguments used. The width setting specifies the amount of time, in seconds, to either side of the current frame that is averaged into the smoothing calculation. The samples setting specifies how many increments to examine within that keyframe range (typically, you should choose an odd number to include the current frame in the calculation). The time setting allows you to offset the effect of the smooth, something you'll rarely, if ever, need to do.
The wiggle expression needs a couple of arguments by default, and has the option for more. At the very least, you need to enter freq, or frequency (the number of wiggles per second), and amplitude (the maximum amount the wiggle can change a value—in other words, the number of pixels). The full default expression reads
wiggle(freq, amp, octaves = 1, ampMult = 5, t = time)
For the most part, freq and amplitude are all you need, but if you must know, octaves has to do with how much noise is added together, and won't usually need to be more than 1. A higher value for octaves doesn't mean more noise, it just means more samples, and ampMult multiplies the result—again, it's about variety. For just plain more, add to the frequency and amplitude. Time, once again, is an offset.
Note
Although it wasn't possible in earlier versions of After Effects, in 6.5 you can apply wiggle() to a property that has no keyframe data whatsoever, useful for adding the jitter of a handheld camera to a static setup.
To apply smooth() and wiggle() expressions to a 3D camera that has been tracked to match the background (as demonstrated in Chapter 8), make sure that you apply them both to the null layer to which the camera is parented and to the background plate.
Alternatively, if you're just looking to apply random numbers within a certain range rather than wiggling keyframe values, you can use the various random, Gaussian random, and noise functions found in the Random Numbers submenu (see the In Depth box). Or, if you want to wiggle the temporal position of the keyframes themselves (to wiggle them in time), try
temporalWiggle(freq, amp).
Geek Alert: Wiggle versus Random
The wiggle() function adds random data to an animation channel. How does it differ from the functions in the Random Numbers submenu?
Random numbers are truly random; any number generated has no relationship to the number preceding it. They can be constrained to a particular range, and Gaussian random numbers will tend toward the center of that range (following a Gaussian distribution pattern that weights random numbers toward the median), but the effect is one of values that pop around completely randomly.
With wiggle(), the seeming randomness is generated by adding an organic noise function to existing data. The randomness is not quite so random: It takes existing data and deviates from it, within a set range (amplitude) and at a set number of times per second (freq). The wiggle() function, then, not only has the advantage of using animation data to determine its range, but of generating an effect that does not feel so chaotic as random data.
It's not the most commonly used, but it is useful if you need the animation values to stay in exactly the same range (to follow a path, for example) but to move back and forth semi-randomly on that path.
Some of the coolest things you can do with expressions involve incrementing either layer index numbers (the number of the layer that you always see to the left of the source name) or time itself. Time in expressions is measured in whole seconds. Frames and fields are calculated as decimal fractions of seconds. Of course, if you're ever worried about calculating this, you can use fractions instead: in 24 fps footage, frame 65 would be time = 65/24 (or 2.7083 seconds). See how easy?
A frame's index and time become especially useful when using conditionals. In the example expression, you will use index and time to average grain between several frames of a sequence. Although I'm still trying to keep this simple, this means moving beyond the one-liner expressions that can be applied and tweaked easily.
In some cases, the normal methods of dealing with grain just don't do the trick—even methods as powerful as the Remove Grain effect (detailed in Chapter 9, “Virtual Cinematography”). The noise simply obscures too much of the frame. If the shot is locked off, there is an interesting alternative, one that came in handy for me on one shot in The Day After Tomorrow.
This effects shot started with a plate that was taken on a huge blue-screen stage of actors trudging across a snowy plain. It was meant to be snowing fairly hard in the shot, and for whatever reason it was decided to use practical snow on set. Usually, as in Figure 10.16, this means little bits of plastic confetti or corn flakes painted white. With 20/20 hindsight, this was clearly the wrong decision, because we were adding computer-generated snow to all kinds of exterior shots, and furthermore, the way it was shot, the lighting grid was too far in shot so I had to mask out a big hole where the falling snow should have been. So, what was needed was to get rid of the plate snow altogether and start over. Happily it was a locked-off shot, so the following trick worked, and then I added a gentle camera push-in to the final composition.

First I'll describe the solution so you understand it logically, then we'll look at the pair of expressions that accomplished this. First, I determined that the frames I wanted to average were the ones at the end of the shot, where I could easily eliminate the one moving element in the shot, some figures walking across the horizon. I did not know how many frames I would need to average, but I knew that if I took a series of different frames and set their Opacity so that collectively, it added up to 100%, I would get an average of all of them. On a given frame, a given snowflake would appear on a given pixel, but it would be missing from the other frames, and therefore would be averaged out. If I needed to average ten frames, then each would have Opacity at 10%, adding up to 100%.
Without expressions, this process would be a real pain. Each added layer would have to be adjusted to the proper frame and would have necessitated adjusting the opacity of the other layers so that they all still added up to 100%. Instead, I was able to apply two expressions to one layer and simply duplicate that layer until I had enough iterations to accomplish the effect of averaging.
First, I took care of the Opacity settings by applying
100/thisComp.numLayers
to Opacity. This expression simply says, “Take 100, my target Opacity total, and divide it by the number of layers in this composition.” The thisComp and numLayers keywords are found in the expressions menus, in case you're wondering where they came from. Truth be told, I had a couple of extra layers in my actual comp (for adjustment and rotoscoping), so I wrote the real expression with an offset to compensate:
100/(thisComp.numLayers-2)
The parentheses are necessary to force the offset to occur before dividing the result into 100.
Next, I wanted to average together the last few frames of the composition, but I wasn't certain how many. As the solution, I applied Time Remapping to which I added the expression
thisComp.duration—(index / 24)
The duration of a composition is measured in seconds, and this was a 24 fps comp. By dividing the index number by the frame rate and subtracting that from the total number of seconds, I caused each successive frame in the timeline to increment backward one frame.
With these two expressions applied, I was able to do the artistic work of choosing the optimal amount of frame averaging in real time, by duplicating (Ctrl+D/Cmd+D) and deleting the layer until I'd nailed it. In the end, it required fewer frames than expected—just four, but in deciding to use that number I tried as many as ten, and handling these changes with expressions made it a breeze (Figure 10.17).
Also known as If/Then statements, conditionals open up a host of possibilities. They allow you to use any circumstance that expressions can recognize—pretty much any numerical or Boolean condition in the timeline—as a condition for an event or a series of events to occur.
If you're really going to harness the power of automation in expressions, it's extremely helpful to understand how to set up conditionals. All kinds of effects shots feature a cause-and-effect relationship that you can set up logically with expressions so that, even if the timing or other parameters change, the amount of busywork involved in rippling those changes through is minimized.
Here's a simple example of conditionals: using layer markers to trigger a one-second filmic dissolve. This expression could just as easily be set up to trigger a different operation, such as a simple opacity fade to black or white, but once you understand the basics, you'll be able to adapt it however you like.
A composition marker can be set by pressing Shift+1 (or Shift plus any number, 0 through 9, on the top of the keyboard—not the numeric keypad). For the following example to work as-is, if you want to try it yourself, place marker number 1 (Shift+1) at the frame at which you want the fade to begin.
Add the Levels (Individual Controls) effect. Reveal controls for Input Black and Output White; you'll be applying the same expression to each, with the variation that they will be animated in opposition (Figure 10.18). The expression for Input Black is
mark = thisComp.marker(1);
linear(time, mark, mark+1, 0, 1)
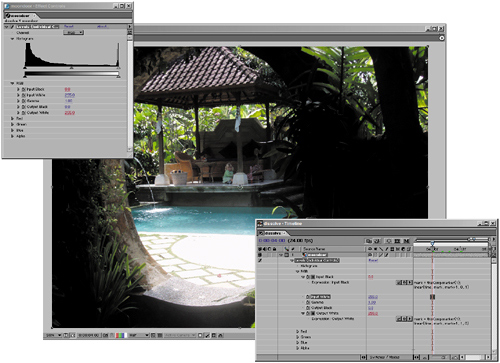
Figure 10.18. The expressions have been set for Input Black and Output White; values appear in red in the Timeline and Effect Controls windows.
The inversion for Output White is
mark = thisComp.marker(1);
linear(time, mark, mark+1, 1, 0)
Note
You can apply an expression directly from the Effect Controls window by Alt-clicking (Option-clicking) on the stopwatch, the same way you would in the Timeline window. This can be convenient because the property with the expression is revealed in the timeline as well, where you can edit the expression.
What the heck? Here's what's happening. This is the first example in this chapter in which you're setting a variable. This one is called mark, named for the fact that it identifies a marker (and also for the author's vanity). How do you know it's a marker and which one it is? The variable's argument tells you; the thisComp.marker portion signifies a marker and (1) specifies which one. Any time you use a unique name followed by an equals sign, you are telling After Effects to save you the trouble of having to repeatedly type whatever comes after that equals sign. That's all. No big deal about variables.
The linear(t, tMin, tMax, value1, value2) command is so compact and efficient that it's easy to forget it even exists. It has five (count 'em) required arguments that identify, in order, the
Time that the effect evaluates
Time to start a linear transition
Time to end a linear transition
Value at the start
Value at the end
With this in mind, you can see that the expression first evaluates the current time (time). When that time reaches mark (marker 1), After Effects should perform a linear transition from 0 (0%) to 1 (100%), and the transition should last one second (until mark + 1, or one second past marker 1). You can see what's going on in the expressions graphs, and the result is reflected in the Composition window (Figure 10.19).
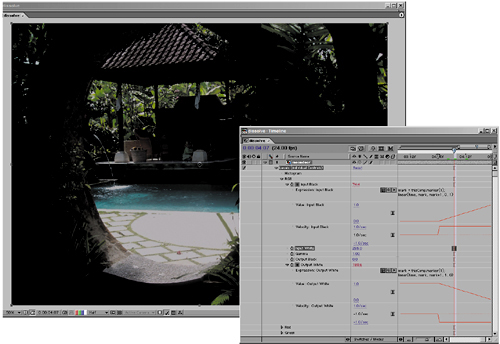
Figure 10.19. The result of the dissolve appears in the graphs as well as in the composition itself. A filmic dissolve re-creates what happens to film densities when film is faded to black.
Now, why go to all that trouble to do an effect that would take a few keyframes? Because you can save the effect into your favorites and apply it whenever you want to trigger a filmic dissolve using a layer marker, without having to do any keyframing or setup at all, and you can change this animation, which would require four keyframes, using only the marker. Not life-changing, perhaps, but satisfying and one more indication of the many applications of expressions.
How will you ever remember how to do this again? Most of the components of this expression are organized into the Expressions menu. A variable is always set by naming it and then adding = after the name; whatever follows the equals sign is the variable setting. (There's no need to type variables in JavaScript, in case you were wondering about that.) The shorthand thisComp is in the Global category of the menu, which also tells you that it sits at the top level of any hierarchy, such as thisComp.marker(1). Look in the Comp category for marker(name); you need to add the dot separation between them and the semi-colon at the end yourself. As you've seen already, these are basics of JavaScript. With all of its defaults, linear() is an interpolation function and found in the Interpolation category. (You'll see two versions there, one showing the option of fewer arguments).
Finally, there has to be something to make everyone's head hurt, not the least mine. Although most major studios have access to 3D tracking these days, you may run into a situation where you don't. This workaround will do the trick for you, using the plain old After Effects 2D tracker. Just keep in mind that it will work only on shots in which the ground plane is clearly visible as you travel forward (or backward) in imaginary Z space.
I first used this setup on an aerial shot of a forest for the television movie Superfire; images from the movie appear in Section III of this book. For this shot, the forest needed to be covered with smoke, but the point of view was from a moving helicopter, banking slightly to the right. The idea was to track in a series of smoke planes to give the illusion of a bank of smoke, but each one had to be positioned separately because of the movement in 3D space.
You could track each smoke layer separately, but for five layers, this would take, oh, about five times as long to set up. Instead, for a shot that travels along the imaginary Z axis, it's possible to triangulate the relative position of the smoke layers as they offset into the distance and foreground and average them to create an offset.
Here's basically how it works for a shot in which the camera tracks forward over the ground plane:
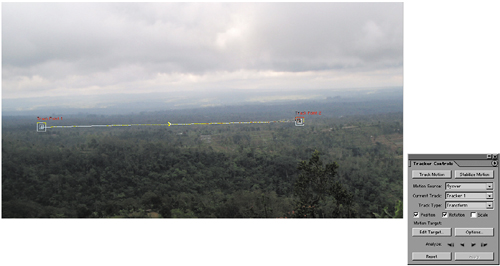
Create a rotation/scale track on two points that represent the background of your plate—they are the most distant trackable points (visible at the start and end of the shot) from the camera's point of view. Apply this track to a new null called layerMotion1 (Figure 10.20).
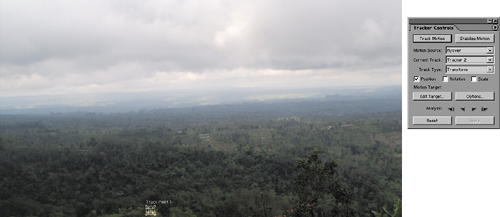
Create a separate one-point track that represents the foreground of your plate, closer to the camera position. Apply this track to a new null called FG. Along with the two previous points, this completes the triangle you need to re-create distance effects (Figure 10.21).
Apply a Slider Control to layerMotion1. Change the Slider Control's name to Distance. (The names are for clarity; you can create whatever names you like.)
Create two more nulls, name them BG1 and BG2, expose their position values (P), and then apply an expression to each. Pickwhip the value of each of the two attach points from the two-point track you made in step 1. Yes, the resulting code path is gnarling-looking. This step is mostly just to bury these paths so they don't show up in the main expression!
Now comes the expression. To the Position property of layerMotion1, apply the following expression:
fg = thisComp.layer("FG").position;
(this_comp.layer("BG1").position + this_comp. layer("BG2").position) * 0.5;
placement = effect("Distance"). param("Slider")/-100;
bg + ((bg – fg) * placement)
And you're done—almost. What you now have is a null, layerMotion1, that can be offset using the Distance slider value. You then parent any layers that belong to that plane of motion to layerMotion1. You next duplicate layerMotion1 to create layerMotion2 with a different offset value, to create a separate plane of motion, then layerMotion3, and so on until you have enough layers to create the illusion of depth.
So there you have some useful practical applications for expressions in visual effects work. Maybe you still want more—a more thorough understanding of the basics, if you're a beginner, or more advice on developing your own expressions, if you're an expert.
Unfortunately, expressions is one area where the official After Effects documentation falls short. Plenty of information is there, but it's organized in such a way that you already need to know quite a bit about expressions before you can understand it.
Happily, a couple of Web sites take up the slack. They are excellent, and at this writing they are still very much up to date:
www.motionscript.com: This site is the work of Dan Ebberts, a prolific contributor of expressions information in various online forums. One section of the site, Mastering Expressions, thoroughly explains how JavaScript works as is implemented in After Effects. The Expressions Lab contains more hands-on examples for you to dissect.
www.aenhancers.com: This is a forum-based site filled with sample expressions and scripts created for specific purposes, as well as areas for discussion about how they work.
Both sites also include information on scripting, an automation feature set in After Effects that, alas, makes creating expressions look like child's play (and I should know, having documented this feature for version 6.0 and 6.5). Someday, perhaps the development team will be able to add recordable Actions as are found in Photoshop, and scripting will be unlocked for the masses. For now, how-ever, the scripting controls are double black–diamond expert features, for the most part requiring full-fledged programming capabilities to accomplish anything truly significant.
And hold onto your hats, because the complicated stuff isn't over with yet. The next chapter deals with issues specific to film, most of which have never been handled in any book on After Effects.