
Welcome to Apple’s Final Cut Express—a combination digital video editing, compositing, and special effects program. Final Cut Express is based on Final Cut Pro, Apple’s wildly popular professional digital video editing program.
Final Cut Express is tightly integrated with Apple’s G4 and G5 processors, FireWire high-speed data transfer technology, and QuickTime multimedia format. FCE is designed to capture only DV-format video via FireWire, but allows you to export to most QuickTime formats. Final Cut Express provides professional editing functionality in a variety of styles, from strictly drag-and-drop edits to entirely keyboard-based editing.
Soon you’ll be spending plenty of time working with clips, audio levels, and other editing minutiae, so let’s start with the big picture. This chapter provides an overview of Final Cut Express features and tracks a basic FCE project from start to finish. You’ll be introduced to the main interface windows used for editing and for creating effects, plus learn how to customize the arrangement of these windows.
Here’s a roadmap you can use to chart a course through your first FCE project. This flowchart describes the production pathway of a typical DV project from hardware setup through output of the finished program. At each step, you’ll find pointers to sections in this book that describe that part of the process in more detail.
Set up hardware, install FCE, and choose an initial Easy Setup: Use a FireWire cable to connect your DV camcorder to your computer. If you hook up your hardware before you install FCE, the program will select the correct initial settings automatically. (If you’ve already installed FCE, don’t worry—those settings are easy to define at any time.)
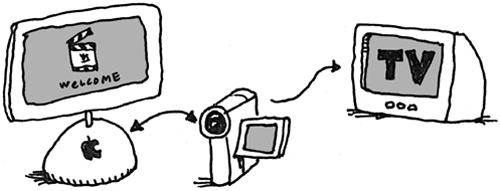
See Chapter 2, “Installing and Setting Up.”
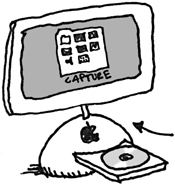
Capture DV: Use the controls in the Capture window to capture raw video and audio from your DV camcorder and save it to a hard disk.

See Chapter 5, “Capturing Video.”
Import other media elements: Add music or sound effects, or graphics elements such as digital stills or graphics created in Photoshop.
See Chapter 6, “Importing Digital Media.”
Rough assembly:Review your raw video in the Viewer and select the portions you want to use by marking In and Out points. Assemble the selected portions into a rough cut in an empty sequence in the Timeline. If your project includes narration, be sure to edit a draft narration into your rough cut. If you plan to base the rhythm of your cut on a piece of music, you should edit the music into the rough cut as well.
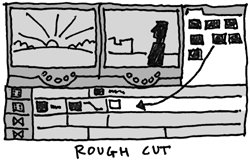
See Chapter 9, “Basic Editing.”
Fine cut: Revisit your rough cut and make fine adjustments to edit points directly in the Timeline or in the Trim Edit window or by opening sequence clips and making adjustments in the Viewer.
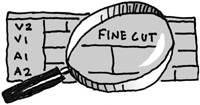
See Chapter 11, “Fine Cut: Trimming Edits.”
Finishing: When your fine cut is complete, use FCE’s text generators to add titles, apply the Color Corrector filter to tweak the video’s color balance, and fill out the audio tracks with effects and music.
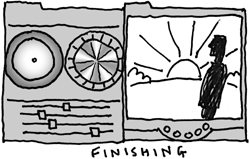
See Chapter 14, “Compositing and Effects Overview.”
Output: Output your finished program to DV tape or to a DVD-mastering program like Apple’s iDVD, or export it in a compressed QuickTime format for distribution in another digital format like streaming web video or CD-ROM.
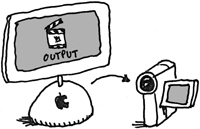
See Chapter 19, “Creating Final Output.”
Four program windows form the heart of the Final Cut Express interface: the Browser, the Viewer, the Canvas, and the Timeline (Figure 1.1).
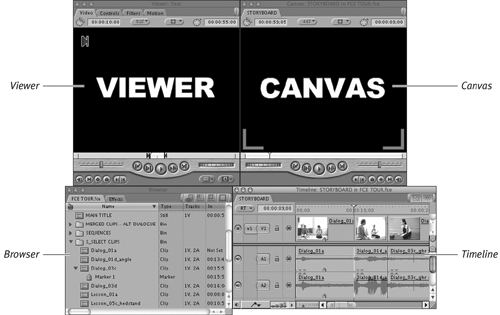
Because the program combines so many editing and effects-creation capabilities in a single application, each of these windows performs multiple functions. Final Cut Express’s elegant use of tabbed windows to stack multiple functions in a single window makes maximum use of your screen real estate.
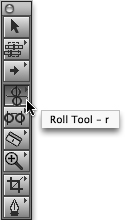
A small, floating Tool palette contains tools you can use to make selections, navigate, and perform edits in the Timeline and the Canvas.
Following are a few useful features that apply throughout the program:
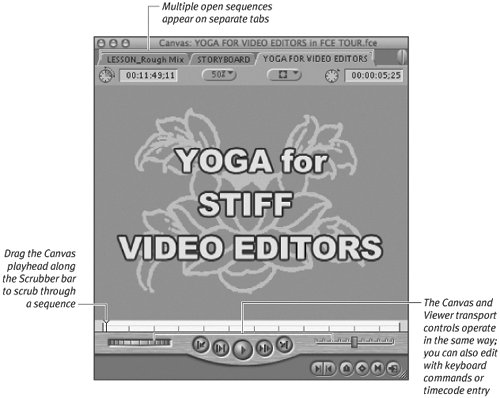
Tabbed windows: Every major window in Final Cut Express uses tabs. In the Viewer and User Preferences windows, tabs give you access to multiple functions within the window (Figure 1.2). In the Canvas, Timeline, and Browser, tabs provide access to multiple sequences or projects (Figure 1.3). You can drag a tab out of the Browser, Viewer, Canvas, or Timeline and display the tab as a separate window. You can also return a tab to its original window by dragging the tab back to the tab header of the parent window. You can find out more by reviewing “Creating Custom Screen Layouts” in Chapter 3.
Tooltips: You can use tooltips to identify most of the controls in the Viewer and Canvas windows and on the Tool palette (Figure 1.4). Tooltips also display the keyboard shortcut for a tool or button. Rest the pointer over the button and wait a moment, and a label will appear. Activate tooltips on the General tab of the User Preferences window.
Final Cut Express offers several methods for performing video editing tasks. Some people work fastest using keyboard shortcuts; others prefer to use the menu bar or shortcut menus as much as possible. Apart from the menu bar and window buttons, you can use several other means to access Final Cut Express’s functions; experiment to find out which control methods work best for you:
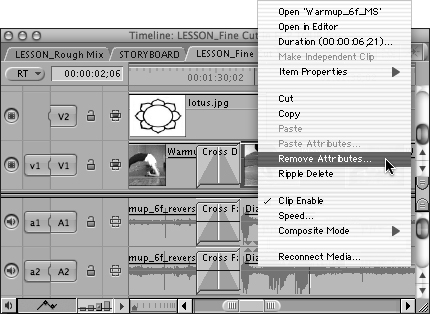
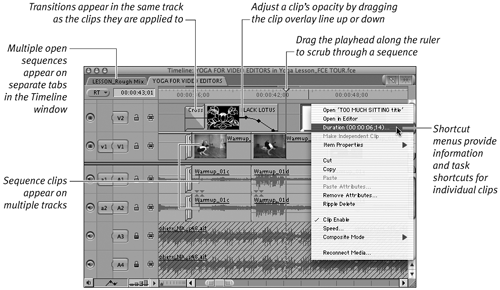
Shortcut menus: Shortcut menus can speed your work and help you learn Final Cut Express. Control-click an item in one of the four main interface windows and select from a list of common functions specific to that item (Figure 1.5). Control-click often as you learn your way around the program just to see your options in a particular area of the FCE interface.
Keyboard shortcuts: You’ll find a complete list of keyboard shortcuts in Appendix B. You may find that these shortcut keys help you work more efficiently.
Timecode entry shortcuts: Final Cut Express provides a number of timesaving shortcuts for timecode entry. See “FCE Protocol: Entering Timecode Numbers” in Chapter 8.
FCE’s flexible interface can be custom-tailored to suit your needs. You can create and save custom screen layout configurations to facilitate different editing and effects-creation tasks. Personalize and save anything from a single custom shortcut button to an entire screen layout for a multi-monitor setup.
See “Customizing Final Cut Express” in Chapter 3.
Onscreen help for FCE is a 980-page PDF file, Final Cut Express Help. The PDF has a couple of advantages over the printed manual. The PDF index entries are hyperlinked; you can jump to a listing by clicking its page number. The PDF is also illustrated in full color.
To access onscreen help:
The following brief descriptions of the features and functions of each of the four main windows are simplified summaries of the full list of features. Final Cut Express’s designers went all out to support a wide variety of editing styles, and they have produced a very flexible editing system.
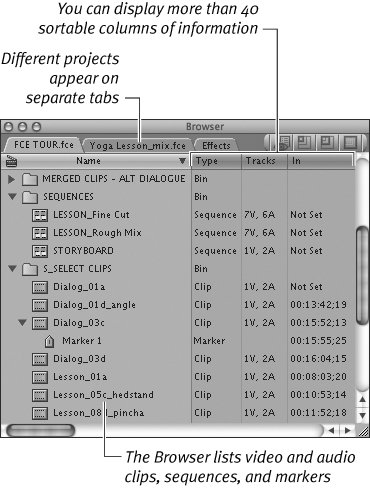
The Browser (Figure 1.6) is the window where you organize and access all the media elements used as source material for your projects. It also contains your projects’ sequences: the data files that contain edited playlists.
The Browser’s Effects tab is your source for effects, filters, and generators, including the text generator (Figure 1.7).
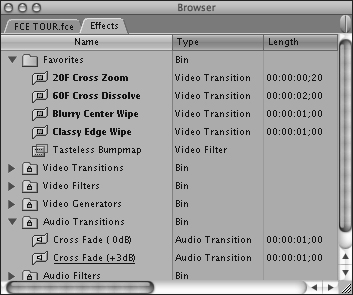
Figure 1.7. The Browser’s Effects tab displays Final Cut Express’s effects, filters, and generators, as well as your own customized effects.
The Browser is not like a folder on your computer’s Desktop—it’s not a collection of actual files. Instead, a Browser item is a pointer to a file on your hard disk. It’s important to keep in mind that file storage is independent of Browser organization. That means you can place the same clip in multiple Browser projects, and each instance of the clip will refer to the same media file on your hard drive. For detailed information about the Browser, see Chapter 7, “Organizing Clips in the Browser.”
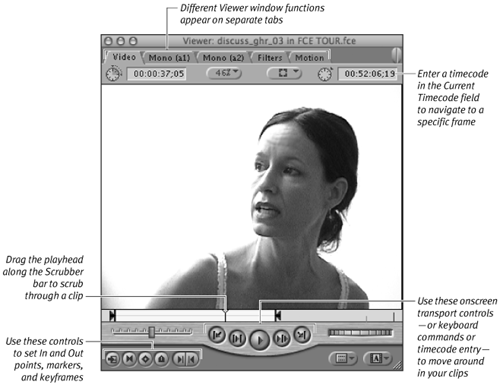
The Viewer is bursting with functions. When you’re editing, the Viewer acts as your source monitor; you can review individual video and audio clips and mark edit points. You can also load clips from the current sequence into the Viewer to refine your edits, apply effects, create titles—and, as they say, much, much more.
The FCE interface offers a stack of tabs in the Viewer that organize and display audio and video plus provide controls for any effects you want to apply to a clip. Here are quick summaries of the functions available on each tab.
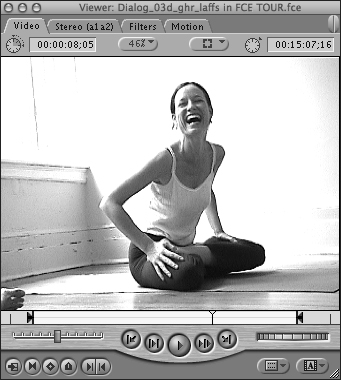
The Viewer’s Video tab
Video tab (Figure 1.8): View video frames and mark and refine edit points. This is the default playback window for a video clip.
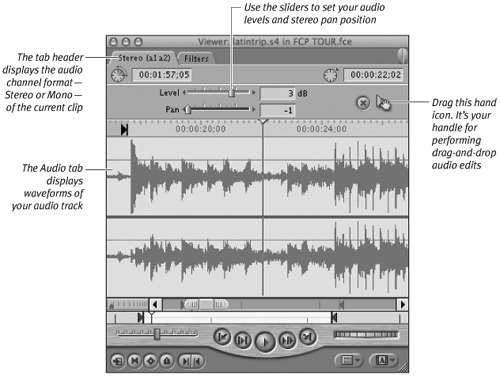
Audio tab (Figure 1.9): Audition and mark edit points in audio-only clips. Set level and pan or spread settings. The Audio tab displays the audio portion of an audio+video clip. Clips with two channels display two audio tabs.
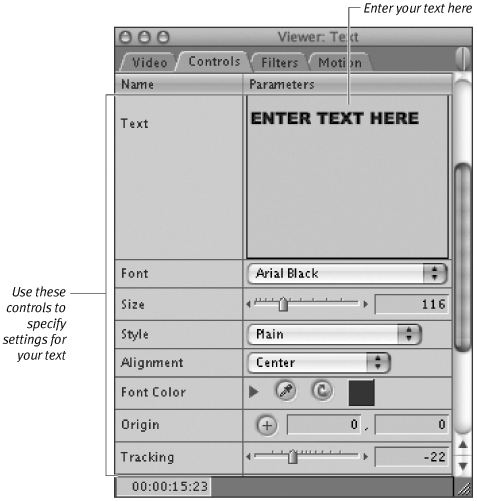
Controls tab (Figure 1.10): Adjust the settings for a generator effect, such as the text generator.
Filters tab: Adjust the settings for any filter effects you have applied to a clip.
Motion tab: Apply and modify motion effects.
Color Corrector tab: Use onscreen controls to adjust the settings for the Color Corrector filter. This tab appears only on clips with the Color Corrector filter applied.
For more information on the Viewer, see Chapter 8, “Working with Clips in the Viewer.”
To learn about creating effects, see Chapter 14, “Compositing and Effects Overview.”
The Canvas is a monitor where you view playback of your edited sequence. The Canvas and the Timeline work together; the Canvas always displays the frame at the current position of the Timeline’s playhead.
The Canvas (Figure 1.11) looks similar to the Viewer and has many of the same controls. You can use the controls in the Canvas to play sequences, mark sequence In and Out points, add sequence markers, and set keyframes.
In addition to using the Viewer-like marking controls, you can perform various types of drag-and-drop edits in the Canvas edit overlay (Figure 1.12), which appears automatically when you drag a clip into the Canvas. You can also use the Canvas’s Image+Wireframe mode to plot motion effects.
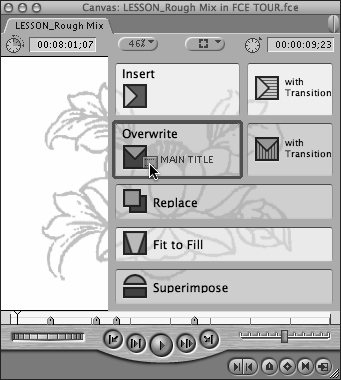
Figure 1.12. The Canvas window, with the Canvas edit overlay displayed. Drag a clip from the Viewer or Browser and drop it on the type of edit you want to perform.
For more information on the Canvas, see Chapter 10, “Editing in the Timeline and the Canvas.”
Learn about applying motion effects in Chapter 15, “Motion.”
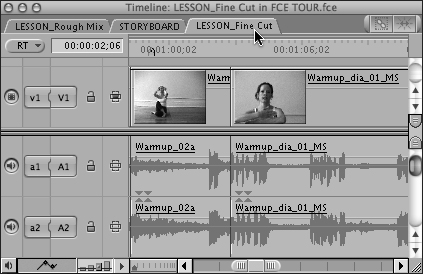
The Timeline displays your edited sequence as clips arrayed on multiple video and audio tracks along a time axis (Figure 1.13). The Canvas and Timeline are locked together; you view Timeline playback in the Canvas. If you have multiple sequences open, both the Timeline and the Canvas will display a tab for each sequence. You can edit by dragging clips directly from the Browser or the Viewer and dropping them in the Timeline; see Chapter 10, “Editing in the Timeline and the Canvas.”
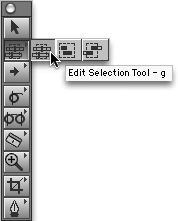
The Tool palette (Figure 1.14) contains tools for selecting and manipulating items in the Timeline, Canvas, and Viewer. For a listing of each tool, see Chapter 9, “Basic Editing.”
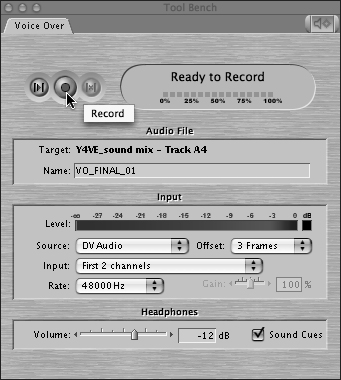
Use the Voice Over tool (Figure 1.15) to record audio inside Final Cut Express. Specify a section of your sequence in the Timeline; then record voice-over as you play. See “Recording Audio with the Voice Over Tool” in Chapter 12.
Although you perform most editing tasks in Final Cut Express’s main editing and effects windows, you’ll need to use a couple of other windows to shape your program’s input and output.
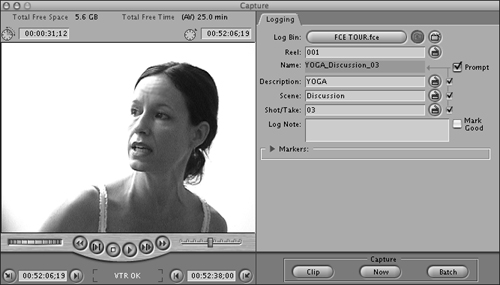
Use the Capture window (Figure 1.16) to capture video and audio media in Final Cut Express. Capture supports a range of capturing options, from live video capture on the fly to project recapture with full device control. Capture functions are explained in detail in Chapter 5, “Capturing Video.”
Use Print to Video to output a Final Cut Express sequence or clip to videotape. The Print to Video function lets you configure pre- and post-program elements such as color bars and a 1-kHz tone, leader, slate, and countdown. Print to Video’s loop feature allows you to print your sequence multiple times automatically.
For more information on the Print to Video window, see Chapter 19, “Creating Final Output.”
Final Cut Express’s media handling is based on Apple’s QuickTime, and that means you have a lot of import and export format options. If QuickTime can handle it, so can Final Cut Express.
You can import QuickTime-compatible media files into a Final Cut Express project.
You can import an iMovie project and convert it into an FCE project.
You can import audio directly from a CD.
You can import still images in a full range of formats.
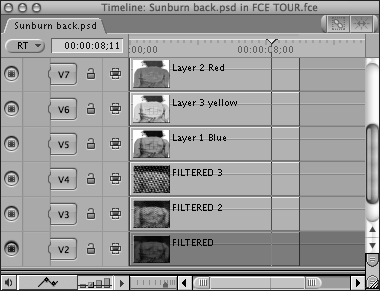
You can import a layered Adobe Photoshop file (Figure 1.17). Final Cut Express preserves the layers, importing the file as a sequence. Each layer in Photoshop corresponds to a video track in the sequence.
You can export clips, sequences, or portions of either as QuickTime movies or in a variety of image and sound formats, including export to iDVD.
Final Cut Express HD ships with a suite of two special-purpose applications. Each application is independent, but has been designed to work closely with the program.
This book’s coverage of LiveType and Soundtrack is limited to importing and exporting material between these applications and FCE. Individual PDF manuals are available from the Help menu of each application.