
Chapter 2. Organizing and Editing Records
With all its advanced database options—like Find mode in this chapter and the relational database features covered in the later parts of this book—FileMaker is a pretty good deal for $279. But you’re getting way more for your money than a powerhouse database program. FileMaker has many of the capabilities of a basic word processor built right in, so you can unleash your creative text-formatting urges using tools that look and feel quite familiar. What you can do with FileMaker is limited only by your imagination and willingness to plunge into a few dialog boxes.
Once you have even a few records entered into your database, clicking through them all whenever you want to make changes gets cumbersome. This chapter shows you how to pull up the records you want to work with. Then once you’ve got ‘em, the real fun begins. You’ll find out all the ways you can format text in File-Maker to get just the right look for your project, and how to print it out on paper.
Views
In the Contact Management database example, you learned how to add to and edit your new database with only one record onscreen at a time (Section 1.5.3). This view is a common way to look at your information, but it’s far from the only way. In fact, there are three possible ways to look at a database: Form view, List view, and Table view.
The one-at-a-time approach to viewing records you saw in Chapter 1 is called Form view. In List view, you see lots of records in, well, a list. If they don’t all fit in the window, you can use the vertical bar to scroll through them. If you’ve used a spreadsheet program like Microsoft Excel, the Table view will look familiar—it looks a lot like a spreadsheet, with one row for each record and one column for each field.
To switch among views in any FileMaker database, use the View menu. Choose View → As Form, View → As List, or View → As Table. Figure 2-1 shows the same database in all three views.

Note
When you design a database, you can add clickable buttons, tabs, or other handy means to switch among views. For example, the Contact Management database you used in Chapter 1 has View tabs built into the template (see Figure 1-5). You can even turn off certain views if you want. If your database holds mostly digital photographs and makes no sense in Table view, then you can make sure no one ever sees it that way. (You’ll learn how in Chapter 5.)
Form View
In Form view, you see only one record at a time. If you want to see the next record, you must click the pages of the Book icon, press Control-down arrow, or use some other method of switching records (see Section 1.6.1). Most of the database work you’ve done so far has been in Form view. You might use Form view when you have a lot of information to see about one record, or if you want to focus on just one record without being distracted by all the other records.
List View
List view works almost exactly like Form view. It shows your layout complete with its pretty design, but instead of limiting you to one record at a time, it shows you multiple records in a scrolling list. It also adds another element of feedback to the status area, as shown in Figure 2-2.
When you’re working with a group of records—updating one field in several records or browsing through all your records in search of something—List view comes in handy.
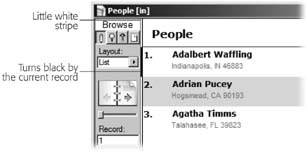
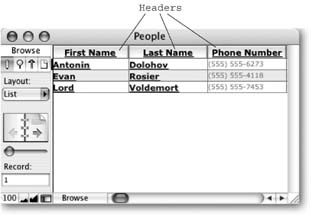
Table View
If List view looks a lot like Form view, then Table view…well…doesn’t. This view appeals to spreadsheet fans since it offers a consistent rows-and-columns design, the ability to sort with the click of a button, and the freedom to rearrange columns by dragging them around. Of course, like any self-respecting view, you can use Table view to add, edit, delete, and find records too.
When you put your layout into Table view, any graphical embellishments disappear. Instead, FileMaker displays the fields of your layout in a no-nonsense, spreadsheet arrangement (Figure 2-3).
Each column represents one of your fields, and the order of the columns matches the order you go through the fields when tabbing. For example, the first column is the field you wind up in if you press Tab for the first time. Another Tab takes you to the second column.
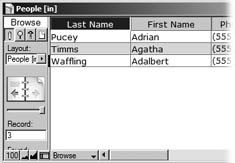
In Table view, you can move columns around by dragging them. To switch the First Name and Last Name columns, for example, do the following:
Point to the words Last Name and hold down the mouse button.
FileMaker darkens the column header to show you it’s selected.
Drag the column to the left of the First Name column.
You see a black line extending from the top of the window to the bottom. This line shows you where the column will land when you let go. All the other columns will shift around to make room. In this case, you want the black line to appear to the left of the First Name column.
Let go of the mouse button.
FileMaker moves the Last Name column to its new home, swapping the columns.
The column headings also make it easy to sort your data, as shown in Figure 2-4.
Advanced Find Mode
In Chapter 1 you learned about using Find mode for simple searches—but you only scratched the surface. The more records you have in your database, the more you’ll need advanced finding techniques to avoid wasting precious minutes clicking the Book icon 1,057 times in a row just to find the record or records you want to display, edit, or print. FileMaker’s Find tools give you the power to track down the one record in 100,000 you need right this minute, or the five records with missing phone numbers that you created a week ago Tuesday.
Finding by Omitting
If you know what you don’t want better than what you do want, you can use the Omit checkbox. This feature comes in handy when the records you’re looking for can best be described by what they aren’t. For example, “every person who isn’t from California” is a lot easier to say than “everyone from Alabama, Alaska, Arizona, Arkansas, Colorado…” In this case, you can get what you want by creating one find request, with California in the State field. Then, before you perform the find, simply turn on the Omit checkbox, which appears in the status area only when you’re in Find mode (Figure 2-5). That’s all there is to it. FileMaker starts with every record in the found set, then throws out all the records with “California” in the State field, so you’re left with everything else.
Omit also works with multiple find requests (see the box on Section 2.2.1.3). If all your requests have the Omit option set, then all the records that match any of your requests are thrown out. Whatever’s left over goes in your found set. If you have a mix of requests with and without Omit set, FileMaker first finds all the records that match your normal requests. It then discards any that match an Omit request. You’re finally left with a found set in which every record matches at least one of your requests, and doesn’t match any of your Omit requests.
Constraining and Extending the Found Set
When you perform a find normally, it effectively throws away any found set you had before, searches through all the records in the database, and produces a new found set. But you can also tell FileMaker to constrain the found set (that is, search within your last find results) or extend it (add matching records to the current found set).
Constraining the found set
Suppose you’ve just created a great product, and want to send out some free samples to see how people like it. You can’t afford the postage to send everyone in your database a sample, so you decide to start with a smaller sampling—just people named Smith.

Problem is, your database has hundreds of Smiths. Some quick math in your head reveals that it’s still too expensive. How about sending samples to just the Smiths in California? You could go back to Find mode and construct a request to find this criteria instead (by putting Smith in the First Name field and California in the State field), but there’s an easier way. After all, you’ve already got all the Smiths in your found set. What you really want to do is search inside this found set for all the records with California in the State field.
Here’s how the procedure goes:
Switch to Find mode, type Smith in the Last Name field, and then press Enter.
FileMaker searches the database and, in Browse mode, shows you the records with Smith for the last name. You glance at the status area—678 records! You now need to search through these records for the ones whose state is California. That’s exactly what the Constrain Found Set command does.
Immediately switch to Find mode again using any of the methods described on Section 1.6.3 .
In other words, don’t choose Records → Show All Records, and don’t do anything to tamper with the current found set (678 records, in this example). You’re now in Find mode again, ready to enter a request.
Type California in the State field.
Since the found set already has only Smiths in it, there’s no need to repeat that information.
Choose Requests → Constrain Found Set.
FileMaker searches out the people from California, but this time it only looks in the current found set. In the end, you get what you want with less typing.
Warning
Once you’re in Find mode, FileMaker is itching for you to perform a find. If you just press Enter, it assumes you want to throw away your last found set and make a new one. Once it’s gone, there’s no way to return to the old found set and constrain or extend it. Likewise, if you accidentally choose the wrong command from the Requests menu, there’s no going back. If you want to constrain or extend, be sure you choose wisely or you’ll have to start all over again.
Extending the found set
Extending the found set works similarly. This time, though, you’re asking FileMaker to perform a new find (through all records in the database) and then add the records it finds into your found set. What you end up with is all the records you already had, plus any new ones that were found. Suppose you’ve already found the Smiths, and you want all the Johnsons as well.
In Find mode, type Johnson in the Last Name field.
So far, you’re doing exactly what you would in every other find. You just have all the Smiths in your found set, even though you can’t see that in Find mode.
Choose Requests → Extend Found Set.
This time, FileMaker looks through every record in the database for any Johnsons. Each time it finds one, it adds it to your existing found set. When it’s done, you have all the Smiths and Johnsons in one found set.
Refining Searches with Find Symbols
Normally, FileMaker uses a pretty simple rule to decide whether a field value matches the field in your request (the criteria): If every word in the criteria appears at the beginning of any word in the field, FileMaker considers it a match.
For example, if you put “for” in the Note field in a find request, any of these notes would match:
All for one and one for all.
We will forever remember.
Back and forth it went.
On the other hand, neither of these would match:
Wherefore art thou, Romeo?
Before there was art, there was an artist.
How do you tell FileMaker that you’re looking for “for” wherever it appears in a word, not just at the beginning? You can use a special symbol—a character that has special meaning in a Find request—to stand for part of a word.
The Symbol pop-up menu, which appears in the status area when you’re in Find mode, lets you add these special characters to your searches, thus gaining more control over FileMaker’s decision-making process when it’s looking for records. There are plenty more special symbols, and each is described below.
The Wildcard (*)
In the “Wherefore art thou Romeo” example, you would use the * wildcard symbol, which stands for “anything.” It tells FileMaker that you don’t mind if there’s something right before or right after the “for.” If you type *for* as your find criteria, FileMaker will display records that contain “wherefore,” “before,” “George Foreman,” and so on.
Less Than (<), Less Than or Equal To (≤), Greater Than (>), and Greater Than or Equal To (≥)
These symbols tell FileMaker to use your criteria as a maximum or minimum rather than a direct match. For example, the criteria <David will find every person whose name comes before David alphabetically. ≤David is just about the same, but it will include any Davids as well.
Note
In Mac OS X, the Less Than or Equal To symbol shows up as ≤, but on Windows, it shows up as <= instead. You can type the ≤ symbol on Mac OS X (hold down the Option key and press the comma key) but it works just as well to type <= as you would on Windows. The same thing goes for the Greater Than or Equal To symbol, which you can type as >=.
These symbols are smart enough to understand different kinds of information. <10 in a field that expects numbers will find real numbers less than 10 (like 9). FileMaker performs the correct function with dates and times as well, in which case Less Than means before and Greater Than means after.
Exact Match (=), Literal Text (“”), and Field Content Match (==)
The rule FileMaker uses automatically for determining a match is pretty loose. But sometimes you want exactly what you say: “Smith,” not “Smithers” or “Smithey” or “Smithsonian.” In this case, use the Exact Match symbol (=). In this example, type =Smith in the Last Name field, and perform your find.
If you want to exactly match more than one word, put the words in quotes instead. This Literal Text match is also good for criteria that contain punctuation, like “Mr. Smith.”
Note
Like French fries, quotes come in two varieties: curly and straight. If you’re someone who notices this kind of thing, you may wonder if it matters which kind you use. It doesn’t. Usually FileMaker turns your quotes curly for you, but you can turn off smart quotes for a database in the File → File Options dialog box.
For the ultimate in specificity, use the Field Content Match symbol (==) instead. Exact Match requires that each word in your criteria match one or more words in the field. Literal Text only seeks to match whatever is in the quotes anywhere in the field. Field Content Match insists that the entire field matches the criteria text exactly. For example, =Smith matches “Smith,” “Mr. Smith,” and “Smith-Johnson.” On the other hand, ==Smith matches only “Smith” in the field and nothing else.
Range (…)
The Range symbol is like the Greater Than or Equal To and Less Than or Equal To symbols combined. The criteria “David…Michael” matches everyone from David to Michael, alphabetically speaking. Just like the other symbols, the Range symbol is smart enough to understand numbers, dates, and times, as long as the field expects them. (You’ll learn more about field types in the next chapter.)
Duplicates (!)
The Duplicates symbol (!) can be hard to get the hang of. When you put ! in a field in Find mode, FileMaker finds records with duplicate data in that field. In other words, it looks for records with the same value in that particular field. The same as what you ask? The same as any other record. Think of it this way: If you have only one person in your database from Idaho, and you perform a find with ! in the State field, the person from Idaho won’t appear. That’s because—when considering the State field alone—the person from Idaho has no duplicates. On the other hand, if you have 11 people from Oklahoma, they’ll all be found because they all have duplicates (each one has 10 others just like it, statewise).
Unlike most other symbols, the ! symbol is always used alone in a field in Find mode. You would never put ! Smith in the last name field. Instead, you’d just put ! all by itself.
Today’s Date (//) and Invalid Date or Time (?)
Like the ! symbol, these symbols can go in a field in Find mode all by themselves. The double slash is convenient shorthand for the current date. If you’re looking for all the payments due today, you can type // in the Due field more quickly than “September 15, 2005.”
The Invalid Date or Time symbol (?) is another helper when it comes time to clean house. It’s possible to end up with the wrong kind of data in fields that are supposed to hold dates or times (like “N/A,” “Never,” or “Next Week”). Put ? in the Due field, and FileMaker finds every payment whose date is not valid, giving you an opportunity to fix them. (You’ll learn more about fields that hold special kinds of data in Chapter 3.)
One Character (@), One Digit (#), and Zero or More Characters (*)
These symbols are like the wildcard characters you sometimes see in other programs. You already saw the Zero or More Characters symbol (*) at the beginning of this section. It simply tells FileMaker you’re willing to accept some text—any text—in place of the * symbol. If you’re not ready to go that far, you can instead permit just one character (letter, number, or punctuation) with the One Character (@) symbol. When matching numbers, you can be even more specific, permitting just one numerical digit with the One Digit (#) symbol. Here are a few examples:
*smith* matches “Smith,” “blacksmith,” “Smithsonian,” and “blacksmiths”
*smith matches “Smith” and “blacksmith,” but not “blacksmiths” or “Smithsonian”
smith@ matches “smithy” but not “smithers”
@*smith matches “blacksmith” but not “Smith” or “blacksmiths”
smith# matches “smith1” and “smith2” but not “smithy”
Relaxed Search (~)
The last symbol, called Relaxed Search (~), only applies to searching Japanese language text. It instructs FileMaker to consider characters to match if they make the same sound, even if they aren’t exactly the same character. Alas, in English, spelling always counts (you can’t expect “~korn” to match “corn”).
Refining a Found Set with Omit Commands
FileMaker provides a few menu commands to help you fine-tune your found set. Sometimes, after you’ve done the best find request you can, you still end up with a couple of records in the found set that you don’t really want to see. FileMaker offers three commands that make tossing out misfit records as easy as pie.
Omit Record
Go to the record you don’t want (using the Book icon, for example) and choose Records → Omit Record. This one-off command tosses the record out of the found set, reducing your found count by one. Don’t confuse it with the Omit checkbox that shows up in the Status bar when you’re in Find mode (Section 2.2.1), which tells FileMaker to omit all the records that match your find request. The Records → Omit Record command just omits the single record you’re sitting on.
Omit Multiple
If you have a whole stretch of records you don’t want, use Records → Omit Multiple. It omits a contiguous group of records from the found set, starting with the current record. For instance, if you want to omit ten records in a row, navigate to the first record of the ten. Then choose Records → Omit Multiple and type 10 in the dialog box that appears. Click Omit and the job is done.
Show Omitted Only
You might use this option when you’re printing two separate lists—one of the California customers, and one of everyone else, for example. Once you’ve printed the California records, your found set happens to be exactly what you don’t need. Choose Records → Show Omitted Only. This command effectively puts every record that’s not in the found set into the new found set, and takes every currently found record out.
Here’s how it works: Perform a find for the customers who have “CA” in the State field. FileMaker produces a found set of all California records for you, ready to print. After printing, choose Records → Show Omitted Only.
Now you have everyone not in California in your found set, and you’re ready to print again.
If you try to omit more records than possible (for example, you’re on the third-to-last record and you ask FileMaker to omit 12 records), FileMaker will complain with this message. But don’t take offense: It’s also nice enough to fix the problem for you. When you click OK, FileMaker returns you to the Omit dialog box and changes the number you entered to the maximum number possible. You only need to click Omit again to get what you probably wanted in the first place.
If you’re looking at a record, and you know you want to omit it and every record after it, you might be tempted to look at the Record Number and the Found Count to figure out how many need to be omitted. But that’s more trouble than it’s worth. Just choose Records → Omit Multiple and enter something really big, like 999, or 9999999. When you click Omit, FileMaker will complain, do the math for you, and enter the right value.
This routine may sound contrived, but it’s actually not all that uncommon among FileMaker pros. Imagine you’re doing a direct-mail campaign and you can only afford to send 1200 post cards. Your find request, however, produces 1931 potential recipients. Rather than do the math, just go to record 1201 and use this Omit Multiple trick.

Changing Multiple Records
Sometimes the whole reason you performed a find is to change something in several records. If one of the companies you work with changes its name, you may have several records that need to be updated. The first step to fixing them is to find them. Once your found set includes the people at that company, you could change the Company Name field one record at a time (especially if you’re billing by the hour). But a better use of your time is to use the Replace Field Contents command. Here’s how it works:
Click in the Company Name field (it doesn’t matter which record), and correct the company name.
You’ve just fixed one of the records. All the others in the found set need the same fix.
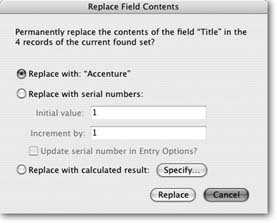
Choose Records → Replace Field Contents
The Replace Field Contents dialog box appears (Figure 2-6). It has a handful of options that may not make sense to you yet. That’s OK; just choose the first one: “Replace with.” The new data you just typed is listed beside this option.
Figure 2-6. The Replace Field Contents dialog box has three options: “Replace with,” “Replace with serial numbers,” and “Replace with calculated result.” The first option is the only one you’re concerned with right now. It replaces the contents of the current field in every record in the found set with whatever is in the current record when you click Replace. (You’ll learn about serial numbers in Chapter 3 and calculations in Chapter 9.)Click Replace
FileMaker now updates the Company Name field in every record in the found set to match what you typed in the current record. When it’s done, you’re still sitting on the same record, but if you use the Book icon to click through the records, you’ll see that they’ve all been changed.
Sorting Records
Your Rolodex may be limited to an alphabetical (by last name) arrangement, but a FileMaker database has no such limitation. You can sort the records in any order you want, as often as you want. You can even do a sort-within-a-sort, as you’ll see later in this section.
The process always begins the same way: Choose Records → Sort Records. You’ll see the Sort Records dialog box shown in Figure 2-7.
The Sort Records window lists all fields in your current layout on the left. Use the pop-up menu at the top of the list to switch to a list of all the fields in the table that are tied to the current layout. See Section 7.3.5.7 for details on tables and layouts. You tell FileMaker what to sort by moving the field to the list on the right. For example, if you’re in need of a short-term loan, you may find it useful to sort your contacts by annual income, so you’d start by clicking the annual income field.

The steps below, though, show a more common example—sorting by Last Name:
Choose Records → Sort or press Ctrl+S (⌘-S).
The Sort Records dialog box (Figure 2-7) appears.
Select the Last Name field from the list on the left, and then click Move.
The field name appears in the Sort Order list on the right. You can save a little mouse-mileage by double-clicking a field on the left instead of selecting it, then clicking Move.
Click Sort.
FileMaker sorts the records in the traditional alphabetical-by-last-name order. You can tell by flipping through the records or switching to Table view.
Each sort field has an order associated with it as well. Right now, you only need to worry about two of these orders: “Ascending order” and “Descending order.” You can click one of these radio buttons before you click Move and the field will have the setting by the time it makes it to the Sort Order list. More often than not, though, you’ll move the field over before you think about the order. In this case, just click select the field from the Sort Order list and then pick the order. Each field in the Sort Order list shows a little bar-chart icon representing the order assigned to it, which matches the icons next to each radio button.
Tip
If you change your mind about one of the fields in the Sort Order list, click it. The Move button changes to say Clear, and a click removes the selected field from the list. If you want to remove every field from the Sort Order list, click Clear All.
When you’re all done, click Sort. If you change your mind, click Cancel instead and FileMaker will forget everything you’ve done while in this window. Otherwise, the next time you choose the Sort Records command, the dialog box will show the same settings you used most recently.
The status area lets you know if your records are sorted (no surprise there). Below the Record Count, it says “Sorted” if you’ve done a sort, and “Unsorted” otherwise. (See the box on Section 2.5 to learn what “Semi-sorted” means.)
Multiple Sort Fields
FileMaker lets you pick more than one field to sort by, which comes in handy when you have lots of records with the same data in some fields. For example, if your People database gets really big, you might have several people with the same last name. If you just sort by last name, there’s no telling in which order the like-named people will fall. In this case, it would help to sort by last name and first name.
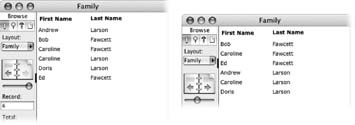
When you use more than one sort field, the order the fields appear in the Sort Order list is important, because it determines which field FileMaker uses first. If you sort a list of family members by First Name, then Last Name, you might wind up records ordered like those shown at left in Figure 2-8.
If you sort by Last Name, then First Name, you’ll get something like the window shown at right instead. In the first example, FileMaker sorts everything by First Name. When two people have the same first name, it then uses Last Name to figure out what order those two should be in. In the second example, the records are first sorted by Last Name instead. First Name is then used to figure out how to sort the folks with the same last name.
Since the order of the sort fields is so important, FileMaker provides a convenient way to shuffle them around in the Sort Records dialog box after you’ve added them to the Sort Order list. Figure 2-9 sheds some light on how it works.
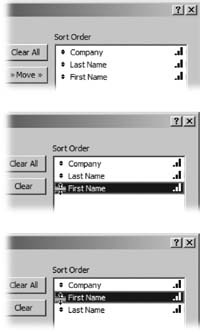
If you do a multi-field sort and then discover you didn’t get quite what you expected (because you had the fields in the wrong order), just choose Records → Sort Records again, move the fields in the Sort Order list to the right places, and then click Sort.
Editing What’s in Your Fields
Once you’ve found the records you want to work on, it’s time to learn timesaving and creative ways to revise and format your record text. FileMaker fields are a lot more capable than the little fields you’re used to from dialog boxes. Each field is like a mini–word processor, with features that you’re familiar with if you’ve ever written a letter on a computer. Of course you can do basic things like select text, and cut, copy, and paste. There’s even a Find and Replace feature and flexible text formatting powers. Read on to find out what you can do.
Find and Replace
Like your word processor, FileMaker has a Find and Replace feature. And also as in your word processor, you can (and should) use Find and Replace tools as often as possible to automate your editing process and eliminate retyping.
Suppose one of your clients is called Anderson Consulting. For one reason or another, they decide to change their name to Accenture. Unfortunately, you have 27 folks in your database with the old name. You could look through your records one by one and fix them yourself, but you’re never going to become a database guru that way. Instead, do a Find/Replace operation.
FileMaker fields can hold a lot of information, and it’s not at all uncommon to put things like letters, emails, product descriptions, and other potentially long documents into a field. In cases like this, the Find/Replace command is just as useful as it is in your word processing program.
Since FileMaker has fields and records to worry about, though, its Find/Replace dialog box is a little more complicated that what you may be familiar with. Luckily, the concepts are simple, as shown in Figure 2-10. The Find/Replace dialog box lets you search a field, a record, or all records for a little snippet of text. It can also replace every occurrence of that text with something new—either one at a time, or all at once.
Note
Don’t confuse Find/Replace with Find mode. Find/Replace is for finding text in one or more fields and one or more records. Find mode is for finding records. You’ll probably use Find mode much more often than Find/Replace. For the full story, see the box on Section 2.5.1.
Here’s FileMaker’s version of Find and Replace:
Choose Edit → Find/Replace → Find/Replace.
The Find/Replace dialog box opens, as shown in Figure 2-10.
In the lower-left corner of the dialog box, turn on “Match case” and/or “Match whole words only” to tell FileMaker how you want it to match the text you’re looking for.
Turning on “Match case” ensures that FileMaker looks for an exact uppercase and lowercase match. For example, when “Match case” is turned on, “Kite” and “kite” don’t come up as a match.
If you turn on “Match whole words only,” FileMaker eliminates partial word matches. For example, “Drag” matches “Drag” and not “Dragon.”
Figure 2-10. In FileMaker, you use the same dialog box both to find text and to find and replace text. If you aren’t replacing anything, don’t click any of the Replace buttons. The text you’re looking for goes in the “Find what” text box. If you’re replacing it with something new, type that text in the “Replace with” text box. (If you want to replace some text with nothing, making it go away, leave the “Replace with” box empty.)Under “Search across,” select either “All records” or “Current record.”
You’ve just told FileMaker whether you want it to look through all the records in the found set, or only the record you’re currently on. In a case like the Anderson/Accenture example, choose “All records.”
Under “Search within,” select either “All fields” or “Current field.”
“Current field” refers to the field you were editing when you opened the Find/ Replace dialog box. If you weren’t editing one, FileMaker will let you pick Current field, but when you try to find, it will complain with an error message. You’re allowed to select any combination of Search across and Search within. Here’s how that shakes out:
All records and All fields. FileMaker looks through every field in the window for a match. When it’s done, it moves on to the next record.
Current record and All fields. FileMaker looks through every field in the window, then tells you it’s finished.
Current record and Current field. FileMaker looks only in the current field. When it reaches the end of the text in that field, it stops.
All records and Current field. FileMaker looks through the current field, then moves to the next record. It keeps looking through records for more matches, but it pays attention only to the current field.
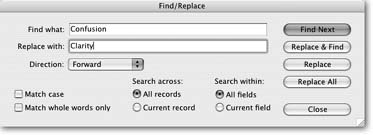
From the Direction pop-up menu, choose Forward, Backward, or All.
The Direction pop-up menu controls which way FileMaker goes when it starts its search. To figure out what that means, imagine there’s a long string running through your database. One end is tied to the first letter of the first field of the first record. The other end is tied to the last letter of the last field of the last record. This concept is pictured in Figure 2-11.
Forward. FileMaker starts looking at your current spot on the string, and moves forward (towards the end of the string). When it gets to the end, it beeps.
Backward. FileMaker starts looking at your current spot on the string, and moves backward (towards the beginning of the string). When it gets to the beginning, it beeps.
All. FileMaker starts off just like a Forward search. When it reaches the end of the string, instead of beeping, it skips to the start of the string and keeps looking. It finally beeps and stops when it gets back where it started.
Now that you’re through setting all your Find/Replace options, it’s time to decide which button to click:
Click either Find Next, Replace & Find, or Replace All.
Find Next starts FileMaker looking. When it finds a match, it highlights it right in the field. The Find/Replace window doesn’t go away yet, though. This way, you can click Find Next as many times as necessary to find what you’re looking for, then click Replace to change it to your replacement text. Click Find Next again to go to the next match.
If you feel the need to work more quickly—say you’ve done Find Next and Replace a couple times and everything looks in order—click Replace & Find instead. It replaces the current match, and then finds the next one all in one step. Repeat as many times as necessary.
Finally, if you’re sure you want every match replaced, click Replace All, and FileMaker will do the entire find-replace-find-replace dance for you. FileMaker always asks you if you’re sure about Replace All first, just in case. For instance, if you have some clients whose last name is Anderson and others whose company name is Anderson, you may not want to use the Replace All option. You’ll need to check each occurrence individually to make sure you don’t accidentally change someone’s last name to Accenture.
>When you’re done with the Find/Replace window, just click Close.
Fields for Lots of Text
Click in the Notes field in the Contact Management database. Notice that when you do, a scroll bar appears on the right side of the field. If you type lots of notes, you’ll be able to scroll through them. FileMaker fields can hold a lot of text. Technically, each field is limited to two gigabytes of data per record, which is a fancy way of saying “way more than you’ll ever need.” (When you design a database, you get to decide which fields have scroll bars, as discussed on Section 4.4.7.2.)
You can enter text into a field in all the usual ways, like typing on your keyboard or pasting text you copied from another field or another program. You can also select text in one field and drag it into another. (In Mac OS X, in fact, you can drag text into a field from any other program.)
Note
Even if a field doesn’t have scroll bars, you can still add lots of text. In this case, FileMaker just makes the field grow to hold whatever you type. When you leave the field, it shrinks back to its normal size, hiding anything that goes outside the edges. Don’t worry, though, the text reappears when you click back into the field.
Drag and Drop Editing
In addition to copying and pasting, you can drag text from one place to another. But first, you have to turn it on in FileMaker’s preferences, like so:
Now that dragging is turned on, here’s how it works:
Make a new record (Records → New Record).
Now you’ve got a nice clean work surface.
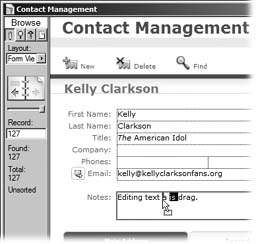
Type Editing text a is drag into the Notes field.
Yes, it says “text a is.” Type the mistake and all. Next you’ll drag to fix it.
Double-click the word “is.”
The word is highlighted to let you know it’s selected.
Drag the selected word over between "text” and “a.”
Figuring out where dragged text is going to land can be tricky. If you look closely, you’ll see that in addition to the text you’re dragging, a little vertical line moves along under your arrow. You can see this in action in Figure 2-12.
Figure 2-12. When you turn on “Allow drag and drop text selection” in Preferences, FileMaker lets you drag selected text around with the mouse. Here, the word “is” is being moved after “text” by dragging. The little vertical line under the arrow shows you exactly where the text will go when you drop it.You’ll probably have to fix the spaces between words. Unlike most word processors, FileMaker isn’t smart enough to figure out where they go for you.
Note
You can also drag text from one field to another. Instead of moving the text, FileMaker copies it. In other words, once you let go of the mouse button, the text will be both where it started and where you dropped it. If you want this behavior when dragging within a field, hold down the Alt (Option) key while you drag.
Text Formatting
Just like a word processor, FileMaker has commands to set the Font, Size, and Style of the text in a field. (Figure 2-13 shows a field with formatted text.) This feature comes in handy for many reasons. For instance, imagine you have some really important information about a customer (“NEVER PAYS HIS BILL”) that you want to keep in the Notes field. To make sure it gets noticed, you can make it big, bold, and red. You can even use one of those fancy frilly fonts just to keep things interesting.
The formatting commands for font, font size, and type style are in the Format menu. But before you change anything, you’ll notice that all FileMaker fields come with a preset (and pretty boring) standard formatting. (Part 2 of this book explains how you can change this automatic formatting.) Each of the formatting commands covered in this section lets you override the standard formatting for a field on a record-by-record basis.
Warning
Consider (and remember) the full implications of the paragraph above: All of the techniques described in the rest of this chapter pertain only to editing and formatting individual records. If you would like to change a field’s formatting across the board, you need to make that change to your databases layout. For example, you might want all last names in your database to appear in boldface letters, or put a box around everyone’s phone number. You’ll learn how in Part 2 of this book.
Font
FileMaker lets you pick from all the fonts you have on your computer (see More Fonts on Windows if you don’t believe it). Using a font is a breeze if you’re one of those FileMaker users who’s heard of a computer. Just select the text you want to change, then choose the font you want from the Format → Font menu. (If you’re the type who plans ahead, you can also choose a font before you start typing.)
Size
Changing the size of text is equally easy. Like changing fonts, you simply select the text and pick a size, in points, from the Format → Size menu. (Again, you can pick the size before you type if that’s your thing.) The Format → Size menu only lists a few standard sizes. If you need a size that’s not listed, just choose Format → Size → Custom and FileMaker will let you enter any point size from one to 500. (See Section 4.4.6.3 for more detail on font sizing.)
Immediately after Custom, one last size is listed. This one isn’t separated from the rest just to be cute—it shows the last custom size you used. If you prefer 11 point, you only need to visit the Custom command once.
Once you’ve made the change, 11 will be listed at the bottom of the menu…until you decide that 13-point type is your new favorite, that is.
On Windows, the Font menu may not show the fonts you want—it normally only shows a few (on Mac OS X, the Font menu always displays all your fonts). To get to the rest, choose Format → Font → Configure/More Fonts to show the Configure Font Menu dialog box. Once here, you can do three things: Pick fonts that don’t show in the menu, control which fonts do show in the menu, and change how they display.
The Available Fonts list shows every font installed on your computer. If you want to choose a font that isn’t in the Font menu, select it from the Available Fonts list and click Apply. Unlike every other Apply button you’ve ever seen, this one applies the new font selection and dismisses the window.
To add a font to the Font menu, select it from the Available Fonts list and click Move to add it to the Appear in Menu list. If you want the menu to show every possible font, click Move All instead. When you select a font from the Appear in Menu list, the Move button changes to Clear, and a click removes the font from the list. As usual, you can double-click font names to mimic the Move or Clear buttons.
FileMaker can show fonts in the menu in their own typeface. For instance, the words “Times New Roman” will actually be in Times New Roman in the menu. If you don’t want this behavior, turn off Show Fonts in Typeface. This setting also affects the display of fonts in the Appear in Menu list right in this dialog box.
When you’re finished configuring, click OK. Your selected text won’t be changed, but the font menu will now list the fonts you put in the Appear in Menu list. If you want to change the font of the selected text at the same time, select the font and click Apply instead.

Style
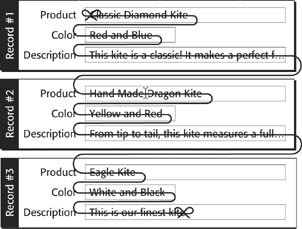
Using styles is a snap. Pick the style from the Format → Style menu and start typing, or select some text and apply a style. In addition to the industry-standard Bold, Italic, and Underline styles, FileMaker adds a few less common options to the mix. Except where noted here, you can mix-and-match styles to your heart’s content (see the Notes field in Figure 2-12).
Word Underline underlines each word, but not the space(s) between them. Double Underline puts two lines under your text. Each of the Underline styles is mutually exclusive, meaning you can’t have text that’s double underlined and word underlined.
Condense squishes the text together so it takes up less space. Extend does just the opposite, putting a little extra space between each letter. Since these choices are opposites, you can’t use both at the same time.
Strike Thru draws a line right thru…uh, through the middle of each line of text. Use it when you want something to look like it’s been crossed out—perhaps you have some data in the Notes field that no longer applies, but you want it there anyway in case it’s important later.
Small Caps replaces all the lower-case letters in your text with uppercase letters in a slightly smaller size, for an effect like you often see on fancy lawyer’s stationery or wedding invitations.
Uppercase, Lowercase, and Title Case are handy for those times when you’ve already typed text and later realize that you capitalized it incorrectly. Maybe your Caps Lock key got stuck halfway through someone’s name, or you realize that you forgot to capitalize every word of a street address. You can use these commands to repair the damage. Uppercase and Lowercase turn all selected letters to capital or small, respectively. Title Case makes the first letter of each word uppercase, and every other letter lowercase.
Note
Using one of these styles doesn’t change the actual text in the field at all. If you type Mr. President into a field, then change its style to Uppercase, it will show as MR. PRESIDENT. But at any time, you can go back and remove the Uppercase style, and you’ll get the original capitalization back unchanged.
Superscript (Ctrl+Shift+plus sign or ⌘-Shift-plus sign) makes the text a little smaller and raises it up on the line, as in x2. Subscript (Ctrl+Shift+minus sign or ⌘-Shift-minus sign) comes in handy when you’re entering chemical formulas. (You do enter chemical formulas a lot, don’t you?) You can’t use superscript and subscript simultaneously on the same letter or number.
Note
The keyboard shortcuts for text styles in FileMaker are non-standard. While in most programs Ctrl+B (⌘-B) means Bold, in FileMaker it’s Ctrl+Shift+B (⌘-Shift-B). The same goes for Italic and Underline. This change takes a little getting used to. Basically, take the keyboard shortcut you use in all your other programs, and add the Shift key.
Text Color
The mini–word processor wouldn’t be complete without colors. The Format → Text Color menu gives you a handful of colors to choose from. If you don’t like those options, you can select Other Color (located below all the little color squares in the menu) to pick any color you want, as described in Figure 2-14.
If you don’t like the assortment of colors FileMaker provides, you can change them in the Edit → Preferences (Windows) or FileMaker Pro → Preferences → Layout panel (Mac). You get three choices: System subset, Standard system palette, and Web palette (see Figure 2-14). The normal palette (System subset) gives you 88 colors, which most FileMaker mavens find more than sufficient. It’s also nice because it’s small enough for you to remember what color you’ve been using (“the third red from the top”).
If you find the System subset palette too limiting though, feel free to try one of the others. The Standard system option displays the color palette built into your computer’s operating system—Windows or Mac. Since you’ve probably seen this color arrangement elsewhere on your computer, you may find it easiest to use.
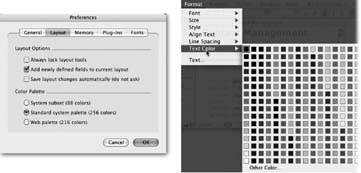
The Web palette lets you choose from the set of 216 colors commonly considered Web safe; that is, they’re guaranteed to look pretty much the same in any browser on any computer. At one time, you needed to stick to only these colors if planning to publish your database on a Web site (Chapter 18), but the truth is you don’t really need to worry about Web safe colors anymore. Every computer sold since, oh, about 1997 can display more colors than you ever dreamed of.
The Text Format Dialog Box
FileMaker provides one-stop shopping for all your text-formatting needs. Suppose you want to change a word to red 13-point bold-italic-underline-uppercase-condensed. That looks to be about seven trips to the Format menu. Instead, choose Format → Text to summon the Text Format dialog box (Figure 2-15). This one little window combines the Font, Size, Style, and Color menus described in the previous pages into one convenient place, turning seven menu commands into one. (Now if only it had a keyboard shortcut.)
Note
The Paragraph button reveals the Paragraph dialog box. It’s covered on Section 2.6.4.

Paragraph Formatting
Sometimes you put lots of information in a field. For example, suppose you decide to keep track of all your correspondence with your customers. You might make a database to store letters and emails so you can search them or print them out, as needed. In a database like this, you usually end up typing (or pasting) long blocks of text into a field, where you need to control more than just the font, size, style, and color.
Align Text
Text alignment is perhaps the most important aspect of your document’s appearance. You can have text rigidly justified on both right and left, or with a loose right margin for a more casual look. If you use FileMaker to send party invitations to your contacts, you can use centered alignment for an attractive, social look. People may not think about text alignment much, but it really sets the whole tone of a document. FileMaker puts these settings right on the Format menu.
The Format → Align Text menu offers four useful choices:
Choose Left to make every line of text start at the left edge of the field. As the text wraps from line to line, the right edge appears jagged.
Choose Center to make every line of text center itself in the field. In this case, both edges are jagged.
Choose Right if you want every line to end exactly at the right edge of the field. As you can probably guess, this options means the left edge is jagged.
The Full text alignment (sometimes called Justified in other programs) tells FileMaker to take special care to make every line start on the left edge of the field and end on the right edge. It adds a little space between words and letters as necessary so that everything lines up.
Note
The Format → Align Text menu also has three perpetually disabled items: Top, Center, and Bottom. These items control vertical alignment of the text within the field. The reason they’re gray is that you can choose them only when you’re designing your layouts (Chapter 4), not when you’re entering data.
Line Spacing
Format → Line Spacing lets you single- or double-space the text. Text is singlespaced normally, and if you choose Double instead, FileMaker spreads out your lines of text, giving them a little breathing room. This menu also has a Custom option, which is primarily just a shortcut to the Paragraph dialog box. As you’ll learn on Section 2.6.4, you can use the Paragraph dialog box to control several aspects of text formatting—including more fine-grained control of line spacing.
The Text Ruler
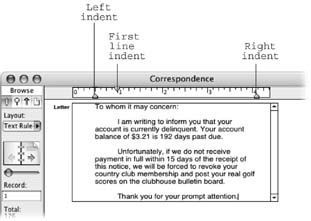
A FileMaker field is much more than a mere container for plain text. Like a mini– word processor, you can set left and right indents and FileMaker makes sure your text stays between them. You can even set a first-line indent so the first line of each paragraph is automatically indented a little more (or less) than the rest of the text. Finally, you have complete control over tab stops: where they are and which direction the text goes when you tab to them.
The Text Ruler (View → Text Ruler) lets you set indents and tab stops for instant visual gratification. The ruler has an arrow icon for the Left, Right, and First Line indent settings (Figure 2-16), which you just drag to the spot on the ruler where you want the indent set. (For greater precision, you can also set indents in the Paragraph dialog box, as discussed in the next section.) You’ll learn how to set tab stops on Section 2.6.5.2.
When you turn on the Text Ruler, FileMaker adds a space along the top of the window to hold the ruler. When you’re in a field, the ruler itself appears in the portion of this space that is directly above the field, with the zero point on the ruler lined up with the left edge of the field. (When you’re not in a field, the ruler just measures the width of the content area.)
Detailed Formatting in the Paragraph Box
This multitalented window offers three groups of settings: Alignment, Line Spacing, and Indents. You can get to the Paragraph dialog box in one of two ways. Either choose Format → Line Spacing → Custom, or choose Format → Text and then click Paragraph. The dialog box opens, as shown in Figure 2-17.

Warning
When you click Paragraph in the Text Format dialog box, FileMaker immediately applies any formatting settings you’ve made. To avoid unintentional reformatting, make sure you don’t have any text selected when you choose Format → Text. (Better yet, bypass the Text Format dialog box altogether by choosing Format → Line Spacing → Custom instead.)
The Alignment options are almost exactly the same as those found in the Format → Align Text menu. There is one small exception, though: Full alignment is called Justified, though it means the exact same thing. (Don’t ask.)
Next in line are the Indent settings. Here, you can specify how far the text indents from the left and right edges of the field. The Left setting applies to every line in the field, giving you the specified space between the left edge of the field and the beginning of each line. The Right setting works the same way, only it applies to the right edge of the field. The First setting, meanwhile, applies only to the first line of each paragraph. It tells FileMaker to insert more space before the first line, in addition to what’s specified for Left indent.
The Paragraph window also gives you more fine-grained control over Line Spacing. For instance, you can give your text 1.5 line spacing instead of single-or double-spacing by entering 1.5 in the Height box and choosing “lines” from the popup menu beside it. The Above and Below options refer to spacing before and after each paragraph. Unlike the indent settings, the spacing options let you pick the units right in the dialog box. You can choose Pixels (little dots on the screen), Inches, or Centimeters from the pop-up menu.
When your text is positioned and aligned just the way you want it, you have two options: Click OK to make the changes and close the Paragraph dialog box, or click Apply to inspect your changes so far. The Apply button leaves the Paragraph box open, so you can peek at your database window and see how it looks, then continue tweaking. Click OK when you’re satisfied.
Tabs
Since a field can hold just about any kind of text, you might eventually need to use tab stops within a field. For example, you could have a nice large field into which you paste rows of text from a spreadsheet. To make things line up properly, you can set tab stops for each column of text. To move the insertion point to the next tab, press Ctrl-Tab (Option-Tab). This is a special keystroke, obviously, because in FileMaker pressing Tab jumps you to the next field. See Section 6.4 to learn how Field Controls make plain old tabs work the way you’re used to.
Like most word processing programs, FileMaker provides two ways to create tab stops: the Text Ruler described on Section 2.6.2, and the Tabs dialog box.
Setting tabs in the Text Ruler
To insert a new tab stop, simply click anywhere in the ruler. A small right-pointing arrow appears where you clicked, representing a left tab stop. (The arrow shows you what direction text will go when you start typing.) FileMaker also supports other kinds of tab stops, but to get them, you have to visit the Tabs dialog box, described next.
In the pictures shown here, the Indent options are specified in Inches (you see “in” next to each text box). FileMaker actually has a setting for the unit used here and other places. FileMaker comes factory-set to inches, but it’s nothing if not flexible. You can use inches, centimeters, or pixels—the choice is yours. If you’re used to the Metric system, by all means tell FileMaker to use centimeters. Or choose pixels for really precise control over text positioning. Here’s how to change how FileMaker displays measurements:
If the Paragraph dialog box is open, click Cancel. The remainder of these steps will work only if your database’s main window is in front.
Choose View → Layout Mode. In this mode, the content area of the window changes somewhat. Don’t be alarmed…and don’t click anything in the window. (If you accidentally change something, that’s OK. FileMaker will soon ask if you want to save).
Choose Layouts → Set Rulers to open the Set Rulers dialog box.
In the Units pop-up menu, choose Pixels. (If you’d rather use different units, you can select anything you like. You can always repeat these steps later to get things back.)
Click OK, then choose View → Browse Mode
You should be back where you started now. If you get a message asking if you want to save your changes, click Don’t Save.

Setting tabs in the Tabs dialog box
The Tabs dialog box is a laborious way of setting tabs, but it gives you more options because you can control all aspects of each tab stop manually. Here’s the drill:
Choose Format → Text.
The Text Format dialog box appears.
Click Paragraph.
Click Tabs.
Ta-da! You found the Tabs dialog box (Figure 2-18).
Note
If the Text Ruler is showing (Figure 2-19), you can get to the Tabs dialog box quickly. Just double-click any tab stop in the ruler. The Tabs dialog box opens with the clicked tab preselected.

To make a new tab stop, simply select the appropriate options as described below, and then click New. A new entry will appear in the list named after the Position you specified. You can create up to 20 tab stops, after which the New button becomes disabled. If you try to add a tab stop at a position where one already exists, the new stop simply replaces the old one.
Editing tab stops in the Tabs dialog box
Once you’ve created tab stops, you can change them anytime using the same Tabs dialog box. Select a Tab stop in the list to see its settings. The Type radio buttons, as well as the Position and Fill Character fields, change to reveal the settings for the selected stop. To change them, modify the values in any way, then click Set. To delete the selected tab stop, click Clear.
Finally, you’ve probably noticed that the Tabs dialog box has an Apply button just like the Paragraph dialog box, and it works the same way. Click Apply, and the tab stops showing in the list will be reflected in the current field. Sometimes it can be tough to position your tab stops in just the right place. Use the Apply button to see how things line up. When you’re satisfied with the tabs, click OK.
Type. A Tab stop’s type effects how text entry behaves when you tab to that particular stop. Figure 2-19 shows how these different tab stops look in action.
A Left tab causes the next text you type to be anchored to the tab stop on its left side. As you type, the text moves to the right just like normal Left aligned text.
A Right tab works in the other direction. When you tab to one, everything you type is anchored on the right, like right-aligned text. As you type, the text moves to the left, towards the beginning of the line.
A Center tab causes the text you type to be centered at the point of the stop. As you type, the text moves in both directions.
The Align on tab lets you specify any character (letter, number, or punctuation) to act as the point of alignment. For instance, if you specify a period for the alignment character, the period or decimal point you type will anchor to the tab stop. Any text you type before the period will be right aligned and any text after the period will be left aligned. You use this feature most often to line up lists of numbers by their decimal points.

Position. In addition to a type, every stop has a position, which is measured from the left edge of the field, in the same units used for Indent settings (such as inches and centimeters). For example, if you’re storing a little two-column list in a text field, you might set tab stops at .5 inches and 2 inches.
Fill Character. FileMaker also accepts a fill character for each tab. This character is repeated as many times as necessary to fill the blank space leading up to a tab. Most often you use a period for the fill character (as shown in Figure 2-20), but any character is allowed.
Beyond Text: Container Fields
Words and numbers form the bulk of most databases. All these letters and figures convey important information, but they can be pretty boring. Increasingly, people are using FileMaker databases to store images, movies, and other bits of multimedia. For example, you can store a photograph of each employee right along with her personnel records. Or add product shots to your inventory database.
The Contact Management database has one field you may have been ignoring until now: Image. Unlike all the other fields in this database, the Image field doesn’t expect (and won’t accept) typed text. It’s a special kind of field called a container field. Container fields can hold just about anything you want, including pictures, sounds, animation, music, and movies. You can even put any file from your hard drive into a container field, like a PDF file or a Word document. You can see container fields holding assorted things in Figure 2-21.

Whether you realize it or not, when you use container fields you’re using FileMaker as asset management software. That’s the industry term for elaborate, customized software that contains and catalogs huge numbers of images (for use in brochures, books, or Web sites, for example). These programs are essentially databases, and with FileMaker, you can also manage large numbers of the images and documents you use every day. The data in a container field falls into one of four categories: picture, QuickTime, sound, and file.
Pictures
A picture can be in any of more than a dozen formats, including the common kinds like JPEG, GIF, and TIFF, PICT, and BMP. FileMaker will also accept PhotoShop and PostScript (.eps) files. When you put a picture in a container field, the field displays the picture itself.
The following methods for copying, pasting, and inserting pictures into container fields are the same whether you’re inserting a movie, PDF, text, or other type of file. You see the same type of Insert dialog box for navigating your hard drive each time.
Copy and paste
The most obvious way to put a picture into a contained field is to paste it in. You can copy a picture from just about anywhere, then click once in the field and choose Edit → Paste (Ctrl+V or ⌘-V).
You can also copy data from the container field. Again, simply click once on the field, and choose Edit → Copy (Ctrl+C or ⌘-C) or Edit → Cut (Ctrl+X or ⌘-X). Whatever was in the field is now ready to paste into another field, record, or program.
Insert → Picture
If the picture you want in a container field is stored in a file, copy and paste doesn’t do you much good. You’d have to open the file in some program first, and then copy it from there—and that’s no fun. Instead, you can insert the file directly into the field without ever leaving the comfort of FileMaker. Here’s how:
Click in the Image field.
You’ve now entered the record, and the Image field in particular.
Choose Insert → Picture.
The Insert Picture dialog box appears. This window looks almost exactly like a typical Open File dialog box in Windows or Mac OS X. You can use it to find the picture you want to insert.
Click Open.
FileMaker grabs the picture and puts it in the Image field.
Tip
If you need to insert lots of pictures into a database, you can save yourself a lot of trouble by using the File → Import Records → Folder command. See Section 17.4.2 for the full explanation.
QuickTime
QuickTime data includes anything supported by QuickTime Player, the multimedia software from Apple. FileMaker uses QuickTime to help it deal with multimedia files. The file types include QuickTime files (.mov); FLASH animations; video files like AVI, DV, MPEG, and MPEG4; virtual reality files (VR); and music files like WAV, AIFF, MP3, and AAC. Because FileMaker uses QuickTime, and QuickTime is frequently upgraded (www.quicktime.com), the exact list of formats FileMaker supports also changes. For the most part, QuickTime can handle most standard music, video, and animation formats.
When a container field holds a QuickTime file, you normally see the movie’s poster frame, which is usually just the first frame of the movie. When you click the movie, a standard movie controller appears (like the one at the lower-left of Figure 2-21), so you can play, pause, fast-forward, and rewind it. The controller also has a button to adjust the volume and a little knob that shows you where you are in the movie.
When inserting a picture, QuickTime movie, or file (Section 2.7.2.1), the dialog box includes an option to "Store only a reference to the file.” When this option is turned off, FileMaker copies the actual file into your database. You can move or delete the original file and the data will still appear in the field, because the database now contains all the file’s information within itself. If you turn on “Store only a reference to the file,” FileMaker doesn’t copy the file into the field at all. Instead, it just remembers the file you wanted. Each time you look at this record, FileMaker returns to the disk and finds the original file so it can display the data. In this respect, it works exactly like a shortcut or alias. If the file is gone (moved, deleted, or renamed), FileMaker will show you this message instead.

There’s no simple rule for when you should store the actual file, and when you should store a reference instead. Most people decide to store the file itself, because it saves the trouble of keeping the files and database together.
This is especially true when multiple people are using the database from different computers. On the other hand, here are a couple of reasons you might want to store a reference instead:
Storing many larger files can make your database get big—really big—which can cause a number of problems. It’s harder to back up and move a huge database file from one place to another. If you’re trying to email the database to your home office, your ISP may not appreciate (or allow) a 3 GB attachment, for example. If the inserted files aren’t critical to the record data, it may make sense to leave them out of the database so it’s easier to work with.
Sometimes you want to catalog files inside FileMaker even though they might change over time. For example, if you wanted to put promotional images into a database so they’re easy to locate, you probably don’t want to make editing those images difficult. If you store a reference to these images, you can still edit the originals any time. As long as you haven’t changed their name or location, when you look in FileMaker, you’ll see the latest edits.
Otherwise, when you’re using your database day to day, it usually doesn’t matter whether you’ve inserted a reference or the actual file. For the most part, both kinds work exactly the same. This book explains the differences as they come up.
Just as with a picture (Section 2.7.2.1), you can copy and paste QuickTime movies or sounds into the container field or use the Insert → QuickTime menu command to select a QuickTime file from the hard drive.
Sound
A sound is a recorded bit of audio. FileMaker actually lets you record sounds right into the field. You can keep audio notes with a project record, or record your practice speeches and save them for when you’re famous. When a container field holds a sound, it displays a little speaker icon; double-click it to hear the recorded sound.
Recording sound
The Insert → Sound command doesn’t bring up the same dialog box as the other Insert commands. Instead, it shows the Record dialog box (Figure 2-22). If your computer has a microphone attached, you can record any sound directly into the field.
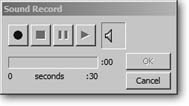
The Record dialog box is simple, but capable. The speaker icon provides feedback about what the microphone’s picking up, by showing little soundwaves indicating the sounds it’s hearing. The more soundwaves you see, the louder the recording. In fact, the speaker icon lets you check for soundwaves even when you’re not recording, so use it to do a quick sound check (“Testing, testing, 1, 2, 3”). If you don’t see waves when you talk, make sure the microphone’s plugged in.
When you’re ready to record, proceed as follows:
Click the Record button.
FileMaker immediately begins recording everything the microphone hears. As it does, the Recording Time progress bar fills slowly. When the progress bar reaches the end, you’ve recorded as much as you have room for.
When you’re done recording, click Stop.
At this point, you have some sound recorded. The length of the recording shows to the right of the Recording Time progress bar.
To hear what you got, click Play.
Once the recording is playing, you can use the Stop or Pause button to stop it. Clicking Stop will stop it completely. (The next time you press Play, it starts over from the beginning.) Pause, on the other hand, lets you stop the playback momentarily. (Clicking Pause or Play again starts the playback right where it left off.)
If you’re satisfied with what was recorded, click Save to store the sound in the container field.
If you click Cancel, FileMaker completely erases the sound you recorded with no warning…so be sure you click the correct button.
Tip
The Insert → Sound command is specifically for recording sound directly into the field. If you have a sound file of some kind already on your hard drive (an MP3 for example), choose Insert → QuickTime instead. In general, if the data you’re putting in the field has a time component (meaning it happens over time, like video or sound), treat it like a QuickTime file.
File
A container field can also hold a file. Since FileMaker doesn’t know what the file is supposed to be, it simply shows you the file’s name and icon. Unfortunately, you can’t do anything with a file like this while it’s in FileMaker. You can’t edit it. You can’t even open it and view its contents. Rather, the Container field simply holds the file for you. (Soon you’ll learn how to get it back out.)
The ability to store pictures, movies, sounds, and files in your database can be useful for lots of reasons. For example, if you’re a recruiter, you could store resumes in Microsoft Word or PDF format right in the database alongside the info about a particular candidate. In fact, the Adobe PDF format is so common that people often need to keep track of PDF files—the brochure, flyer, or documentation for each of your products, the prospectus for each of your investments, or a floor plan for each of your properties.
You already know you can use the Insert → File command to store the PDF document right in a container field (and get it back out again later to look at it). But if you’re on Mac OS X, you can do one better. Choose Insert → Image and then select a PDF file. FileMaker then shows you the PDF (the first page of it, anyway), right in the container field. If your document has more than one page, you need to export the PDF out of the container field (Section 2.8) to read the whole thing.
Or, try this unexpected twist: You can read multipage PDFs right in FileMaker if you use Insert → QuickTime instead (Section 2.7.2.1).
This time, when you click the container field itself, the standard QuickTime movie controls appear, as shown here. Using these controls, you can flip through the pages in the PDF: Fast Forward goes to the next page, Rewind goes to the previous page. If you press Play, FileMaker flips through the pages one after the other until it reaches the end of the document.
If you need to search within a PDF file, try this. Open the PDF file, select all the text, copy it, then paste it in a regular text field. FileMaker can search the text field, but you can view the PDF in all its glory in the container field.

If you can’t use the file in FileMaker, why put it there at all? Sometimes people need to keep track of lots of files. They might need to organize them in ways that make sense only to their business. Keeping all these files in a folder on your hard drive can be a real drag since they can be slow to search and hard to reorganize. With FileMaker, you can keep the files right alongside other important data. For example, you can store project specifications (in Microsoft Word format) and diagrams (in Visio format) in your database along with tasks, team members, and timelines.
The most common way to place a file into a container field is to use the Insert → File command. On Windows, you can also copy a file on the desktop and paste it into a container field. When you insert a file, FileMaker makes no effort to figure out what’s in the file. If you choose a picture, you’ll still get just the name and icon. If you want to see the picture itself in FileMaker, you must choose Insert → Picture, as described on Section 2.7.2.1.
Exporting data from container fields
Inserting files into container fields is all well and good…but it’s just as important to get them back out again. When you use the Insert → File command, all you get to see is an icon and file name. Copying the file from the field with Edit → Copy, doesn’t even do you much good, since FileMaker can’t paste files to the desktop where you might actually be able to open and read them. A better way is to use the Export Field Contents command. Just click in the container field in question, and choose Edit → Export Field Contents. FileMaker asks you where you want to put the file, and what to name it. Click Save, and FileMaker creates a new file that’s an exact copy of the one you put in the container field.
Checking Spelling
Considering all the tools FileMaker provides for editing your records, it’ll come as no surprise that it also has a full spell checker built right in.
Spell Checking in One Pass
Before printing out your database or otherwise sharing it with the greater public, you’ll want to make sure your spelling is correct. If you’ve been typing new records at lightning speed, there are bound to be some typos. And nothing screams “amateur” louder than a date field that reads “Febuary 15.” All the spell checking commands are found under the Edit → Spelling menu. Here you have three choices:
Choose Edit → Spelling → Check Selection to spell check selected text only.
To check the entire record, choose Edit → Spelling → Check Record.
And finally, you might want to check spelling on many records at once. In this case, choose Edit → Spelling → Check All. When you choose this option, you’re telling the spell checker to look at every field of every record in the current found set.
Tip
To check spelling in every record, make sure you have them all showing first. Just choose Records → Show All Records before running the spell checker
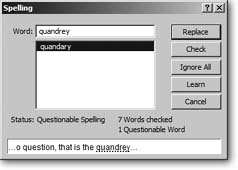
No matter how many records you’re checking, FileMaker opens the same Spelling dialog box shown in Figure 2-23 as soon as it stumbles upon a misspelled word. At bottom, the Spelling window says Status: Questionable Spelling. The Word text box displays the word in question. There are a few different ways things can proceed from here:
You can edit the misspelled word directly in this box. More often than not, though, the correctly spelled word appears in the list below. In this case, just click the correct spelling, then click Replace. (Alternately, you can simply double-click the correctly spelled word and save the trip to the Replace button.)
If you don’t see the right spelling, you can correct it yourself. Type the correct spelling into the Word box, right over the misspelled word. To confirm that your new spelling is correct, click Check; the status line changes to say Correct Spelling if you got it right. Otherwise, you’ll be back where you started, with a misspelled word and a few suggestions below it.
If you spelled it right originally, but FileMaker doesn’t agree, you can Skip the misspelled word. Better yet, click Learn to teach FileMaker the word so it won’t bother you about it in the future. (Clicking Learn adds the word to your current user dictionary, which is explained below.)
If you change your mind and want to stop the spell checker, just click Cancel. When the spell checker has finished its work, the status line changes again, this time to say Finished Spelling.
Note
Clicking Cancel doesn’t undo all the changes you’ve made in the spell checker. It simply stops any further checking. If you’ve already corrected some words, the corrections will stick around after you cancel.
Spell Checking as You Type
FileMaker’s spell checker also works automatically as you type. This visual spell check is a per-database setting, so you control it from the File Options dialog box. Choose File → File Options, then click the Spelling tab. You’ll find two options that you can mix and match to help you spell better, run faster, and jump higher. Well, you’ll spell better, anyway.
The first option is “Indicate questionable spellings with special underline.” If you miss your word processor, this one will make you feel right at home. You’ll see that familiar red line underneath any word FileMaker doesn’t like the looks of. Plus, if you right-click (Control-click on the Mac) on the underlined word, FileMaker offers a menu containing suggestions for spelling the word properly.
If red lines aren’t annoying enough, you could turn on “Beep on questionable spellings” and FileMaker will make your computer beep when you type a space after a misspelled word. Unfortunately, it’s just the same old alert beep that your computer makes in all kinds of other situations—so it can be easy to miss. But in combination with the red line, this pair could be a formidable reminder to spell better.
Tip
Use spell checking as you type with caution, because it’s just bright enough to catch your errors, but not quite smart enough to know when you don’t need it butting in. Lots of perfectly fine database entries aren’t in the spelling dictionary, like inventory codes, abbreviations, or even email addresses. Most people (those who don’t like being beeped at every seven seconds) turn these options on for typing long text passages, then turn them back off for other data entry tasks.
Managing Spelling Dictionaries
FileMaker comes with spelling dictionaries for various languages and choosing among them is easy. Just choose Edit → Spelling → Select Dictionaries. The Select Dictionaries window lets you choose the language to use for all spell-checking operations. You can see it in Figure 2-24.

User dictionaries
Remember from Section 2.8.2 when you clicked the Learn button to teach FileMaker a new word? When you did so, behind the scenes, FileMaker actually added that word to the user dictionary, which is separate from the normal dictionary that comes with FileMaker.
In the Select Dictionaries window shown in Figure 2-24, you can choose whether or not to use the user dictionary. You can select an existing user dictionary (presumably, one you created previously), or create a new one. You can even have multiple user dictionaries for different purposes. For example, if you have two databases, one that tracks your apparel products and one that stores information about tools, it might make sense to keep two user dictionaries. The tools version might include words like “mm” and “pcs” while the apparel version would have “XXL” and “CottonPoly.”
Tip
In reality, it’s nine times easier to just use one user dictionary, so you don’t have to worry about which one is selected. (It generally doesn’t hurt to have too many words in your user dictionary, while not having enough makes spell checking much more time consuming. Nothing’s worse than having to wade through a dozen correctly spelled words every time). Nevertheless, if you feel the need for more than one, the option is there.
You’ve already learned how to add to your dictionary using the Learn button in the spell checker. Well, if you’ve ever wanted to just tell it what words you want it to skip, you can. Just choose Edit .Spelling .Edit User Dictionary to open the User Dictionary dialog box. Here you can add new entries to the dictionary (type the word and click Add), or remove existing entries (select the word and click Remove).
You can also export all the entries to a text file where you can edit them to your heart’s content. When you click Export, FileMaker asks where it should save the export file. The file you get is simply a plain text file with one word on each line. You can then edit in a text-editing program.
If you already have a file that has words you want, you can Import those words into your User dictionary en masse. For instance, if you use a lot of technical terms, you might be able to download a list of terms from your industry and load them into a dictionary in one shot. The file has to have each word on its own line, so if it’s in some other format, you’ll need to clean it up first. (For example, use your word processor’s Find & Replace function to turn a comma-separated list into one with a carriage return between each word.) Also, make sure the file is plain text.
A Microsoft Word file (.doc) or other special format won’t work. (Making a plain text file on Windows is a breeze: Just use Notepad, the simple text-editor program in the Accessories folder in your Start menu. On Mac OS X, however, you need a little more care. You can use Text Edit—it’s in your Applications folder—but you must tell it you want plain text. Just choose Format → Make Plain Text in Text Edit before you save the file.)
Using the Import and Export features together can be particularly useful. You can export your user dictionary, edit it manually in the text-editing program (where making lots of edits might be easier), then import it back in.

Printing and Preview Mode
All this talk about the wonders of an electronic database may leave you thinking FileMaker has nothing to do with paper, but that’s not true. It’s a cruel fact of life that eventually you’ll need to put your data on paper. You might want mailing labels for all your customers in Canada, or a special printed form prefilled with patient information for insurance filing. Sometimes you just need your data with you when you’re away from your computer. As you’ll learn in Part 2, you can arrange the data any way you want in FileMaker, and make certain layouts that are particularly suitable for printing. But for now, remember that FileMaker lets you print anything you see onscreen (just choose File → Print). Its Print dialog box has a few special options, as shown in Figure 2-25. (In Mac OS X, you have to choose FileMaker Pro from the pop-up menu to see them.)
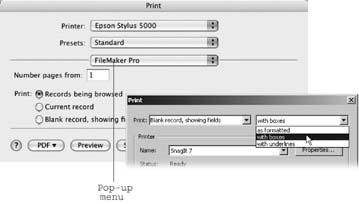
Records being browsed tells FileMaker to print every record in the found set (Section 1.6.3.2). If you want to print all your Canadian customers, choose this option.
Current record will print just the current record, which comes in handy when you just want to print one thing: your doctor’s contact information to keep in the car, perhaps, or maybe Aunt Edna’s candied yams recipe.
Blank record, showing fields causes FileMaker to print what’s onscreen with no data at all. You can change the look of each field to a box or an underline if you want (just pick your choice from the pop-up menu shown in Figure 2-25). You would choose this option if you wanted to hand out pages for people to fill out with a pen (it’s a kind of antique writing device), and later type their responses into the real database.
To see how the printout is going to look without committing trees to it, you can use Preview mode (Figure 2-26). You access Preview mode via the View menu, the Mode pop-up menu, or the Mode tabs.
Preview mode shows you what your database looks like as though it were printed on paper. For instance, you can see whether FileMaker’s going to chop any information off to fit on the page (anything beyond the width of the page simply isn’t printed). Preview mode also indicates the margins and lets you flip through the file page by page using the Book icon.

Note
When you first go to Preview mode, the page count says “?” instead of the number of pages. FileMaker actually doesn’t know how many pages it’s going to print until you force it to count them. To do so, just drag the Record Slider all the way to the right, which tells FileMaker you want to see the last page. On its way there, FileMaker counts the pages, too. The process may take some time but FileMaker will catch up eventually.
All the standard page-setup options (Section 2.9) affect what you see in Preview mode. For example, if you change the paper orientation, Preview mode reflects the change right away. On some computers and printers, you can reduce the printout by a percentage.
When you reduce or enlarge in the Page Setup dialog box, Preview mode shows the page proportionately larger or smaller so you can see how the content area will fit on the page. (Which of these options are available to you depends upon the computer, operating system, and printer you’re using.) The Zoom controls (Section 1.1.2.2) work in Preview mode, too. If the full page is too big to fit on your screen, just zoom out a bit to see the whole thing.