
In this section
Whether you call it the Internet, the Net, or the Web, and whether you use it for business, homework, research, communicating, or shopping, the Web is probably already your window on the world. With that insight in mind, one of the goals of Microsoft Windows XP’s designers was to enable you to move between the Web and your own computer in an almost effortless fashion.
If you know the address of the Web page or site you want, you can simply type the address in the Address Bar, and Microsoft Internet Explorer will find and display the page for you. If you don’t know the address, you can use the Search feature to search the Internet to find the requested information. Once you’ve found the page, you can use the hyperlinks that you’ll find on most pages to navigate from one page or site to another to obtain any additional information you need.
When you start Internet Explorer, it takes you to your home page, which is usually a page you’ve customized to display information that you want to see every day. However, if you want to designate another page as your home page or change some items on the existing home page, you can do so with a couple of mouse-clicks. If there’s a page you want to revisit, you can add it to your Favorites list, and Internet Explorer will create a shortcut to that page for you. You can save a Web page and then send it, with all its formatting intact, to friends or colleagues. You can economize on connection charges by saving Web pages and viewing them off line, and you can even set up your computer so that those pages will be updated automatically whenever any of their content changes.
You do most of your navigation on the Internet using the hyperlinks (also called links or jumps) that are located on Web pages. When you click a link, an Internet address is sent to your Web browser, which looks for the Web site and then displays the requested page. After you’ve located a Web page, you can explore further if you want. It’s a bit like looking up a word in a dictionary and then looking up another word to expand your understanding of the first one.
Tip
If you start Internet Explorer from the Start menu, from your Desktop, or from the Quick Launch toolbar, Internet Explorer goes to the page you’ve designated as your home page. If you start Internet Explorer by clicking a link, choosing a menu command, or using an Internet address, Internet Explorer goes to that specific page and bypasses your home page.
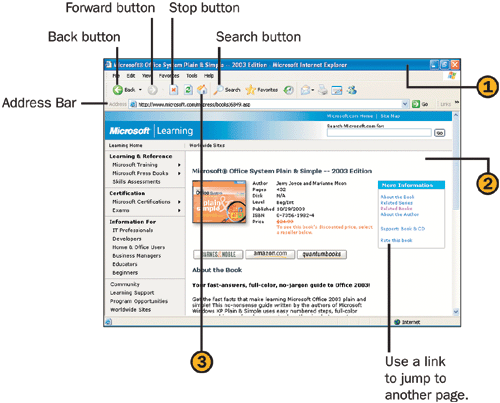
![]() Start Internet Explorer if it isn’t already running. If you’re using a dial-up connection and you aren’t already connected to the Internet, connect to your Internet Service Provider (ISP).
Start Internet Explorer if it isn’t already running. If you’re using a dial-up connection and you aren’t already connected to the Internet, connect to your Internet Service Provider (ISP).
![]() From your current page, do any of the following:
From your current page, do any of the following:
Click the Search button, and search for businesses or individuals or for Web pages that contain specific text.
Click a relevant link on the page to go to a new page or site.
Click the Forward or Back button to return to a previously visited site.
Open the Address Bar drop-down list to specify and jump to a previously visited site, or type a new address to go to that site.
Click the Stop button to stop downloading a site, and then jump to a different location.
![]() If you get lost, click the Home button to return to your home page.
If you get lost, click the Home button to return to your home page.
See Also
For information about changing your home page, see "Setting Your Home Page".
For information about controlling and safeguarding your Internet connection, see "Protecting Personal Information on the Internet" and "Restricting Internet Access".
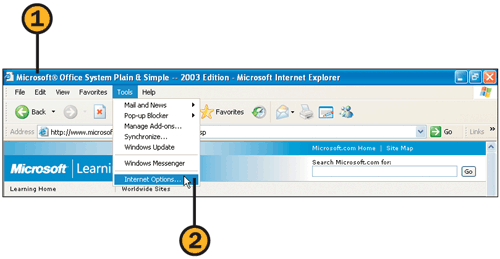
When you start Internet Explorer, you automatically go to your home page—a page that you might have customized or that contains the links and services you want. If you’d rather use a different home page, or if you want to reset the home page after a service or a program has changed it, you can designate a new home page with just a couple of mouse-clicks.
Tip
If a service provider or an installed program has made substantial changes to the way Internet Explorer looks and works, click the Restore Defaults button on the Advanced tab of the Internet Options dialog box to return Internet Explorer to its normal functionality.
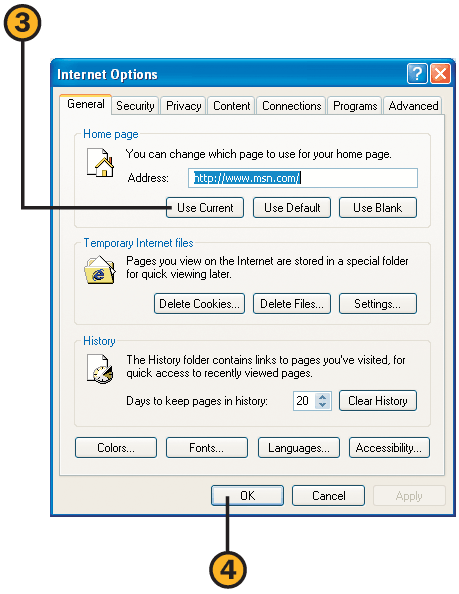
![]() Use Internet Explorer to go to the page you want to use as your home page.
Use Internet Explorer to go to the page you want to use as your home page.
![]() Choose Internet Options from the Tools menu.
Choose Internet Options from the Tools menu.
Tip
If you don’t want anyone who uses your computer to review the Internet sites you’ve visited recently, click the Clear History button on the General tab of the Internet Options dialog box.
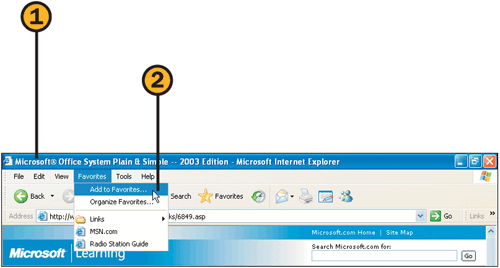
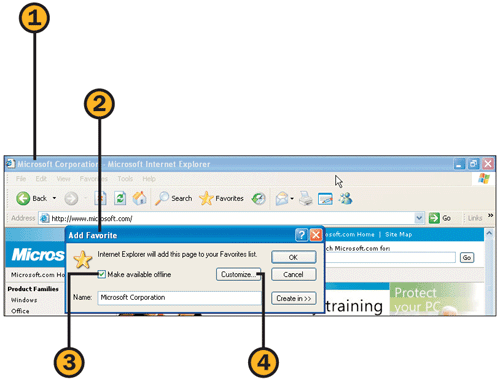
When you find a good source of information or entertainment, you don’t need to waste a lot of time searching for that site the next time you want to visit it. You can simply add the site to your Favorites list, and Internet Explorer will obligingly create a shortcut to the site for you. And when there are sites that you go to all the time, you can place them on your Links toolbar for even easier access.
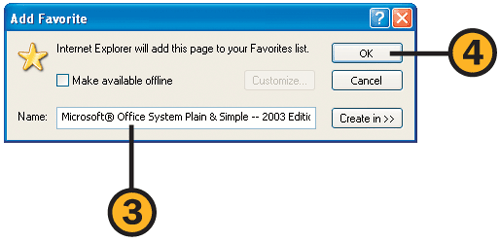
![]() Go to the site whose location you want to save.
Go to the site whose location you want to save.
![]() Choose Add To Favorites from the Favorites menu to display the Add Favorite dialog box.
Choose Add To Favorites from the Favorites menu to display the Add Favorite dialog box.

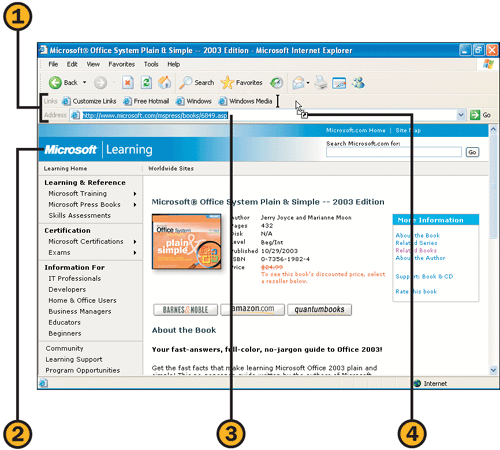
![]() Click Favorites on the Standard Buttons toolbar.
Click Favorites on the Standard Buttons toolbar.
![]() In the Favorites Explorer Bar, click the name of the site you want to return to. If the site is contained in a subfolder, click the folder and then click the site.
In the Favorites Explorer Bar, click the name of the site you want to return to. If the site is contained in a subfolder, click the folder and then click the site.
See Also
For information about working with toolbars, see "Navigating with Toolbars" and "Displaying and Arranging the Toolbars".
![]() Display both the Address and the Links toolbars.
Display both the Address and the Links toolbars.
![]() Go to a Web site that you want to add to your Links toolbar.
Go to a Web site that you want to add to your Links toolbar.
![]() Click the address of the Web site.
Click the address of the Web site.
![]() Drag the address onto the Links toolbar.
Drag the address onto the Links toolbar.

![]() Right-click the link on the Links toolbar, and choose Rename from the shortcut menu that appears. Type a short, friendly name for the Web site in the Rename dialog box, and click OK.
Right-click the link on the Links toolbar, and choose Rename from the shortcut menu that appears. Type a short, friendly name for the Web site in the Rename dialog box, and click OK.
![]() Repeat steps 2 through 5 to add other sites to your Links toolbar. If necessary, right-click any link you don’t want, and choose Delete from the shortcut menu to customize the Links toolbar.
Repeat steps 2 through 5 to add other sites to your Links toolbar. If necessary, right-click any link you don’t want, and choose Delete from the shortcut menu to customize the Links toolbar.
Try This
Did you forget to save the location of a Web page that you want to return to? In Internet Explorer, click the History button on the Standard Buttons toolbar. In the History Explorer bar, search for the page you want by the time period in which you visited it. If the site is contained in a subfolder, click the folder to reveal the site. Click the site to return to it, and then add it to either the Favorites list or the Links toolbar.
If someone has given you an Internet address that isn’t in one of the usual forms—for example, a hyperlink in an online document, in an e-mail message, or in another Web page—you can easily specify the address. You don’t even need to go to your default home page but can simply jump to the destination. To do so, you use the Address toolbar in Internet Explorer, on the Windows taskbar, or in any folder window.
Try This
Start typing an address for a Web page you visited recently. As you type, you’ll notice that a list box appears containing proposed addresses. If the address you want is listed, use either the mouse to click the address or the down arrow key to select the address, and then press Enter. If no proposed addresses ever appear, in Internet Explorer, choose Internet Options from the Tools menu, click AutoComplete on the Content tab, and select the Web Addresses check box. Click OK twice, and then try typing the address again.
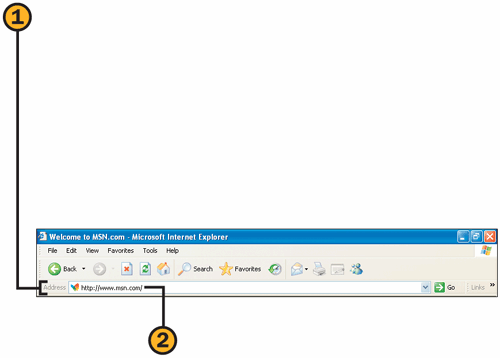
![]() In Internet Explorer, on the Windows taskbar, or in a folder window, display the Address toolbar if it isn’t already displayed:
In Internet Explorer, on the Windows taskbar, or in a folder window, display the Address toolbar if it isn’t already displayed:
In Internet Explorer or in a folder window, point to Toolbars on the View menu, choose Address Bar from the submenu, and then click the current address.
Click a blank spot on the Windows taskbar, point to Toolbars on the shortcut menu that appears, and choose Address.
![]() Click the current address in the Address toolbar to select the entire address.
Click the current address in the Address toolbar to select the entire address.
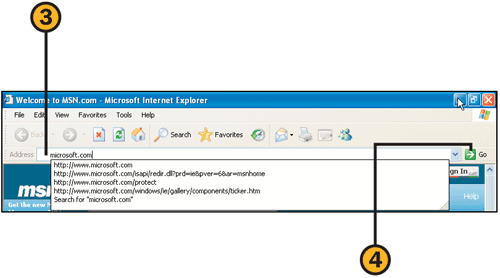
![]() Type the address with which you want to replace the current selected address. (You don’t need to type the http://www. part of the address.)
Type the address with which you want to replace the current selected address. (You don’t need to type the http://www. part of the address.)
![]() Click Go or press Enter to go to the site.
Click Go or press Enter to go to the site.
Tip
You can use the Address toolbar for more than just going to a Web page. You can also enter the address of a folder, a drive, or even another computer on your network.
See Also
For information about displaying the Address toolbar if it isn’t visible or if it’s compressed, see "Navigating with Toolbars" and "Displaying and Arranging the Toolbars".
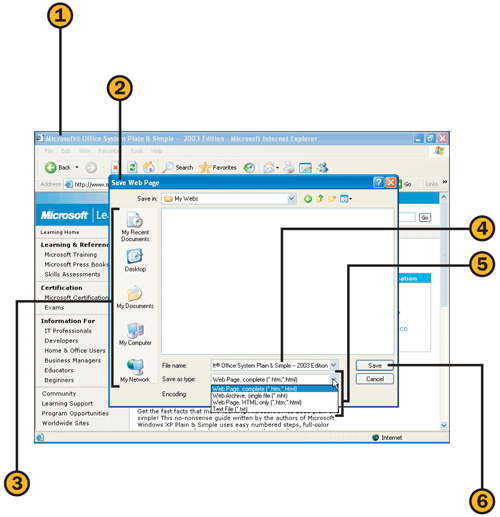
If a Web page contains important information that you know you’ll want to refer to in the future, you can save the page on your computer. The way you save it, however, affects which information will be available when you open the saved page. After you’ve saved the Web page, you can send it to friends and colleagues if you want.
Tip
If you’re planning to send a Web page to someone, save the page as a Web Archive so that the single file will contain all the elements of the Web page. The recipient will need to have Internet Explorer version 4 or later (or a similar browser) installed on his or her computer to be able to read a Web Archive file.
![]() Start Internet Explorer if it isn’t already running, and connect to the Internet if you aren’t already connected. Go to the Web page you want to save.
Start Internet Explorer if it isn’t already running, and connect to the Internet if you aren’t already connected. Go to the Web page you want to save.
![]() Choose Save As from the File menu to display the Save Web Page dialog box.
Choose Save As from the File menu to display the Save Web Page dialog box.
![]() If you don’t want to save the document to the default folder, specify a different location, drive, or folder.
If you don’t want to save the document to the default folder, specify a different location, drive, or folder.
![]() Type a name for the file, or use the proposed name.
Type a name for the file, or use the proposed name.
![]() Click in the list to specify the way you want the Web page to be saved:
Click in the list to specify the way you want the Web page to be saved:
Web Page Complete to save the formatted text and layout and to place all the linked resources, such as pictures, in a separate folder
Web Archive, Single File to create a single archive file that contains all the elements of the Web page
Web Page, HTML Only to save the formatted text and layout but none of the linked items, such as pictures
Text File to save only the text
Caution
Sometimes, although certain items on a Web page appear to be text, they’re actually graphics elements. This is usually the case when the designer of the page or site wanted to include some special formatting that couldn’t be done with normal HTML formatting. If you save the page either as Web Page, HTML Only or as Text File, the information that has that type of special formatting won’t be saved.
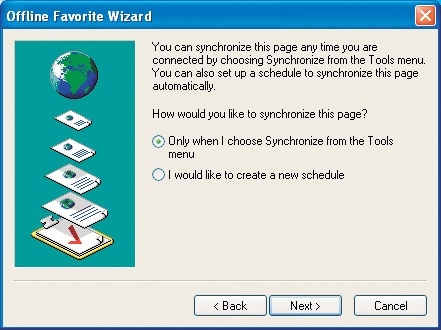
If you aren’t always connected to the Internet, or if you simply want to economize on connection charges, you can store the Web pages you want and then read them off line at your leisure. And if there are Web sites that you visit frequently, you can set up your computer so that the stored Web pages will be updated, or synchronized, automatically when the information in them changes. That way, you’ll always have the most recent version of the Web page.
![]() Start Internet Explorer if it isn’t already running, and connect to the Internet if you aren’t already connected. Go to the Web page you want to store.
Start Internet Explorer if it isn’t already running, and connect to the Internet if you aren’t already connected. Go to the Web page you want to store.
![]() Choose Add To Favorites from the Favorites menu to display the Add Favorite dialog box.
Choose Add To Favorites from the Favorites menu to display the Add Favorite dialog box.
![]() Select this check box to store the Web page.
Select this check box to store the Web page.
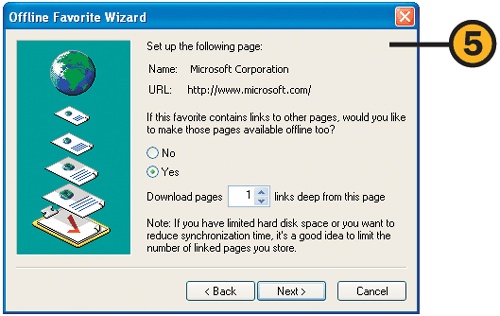
![]() Step through the Offline Favorite Wizard, specifying whether
Step through the Offline Favorite Wizard, specifying whether
Pages linked to this page are also to be stored.
Web pages are to be updated manually or automatically, and, if automatically, specifying the schedule for updating.
A password is required, and, if so, specifying your user name and password.
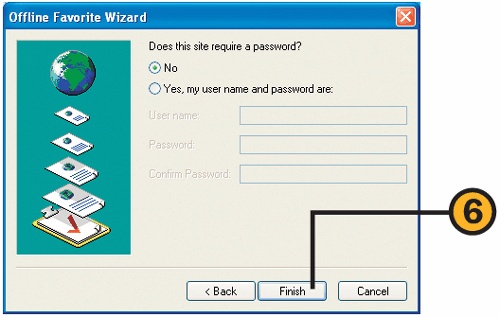
![]() Click Finish, and wait for the Web page or pages to be synchronized.
Click Finish, and wait for the Web page or pages to be synchronized.
![]() Repeat steps 2 through 6 for any other pages you want to view off line. Disconnect from Internet Explorer when you’ve finished.
Repeat steps 2 through 6 for any other pages you want to view off line. Disconnect from Internet Explorer when you’ve finished.
See Also
For information about deleting all your offline files from your hard disk, see "Maintaining Your Hard Disk".
![]() With your computer not connected to the Internet, start Internet Explorer if it isn’t already running. If the computer keeps trying to connect, choose Work Offline from the File menu.
With your computer not connected to the Internet, start Internet Explorer if it isn’t already running. If the computer keeps trying to connect, choose Work Offline from the File menu.
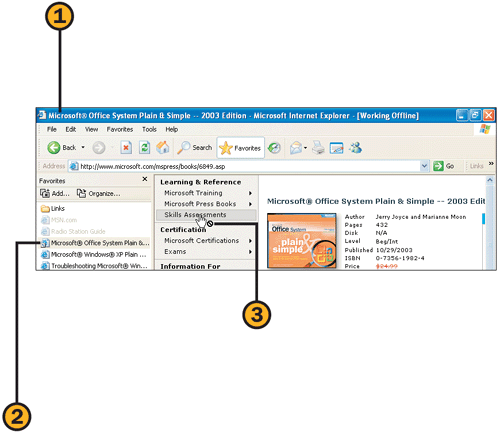
![]() Open the Favorites menu or the Favorites Explorer pane, and click the Web page in the list. Note that files set for offline viewing display a different icon than do files available only while you’re on line.
Open the Favorites menu or the Favorites Explorer pane, and click the Web page in the list. Note that files set for offline viewing display a different icon than do files available only while you’re on line.
![]() Read the page. Note that the mouse pointer indicates when you can’t use a link in the offline page.
Read the page. Note that the mouse pointer indicates when you can’t use a link in the offline page.
![]() Connect to the Internet if you aren’t already connected.
Connect to the Internet if you aren’t already connected.
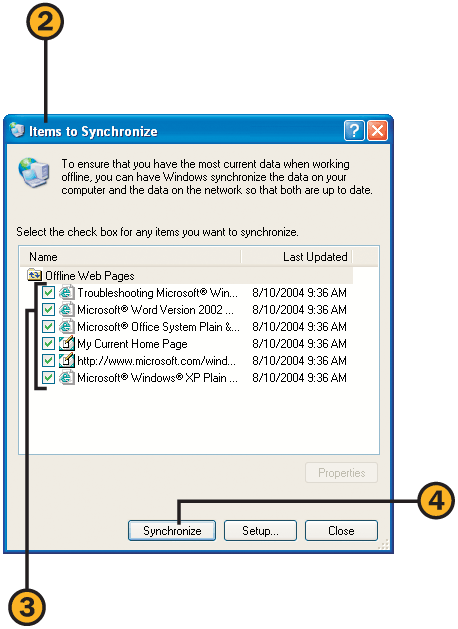
![]() Choose Synchronize from Internet Explorer’s Tools menu or from the Accessories submenu of the Start menu to display the Items To Synchronize dialog box.
Choose Synchronize from Internet Explorer’s Tools menu or from the Accessories submenu of the Start menu to display the Items To Synchronize dialog box.
![]() Select the check boxes (if they aren’t already selected) for the Web pages you want to be automatically updated, and clear the check boxes for the Web pages you don’t want to be updated.
Select the check boxes (if they aren’t already selected) for the Web pages you want to be automatically updated, and clear the check boxes for the Web pages you don’t want to be updated.

Argh! Doesn’t it drive you crazy when you go to a Web site, only to face a relentless barrage of pop-up windows that try to sell you a bunch of stuff you don’t want? With Windows XP Service Pack 2 installed, you can tell Internet Explorer to pop those pop-up windows. However, if there are certain pop-up windows you want to look at, you can tell Internet Explorer to display them.
New Feature
The Pop-Up Manager can block all pop-up windows or only those from sites you don’t trust, depending on your settings. Blocking pop-ups isn’t just a convenience—pop-ups can be used to run malicious code or to steal personal information.

![]() In Internet Explorer, point to Pop-Up Manager on the Tools menu, and choose Block Pop-Up Windows from the submenu if this item isn’t already checked.
In Internet Explorer, point to Pop-Up Manager on the Tools menu, and choose Block Pop-Up Windows from the submenu if this item isn’t already checked.
![]() In a Web site where a pop-up has been blocked, click the Information Bar.
In a Web site where a pop-up has been blocked, click the Information Bar.
![]() Select the item you want from the shortcut menu:
Select the item you want from the shortcut menu:
Temporarily Allow Pop-Ups to allow pop-ups from this Web site during this one visit
Allow Pop-Ups From This Site to add this site to your list of exceptions and always permit pop-ups from this site
Settings to turn off the Pop-Up Blocker, hide the Information Bar, manually add the addresses of sites that you’ll allow to show pop-ups, or change the level (High, Medium, or Low) of the filtering of pop-ups
Tip
By default, the pop-up blocker is set to Medium filter level, which blocks pop-ups either when you click a link to open a pop-up window or when the Web site you’re visiting is in the Internet Explorer Local Intranet or the Trusted Sites security zone. To block all pop-ups, point to Pop-Up Blocker on the Internet Explorer Tools menu, choose Pop-Up Blocker Settings from the submenu, and, in the Pop-Up Blocker Settings dialog box, select the High filter level.
Sometimes, although you might want to save one or two items from a Web page, you have no use for the entire page. It’s a simple matter to save only the parts of the page you want.
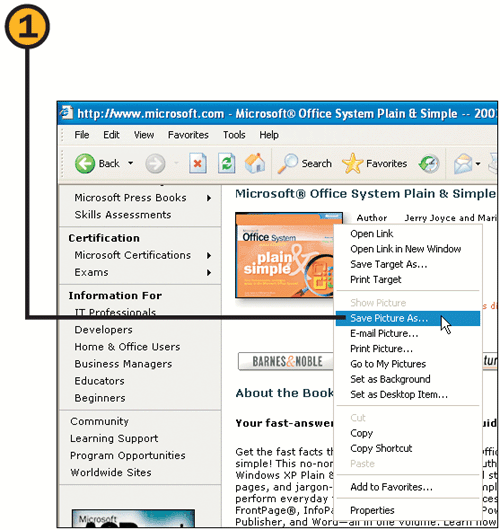
![]() Right-click the picture, and choose Save Picture As from the shortcut menu.
Right-click the picture, and choose Save Picture As from the shortcut menu.
![]() In the Save Picture dialog box that appears, save the picture in the folder and the format that you want, using a descriptive file name.
In the Save Picture dialog box that appears, save the picture in the folder and the format that you want, using a descriptive file name.
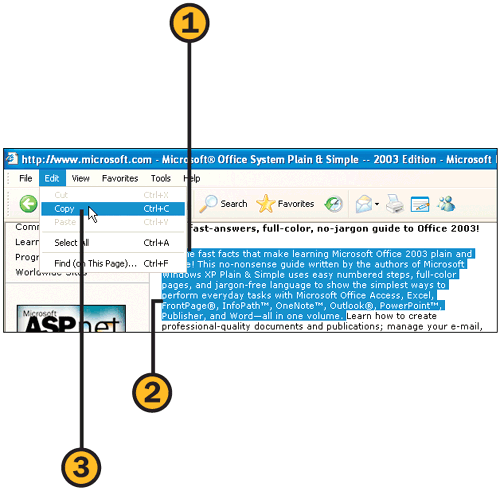
![]() Click at the beginning of the text you want to copy. You won’t see an insertion point, but Internet Explorer is smart—it knows where you clicked.
Click at the beginning of the text you want to copy. You won’t see an insertion point, but Internet Explorer is smart—it knows where you clicked.
![]() Drag the mouse over the text you want to copy.
Drag the mouse over the text you want to copy.
![]() Choose Copy from the Edit menu.
Choose Copy from the Edit menu.
![]() Switch to a word processing program such as WordPad, paste the text, and save the document.
Switch to a word processing program such as WordPad, paste the text, and save the document.
Tip
Web pages are often constructed using tables and nested tables. If you try to copy text from a Web page but are unable to select only the material you want, here’s what to do. Select the material you want, along with any other material that simultaneously becomes selected, copy it, and paste it into your word processing program. In that program, delete the superfluous content, and save the document. If you’re using Microsoft Word as your word processor, choose the Paste Options command from the Edit menu to paste only the formatted text; that way, you won’t have to delete pictures and other content you don’t want.
File Transfer Protocol, or FTP, is a standard way of transferring large files from one location to another. Although most FTP occurs automatically when you click a link on a Web page to download a file, there might be times when you’ll need to go directly to an FTP site, browse through folders, and then download or upload files. Fortunately, Internet Explorer makes this as easy as working in any folder on your computer or network.
See Also
For additional information about FTP and other methods of transferring files, see "Transferring Files".
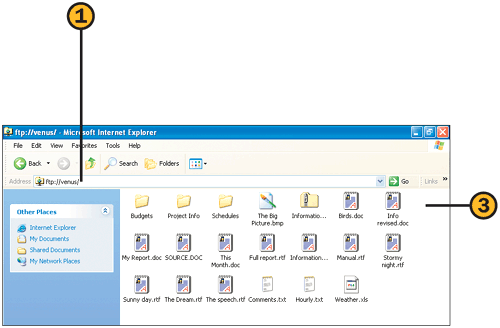
![]() With Internet Explorer running and the Address toolbar visible, type the address of the FTP site, and press Enter. In most cases, the address is in the form ftp://ftpsitename, where ftpsitename is the full name of the FTP site—for example, microsoft.com.
With Internet Explorer running and the Address toolbar visible, type the address of the FTP site, and press Enter. In most cases, the address is in the form ftp://ftpsitename, where ftpsitename is the full name of the FTP site—for example, microsoft.com.
![]() Use the FTP site as you would any other folder window: Double-click an item to open it, drag an item to a folder on your computer to download the file, or drag a file from a folder on your computer to the FTP site to upload the file.
Use the FTP site as you would any other folder window: Double-click an item to open it, drag an item to a folder on your computer to download the file, or drag a file from a folder on your computer to the FTP site to upload the file.
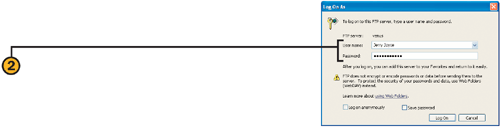
![]() If you’re required to log on to the site, enter the user name and password that were assigned to you by the administrator of the site, and click Log On. If the dialog box doesn’t appear, right-click the window, and choose Login As to display the Log On As dialog box.
If you’re required to log on to the site, enter the user name and password that were assigned to you by the administrator of the site, and click Log On. If the dialog box doesn’t appear, right-click the window, and choose Login As to display the Log On As dialog box.
To search for a specific item on the Internet—a list of sources where you can buy other Plain & Simple books, for example, or the menu and locator map for that new restaurant you want to try—you can jump right to a search page and set up your query. Once the results are displayed, you can jump to the page that contains the information you’re looking for, and, if it’s not what you want, you can try another page.
Tip
To change or eliminate the animated character in the Search Companion pane, use a different search engine, the Indexing Service, or the advanced search fields; then click Change Preferences in the Search Companion pane, and make your changes.
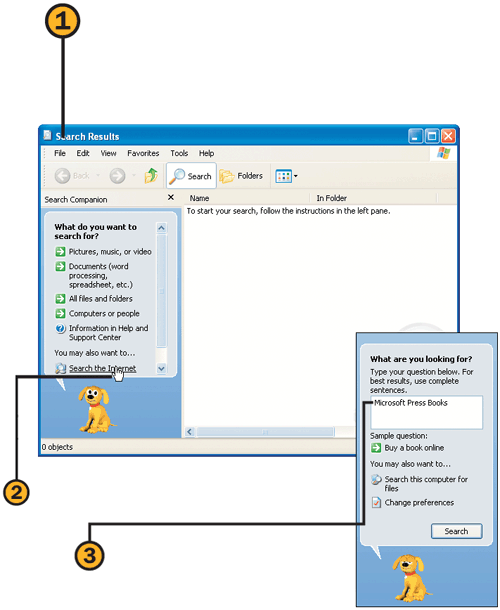
![]() Click the Start button, and choose Search from the Start menu to display the Search Results dialog box. Connect to the Internet if you aren’t already connected.
Click the Start button, and choose Search from the Start menu to display the Search Results dialog box. Connect to the Internet if you aren’t already connected.
![]() Type the information you want to use as your search criterion, and press Enter.
Type the information you want to use as your search criterion, and press Enter.

![]() Click to maximize the window if it isn’t already maximized.
Click to maximize the window if it isn’t already maximized.
![]() Click a link in the search results.
Click a link in the search results.
![]() Conduct any other related actions you want.
Conduct any other related actions you want.
![]() Close the Search Companion when you’ve finished with the search results.
Close the Search Companion when you’ve finished with the search results.
If you use more than one computer or more than one type of browser to explore the Internet, you don’t need to duplicate your list of favorite Web sites, nor do you need to duplicate the registrations, sign-ins, and customizations for Web sites that usually keep that information stored as cookies on your computer. Instead, you can export your list of favorite sites and cookies from one computer or program and import them onto the other computer.
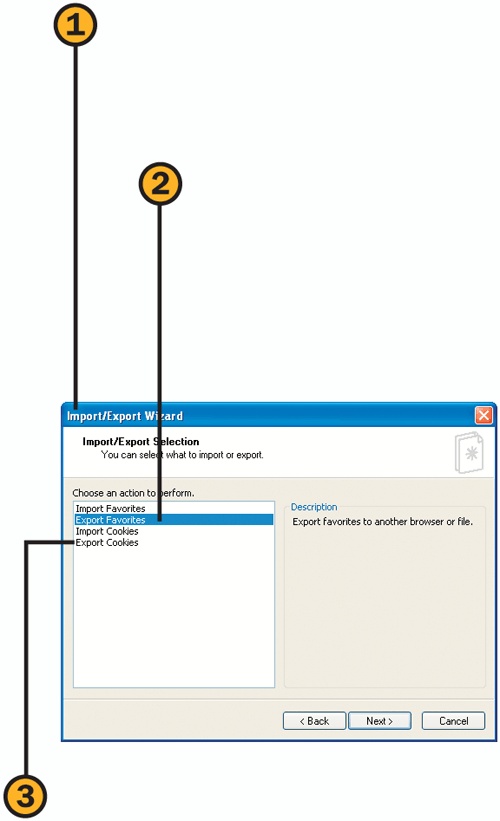
![]() With Internet Explorer running, on the computer that contains the items you want to transfer, choose Import And Export from the File menu to start the Import/Export Wizard. Click Next to start the wizard.
With Internet Explorer running, on the computer that contains the items you want to transfer, choose Import And Export from the File menu to start the Import/Export Wizard. Click Next to start the wizard.
![]() Step through the wizard specifying
Step through the wizard specifying
The location of your Favorites list (usually already selected for you).
That you want to export your Favorites list.
The location in which you want to save the file containing the information.
![]() Use the wizard again to export the cookies if you want to transfer them too.
Use the wizard again to export the cookies if you want to transfer them too.
![]() Transfer the files to a location that will be accessible by the other computer, such as a shared folder or removable storage—a disk or USB storage device, for example.
Transfer the files to a location that will be accessible by the other computer, such as a shared folder or removable storage—a disk or USB storage device, for example.

![]() With Internet Explorer running, on the computer to which you want to transfer the information, choose Import And Export from the File menu to start the Import/Export Wizard. Click Next to start the wizard.
With Internet Explorer running, on the computer to which you want to transfer the information, choose Import And Export from the File menu to start the Import/Export Wizard. Click Next to start the wizard.
![]() Step through the wizard specifying
Step through the wizard specifying
That you want to import Favorites information.
The location of the file containing the information you previously exported.
The destination folder.
![]() Repeat the wizard to import cookies if you previously exported them.
Repeat the wizard to import cookies if you previously exported them.