
CHAPTER 25. Basic TCP/IP Services and Applications
SOME OF THE MAIN TOPICS IN THIS CHAPTER ARE
The File Transfer Protocol (FTP) 404
Using Telnet and FTP with a Firewall 424
Other Services and Applications Built on the TCP/IP Suite 433
In the preceding chapter, it was mentioned that TCP/IP usually refers not just to the two protocols represented by its acronym (the Transmission Control Protocol and the Internet Protocol), but also to other related protocols, services, and applications that were developed to work together. These are referred to as the TCP/IP protocol suite. A wide range of services and applications have been developed to work with TCP/IP, and most implementations contain a standard set of these, which are the subject of this chapter. In addition to services and applications, other protocols have evolved along the way as the Internet has grown, such as the Simple Mail Transfer Protocol (SMTP), discussed in the next chapter, which makes global email possible.
This chapter deals with the TCP/IP suite of utilities that are generally used by end users, and the protocols that these utilities use to communicate.
![]() Troubleshooting utilities, such as Ping and Traceroute, among others, are covered in Chapter 27, “Troubleshooting Tools for TCP/IP Networks.”
Troubleshooting utilities, such as Ping and Traceroute, among others, are covered in Chapter 27, “Troubleshooting Tools for TCP/IP Networks.”
Because you’ve already read about how protocols within the TCP/IP protocol suites get data from one point to another, it’s time to look at some of the protocols and applications you can use on a network. In this chapter you will see examples from various operating systems, including Unix, Linux, and Windows.
For some of the more important applications, such as FTP and telnet, we’ll look closely at the protocol itself and the messages that are exchanged between client and server. These are the actual protocol commands that a particular utility uses to communicate with its counterpart. These low-level message or command exchanges can be useful when you are troubleshooting these applications using a protocol analyzer.
The sample syntaxes for commands found in this chapter are meant to show you that it’s a good thing help files (or man pages) were invented. The difference in a command from one system to another can vary greatly.
The File Transfer Protocol (FTP)
FTP is used to transfer files between computers. It is a complex protocol that enables the exchange of data files using different methods of data representation and file storage. In its simplest form, FTP uses clear-text username and password exchanges and is not considered to be a very secure utility. FTP was originally created when the Internet was still composed mostly of large business, government, and educational institutions, and a breach of security wasn’t considered that big of a threat. When used on the Internet, however, most every legacy TCP/IP utility is best used in a secure environment. The commands in this chapter show you how to use FTP. To ensure a secure exchange of information, be sure to read the chapters in Part VIII, “System and Network Security.”
The syntax for FTP varies from one vendor’s implementation to another. However, the simplest format, used to initiate a connection, is
ftp hostname
in which you simply follow the ftp command with a hostname—for example, ftp ftp.archive.org. You also can use the dotted-decimal address instead of the DNS name of the system with which you want to establish a connection. Alternatively, you can enter ftp at the command prompt and then, from the ftp> prompt, enter the commands needed to accomplish a particular task.
Tip
The Web site ftp.archive.org is a great place to practice using ftp commands, and is also a great place to obtain a lot of free files if you are interested in historical films. At this site you can set your default directory to pubmovies and will find several thousand “ephemeral” films that have been encoded in several different digital formats (take your pick). These films include everything from home movies to corporate films, as well as TV commercials and—for us old folks—those flicks you used to see in high school way-back-when, telling you how to behave on a date! This site is a treasure trove of files that you should investigate if you have any interest in twentieth-century life.
A lot has changed in the past 20 to 30 years. More secure forms of authentication and data exchange have been added to create more secure forms of FTP. Before we look at a few common FTP clients and their syntaxes, let’s look at the basic FTP protocol and get a feel for how it works.
Note
The File Transfer Protocol can be found in a large number of RFC documents that were created over the years. The main RFC that most documents point you to is RFC 959, “File Transfer Protocol (FTP).” RFC 2151, “A Primer on Internet and TCP/IP Tools and Utilities,” is also a nice read and covers many of the utilities in this chapter. RFC 2228, “FTP Security Extensions,” deals with the inherent security problems found in the FTP protocol. This last RFC discusses extensions that can be used to provide for secure authentication and encryption for the FTP protocol. In addition, there are several proposed RFCs that are on the path toward becoming a standard. RFC 2640, “Internationalization of the File Transfer Protocol,” and RFC 2428, “FTP Extensions for IPv6 and NATs,” provide insight into the future of FTP.
FTP is based on a client/server architecture. An FTP server (called a daemon on Unix or Linux systems and a service on Windows systems) manages a file system (anything from a single directory to a disk farm). FTP servers authenticate the client user using a username and password, and then work with the client to transfer files between the client and server computers. The basic protocol is a simple exchange of messages. Traditional FTP uses a simple command-line interface. Today, many shareware and commercial GUI versions of FTP are available. For example, if you are already using a favorite FTP site, try using a URL such as ftp://ftp.archive.org to see whether your browser supports a GUI interface for FTP. Either way, command line or GUI, it is an extremely useful utility because it allows the transfer of many types of files between two hosts on the network.
Note
FTP clients come in many forms. As mentioned in the text of this chapter, you can use a command-line interface using a computer running Unix/Linux or any Windows operating system. Really, just about any system running the TCP/IP protocol stack is likely to have FTP included as a service. Most browsers support the prefix “ftp” just as they do the “www” prefix when browsing Internet sites. You can also download GUI FTP applications that operate outside the command line or browser interface. Use a search engine and you will find many of these applications. Most differentiate themselves from others by providing additional features, such as an easy-to-use interface or integration with other applications, such as Windows Explorer.
FTP Ports and Processes
The FTP server daemon listens in the background for FTP requests on TCP port 21. In the literature, the server is composed of two components, though they are often combined into a single program. The first is the Server-PI, which stands for “server protocol interpreter.” This is the component that listens to TCP port 21 and interacts with its client counterpart, the User-PI. The user protocol interpreter initiates an FTP session by sending a request to the server. The client’s request can include a port that the client wants the server to use when it opens a data channel.
The second component of the server is the Server-DTP, which stands for “server data transfer process.” This is the code that interacts with its counterpart, the User-DTP, to perform the actual file data transfers. An overview of this process appears in Figure 25.1. The important thing to notice in this figure is that two channels of communication are used for FTP—one for commands and one for the actual exchange of data—and that both of these channels work in both directions.
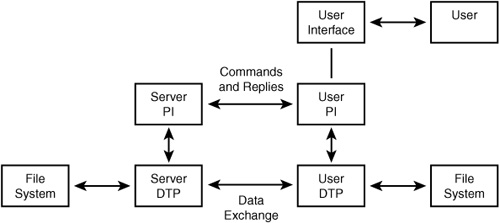
Figure 25.1. The FTP session consists of both a command and a data channel.
The client’s User-PI should be listening on the specified port for incoming data transmissions before it has issued the commands necessary to start a data transfer from a remote server. The actual commands used on the control connection are in the same format used for the telnet utility (NVT-ASCII), which is discussed later in this chapter.
Data Transfers
All FTP data transfers take place using bytes (8 bits), independent of the size of the actual data being transferred. That is, if the local file system uses a different size for storage, such as a word or a floating-point numerical representation, FTP just sends 8 bits at a time. The data is reconstructed on the receiving end into its original format. The client and server applications are responsible for making sure that conversions are done on their end to make data usable on their respective systems.
When you’re using an FTP client, it is important that you know what type of file you are sending or receiving. The default for most clients is to send/receive ASCII text files. If you want to send or receive an executable program, most clients use the command “binary” to inform the server you interact with that this is not an ASCII text file.
Additionally, there are three modes that are used for transfers:
![]() Stream mode—This is a simple transmission of a stream of bytes. To represent record and file structures using this mode, End of Record (EOR) and End of File (EOF) control bytes can be used. Control bytes consist of 2 bytes. The first byte is set to all ones (which is the escape character), and the second byte is the control character. A value of 1 for this byte indicates that it is the EOR character. A value of 2 indicates that it is the EOF character. A value of 3 indicates both characters (EOR and EOF). Note that if an actual byte of all ones is in the data stream, it is transmitted as a 2-byte sequence also, with both bytes being set to all ones.
Stream mode—This is a simple transmission of a stream of bytes. To represent record and file structures using this mode, End of Record (EOR) and End of File (EOF) control bytes can be used. Control bytes consist of 2 bytes. The first byte is set to all ones (which is the escape character), and the second byte is the control character. A value of 1 for this byte indicates that it is the EOR character. A value of 2 indicates that it is the EOF character. A value of 3 indicates both characters (EOR and EOF). Note that if an actual byte of all ones is in the data stream, it is transmitted as a 2-byte sequence also, with both bytes being set to all ones.
![]() Block mode—This transmission mode sends a series of data blocks, each of which has a header. The header information consists of 3 bytes of information. The 16 lower-order bits indicate the byte count, which is the total length of the block (expressed in bytes). The remaining high-order byte is used for a descriptor code. A descriptor code value of 128 indicates that the end of a data block is the end of a record (EOR). A value of 64 indicates that the end of a data block is the end of a block of data (EOF). A value of 32 is used to indicate that there is reason to suspect errors in the data stream.
Block mode—This transmission mode sends a series of data blocks, each of which has a header. The header information consists of 3 bytes of information. The 16 lower-order bits indicate the byte count, which is the total length of the block (expressed in bytes). The remaining high-order byte is used for a descriptor code. A descriptor code value of 128 indicates that the end of a data block is the end of a record (EOR). A value of 64 indicates that the end of a data block is the end of a block of data (EOF). A value of 32 is used to indicate that there is reason to suspect errors in the data stream.
![]() Compressed mode—In this mode, data can be sent using various compression mechanisms.
Compressed mode—In this mode, data can be sent using various compression mechanisms.
All transfers are done in 8-bit bytes, regardless of the way the bits are interpreted on the receiving system. The data types that FTP allows are very basic. The ASCII type consists of standard 8-bit NVT-ASCII characters. In this format, the carriage-return and line-feed characters are used to indicate the end of a line. Some systems, such as many Unix systems, do not use this combination of characters, and the receiving side converts the received stream of bytes to its own format.
The EBCDIC type (Extended Binary-Coded Decimal Interchange Code) is a method of character representation used mainly on IBM mainframe computers, which were quite popular back when development on FTP (and its predecessors) first started. The EBCDIC and ASCII transfers are sent as 8-bit characters and are similar, with just the character representations of the numerical values differing.
The IMAGE mode of transfer sends data as a simple stream of bits, which are stored in the usual 8-bit transfer byte used by FTP. At the receiving end, the bits are stored in a contiguous manner, with padding added to the end of a file or record as necessary. The method used must ensure that the process of this padding can be reversed if the file is transferred to another system that does not use that method.
The LOCAL type allows the user to set a logical size for the bytes to be sent. All data is still sent as a byte, but on the receiving end this command allows the receiver to know how to reassemble the bits into the correctly sized bytes for that operating system.
FTP Protocol Commands
This section looks at some of the more useful commands that the protocol uses to control an FTP session. This is not an exhaustive discussion of all possible protocol commands, however. The next section looks at examples of the syntax for FTP for several implementations so that you can see how various FTP applications work, and how their command structure matches up user commands to the commands actually used by the FTP protocol processes.
Note that these “protocol commands” are the commands exchanged by client and server applications on the network. Commands entered by an end user are a different matter altogether. Many end-user commands involve a sequence of protocol commands to accomplish the desired function. Here we examine the commands exchanged between the server and client applications, not the command entered by a user.
FTP protocol commands start with the command code itself and are usually followed by one or more arguments. All FTP protocol commands are four characters or fewer and can be grouped into a few categories:
![]() Access Control Commands (ACT)—These are used to authenticate the user, change directories, and so on.
Access Control Commands (ACT)—These are used to authenticate the user, change directories, and so on.
![]() Transfer Parameter Commands (TPC)—These commands control the actual data transfer process, such as the port used and the file structure.
Transfer Parameter Commands (TPC)—These commands control the actual data transfer process, such as the port used and the file structure.
![]() FTP Service Commands (FSC)—These commands indicate the function the user wants to perform, such as sending or receiving a file, or perhaps renaming or deleting a file.
FTP Service Commands (FSC)—These commands indicate the function the user wants to perform, such as sending or receiving a file, or perhaps renaming or deleting a file.
Table 25.1 is a list of commonly used commands along with a description of their use.
Table 25.1. FTP Protocol Commands
As you can see from this table, there are many commands that the client side can use to control file transfers. In the next section we will look at the replies that the FTP server can send in response to these commands. Remember, these are the commands used in the protocol exchange. The replies in the next section are not manually entered by a user at a keyboard. They are the replies sent by the FTP server in answer to the protocol commands of the FTP client.
Server Replies to FTP Commands
In the FTP protocol, every command must be followed by a reply from the server. In some cases, more than one reply will be sent to the client. The actual reply is a three-digit number, but it is transmitted as text characters. Following this number is usually some variable-length text. The numerical value is used by the program, and the text is intended for the user of the FTP client. Because some of the text is configurable, you can expect to see different text for the same numerical reply from one implementation to another. For example, you can usually specify the text that is displayed on the client when the user first logs in to your server.
To reply to the client, the three characters representing the numeric reply code are sent, followed by a minus sign (–) or space character and then the reply text. A simple convention is used for multiline text messages. The first line contains the three-letter numerical code followed by the –character and then the text. The last line replaces the –character with the space character. By matching up the two three-digit codes, the client can determine the beginning and ending of a particular multiline message.
Reply Codes
Each of the actual digits that make up the reply code is significant. If you’ve ever wondered why all those text lines start with numbers, you’ll find their meaning in this section. The text displayed will vary from one vendor to another, but the codes should still be implemented for the same general reply condition.
The first digit indicates success or failure:
![]() A value of 1 indicates a Positive Preliminary reply, which means that the function requested by the client has been started.
A value of 1 indicates a Positive Preliminary reply, which means that the function requested by the client has been started.
![]() A value of 2 is the Positive Completion reply, which means that the requested function was successfully performed.
A value of 2 is the Positive Completion reply, which means that the requested function was successfully performed.
![]() A value of 3 is the Positive Intermediate reply, indicating that the command was received by the server but has not been executed. The server might be waiting for further information.
A value of 3 is the Positive Intermediate reply, indicating that the command was received by the server but has not been executed. The server might be waiting for further information.
![]() A value of 4 indicates a Transient Negative Completion reply. This means that a temporary error situation has prevented the function requested by the client from being performed.
A value of 4 indicates a Transient Negative Completion reply. This means that a temporary error situation has prevented the function requested by the client from being performed.
![]() A value of 5 in the first position is the Permanent Negative Completion reply. This indicates that the requested action was not performed. Unlike the Transient message code, the user is not encouraged to retry the command.
A value of 5 in the first position is the Permanent Negative Completion reply. This indicates that the requested action was not performed. Unlike the Transient message code, the user is not encouraged to retry the command.
The second digit is used to place message types into groups:
![]() A value of 0 refers to a syntax error.
A value of 0 refers to a syntax error.
![]() A value of 1 is an informational message.
A value of 1 is an informational message.
![]() A value of 2 indicates that the reply refers to either the control or the data connection.
A value of 2 indicates that the reply refers to either the control or the data connection.
![]() A value of 3 is used for replies regarding authentication and accounting, such as during the initial logon process.
A value of 3 is used for replies regarding authentication and accounting, such as during the initial logon process.
![]() A value of 4 is unspecified at this time.
A value of 4 is unspecified at this time.
![]() A value of 5 means that the reply refers to the status of the file server’s file system as it relates to the user request.
A value of 5 means that the reply refers to the status of the file server’s file system as it relates to the user request.
The third digit in the response code is used to further divide the replies based on the categories indicated by the second digit.
In Table 25.2, you can see the recommended reply codes, in numerical order, as specified in RFC 959.
Table 25.2. FTP Numerical Reply Codes
Using a Windows FTP Command-Line Client
Client implementations can vary from simple command-line interfaces to programs that enable you to drag and drop using a graphical interface. All Windows client operating systems, from 98 to XP, provide a default FTP client that works from the command line. The syntax for the Windows XP Professional FTP client is simply the command FTP followed by the server to which you want to connect. The complete syntax for the command is
ftp [–v] [–n] [–i] [–d] [–g] [–s: filename] [-a]![]() [-A] [-w:windowsize] [hostname]
[-A] [-w:windowsize] [hostname]
where
![]()
-v—This parameter suppresses responses from the remote server.
![]()
-n—The Windows FTP client automatically prompts you for a username and password. This option suppresses these prompts. You are presented with the ftp> prompt and allowed to use the USER command to specify your logon username.
![]()
-i—This turns off prompting that occurs when transferring multiple files with the MGET or MPUT command. This is the same function performed by the PROMPT command when you’re at the ftp> prompt.
![]()
-d—Enables debugging the FTP session. All commands (the actual protocol commands) sent between the client and server are displayed.
![]()
-g—Disables filename globbing. When globbing is turned on, you can use wildcards (asterisk and question mark) in filenames. This option forces you to use the exact path and filename.
![]()
-s:filename—The commands found in the file named filename are executed after the FTP command line is entered.
![]()
-a—Indicates that any local interface can be used when binding the data connection.
![]()
-A—Performs an anonymous logon to the FTP server.
![]()
-w:windowsize—Specifies the transfer buffer size. The default is 4,096 bytes.
![]()
hostname—The hostname or IP address of the remote server.
You can also just enter the command ftp and enter a state called interactive mode. During interactive mode, you will see the prompt ftp> at which you can enter commands. These include some of the same options you can enter on the command line and additional commands that can be used to transfer files, list directories, and so on. The following commands are available with the Windows XP client:
![]()
! command—Yes, it’s an exclamation point. Used with no command, this causes you to exit to the “shell,” which on a Windows system is the command prompt. After you have performed any tasks that you need to, you can type exit to return to the current FTP session. This command enables you to escape temporarily to check execute commands on the local system without being forced to terminate the FTP program. Alternatively, you can enter a command (separated by a space from the exclamation character) and the program will execute the command on the local system and remain the FTP client program.
![]()
? or help—Typing ? prints a list of commands available. The word help followed by a command gives you local help text for that command.
![]()
append filename filename—Appends data to an existing file.
![]()
ascii—Sets the transfer type to ASCII (default).
![]()
bell—Toggles on or off a bell that sounds after each file transfer. The default is off.
![]()
binary—Sets the file transfer type to binary for image files.
![]()
bye—Exits the client and ends the current FTP connections.
![]()
cd directory—Changes the working directory on the remote FTP server.
![]()
close—Closes the current connection and leaves you in the ftp> interpreter prompt so that you can continue to perform other actions, such as open another server.
![]()
debug—Similar to the -d command-line option; causes the protocol messages exchanged between client and server to be displayed, prefixed with the characters - - - >.
![]()
delete filename—Deletes a file on the remote server.
![]()
dir—Lists files and directories on the remote server. You can follow this command with a wildcard to narrow your listing, provided that globbing is turned on.
![]()
disconnect—Disconnects the session with the current server, leaving you in the FTP interpreter prompt to continue working.
![]()
get filename—Is used to get a single file from the remote server.
![]()
glob—Toggles (as does the -g command-line option) for globbing filenames. This is a simple way to say that you can use wildcards in local filenames and pathnames, and it is the default.
![]()
hash—What you used to eat in the Army. Actually, this command causes a hash mark (more correctly called the number-sign character) to be printed for every 2,048 bytes transferred. This is helpful in a long transfer because you can watch the progress and determine whether it has stalled or stopped.
![]()
lcd pathname—Changes the working directory on the client’s local system. Compare to CD, which changes the working directory on the remote server’s system.
![]()
literal text—Sends text, verbatim, to the server. A single response is expected back.
![]()
ls—Displays an abbreviated listing of the files or directories on the remote server system. Similar to the dir command.
![]()
mdelete filenames—Is used to delete more than one filename on a remote server. You can use wildcards for this if needed (check that globbing).
![]()
mdir—Displays a listing of files and directories that exist on the remote sever.
![]()
mkdir directoryname—Creates a new directory (or subdirectory) on the remote server.
![]()
mls—Displays an abbreviated listing of the files and directories that exist on the remote server.
![]()
mput filenames—Performs multiple file transfers from the client to the server, using only one command. Wildcards can be used.
![]()
open hostname—Is used to connect to a specific server after the FTP interpreter prompt has been issued.
![]()
prompt—Is used to toggle on or off prompting during multiple file transfers. The default is on. This means that if you use mget, mdel, or mput to work with files, you’ll get prompted for each file. Toggle this off if you want to work with a large number of files and let it just run without having to answer Y or N to each prompt for each file.
![]()
put filename—Transfers a single file to the remote FTP server from the client.
![]()
pwd—Stands for Print Working Directory. This displays the current directory on the remote FTP server.
![]()
quit—Exits the FTP client and ends any outstanding connections.
![]()
quote—Same function as the literal command.
![]()
recv—Same as the get command.
![]()
remotehelp—Displays help from the remote server.
![]()
rename filename filename—Renames a file on the remote FTP server.
![]()
rmdir directory—Removes a directory on the remote FTP server.
![]()
send filename—Same as the put command.
![]()
status—Toggles on or off a status display.
![]()
trace—Toggles on or off a display showing the routes taken by each packet.
![]()
type type—Sets the current transfer type. Examples: type ascii (for text files) or type binary (for program files).
![]()
user username—Is used to specify a username during the logon process.
![]()
verbose—Toggles on or off verbose mode. The default is on, so all replies sent by remote server are displayed.
As you can see, many commands duplicate functions performed by others. Over the years, commands have been added that are easier to remember. For example, you’ll find that some of the commands supported by Linux are different than Windows FTP clients.
Note that there are usually two commands to perform file functions, depending on whether you are operating on one or multiple files. For example, use GET filename to get a single file, but to get multiple files, use MGET filename in a format such as MGET REPORTS*.*. Don’t forget that, when using the “M” (multiple) commands, you might want to first issue the PROMPT command to turn interactive mode off. Otherwise, you will be prompted before downloading each file and have to enter Y or N. Conversely, you can leave prompting turned on if you know you want to retrieve most of the files that match your file specification but want to exclude a few by answering no to the prompts.
In the following listing, you can see how the command is invoked to connect to the remote server, the reply messages received from the server, and a directory listing produced by using the DIR command. Next, the ls command is used to show the difference in the output. Finally, the session is set to show hash marks (hash) and then set to do a binary download (binary). You can see the results of using the HASH command and then the GET command to retrieve a file from the remote server.
J:>ftp ftp.twoinc.com
Connected to ftp.twoinc.com.
220-ArGoSoft FTP Server for WinNT/2000, Version 1.2 (1.2.1.1)
220-Welcome to Active Web Hosting
220-For more information on our
220-services please call
220 (800) 946-7764 or (702) 451-1577.
User (ftp.twoinc.com:(none)): twoinc.com
331 User name OK, need password
Password:
230 User twoinc.com logged in successfully **
ftp> dir
200 Port command successful
150 Opening binary data connection
drw-r--r-- 1 user group 0 Mar 06 00:00 ..
-rw-r--r-- 1 user group 436 Feb 24 13:36 cnt.htm
-rw-r--r-- 1 user group 455 Feb 24 13:36 default.htm
-rw-r--r-- 1 user group 949 Feb 24 13:36 default.html
-rw-r--r-- 1 user group 807 Feb 24 13:36 emp.htm
-rw-r--r-- 1 user group 1729597 Mar 06 09:52 hiroshimamontage.mp3
-rw-r--r-- 1 user group 268 Feb 24 13:36 lnk.htm
drw-r--r-- 1 user group 0 Jan 26 12:56 logs
-rw-r--r-- 1 user group 1969 Feb 24 13:36 pub.htm
-rw-r--r-- 1 user group 1317 Feb 24 13:36 who.htm
226 Transfer complete
ftp: 807 bytes received in 0.15Seconds 5.38Kbytes/sec.
ftp> ls
200 Port command successful
150 Opening binary data connection
..
cnt.htm
default.htm
default.html
emp.htm
hiroshimamontage.mp3
lnk.htm
logs
pub.htm
who.htm
226 Transfer complete
ftp: 147 bytes received in 0.05Seconds 2.94Kbytes/sec.
ftp> hash
Hash mark printing On ftp: (2048 bytes/hash mark) .
ftp> binary
200 Type set to Image (binary)
ftp> get hiroshimamontage.mp3
200 Port command successful
150 Opening binary data connection
#############################################################################
#############################################################################
#############################################################################
#############################################################################
############################################
226 Transfer complete
ftp: 1729597 bytes received in 573.14Seconds 3.02Kbytes/sec.
ftp>
As you can see, using the FTP utility is an easy way to examine directory information on remote systems or to exchange files.
Using Red Hat Linux FTP
Red Hat Linux, since version 8.0, has offered both a GUI FTP client and a command-line client. If you choose to install the server version of Red Hat Linux, you will also find an FTP server. In Figure 25.2 you can see an example of the GUI version. To start up the GUI FTP client, click on the Red Hat symbol (it’s in the same place as the Start button on Windows systems), Extras, Internet, and then gFTP.
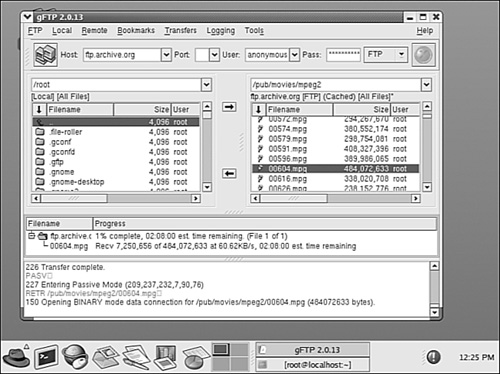
Figure 25.2. Red Hat Linux offers a GUI FTP client.
From Figure 25.2 you can see that the GUI FTP client allows you to enter the destination location (Host = ftp.archive.org) and also lets you use the CD (change directory) command to get to the target directory (/pub/movies/mpeg2). From this directory you simply double-click on the file to download. The lower portion of the window shows the progress being made (the number of total bytes for the file, and the number of bytes transferred so far). At the very bottom of the window, you can see the actual FTP commands that are used during this session. These can be just as useful as those from a command-line client when you’re trying to determine what has gone wrong during troubleshooting efforts. Also notice that on the right side of the window you can see the files available in the local directory (in this case the root directory, which you shouldn’t use unless you know what you are doing!).
Tip
Because this GUI client is so easy to use, it is the preferred method for those who are just now learning how to use Linux. One important thing to note here is that, unlike with Windows, there are several graphical user interfaces, usually referred to as desktops in the Unix/Linux community. In the example shown in Figure 26.2, you are seeing the Gnome desktop. Another popular desktop is the KDE desktop. Depending on the company from which you obtain your Linux system, you may find one of these, both of these, or other desktops. Some even allow you to use one desktop while listing accessories from the other desktops installed on the system! Additionally, Linux itself is just an operating system. The applications, such as the GUI FTP client described here, are open-source applications that Red Hat decided to ship with its version of Linux. With other Linux vendors, your mileage may vary, as the saying goes.
Using the Red Hat Linux Command-Line FTP Client
Just about every operating system in existence today offers, just as Windows does, a command-line version of the FTP client. Although a GUI version is usually easier to use, the command-line version offers specific capabilities (as you learned earlier about the Windows version) that can be incorporated into script files. For those who are used to using a command-line version, you’ll find it in Linux also. If you are trying to automate the transfer of a file (such as a report or data file created by an application) to another system, then the command-line version is the choice to make. You could manually use the GUI version, but if you use the command-line version, the process can be automated. Simply check the log file to ensure that the file has successfully been transferred to (or from) the other system.
Note
In the FTP syntax listing for Linux, keep in mind that unlike some other operating systems, Linux is case-sensitive. That is, a –a is not the same as a –A. And the command ftp is to be entered, not FTP. Other commands, such as quit, will not work if capitalized. You will find that many Unix/Linux utilities use the same alphabetic characters in the same utility, and it is the case of the character that makes the difference. And don’t forget filenames! If you attempt to send a file from a Unix/Linux system that is named myfile, you’ll get an error (file not found) when trying to send MYFILE or MyFile.
The syntax of the Red Hat Linux command-line version of the FTP client is
ftp [-v] [-d] [-i] [-n] [-g] [-k realm] [-f] [-x] [-u] [-t] hostname
where
![]()
-v—Invokes the verbose option, which makes the FTP client show all responses that the remote server sends. Also displays the statistics of the session.
![]()
-d—Displays debugging for troubleshooting purposes.
![]()
-i—For multiple file transfers, such as filenames specified with a wildcard, this option will prevent the ftp utility from prompting you (Y or N) for each file.
![]()
-n—This command prevents ftp from attempting an autologin to the remote server. The file named .netrc in the user’s home directory is checked to see whether authentication is necessary. Otherwise, you will be prompted for authentication credentials when logging in to a remote server.
![]()
-g—As described in the previous syntax for Windows, prevents globbing.
![]()
-k realm—This is used when Kerberos authentication is used. This command will obtain the authentication tickets valid for the Kerberos realm.
![]()
-f—This option causes authentication credentials to be forwarded to the remote computer.
![]()
-x—The encryption procedures will be negotiated with the remote host after a successful authenticated login.
![]()
-u—Causes the client to negotiate authentication methods with the remote system. The AUTH command, as described earlier in this chapter, is used instead.
![]()
-t—This option enables packet tracing for the session.
![]()
hostname—This is the DNS hostname, or the IP address that you want to connect to using ftp.
Similar to the Windows version, if you simply enter ftp for the Red Hat command utility, you will enter a command-line interpreter mode in which you can issue commands interactively. Most of the commands you can enter in interactive mode are the same as the Windows versions. Following is a list of additional commands provided by the Red Hat ftp command-line utility in interactive mode.
![]()
account [password]—Used to enter a second password after the initial logon if the server computer requires it. If you just enter account, you will be prompted for the password.
![]()
case—This command toggles on/off filename case mapping. When off, which is the default, filenames from remote systems that use uppercase letters are converted to lowercase letters when a file is transferred to the client.
![]()
cdup—Similar to cd, this command changes the current directory on the remote server. The working directory is set to the parent directory of the current working directory.
![]()
chmod mode filename—This change mode command is used to alter the permissions (mode) of the remote filename, provided you have the right to do so.
![]()
cr—For ASCII file transfers, this command toggles on/off the stripping of carriage-return (CR) characters. Some operating systems, such as Windows, use a CR/LF (linefeed) character to denote the end of a text record. Unix and Linux use just the LF character. When toggled on, the CR character is removed. Otherwise, both CR and LF are left in the file retrieved from the server.
![]()
debug—Toggles debug mode on/off. When on, commands sent to the remote server are printed, preceded by the ---> text string.
![]()
help command—Provides a short help text message for command.
![]()
idle seconds—Sets the inactivity timer on the server (after which a disconnection can occur). When it’s used without seconds being specified, the current inactivity timer value is displayed.
![]()
macdef macroname—Used to define a macro, which is a set of commands to be executed. See help text for information on defining macros in FTP.
![]()
mode modename—Sets the default transfer mode to modename. The default is stream mode.
![]()
modtime filename—Displays the time a file on the remote server was last modified.
![]()
newer filename—If the modification time on a remote file is newer than a file of the same name on the client, the newer file is retrieved from the server. If the file does not exist on the client, the remote file is retrieved.
![]()
reget—Similar to the get command, this command will check to see whether a file with the same filename exists on the local machine. If so, and if the file is smaller than the same file on the remote server, then it is assumed that a previous file transfer was interrupted, and the reget command restarts the transfer from the point where it stopped. Useful for transferring large files.
![]()
restart marker—Similar to reget, this restarts an interrupted transmission. For most Unix/Linux systems, marker is a byte offset into the file indicating where the file transfer should be resumed.
![]()
runique—Useful when retrieving files that have the same names as existing files on the client. Instead of replacing the file, a number in the format of “.1” is attached to the filename, with a possible total of 99 versions of the file. runique toggles this behavior on/off.
![]()
size filename—Gets the size of a remote file.
![]()
sunique—Similar to the runique command, causes unique filenames to be used on a remote system when the name of the file being sent already exists on the remote server. The remote server must support this command.
![]()
system—Returns the operating system running on the remote server.
![]()
tenex—Sets the file transfer to a type used to exchange data with a TENEX machine.
There are other commands available in interactive mode, such as those related to security. Use the help command interactively to learn about these and other commands that are not often used.
The Trivial File Transfer Protocol (TFTP)
This protocol was developed to be a “lite” version of FTP, where security and elaborate mechanisms for error control were not needed. Generally, TFTP is used to download operating systems, firmware upgrades, and other files to network devices or diskless workstations. For example, a diskless workstation can use BOOTP (or DHCP) to obtain IP configuration information and the location of a TFTP server, along with the name of the file to download. For more information about BOOTP and DHCP and how they allow diskless workstations to obtain the information they need in order to boot, see Chapter 28, “BOOTP and Dynamic Host Configuration Protocol (DHCP).”
No authentication is used, so this is a service that should be used only where it is absolutely needed. The syntax for the TFTP command is
tftp [-i] host [get | put] source [destination]
The command-line option -i specifies a binary image transfer, which is precisely the kind of transfer for which this utility is usually used. If you omit this option, an ASCII file transfer is done by default.
The get command specifies that the source file is to be transferred from source to destination. The put command works, just as in FTP, in the opposite direction to send a file from the client to the TFTP server.
The following are other important differences between FTP and TFTP:
![]() FTP uses TCP, whereas TFTP uses UDP.
FTP uses TCP, whereas TFTP uses UDP.
![]() Only file transfers are supported. Directory listings, file deletions, and other features of FTP are not implemented in TFTP.
Only file transfers are supported. Directory listings, file deletions, and other features of FTP are not implemented in TFTP.
![]() TFTP was designed to be simple and compact so that its code could be stored in a small amount of read-only memory, making it an ideal solution for implementation in device firmware.
TFTP was designed to be simple and compact so that its code could be stored in a small amount of read-only memory, making it an ideal solution for implementation in device firmware.
The official specification for TFTP can be found in RFC 1350, “The TFTP Protocol (Revision 2).” It uses a simple set of messages to establish the file exchange. In each message, the first 2 bytes are reserved for use as an opcode. Five message types are used:
![]()
1—This opcode (RRQ) is used to initiate a read request to download a file from the TFTP server to the client. After the first 2-byte opcode, a variable number of bytes specifying the filename follows and is terminated with a zero byte. Following this is the mode used for the transfer. This can be the text netascii, which means that the transfer will consist of ASCII text lines terminated by the carriage-return/line-feed combination. The text octet in the mode field indicates that the data transfer will be a simple transfer of 8-bit octets of data.
![]()
2—This opcode (WRQ) is similar to the first one, except that the file transfer will be made from the client to the TFTP server.
![]()
3—This opcode (data) is used to send a block of data. The 2-byte opcode is followed by a 2-byte field that contains a block number. Following this is from 0 to 512 bytes of actual data.
![]()
4—This opcode (ACK) acknowledges the block transferred. Each block is acknowledged. The format for this packet is the 2-byte opcode followed by the 2-byte block number being acknowledged by the receiver.
![]()
5—This opcode (error) is reserved for reporting errors. The 2-byte opcode is followed by a 2-byte error code and a variable-length error message terminated by a zero byte. Note that, for most error types, the connection is aborted and must be tried again.
The interoperation of this protocol is quite simple. For each block sent, an acknowledgment is sent back to the sender. This is sometimes called a stop-and-wait protocol. Remember that TCP uses an acknowledgment mechanism in which one ACK can acknowledge multiple segments of data. In TFTP, each block is acknowledged.
Block numbers are numbered starting at 1. However, for a write request, the acknowledgment number returned to the sender is a zero because a data block has not yet been exchanged.
Termination of the file transfer is also simply done. When a block that has less than 512 bytes of data in it is received, the file transfer has finished. Because UDP is used instead of TCP, the TFTP client/server software must implement its own retransmission technique for blocks that get lost or damaged in the network. Again, to make the protocol as simple as possible, no checksum is calculated on the TFTP messages. Instead, the simpler methods used by UDP are depended on to catch any errors.
Ports used by TFTP are allocated on a client-by-client basis. When the TFTP server receives the first client request message on its well-known TFTP port of 69, the server then allocates another port for use and communicates this back to the client. The client can continue to use a port on its side of the connection. However, from that point on it uses the newly assigned port it received from the TFTP server as the server host port. This feature allows a TFTP server to service multiple requests from different clients. The well-known port of 69 is used only for the initial communication.
The Telnet Protocol
Telnet is another of the most useful tools that make up the TCP/IP protocol suite. The “remote terminal” telnet application enables you to establish an interactive logon session with a remote computer and execute commands as if you were logged directly into that remote computer. Telnet not only can be used to establish sessions with other computers, but also is embedded in many network devices, such as print servers (or HP Jet-Direct Cards), hubs, switches, and routers. Using telnet is an easy way to manage multiple network nodes—computer or network devices—from a central location.
However, basic implementations of telnet suffer from a similar problem that plagues FTP. It uses a clear-text method for passing user authentication information and the remaining data transfers.
The main RFC that defines basic telnet operation is RFC 854, “Telnet Protocol Specification.” In addition, many additional RFC documents have been issued to add security, provide additional functionality, or further clarify the Telnet protocol.
The protocol is based on three basic concepts:
![]() The Network Virtual Terminal (NVT)
The Network Virtual Terminal (NVT)
![]() Options negotiation
Options negotiation
![]() A symmetric view of terminals and processes
A symmetric view of terminals and processes
This protocol was designed to allow interactive sessions with terminals of many types. A basic Network Virtual Terminal is defined by the telnet protocol, but clients and servers can negotiate additional parameters using options. Because either side can initiate options negotiations, the protocol is called symmetric.
What Is a Network Virtual Terminal and NVT ASCII?
Each end of the telnet connection is called a Network Virtual Terminal. It is simply a data construct that keeps track of the current state of the terminal, keeping both ends in sync. The virtual terminal operates in a bidirectional manner, sending and receiving data from another remote NVT. The basic NVT uses a 7-bit ASCII code, stored in an 8-bit byte. The high-order bit is set to zero. Carriage-return and line-feed characters are transmitted to indicate the end of a line. The method of representing characters and delineating lines is known as NVT ASCII. You’ll find that many different TCP/IP utilities use this to communicate commands to and from the client and server.
Conversion to other codes can be done at each client’s end. The NVT has both a virtual terminal (or printer, as it’s called in the RFC) and a keyboard.
Characters that are entered on the keyboard at one end of the connection are locally echoed, and do not have to be echoed back from the remote terminal. Usually, a buffer is set aside in the host’s memory to store a line of characters for transmission. The characters are transmitted when a line is complete or until some other signal (from the user, for example) causes the line to be sent.
The basic NVT is designed to be the lowest common denominator for telnet sessions. Options can be negotiated, usually more so at the beginning of a session, that change the characteristics of the basic NVT. By a process of negotiation, both sides will always have the NVT default to fall back on if the other side of the connection does not support certain options. Thus, the NVT is the basic telnet terminal, without any extra options enabled.
Upon the initial connection, both sides are basic NVTs. Usually, options will be negotiated by both sides before the user has time to begin typing. Occasionally, option changes will be requested during the later data exchanges, but the basic setup for the session is done at the beginning.
Telnet Protocol Commands and Option Negotiations
Commands for the telnet protocol are 2 or 3 bytes in length, with the first character being the interpret as command (IAC) character. This character has the ASCII value of 255. If it is necessary to actually send this character as part of the data stream, it is sent as two successive bytes of 255. Following the IAC character, another command character usually is sent. For option negotiations, a third byte is used to indicate the option code being negotiated. In Table 25.3 you can see a list of the basic telnet protocol commands, along with descriptions of their functions.
Table 25.3. Telnet Protocol Commands
This simple command structure is used to establish a telnet session, negotiate the optional parameters, if any, and end the session. Telnet, like FTP and other client/server protocols, requires that a telnet server process listen on a well-known port, which in this case is port number 23. The server listens for incoming telnet commands from telnet clients.
Following is a short description of some of the protocol commands:
![]() Are You There—This command is used as sort of a “keep-alive” signal. It is intended to be sent after the connection has been idle for an amount of time. The remote end should respond with some visible response.
Are You There—This command is used as sort of a “keep-alive” signal. It is intended to be sent after the connection has been idle for an amount of time. The remote end should respond with some visible response.
![]() Erase Character—Most operating systems have the capability to backspace and erase a character. Again, telnet uses a common command for this function, because not all operating systems support it or use the same numerical code for this function.
Erase Character—Most operating systems have the capability to backspace and erase a character. Again, telnet uses a common command for this function, because not all operating systems support it or use the same numerical code for this function.
![]() Erase Line—This is similar to the Erase Character command, but it instead maps the local keyboard’s command sequence or key used to erase a line to a command that can be passed to the remote side of a connection.
Erase Line—This is similar to the Erase Character command, but it instead maps the local keyboard’s command sequence or key used to erase a line to a command that can be passed to the remote side of a connection.
![]() Interrupt Process—This command is used to map to the typical Ctrl+C or other character sequence used on a local machine to interrupt a process. This can differ from one computer operating system to another, hence the need for a common code to pass this condition to the other end of the connection.
Interrupt Process—This command is used to map to the typical Ctrl+C or other character sequence used on a local machine to interrupt a process. This can differ from one computer operating system to another, hence the need for a common code to pass this condition to the other end of the connection.
![]() Data Mark—This command is sent as part of a TCP Urgent segment and is notice to the receiving end that it should look for “interesting” characters (such as IP, AO, and AYT) in the data stream. This causes an immediate action. The TCP Urgent message followed by a DM also is called a telnet sync operation. This allows out-of-band communications for important events—for example, an IP that results from a user entering Ctrl+C.
Data Mark—This command is sent as part of a TCP Urgent segment and is notice to the receiving end that it should look for “interesting” characters (such as IP, AO, and AYT) in the data stream. This causes an immediate action. The TCP Urgent message followed by a DM also is called a telnet sync operation. This allows out-of-band communications for important events—for example, an IP that results from a user entering Ctrl+C.
Options and Negotiations
The standard NVT described in RFC 854 might not be sufficient for all situations, and thus the telnet protocol allows for a process of negotiation of options. This allows for additional capabilities and services to be provided using telnet. For example, an option could be used to provide for a different character set than the standard. Either side of the telnet session can send a request to the other side for an option. The receiving end can then reply with either an acceptance or a rejection of the option. If an option is accepted, it takes effect at once.
The following are some basic rules of the negotiation process:
![]() Option requests are sent only to change an option. If the option is already in effect, sending out a request for the option simply to announce that it is being used is not permitted.
Option requests are sent only to change an option. If the option is already in effect, sending out a request for the option simply to announce that it is being used is not permitted.
![]() Similar to the preceding rule, an option request for an option that is already in effect should not be acknowledged.
Similar to the preceding rule, an option request for an option that is already in effect should not be acknowledged.
![]() In addition, if one side sends a request to disable an option, that request must be honored.
In addition, if one side sends a request to disable an option, that request must be honored.
In Table 25.3, the DO, DON’T, WILL, and WON’T operations are used when one side of the connection wants to do something and inform the other side, or when one side wants the other side to perform an action. For example, when an NVT receives a WILL command followed by an option code, it means that the sender will start, or has started, using this option. The receiver of this message can reply with a DO if the option is acceptable or a DON’T if it doesn’t support the option. If the sender sends a DO command, followed by an option, then the sender is telling the receiver that it would like for it to use a particular option. The receiver can respond with a WILL command if it does support the option, or a WON’T command if it does not.
In addition, a sender can send a WON’T command, which indicates that a particular option is disabled. The receiver should respond with a DON’T command. The sender also can send a DON’T command to indicate that it wants the receiver to disable an option. The response to this command must be a WON’T. Remember that an option cannot be used unless both sides agree to it. Instead, the basic NVT is used with any options that were negotiated.
Finally, some options will lead to subnegotiations to further identify parameters of a particular option. These are beyond the scope of this chapter—refer to the appropriate RFCs.
In Table 25.4, you can see a summary of RFCs that describe some of the more useful options for use with telnet.
Table 25.4. Additional Option Code Definitions
In addition to this summary of options, others exist that are defined in documents other than RFCs. In addition to the basic telnet commands, telnet recognizes some, but not all, of the special ASCII control code characters. Table 25.5 lists these characters.
Table 25.5. ASCII Control Characters Recognized by Telnet’s NVT
Telnet and Authentication
One of the problems with applications that were developed during the early years of TCP/IP is that Internet (or ARPANET, depending on how far back you want to go) security wasn’t as big an issue as it is today. Because of this, many protocols and utilities have been exploited over the past few years by hackers who know how to take advantage of this lack of foresight. Telnet is just such an application. However, with the use of options, it is possible to perform authentication using other than the traditional clear-text method.
In RFC 2941, “Telnet Authentication Option,” an option to allow for more secure authentication methods, is set forth. This specification is intended to provide a mechanism that can be used by many authentication methods. The code number used for the AUTHENTICATION option is defined as 37. In Table 25.6 you can see some of the codes used to specify different types of authentication.
Table 25.6. RFC 2941 Telnet Authentication Methods
The RFC specifies that IANA will be responsible for maintaining the numbers associated with authentication types in the future. In addition, not all of those in the table were submitted to the Internet Engineering Task Force (IETF) as a standard, so some of the values may change.
Using Telnet and FTP with a Firewall
FTP and telnet are very useful utilities. They are also very powerful utilities. For this reason, you should be careful when configuring a firewall to ensure that FTP and telnet are not used to compromise your system or network.
Firewalls employ many techniques to protect your network. However, one of the basic functions you will find in all firewalls is the capability to enable or disable ports, for both incoming and outgoing traffic. Consider the case of telnet. It may be a good idea, if your environment requires it, to allow users on your network the capability to establish a telnet session on a remote server outside of your network. The reverse, though, is not always a good idea. Because telnet allows the user to interact with the computer and issue commands at the operating-system level, it is possible that telnet could be used to (1) gather information about your systems and (2) make changes to your systems, depending on the “privileges” granted to the user account associated with the telnet session.
Yet there may be situations in which you need to allow telnet sessions from computers outside of your network. In such a case, it is a better idea to place the computer that will be the target of incoming telnet sessions in a “demilitarized zone” using a firewall. This limits telnet access to just that computer, while blocking access to other computers in your network.
The same principle applies to FTP. You might want to enable ports that allow users on your network to download files from Internet sites. For example, FTP can be used to download device driver or software updates from a vendor’s site. However, it isn’t always a good idea to allow users on your network to upload files to computers outside of your network. Confidential information could easily be transferred this way, and go undetected. For the same reasons, you should not always allow incoming FTP sessions. If you have a business need to let customers upload files to your network, consider using a dedicated server in a demilitarized zone in the same manner you would provide a telnet service. Decide whether you want to allow both uploads and downloads, or one but not the other.
Chapter 45, “Firewalls,” explains the concept of a demilitarized zone in detail. You will also find information in that chapter about using “anonymous FTP” and some considerations for configuring servers to allow users outside your network to gain access to data as your business requires it, without compromising the rest of the network.
The R-Utilities
This famous set of network utilities was originally developed at the University of California at Berkeley and included in its versions of Unix that followed. Because all these utilities start with the letter R, which stands for remote, they often are lumped together and called the R-utilities. These utilities share more than just a common first letter. They also use an authentication scheme that most network administrators consider to be very insecure. These files will be discussed first, and then we’ll look at some of these utilities, showing the syntax examples from Solaris 8 and FreeBSD for comparisons.
How the Traditional R-Utilities Authorize Access to Your Network’s Resources
Newer versions of these utilities use authentication schemes using such methods as Kerberos tickets, as you will see in some of the syntax examples for the FreeBSD commands. However, because these tools were developed to make it simple to perform basic network functions, having to enter a username and password each time you used a utility was considered too much of a hassle. Those were the days, you should remember, before security was considered an issue.
To overcome this username/password obstacle, the R-utilities can use two files to perform authorization without having to send a password across the network. These are the hosts.equiv and .rhosts files.
The System’s hosts.equiv and .rhosts Files
The hosts.equiv file is a global file that is managed by the system administrator for a computer. It contains a list of remote computers that are to be trusted on this computer. When a user executes one of the R-utilities, this file can be consulted to see whether the host computer of that user is a trusted one. If so, the user is allowed to perform the same actions and is given the same access as a local account of the same name. This file also can have one or more usernames associated with a remote host, restricting access to just those usernames.
The file .rhosts is a local file that can be created in any user’s home directory. It performs the same function as the systemwide hosts.equiv file. The format for basic entries into either of these files is
hostname [username]
If you enter only a hostname on a line by itself, all users from that host who have accounts on this computer will be allowed access. If you place a username after the hostname (with a space or tab to separate them), that particular user will have access. To make it easier to restrict access with these files, most Unix systems allow you to use a few other methods to create entries in these files:
![]()
+ username—Allows access for this username.
![]()
- username—Specifically prohibits access for this username.
![]()
hostname +—Allows all users from hostname to access the system using a local user account.
![]()
- hostname—Specifically prohibits users from hostname from access.
For example, the entry
hostname -username
prohibits the user indicated by username coming from the host hostname from gaining access to the local computer using the hosts.equiv or .rhosts file.
To make matters even more complicated, you must consider the search order and how the entries in these files are evaluated. The hosts.equiv file is searched, and then the .rhosts file is searched. When a positive entry is found, granting access, the process stops. When a negative entry is found that denies access, the process stops. If no entries are found that grant or deny access, then access is denied.
The use of these files, and indeed of any insecure earlier versions of the R-utilities, is highly discouraged. For more information about how these can be abused, see Chapter 42, “Basic Security Measures Every Network Administrator Needs to Know.”
The rlogin Utility
This utility uses TCP (port 513) and enables you to establish an interactive session with another computer, similar to telnet. However, the rlogin command uses a much simpler protocol. It was introduced in version 4.2 of BSD Unix and is defined in RFC 1282, “BSD Rlogin.” Unlike telnet, rlogin does not use option negotiation. Instead, it allows a simple exchange of commands between the two systems.
The protocol is a simple one. The client software sends a string of text to the server. This string consists of a zero byte, the login name of the user on the client, another zero byte, the login name to be used on the server, another zero byte, the terminal type, the slash character, the speed of the terminal, and, finally, another zero byte.
The rlogin server will respond to this string with a zero byte. Then, if a password is required on the server (that is, the user is not found in the hosts.equiv or .rhosts files), the server will send a prompt string to the client. If the user sends the correct password back, the session can continue. Note again here the security problem with another TCP/IP utility. The username and the password are not encrypted in most versions of this utility. They go over the network as ordinary clear text that any network sniffer can detect. Newer forms of this utility use more secure authentication methods, but the basic protocol does not define this.
Finally, the server sends a request to the client to find out the client’s window size. After the session has been established, communication from the client to the server takes place using only one character at a time. When you consider that the server then echoes back the character to the client, you can start to see that rlogin isn’t as efficient as some other protocols. To help prevent this, the Nagle algorithm normally is used, enabling the buffering of several characters into a single TCP segment.
The only command that the client can send to the server is the window size, and the client can send this only in response to a query from the server. The server can send various commands to the client, and it uses TCP’s Urgent Data pointer to indicate the control command byte in the data stream. A client receiving a TCP segment with the Urgent Data pointer will immediately buffer all data up to the command byte and then interpret the command byte. There are only four possible commands:
![]()
0x02—This causes the client to discard all buffered data that hasn’t yet been displayed on the client.
![]()
0x10—This switches the client to “raw” mode, in which the ASCII STOP and START characters (Ctrl+S and Ctrl+Q) are ignored by the client and passed as data to the server to deal with.
![]()
0x20—This switches the client back to its normal mode of interpreting the ASCII START and STOP characters.
![]()
0x80—This is the window size request the server can send to the client.
The control byte pointed to by the Urgent Data pointer is not displayed on the client’s display, and all values other than those listed are ignored.
Using the rlogin Command
The syntax for this command will, as with most Unix commands, vary from system to system. Here we’ll look at the syntax for Solaris 8 and then the syntax for FreeBSD Unix.
The syntax for the rlogin command for Solaris 8 is
rlogin [ -8EL ] [-ec ] [ -l] username | hostname
where
![]()
-8—Indicates that 8-bit data should be used for the connection instead of 7-bit data representations.
![]()
-ec—Is used to specify a different escape character. Substitute the escape character for c.
![]()
-E—Means that no character will be recognized as the escape character.
![]()
-l username—Is used to specify a different username for the logon procedure. The default is to use the same username you used to log on to your local system.
![]()
hostname—Specifies the name of the remote host to which you want to log on.
Solaris also enables the user to enter escape characters during the rlogin session. The tilde character (~) starts the escape sequence. The sequence of characters ~. causes the computer to immediately disconnect from the remote host. ~susp suspends the login session if you are using a shell with Job Control.
The syntax for the rlogin command for FreeBSD is
rlogin [-468DEKLdx] [-e char] [-i localname] [-k realm] [-l username] host
where
![]()
-4 (-6)—Specifies to use IPv4 or IPv6 addresses only.
![]()
-8—Allows for 8-bit data transmissions.
![]()
-D—Sets the TCP-NODELAY socket option. This can improve interactive responses, but also increases the load on the network.
![]()
-E—Means that no character is recognized as the escape character.
![]()
-K—Turns off all Kerberos authentication.
![]()
-L—Lets the rlogin session run in “litout” mode.
![]()
-d—Turns on socket debugging.
![]()
-x—Turns on DES encryption for the data stream passed between client and server. Because the original implementation of rlogin uses clear-text, this is a very good option to use.
![]()
-e char—Is used to specify a different escape character. Substitute the escape character for char. The default escape character is the tilde.
![]()
-i—Lets the sender specify a different local name to be used for authorization purposes. Processes must have the UID of zero to use this feature.
![]()
-k realm—Requests that rlogin obtain Kerberos tickets in the host realm instead of the host’s currently defined realm.
![]()
-l username—Is used to specify a different username for the logon procedure. The default is to use the same username that you are logged in under on your local system.
![]()
host—Specifies the host with which you want to establish a remote session.
As you can see, the FreeBSD’s latest version of rlogin provides more security than the basic version of this program. By adding authentication schemes other than clear-text, and by allowing the data stream to be encrypted, this utility can be used in an environment requiring a medium amount of security.
Using rsh
The Remote Shell (rsh) utility enables you to execute a single command on the remote node. This utility first makes a connection to the remote computer and then executes the command specified by the user. It copies standard input to the remote command, and the standard output resulting from the remote command, if any, is copied back to the local standard output. Likewise, the remote standard error stream is copied back to the local standard error stream.
This utility is not meant for use when you need to execute a lot of commands or use an interactive program, such as the vi editor, that is screen-oriented. Instead, it is a quick way to execute a single command on another network node that supports the protocol.
The rsh utility has been implemented, like most of the other R-utilities, differently on various Unix flavors.
The syntax for the rsh command on Solaris 8 is
rsh [ -n] [ -l username] hostname command
rsh hostname [ -n ] [-l username ] command
rmesh [ -n ] [ -l username ] hostname command
rmesh hostname [ -n ] [ -l username ] command
hostname [ -n ] [ -l username ] command
This command makes a connection with the remote hostname system. The command you enter on the command line will be executed. Standard Unix inputs and outputs will be manipulated to display the results of the command on your display. Note that if you don’t include a command in the syntax, you will enter an rlogin session for this command on Solaris. See the preceding section for information about using rlogin.
Command-line parameters for this command include the following:
![]()
-l username—Substitute this username on the remote system instead of using the local username.
![]()
hostname—The name of the remote host on which the command will be executed.
![]()
command—The command to be executed on the remote computer.
![]()
-n—Redirects the input of rsh to /dev/null.
Remember that this utility runs just one command on the remote system. For example, you can use it to rename a file or copy a file on a remote system. To edit the file, however, you would have to use telnet or rlogin, both of which allow for interaction with a program running on a remote system.
The syntax for this command on FreeBSD is
rsh [-46Kdnx] [-t timeout] [-k realm] [-l username] host [command]
where
![]()
-4 (-6)—Specifies to use IPv4 or IPv6 addresses only.
![]()
-K—Disables Kerberos authentication.
![]()
-d—Turns on socket debugging.
![]()
-n—Redirects input to the special device /dev/null.
![]()
-x—Turns on DES encryption for data exchanges, possibly causing a delay in response time due to the encryption overhead.
![]()
-t timeout—If no data is sent across the connection established by rsh for timeout seconds, the rsh program will exit.
![]()
-k realm—The rsh utility tries to get Kerberos tickets from the host in realm instead of the remote host’s realm.
![]()
-l username—Is used to specify a username on the remote system to use for authentication. The default is to use the same name as the local username.
Like the Solaris version of rsh, if you choose to omit a command from the command line when you invoke rsh, the rlogin program will run instead.
In both cases (Solaris and FreeBSD), metacharacters recognized by your shell must be enclosed in quotation marks for them to be included as part of the remote command.
You can also obtain a version of RSH and many other Unix commands and utilities by purchasing Microsoft’s Services for Unix (see www.microsoft.com).
Using rcp
The Remote Copy (rcp) command is used to copy files between two computers on the network. You also could use FTP for this, but the rcp utility enables you to do the same thing with a more simplified syntax, and allows for authentication using .rhosts and hosts.equiv files. Another thing you can do with rcp that you can’t do easily using a standard FTP client is to recursively copy directories and subdirectories.
The syntax for the rcp command for Solaris 8 is
rcp [ -p ] filename1 filename2
rcp [-pr ] filename ... directory
where
![]()
-p—If possible, this option causes the copied file to have the same modification and access times as the original, as well as the same mode an any ACLs that were applied to the original file. Note that rcp will not work correctly if you try to copy ACLs to a system that doesn’t support them.
![]()
-r—This option is used when the destination is a directory. It indicates that each subtree that is rooted at filename (a directory) is copied.
In the first line of the preceding syntax, filename1 and filename2 are the source and destination filenames. In the second example, filename is a starting point for a set of subdirectories that will be copied to a directory directory on the remote system. Also note that you can use the rcp command to copy files between computers other than your own (third-party computers). In this case, you must specify the filename variables on the command line to include hostname:path. If you want to use a different username for authentication purposes, use the format username@hostname:filename instead. For third-party copies, the host that is the source of the file to be copied must have permission to access the target computer.
The FreeBSD syntax for this command is
rcp [-Kpx] [-k realm] file1 file2 rcp [-Kprx] [-k realm] file ... directory
![]()
-K—Disables all Kerberos authentication.
![]()
-k realm—The rcp utility tries to get Kerberos tickets from the host in realm instead of the remote host’s realm.
![]()
-p—Makes rcp attempt to keep the same modification times and modes of the source files when making copies.
![]()
-r—Is used when the destination is a directory. It indicates that each subtree that is rooted at filename (a directory) is to be copied.
![]()
-x—Turns on DES encryption for data that is sent between the two computers, at the expense of a slower copy time.
This version of rcp also enables you to perform third-party copying. The addition of Kerberos authentication and DES encryption are welcome improvements over the original rcp.
Using rwho
The rwho command is used to show information about users on the network. It works similar to the who command, but gets information from computers on the network instead of just local users.
Both Solaris 8 and FreeBSD versions of this command assume that a computer is down if they don’t receive any data from it for five minutes. If a user is logged in but does not interact with the computer for more than an hour, the user will not be included in the display by default. The syntax for this command is
rwho [ -a ]
The -a option causes the report to include all users and ignore the one-hour idle timeout.
The file /var/rwho/whod.* path is used to store data files containing the hosts on the network about which the command reports (/var/spool/rwho/rwhd.* for Solaris 8). Each computer on the network that can show up in the display produced by rwho must be running the rwhod daemon process. This background process sends out a broadcast packet of information on a periodic basis. Other servers store this information and use it when producing a display.
Using ruptime
For each machine on the network, the command ruptime reports a status line showing how long the system has been booted. Again, the file /var/rwho/whod.* (/var/spool/rwho/rwhd.* for Solaris 8) path is used to store data files containing the hosts on the network about which the command reports. Each system must be running the rwhod daemon. Note that this background process sends out informational packets that remote systems collect for use with both the rwho and the ruptime commands.
For this command, both Solaris 8 and FreeBSD use the same syntax:
ruptime [ -alrtu ]
where
![]()
-a—Causes the utility to report on the number of users on remote machines even if they have been idle for more than one hour.
![]()
-l—Causes the display to be sorted by load average.
![]()
-r—Reverses the sorting order for the displayed information.
![]()
-t—Causes the display to be sorted by the amount of uptime for the systems shown.
![]()
-u—Causes the display to be sorted by the number of users on the systems shown.
As you can see, ruptime can be a very handy utility to use to quickly survey selected nodes on your network.
The Finger Utility
The finger utility is a more complex utility that gives the administrator a lot of information, with a syntax that allows for selective reporting. You can use finger to get information about local users or users on remote hosts on the network. RFC 1288, “The Finger User Information Protocol,” is the most recent RFC in a series to define this protocol.
The finger protocol uses TCP, port 79. The finger command opens a TCP connection with a finger server daemon on a system and sends a line of text that makes up the query. The server responds and then closes the TCP connection. The RFC goes on to define different types of queries and how they can be forwarded from one machine to another. If you think that people who write these RFCs don’t have a sense of humor, ponder the following paragraph taken from RFC 1288:
2.5.5. Vending Machines
“Vending machines SHOULD respond to a {C} request with a list of all items currently available for purchase and possible consumption. Vending machines SHOULD respond to a {U}{C} request with a detailed count or list of the particular product or product slot. Vending machines should NEVER NEVER NEVER eat money.”
Now, with a sense of humor like that, is it any wonder that they name a user information protocol “finger”? However, you should note that as the Internet continues to infiltrate almost every type of electronic appliance, there are already “snack machines” that are part of a network. Recently, beverage machines have been developed that charge a different price depending on the current temperature! The capability to inventory such machines from a remote site can greatly reduce labor costs associated with visiting each machine on a regular basis.
The syntax for the finger command on Solaris is
finger [ -bfhilmpqsw ] [ username ... ]
finger [ -l ] [ username@hostname 1 ] [@hostname 2 ...@hostname n ... ] ]
finger [ -l] [ @hostname 1 [ @hostname 2 ...@hostname n ... ] ]
where
![]()
-b—Suppresses listing the user’s home directory and the shell used when using the long format output.
![]()
-f—Suppresses listing the header that is displayed in the non-long format output.
![]()
-h—Suppresses printing the contents of the .project file when using the long format.
![]()
-i—Displays “idle” format showing only the login name, terminal, login time, and idle time.
![]()
-l—Causes a long display format. More data is shown.
![]()
-m—Causes matches to be made on the user’s username, not on the first or last name.
![]()
-p—Suppresses displaying the contents of the .plan file when using the long format.
![]()
-q—Produces a quick format output. This is almost the same as the short format, but the only items displayed are the login name, terminal, and login time.
![]()
-s—Causes a short form of the user information to be displayed. Less data is shown.
![]()
-w—Suppresses the display of the user’s full name in a short format output.
The default information displayed about each user is the username, the user’s full name, the terminal type, the amount of idle time, the login time, and the hostname if the user is logged in to the system remotely. If you provide a username on the command line, more information will be displayed. When using this method, you can specify more than one username and the user does not have to be logged in to the system for finger to display information about the user. However, this is limited to just users on the machine on which you are executing the finger command.
Additional information you’ll see if you specify one or more usernames includes the user’s home directory and login shell, the time the user logged in (or last logged in), the last time the user received any email, and the last time the user read his email. If the plain-text files .project and .plan exist in the user’s home directory, their contents will be displayed.
In the syntax that uses the username@hostname1 [@hostname2 ... @hostnamen] or @hostname1 [@hostname2 ...@hostnamen], the finger request is sent first to the last hostname in the list (hostnamen), which sends it to the next-most previous host in the list, until the request reaches hostname1. Note also that the username@hostname syntax allows only the -l command-line option.
The FreeBSD syntax for this command is a little simpler. The syntax is
finger [-lmpshoT] [user ...] [user@host ...]
where
![]()
-l—Produces a display of several lines. All the items that the -s option outputs are displayed, along with the user’s home directory, home phone number, login shell, mail status, and the contents of the files .forward, .plan, .project, and .pubkey, if these files are found in the user’s home directory.
![]()
-m—Suppresses matching of usernames. By default, finger tries to match a login username and users’ real names. This option forces finger to use only the login username.
![]()
-p—When used with -l, suppresses the listing of the contents of the .forward, .plan, .project, and .pubkey files.
![]()
-s—Displays the user’s login name, full name, terminal, idle time, login time, and either the office location and office phone number or the remote host, depending on which of the remaining options are used.
![]()
-h—Causes the -s option to display the remote host instead of the office information.
![]()
-o—Causes the -s option to display the office information instead of the remote host. This is the default.
![]()
-T—Is used to disable “piggybacking” data on the initial TCP connection request with some finger implementations.
This version of finger also enables you to view information about hosts on other computers. Use the format user for users on the local machine and user@hostname for remote users.
Caution
The finger command is rarely used today. In fact, it’s often disabled because it represents a security risk to have it running.
Other Services and Applications Built on the TCP/IP Suite
You’ll find many services in older RFC documents referring to protocols or utilities that once served an important purpose—for example, the ARCHIE and WAIS utilities. However, as the Internet has made obsolete many older protocols and utilities, it has provided a hotbed for the development of new utilities, services, and applications. Many of these services are no longer needed or used, or are used in limited locations because more improved methods have generally replaced them.
Other protocols, such as the Simple Mail Transfer Protocol (SMTP) and the Simple Network Management Protocol (SNMP), are also very popular and useful protocols for providing application support on the network. However, these protocols are not as limited in their scope as the “utilities” discussed in this chapter. SNMP is discussed in Chapter 49, “Network Testing and Analysis Tools.” SMTP and other Internet email protocols are covered in Chapter 26, “Internet Mail Protocols: POP3, SMTP, and IMAP.”
Secure Network Services
As pointed out several times in this chapter, using some of the standard TCP/IP utilities that have been developed over many years can have security implications, especially now that most businesses are connecting to the Internet. The matters of user authentication and data encryption become more important when you expose your network to the world. Fortunately, as with most security issues, a need generally leads to someone coming up with a solution. In this section, we’ll look at some more utilities that perform tasks similar to those already discussed, but in a more secure manner.
The Secure Shell (SSH) is the name given to a protocol that enables you to replace rsh, rlogin, rcp, telnet, rexec, rcp, and ftp with a more secure application. You can visit a Web site devoted to these utilities at www.ssh.org. Here you can find out about the specifications for the protocols, mailing lists, patches, and places to download the utilities for your system. Although there are no Request for Comments documents yet for SSH, several Internet drafts are available at the Web site that describe everything from authentication to transport protocols.
SSH provides you with complementary commands for the utilities listed in the preceding paragraph. For example, instead of using the ftp command, you would use the sftp command. The same goes for the other utilities.
Secure Shell utilities can use various encryption methods for both authentication and encryption of the data sent across the network. Because different software houses may implement the SSH protocol a little differently, you might want to consider checking which ciphers are used by a particular product.