CHAPTER 21. The IEEE 802.11g Standard
SOME OF THE MAIN TOPICS IN THIS CHAPTER ARE
Overview of the 802.11g Standard 310
Installing a Wireless-G Broadband Router 312
Installing and Configuring a Wireless Network Adapter 321
Proprietary Extensions to the IEEE 802.11g Standard 327
Improving Network Performance with Dual-Band Wireless Technology 328
Which Wireless Protocol Should You Use? 329
The preceding two chapters discussed the first two wireless protocol standards to achieve wide market success at inexpensive prices. Today, IEEE 802.11b hardware is largely obsolete, while IEEE 802.11a hardware is largely restricted to corporate networks. However, this does not mean that IEEE 802.11-based wireless networking is unimportant. Rather, it reflects the overwhelming dominance of the newest wireless networking standard, IEEE 802.11g.
IEEE 802.11g wireless networking is so inexpensive that almost anyone or any business can afford it. PCI, CardBus, and USB adapters are available for about $40–$50 each, and many recent notebook computers already include an integrated IEEE 802.11g network adapter. Wireless Access Points (APs) with integrated routers and Ethernet switches are available for less than $50. At these prices, wireless networking is about the same price per system as wired networking, and is even less expensive if you include the cost of rewiring your home or office for a wired network. Because it’s easy to interconnect wired and wireless Ethernet clients into a single network, it’s worthwhile for you to consider if it’s time to add wireless networking to your home or office, or use it as a complete replacement for wired networking.
That said, if you already have an installed base of network cables for users in a wired environment, do you really need wireless networking? Conversely, there are a few scenarios that make wireless networking the best solution. If wireless is for you, the question of which standard to choose arises. Although some variants of wireless networking hardware are now very inexpensive, there are a few relevant considerations you need to think about, such as these:
![]() All major vendors are shipping IEEE 802.11g hardware. Some are also shipping faster versions, however, including some pre-N and MIMO hardware designed to improve speed and range. If you are building a wireless network from scratch, it might make sense to adopt one of the faster-than-802.11g standards. However, if you are building a wireless network to support laptops with integrated 802.11g network adapters, a faster standard won’t necessarily improve the performance of integrated adapters. However, MIMO routers, which use multiple antennas to boost range, can sometimes improve the performance of standard 802.11g clients as well as MIMO-enabled clients.
All major vendors are shipping IEEE 802.11g hardware. Some are also shipping faster versions, however, including some pre-N and MIMO hardware designed to improve speed and range. If you are building a wireless network from scratch, it might make sense to adopt one of the faster-than-802.11g standards. However, if you are building a wireless network to support laptops with integrated 802.11g network adapters, a faster standard won’t necessarily improve the performance of integrated adapters. However, MIMO routers, which use multiple antennas to boost range, can sometimes improve the performance of standard 802.11g clients as well as MIMO-enabled clients.
![]() IEEE 802.11b provides a data rate of 11Mbps. IEEE 802.11a increases this to 54Mbps, as does IEEE 802.11g.
IEEE 802.11b provides a data rate of 11Mbps. IEEE 802.11a increases this to 54Mbps, as does IEEE 802.11g.
![]() The 802.11g standard can interoperate with both 802.11g and 802.11b. Thus, you can obtain a network bandwidth of 54Mbps in the 2.4GHz bandwidth, and use both 11Mbps and 54Mbps in the same network. The 802.11g devices can be used as an upgrade path for 802.11b hardware. Pay as you go, so to speak. Do you really need to use 802.11a if you can achieve the same bandwidth using 802.11g? And 802.11g allows you to start replacing older hardware as you can afford it because it can also work with your legacy 802.11b hardware.
The 802.11g standard can interoperate with both 802.11g and 802.11b. Thus, you can obtain a network bandwidth of 54Mbps in the 2.4GHz bandwidth, and use both 11Mbps and 54Mbps in the same network. The 802.11g devices can be used as an upgrade path for 802.11b hardware. Pay as you go, so to speak. Do you really need to use 802.11a if you can achieve the same bandwidth using 802.11g? And 802.11g allows you to start replacing older hardware as you can afford it because it can also work with your legacy 802.11b hardware.
![]() Cost, of course. However, this is not much of a factor today unless you have a very large wireless network in which replacing several hundred network cards (as well as APs) can add up to a large amount of cash.
Cost, of course. However, this is not much of a factor today unless you have a very large wireless network in which replacing several hundred network cards (as well as APs) can add up to a large amount of cash.
The 802.11g standard was approved in 2003.
Overview of the 802.11g Standard
The IEEE 802.11g standard is supported by both single-band 2.4GHz and dual-band (2.4/5GHz) hardware. It uses the same 2.4GHz frequency and channels as IEEE 802.11b, enabling an 802.11g client to connect to an 802.11b wireless network.
To achieve the superior speed of 802.11g networking, however, all network hardware, including network adapters, APs, repeaters, print servers, and bridges, must also be upgraded to 802.11g. An 802.11g-based AP can support 802.11b clients if it is configured for mixed operation.
Table 21.1 summarizes the differences between 802.11g and 802.11b wireless networks.
Table 21.1. Features of IEEE 802.11g and 802.11b Wireless Networks
Note
The IEEE 802.11a standard uses the 5GHz spectrum. This is the most significant difference between 802.11a and 802.11g. Hardware based on the 802.11g standard suffers from the same limitations as the 802.11b standard—interference from microwave ovens and some portable telephone devices, as well as from other electrical devices. Thus, for some environments, the 802.11a standard might be more appropriate. However, you can locate interfering devices so they do not affect your 802.11g network.
The newer 802.11g specification increases the bandwidth from 11Mbps (802.11b) in the 2.4GHz radio spectrum to 54Mbps. With backward compatibility built into 802.11g hardware, you can preserve your investment in IEEE 802.11b equipment when you incorporate 802.11g hardware into your wireless network.
But does 802.11b provide for your bandwidth needs? Consider that the basic bandwidth of 11Mbps is about the same speed you could obtain with a 10Mbps switched Ethernet wired network. A wired network consisting of 10Mbps (also known as 10BASE-T), if already installed, is considered legacy hardware.
It’s likely that you have already moved as much of your wired Ethernet network as possible to 100Mbps (100BASE-T) speeds. In this situation you need to consider whether you really need wireless networking in your enterprise (or your SOHO). Because most users don’t actually make full use of the 100Mbps that 100BASE-T enables, using 802.11g, despite its lower bandwidth, might be a cost-effective solution. This is especially true for mobile users.
Newer Gigabit Ethernet wired specifications are generally used for network backbone cabling, and have not reached the desktop except in a few instances.
For example, if your office only uses word processing, email, and spreadsheet software, the 11Mbps provided by 802.11b will probably suffice.
However, if you are using newer applications that require a larger bandwidth to satisfy users, such as graphic or other similar software, the difference between 802.11g (nominal 54Mbps data rate) and 100Mbps is not that great. Although 100Mbps is more than twice as fast as 54Mbps in actual throughput, you needn’t consider 100Mbps unless your clients actually use the entire bandwidth! Even when transferring large amounts of data, 54Mbps (wireless) versus 100Mbps will probably not be noticed by your users.
In the rest of this chapter, I’ll show you examples for installing an AP as well as a wireless network adapter card.
Installing a Wireless-G Broadband Router
This section covers the steps needed to get your network up and running using an AP, and how to install a wireless network adapter.
Note
A wireless Access Point is a device that acts much like a switch in a wired network. Wireless clients send and receive data by sending it through the Access Point. The Access Point can also be connected to a wired network, and thus provide wireless clients to communicate with clients on the wired network. Contrast this with an ad-hoc network, where no Access Point is used. Instead, wireless clients in this type of small network simply establish direct links with each other.
Not all manufacturers use the same interface, or support the same functionality. However, this section will give you a good overview of a typical installation and configuration of an AP using the Linksys WRT54G Wi-Fi router. The steps are listed here:
1. Turn off all devices that will be used in the wireless network, including your PC, and the cable or DSL modem. Do not connect the power cable to the Wireless-G router yet. Power off every device that will be connected to any of the four Ethernet ports on the router, as well as any PCs that are going to use a wireless network card.
2. If you are going to use the router only for wireless data transfers, skip this step; otherwise you can connect any other PCs or network devices that are located near the router by connecting them to one of the four switch ports. Standard Category 5 UTP cabling is all that you need.
3. Use the WAN port on the router to connect an Ethernet cable to your broadband connection (cable or DSL modem). Note that you should use only this port for connecting to the modem. The other four ports should be used only for connecting devices that do not make use of the router’s wireless features.
4. To configure the wireless router, you must use a wired connection because you have not yet configured the AP to use wireless networking, much less a client computer. This means you need to connect a computer to one of the four Ethernet ports to continue this configuration.
5. Power on the devices in your network in the following order: first the cable or DSL modem, then the wireless router, and finally any PCs that are directly connected to the router.
6. On the front panel of the router, check to see that the Internet Link and Activity LEDs are green. Note that when you first power up the router, the red Diag (diagnose) LED lights up for a short time while the router performs its diagnostic checks. If the red LED does not turn off, the router is experiencing some form of problem.
7. Check the configuration for PCs that are connected to the wired switch ports to ensure that each is set up to automatically configure IP addressing information. This feature tells your computer to automatically obtain all necessary addressing information using DHCP—the Dynamic Host Configuration Protocol. For example, for Windows XP, select Start, Control Panel, and then in the Control Panel double-click on the Network Connections icon. In Figure 21.1 you can see an example of this showing a connection to a local area network (LAN). Remember that these steps, and those following, are for configuring the computers that connect via a cable to the switch ports that the wireless router provides. In the next section you will learn about how to use a wireless network adapter with the AP. One of the computers that uses a wired connection will also be used to configure the AP.
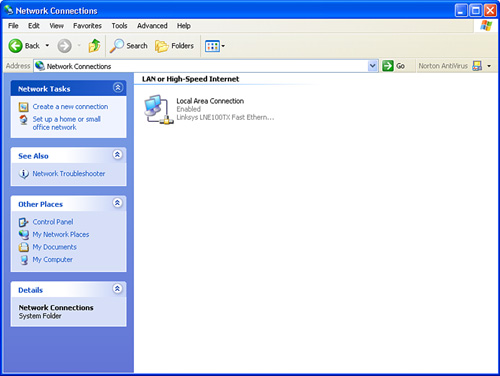
Figure 21.1. In Windows XP, the Network Connections window allows you to view and make modifications to your computer’s network configuration.
Note
If you are using Windows 2000, use Start, Settings and then click on the Control Panel. Double-click on the Network and Dial-up Connections icon. Double-click on the LAN connection you want to use to connect to the router.
Also, if you prefer the Category view of the Control Panel that is the default for Windows XP, you will have to use the menu this interface provides to get to the LAN connections window. From the Pick a Category menu, select Network and Internet Connections. The Pick a Task menu pops up, and you should select Network Connections, which appears at the bottom of the menu under the heading Or Pick a Control Panel Icon. Click on Network Connections. You then see the Network Connections window and can continue to configure your computer as described in these steps.
8. For Windows XP, right-click on the Local Area Connection icon to bring up the Properties dialog box for this connection. In Figure 21.2 you can see the General tab, which lists the protocols, services, and other network components used by this connection. If the Internet Protocol (TCP/IP) check box is not selected, click on the check box.

Figure 21.2. Make sure that the Internet Protocol (TCP/IP) check box is selected.
Tip
If you have not yet set up a LAN connection, use the Create a New Connection option, located on the left side of the Network Connections window under the Network Tasks section for Windows XP. Windows 2000 users see an icon labeled Make a New Connection that can be used for the same purpose. A wizard walks you through the process step-by-step.
9. After the check box for TCP/IP has been selected, you can click once on the TCP/IP entry in the dialog box, and then click on the Properties button. The properties for the TCP/IP protocol pops up, as shown in Figure 21.3. If the radio button labeled Obtain an IP Address Automatically is not selected, click on it. Next click the OK button to dismiss the dialog box.
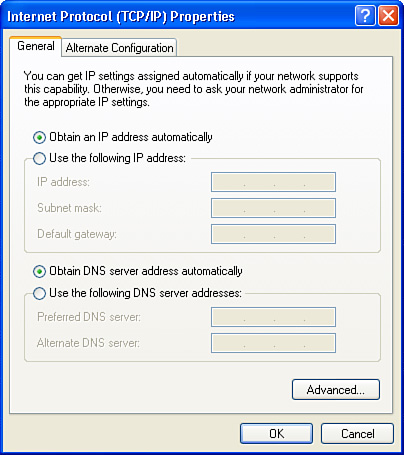
Figure 21.3. Select the radio button labeled Obtain an IP Address Automatically.
10. If the TCP/IP properties dialog box has already been set up to use DHCP to automatically configure the IP information, simply click OK on the dialog boxes as you back out of the LAN configuration. This means your computer has already been set up to use DHCP. This is usually the case when you have a computer already connected directly to a cable/DSL modem. If you changed the configuration by choosing the automatic configuration option, any static addressing information entered previously is not used. Also, if you had to change the configuration to use DHCP, restart your computer.
After you have configured the PCs that are attached using cables to the ports on the router, you can configure the wireless access port. Keep in mind that you will need to use a wired connection in order to configure the AP because no wireless adapter has yet been configured!
1. Using the PC that you just configured to use automatic addressing, launch an Internet browser (Internet Explorer, Netscape, Opera, and so on). Enter the URL necessary to work with your AP in your browser’s Address field. (For example, the URL needed to work with my AP is http://192.16.0.1. Check the documentation of the AP you purchase to determine the addresses it uses.)
2. A dialog box pops up asking you for a username and password. Because no username has yet been configured, use the default password. For this Linksys router, the username should be left blank, and the password is admin, in lowercase letters. Click the OK button.
3. After you enter the default password, the PC establishes contact with the wireless router and displays a page similar to that shown in Figure 21.4.
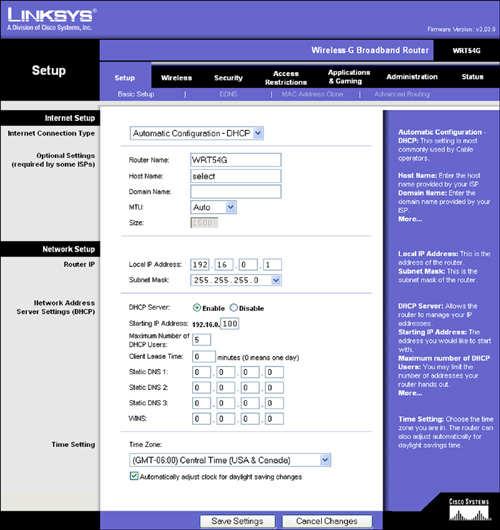
Figure 21.4. The router sends an HTML page to the PC you are using to configure the wireless router.
4. If your ISP requires a hostname for your computer, enter it in the field shown in Figure 21.4. In many cases, you will not have to put anything in this field. However, the Domain Name field will probably need to be filled in. Note that the HTML page here is usually capable of obtaining the Domain Name information if you are connected to the Internet (via your ISP) during this configuration process. If you are not sure whether this info is required by your ISP, give them a call, or check any documentation they might have provided.
Tip
You can get the hostname for your computer by entering the command hostname at the command prompt. Similarly, if the HTML page that the router displays on the computer you are using to configure the router does not display the domain name, use the ipconfig command from the command prompt to find out the hostname and domain name of your computer.
Note that for many cable modems you can leave both of these fields blank.
If you are not sure about these fields, check any documentation that was included when you established your broadband connection. As a last resort, you can always check with your ISP’s technical support line.
5. The Internet Connection Type field shown in Figure 21.4 allows you to specify the method your ISP uses to connect you to the Internet. This information is based on protocols that your ISP uses. This field uses a drop-down menu to show you the options available. These are the most prominent:
![]() Automatic Configuration - DHCP—This is most likely the case, as described previously, for most users.
Automatic Configuration - DHCP—This is most likely the case, as described previously, for most users.
![]() Static IP—Although it is unlikely that an ISP will have enough IP addresses that are valid on the Internet to use static IP addresses for all customers, some business-class customers may be assigned a static address. If so, your ISP should give you the address, or as described in the preceding tip, you can use the
Static IP—Although it is unlikely that an ISP will have enough IP addresses that are valid on the Internet to use static IP addresses for all customers, some business-class customers may be assigned a static address. If so, your ISP should give you the address, or as described in the preceding tip, you can use the ipconfig command to get this information.
![]() PPPoE—This abbreviation stands for Point-to-Point Protocol over Ethernet. This protocol is generally used in buildings (such as hotels, office buildings, or apartment buildings) where more than one customer uses a broadband connection to connect to the Internet. Because an Internet connection is becoming more commonplace, and in many instances a necessary requirement for doing business, you can expect to see this protocol used more extensively over the next few years.
PPPoE—This abbreviation stands for Point-to-Point Protocol over Ethernet. This protocol is generally used in buildings (such as hotels, office buildings, or apartment buildings) where more than one customer uses a broadband connection to connect to the Internet. Because an Internet connection is becoming more commonplace, and in many instances a necessary requirement for doing business, you can expect to see this protocol used more extensively over the next few years.
Tip
PPP is a protocol that has traditionally been used for dial-up connections. Data that is usually sent through a PPP connection is instead placed into the data portion of an Ethernet frame. (See Chapter 13, “Ethernet: The Universal Standard.”) PPPoE allows multiple users to use a LAN to access the broadband connection. PPP is just what it says—a point-to-point connection. That is, only two devices are part of the configuration: the dial-up modem and the modem at the ISP’s end of the connection. Because Ethernet frames contain the IP address of the sender and recipient of the frame, this allows for multiple users to use the same connection, and the Ethernet frame is used to identify each individual user. The main reason this protocol is used is for identifying each individual using a single broadband connection. This allows the ISP to charge individual users according to their usage of the connection.
![]() PPTP—The Point-to-Point Tunneling Protocol provides the best of both worlds—the LAN and the WAN. Although this standard is mostly found in Europe at this time, it may become widely adopted in other parts of the world in a few years. This is because PPTP basically operates much like a VPN when it comes to a secure “tunnel” through the Internet. Companies that have more than one location can use PPTP (if offered by their ISPs at each location) to get a secure “tunnel” through the public Internet.
PPTP—The Point-to-Point Tunneling Protocol provides the best of both worlds—the LAN and the WAN. Although this standard is mostly found in Europe at this time, it may become widely adopted in other parts of the world in a few years. This is because PPTP basically operates much like a VPN when it comes to a secure “tunnel” through the Internet. Companies that have more than one location can use PPTP (if offered by their ISPs at each location) to get a secure “tunnel” through the public Internet.
Recent firmware updates to the WR54T router add two additional connection options: L2TP (the Layer 2 Tunneling Protocol) provides support for VPN connections, and Telstra Cable supports unique features of the Telstra Cable broadband service available in Australia.
6. Router IP/Local IP Address—The router IP is the IP address your router uses on the local network. This information is provided automatically by your Internet connection if you selected Automatic Configuration-DHCP as the connection type in Step 5. You can also enter the IP address yourself if your connection uses a static IP address. In such cases, enter the IP address provided by your ISP.
7. Network Address Server Settings/DHCP—This section of the dialog allows you to enable/disable the DHCP feature that the router provides. Unless you have a good reason to change this, do not change the default, which is to use DHCP to provide IP addresses to clients on the network. If you already have a DHCP server on your network such as those provided with Windows servers, Linux-based systems, and others, use this property sheet to disable the router’s DHCP feature. It doesn’t matter what device on your network is used for DHCP. If you are using another computer for this service, select the Disable option for DHCP Server. There are other features that can be configured here, such as the length of time a computer can use an IP address provided by DHCP before it has to be renewed, static DNS server names, and the IP address of the WINS server on your network (if any). Some systems also list a table of IP addresses that have already been leased to clients on this dialog. You can also configure the address range used by the router when it allocates addressing information to client computers.
The address ranges reserved for “private” networks by the Internet Engineering Task Force (IETF) are 10.0.0.0 to 10.255.255.255.255, 172.16.0.0 to 172.31.255.255, and 192.168.0.0 to 192.168.255.255.
These addresses are not valid on the Internet, but instead are used by Network Address Translation (NAT) to distinguish computers on your LAN from computers on the Internet that use valid IP addresses. You can specify a private address range here that the router-provided DHCP service will use. Keep in mind that it is a good idea to use an address range separate from the one used by your ISP. Although there is only a small chance that NAT will fail if you use the same address range, it’s best to use one of the address ranges that the IETF has set aside for private networks. This particular router uses the 192.168.0.xxx range.
Tip
If you have not configured a router before, you might prefer to save the changes you make on each screen before continuing. To save the current router configuration, click the Save Settings button shown on the bottom of Figure 21.4. Repeat on each screen after you make changes. If you only want to save your changes once, make sure you click Save Settings before you log out of your router configuration screen. Click Cancel Changes if you need to discard changes, or if you are merely viewing settings and have no intention of making any changes.
8. To continue configuring the router, click the Wireless tab shown in Figure 21.4. This displays the basic wireless network settings shown in Figure 21.5. The field labeled Mode enables you to select the bandwidth that the wireless router will use. You can select Mixed, which supports the earlier 802.11b protocol, or you can select G-Only as shown here, which gives you a faster network speed. G-only cannot be used if your wireless network contains both 802.11b and 802.11g clients. Or you can select Disabled to keep users from using the wireless AP. This is useful during maintenance times or if you want to shut off access for specific times, such as nighttime when no employees are using the network.

Figure 21.5. Configuring basic wireless network settings.
9. The SSID field is very important. This identifies your wireless network. You should change this from the default value to something that will not be easy to guess. Consider this a “password” that allows only the computers you want to use your network to establish a connection to the AP. Change this from the default or you will be subject to hackers (and they can usually pick up your signal from outside of your office/building). You should also be sure to select Disable for Wireless SSID Broadcast field because these signals can be picked up by hackers who use tools freely available on the Internet to locate wireless access zones. Record this information so you can use it to configure wireless clients.
10. The Channel field allows you to use different frequencies. If you are having problems (such as a slow bandwidth), try changing this to a different channel. It may be that other APs are using the same channel, decreasing your bandwidth. Keep in mind that the only non-overlapping channels for 802.11g/b wireless networks are 1, 6, and 11.
Tip
If you want to determine the channels used by nearby wireless networks, you can use the NetStumbler utility available from www.netstumbler.com. For best performance, choose a channel not used by other nearby networks.
11. To continue with wireless configuration, click the Wireless Security tab shown in Figure 21.5. This opens the Wireless Security dialog shown in Figure 21.6, which is used to configure how information being transmitted around the network is encrypted. If your router and adapters support WPA security, select WPA Pre-Shared Key from the Security Mode dialog. For best security, select TKIP (Key Integrity Protocol) as the WPA algorithm. This setting provides much greater security than the WEP security setting used on early Wi-Fi implementations.
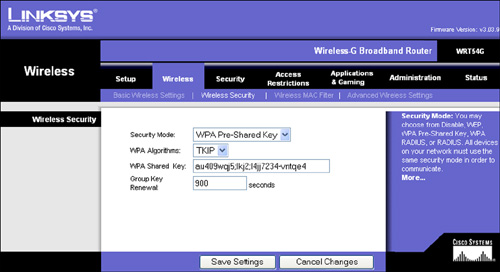
Figure 21.6. Use this dialog box to configure the encryption security used by your wireless AP.
Note
WPA Pre-Shared Key with TKIP is also known as WPA2-Personal. If you use the less-secure AES encryption algorithm, this is also known as WPA-Personal. Use WPA-Personal only if some network adapters don’t have support for WPA2-Personal. Use the older WEP encryption method only if some equipment doesn’t support any level of WPA encryption. On a corporate network with a RADIUS authentication server, use WPA RADIUS.
12. In the WPA Shared Key dialog box you can specify the encryption key, which can be between 8 and 63 characters; longer keys, particularly if they are randomized alphanumeric text, are better. To avoid mistyping the key, type it into a text editor such as Notepad, copy it, and paste it into this field. The WPA Security Mode, WPA algorithm, and WPA Shared Key information need to be recorded so they can be used by each wireless client to connect to the router.
13. To adjust how frequently the group key is re-encrypted, enter a time (in seconds) in the Group Key Renewal field. Various router versions have different defaults. A relatively short time (such as 900 seconds, shown here) can help enhance security. However, the length and randomness of the WPA Shared key (step 12) is more important than the Group Key Renewal time setting.
14. After entering the WPA information, click Save Settings, and then close the browser window after the dialog box confirms your settings have been saved. That’s all you need to do for a basic configuration.
Note
In the preceding example, configuring the AP was done manually using a browser. With most APs there is a setup CD you can use to perform the same functions in a simpler manner. By using the manual method, however, you can see all the features you can configure. If you decide to make changes to the AP’s configuration, you can use the manual method (via a browser) and use the appropriate property sheet to make changes.
There are other tabs on this properties sheet. Although it is not absolutely necessary to use the other tabs, it is important to know what you can accomplish using them. With the exception of the Security property sheet, in most circumstances you do not need to use these property sheets. The following list describes the functions that can be accomplished using the other property sheets:
![]() Setup—This is the property sheet that has been described in the previous steps to initially set up the router.
Setup—This is the property sheet that has been described in the previous steps to initially set up the router.
![]() Administration—This tab brings up the Management dialog box that allows you to configure several setup security items. For example, you can specify a password for the wireless router. This password is required in order to make changes to the router’s configuration. It is not a password that is used for clients to connect to the AP. For this brand of router, the default password is admin. You should change this at once! Otherwise, someone familiar with this technology will probably have already obtained a list of default passwords for many types of wireless routers and other networking components. Change this password! You can also configure web and remote router access.
Administration—This tab brings up the Management dialog box that allows you to configure several setup security items. For example, you can specify a password for the wireless router. This password is required in order to make changes to the router’s configuration. It is not a password that is used for clients to connect to the AP. For this brand of router, the default password is admin. You should change this at once! Otherwise, someone familiar with this technology will probably have already obtained a list of default passwords for many types of wireless routers and other networking components. Change this password! You can also configure web and remote router access.
Caution
For any networking equipment (or any software) that requires a password for any type of access, you should always change the default password. Computer hackers can easily obtain default passwords for just about anything by searching the Internet. In addition, it is important to use passwords that are not easy to guess, such as words that can be found in a dictionary. Hackers can typically cross-reference standard terms found in a dictionary in a matter of minutes with programs available on the Internet. Ideally, you’ll want to create passwords that are difficult to discover using a traditional dictionary attack. Chapter 42, “Basic Security Measures Every Network Administrator Needs to Know,” can assist you in determining a password policy for your network.
![]() Factory Defaults—Click this tab in the Administration dialog to bring up an option to reset the router to its factory defaults. This will, of course, replace any other configuration information you have already set up. Use this if you are having problems and need to start over from scratch!
Factory Defaults—Click this tab in the Administration dialog to bring up an option to reset the router to its factory defaults. This will, of course, replace any other configuration information you have already set up. Use this if you are having problems and need to start over from scratch!
![]() Other Administration Options—Other tabs in the Administration section of the router setup permit you to enable logging of incoming and outgoing traffic (Log), run network diagnostics such as Ping and Traceroute (Diagnostics), upgrade the firmware (Firmware Update), and backup or restore the configuration (Config Management).
Other Administration Options—Other tabs in the Administration section of the router setup permit you to enable logging of incoming and outgoing traffic (Log), run network diagnostics such as Ping and Traceroute (Diagnostics), upgrade the firmware (Firmware Update), and backup or restore the configuration (Config Management).
Tip
It’s a good idea to visit your router vendor’s Web site (Linksys’s site is located at www.linksys.com) to determine if you are running up-to-date firmware. However, you should update firmware only if necessary to add new features you really need or to fix bugs in the router’s functionality. Linksys routers display the firmware version onscreen. For other routers, see the documentation to learn how to determine the firmware version.
![]() Access Restrictions—Use this dialog to control when the Internet will be available to users, which PCs on the network will be allowed (or denied) Internet access, which services will be denied or allowed, and what URLs or keywords will not be accessible (blocked).
Access Restrictions—Use this dialog to control when the Internet will be available to users, which PCs on the network will be allowed (or denied) Internet access, which services will be denied or allowed, and what URLs or keywords will not be accessible (blocked).
![]() Applications and Gaming—Use this dialog to forward traffic for particular games or other online applications to the correct PC (port forwarding), open a PC for complete access from the Internet (DMZ), configure Quality of Service (QoS) settings for various applications, or set up port triggering.
Applications and Gaming—Use this dialog to forward traffic for particular games or other online applications to the correct PC (port forwarding), open a PC for complete access from the Internet (DMZ), configure Quality of Service (QoS) settings for various applications, or set up port triggering.
Caution
While time-consuming, it’s much safer to use the Port Forwarding and Port Triggering dialogs to set up an online game or other application than it is to use the DMZ (demilitarized zone) option. Port Forwarding and Triggering allow only specified traffic to access the specified computer. The DMZ option, however, enables all Internet traffic to directly access the specified computer. When DMZ is enabled, the computer specified receives no protection against online threats from the router. Note that IP addresses are used to configure Port Forwarding, Port Triggering, and DMZ. To determine the IP address of a computer that needs these services, go to the computer and run a program such as IPConfig, WinIPCfg, or another utility that displays this information.
![]() Status—This property sheet lets the administrator view the current network configuration for the router. You can also use this property sheet to release or renew DHCP configuration data for the wireless router. This is not the IP address that the router can provide to clients on your network, but instead is the IP address the router may have obtained from your broadband provider.
Status—This property sheet lets the administrator view the current network configuration for the router. You can also use this property sheet to release or renew DHCP configuration data for the wireless router. This is not the IP address that the router can provide to clients on your network, but instead is the IP address the router may have obtained from your broadband provider.
![]() Help—The router shown in Figures 21.4–6 displays help on the right side of each dialog. Click More to see more information. Some routers use a separate Help dialog instead.
Help—The router shown in Figures 21.4–6 displays help on the right side of each dialog. Click More to see more information. Some routers use a separate Help dialog instead.
Tip
You need Adobe Reader to view .PDF documents, such as the documentation provided on the setup CD supplied with many routers, or available online from the router vendor’s Web site. Although the .PDF application that creates these documents is a product that must be purchased, the reader is free. You can download this application using the hyperlink in the Help tab, or visit the Web site www.adobe.com. This application is used for many vendors to produce documentation.
Note
At this point you only need to configure one PC to use automatic IP addressing configuration. This PC will be used to configure the router, and you can then follow the instructions for wireless network interface cards. After you have configured the AP, you can proceed to configure the remaining client computers so that they can use the AP. This subject is discussed later in this chapter.
With your access point configured it’s time to do the same for the client systems you want to use to access it.
Installing and Configuring a Wireless Network Adapter
The next step you will have to complete is to install wireless network adapters for the computer(s) you want to enable to use this wireless LAN. A wireless network is perfect for a small office where all the clients are in close proximity to each other. Perhaps the best use you will put wireless networking to is for laptop computers. If this is the case, you can go out into your back yard and relax in the sun and establish and maintain a connection to the network.
The network card installation described in these sections is based on the Linksys Wireless-G Notebook Adapter, model WPC54G, and should only be considered as an example. As always, use the documentation for the particular network adapter that you purchase. Additionally, the example details the steps to install and configure the adapter card on a computer using Windows 98SE through Windows Server 2003.
When configuring the AP in the previous section, a browser was used to configure settings stored on the AP. When configuring a network adapter, you need to install a driver on the computer, and then configure the card so that it can interact with the AP. Because of this, most manufacturers provide a CD that contains the driver, documentation, and other software. The following configuration examples will not make any changes to the AP. Instead, these steps configure your computer so that it can make use of the network adapter.
Using the Setup CD
This example demonstrates using the setup CD provided with the adapter to install drivers and configure the adapter. Do not insert the wireless adapter into the PCMCIA/CardBus slot on your laptop computer until prompted in this example.
1. Place the setup CD in the computer’s CD-ROM drive. After a few seconds, a wizard dialog box (see Figure 21.7) pops up. You can choose to read the user’s guide, begin the installation, or exit the wizard. Click on the Install button.
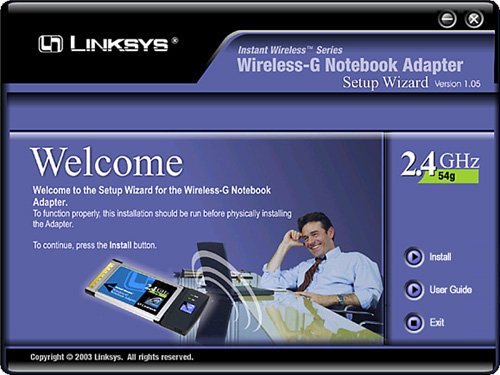
Figure 21.7. Click the Install button to begin the network adapter setup.
2. Click the Next button when the License Agreement dialog box appears. Of course, as always, be sure to read the license agreement text first. If you do not agree with the terms of the license, click the Back button and then exit the wizard. You can then return the adapter to the place of purchase.
3. The Wireless Mode dialog box, shown in Figure 21.8, allows you to decide whether you want to use the adapter in an infrastructure mode or in ad-hoc mode. In either case you need to enter text into the SSID (Service Set Identifier) field. Each computer in the network uses the same value. If an AP is used, use the SSID you entered when you configured the AP. Click Next to continue.
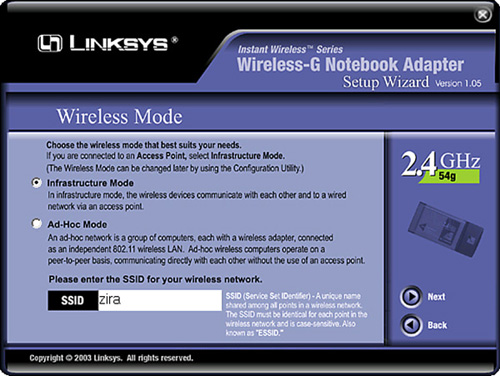
Figure 21.8. Use the Infrastructure Mode radio button if the adapter will coordinate data transfers via an Access Point.
Tip
Ad-hoc mode is used when no AP is available. Instead, each computer that is part of the wireless network communicates directly with the others, similar to the legacy Windows workgroup network. Infrastructure mode means that the adapter exchanges data with other computers via an AP. The AP can be standalone if it will be used only to provide connectivity between associated wireless clients, or the AP can be connected to a wired network if you will be providing access to services available on the wired network. Depending on the brand of your network card, the term SSID could possibly be Network Name, Preferred Network, or other terms. Whatever term is used, be sure to change it from the default value! For the adapter used in this example installation, the default SSID is Linksys. Using the default value makes it easier for others to tap into your network.
4. If you are going to operate in ad-hoc mode, a dialog box pops up enabling you to select a channel to be used for the particular network. The default is channel 6. This is to prevent different ad-hoc networks in close proximity from communicating with each other. Use different channel numbers for each separate ad-hoc network if you set up more than one. Also, you must select what mode the ad-hoc network will operate in: Mixed Mode (both IEEE 802.11g and 802.11b) or G-Only Mode (802.11g).
5. As shown in Figure 21.9, a dialog box shows you the choices you have made. Click Next to continue if you are satisfied with the configuration. Otherwise, use the Back button to back up through the wizard screens to make any changes you want.
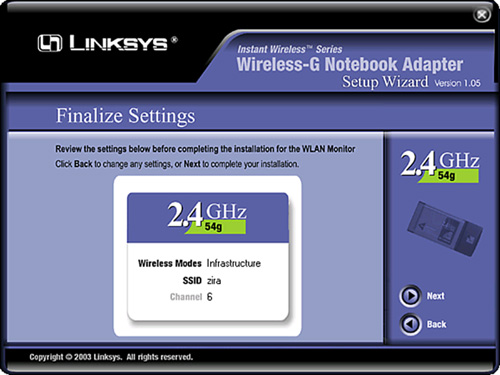
Figure 21.9. Review the configuration you have created.
6. The setup program copies the files necessary for your configuration to the computer’s hard drive. When it’s finished, another dialog box tells you whether you were successful in setting up the card’s configuration. Click Exit to finish the installation.
After you have finished with the setup wizard, you can physically install the network adapter. First, power off the computer. If you do not, it is possible that the card could be damaged, or the setup configuration might not work. Insert the adapter into a PCMCIA or CardBus slot on the computer and restart the computer. When Windows has finished booting, it starts to copy the adapter card’s driver software. After the driver files have been copied, you are finished with the network card installation.
If you are using Windows XP (or Windows Server 2003), use the following steps:
1. Power off the computer.
2. Insert the network adapter.
3. Power up the computer.
4. The Windows XP Found New Hardware Wizard pops up after the computer has finished the boot process. When the wizard appears, place the setup CD into the computer’s CD-ROM drive.
5. Click the Install the Software Automatically radio button, and then click Next. The Windows XP Wireless Zero Configuration icon is placed in the system tray. Double-click on that icon.
Windows XP then prompts you for the same information used in the previous example, with one exception. Windows XP doesn’t use a Passphrase, so you have to enter an encryption key (which you can get from your AP). This is necessary only if you select to use WEP. In any case, after the required files are copied to your computer, click the OK button. If your configuration was successful, a balloon pops up from the system tray telling you that you are connected to the network.
Using the Windows XP Service Pack 2 Wireless Network Setup Wizard
One disadvantage of using manual configuration for network clients and APs is the possibility of incorrectly configuring some of the options, particularly security settings. To make wireless setup easier and to provide a record of the settings used, Microsoft has added a Wireless Network Setup Wizard to Windows XP, starting with Service Pack 2. You can run this wizard on any computer you plan to connect to your wireless network after you install the wireless network adapter and drivers.
Using the Wizard to Set Up the First Computer on the Network
To run the wizard, follow this procedure:
1. Click Start, All Programs, Accessories, Communications, Wireless Network Wizard. At the introductory screen, click Next to continue.
2. In the Create a Name for Your Wireless Network dialog (see Figure 21.10), enter the service set identifier (SSID) you want to use for your network. You can create an SSID up to 32 characters.

Figure 21.10. Creating an SSID and selecting network encryption with the Windows XP SP2 Wireless Network Setup Wizard.
3. Select whether you want to automatically assign a network key (default) or manually assign a network key. Use the manual option if you are adding your system to an existing network. If you use the manual option, you will be prompted to enter your wireless network’s existing WEP or WPA key later (see Step 6).
4. By default, the wizard uses WEP encryption; to use WPA encryption, click the Use WPA Encryption... check box. Click Next to continue. You see an error dialog onscreen if your network hardware is already connected to your system and it does not support WPA. Click OK to continue.
5. If you select the default automatic option shown in Figure 21.10, you can select from two options to save your settings: a USB flash (keychain) drive or manual network setup. The USB flash memory drive option can be used by any devices that support Microsoft Connect Now technology. Such devices automatically read the XML-format network setup files from the USB flash memory drive when the drive is connected to the device.
6. If you select the option to enter a network key yourself, you see the dialog shown in Figure 21.11. Enter the network key and then re-enter it. Click Next to continue.
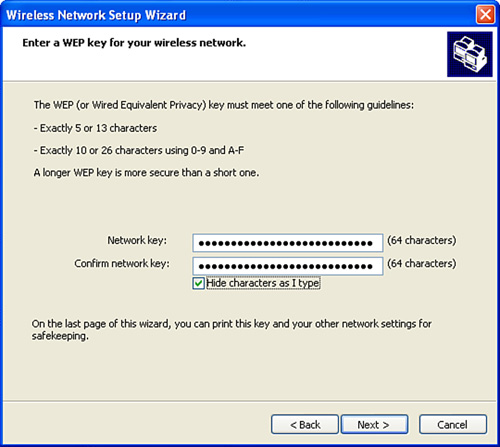
Figure 21.11. Entering a WEP key manually with the Windows XP Wireless Network Setup Wizard. The WPA dialog is similar.
7. On the following screen, select the option to store the network settings to a USB flash drive or to configure the network manually.
8. If you selected the option to store the network settings on a USB flash drive, insert the drive when prompted. Click Next. A dialog displays the setup files as they are transferred to the flash drive.
9. Follow the instructions shown in Figure 21.12 to transfer the settings from the USB flash drive to your AP (or router) and other network client PCs and devices. Click Next to continue.
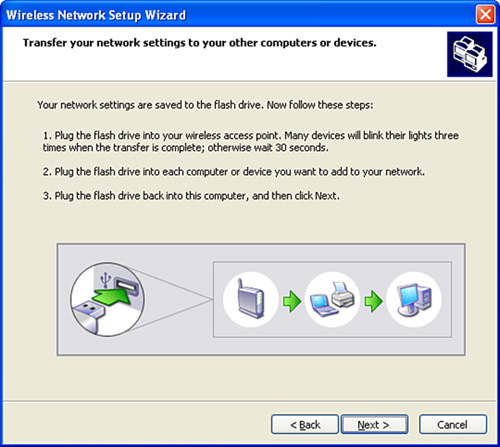
Figure 21.12. How to transfer settings to other computers and devices.
Note
If your AP doesn’t support Microsoft’s Connect Now, you cannot automatically configure it using these steps. You can still use the data stored on the USB flash drive, however, to configure other Windows client PCs as long as the specific version of Windows supports or has been updated to support Connect Now.
10. At the end of the process, the wizard displays a Completed Successfully dialog. If you transferred settings to other devices using the USB flash memory drive (step 9), the devices are listed by name.
11. Click the Print Network Settings button to open the settings in Notepad (see Figure 21.13).
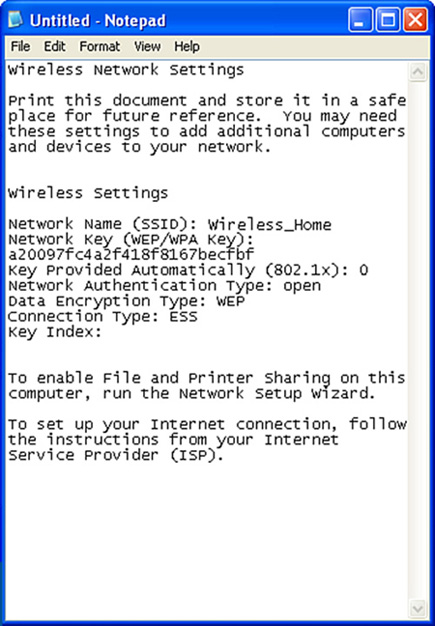
Figure 21.13. Using Notepad to view, save, or print your settings.
12. Click File, Save As and name the file to create a backup of your settings, or click File, Print to make a printout that you can use to manually enter the settings on your AP, router, or other network clients.
Proprietary Extensions to the IEEE 802.11g Standard
Although IEEE 802.11g is the fastest IEEE wireless network standard at present, it is frequently referred to as the slowest wireless network standard at many retail stores. This is because most vendors have created various extensions to the IEEE 802.11g standard in a drive to improve network performance and to sell more expensive network adapters, APs, and so forth. Proprietary extensions fall into the following categories:
![]() Network hardware promising faster throughput
Network hardware promising faster throughput
![]() Network hardware offering greater range
Network hardware offering greater range
Two major technologies are designed to improve IEEE 802.11g transfer rates: Atheros Super G and Broadcom Afterburner. Atheros and Broadcom are chipset vendors, not network adapter vendors. However, between them, almost all wireless network vendors offer one or the other speedup technologies as part of their product lines. Table 21.2 compares the major features of these technologies.
Table 21.2. Faster-than-802.11g Technologies Compared

Although the real-world throughput of these products is considerably lower than the stated speeds, both types of products do provide about a 30%–35% boost in real-world throughput over standard 802.11g hardware. For best results, products from the same vendor, or at least using the same chipset, should be used on a single network.
The second type of improvement over standard IEEE 802.11g hardware involves improvements in range, often combined with speed improvements based on the technologies listed in Table 21.2.
Table 21.3 compares range-improvement technologies used by major wireless network vendors. Most use some form of multiple in, multiple out (MIMO), which uses multiple antennas in various ways.
Table 21.3. Range Improvements Technologies for Enhanced 802.11g Networks

Note
Airgo claims that the definition of MIMO involves techniques such as beam forming, receive combining, and multiplexing along with multiple antennas. Other vendors, such as Atheros and Video54, use MIMO to refer to other methods of using multiple antennas. At this point, there is no legal definition of MIMO, so different vendors are free (for now) to use (and argue over) the meaning of MIMO.
Because these methods have been developed by chipset and technology vendors rather than by network adapter manufacturers themselves, you might see other vendors adopt various combinations of these technologies in the future.
Improving Network Performance with Dual-Band Wireless Technology
In this and other chapters, dual-mode wireless hardware has been discussed, such as APs designed to connect with 802.11a and 802.11b or 802.11g clients. If your home or office network is used for streaming audio and video, consider using a dual-band AP and compatible client hardware to improve overall performance.
A dual-mode wireless network can use either its 2.4GHz (IEEE 802.11b or 802.11g) or 5GHz (IEEE 802.11a) radio to connect with a given client. In essence, a dual-mode wireless network with both types of clients is like having two separate networks that can communicate with each other.
By contrast, a dual-band wireless network uses both frequencies at the same time. Typically, the 2.4GHz band is used for standard wireless network tasks such as Web surfing, email, file and folder sharing, and printer sharing, while the 5GHz band is used for streaming audio and video. Thus, you can surf the Web on a dual-band wireless client and play streaming video on the same client at the same time, at the maximum speed possible.
Dual-band wireless clients, like dual-mode (sometimes called tri-mode) wireless clients, can connect to existing 802.11b, 802.11g, and 802.11a APs. Thus, a dual-band wireless client is essentially a universal client for standard wireless networks, and can benefit from greater speed when connected to a dual-band wireless network that separates high-bandwidth traffic from lower-bandwidth traffic. In such cases, high-bandwidth traffic should use the 5GHz (IEEE 802.11a) frequency, and low-bandwidth traffic should use the 2.4GHz (IEEE 802.11g) frequency.
Which Wireless Protocol Should You Use?
This chapter, as well as the preceding three chapters, was written to introduce you to the current wireless network standards. This chapter includes examples of 802.11g hardware installations because 802.11g is the prevailing standard for wireless networking. Even if you choose one of the enhanced 802.11g standards discussed earlier in this chapter, configuration of APs and servers using faster or longer-range technologies is similar.
You have a variety of choices to make in the current marketplace:
![]() Standard IEEE 802.11g wireless hardware
Standard IEEE 802.11g wireless hardware
![]() Dual-band IEEE 802.11a/802.11g wireless hardware
Dual-band IEEE 802.11a/802.11g wireless hardware
![]() Dual-mode IEEE 802.11a/802.11g wireless hardware
Dual-mode IEEE 802.11a/802.11g wireless hardware
![]() Enhanced-speed versions of IEEE 802.11g
Enhanced-speed versions of IEEE 802.11g
![]() Enhanced-range versions of IEEE 802.11g
Enhanced-range versions of IEEE 802.11g
If you are satisfied with the performance of IEEE 802.11g, plan to use it at ranges of no more than about 50 feet between the furthest client and an AP. Especially if you are building on an earlier IEEE 802.11b wireless network, standard 802.11g network hardware is the least expensive choice, and a good one for most users. It enables seamless interconnection of 802.11b and 802.11g clients, whether they use USB, PCI, CardBus, or integrated adapters.
If you need to support 802.11a clients as well as 802.11g or 802.11b clients, select a dual-band 802.11a/g AP. Dual-band 802.11a/g clients are useful primarily if the computer will be moved between networks based on those standards.
To improve performance on a network that uses both 802.11a and 802.11g clients, use a dual-mode AP and configure it so high-bandwidth traffic runs on the 5GHz 802.11a frequency and lower-bandwidth traffic uses the 2.4GHz 802.11g/b frequency. To get the maximum benefit from dual-mode networking, you might need dual-mode clients.
If you need 30% faster speed than standard 802.11g, consider one of the enhanced-speed 802.11g solutions detailed in Table 21.2. For best interoperability with existing hardware, choose an AP that uses a chipset from the same vendor that your existing clients use. Generally, a wireless vendor uses the same chipset vendor for various product lines. If you need greater range, especially for a campus environment with a large outdoor space, and you’re building your network from scratch, consider a MIMO solution from those listed in Table 21.3. If you need to boost the range of an existing network and don’t want to replace your APs or client adapters, consider replacing your AP’s standard antenna with high-gain versions.
Keep in mind that security can be the weak spot in wireless networking. By nature, a wired network is still more secure than a wireless network. If you decide to build a new wireless network or add to an existing one, make sure your wireless network supports, at a minimum, WPA security.
![]() For more information about WPA and other types of wireless security, see “Wireless Security” in Chapter 23, “Security and Other Wireless Technologies,” p. 349.
For more information about WPA and other types of wireless security, see “Wireless Security” in Chapter 23, “Security and Other Wireless Technologies,” p. 349.