CHAPTER 31. File Server Protocols
SOME OF THE MAIN TOPICS IN THIS CHAPTER ARE
Why File Server Protocols are Important 594
Server Message Block (SMB) and the Common Internet File System (CIFS) 595
NetWare Core Protocol (NCP) 608
Unix Network File System (NFS) 610
Microsoft Distributed File System (DFS) 623
The first thing that comes to mind when you think “network” is probably file and print services or servers. When an addition is made to the network for a new business unit, or when existing units are shuffled around and users and resources must be regrouped, it is usually the files that users access and the printing capacity they require that need to be given special consideration. Plan for the necessary bandwidth, and check the logical and physical topology of the LAN to be sure that you have the necessary capacity, either in bandwidth or in storage. This chapter details the protocols that are used for file services.
![]() Chapter 44, “Network Printing Protocols,” covers print services for the LAN.
Chapter 44, “Network Printing Protocols,” covers print services for the LAN.
Why File Server Protocols are Important
Understanding how a particular protocol functions will better enable you to troubleshoot network problems that prevent users from timely access to file resources. For example, using a LAN analyzer to review network traffic during a troubleshooting session will be of little use unless you know what types of frames you are looking for and understand their function in the file-sharing process. You also can use the knowledge gained from this chapter to assist in making decisions about future additions to the network.
There are many ways you can share files. You can copy them to a floppy disk or tape cartridge (or more likely today, a CD or DVD you just burned) and pass them around the office (a la sneaker-net). This is not a very efficient method when your volume of data grows and you find yourself trying to keep track of multiple versions of a file.
When TCP/IP was developed, several handy utilities were created to work with the protocol to provide clients some useful file- and system-sharing functionality. One of these, the File Transfer Protocol (FTP), enables a user to copy a file to or from a remote computer to his own so that manipulation of the data can be done locally, and then the file can be transferred back onto the original server.
FTP is an ideal mechanism when you want to distribute multiple copies of a file to multiple people. When used in an environment where the goal is to allow multiple users to modify a file, however, FTP doesn’t really improve much on the floppy method, except that the network can often handle a larger number of files over a greater distance more quickly. However, because users end up with more than one copy of the file, there is always the potential of creating mismatched versions when trying to coordinate multiple access to a file by making many copies of it. For example, if the user forgets to copy the file back to its original location after making changes, the next user who makes a copy of the file will find herself working on a file that does not contain these changes. Another problem with the copying method is that the network bandwidth (or lack of it) can become a problem for very large files, though this is less of a problem in today’s faster networks. It may be a hindrance, however, in slow dial-up connections to the network.
![]() FTP, telnet, and a host of other useful network utilities are covered in Chapter 25, “Basic TCP/IP Services and Applications.”
FTP, telnet, and a host of other useful network utilities are covered in Chapter 25, “Basic TCP/IP Services and Applications.”
Other TCP/IP utilities can be used to access files remotely. For example, you can establish a telnet session to a remote computer and then issue commands locally to manipulate data.
Using telnet, the user’s PC or workstation acts as nothing more than a terminal emulator, and a rather expensive one at that. All applications that are needed to manipulate the data must be installed on the remote computer. This is probably a better method to use than copying from an FTP site or floppy disk when trying to share a single file among many users, because it maintains only one copy of the file. However, it is still not a very convenient method for several reasons. If you want to access files on more than one remote system, you need a separate telnet session for each one. This means it is not possible for an application, such as a word processor or database, to access files or remote systems at the same time (because the word processor or other application is running on the target system and not the client workstation). When using a telnet client, the user must have a user account set up on each remote system so that the logon can be validated. This can be overcome by using a single signon technology such as the Active Directory. But using telnet is not as transparent a process as simply running an application on the user’s workstation and accessing files in the local file system.
The Network File System (NFS) protocol was developed by Sun Microsystems to make remote file access as simple a process for the user as local file access. NFS enables a user to access a remote file system while making it appear to the user to be a local file system. There is no need to copy files back and forth from servers. Using NFS, a file system (or a portion of it) residing on a remote system can be made to appear to the client as though it were simply part of the local file system. Early on, NFS was found only on Unix boxes. However, its popularity spread, and you can now find NFS server applications and client applications for most major operating systems. A minor disadvantage to using NFS is that network problems can interfere with file access. However, this is true for any kind of network file-sharing protocol.
Note
Microsoft’s Services for Unix (SFU) (version 3.5) provides various Unix-like utilities and commands to Windows 2000 Server and Windows Server 2003. These include an NFS client as well as an NFS server. You can learn more about Services for Unix 3.5 in Chapter 57, “Migration and Integration Issues: Windows NT, Windows 2000, Windows 2003, Unix, and Linux.”
Microsoft operating systems have long used the Server Message Block (SMB) protocol to provide file and printer access to networked clients. This protocol has developed over the years and has been adopted into Windows NT and Windows 2000. Whereas NFS is built on top of several other complex protocols and is used to provide only file-sharing capabilities, SMB is a more basic protocol that can be used across a network to provide network access to files and print sharing to interprocess communication, and other resources such as named pipes and mailboxes. The latest incarnation of SMB is called the Common Internet File System (CIFS) protocol.
In this chapter, you will briefly look at these protocols that enable you to share files on a network.
Server Message Block (SMB) and the Common Internet File System (CIFS)
A common protocol you will find on almost any computer running a Windows operating system, from early LAN Manager products to Windows Server 2003, is the Server Message Block protocol. This is a protocol used for basic file sharing and printer sharing, and for locating other network resources. It is a basic client/server protocol that uses request and response messages.
SMB has also been used by many vendors other than Microsoft to provide file and print services, including IBM (OS/2) and Digital Equipment Corporation (DEC, now HP) in its Pathworks products.
SMB has been around for awhile and has been modified to support new functions as PC networks have evolved. Each new version of the protocol is called a dialect. Table 31.1 shows the dialects in order from the earliest to the latest, and any server implementing a particular dialect must also support interaction with clients of any earlier dialect in this table. This allows for backward compatibility for older clients when parts of the network, such as servers, are upgraded.
Table 31.1. SMB Protocol Dialects

SMB Message Types
SMB is a message-oriented protocol in which the client makes a request of the server using a message formatted according to a specific SMB message type. The server responds to the client’s request using a specific SMB format. There are many types of messages, which are listed in Table 31.2. Note that not all message types are supported by all clients. The table is subdivided into sections showing at what point in the development of SMB-based networks a particular message type was introduced.
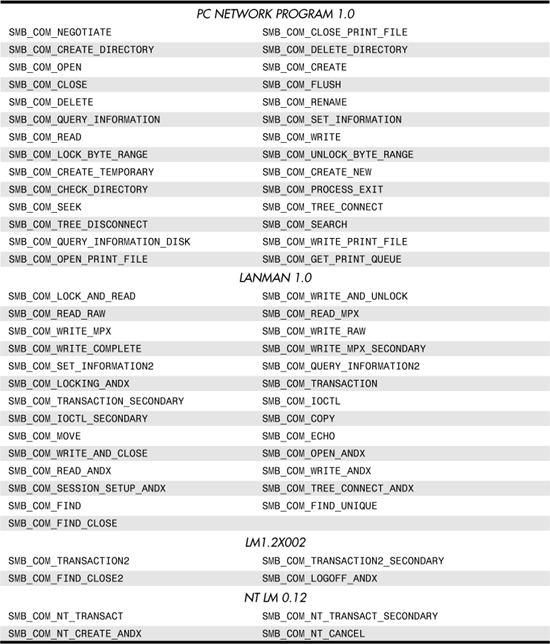
From the list in Table 31.2, it is easy to see that SMB has evolved over the years and has a specific command set that provides detailed functionality while maintaining simplicity by using a simple message exchange format. Most LAN analyzers have the capability to decode SMB packets, and you can troubleshoot SMB client/server sessions to observe the interaction of the commands shown in the table.
SMB Security Provisions
SMB has the capability to provide for two kinds of security for file sharing:
![]() Share level
Share level
![]() User level
User level
The most basic level of security that can be used on an SMB network is share-level security. This approach offers a disk or directory as an available resource on the network, protecting it with a password. Users who want to access a resource that is protected at the share level need only know the name of the resource, the server that offers it, and the password for it to make a connection. This kind of file sharing is usually employed by Windows 9x/Me computers configured as a workgroup, in which using domains and the Active Directory would require too much administrative overhead—not to mention expense. In a small LAN in which there is not a great need for a high degree of security among users, it is simple to set up and maintain a network based on this model.
A superior method that is more likely to be found in the business environment involves making users accountable for accessing resources. A user-level security model dictates that each user should log in using a unique identifier, called a username, which is associated with a password for the user account. After logging in to the network, users are granted access to resources based on the rights accorded their accounts (what the user can do) and the resource protections placed on files or directories (what the user can do with the resource). This user-level method enables you to assign different kinds of access based on username and resource.
Note
In addition to a username/password model commonly used for computer access, there has been a rapid increase in the marketplace for more secure authorization mechanisms, such as using smartcards with assigned PIN numbers to each employee. As recognition software continues to increase at the top edge, you can use it in your network also. It won’t be long (the technology is available now, at quite some expense) before you’ll use technologies of recognition software such as one now used by super-secure organizations—a retinal scan. Just as computer hardware gets less expensive every year as production ramps up to higher levels, you can expect the same from recognition devices in the very near future.
In the share-level security model, access to a share enables the user to access any files in the top-level directory of the share and all the files in all the subdirectories that might fall under the top-level directory. In the user-level security model, the administrator can place different access limitations on every directory, subdirectory, and file that exists in the share.
The earliest SMB clients do not have the capability to exchange an account name and password with a server and are thus limited in what they can do in a more modern environment. SMB servers will generally provide some functionality for user-level security. For example, if the client computer’s computer name matches an account name that is known to the server, and if the password that the client passes as a “share” password matches that of the account, the SMB server can perform a logon for the user and grant access to the resource.
Protocol Negotiation and Session Setup
SMB has a built-in mechanism that is used by the client and server to determine the other’s capabilities so that a common protocol version can be established that the two will use for the network connection. The first SMB message that the client sends to the server is one of the SMB_COM_NEGOTIATE type. The client uses this message to send the server a list of the dialects it understands. The server selects the most recent dialect it understands from the client’s list and returns a message to it.
The response the server returns depends on the type of client. The information includes the dialect selected and can include additional information, such as buffer sizes, supported access modes, time and date values, and security information. After the client receives this response, it can continue to set up the session by using the SESSION_SETUP_ANDX message type.
If the initial server response indicates that user-level security is being used, this message type can be used to perform a user logon. The client sets a value in the message header called the UID (user ID) for the account it wants to use. It also supplies the account name and password to the server by using this message type. If these values are validated by the server, the user can continue to use the UID to make subsequent accesses.
Other setup functions that are performed by using SESSION_SETUP_ANDX include the following:
![]() Set the maximum values for the size of buffers that will be used in the message exchange.
Set the maximum values for the size of buffers that will be used in the message exchange.
![]() Set the maximum number of client requests that can be outstanding at the server.
Set the maximum number of client requests that can be outstanding at the server.
![]() Set the virtual circuit (VC) number.
Set the virtual circuit (VC) number.
If the VC passed to the server is zero and the server has other circuits open for the client, it will abort those services, assuming that the client has rebooted without freeing those services first. To properly close a session, the client uses the message type LOGOFF_ANDX, which causes the server to close all files associated with the user’s UID.
Accessing Files
Other SMB message types are used to traverse the resource directory and to open, read, write, and close files. First, the user must connect to the resource by using the TREE_CONNECT message. The message includes the name of the resource (server and share name) and, for earlier clients that do not perform logons, a shared password. The server responds by sending the user a value called the TID (Tree ID), which will be used in SMBs exchanged for this connection.
After the connection has been established, several basic SMB command formats can be used to manipulate files and directories that reside on the share. For example, the CREATE_DIRECTORY message is used to create a new directory in the file share’s directory structure. The client passes the pathname for the new directory, and the server creates the directory, provided that the client has the appropriate access rights or permissions. The DELETE_DIRECTORY SMB message can be used to remove a directory, again based on the functions allowed for the username.
Opening and Closing Files
The OPEN message is used by a client to open a file. The path for the file is given, relative to the file share root. The client specifies the access that is desired, such as read, write, or share. If the file is successfully opened, the server returns a File ID (FID) to the client, which is used to further access the file using other SMB message types; it is similar to a file handle, which most programmers will recognize.
The server also returns data to the client indicating the actual access that was granted, which is read-only, write-only, or read/write.
The CLOSE message is sent by the client to tell the server to release any locks held on the resource file held by the client. After this message, the client can no longer use the FID to access the file, but it must instead reopen the file and obtain a new value.
When a client does not know the exact name of a file that it wants to open, the SEARCH message can be used to perform a directory lookup. This function enables wildcards to be used, and the server response can include more than one filename that matches the request.
Reading and Writing
The SMB protocol uses the READ and WRITE message types to perform I/O operations on a file for the client. Using the READ request, a client can request that the server return information from the file by specifying a number of bytes and an offset into the file. The server returns the data, indicating the actual number of bytes returned, which can be less than requested if the user tries to read past the end of a file.
The WRITE command updates a file in a similar manner. The client sends in the data that will be written, indicating the number of bytes to write and an offset into the file where the write operation will begin. If the request causes a write past the end of the file, the file is extended to make it larger. The server sends a response telling the client the number of bytes that were written. If the number is less than the requested value, an error has occurred.
To increase read/write performance, the READ_RAW and WRITE_RAW message types can be used to exchange much larger blocks of information between the client and the server. When these are used, the client must have only one request issued to the server. In one send, the server will respond with data that can be as many as 65,535 bytes in length. The WRITE command works in the opposite direction, allowing the client to send a large buffer of raw data to the server for a write operation.
Locking Mechanisms
Locking allows a particular client exclusive access to a file or a part of a file when it is shared on the network. In SMB, the capability to create a lock is called an opportunistic lock, or oplock for short. This is better explained by looking at the way in which it works. A client can create a lock on a resource using three kinds of locks. The first is an exclusive lock, in which the client has exclusive access to the data held by the lock. A batch oplock is one that is kept open by the server when the client process has already closed the file. A Level II oplock is one in which there can be multiple readers of the same file.
The locking process consists of the client requesting the type of lock it wants when it opens the file. The server replies to the client with the type of lock that was granted when it responds to the open request.
A lock gives the client the capability to efficiently manage buffer space it uses when accessing a file over the network. For example, if a client has exclusive access to a file and is performing writes to it, it can buffer a lot of the newly written information before having to send it to the server to update the file. This can provide a reduced number of network packets when updating a file. A client that has an exclusive lock on a file can also buffer read-ahead data to make reading a file much faster.
These locks are called opportunistic locks for a reason. A client can be granted exclusive access to a file if no other client has it open at the time of the request. What happens when another client needs to read the file? The server notifies the first client that it needs to break the exclusive lock. The client then flushes its buffers so that any data that has not been written to the file is processed. The client then sends an acknowledgment to the server that it recognizes that the exclusive lock has been broken. In Figure 31.1, you can see the interaction between two clients and a server as these messages are exchanged.
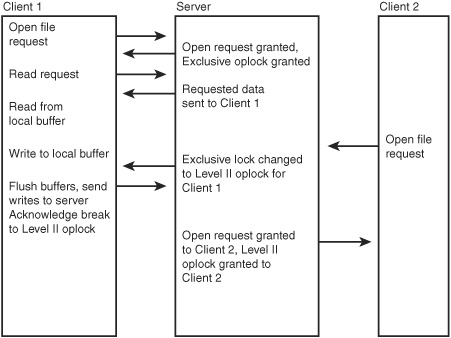
Figure 31.1. Exclusive oplocks are changed to Level II oplocks when a second client wants to open a file.
Batch oplocks are used to reduce the amount of traffic on the network when some programs require continual reopening of a file to obtain commands, as when a batch command procedure is executed.
For example, a batch procedure executed by the command processor usually opens a file, locates the next line to be executed, reads that line, closes the file, and then executes the command. The problem with this is that these steps are taken for each command line in the procedure, resulting in multiple file open/closes that are not really necessary.
This procedure for reading individual lines from a file is done by using a batch oplock whereby the client can read the data from its local read-ahead cache instead of reopening the file on the remote server to get each line.
Level II oplocks were new with the NT changes to SMB. This kind of lock allows more than one client to have a file opened for reading. When a client must read from a file that is opened by another exclusively, the server informs the current client that its exclusive lock has been broken and is now a Level II oplock. No client that has a Level II oplock will buffer data to or from the file. Thus, after the lock has changed to a Level II oplock (and the first client has flushed any data in its buffers), both clients can continue reading the file.
Using NET Commands
The set of NET commands form the basis for a command-line interface that the client can use to access SMB-based file services. For server functions, the NET commands allow you to create and configure shares, manage users and groups, and more. This command, with its many command-line parameters, can be used to make a directory available for sharing, to connect or disconnect a resource, or to view resources available on a server, among other functions. Clients using operating systems such as Windows 98/Me or Windows NT/2000/XP/2003 can also use Microsoft Windows Explorer to connect to file resource shares on the network. However, the NET command provides a simple interface that also can be incorporated into command procedures, such as user login script files. You can also use these commands during troubleshooting. For example, you can establish a telnet session with a remote client who is having problems with a file share and execute the NET commands directly via the Command Prompt window. When present at the actual computer that is experiencing a problem, you will probably get more information by using commands than by using the GUI interface. The exception to this is the Event Viewer, which can give you valuable guidance by narrowing down the problem that generated an error. Reading the Event Viewer records can be confusing, and they are often easily interpreted only by experienced personnel. Yet, using the Event Viewer, you can at least determine such basic conditions as a bad password, a nonexistent user account (create it), and other simple items that often show up in day-to-day network activities.
Note
More information about using the Event Viewer on Windows systems can be found in Chapter 43, “Auditing and Other Monitoring Measures.” By setting up the correct items to be audited, and using the Event Viewer to check for messages, you can quickly debug many problems.
Because the NET command can be a useful tool both for setting up users to connect to resources and for troubleshooting clients, it is worth looking at the basic functions you can perform using this command.
There are several command parameters you can use with NET. For file sharing, these are the most basic commands:
![]()
SHARE
![]()
USE
![]()
VIEW
Net Share
The NET SHARE command enables you to offer a disk or directory structure for sharing on the network. If used by itself with no other parameters, the command will show you the current shares that are being offered by the workstation or server, as in the following example:
C:>net share
Share name Resource Remark
-------------------------------------------------------------------------------
IPC$ Remote IPC
D$ D: Default share
print$ F:WINNTSystem32spooldrivers Printer Drivers
E$ E: Default share
C$ C: Default share
F$ F: Default share
ADMIN$ F:WINNT Remote Admin
documents d:
HPLaserJ LPT1: Spooled HP LaserJet 6L
The command completed successfully.
Note
In the listing of file shares, note that some end with a dollar sign, such as C$ and F$. An administrative drive share for each unique local drive volume on nonremovable media is automatically created using this syntax. However, unless you have administrator privileges, you won’t see these when using the NET command to view shares on another computer. The dollar sign can be added to any new file share that you create as well. Any share that ends in a dollar sign is a “hidden” share. Hidden shares other than the previously mentioned root drive shares can be accessed by any user who has permissions to the share and who knows the hidden share name. Administrative drive shares cannot be accessed by anyone other than administrators, and these permissions cannot be modified.
In this example, you can see that SMB is used not only to provide network communications for file sharing, but also to provide shared printing (HPLaserJ LPT1:) and interprocess communications (IPC$).
The basic syntax for sharing is as follows:
NET SHARE sharename
Entering just this command will return an error message, because you haven’t specified what is to be shared. To make a directory available for sharing, specify the name you want the file share to use on the network, and follow it with the path to the directory to be shared:
NET SHARE sharename=drive:path
You can further configure the share by using the following qualifiers:
![]()
/Users:number or /UNLIMITED—You can specify the maximum number of users that are allowed to simultaneously connect to the share.
![]()
/REMARK:text—You can display text to describe the share.
![]()
/CACHE:—You can specify manual, automatic, or no.
See the following example:
F:>NET SHARE ACTFIL=D:ACCTPAY /USERS:5
ACTFIL was shared successfully.
This code offers the file share actfil on the network. It allows as many as five concurrent connections to the files contained in the directory D:ACCTPAY and all subdirectories that fall under it.
Deleting a file share on the server is also a simple matter:
F:>NET SHARE ACTFIL /DELETE
ACTFIL was deleted successfully.
In this example, you can also specify the pathname that is being shared:
F:>NET SHARE D:ACCTPAY /DELETE
ACTFIL was deleted successfully.
D:ACCTPAY was deleted successfully
In both of these instances, the actual directory that was offered for sharing is not deleted. Only the file share is deleted.
Troubleshooting Using NET VIEW and NET USE
These two commands enable you to view the resources available on the network and then make connections to them. NET VIEW returns a list of the servers it knows about on the local network. You can use NET VIEW \servername to get a list of services offered by any server in the list, as in the following example:
F:>NET VIEW \bcanjs1
Shared resources at \bcanjs1
Share name Type Used as Comment
-------------------------------------------------------------------------------
acct Disk Accounting
cdrom Disk CD Drive on BCANJS1
documents Disk
dvdrom Disk DVD Drive on BCANJS1
HPLaserJ Print HP LaserJet 6L
Rschlz Disk Restricted
The command completed successfully.
It is easy to get confused when trying to troubleshoot problems with users connecting to shared resources. If you are using a Microsoft-based network that provides file sharing through SMB mechanisms, the NET VIEW command can be extremely useful. You can determine from this command whether the remote resource server is even seen in the browsing list by the client computer. If it is, you can display the resources offered. To connect to a resource manually, you can use the NET USE command. When executed by itself with no other command-line parameters, this command displays a list of your current connections.
To make a new connection, the syntax is very basic, though it has variations:
NET USE device sharename
Here, device can be an actual drive letter (such as D: or E:), a device name for a printer (LPT1:), or the wildcard *, in which case the next available drive letter will be chosen automatically when the connection is made. Observe the following example:
NET USE X: \BCANJ1DOCUMENTS
Tip
If you use an asterisk (*) instead of a drive letter with the NET USE command, the system will assign drive letters starting with the end of the alphabet (Z, unless it is already in use). Then, for each subsequent NET USE command that uses the asterisk, the next lower alphabetic character will be used.
This attaches the drive letter X: to the resource documents on the server BCANJ1.
You can also specify a username that can be used to evaluate your access rights to the remote resource:
NET USE X: \BCANJ1DOCUMENTS /USER:[domainname]username
Here, you would specify a valid username and, if it is a domain account, the name of the Windows domain. To delete a connection to a remote resource, use the /DELETE qualifier:
NET USE X: /DELETE
The NET USE command is most often associated with creating user logon scripts or other batch-oriented procedures that are used to interact with files offered as resources on a network. It can also be a very handy command to remember when performing a new installation or upgrading a user. For example, when installing a new application or troubleshooting a misbehaving one, you can quickly connect to a remote resource to download configuration or driver files.
Monitoring and Troubleshooting SMB Communications
You can use the NET STATISTICS command to obtain a quick view about statistics related to the SMB protocol.
Use either WORKSTATION or SERVER as a keyword to indicate which set of statistics you would like to see, as in the following example:
F:> NET STASTICS SERVER
Server Statistics for \BCA-NJ-S1
Statistics since 11/09/02 05:45 PM
Sessions accepted 1
Sessions timed-out 0
Sessions errored-out 0
Kilobytes sent 3
Kilobytes received 3
Mean response time (msec) 0
System errors 0
Permission violations 0
Password violations 0
Files accessed 7
Communication devices accessed 0
Print jobs spooled 0
Times buffers exhausted
Big buffers 0
Request buffers 0
The command completed successfully.
From this display, you can quickly see whether a server is having problems with a recent password change—password violations will probably be excessive. A high value for permission violations can indicate that an access control list on a file or directory might have recently been changed. The other statistics shown here also can be used for many different troubleshooting scenarios.
The NET command has the capability of showing you a lot of information. For example, in addition to giving SMB statistics, the NET command can be used to show the services currently running on an NT/2000 or Windows 2003 family of operating systems. Using the NET START command with other parameters on the line displays a list of the services currently running. If you are troubleshooting a client and see, for example, that the Workstation service is not running, you can use the NET START WORKSTATION command to start it. The NET command enables you to view, start, and stop services without having to use the graphical interface and can be a great help when performing remote diagnosis.
When you upgrade a network or make repairs, it is often useful to send a message to users to let them know what is happening. For example, replacing a network card might require that a server be out of commission for a short time. Changing a network cable might disrupt network access for users. You might have established a telnet session with a user’s workstation and want to send him a message on the screen to let him know that you are working. You can use the NET SEND command, using the following syntax, to send a message to users:
NET SEND {name | * | /DOMAIN[:domainname] | /USERS} message
Here, you can see that you can send a message to a single user or use the wildcard * character to send the message to all users. You can use the /DOMAIN:domainname variation to send the message to all users in a particular domain, for example. See the following command:
NET SEND * I am monitoring your workstation right now. Will call when finished.
When logged in to a server, this command produced the pop-up message on the terminal of the logged-in user shown in Figure 31.2.
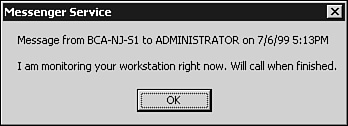
Figure 31.2. The NET SEND command can be used to send a message to users when you are logged in to their workstations.
To carry problem diagnosis any further when using SMB for file sharing, you need to resort to a LAN analyzer of some kind. You can use this to verify that the correct SMB messages are being exchanged between the client and the server. In Figure 31.3, you can see the Microsoft Network Monitor being used for this purpose.
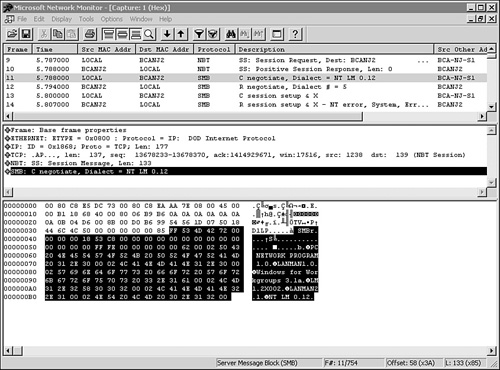
Figure 31.3. Using Microsoft Network Monitor, or a similar LAN analyzer, you can examine the exchange of SMB packets between the client and the server.
You can step from one packet to the next to discover where a problem might be occurring. For example, is a password required? Are there problems with opening a file? You can watch the sequence of commands that are used to connect to a tree, open a file, and make an attempt to read or write.
The Windows 2003 family of servers offers a slightly different view of the Microsoft Network Monitor, as shown in Figure 31.4.
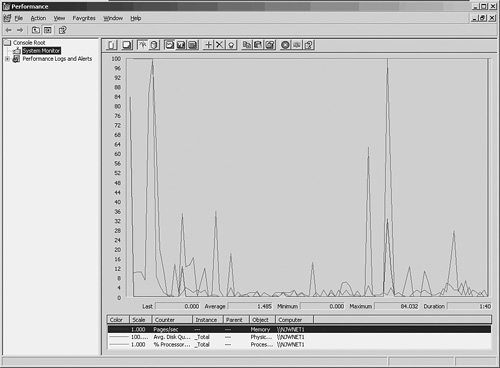
Figure 31.4. The Windows 2003 family of servers’ Network Monitor has an updated interface.
In Figure 31.4 you can see a simple example of tracking network performance. You can customize this tool to further capture and display network packets just as you can in Windows 2000.
Although it would be necessary to have more detailed information about the format of SMB packets to make a detailed diagnosis at this level, it is still very helpful to be able to see the types of messages being exchanged, regardless of whether you can understand every byte in the packet. Viewing the data at this level can be used to troubleshoot most problems with this protocol. You also can use the event-logging capabilities of Windows NT/2000 and the Windows 2003 family of servers (the Event Viewer) to look for problems. For example, if you have a password failure and have set the server to audit failed resource accesses, the Event Viewer will have a record showing you the failed attempt, and you can quickly resolve the problem by giving the user the correct password or by changing it. The Event Viewer can also let you know whether the network services installed on your server were started correctly, or encountered problems.
![]() The Microsoft Network Analyzer is covered in more detail in Chapter 49, “Network Testing and Analysis Tools.” Using the Event Viewer is covered in Chapter 43.
The Microsoft Network Analyzer is covered in more detail in Chapter 49, “Network Testing and Analysis Tools.” Using the Event Viewer is covered in Chapter 43.
Using the SMB/CIFS Protocol on Non-Microsoft Clients: Samba
SMB/CIFS is a protocol that is highly entrenched in the Microsoft world of operating systems and networking products. It makes sense, then, that there would be a way in which these workstations and servers could be integrated into a Unix/Linux environment without a lot of difficulty. The answer to this problem is called Samba, which is a set of products that provide for SMB conversations between SMB servers, such as Microsoft Windows operating systems, and those that do not use it natively, such as many different variants of Unix or Linux systems. In addition, Samba has been ported to several other popular operating systems, including OpenVMS.
Tip
You might not have to download Samba from the Web. Some Unix or Linux vendors include it as part of the installation package. For example, Samba is included with Red Hat Linux, which is one of the more popular Linux distributions.
Samba was originally developed by Andrew Tridgell and is now maintained by him and other developers (the “Samba Team”) on the Internet. You can go to the home page for the Samba effort by using the URL www.samba.org.
From this Web site you can choose a mirror Web site for your country, and then you can view the documentation for Samba and download the most recent version. The software is freely distributed under the GNU public license.
You can configure Samba servers on your Unix boxes to enable high-performance machines to be used as file servers on the Windows network. You can still manage the servers using Unix file administration procedures, and yet to the client computers, the shares appear no different than those offered by other Windows-based file servers.
Troubleshooting a Samba server can be made easier by starting the Samba server software using the -d parameter to specify a debug level (from 1 to 100), which will cause more output messages, depending on the level you specify.
You can also use a LAN analyzer to view the sequence of exchange of SMB messages between server and client. Available as a download from the Samba home page is an extension to the tcpdump utility, called tcpdump-smb. You can use this to capture smb packets and decode the header information.
The Common Internet File System (CIFS)
CIFS is intended to be a replacement, or an upgrade, of the SMB protocol. Design considerations include making it platform-independent. While SMB resides in the NetBIOS legacy environment, CIFS runs on top of TCP. Other improvements over SMB include the following:
![]() Unicode filenames are used. Because the Internet is global, it’s helpful to be able to encode characters that support multiple languages.
Unicode filenames are used. Because the Internet is global, it’s helpful to be able to encode characters that support multiple languages.
![]() Service is automatically restored after a network disruption.
Service is automatically restored after a network disruption.
![]() CIFS is not proprietary to Microsoft. It is an Open Group standard (X/Open CAE Specification C209). It has also been proposed as an Internet standard to the Internet Engineering Task Force (IETF). This is an improvement over the earlier SMB protocol.
CIFS is not proprietary to Microsoft. It is an Open Group standard (X/Open CAE Specification C209). It has also been proposed as an Internet standard to the Internet Engineering Task Force (IETF). This is an improvement over the earlier SMB protocol.
![]() DNS is used to translate between computer hostnames and IP addresses.
DNS is used to translate between computer hostnames and IP addresses.
![]() Both share-level authentication and user-level authentication are supported. With user-level authentication, the user must be authenticated (using a username/password valid on the server) before access is granted. This is much more secure than share-level access, discussed earlier in this chapter. Authentication is done using DES encryption.
Both share-level authentication and user-level authentication are supported. With user-level authentication, the user must be authenticated (using a username/password valid on the server) before access is granted. This is much more secure than share-level access, discussed earlier in this chapter. Authentication is done using DES encryption.
![]() CIFS has been optimized to make communications across a slow link—such as a dial-up modem—possible.
CIFS has been optimized to make communications across a slow link—such as a dial-up modem—possible.
Tip
CIFS (or SMB) is not going to be dying out anytime soon. The Storage Networking Industry Association (www.snia.org) has a 150-page PDF file discussing the use of CIFS in both Storage Area Networks (SANs) and Network Attached Storage (NAS)—both among the hottest networking technologies coming to market today. You can find out more about SANs and NAS in Chapter 11, “Network Attached Storage and Storage Area Networks.”
CIFS is basically an enhanced version of SMB and still uses server message block messaging. Better security and the use of DNS are necessary additions if the protocol is to be used on the Internet.
NetWare Core Protocol (NCP)
NetWare is composed of several protocols. IPX is a connectionless delivery service that can be used by higher-level protocols (such as NCP or SPX) to create a connection-oriented, reliable transport service. Two other important protocols used in NetWare are the Service Advertising Protocol (SAP) and the Routing Information Protocol (RIP). It is through SAP that servers announce their presence periodically and clients can make requests to locate resources. RIP is used to locate servers on the network.
Another protocol, called NetWare Core Protocol (NCP), is used for communications exchange between a client and a server when file reads, file writes, or other file-related activities are being performed. It provides connection control and defines the methods used to encode requests and replies. NCP is a simple request-response protocol, similar to SMB in that respect. NCP requests are encapsulated in IPX packets. The NCP header information, which follows the IPX header information, consists of five fields. The first indicates the request type, which provides the function of the packet.
The client can make a request using four request types in this field, and the server can use this field to indicate a type of reply:
![]() Create a service connection (1111)
Create a service connection (1111)
![]() General service request (2222)
General service request (2222)
![]() General service replies (3333)
General service replies (3333)
![]() Terminate a service (destroy) connection (5555)
Terminate a service (destroy) connection (5555)
![]() Request burst-mode transfer (7777)
Request burst-mode transfer (7777)
![]() Request being processed (9999)
Request being processed (9999)
These services can be further qualified by function and subfunction codes contained in the request packet. Other fields in the NCP header include the following:
![]() Sequence Number field, which is used to track the sequencing information for the connection.
Sequence Number field, which is used to track the sequencing information for the connection.
![]() Connection Number Low field, which is a service connection number that is assigned to the client when it logs on to the server.
Connection Number Low field, which is a service connection number that is assigned to the client when it logs on to the server.
![]() Task Number field, which is a value that identifies the client that is making an NCP request.
Task Number field, which is a value that identifies the client that is making an NCP request.
![]() Connection Number High field, which is currently not used and should always have the value of 00 hex.
Connection Number High field, which is currently not used and should always have the value of 00 hex.
The header information for the response packet that the server sends back to the client will contain these same fields, but it will also add to additional fields. The first is a Completion Code field, which will be set to 0 if the request was successfully completed or to 1 if an error was encountered in processing the request. The Connection Status field might have values indicating an error condition between the client and server connection.
When the client initiates a connection request with a server, it will create a service connection (1111) request type. The server gives the client a connection number in its response. This connection number is used by the client when it submits its remaining requests. Each time a request is sent on the particular connection, the sequence number is incremented. The response to a request contains the same sequence number, making it easy for the client to match up responses to pending requests.
General Requests and Responses
Most of the exchanges between client and server are usually the result of requests made by the client (type 2222) and the replies sent by the server (type 3333). These requests can be used to search directories or to open, read, and write to files.
The server uses the connection ID number and the sequence number when it sends a reply to a request. The Completion Code field is filled in to indicate success or failure, and other data might follow in the packet that is used to fulfill the request (such as data read from the file).
Burst Mode
NCP provides commands that can be used to read and write blocks of information in files that reside on the network. However, when larger files must be transferred, a special NCP request (Request Type value=7777), using burst mode, allows the server to send a larger, single burst of data to the client at one time—much larger than the amount allowed by the regular read and write requests (up to 64K).
Burst mode capabilities can be found on NetWare 3.0 and later servers.
The actual mechanics of burst mode involve more than just sending larger amounts of data in a single operation. The client first performs testing to determine a value that will be used for the Interpacket Gap Time (IPG) and the size of the data request (the burst windows size). The window size might vary during the history of the connection, based on how successful communications are. When data is lost during a transmission, the client can send a request to the server to transmit only fragments of the original data stream, those that were not correctly received.
An error condition such as this causes the window size to be reduced. As communications continue with no problems, the window size gradually increases.
Request Being Processed Response
When a client does not receive a response to a request after a timeout period, it will send in a duplicate request. If the server is heavily loaded, it might send back a request that has a request type value of 9999, which is the Request Being Processed type. This is an indication to the client that the request has been received, but that the server is just too busy to do anything about at it at the time. This reply does not guarantee the client that the request ever will get answered, however. It only lets the client know that it can reset its timer and wait longer if need be.
When the client’s timer expires, it can send another request to the server, which might respond to the request or which might send another message telling the client to wait. This response type is used to help reduce congestion in a busy network by reducing the number of requests transmitted on the network.
Terminating Connections
This request type is used to end a connection between the client and the server. The only information needed in this packet, other than the request type (5555), is the sequence number of the request and the connection ID number. The server will respond with a standard response packet (3333) with a completion code of zero to indicate that the connection has been successfully brought to a close.
Unix Network File System (NFS)
The Network File Systems (NFS) protocol consists of several protocols that perform specific functions. Sun Microsystems has published the specifications for NFS so that other vendors can easily implement these protocols to allow for remote mounting of file systems independent of the operating system of the computers. RFC 1094 defines the most widely used version of NFS (version 2). RFC 1813 documents version 3, which adds better support for wide area networking. If you think you will be involved in troubleshooting NFS on the network, you should find out on which version your NFS software is based and become familiar with these documents.
Note
A newer proposed standard is possibly going to replace RFCs 1094 and 1813. RFC 3010, “NFS Version 4 Protocol,” discusses a newer version of the protocol. The newer version includes more detailed support for locking and the mount protocol (discussed earlier in this chapter), as well as stronger security and internalization issues.
NFS is built on routines made up of remote procedure calls (RPC). XDR is used as the data format so that data from different systems can be represented in a common format for interchange. In addition, the Mount protocol is used to make the initial connection to a remote file system. Because NFS is built in this layered fashion, and problems can occur at any level, you will need to understand not only how the NFS protocol functions, but also RPC, XDR, and the Mount protocol.
Protocol Components: Remote Procedure Call (RPC) Protocol
RPC is a simple client/server protocol application. RPC defines the interaction between a client, which formats a request for execution by the server, and the server, which executes the client’s request on the local system. The server performs whatever processing is required and returns the data and control of the procedure to the client. Sun developed RPC for use in NFS, but it has since been employed quite usefully by many other client/server-based products.
The rpcbind daemon (a process that runs in the background waiting for requests) runs on both the client and the server and is responsible for implementing RPC protocol exchanges between hosts on the network.
A service is a group of RPC procedures that have been grouped together into programs. A unique number is used to identify each service, which means that more than one service can operate at any given time. An application that needs to use a service can use the different programs that make up the service to perform specific actions. For example, when designing an NFS service, one program might be responsible for determining a file’s attributes, and another program might be responsible for the actual transfer of data between the client and server computers.
The unique service number is used to identify different network services that run on a particular system, and the mapping for this is usually found in the file /etc/rpc. The RFC that defines RPC sets forth numbers used for many common services, and these are shown in Table 31.3.
Table 31.3. Numbers Used to Identify RPC Services
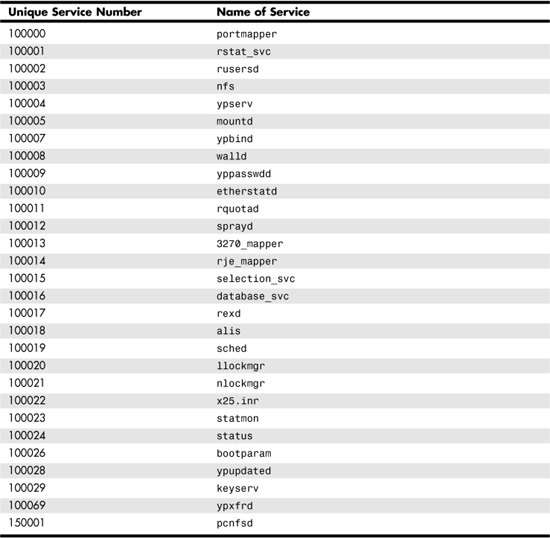
The portmapper service (using port 111 for UDP or TCP) manages the port numbers used in TCP/IP communications. Because there can be more than one open connection between a client and a server, a port number is used to identify each connection.
Don’t confuse port numbers with the numbers assigned to services. Service numbers are used to identify a particular RPC service. Port numbers identify connections between two computers that use a service.
External Data Representation (XDR)
A common format is used when exchanging data between computer systems that are running different operating systems. Some use ASCII code for text, whereas others use Unicode. Some use bigendian encoding techniques, whereas others use little-endian, which determines the order in which bytes are used to represent data (left to right or right to left). It is even more complicated when you look at how different computer systems represent numeric data in memory or storage. When using a multiple-byte value to represent a floating-point number, for example, you need to know which bits are used for the exponent and which are used for the mantissa.
NFS uses the External Data Representation (XDR) standard for data exchange. The details of XDR are covered in RFC 1014. It is a C-like notation for representing data, not a programming language itself. An item, such as a character or numeric value, is represented in XDR by using 4 bytes (32 bits), with the lower bytes being the most significant.
Other encoding features of XDR include the following:
![]() Signed integers are stored using “twos” complement notation and range in value from –2,147,483,648 to +2,147,483,647.
Signed integers are stored using “twos” complement notation and range in value from –2,147,483,648 to +2,147,483,647.
![]() Unsigned integers can range from 0 to 4,294,967,295.
Unsigned integers can range from 0 to 4,294,967,295.
![]() Hyper integers and unsigned hyper integers are 8 bytes in size and can be used to represent larger integers.
Hyper integers and unsigned hyper integers are 8 bytes in size and can be used to represent larger integers.
![]() Floating-point formats are also defined, and so are the
Floating-point formats are also defined, and so are the enum type (familiar to C programmers) and a Boolean type.
![]() Structures, arrays, constants, and many other data types are also defined.
Structures, arrays, constants, and many other data types are also defined.
XDR provides an extensible data description format that makes implementing NFS on multiple hardware and software platforms much easier.
The NFS Protocol and Mount Protocol
The NFS protocol is a set of procedures (called primitives) that are executed via RPC to allow an action to be performed on a remote computer. NFS is a stateless protocol, which means that the server does not have to maintain information about the state of each client. If the server (or the network) fails, the client needs only to repeat the operation. The server doesn’t have to rebuild any data tables or other structures to recover the state of a client after a failure.
Note
Certain operations, such as file or record locking, do require a stateful protocol of some sort, and many implementations of NFS accomplish this by using another protocol to handle the specific function. NFS itself is composed of a set of procedures that deal only with file access.
The RPC procedures that make up the NFS protocol are the following:
![]()
Null—The “do nothing” routine. It is provided in all RPC services and is used for testing and timing operations.
![]()
Get File Attributes—Gets the file attributes of a file on a remote system.
![]()
Set File Attributes—Sets the file attributes of a file on the remote server.
![]()
Get File System Root—No longer used. Instead, the Mount protocol performs this function.
![]()
Look Up a Filename—Returns a file handle used to access a file.
![]()
Read From Symbolic Link—Returns information about symbolic links to a file on the remote server.
![]()
Read From File—Procedure to read data from a file on a remote system.
![]()
Write to Cache—Cache feature to be included in version 3 of the protocol.
![]()
Write to File—Used to write data to a file on a remote server.
![]()
Create File—Creates a file on the remote server.
![]()
Remove File—Deletes a file on the remote server.
![]()
Rename File—Renames a file on the remote server.
![]()
Create Link to File—Creates a hard link (in the same file system) to a file.
![]()
Create Symbolic Link—Creates a symbolic link (can be used to link a file across file systems). A symbolic link is a pointer to a file.
![]()
Create Directory—Creates a directory on the remote server.
![]()
Remove Directory—Deletes an empty directory on the remote server.
![]()
Read From Directory—Obtains a list of files from a directory on the server.
![]()
Get File System Attributes—Returns information about the file system on the remote server, such as the total size and available free space.
There is no provision in these procedures to open or close a file. Because NFS is a stateless protocol, it doesn’t handle file opens or closes. The Mount protocol performs this function and returns a file handle to NFS. The mountd daemon runs on both the client and the server computer and is responsible for maintaining a list of current connections. Most implementations of NFS recover from client crashes by having the client send a message to the NFS server when it boots, telling it to unmount all its previous connections to the client.
When compared to the NFS protocol, the Mount protocol consists of only a very few procedures:
![]()
Null—The “do nothing” procedure, just like the one listed under the NFS protocol.
![]()
MNT—Mounts a file system and returns to the client a file handle and the name of the remote file system.
![]()
UNMT—The opposite of the MNT procedure. It unmounts a file system and removes from its table the reference to it.
![]()
UMNTALL—Similar to the UNMT procedure, but this one unmounts all remote file systems that are being used by the NFS client.
![]()
EXPORT—Displays a list of exported file systems.
![]()
DUMP—Displays a list of file systems on a server that are currently mounted by a client.
Configuring NFS Servers and Clients
The biod daemon runs on the client system and communicates with the remote NFS server. The daemon also processes the data that is transferred between the NFS client and the NFS server. The RPC daemon must also be running, and either UDP or TCP needs to be running, depending on which one your version of NFS uses as a transport. Users can mount a file system offered by an NFS server, provided that they are not prevented from mounting the file system by the server, by using the mount command.
Note
The commands shown in the following sections might differ from one version of Unix to another. As always with Unix or Linux, consult the man pages to determine the exact syntax for commands and the locations of files mentioned in relation to the commands.
NFS Client Daemons
On the client side of the NFS process, there are actually three daemon processes that are used. The first is biod, which stands for block input/output daemon. This daemon processes the input/output with the NFS server on behalf of the user process that is making requests of the remote file system. If you use NFS heavily on a client, you can improve performance by starting up more than one biod daemon. The syntax used to start the daemon is as follows:
/etc/biod [number of daemon processes]
This daemon is usually started in the /etc/rc.local startup file. Modify this file if you want to permanently change the number of daemons running on the client system. You can first test by executing the command online to determine how many daemons you need to start and then place the necessary commands in the startup file.
When deciding performance issues, remember that on a heavily loaded client, making a change in one place might result in poorer performance from another part of the system. So don’t assume that you need a lot of extra daemons running unless you can first show that they are needed and do improve performance. Each daemon process is like any other process running on the system, and it uses up system resources, especially memory. Begin by using one or two daemons if you are using a workstation dedicated to one user. For a multiple-user computer, test your performance by increasing the number of daemons until NFS performance is satisfactory (all the time checking, of course, other performance indicators to be sure that the overall system impact is justified).
Although having multiple daemons means that NFS requests can be processed in parallel, remember that the network itself might be a bottleneck. Additional biod daemons will not increase throughput when the network itself is the limiting factor.
Also note that the biod daemon is a client process. You should not run it on an NFS server unless that server is also a client of another NFS server.
In addition to the biod daemon, the lockd and statd daemons also run on the client. For more information on these, see the section “Server-Side Daemons,” later in this chapter.
The mount Command
The mount command is used to mount a local file system, and you can also use the command to mount a remote NFS file system. The syntax for using mount to make available a file system being exported by an NFS server is as follows:
mount -F nfs -o options machine:filesystem mountpoint
In some versions of Unix, the syntax for mounting a remote NFS file system is a little different. For example, in SCO Unix you use a lowercase f and an uppercase NFS:
mount -f NFS -o options machine:filesystem mountpoint
In BSD Unix, there is a command called mountnfs, which uses the system call mount to perform most of its functions. This version of the mount command comes with a lot of additional parameters, including the capability to specify on the mount command line whether to use UPD or TCP as the underlying transport mechanism.
The value you supply for machine:filesystem should be the hostname of the remote server that is exporting the file system you want to mount for machine. Substitute the name of the file system for filesystem. The following example causes the remote file system on host zira, called /usr/projectx/docs, to be made accessible in the local file system hierarchy at the /usr/docs directory:
mount -F nfs -o ro zira:usr/projectx/docs /usr/docs
This is the same way you mount other local file systems into the local hierarchy. Under the /usr/docs directory, you can access any other subdirectories that exist on host zira under the /usr/projectx/docs directory.
The -o parameter can be used to specify options for the mount command. In the preceding example, the letters ro for the option were used to make the remote file system read-only by users on the local computer.
Other options that can be used when mounting a remote file system include the following:
![]()
rw—Mounts the file system for local read-write access, which is the default.
![]()
ro—Mounts the file system for local read-only access.
![]()
suid—Allows setuid execution.
![]()
nosuid—Disallows setuid execution.
![]()
timeo=x—Specifies a timeout value (in tenths of a second). The mount command will fail if it cannot mount the remote file system within this time limit.
![]()
retry=x—The mount command will attempt to mount the remote file system x number of times, with each attempt lasting for the length of time specified by the timeo parameter.
![]()
soft—Causes an error to be returned if the mount is unsuccessful. Opposite of the hard option.
![]()
hard—Causes the mount attempt to continue until it succeeds. Opposite of the soft option.
For more command-line parameters and options, see the man page for the mount command for your particular system.
Caution
A computer can be an NFS server, an NFS client, or perhaps both a server and a client. However, you should not try to mount an exported file system on the same server that is exporting it. This can lead to looping problems, causing unpredictable behavior.
The mountpoint is the path to the location in the local file system where the remote NFS file system will appear, and this path must exist before the mount command is issued. Any files existing in the mountpoint directory will no longer be accessible to users after a remote file system is attached to the directory with the mount command, so do not use just any directory. Note that the files are not lost. They reappear when the remote file system is unmounted.
Using the fstab File to Mount File Systems at Boot Time
When you have file systems that need to be remounted each time the system reboots, you can use the file /etc/fstab to do this. This file is also used to mount local file systems, so be careful when making edits. The format for a record is as follows:
filesystem directoryname type options frequency pass
The filesystem field for a record used to mount a remote file system includes the server hostname and the pathname of the remote file system separated by a colon (hostname:path). The second field, directoryname, is the path for the mountpoint on the local system, which indicates where the remote system is mounted and made available for access. The next field, type, is used to specify the file-system type, which can be any of the following:
![]()
ufs—A typical local Unix file system.
![]()
mfs—The memory file system.
![]()
nfs—An NFS remote file system.
![]()
swap—A disk partition used for swapping by the virtual memory system.
![]()
msdos—An MS-DOS–compatible file system.
![]()
cd9660—A CD-ROM file system as defined by ISO 9660.
![]()
procfs—A filesystem structure used to access data about processes.
![]()
kernfs—A filesystem structure used to access kernel parameters.
The options field is used for a comma-delimited list of mounting options (rw, ro, and so on). The frequency is used in determining when a file system will be “dumped” for backup purposes. This can usually be set to zero for NFS systems mounted on a client because it is usually the NFS server that is responsible for making backups of local data. The final field, pass, can also be set to zero most of the time for an NFS file system mounted on a client. This field is used by the fsck utility to determine on which pass it is to check this file system.
Caution
The order in which you place entries in this file can be important. For example, do not place a command in this file to mount a remote NFS file system on a mountpoint unless the file system that contains the local mount has been mounted earlier in the file!
Server-Side Daemons
The nfsd daemon process handles requests from NFS clients for the server. The nfsd daemon interprets requests and sends them to the I/O system to perform the requests’ actual functions. The daemon communicates with the biod daemon on the client, processing requests and returning data to the requestor’s daemon.
An NFS server will usually be set up to serve multiple clients. You can set up multiple copies of the nfsd daemon on the server so that the server can handle multiple client requests in a timely manner.
The syntax for the command to start the daemon is as follows:
/etc/nfsd [number of nfs daemons to start]
For example, to start up five copies of the nfsd daemon at boot time, modify your startup scripts to include the following command:
/etc/nfsd 5
Unix systems and the utilities that are closely associated with them are continually being updated or improved. Some new versions include using the concept of threads to make it possible for a daemon to be implemented as a multithreaded process, capable of handling many requests at one time. Digital Unix 4.0 (now HP True64 Unix) is an operating system that provides a multithreaded NFS server daemon.
Other daemons the NFS server runs include the lockd daemon to handle file locking and the statd daemon to help coordinate the status of current file locks.
Configuring Server Daemons
For an NFS server, choose a computer that has the hardware capabilities needed to support your network clients. If the NFS server will be used to allow clients to view seldom-used documentation, a lesspowerful hardware configuration might be all you need. If the server is going to be used to export a large number of directories, say from a powerful disk storage subsystem, the hardware requirements become much more important. You will have to make capacity judgments concerning the CPU power, disk subsystems, and network adapter card performance.
Setting up an NFS server is a simple task. Create a list of the directories that are to be exported, and place entries for these in the /etc/exports file on the server. At boot time the exportfs program starts and obtains information from this file. The exportfs program uses this data to make exported directories available to clients that make requests.
Sharing File Systems: The exportfs Command
At system boot time, the exportfs program is usually started by the /sbin/init.d/nfs.server script file, but this can vary, depending on the particular implementation of Unix you are using. The exportfs program reads the information in the /etc/exports configuration file.
The syntax for this command varies, depending on what actions you want to perform:
/usr/sbin/exportfs [-auv]
/usr/sbin/exportfs [-uv] [dir ...]
/usr/sbin/exportfs -i [-o options] [-v] [dir ...]
The parameters and options you can use with this command are listed here:
![]()
a—Causes exportfs to read the /etc/exports file and export all directories for which it finds an entry. When used with the -u parameter, it causes all directories to be unexported.
![]()
i—Specifies options in the /etc/exports file to be associated with each directory to be exported. It is used to tell exportfs to ignore the options you placed in this file.
![]()
u—Used to stop exporting a directory (or all directories if used with the -a option).
![]()
v—Tells exportfs to operate in “verbose” mode, giving you additional feedback in response to your commands.
The options you can specify after the -o qualifier are the same as you use in the /etc/exports file (see the following section, “Configuration Files”).
To export or unexport (stop sharing) all entries found in the /etc/exports file, use the -a or -u option. This is probably the most-often-used form because you can specify the other options you need on a per-directory basis in the /etc/exports file. This example causes all directories listed in /etc/exports to be available for use by remote clients:
exportfs -a
The following example causes your NFS server to stop sharing all the directories listed for export in the /etc/exports file:
exportfs -au
The second form can be used to export or unexport (stop exporting) a particular directory (or directories) instead of all directories. You specify the directories on the command line. You can use this form if you want to stop sharing a particular directory because of system problems or maintenance, for example. Using the following syntax causes the NFS server to stop sharing the /etc/user/accounting directory with remote users:
exportfs -u /etc/users/accounting
The next form of the command can be used to ignore the options found in the /etc/exports file. Instead, you can supply them (using the -o parameter) on the command line. You will probably use this in special cases because you could just as easily change the options in the /etc/exports file if the change were a permanent one. If, for example, you decided that you wanted to make an exported directory that is currently set to be read-write to be read-only, you could use the following command:
exportfs -o ro /etc/users/purch
You can also dismount and mount remote file systems using different options when troubleshooting or when researching the commands you will need when preparing to upgrade a network segment where connections need to change.
If changes are made to the /etc/exports file while the system is running, use the exportfs command (with the -a parameter) to make the changes take effect. To get a list of directories that are currently being exported, you can execute the command with no options, and it will show you a list.
Of course, it is not necessarily a good idea to make changes on-the-fly without keeping track of the connections. When you decide to perform online testing to mount or dismount file systems, be sure that you are not going to impact any users who are currently making productive use of the resources. To make testing more foolproof and to provide a quick back-out procedure, try copying the /etc/exports file to keep a safe starting copy and making changes to the copied file, loading it by using the exportfs -a command. When you determine that something has been done incorrectly, you can simply use the backup copy of the file you have made to restore the status quo.
Configuration Files
To make a file system or a directory in a file system available for export, add the pathnames to the /etc/exports file. The format for an entry in this file is as follows:
directory [-option, ...]
The term directory is a pathname for the directory you want to share with other systems. The options you can include are the following:
![]()
ro—This makes the directory available to remote users in a read-only mode. The default is readwrite, and remote users can change data in files on your system if you do not specify ro here.
![]()
rw=hostnames—This specifies a specific host or hosts that you want to have read-write access. If a host is not included in hostnames, it will have only read access to the exported file system.
![]()
anon=uid—Use this parameter to set the uid (user ID) that will be used for anonymous users, if allowed.
![]()
root=hostnames—Users who have root access on a system listed in hostnames can gain root access on the exported file system.
![]()
access=client—This specifies a client that can have mount access to this file system.
For example:
/etc/users/acctpay -access=acct
/etc/users/docs -ro
/etc/users/reports/monthend -rw=ono
In this file, the first directory, /etc/users/acctpay, which stores accounts payable files, will be shared with a group called acct—the accounting department. The /docs directory can be accessed by anyone in read-only mode. The /reports/monthend directory can be accessed in read-only mode by most users, but users on the computer whose hostname is ono will have read-write access.
Caution
You should give considerable thought to the matter before using NFS to export sensitive or critical data. If the information could cause great harm if it were to be altered or exposed, you should not treat it lightly and make it available on the network via NFS. NFS is better suited for ordinary user data files and programs, directories, or other resources that are shared by a large number of users. There are not enough security mechanisms in place when using many implementations of NFS to make it a candidate for a high-security environment.
Automounting File Systems
The Mount protocol takes care of the details of making a connection for the NFS client to the NFS server. This means that it is necessary to use the mount command to make the remote file system available at a mountpoint in the local file system. To make this process even easier, the automountd daemon has been created. This daemon listens for NFS requests and mounts a remote file system locally on an as-needed basis. The mounted condition usually persists for a specified number of minutes (the default is usually five minutes) in order to satisfy any further requests.
As with other daemons, the automountd daemon is started at boot time in the /etc/rc.local file. You can enter it as a command after the system is up and running, if needed. When a client computer tries to access a file that is referenced in an automount map, the automountd daemon checks to see whether the file system for that directory is currently mounted. The daemon temporarily mounts the file system so that the user’s request can be fulfilled, if needed.
The automount map is a file that tells the daemon where the file system to be mounted is located and where it should be mounted in the local file system. Options can also be included for the mount process, for example, to make it is read-write or read-only. The automountd daemon mounts a file system under the mountpoint /tmp_mnt. It then creates a symbolic link that appears to the user as part of his file system.
Mounting File Systems Using the automount Command
The /etc/rc.local file usually contains the command used to start the automountd daemon. This daemon is responsible for processing NFS mount requests as they are defined in special files called map files.
The syntax for the automount command is as follows:
automount [-mnTv] [-D name=value] [-f master-file]
[-M mount-directory] [-tl duration] [-tm interval]
[-tw interval][directory mapname [- mount-options]]
The options you can use are the following:
![]()
m—Ignores directory-mapname pairs that are listed in the master map file.
![]()
n—Dynamic mounts are to be disabled. If a directory is already mounted, the user’s request will succeed, but no further file systems will be mounted.
![]()
T—Causes the daemon to provide trace information about each request. The output is sent to standard output.
![]()
v—Verbose; causes the daemon to send status messages to the console.
![]()
D name=value—Defines automount environment variables. The text associated with value is assigned to the variable name.
![]()
f master map file name—Provides the name of the master map file to the automount daemon.
![]()
M mountpoint directory—Specifies a directory to use for the temporary mountpoint (one other than /tmp_mnt).
![]()
tl time value—Specifies how long a file system should stay mounted after the last user request before automount automatically dismounts it. The default is usually five minutes.
![]()
tm time value—The amount of time (in seconds) that should elapse between attempts to mount a file system (the default is 30 seconds).
![]()
tw time value—The amount of time (in seconds) between attempts to unmount a file system that has exceeded its cached time. The default is usually one minute.
![]()
mount_options—Options to be applied to all the directories listed in the map file. Any options listed in a map file override those listed here on the command line.
Master Maps
The automount daemon uses the master map to obtain a list of maps. The master map also contains mount options for those maps. The master map file is usually named /etc/auto.master. The syntax for the entries in this file is as follows:
mount-point map [mount-options]
mount-point is the pathname of the local directory for an indirect map specified in the map field. If the map specified in the map column is a direct map, the mountpoint is usually /-.
The data listed under the map field is used to find the map that contains the actual mountpoints and the locations of the remote file systems. Any data you supply for mount-options will be used when mounting directories in the map file associated with it.
Following is an example of a master map file (lines that begin with # are comments):
#mount-point map options
/etc/users /etc/auto.usr -ro
/- /etc/auto.direct -rw
When the automount daemon determines that access is needed for files found in the /etc/users directory, it will look for another map file, named auto.usr, to get the rest of the information. The -ro options are specified for this entry and will be applied to the file system designated in the auto.usr map file.
The argument /- is used to specify that a map file it points to, in this case auto.direct, is a direct map file or one that contains the mountpoints and the remote file-system information needed to complete the mounts.
Direct Maps
The remote file systems can be mounted into the local file system, and the mountpoint should be information you will find in a direct map. The construction of this file is very direct. The syntax for an entry is as follows:
key [mount-options] location
The key field is the mountpoint to be used for this entry. mount-options are the options used with the mountd daemon discussed earlier in this chapter. The location field should be in the format of machine:pathname, where machine is the hostname of the remote system that the file system actually resides on and pathname is the path to the directory on that file system. You can specify multiple locations to provide for redundancy. The automount daemon queries all locations in this case and takes the first one to respond to its requests.
Indirect Maps
In an indirect map file, most fields are the same as in a direct map file, except that the first field (key) is not a full pathname. It is a pointer to an entry in the master map file. You can list multiple directories in an indirect map file, and each of these remote file-system directories will be mounted under the mountpoint designated in the master map file that contains a reference to the indirect map.
Check the man pages on your system to be sure of the syntax for options used in map files because they might vary just like options do for the mount command among different Unix systems.
Troubleshooting NFS Problems
Many of the TCP/IP utilities that are used for troubleshooting can be employed when trying to diagnose and fix problems having to do with NFS. For example, if a remote file system suddenly becomes unavailable, it only makes sense to first determine whether the remote server is still functioning. You can do this quickly by using the ping command to establish basic network connectivity. A failure to communicate using this small utility indicates that there is a server problem at the other end or perhaps a network malfunction that is preventing communications with the remote system. When you’re troubleshooting, this tells you that the problem is most likely not one to be found in the NFS subsystem.
![]() You can find detailed information about using various TCP/IP utilities for troubleshooting purposes in Chapter 27, “Troubleshooting Tools for TCP/IP Networks.”
You can find detailed information about using various TCP/IP utilities for troubleshooting purposes in Chapter 27, “Troubleshooting Tools for TCP/IP Networks.”
The tracert utility also can be used when ping fails to determine how far along the network route the packet is getting on its trip to the remote system. Use this when trying to isolate the particular point of failure in the network.
There is a useful command specific to NFS that can be used to display statistical information about NFS. It is nfsstat. This command shows you statistics about NFS and RPC. The syntax for nfsstat is as follows:
nfsstat [-cnrsz] [vmunix.n] [core.n]
These are the options you can use:
![]()
c—Shows only client-side information.
![]()
n—Shows only statistics for NFS, both client- and server-side.
![]()
r—Shows only statistics for RPC, both client- and server-side.
![]()
s—Shows only server-side information.
![]()
z—Is used to zero out the statistics. You can combine it with other options to zero out statistics referred to by those options (for example, -zc to zero client size information). Write access to /dev/mem is required to zero statistics.
![]()
vmunix.n—The name of the kernel image.
![]()
core.n—The name of the system’s core image.
All statistics are shown if you do not supply any parameters when executing the command. The statistical data that will be displayed depends on the options you choose. For an example of the detailed data you can obtain using this command, see the man page for nfsstat for your particular Unix or Linux system.
Examining the output from the nfsstat command can be useful on an ongoing basis to help you establish a baseline for performance evaluations you will need to make later when thinking about upgrading. You can easily selectively store data output by this command in a text file or spreadsheet. You can also create a simple script file that can be used to gather statistics using this command on a periodic basis, storing the results in a temporary directory for your later review.
For example, the command nfsstat -s displays statistics for the NFS server as shown here:
# nfsstat -s
Server RPC:
calls badcalls nullrecv badlen
23951 0 0 0
Server NFS:
calls badcalls
23164 0
null getattr setattr root lookup readlink
1 0% 64 0% 0 0% 0 0% 121 0% 0 0%
read wrcache write create remove rename
22951 99% 0 0% 0 0% 0 0% 0 0% 0 0%
link symlink mkdir rmdir readdir fsstat
0 0% 0 0% 0 0% 0 0% 25 0% 2 0%
In this display you can see statistics for the total number of remote procedure calls, along with information about those RPC calls that relate to NFS. In addition to the total number of calls, you can see statistics concerning the following items for RPC:
![]()
badcalls—Number of calls that were rejected by the server.
![]()
nullrecv—Number of times that there was no RPC packet available when the server was trying to receive.
![]()
badlen—Number of packets that were too short.
In addition, some implementations might show additional RPC fields. For the NFS server, there are many columns of information displayed, showing you the number of reads and writes, along with other useful information. For example, you can examine cache usage (wrcache), or determine when other file commands are used to create or remove directories.
If the number of badcalls begins to become significant when compared to the overall number of calls, a problem obviously exists. If the value displayed for badlen is consistently a higher percentage of the overall number of calls, a client might be incorrectly configured or a network problem might be causing packets to become corrupted. Again, you may see different or additional fields of information in the display, depending on the Unix/Linux and NFS implementation you are using. A careful review of the documentation for your system will give you a good idea of the performance to be expected from your server and the kinds of events to look for.
Microsoft Distributed File System (DFS)
Like NFS, DFS employs a tree structure for file systems. A directory that is being imported by a client is attached at a point somewhere in the local file system, where it is then made available to applications as if the directory and its files were local.
The Windows Server family (both 2000 and 2003 versions) includes DFS as an integral part of the operating system. The interface is written as a snap-in to the Microsoft Management Console (MMC) tool, making administration a simpler process. A wizard prompts you through setting up a DFS root, and from there on out you can add, modify, or remove directory paths from the DFS tree. Paths represented in the DFS tree can come from one or more servers on the network. A tree is not bound by a single host.
In Windows NT 4.0, directory replication allowed you to create copies of directories on multiple systems, keeping them in sync. This functionality was replaced in Windows 2000 Server with Distributed File System (though it is also possible to download DFS for Windows NT 4.0). DFS is now included as a part of modern Windows operating systems. DFS allows you to move away from the \server sharename concept to one based on the domain. Instead of having to remember (or browse and find) on which server a particular file share is hosted, you can use DFS to create shares that are global to the domain. That is, if you’re a member of the domain, you can specify the share as \domainname share. DFS also allows for replication. This means that you can have more than one copy of the data being shared, but only have to use the global domain-wide share name to connect. This provides for some fault tolerance. If a server goes down that happens to host a replica of a share, then the other servers that contain copies of the share can be connected to by users. Note that this does not provide any kind of failover if a server crashes. The user can, however, restart her work by reconnecting to the share. The connection will be made to another replica of the file share.
Tip
Although DFS does not come with Windows NT 4.0 Server, you can obtain it from Microsoft (www.microsoft.com). The downloadable version can be installed on Microsoft Windows NT Server 4.0 systems and can be used to provide a service to clients similar to that offered by NFS. At the main Web site, click on Downloads and look for it under Downloads for Windows NT 4.0.
Important terms to understand when dealing with DFS are listed here:
![]() Root—A server can have only one root installed. It is just about the same thing as a file share, with a few differences, which will become apparent shortly.
Root—A server can have only one root installed. It is just about the same thing as a file share, with a few differences, which will become apparent shortly.
![]() DFS link—Under the root you create DFS links. These are links to file shares that will be available under the root you have created. This means you can create a single root yet place multiple shared directories under the root so that only one file share connection is necessary. If not, users would have to connect to each directory as a separate file share.
DFS link—Under the root you create DFS links. These are links to file shares that will be available under the root you have created. This means you can create a single root yet place multiple shared directories under the root so that only one file share connection is necessary. If not, users would have to connect to each directory as a separate file share.
![]() Replica—You can create shares that replicate the data in other shares. This can be done to provide for both load balancing and a degree of fault tolerance.
Replica—You can create shares that replicate the data in other shares. This can be done to provide for both load balancing and a degree of fault tolerance.
Creating a DFS Root
Creating a DFS tree is not a complicated task when using a graphical interface such as the one provided by the MMC and by the wizards that walk you through setting up your file system. To create a new DFS root, use the following steps:
1. Click Start, Programs (All Programs for Windows Server 2003), Administrative Tools, Distributed File System.
2. When the management console appears, select New Root from the Action menu. A wizard pops up. Click Next.
3. You can select to create a file system that makes use of the Active Directory for storing the DFS configuration information. You can also select to not use the Active Directory. For the purposes of this example, I’ve chosen to not use the Active Directory. After making the selection, click Next.
4. The next dialog box prompts you to enter the name of the server that will host the distributed file system. The default is usually the server on which you are running the wizard. Use the default or enter another server. Click Next to continue.
5. The wizard next prompts you to enter the name of the new root DFS file system. Note that what you enter here shows up in the field Share to Be Used at the bottom of the dialog box. You can use the name of an existing share in the Root Name field, or create the share to be used after you complete this wizard.
6. If you entered a share that does not yet exist, you can now choose the folder to share by entering it in the field or by using the Browse button.
7. Finally, the wizard displays a summary of the information you have entered. Click the Finish button to complete the process of creating the new DFS root.
When you’re finished, your DFS root will show up in the tree structure in the left pane of the MMC, as you can see in Figure 31.5.

Figure 31.5. The new DFS root is now displayed in the MMC.
Adding Links to the DFS Root
After you’ve created the initial root for your file system, you can add one or more links. Links, as you will recall, are actual directories (or folders, depending on which terminology you prefer) that will be accessible from your DFS root.
To create a link, right-click on the root in the left pane of the console. From the menu, select New DFS Link. In Figure 31.6 you can see the dialog box used to input the information about the link.
Figure 31.6. You can specify a logical name that users will see so that they don’t have to remember the actual directory path.
First you need to enter a name that will be used as a logical association for the link. That is, when the user connects to the share, this name will show up as a folder he can use. You can see that in the next field you are asked to fill in the actual pathname for the folder being offered as part of the DFS share.
In the example in Figure 31.6, the folder that users will see is called accountspayable. The shared directory that contains the actual files is \Njnet1wmpub. Note that there is also a comment field in this dialog box. In a large network with many resources, you’ll appreciate this information when managing your network. Finally, the last field allows you to specify how long a client will cache the link. When the client makes the initial connection, the connection will be made to the actual directory. However, the user’s computer will check back with the DFS server when the cache timer expires.
DFS is a domain-wide file system. In the dialog box shown in Figure 31.6, you can easily browse a file share located on another server in the domain. Thus, you can hide the physical location of files from users. Instead of having to remember servers and share names, the user only has to remember the share name. Because the share name is domain-wide, you can’t use the same share name on one server that you do on another. Users can then simply connect to the share \domainnameshare. They don’t need to know the server names on which the actual folders in this share are located.
You can use the Action menu to add or delete a DFS root. You can also use the Action menu to manage links and replication.
DFS does not add any additional security features to the file system. Instead, the usual rights and permissions that are already in place on the server are used when evaluating a client’s access to a file or directory in the DFS tree.
One major difference between NFS and DFS is that DFS is built using SMB messaging techniques for the most part and is not compatible with all NFS servers. If you have a mixed-environment network in which most of your data files are offered via NFS on Unix servers, it would be more economical to acquire PC-based NFS client software than it would be to replace all your existing servers with NT DFS servers.