CHAPTER 39. Rights and Permissions
SOME OF THE MAIN TOPICS IN THIS CHAPTER ARE
User-Level and Share-Level Security 722
Assigning User Rights for Windows 2000, Server 2003, and XP 725
NTFS Standard and Special Permissions 733
User Groups Make Managing User Rights Easier 736
User Groups in Windows 2000 and Server 2003 737
Controlling access to system and network resources is a very important topic for the network administrator to understand. In a homogeneous network where all file servers and clients are of one particular brand, it can still be difficult to keep track of all file and print shares and which users need access to these resources. When you begin to add a mixture of network nodes consisting of more than one operating system to create a more diverse network, you can end up with the requirement to understand the access restrictions imposed by more than one operating system.
Note
A network composed of more than one operating system is generally referred to as a heterogeneous network. Part XI, “Migration and Integration,” can help you learn the similarities and differences between different operating systems, and the utilities and add-on products that can enable them to coexist and share data on the same network. However, this chapter is one you should read first, because you will learn the importance of protecting important resources when operating a heterogeneous network.
Two kinds of identifying values are used to decide on access. The first is an identifier that uniquely specifies the user who is logged on to the system and the specific rights (or privileges) defined by an operating system. Rights are definitions of the types of actions that can be performed on the system by the users. For Windows Server 2003, the terms rights and permissions are used interchangeably when granting rights to a user account. The term permissions is also used, as described in the next paragraph, to define access and restrictions to files, directories, and other objects.
Permissions placed on each resource usually are granular, giving permission separately to read, write, execute, or delete a file or directory. Depending on the operating system, the names used for these permissions can vary, and other types of permissions and combinations of these basic types can be found.
The important point to remember when setting up new users or resources, or when troubleshooting existing connections, is that you might need to look at both ends: What rights does the user possess and what access controls (permissions) exist on the resource? Both of these factors determine what users can do on the network. This chapter takes a quick look at the concepts of rights and permissions in several major operating systems and discusses some of the methods used to solve problems related to them.
Tip
Rights and permissions are just one side of the coin. You can’t ensure that security measures are working as they should unless you also use the operating system’s auditing facility. In Windows, this is accomplished using the Event Viewer to examine security violations. For Unix/Linux systems, the syslog daemon is generally used for this purpose. You can find out more about the Windows Event Viewer, and how to set up which security events to audit, as well as how to set up the configuration files used by the Unix/Linux syslog daemon, in Chapter 43, “Auditing and Other Monitoring Measures.”
User-Level and Share-Level Security
There are two basic means for protecting resources offered on a network. Each method strives to make the protected resources available only to users who have been authorized access to these resources. They do so in different ways, however, and grant different kinds of access.
Share-level security involves securing connections to a network share point by a password. Users who know the name of the share point and the password can connect to the share point. All subdirectories and files found under the share point are accessible by using only the single password.
User-level security involves using access controls in the file system and does not stop at placing a single password on an entire tree of resources (although you can do it that way if you want). Instead, access permissions can be placed on any directory or file in a directory, or subdirectories. When a user connects to a resource protected by user-level security mechanisms, the user must first authenticate himself (log on to the server). The user then is granted access rights to each file or directory on the resource, either by the access control restrictions implicitly placed on the resource or by inheritance of access rights.
Obviously, the user level of security permissions provides the administrator a finer granularity of detail when making resource access decisions. A combination of both share-level security and userlevel security mechanisms can enable you to create resources on the network that are more secure than using just one of these methods.
When a logon username is employed to identify the user who is accessing a resource, an audit trail with more specific details can also be kept for troubleshooting purposes.
Tip
An audit trail can show you who did what, and when they did it. In Windows, Unix/Linux, and NetWare, you can decide which types of events to log, thus creating an audit trail that matches the level of security required in your network. One mistake often made by administrators of all three of these operating systems is to use the Administrator/Superuser account for administrative tasks.
In this type of situation—if you have more than one administrator—your audit trail can be useless for the capabilities these accounts enable. An audit trail should tell you the event that was logged, as well as what user performed the action. If all administrative users make use of a single built-in administrative account, you will not be able to easily track down the person who performed an event. For security reasons you should not use these accounts. Instead you should create separate accounts for each administrative user and grant the rights needed and give these accounts the same permissions (or a subset) that the highly privileged accounts use. This approach will allow you to delegate authority to selected users (such as network administrators), while maintaining an audit trail—by username—that you can use to determine what user performed a particular action on the network or computer.
Microsoft networks allow for both share-level and user-level permissions on network resources. Windows 9x operating systems allow each computer in the network to offer a directory (or subdirectory) as a file share on the LAN and protect it with a password. For example, you don’t have to use Windows Server to offer file shares on the LAN; you can also do so with Windows 2000 Professional or Windows XP.
In this type of scenario, each computer has its own security database that stores the share-level password. That means that a user might need to learn several passwords, depending on the number of share connections required in order to get their job done. A simple solution to this would be to use the same password for each share, on each computer. However, the drawback to this is that anyone who knows the password for one file share would know the password for all file shares. So, when all is taken into account, using share-level security is not really a good idea in a large network.
For Windows operating systems, starting with Windows NT 4.0, you need to have both a valid username (for the server you want to connect to, or a domain account) and a password valid for that account in order to connect to a resource share.
Tip
In a small network, such as a SOHO network, you might not need to worry about security problems when you have a small LAN consisting of just a few client computers. For this kind of LAN, you probably don’t even need a server-class computer, because share-level security can be implemented by the clients, including Unix or Linux computers.
If you have a firewall of some sort protecting your small LAN from intruders from the Internet (as well as a good virus prevention program), then you might want to use a single password for all file shares to make your job easier. You don’t have to be an advanced network administrator to operate a LAN that is under your control, in which only you or a few others use the LAN resources. Keep in mind, however, that if sensitive information (such as payroll information) needs to be viewed by only yourself, you should not offer that as a file share, and instead should manage those resources yourself.
Microsoft Windows Share-Level Security
Earlier versions of Windows operating systems used the FAT (File Allocation Table) and FAT32 (similar to FAT, but for larger disk volumes, as well as other features) file systems. Beginning with Windows NT, the NTFS file system enabled a more secure file system. FAT and FAT32 don’t provide the mechanisms to store security attributes, such as access control lists (ACLs), for files or directories, as NTFS does.
The main benefit of using NTFS is that it does allow you to store a lot more information about a file or a directory. When you use the NTFS file system to format a disk, you can apply user-level security permissions on individual files or directories. You can still create file shares using Windows sever operating systems, but NTFS allows you to further define which files/directories a user can access when using the file share. For an environment that requires a high degree of security, the NTFS partition is the choice to make. Additionally, the Windows 2000 and Server 2003 operating systems allow for other features that make NTFS a more secure choice, including the capability to encrypt and decrypt data on-the-fly when storing or retrieving it from disk. You can also choose to compress data on files so that less disk space is used to store files.
For either of these options, just right-click on a folder and select the properties page from the menu that appears. You’ll see an Advanced button on the General tab. After clicking that button, you’ll see two important check boxes. The first is Compress Contents to Save Disk Space. The second is Encrypt Contents to Secure Data. Select either or both of these check boxes to enable that feature for the folder.
The only reason to format a disk using FAT or FAT32 is if you are going to dual-boot the computer, and one of the earlier operating systems (such as Windows 9x) will be used. This is because Windows 9x systems are not capable of using an NTFS partition. You can create one partition and format it using FAT, and create additional partitions using NTFS for Windows NT and later operating systems, such as Windows 2000, Server 2003, and XP. However, this sort of dual-boot setup should be used only in an environment where security is not an important issue, such as a standalone computer (one not connected to a network). This is because a FAT partition does not let you set file or directory partitions and does not support encryption.
Another example is in your home, where you don’t have such strict security requirements. For example, you might need to use an older software application that will not run under newer Windows operating systems. Even then, if you are connected to the Internet, you should consider the implications of using FAT or FAT32 on a home computer because many hackers regularly scan IP addresses looking for vulnerable systems. If you stay online for extended periods browsing the Internet—or if you’re online all the time using a broadband connection such as a cable or DSL modem, then a FAT-based disk is wide open for planting a Trojan horse and other malicious programs. If you use NTFS instead, and set up your user accounts correctly, you can potentially head off this sort of problem. This is because on NTFS partitions you can set permissions for every file or directory on a one-by-one basis.
Single computers and small LANs typically use an out-of-the-box firewall solution, such as a DSL/cable router, which can offer some degree of protection, such as Network Address Translation (NAT). However, by applying permissions on an NTFS formatted disk, you can further enhance your security.
![]() For more information about NAT, see Chapter 45, “Firewalls.”
For more information about NAT, see Chapter 45, “Firewalls.”
Assigning User Rights for Windows 2000, Server 2003, and XP
Users who are logged in to a Windows 2000, Server 2003, or XP computer can be granted rights by the administrator of the computer. If the user logs in to a domain account instead of the local computer, a domain administrator can manage these rights. Rights granted to an account that resides on an individual Windows computer protect access to resources on that computer only. The security information for the computer is stored locally, in the Security Accounts Manager (SAM) database, and applies only to resources on that local system.
Accounts that are created on a domain controller can be used when assigning user rights to resources on computers throughout the domain. And, by placing users into groups, you can easily manage a number of users who need the same access to resources or the same rights. This is done by granting the rights to the group, instead of individual users. If a user needs access to resources that are not granted by the group membership, you can place the user in more than one group. Because groups enable you to simplify granting rights to users, the following discussion will concentrate on those rights. User groups are discussed later in this chapter.
Starting with Windows 2000, most Administrative Tools are snap-ins for the Microsoft Management Console (MMC). By using the MMC to create management tools, you’ll find it easy to switch from one MMC console to the next, without having to relearn the mechanics of the particular utility. For example, when using MMC you’ll find two panes on the screen. The left pane contains a tree of objects that can be managed. An Action menu presents you with functions you can perform. The right pane is used to display different kinds of information, based on the particular utility and the actions you take. The MMC allows you to create new utilities by installing a snap-in that is appropriate for the functions you need to perform. However, most of the tasks you will use to manage the computer or domain have already been set up as an MMC application. Other snap-ins, which are used for more sensitive operations, such as altering the Active Directory schema, must be created by installing the snap-in.
![]() For more information about using MMC snap-ins, see Chapter 30, “Using the Active Directory.”
For more information about using MMC snap-ins, see Chapter 30, “Using the Active Directory.”
In Figure 39.1, you can see the MMC with the snap-in for managing domain users and computers loaded. Although the User Manager or User Manager for Domains was used by Windows NT 4.0 computers, the MMC snap-in is used with Windows 2000 and Server 2003 to manage users and computers in the domain. After you’ve created a domain controller in a Windows 2000 or Server 2003 network, this utility is already set up. The example used in this section is based on Windows Server 2003. For Windows 2000 computers, the MMC is pretty much the same for the tasks that are described in the text that follows.

Figure 39.1. Windows 2003 uses the Active Directory Users and Computers MMC snap-in to manage users.
Tip
If you are not logged in to an account that grants administrator privileges, you can simply hold down the Shift key and then right-click on the desktop. Select Run As and a dialog box will pop up and enable you to enter another username and password for an account that does have the necessary rights to run Administrative Tool utilities.
To begin, click Start, All Programs, Administrative Tools, and then Active Directory Users and Computers. In Figure 39.1 you can see the MMC with the Users folder selected. The Users folder has been expanded in the left pane, and in the right pane you can see user groups and users for the domain.
Note
You still can use the MMC snap-in for managing users and computers to manage other domains. In Windows NT 4.0, you needed to have a trust relationship set up with other domains you wanted to manage from a central location. The Active Directory automatically creates transitive (two-way) trust relationships between all domains that are in the same domain tree. You can simply use the first entry in the left pane shown in Figure 39.1 (Active Directory Users and Computers), and then select Connect to Domain from the Action menu to connect the utility to another domain whose users or computers you want to manage. Essentially, you can use this MMC snap-in to manage all the users and computers throughout the domain tree. See Chapter 30 for more information about the Active Directory tree structure (as well as the concept of a forest of trees).
Windows NT defined certain basic rights you could grant to a user account, as well as a set of rights that were granular. The basic rights were simply combinations of these granular rights. In Windows Server 2003, rights have been divided into two categories. These are logon rights and privileges. Logon rights are few in number, and can generally be used to manage most users or groups.
Tip
The Administrators user account cannot be deleted or removed from the Administrators group. However, because many hackers know that this account exists on Windows servers, you can, and should, rename it. You can also disable this account, while giving other accounts the same rights and privileges. Think about this in a high-security environment. Lastly, as discussed elsewhere in this chapter, creating an individual account for each user who requires administrative rights and permissions can help you to determine the source of any changes, using the Event Viewer. If every administrator uses the same account, your audit trail becomes meaningless, because you cannot determine which administrative user has made changes to the operating system.
These logon rights are listed here:
![]() Allow log on through Terminal Services—Enables a user of a computer to log on using Microsoft Terminal Services. Essentially, a Terminal Services client runs programs on a server designated to supply this service, and the Terminal Server client computer displays the GUI interface for the application. This enables you to use older computers with fewer resources (such as memory or processor speed) to be used in your network.
Allow log on through Terminal Services—Enables a user of a computer to log on using Microsoft Terminal Services. Essentially, a Terminal Services client runs programs on a server designated to supply this service, and the Terminal Server client computer displays the GUI interface for the application. This enables you to use older computers with fewer resources (such as memory or processor speed) to be used in your network.
![]() Allow log on locally—Enables a user to log on locally at a workstation or server; that is, to log on sitting at the workstation or computer, not using a network connection. Generally, administrators are the only users who can log on locally at a server.
Allow log on locally—Enables a user to log on locally at a workstation or server; that is, to log on sitting at the workstation or computer, not using a network connection. Generally, administrators are the only users who can log on locally at a server.
![]() Access this computer from a network—Enables a user to log on to the computer from the network. In other words, this gives the capability to make a network connection, such as to access a file share on the computer.
Access this computer from a network—Enables a user to log on to the computer from the network. In other words, this gives the capability to make a network connection, such as to access a file share on the computer.
![]() Log on as a batch job—Allows a user to submit a batch job (using the task scheduler) that will run under the user’s account. Unless you deny this right, the default allows users to submit batch jobs to run in the background. Batch jobs are used to perform specific functions at a certain time, unlike services that run in the background and respond to certain system or user events.
Log on as a batch job—Allows a user to submit a batch job (using the task scheduler) that will run under the user’s account. Unless you deny this right, the default allows users to submit batch jobs to run in the background. Batch jobs are used to perform specific functions at a certain time, unlike services that run in the background and respond to certain system or user events.
![]() Log on as a service—This right allows the user to start a service using his or her account. A service is a process that runs in the background continuously.
Log on as a service—This right allows the user to start a service using his or her account. A service is a process that runs in the background continuously.
![]() Deny log on as a batch job—Prevents an account from running a batch job on the computer.
Deny log on as a batch job—Prevents an account from running a batch job on the computer.
![]() Deny log on as a service—Prevents an account from being used to run a service (a background process that runs without a GUI interface).
Deny log on as a service—Prevents an account from being used to run a service (a background process that runs without a GUI interface).
![]() Deny log on locally—Is the opposite of the Allow log on locally right. This right overrides the Allow log on locally right.
Deny log on locally—Is the opposite of the Allow log on locally right. This right overrides the Allow log on locally right.
![]() Deny access to this computer from network—Is the opposite of the Access this computer from the network right. This right overrides the Access this computer from a network right.
Deny access to this computer from network—Is the opposite of the Access this computer from the network right. This right overrides the Access this computer from a network right.
![]() Deny log on through Terminal Services—Is the opposite of the Allow log on through Terminal Services right.
Deny log on through Terminal Services—Is the opposite of the Allow log on through Terminal Services right.
If you are familiar with the complete list of rights used by Windows NT, you’ll see that the privileges that Windows Server 2003 uses are similar to those, with a few additions. These are the privileges you can use with Windows Server 2003:
![]() Act as part of the operating system—This right is usually granted to subsystems of the operating system, and for running services. It allows the holder to act as a secure, trusted part of the operating system. This is not a right you would normally need to grant to a user. The LocalSystem account possesses this privilege by default. You won’t see this account, however, when you list user accounts in the Active Directory.
Act as part of the operating system—This right is usually granted to subsystems of the operating system, and for running services. It allows the holder to act as a secure, trusted part of the operating system. This is not a right you would normally need to grant to a user. The LocalSystem account possesses this privilege by default. You won’t see this account, however, when you list user accounts in the Active Directory.
![]() Add workstations to a domain—Users or groups granted this privilege and logged in at a domain controller can add client computers (but not domain controller computers) to the domain. This privilege is granted by default to users that are authenticated and are logged in to a domain controller, in which case the user holding this privilege can add up to 10 other computers to the domain.
Add workstations to a domain—Users or groups granted this privilege and logged in at a domain controller can add client computers (but not domain controller computers) to the domain. This privilege is granted by default to users that are authenticated and are logged in to a domain controller, in which case the user holding this privilege can add up to 10 other computers to the domain.
![]() Adjust memory quotas for a process—If an account is granted this privilege, the user can make changes for the amount of memory a process can use.
Adjust memory quotas for a process—If an account is granted this privilege, the user can make changes for the amount of memory a process can use.
![]() Bypass traverse checking—The user holding this right can read through a directory tree, even though she might not have access to all directories in the tree. Thus the user can be granted access to a file that exists in a directory (or subdirectory) for which the user is denied access. The user account granted this privilege, however, cannot list (view) the contents of directories that are bypassed to get to the file or directory for which access is granted.
Bypass traverse checking—The user holding this right can read through a directory tree, even though she might not have access to all directories in the tree. Thus the user can be granted access to a file that exists in a directory (or subdirectory) for which the user is denied access. The user account granted this privilege, however, cannot list (view) the contents of directories that are bypassed to get to the file or directory for which access is granted.
![]() Create a pagefile—This right is usually granted to just the Administrators group. It allows the user to create additional page files using the System applet in the Control Panel. By creating page files on disks other than those used for the operating system or for applications, you can usually increase performance on the system. Note that a partition of a disk is not the same thing as a separate disk. Using separate partitions on the same disk will not give you the increased performance.
Create a pagefile—This right is usually granted to just the Administrators group. It allows the user to create additional page files using the System applet in the Control Panel. By creating page files on disks other than those used for the operating system or for applications, you can usually increase performance on the system. Note that a partition of a disk is not the same thing as a separate disk. Using separate partitions on the same disk will not give you the increased performance.
![]() Create a token object—This is the right to create a user logon token and is usually not granted to an individual user, but instead only to the local security authority (LSA) on the Windows computer.
Create a token object—This is the right to create a user logon token and is usually not granted to an individual user, but instead only to the local security authority (LSA) on the Windows computer.
![]() Create permanent shared objects—This is the right to create special resource structures, such as a directory, that are used internally by the operating system. Again, this is not a right generally needed by, or granted to, users.
Create permanent shared objects—This is the right to create special resource structures, such as a directory, that are used internally by the operating system. Again, this is not a right generally needed by, or granted to, users.
![]() Debug programs—This right allows a programmer to do low-level debugging. It is helpful for applications developers and administrators. However, as in most networks, this right should be granted only on laboratory or development systems, and not on a production server. It is not a good idea to allow application development to be performed on the same computer that is a production server that network users make use of. The reason for this is obvious. The application being tested or created on a development system can potentially cause the server to crash, or corrupt data.
Debug programs—This right allows a programmer to do low-level debugging. It is helpful for applications developers and administrators. However, as in most networks, this right should be granted only on laboratory or development systems, and not on a production server. It is not a good idea to allow application development to be performed on the same computer that is a production server that network users make use of. The reason for this is obvious. The application being tested or created on a development system can potentially cause the server to crash, or corrupt data.
![]() Enable computer and user accounts to be trusted for delegation—The Trusted for Delegation right for a user or computer can be performed by accounts that hold this right. The holder of this right can access resources on another computer—unless that computer has the Account Cannot Be Delegated control flag set. The account holding this right can use the authentication credentials of the client computer.
Enable computer and user accounts to be trusted for delegation—The Trusted for Delegation right for a user or computer can be performed by accounts that hold this right. The holder of this right can access resources on another computer—unless that computer has the Account Cannot Be Delegated control flag set. The account holding this right can use the authentication credentials of the client computer.
![]() Force shutdown from a remote source—This is a right you should grant sparingly. It allows a user to shut down another computer on the same network. If a computer or user’s account becomes compromised because of security problems, this right can be used to shut down other computers, and thus be used to deny other computers access to those computers, resulting in a denial-of-service attack. A denial-of-service attack is an attack that attempts to overwhelm a computer by overloading it with resource requests. For example, a continuous stream of TCP connection attempts can quickly use up the memory data structures a computer can offer. By shutting down a computer that is undergoing a denial-of-service attack, you can begin to protect your network, especially if more than one computer is experiencing this type of attack.
Force shutdown from a remote source—This is a right you should grant sparingly. It allows a user to shut down another computer on the same network. If a computer or user’s account becomes compromised because of security problems, this right can be used to shut down other computers, and thus be used to deny other computers access to those computers, resulting in a denial-of-service attack. A denial-of-service attack is an attack that attempts to overwhelm a computer by overloading it with resource requests. For example, a continuous stream of TCP connection attempts can quickly use up the memory data structures a computer can offer. By shutting down a computer that is undergoing a denial-of-service attack, you can begin to protect your network, especially if more than one computer is experiencing this type of attack.
![]() Generate security audits—This right is needed to create security audit log entries. This right generally is assigned not to a user, but instead to the operating system or applications.
Generate security audits—This right is needed to create security audit log entries. This right generally is assigned not to a user, but instead to the operating system or applications.
![]() Increase scheduling priorities—This gives the capability to boost the scheduling priority of a process. Administrators have this right by default. However, increasing the priority of one process can potentially allow a process that is making heavy use of system resources to dramatically slow down or lock out other processes. To use this right, the Task Manager utility is used. Do not give this right to typical users who do not understand that raising the priority for their session can potentially severely impact other users of the computer. For all practical purposes, Windows server operating systems can adjust priorities as needed. The administrator can also use the System Applet in the Control panel to grant priorities to foreground (applications) or network services, without having to modify process priorities on a process-by-process basis.
Increase scheduling priorities—This gives the capability to boost the scheduling priority of a process. Administrators have this right by default. However, increasing the priority of one process can potentially allow a process that is making heavy use of system resources to dramatically slow down or lock out other processes. To use this right, the Task Manager utility is used. Do not give this right to typical users who do not understand that raising the priority for their session can potentially severely impact other users of the computer. For all practical purposes, Windows server operating systems can adjust priorities as needed. The administrator can also use the System Applet in the Control panel to grant priorities to foreground (applications) or network services, without having to modify process priorities on a process-by-process basis.
![]() Load and unload device drivers—This gives the capability to load and unload device drivers (as well as other kernel mode code). Because kernel processes are the heart of the operating system, you should not grant this right to ordinary users. This right, instead, is granted to Administrators by default.
Load and unload device drivers—This gives the capability to load and unload device drivers (as well as other kernel mode code). Because kernel processes are the heart of the operating system, you should not grant this right to ordinary users. This right, instead, is granted to Administrators by default.
![]() Lock pages in memory—This right gives the capability to lock pages into physical memory so that users do not get swapped out to the pagefile during normal virtual memory operations. This is useful for a process running a real-time application, but this right is not generally given to ordinary users.
Lock pages in memory—This right gives the capability to lock pages into physical memory so that users do not get swapped out to the pagefile during normal virtual memory operations. This is useful for a process running a real-time application, but this right is not generally given to ordinary users.
![]() Manage auditing and security log—This right lets the user determine those objects and resources that will be recorded in the security log file, and view the events produced by the auditing.
Manage auditing and security log—This right lets the user determine those objects and resources that will be recorded in the security log file, and view the events produced by the auditing.
![]() Modify firmware environment variables—A user granted this right can modify firmware values stored in nonvolatile RAM of computers that are non-X86 computers (such as Intel or AMD). For example, on X86 computers, the user holding this right can modify only the Last Known Good Configuration setting. For Itanium computers, users granted this right can run the bootcfg.exe application and manage the Startup and Recovery properties for the computer.
Modify firmware environment variables—A user granted this right can modify firmware values stored in nonvolatile RAM of computers that are non-X86 computers (such as Intel or AMD). For example, on X86 computers, the user holding this right can modify only the Last Known Good Configuration setting. For Itanium computers, users granted this right can run the bootcfg.exe application and manage the Startup and Recovery properties for the computer.
![]() Profile a single process—This allows the user to set the collection information about a nonsystem process, used for measuring performance. The user who has this right can use the Performance Monitor to view the performance of non-system processes running on the computer. Administrators have this right by default.
Profile a single process—This allows the user to set the collection information about a nonsystem process, used for measuring performance. The user who has this right can use the Performance Monitor to view the performance of non-system processes running on the computer. Administrators have this right by default.
![]() Profile system performance—Similar to the preceding right, users who hold this right can perform the same functions, including the right to set or view system processes.
Profile system performance—Similar to the preceding right, users who hold this right can perform the same functions, including the right to set or view system processes.
![]() Remove computer from docking station—This right enables a user account to gracefully remove a computer from a docking station without having to first log on to the computer. By default, this right is not granted to any user.
Remove computer from docking station—This right enables a user account to gracefully remove a computer from a docking station without having to first log on to the computer. By default, this right is not granted to any user.
![]() Replace a process-level token—This right is usually restricted to the operating system, which gives the user the capability to modify a process’s security access token.
Replace a process-level token—This right is usually restricted to the operating system, which gives the user the capability to modify a process’s security access token.
![]() Restore files and directories—A user with this right can traverse directories and restore files and directories, or similar objects. This means that the user can restore files or entire directories, whether or not the user has permissions to access those files or directories when performing duties other than backup or restore functions. The user holding this right cannot access files or directories using this right to examine or change the contents of those files or directories. This right applies only to the restoring files or directories.
Restore files and directories—A user with this right can traverse directories and restore files and directories, or similar objects. This means that the user can restore files or entire directories, whether or not the user has permissions to access those files or directories when performing duties other than backup or restore functions. The user holding this right cannot access files or directories using this right to examine or change the contents of those files or directories. This right applies only to the restoring files or directories.
![]() Shut down the system—Users holding this right can shut down the system. The user must be logged on to the system locally to perform this function.
Shut down the system—Users holding this right can shut down the system. The user must be logged on to the system locally to perform this function.
![]() Synchronize directory service data—This gives the capability to synchronize all directory services. There is no account that possesses this right by default.
Synchronize directory service data—This gives the capability to synchronize all directory services. There is no account that possesses this right by default.
![]() Take ownership of files or other objects—Creators of files, directories, and other objects are in most cases the owners of these objects. Users holding this right can take ownership from the owner. This is useful when a user has left the company, and access is needed to the files, directories, or other objects.
Take ownership of files or other objects—Creators of files, directories, and other objects are in most cases the owners of these objects. Users holding this right can take ownership from the owner. This is useful when a user has left the company, and access is needed to the files, directories, or other objects.
Each of the previous privileges can be enabled for specific user accounts or groups. Some of these rights, however, are granted to groups by default. For example, the Backup Operators group can use the backup utility to back up files to offline storage, despite the protections that are in place for these files. This does not, however, give the Backup Operators group the capability of viewing or modifying files. Members of this group can just use the backup utility to save files to another media, such as a tape.
The Active Directory can be used to delegate management for selected objects that are contained in the directory.
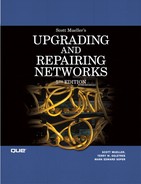
The MMC interface for Windows XP is much the same as that for Windows 2003. To view the rights you can assign on a client Windows XP Professional computer, use the Local Security Settings. Click on Start, Control Panel (and then switch to Classic View), Administrative Tools, and then Local Security Policy (see Figure 39.2). Under the Security Settings tree shown in Figure 39.2, click on Local Policies and then User Rights Assignment.
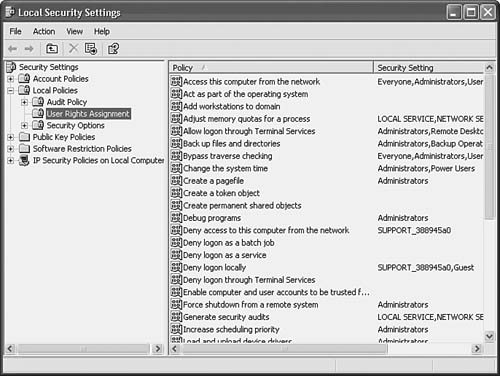
Figure 39.2. You can manage user rights for a Windows XP computer using the Local Security Policy.
In the right pane of this window, you will then see the rights that can be granted to users, as well as the current assignments to existing users or groups. Most of the rights you will see in the right pane are the same as or similar to those described earlier in this chapter. Because Windows XP is a client operating system, many of the rights listed here can be pre-empted by the Default Domain Controller Group Policy object (GPO) if the XP computer is part of a domain. However, if not restricted by the GPO, or if your Windows XP computer is not part of a domain, you can make changes to the rights granted to a user. Note that the rights and privileges for the Windows XP computer are similar to those described earlier for Windows 2003.
Managing User Password Policies
This chapter uses several examples to demonstrate the protections you can use to secure your network. In the preceding section you learned about the rights and privileges you can grant a user (or a group). In this section you will find that these user rights are similar for Windows XP Professional, which you can use as a client in a large network, or as a computer in a SOHO network where a computer using a server operating system is needed.
However, here it’s time to look at other security settings that you can use to control user access to a computer. For example, under Account Policies, you can see (in Figure 39.3) that the Password Policy and Account Lockout Policy can be found.

Figure 39.3. You can manage password policies for a Windows XP computer using the Local Security Policy.
Note
Although this example uses Windows XP Professional, the same password policies are applicable to Windows 2003, and most are also the same for Windows 2000.
Password policies enable the user of the Windows XP computer to enforce several aspects that relate to the use of passwords on this computer. For example:
![]() Enforce password history—You can set a value here that controls the length of time a password is stored in a history file to prevent the same password from being used within this time frame. This is a very useful password policy, because you can use this to ensure that the user chooses a different password when the current one expires. I suggest that you set the value for this item to a number larger than the default. Preventing a user from using the same password over and over again will likely make your system more vulnerable than if the user is required to choose a password that has not been used frequently. If you double-click on the Enforce Password History entry, you will see the dialog box that enables you to set the number of passwords that will be remembered (see Figure 39.4).
Enforce password history—You can set a value here that controls the length of time a password is stored in a history file to prevent the same password from being used within this time frame. This is a very useful password policy, because you can use this to ensure that the user chooses a different password when the current one expires. I suggest that you set the value for this item to a number larger than the default. Preventing a user from using the same password over and over again will likely make your system more vulnerable than if the user is required to choose a password that has not been used frequently. If you double-click on the Enforce Password History entry, you will see the dialog box that enables you to set the number of passwords that will be remembered (see Figure 39.4).

Figure 39.4. You can set the number of passwords that will be remembered by Windows XP.
![]() Maximum password age—This policy defines the length of time a password can be used before the user is required to change the password. A dialog box similar to that shown in Figure 39.4 is used. However, this dialog box allows you to set the number of days a password can be used. In combination with the Enforce password history entry, you can further enhance security as it applies to user passwords.
Maximum password age—This policy defines the length of time a password can be used before the user is required to change the password. A dialog box similar to that shown in Figure 39.4 is used. However, this dialog box allows you to set the number of days a password can be used. In combination with the Enforce password history entry, you can further enhance security as it applies to user passwords.
![]() Minimum password age—This entry enables you to set the minimum number of days that a password must be used before it can be changed. Although it may seem that the default of zero days is a good one, consider that if someone other than the user gains access to the account, he can change the password easily (and thus lock out the original user). Because of this, it’s a good idea to set this to another value to keep an intruder from changing the password. The value you set here should be less than or equal to the Maximum password age value.
Minimum password age—This entry enables you to set the minimum number of days that a password must be used before it can be changed. Although it may seem that the default of zero days is a good one, consider that if someone other than the user gains access to the account, he can change the password easily (and thus lock out the original user). Because of this, it’s a good idea to set this to another value to keep an intruder from changing the password. The value you set here should be less than or equal to the Maximum password age value.
![]() Minimum password length—This value is obvious—you can set the minimum number of characters (both alpha and numeric) that the user needs to choose for a password. Short passwords are much easier to discover using many password cracker programs available on the Internet. A recommended value for this field is 10 characters. The next item is also useful to prevent an outsider from guessing a password.
Minimum password length—This value is obvious—you can set the minimum number of characters (both alpha and numeric) that the user needs to choose for a password. Short passwords are much easier to discover using many password cracker programs available on the Internet. A recommended value for this field is 10 characters. The next item is also useful to prevent an outsider from guessing a password.
![]() Password must meet complexity requirements—This policy is a very important one. Although setting the minimum and maximum password policies are important, this still leaves your user accounts open to a dictionary attack. This sort of attack simply uses a dictionary of ordinary words to attempt to break into your system after a user account name is known. This type of attack is generally used against the Administrator account, because it is a known account for Windows systems. This policy requires that passwords meet certain requirements, such as including numeric as well as alphabetic characters.
Password must meet complexity requirements—This policy is a very important one. Although setting the minimum and maximum password policies are important, this still leaves your user accounts open to a dictionary attack. This sort of attack simply uses a dictionary of ordinary words to attempt to break into your system after a user account name is known. This type of attack is generally used against the Administrator account, because it is a known account for Windows systems. This policy requires that passwords meet certain requirements, such as including numeric as well as alphabetic characters.
Note
The Password must meet complexity requirements option should be used on networks that contain a large number of computers (an Enterprise network, for example) as well as for simple SOHO network LANs. Both types of networks are vulnerable to password attacks. As described in Chapter 42, “Basic Security Measures Every Network Administrator Needs to Know,” and Chapter 44, “Security Issues for Wide Area Networks,” one of the main attacks used by malicious persons is based on many single computers. By planting programs on a large number of computers that have been hacked, a Distributed Denial-of-Service attack can be launched from all the computers that the user has gained entry to. Thus, when a signal is sent to the many hundreds (or even thousands) of computers, a large volume of network traffic can be simultaneously directed to a targeted computer. This means that your local computer can participate in an attack without your knowledge.
![]() Store password using reversible encryption for all users in the domain—If this is enabled, Administrator as well as other accounts that hold administrative privileges can recover the encrypted password. This is not necessary if an Administrator account possesses the right to take ownership of another user’s files. Yet it can be useful if a user forgets his password.
Store password using reversible encryption for all users in the domain—If this is enabled, Administrator as well as other accounts that hold administrative privileges can recover the encrypted password. This is not necessary if an Administrator account possesses the right to take ownership of another user’s files. Yet it can be useful if a user forgets his password.
As you can see from the previous password policies, you can set policies that can help protect your network from compromise for both internal and external users. Don’t think that all security breaches are from external users. Can you be certain that all users inside your LAN are happy users? If so, why is it necessary to let some users go? And remember that when someone is let go, it can take some time for the human resources department to deactivate user accounts (or another entity in your business).
If a Windows XP computer is part of a domain, you can manage user accounts on a domain controller so that the user can be granted access to other computers in the domain instead of just the local workstation. The rights on a Windows XP Professional computer in a domain setting are controlled by a Group Policy Object (GPO), which can be used to set a large number of security and other settings for computers in the network. For a SOHO network, you probably won’t need to assign rights to any user account, but can instead add the user account to a user group that possesses the rights needed to perform the tasks necessary.
![]() To learn about how you grant rights to a user or group, see Chapter 37, “Windows 2000 and Windows Server 2003 User and Computer Management Utilities.”
To learn about how you grant rights to a user or group, see Chapter 37, “Windows 2000 and Windows Server 2003 User and Computer Management Utilities.”
NTFS Standard and Special Permissions
When a disk partition is formatted using NTFS, you can grant permissions that control which directories and files can be accessed by users, and what kind of actions the user can take on a file or directory. Whereas rights grant a user the capability to perform some function, permissions specify which users (or groups) can access a particular object, such as a file, directory, or printer, for example. Some rights, such as Backup of files and directories, can override permissions applied to files or directories. Without this capability, a user who is responsible for performing backups would have to be granted access to every file and directory. Don’t worry, however. That right only allows the user to back up the files, not to read or access the files in any other way.
Tip
If you don’t see the Sharing or Security tabs, you are not using an NTFS partition, but a FAT or FAT32 partition instead. Those file systems do not support the same sharing and security features offered by NTFS. If you are not dual-booting Windows 95/98 on your computer with Windows NT 4.0/2000/Server 2003, there isn’t really a good reason for using a file system other than NTFS.
In the following example Using Windows 2003, the Windows Explorer utility (found under the Accessories folder) can be used to add or change permissions on files and directories. To view or modify the permissions on a directory using Windows Explorer, simply right-click on the file or directory and select Properties. From the File Properties sheet, select the Security tab and from this tab click the Permissions button. In Figure 39.5 you can see the Security tab selected for a directory.
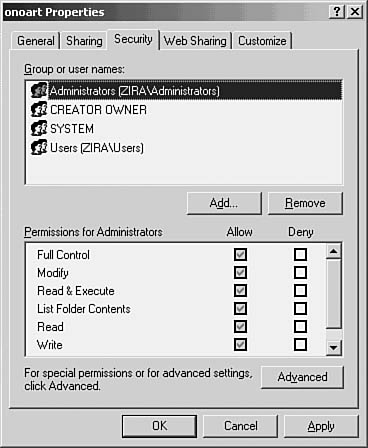
Figure 39.5. Use the Security tab to set permissions on files or directories for NTFS partitions.
In Figure 39.5 you can see that members of the Administrators group of the Zira domain are allowed full access to this directory. Note the Allow and Deny check boxes in the lower pane of this properties sheet.
Using the top pane, you can select other users or groups to see what access has been granted (or denied) them. To add a user or group, click on the Add button, and the Select Users, Computers, or Groups dialog box will allow you to enter one or more usernames or groups (see Figure 39.6). If you know the username, enter it. To see more information about that user (such as the person’s entire name as stored in the Active Directory), click on Check Names after entering the username. In Figure 39.6 this has been done so that I can be sure I have the right person associated with the username I entered.
Figure 39.6. This dialog box enables you to select a user or group.
Tip
The dialog boxes shown in Figure 39.6 and Figure 39.7 are standard dialog boxes used by many utilities to locate users, computers, and other objects in the Active Directory. You can use the Object Types button to select a specific object.
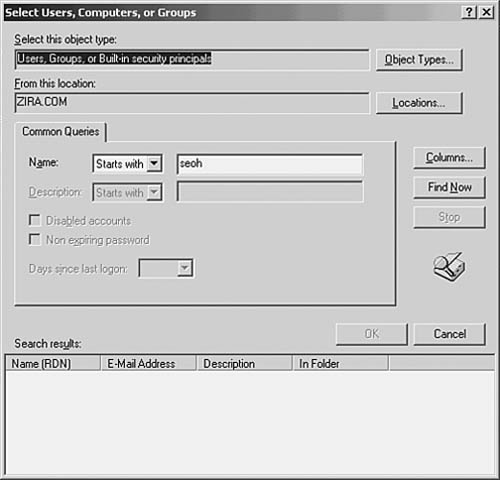
Figure 39.7. You can use the advanced search feature to locate users in the Active Directory.
In Figure 39.6 you’ll see that there is also an Advanced button. If you click on this button, you can search the Active Directory to find a username. This expanded dialog box is shown in Figure 39.7.
After you have selected the user for which you want to manage access to a file or folder, click the OK button on the Select Users, Computers, or Groups dialog box, and you will be returned to the Security tab of the object’s properties sheets. The user you have added will appear in the top pane. Select the user by clicking on the name once. Then you can select which permissions to allow or deny. The basic permissions for a resource are the following:
![]() Full Control—Gives the user full control over the object.
Full Control—Gives the user full control over the object.
![]() Modify—Enables the user to make changes to the object.
Modify—Enables the user to make changes to the object.
![]() Read & Execute—Just what it says: lets the user read files and execute applications in the directory.
Read & Execute—Just what it says: lets the user read files and execute applications in the directory.
![]() List Folder Contents—Lets the user see the files contained in the folder.
List Folder Contents—Lets the user see the files contained in the folder.
![]() Read—Grants the user read access to the folder or file.
Read—Grants the user read access to the folder or file.
![]() Write—Lets the user write to the file or folder.
Write—Lets the user write to the file or folder.
![]() Special Permissions—This last entry is scrolled off of the pane in Figure 39.5. This check box will be selected if you have granted the user any of the special permissions by using the Advanced button.
Special Permissions—This last entry is scrolled off of the pane in Figure 39.5. This check box will be selected if you have granted the user any of the special permissions by using the Advanced button.
The Advanced button will let you further refine the permissions, auditing, and other features, including how permissions can be inherited by subfolders that are created under the folder you are currently managing. Although it is beyond the scope of this chapter to list all the possibilities that the Advanced button offers, Figure 39.8 shows the Advanced Security Settings for a folder, and the tabs that can be used to further customize permissions and other features applied to the folder.
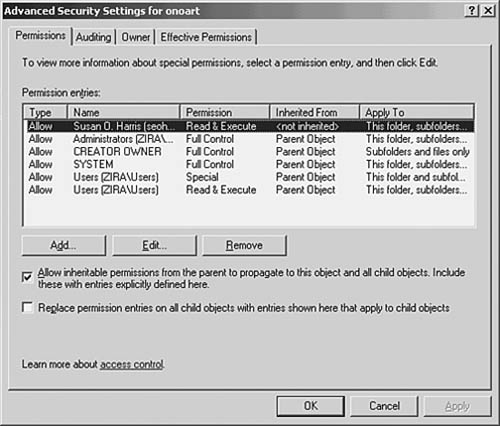
Figure 39.8. The Advanced button enables you to micromanage permissions, auditing, ownership, and other features.
One important thing you can see in this figure is the check box labeled Allow Inheritable Permissions from the Parent to Propagate to This Object and All Child Objects. If it’s selected, then if you are modifying permissions for a subfolder, it will also inherit access controls from parent folders above it. Similarly, new subfolders created under this one will inherit the access controls you have just created. If you want to apply your access control modifications to existing subfolders, use the second check box, labeled Replace Permission Entries on All Child Objects with Entries Shown Here That Apply to Child Objects.
Is that complicated or what? Yet, this just shows that you can fine-tune permissions on objects (such as files, folders, and printers) that are in a domain that uses the Active Directory.
When you are finished making changes to the permissions (access controls) for a folder or file, click the Apply button and then the OK button shown back in Figure 39.8.
Whereas rights and privileges can be granted to users or groups, and enable them to perform certain actions on a computer, permissions are used to restrict which resources a user can access. The NTFS file system enables you to assign granular permissions to every file or directory on your computer, as well as other objects. You can override these permissions, as described previously. For example, the administrator’s right to take ownership of a file or directory can override any permissions you place on a file or directory. Yet, for the majority of your users who do not possess this type of right, permissions on files or directories can serve as a valuable protection that can keep your data safe.
Windows Permissions Are Cumulative
When a user is a member of more than one group, the rights he holds are cumulative. In addition, permissions on a resource are also cumulative, with the exception of the No Access permission. Take, for example, a user who has been granted the Read permission to a directory because of his membership in a group (such as “world”). However, if the user is also a member of another group called “accountants,” the user’s permissions are calculated using permissions granted to that group as well. If the accountants user group has been granted the Change permission for the directory, the user has both the Read and Change permissions when he is evaluated for access to the directory.
The only exception to this rule is the No Access right. This right specifically denies all other access. Thus, if a user is a member of one group that has been granted Full Control over a directory, but is also a member of another group that has been granted the No Access permission for the directory, the user will not be able to access the directory. The No Access permission overrides other access permissions.
The capability to selectively deny access to specific users can be a useful tool when setting up or managing user accounts. It is easier to grant access to everyone in a large user group and then to deny access to a few select individuals who should not be allowed to use the resource. The alternative is to create a more finely tuned user group that eliminates those who do not need access and then grant access to this new group. This method, however, increases the number of user groups you have to manage and, thus, its use becomes less effective the more you use it.
User Groups Make Managing User Rights Easier
Granting rights to a user can be a tedious task if you have hundreds or thousands of users on your network. The easiest method for granting rights to users in an environment where you have a large user base is to create user groups consisting of users who need the same kind of access to the same resources. You can then grant rights to the groups instead of each user. Users of a group inherit the rights assigned to the group, as well as any additional rights you assign to the user. A user can be a member of more than one group, and thus inherit the rights assigned to each of the groups of which the user is a member. This is an important concept, because many users do not fit neatly into a single group.
Tip
In addition to placing users into one or more groups to facilitate assigning rights and permissions to the users, you can still assign rights for the individual user in addition to those provided by group membership.
Windows NT enables you to use two basic kinds of groups: local groups and global groups. Local groups can be local to a particular computer or can be domain local groups. Global groups are used for grouping users from one domain so that they can be managed as a unit in another domain where the administrator can place the global group into a local group created on that computer for administrative purposes. This is a very important distinction to make. You can literally “export” a global group from one computer to a local group on another computer. This capability again makes an administrator’s chore easier. For users who are members of a global group, the administrator of the other computer does not have to grant access to that computer on a one-by-one basis for each user. Instead, a group of users from one computer to another can be imported as a local group, and the administrator of that computer can manage the group when making decisions about rights and permissions.
Windows NT computers come with several built-in user groups, which vary depending on the role of the computer in the network. What is important to understand here is that, although NT allows a large number of specific rights to be assigned to users, you can do this on a group basis rather than for individual user accounts if you want to make user management tasks easier.
User Groups in Windows 2000 and Server 2003
There are a few differences between user groups in standalone Windows computers—those not part of a domain—and those created in the Active Directory. The following groups are available on a local server whether it is part of a domain or a standalone server:
![]() Administrators—Members of this group have full control over the local server. As recommended earlier in this chapter, it is a good idea from a security standpoint to rename the Administrator account. Then you can create individual accounts for administrative-level users and grant them the same rights by adding them to this group.
Administrators—Members of this group have full control over the local server. As recommended earlier in this chapter, it is a good idea from a security standpoint to rename the Administrator account. Then you can create individual accounts for administrative-level users and grant them the same rights by adding them to this group.
![]() Backup Operators—This group lets you specify which users can perform backup and restore operations.
Backup Operators—This group lets you specify which users can perform backup and restore operations.
![]() DHCP Administrators—If you have installed a DHCP server on the computer, this group will be created automatically. Place members into this group if you want them to be able to manage the DHCP service.
DHCP Administrators—If you have installed a DHCP server on the computer, this group will be created automatically. Place members into this group if you want them to be able to manage the DHCP service.
![]() DHCP Users—This group simply lets members view information about the DHCP database. They cannot make changes to it, however.
DHCP Users—This group simply lets members view information about the DHCP database. They cannot make changes to it, however.
![]() Domain Administrators—This group grants members the rights that the Administrator account possesses. It is a good idea to create accounts with a name other than Administrator and put them in this group, and then change the name of the Administrator account. This will enable you to track in the event log which Domain Administrators user has made changes to the system, and protect you from simple attacks that target the known Administrator account.
Domain Administrators—This group grants members the rights that the Administrator account possesses. It is a good idea to create accounts with a name other than Administrator and put them in this group, and then change the name of the Administrator account. This will enable you to track in the event log which Domain Administrators user has made changes to the system, and protect you from simple attacks that target the known Administrator account.
![]() Guests—This group is disabled by default and is used to let members log on using a temporary user profile. No rights are granted by default to this group. You should probably leave this group disabled for security reasons.
Guests—This group is disabled by default and is used to let members log on using a temporary user profile. No rights are granted by default to this group. You should probably leave this group disabled for security reasons.
![]() HelpServicesGroup—This group also does not possess any default rights. If you do grant rights to this group (which you should not!), then they will apply to all Microsoft help applications, such as Remote assistance. Because this group is used by applications, you should not place user accounts into this group.
HelpServicesGroup—This group also does not possess any default rights. If you do grant rights to this group (which you should not!), then they will apply to all Microsoft help applications, such as Remote assistance. Because this group is used by applications, you should not place user accounts into this group.
![]() Network Configuration Operators—This group enables its members to make changes to network protocols, such as TCP/IP.
Network Configuration Operators—This group enables its members to make changes to network protocols, such as TCP/IP.
![]() Performance Monitor Users—This group enables its members to use performance monitor counters to evaluate the operation of the local server.
Performance Monitor Users—This group enables its members to use performance monitor counters to evaluate the operation of the local server.
![]() Performance Log Users—This group is a superset of the preceding group, in that its members can also manage which performance counters are enabled, and enable logs and alerts on the local server.
Performance Log Users—This group is a superset of the preceding group, in that its members can also manage which performance counters are enabled, and enable logs and alerts on the local server.
![]() Power Users—This group is granted the following rights, and should be used only for users who understand what these rights can do: Access this computer from the network; Allow log on locally; Bypass traverse checking; Change the system time; Profile single process; Remove computer from docking station; and Shut down the system.
Power Users—This group is granted the following rights, and should be used only for users who understand what these rights can do: Access this computer from the network; Allow log on locally; Bypass traverse checking; Change the system time; Profile single process; Remove computer from docking station; and Shut down the system.
![]() Print Operators—This group’s members can manage printer resources on the local computer.
Print Operators—This group’s members can manage printer resources on the local computer.
![]() Remote Desktop Users—This group holds the right Allow log on through Terminal Services. Its members can log on to a server remotely.
Remote Desktop Users—This group holds the right Allow log on through Terminal Services. Its members can log on to a server remotely.
![]() Replicator—No user accounts should be added to this group. It is used by several replication functions, specifically those used to access replication services on a domain controller.
Replicator—No user accounts should be added to this group. It is used by several replication functions, specifically those used to access replication services on a domain controller.
![]() Terminal Server Users—This group is made up of users who are currently logged on as Terminal Services users. It is generally used to run older applications, such as those created for Windows NT 4.0.
Terminal Server Users—This group is made up of users who are currently logged on as Terminal Services users. It is generally used to run older applications, such as those created for Windows NT 4.0.
![]() Users—This group contains any user account currently logged on to the computer, as well as the Domain Users group, if the computer is joined to a domain. Members can perform everyday functions such as running applications and using resources such as printers attached to the computer.
Users—This group contains any user account currently logged on to the computer, as well as the Domain Users group, if the computer is joined to a domain. Members can perform everyday functions such as running applications and using resources such as printers attached to the computer.
![]() WINS Users—If you are still using the Windows Internet Naming Service (WINS) this late in the game, this group will be present if WINS is installed and running. Members of this group can only read information from the WINS database, but cannot change it.
WINS Users—If you are still using the Windows Internet Naming Service (WINS) this late in the game, this group will be present if WINS is installed and running. Members of this group can only read information from the WINS database, but cannot change it.
Active Directory Groups
When you use the Active Directory in your network, a number of other groups can be used. The Active Directory controls many aspects that grant or deny access to resources throughout the network, including other domains, and possibly other Active Directory trees in a forest of AD trees. Following is a list of these default groups:
![]() Account Operators—This group’s members can create user accounts and groups in their domain in the Active Directory, as well as modify or delete them. The exception is that members cannot access the Domain Controllers organizational unit. They cannot make changes to Administrator accounts in the domain, or accounts that are members of the Domain Admins group. However, members of this group can shut down a domain controller, so be careful when selecting users to add to this group.
Account Operators—This group’s members can create user accounts and groups in their domain in the Active Directory, as well as modify or delete them. The exception is that members cannot access the Domain Controllers organizational unit. They cannot make changes to Administrator accounts in the domain, or accounts that are members of the Domain Admins group. However, members of this group can shut down a domain controller, so be careful when selecting users to add to this group.
![]() Administrators—This group, of course, can do anything on any domain controller for a particular domain. The groups Domain Admins and Enterprise Admins (for Windows Server 2003 Enterprise Edition) are automatically placed into this group. This group can perform all functions in a domain, so choose its members very carefully. For example, if only a subset of the administrative functions are required, choose another built-in group that matches the job specifications, or create a new group and grant it the rights to perform those functions.
Administrators—This group, of course, can do anything on any domain controller for a particular domain. The groups Domain Admins and Enterprise Admins (for Windows Server 2003 Enterprise Edition) are automatically placed into this group. This group can perform all functions in a domain, so choose its members very carefully. For example, if only a subset of the administrative functions are required, choose another built-in group that matches the job specifications, or create a new group and grant it the rights to perform those functions.
![]() Enterprise Administrators—There is very little this group cannot do. Enterprise Administrators have full control permissions, enabling them to have Read permissions throughout the enterprise. And, you can consider the group Enterprise Administrators to have the same capabilities as Domain Administrators or the local Administrators group.
Enterprise Administrators—There is very little this group cannot do. Enterprise Administrators have full control permissions, enabling them to have Read permissions throughout the enterprise. And, you can consider the group Enterprise Administrators to have the same capabilities as Domain Administrators or the local Administrators group.
![]() Backup Operators—As discussed earlier in this chapter, members of this group can perform backup and restore functions. In addition, however, note that this group’s members can log on to a domain controller and shut it down.
Backup Operators—As discussed earlier in this chapter, members of this group can perform backup and restore functions. In addition, however, note that this group’s members can log on to a domain controller and shut it down.
Caution
Placing a user account into any group that can shut down a domain controller should be done with great caution. For example, if you have just one domain controller in your domain, shutting it down can have a severe impact on your domain. Even if you have multiple domain controllers (which is highly recommended for fault-tolerance), that will not prevent a user who has the right to shut down one domain controller from doing the same to others.
![]() Guests—See the previous entry for the Guests group for the local computer.
Guests—See the previous entry for the Guests group for the local computer.
![]() Incoming Forest Trust Builders—This group will be present only in the forest root domain. A forest is a collection of domain trees. This group can create incoming trust relationships between trees in a forest. This is a powerful right, so be sure to understand the implications before adding members to this group. By default, there are no members in this group.
Incoming Forest Trust Builders—This group will be present only in the forest root domain. A forest is a collection of domain trees. This group can create incoming trust relationships between trees in a forest. This is a powerful right, so be sure to understand the implications before adding members to this group. By default, there are no members in this group.
![]() Network Configuration Operators—This group can modify the TCP/IP configuration, and release/renew DHCP configurations for the same, on domain controllers.
Network Configuration Operators—This group can modify the TCP/IP configuration, and release/renew DHCP configurations for the same, on domain controllers.
![]() Performance Monitor Users—This group’s members can monitor the performance on a domain controller.
Performance Monitor Users—This group’s members can monitor the performance on a domain controller.
![]() Performance Log Users—This group, as you can probably guess from the local group definitions, can manage the items that are set up as counters, alerts, and logs for performance monitoring—but this group can do so on domain controllers.
Performance Log Users—This group, as you can probably guess from the local group definitions, can manage the items that are set up as counters, alerts, and logs for performance monitoring—but this group can do so on domain controllers.
![]() Pre-Windows 2000 Compatible Access—This group is used to provide backward compatibility for Windows NT users, as well as earlier operating systems. If your network is composed of Windows 2000 and later editions of the operating system, this group will not be present, or needed.
Pre-Windows 2000 Compatible Access—This group is used to provide backward compatibility for Windows NT users, as well as earlier operating systems. If your network is composed of Windows 2000 and later editions of the operating system, this group will not be present, or needed.
![]() Print Operators—This is another group that is similar in function to the local group for a particular server. Yet this group can manage printers on a domain controller. More important is the fact that members of this group can make changes in the Active Directory for printer objects, and can also shut down domain controllers. Choose members for this group
carefully!
Print Operators—This is another group that is similar in function to the local group for a particular server. Yet this group can manage printers on a domain controller. More important is the fact that members of this group can make changes in the Active Directory for printer objects, and can also shut down domain controllers. Choose members for this group
carefully!
![]() Remote Desktop Users—This is the same as the local group, but this Active Directory group can also log on to domain controllers in your network.
Remote Desktop Users—This is the same as the local group, but this Active Directory group can also log on to domain controllers in your network.
![]() Replicator—This is another group that is similar to the local group of the same name. This group can also be used to enable file replication between domain controllers.
Replicator—This is another group that is similar to the local group of the same name. This group can also be used to enable file replication between domain controllers.
![]() Server Operators—Members of this group can log on locally to a domain controller. They can perform many other functions in addition, such as create/delete shared resources (such as file or print shares), start/stop most services, shut down the server, and also back up/restore files on the server. Members can also change the system time.
Server Operators—Members of this group can log on locally to a domain controller. They can perform many other functions in addition, such as create/delete shared resources (such as file or print shares), start/stop most services, shut down the server, and also back up/restore files on the server. Members can also change the system time.
![]() Users—Members of this group, as with the same local group, can run applications and perform other functions. Any domain account you create becomes a member of this group.
Users—Members of this group, as with the same local group, can run applications and perform other functions. Any domain account you create becomes a member of this group.
As if that were not enough, there are additional groups contained in the Users container in the Active Directory. These groups are many, and you should investigate their use after becoming familiar with the Active directory. These groups can contain both users and computers.
Tip
Earlier in this chapter you learned that you can disable or rename the Administrator account. However, an important fact you need to remember is that if you boot the computer in Safe Mode, the administrator account will be enabled, to help you recover the system. This is an example of why you need to protect important servers using not only the safeguards built into the operating system, but also the physical constraints used to access the server. In other words, unless the server is located in a secure computer room, there is always the possibility that it can be compromised.
NetWare
When a user logs in to a NetWare 4.x or 5.x, a three-level tiered mechanism is at work to decide how access of resources is to be granted. The first level of security is logon security. The user must be authenticated against a user object in the NDS tree. The second level of security is NDS security, in which access can be controlled by granting or denying the user access to an object or its properties. The third level of security is NetWare file systems security, which involves the permissions on files and directories contained in the NetWare file system. Four types or categories of rights are used in Novell Networking. Versions prior to NetWare 4 and 5 used only the first two of these:
![]() File system directory rights
File system directory rights
![]() File system file rights
File system file rights
![]() NDS object rights
NDS object rights
![]() NDS property rights
NDS property rights
The first two rights are those you normally would associate with an operating system and its file system. These are rights that control access to directories and files in those directories on the disks for which the operating system (or network operating system) is responsible. The last two of these categories are used for rights that apply to accessing objects that reside in the Novell Directory Services (NDS) database.
Trustees
In NetWare networks, a user or group of users who have a right granted to them for a file or a directory are called a trustee of the directory. These rights sometimes are referred to as trustee assignments. A trustee assignment includes all the applicable rights, including a No Rights declaration. For NetWare 4.x and 5.x, other NDS leaf objects and container objects also can be granted a trustee assignment.
Trustee rights can be granted by an administrator using a program such as RIGHTS or FILER. You also can grant trustee rights using the NetWare Administrator. These trustee rights relationships also can be inherited. When discussing how rights are granted in a NetWare environment, remember that when a user or group is made a trustee of a file or directory, the user or group has been granted some kind of access permission right.
File-System Rights
File-system rights are those that control how a user can list the contents of a directory, add to a directory, or remove files or directories from a file system. Table 39.1 lists the terms used for the rights permissions that can be placed on files and directories, along with a short description of their functions.
Table 39.1. NetWare File and Directory Rights
Creators/owners of files and directories usually have the access control right over files they create. This means that they can assign permissions to other users on the system who might need to access their files. The user who has Supervisor access can do as much or more than the owner of a file or directory can do. The File Scan right gives the user the capability to scan the directory and see its contents when searching for a file.
Object and Property Rights
The NDS database is a hierarchical tree structure. Rights in this tree flow from top to bottom, such that an object in the directory can possibly inherit the rights values from all parent objects above it in the tree. Two basic kinds of rights are associated with NDS: Object rights and Property rights. The first, Object rights, defines the kinds of actions a trustee can perform on an object in the NDS tree. These rights do not necessarily give the trustee access to any of the information stored in the object’s properties, just access to the mechanisms used to manipulate objects.
Property rights define access to the information stored in the properties of an object. These rights apply to the properties of an object and not to the object itself. For example, an administrator might choose to grant users the ability to change certain properties of their own user object in the directory. This would allow users to change their own telephone-number properties, email account properties, and so on, relieving the administrator or another resource of this chore.
Table 39.2 shows the object rights and Table 39.3 shows the property rights, along with descriptions of their use.

Table 39.3. NDS Property Rights
Differences Between NDS and File-System and Directory Rights
NDS rights are used to assign access capabilities to objects and their properties that are contained in the NDS directory database. File-system rights are used to assign access capabilities to directories and files stored in the file system. The first difference you will notice between the two is that the NDS rights consist of two other kinds of rights: Object and Property rights. This concept does not exist in the file-system rights.
Finally, trustee assignments in NetWare 3.x could be made only for a user account or a user group. In NetWare 4.x and 5.x, the trustee can be any NDS object, leaf, or container, anywhere in the NDS tree. Because the NDS tree is a distributed database, objects located on different servers can be made trustees to files on other servers.
Inheritance of Rights
Inheritance of rights in the NDS tree is the process by which an object acquires some of the rights granted to objects superior to it in the tree. Rights are inherited starting at the top of the tree, where objects underneath the [root] object inherit some of the rights granted to [root]. The two methods used to block an object from inheriting rights from a superior object are the inherited rights filter (IRF) and direct trustee assignments by an administrator. Direct trustee assignments made anywhere in the path from the [root] object to the object in question can change the rights flowing down the tree.
The Inherited Rights Filter
The Inherited Rights Filter (IRF) can be used to stop one or more rights from being acquired in this fashion. The filter is used to block an object from receiving selected kinds of trustee assignments that it would otherwise inherit. When displaying the IRF, you will see a string of characters enclosed in square brackets. Each letter is the first letter of one of the rights that can be inherited by the object or potentially blocked by the filter. The values for directory and file rights can be read, write, create, erase, modify, file scan, and access control.
To make modifications to an IRF, you can use the utilities RIGHTS, FILER, NetAdmin, or NWADMIN.
Note that an IRF can block the Supervisor right from being inherited in the NDS tree to block access to an object in the tree. However, an IRF cannot block inheritance of the Supervisor right for filesystem rights inheritance. Also, if a right is blocked by an IRF at a higher level, you can always grant the right to a child object specifically. The IRF only blocks rights from being inherited from above, and does not block a right at the level which it is assigned.
Security Equivalence
Security equivalence is another method of granting trustee access rights in NetWare. Using this method, one User object is made equivalent to another object and thus takes on the same trustee assignments. Security equivalence is a property of the User object. Trustee rights gained by this equivalence method are in addition to any other rights the User object might possess. Also, a user might be granted rights that are granted to a group of which the user is a member.
This concept is helpful when it becomes necessary to allow one user to have access to objects in a manner similar to another user—for example, when a user is temporarily out of work and another is brought in to fill in.
Tip
It is not a good idea to grant a user the right to change the Security Equivalent property of their own User object. If the user also has the Write property right to the ACL property of an Admin User object, the user could potentially acquire all the rights associated with the Admin User object.
Effective Rights
When looking at the various means that are used to grant trustee rights to an object in NetWare, it quickly becomes apparent that trying to figure out the actual rights a user possesses might become confusing. The actual rights that a user will end up with are called the effective rights to the object. A few simple rules can be used to deduce effective rights:
![]() If no trustee rights are granted to the directory, the effective rights are computed by a logical
If no trustee rights are granted to the directory, the effective rights are computed by a logical AND operation of the parent directory’s effective rights and the Inherited Rights Filter.
![]() An explicit assignment of trustee rights to a directory overrides an Inherited Rights Filter.
An explicit assignment of trustee rights to a directory overrides an Inherited Rights Filter.
![]() If the Supervisor right is granted to a directory, the trustee will have all rights for all files and subdirectories underneath the directory. Remember that an IRF cannot block the Supervisor right in the file system.
If the Supervisor right is granted to a directory, the trustee will have all rights for all files and subdirectories underneath the directory. Remember that an IRF cannot block the Supervisor right in the file system.
Rights are additive in this computation. Inherited rights are masked by the Inherited Rights Filter, and any rights not masked out are added to any direct assignments made to the object, as well as any rights acquired by security equivalence. If the access granted from one source is less than that granted by another source, the higher-level right is used.
The Everyone Group and the [Public] Group
In NetWare 3.x a group called Everyone was usually assigned the Read and the File Scan right to SYS:PUBLIC. This user group allowed the administrator to assign rights to all users in a convenient method. The Everyone group consists of all users on a NetWare 3.x server. In NetWare 4.x and 5.x, there is no Everyone group, by default.
Note
By default, NetWare 4.x and 5.x do not contain an Everyone group. However, the migration process from NetWare 3.x to NetWare 4.x or 5.x can cause the Everyone group to be migrated as a user group.
Novell Directory Services allows for the creation of user groups. The hierarchical nature of the NDS database enables you to place user objects into container objects. Using this method, you can group users who share the same level of access permissions, for example, so that you have to modify the permissions only at the container level instead of at the individual user object level. However, a user object (or any object in the NDS tree) can be associated with only one container object. Of course, the container object itself can be encompassed by another container object, but it is not possible to just take a single user object and place it into multiple containers at the same time. Instead, you can create a Group object. This kind of object has a property that lists members of the group, which consists of user objects that reside elsewhere in the NDS tree.
The implicit group [Public] exists by default and is made up of all users who have a network connection. This includes users who have not been authenticated by NDS. This means that you can effectively assign rights to objects in the database for workstations that do not have to use a username/password to connect to the database. This enables you to assign the Browse right to all users, by creating a trustee assignment for the [Public] group on the root object in the tree. Sometimes, though, letting unauthenticated users even see (browse) the database can be a security problem. In this case you would not want to grant this right to [Public], or you might want to consider removing the browse right using an IRF for sections of the tree.
Unix and Linux
Under Unix and Linux, users will fall into one of the three following camps:
![]() User
User
![]() Group
Group
![]() Superuser
Superuser
Every user on a Unix system must be identified by a username, just as in all Windows operating systems, as well as NetWare. The user also can belong to one or more groups, one of which is considered to be the user’s primary group. User groups provide a method for assigning access permissions to directories and files based on groups of users with similar needs. Finally, there is a special user called a superuser, whose capabilities on the system are superior to those of ordinary users.
The superuser or root user account is all powerful. The root account, as it is usually called, is represented by the user ID (UID) of zero. This UID can access any file on a local file system and can access information about any process on the system. Some functions that only the superuser can perform on most Unix systems include these:
![]() Mount or unmount a file system
Mount or unmount a file system
![]() Create device special files
Create device special files
![]() Change another user’s password
Change another user’s password
![]() Change the date or time on the system clock
Change the date or time on the system clock
![]() Modify the local network interfaces
Modify the local network interfaces
![]() Shut down the system
Shut down the system
In Windows it was possible to choose from a large number of specific rights to assign to a user or a group so that different users could perform functions requiring different degrees of access. In the Unix environment, the root user account is the one that possesses the super-powers, so to speak, and to perform these functions you must log in as or become the root user.
File permissions are assigned to each file or directory in the following three categories:
![]() Owner permissions
Owner permissions
![]() Group permissions
Group permissions
![]() Other permissions
Other permissions
The first category defines permissions that apply to the owner of the file. Group permissions apply to users who are in a group to which the file belongs. The last category is the permissions that will be applied to all other users who try to access the file. The access permissions that can be granted to each of these categories are as listed here:
![]() Read—This permission enables the user to read the contents of the file. When applied to a directory, this permission enables the user to list the files stored in the directory along with their attributes.
Read—This permission enables the user to read the contents of the file. When applied to a directory, this permission enables the user to list the files stored in the directory along with their attributes.
![]() Write—This permission enables the user to change the contents of the file. This right enables a user to add or delete files in a directory.
Write—This permission enables the user to change the contents of the file. This right enables a user to add or delete files in a directory.
![]() Execute—For a program file, this right enables the user to execute, or run, the program. For a directory, this right enables the user to access the directory.
Execute—For a program file, this right enables the user to execute, or run, the program. For a directory, this right enables the user to access the directory.
Viewing File Permissions
The ls command can be used to show a listing of files along with information about the permissions applied to the files. There are many command-line parameters you can use with this command, but the simple usage shown here is sufficient to view the ownership and permission information about a file:
ls -l /usr/bin/two
dr-xr-xr-x 1 two biz 0 Jul 12 2001 html
dr-xr-xr-x 1 two biz 0 Feb 13 2001 invoices
-r-xr-xr-x 1 two biz 1624 Jun 20 2001 notices.txt
-r-xr-xr-x 1 two biz 1624 Jun 20 2001 appt.dat
The first entry in the directory listing shows a directory file named html. You can tell it is a directory because the first character on the line is a d. The next file is also a directory, named invoices. Both of these directories are owned by the user listed in the third column, two. The group the file belongs to is found in the next column and, in these examples, is biz for all entries. The remaining items on each line show the size and date of the file and its name. Note that Unix is case sensitive when it comes to filenames. Keep this in mind when using the ls command with wildcards when hoping to locate a file.
In this listing, the first thing you notice on each line is a string of letters separated by dashes. This string contains the access permissions for the entry. It is sometimes called the permissions array. This is followed by other information, separated into columns. Each line represents either a directory or a file in the current directory. The permissions array can be easily deciphered. The first character indicates whether the file is a directory (d) or a user file (-), and the remaining three groups of letters indicate the access permissions for the file’s or directory’s owner, the file’s group, and then a group called “other.”
Note that the dashes in the permissions array are not separators. Each position in the array is a fixed place that can either contain a permission for the file or directory or represent the absence of the permission, using the dash (hyphen) character. In the previous listing this means that the owner, group, and world permissions for each of the directories and files listed is Read and Execute (r-x).
Granting permissions to “other” gives the permission to all users on the system. It is important to remember that, in Unix, if you grant access using the world permissions fields, denying access by owner or group fields will not work. Thus, use the world access permissions on files to set values that you would like to apply to all users. For example, if all users will be allowed to read the file, set the Read permission in the world permissions. Use the owner and group fields to grant more restricted access to smaller groups of users.
SUID and SGID File Permissions
In addition to the ordinary permissions that exist to control which users can access a file or directory, two other permissions are used on Unix and Linux systems to give special privileges to executable files. These are called the Set User ID (SUID) and Set Group ID (SGID) permissions. When an executable image is run that has the SUID permission set on it, the image will take on the permissions that are equivalent to those of the owner of the executable file.
The permissions available to a user can also be acquired from group membership. When an executable image is run, it usually runs under the permissions of the user who executes the file and the permissions available to the group to which the user belongs. When the SGID permission is set on an executable, it will inherit permissions from the group of the owner of the file and not the permissions of the user who executes the file.
These two permissions can be very useful. There are times when it is necessary to run a program that must have more access rights than the user who is executing the program. For example, when a user needs to change his password, he needs to be able to make edits to the password file. Because this file is normally protected against writing by most ordinary users, the program that changes your password can get the necessary permission to modify the file. This is a simple example of a process that occurs at many levels in an operating system. Other programs use permissions elevated above the ordinary user to accomplish such tasks as managing print queues and allowing basic system management tasks.
When used on a directory instead of a file, the SUID permission, placed in the group field, indicates that all files created in the directory will take on the ownership of the group that owns the directory.
You can tell from a directory listing (using the ls command) whether the SUID or SGID permission has been set for a file. In the permissions array, the letter S will appear in the position normally used to indicate the owner’s execute access. If the S character is lowercase, the Execute permission for the owner is not set. If it is an uppercase S, the Execute permission is also set for the owner.
In a directory file the s character will appear in the character position that normally indicates a group’s execute access.
Using the chmod and chown Commands
When moving files around on the network, it frequently is necessary to change their ownership or the access permissions so that a new set of users can gain the appropriate access. For example, when a user leaves a company, it is usually customary for someone else to take over managing files and important directories for which the user had been responsible. The two commands you can use to modify ownership and access for files are the chmod (change permission mode) and chown (change owner) commands.
The chown command is a simple one. If you are the owner of a file or if you are the superuser, you can use this command to assign a new owner and/or group to a file. The basic syntax is
chown [ -fhR ] owner [ : group ] file ...
Here, owner is the new user or group ID that will be assigned to the file or files represented by file.... The -f parameter suppresses error reporting. The -h parameter is used to cause an ownership change to be effective on a symbolic link to a file instead of the actual file the link references. Without this parameter, the ownership is changed on the actual file that is referenced by the symbolic link. The -R parameter causes the command to operate recursively, changing the owner ID for files and subdirectories under the current specification.
You can use chown to easily change the ownership of one or more directories when a new user takes responsibility for them. The chmod command can be used by users and administrators to change the access permissions on files or directories.
The chmod command can be used to change access permissions for the owner, group, or others by specifying the rights by either a numeric or a character format. The numeric format for the chmod command specifies rights as a numeric value, totaling each right as described in the following list:
![]() 0—No access
0—No access
![]() 1—Execute file (or search a directory)
1—Execute file (or search a directory)
![]() 2—Write
2—Write
![]() 4—Read
4—Read
Using this format, you would change the access permissions on a file in a manner similar to this:
chmod 666 myfile1
chmod 664 myfile2
chmod 640 myfile3
Here the filename myfile1 has its access permissions set to Read + Write (4 + 2 = 6) for the owner, group, and world fields. The file myfile2 is set to Read + Write for the owner and group fields, but to only Read (4) for the other or world field. Finally, myfile3 is set to give the owner Read and Write permissions. The group permission is set to Read only and the other field is set to No Access (0).
Using the other syntax format for the chmod command enables you to change the permission fields without having to memorize numerical values. Instead, you use the letters r (read), w (write), and x (execute) to specify the permissions, and the letters u (user), g (group), o (other), or a (all, indicates user, group, and other) to specify the user field for which a permission will be modified. For example:
chmod u+rw myfile1
chmod g+rwx myfile1
chmod o+rw myfile1
Here it is easy to see that the user field (user owner, group, or other) is appended to the letter identifying a right (rw, rwx) by the plus sign. This indicates that the right is to be added to the user field indicated for the file myfile1. To remove a right using chmod, use the minus sign:
chmod g-x personalfile
chmod o-w specialfile
Here the command is used to remove the Execute right from the group for the file named personalfile. For the file named specialfile, the owner has used chmod to remove his own right to write to the file. This is not done for security purposes, but because the owner wants to be sure he doesn’t alter the contents of the file by mistake. Because he is the owner, he can always set the mode back to write if it becomes necessary.
Using the su Command
To perform some important system management tasks on a Unix or Linux system, only the privileges granted to the root account can be used. Although it would be easy to let multiple system administrators log in to the root account to perform administrative functions, this is not a very good thing to do from the viewpoint of security. If only one account is used, it is difficult to construct an audit trail to determine which administrator performed a specific function.
To get over this limitation, the su command enables you to log in using your normal user account and then become the root user or another user. The log file /var/adm/sulog tracks attempts to become another user using the su command, and so an audit trail is kept to help when troubleshooting. You can use the su command by itself to become the root superuser, or you can use it in the form of su username to become another user. In all cases you will be prompted for the password for the user account you want to become, unless you are already logged in to the root account.
The power held by the password to a root account can be seen by how it can be used with this command. As a standard security matter, you should regularly review the /var/adm/sulog log file to keep track of how the command is being used.