CHAPTER 41. Print Servers
SOME OF THE MAIN TOPICS IN THIS CHAPTER ARE
Configuring Windows Print Servers 773
Installing and Configuring Printers on Windows Servers 775
Hardware-Based Print Servers—Print Server Appliances 803
In the preceding chapter, several protocols that typically are used for printing on a network were discussed. In this chapter, you’ll examine some of the ways in which printers can be configured, deployed on the network, and made available to users. This function traditionally has been accomplished by using a computer that has a printer directly attached to it. It is now commonplace in large networks to connect printers directly to the network so that any computer can access the printer. You should be sure to determine the mechanisms that your operating system uses to grant/deny access to networked printers.
It is also easy to attach multiple printers to a network directly, yet still manage them from a central print server computer. A print server can take the load off of individual workstations by storing local copies of the files to be printed, as well as giving the network administrator a central point for administrating printing services. By routing the print traffic through a computer that acts as a print server (or hardware print server device), the network administrator is better able to control access to these printers and gather statistics that can be used to improve network performance. In addition, small network devices (usually described as network printer appliances) are small hub-like devices that attach to the network. These devices provide several ports, such as the traditional parallel and serial ports and Ethernet ports (for printers that come network ready), as well as newer ports, such as USB and FireWire, so you can connect multiple printers to the network using a single connection.
This chapter looks at managing print servers using Unix/Linux, Windows NT, 2000, XP, and Server 2003, and NetWare operating systems, and it takes a quick look at network print server appliances.
Unix/Linux Printing
There are two ways of setting up a print server on Unix or Linux computers. This is because there are two major types of Unix, which is where TCP/IP printing was first used. In the following sections you will learn about how to configure printers for Unix/Linux computers, using
![]() The BSD Spooling System: lpr and lpd
The BSD Spooling System: lpr and lpd
![]() The SVR4 Printing System
The SVR4 Printing System
The BSD Spooling System: lpr and lpd
In BSD printing, the user sends files to print by using the line printer remote (lpr) utility; the line printer daemon (lpd) handles the details needed to get the data in the file formatted and sent to the physical output print device.
To set up a printer on a Unix/Linux system that uses lpr/lpd, you need to do several things. How you accomplish them depends on your particular brand of Unix (or Linux) and whether the vendor has supplied script files or applications to help automate the process. These are the basic actions you need to take to configure a print server that will use lpr/lpd:
![]() Physically connect the printer to a port on the server computer or print server or, alternatively, configure a network printer with a TCP/IP address so that you can direct print jobs to it.
Physically connect the printer to a port on the server computer or print server or, alternatively, configure a network printer with a TCP/IP address so that you can direct print jobs to it.
![]() Create a special device file that Unix (and most Linux OSs) use to reference devices if the printer is connected physically to the computer.
Create a special device file that Unix (and most Linux OSs) use to reference devices if the printer is connected physically to the computer.
![]() Create entries in the printer configuration file (
Create entries in the printer configuration file (/etc/printcap) that describe the characteristics of this printer, along with management items such as accounting or log files.
![]() Create the directories that will be used to store files while they are waiting to print (spooling directory).
Create the directories that will be used to store files while they are waiting to print (spooling directory).
![]() Place commands in the appropriate Unix startup file (
Place commands in the appropriate Unix startup file (rc file) to start the lpd daemon when the system boots.
Tip
The steps described to set up lpr/lpd printing are given here so that you can understand how to configure Unix/Linux systems to interact with printers. However, as Unix and Linux are becoming more popular alternatives to Windows and other operating systems, setting up printers has also become a much easier process. For example, Red Hat Linux (as well as other flavors of Linux) can usually detect when a new printer has been connected to the system and load the appropriate drivers and configure the printer automatically—just as most Windows operating systems can. Yet if you are a network administrator, trying to solve a printing problem, you should be familiar with the files, devices, and other configurable aspects of printing under Unix/Linux.
To create the special device file, use the command /dev/makedev port. The port should be the port on the server to which the printer is attached. Typically, the parallel ports are named lptn (that is, lpt1, lpt2...). If the printer is connected to a serial port, the name of the port probably will be in the form of ttynn (that is, tty01, tty02...). Check your system documentation to make sure you have the correct port name. Depending on the system, you might also have to make further adjustments to configure the port, such as setting the speed.
Tip
After you have attached a printer and configured the port, you can use the lptest command to send a simple stream of ASCII characters to the port. This confirms whether you have been successful up to this point. You also can use this command when a printer suddenly stops printing to test simple connectivity. If the printer had been functioning normally but stops unexpectedly, and lptest does not succeed, you might want to check the cabling or fault lights on the printer itself.
To create the spool directory, use the mkdir command. The spooling directory usually is created under the /var/spool/lpd directory. After you create a directory for the printer, use the chmod, chgrp, and chown commands to set the proper ownership and permission mode (for the lpd daemon). For example:
# cd /var/spool/lpd
# mkdir laser1
# chmod 775 laser1
# chgrp daemon laser1
# chown daemon laser1
The lpr command is used for printing files in the BSD system. The syntax for this command is
lpr [-parameters][filename...]
Everything but the command itself is optional. You can specify one or more files, but if you do not specify a filename, the text to be printed comes from standard input. Depending on how your particular Unix vendor has implemented the command, you have a lot of options to choose from, including these:
![]()
#—Specifies the number of copies to print.
![]()
c—The date file(s) to be printed were created by the cifplot filter.
![]()
C—Text following the C (“Job Classification”) character is printed on the burst page for the print job.
![]()
d—Indicates that the data file(s) to be printed contain data created by the tex command.
![]()
f—Printing FORTRAN files. The first character in each line is interpreted as a FORTRAN carriage control character.
![]()
g—The data file(s) to be printed contain data created by a program using the standard plot routines.
![]()
h—Suppresses printing the burst page.
![]()
i Indent value—If a job is printed with an indent of 8 spaces by default, you can change it with this parameter. This value is passed to the Unix input filter, which does the actual formatting of the data to be printed.
![]()
J Job—Text following the J character is printed on the burst page for the print job. If this parameter is not used, the name of the first file on the print command line is used on the burst page.
![]()
l—Control characters are printed and page breaks suppressed.
![]()
m—Send a mail message after the job is printed.
![]()
n—The data file(s) to be printed contain data created by the ditroff command.
![]()
p—Uses the pr command as the filter to process the print job.
![]()
P—Name of the destination printer.
![]()
r—Removes the file when spooling (or printing using the -s parameter).
![]()
s—Indicates that the file should not be spooled. Instead, a symbolic link is used. This is a good option to use when printing large files, or a large number of files, to minimize consumption of disk space.
![]()
T Title—Used with the -p option, which causes the pr command to be used to format the file to be printed. Text specified with this parameter is passed to pr. If blank spaces or special characters are used, the text should be enclosed by single quotes (' ').
![]()
t—Indicates that the data file(s) to be printed contain binary data created by the troff command.
![]()
v—The data file(s) to be printed are in raster image format.
![]()
w—Number of columns. This parameter specifies the number of characters on the page (width).
Tip
A burst page or banner page, sometimes called a separator page, refers to a page that is printed at the beginning or end of a print job and is used to separate one user’s print job from the next. In a high-volume printing environment, these pages make it easier to identify print jobs so that they can be distributed to the appropriate user.
This extensive list of parameters is shown here to make the point that the lpr/lpd printing system is highly configurable from the network administrator’s point of view. It might look more complex at first glance than it actually is. For example, the command
lpr –Phplj1 letter01.txt report.txt
is all you need to use to send the files letter01.txt and report.txt to a printer named hplj1. In most circumstances, the user will not use a large subset of these parameters, but only a smaller combination that fits his work environment. Many of these parameters have default values. For example, if the printer is not specified by using the -P parameter, the Unix environment variable PRINTER will be evaluated and used for the destination of the print job.
After the lpr command has determined the printer to which the data will be sent, it scans the /etc/printcap file to get information about the printer, such as the spooling directory path. It then creates several temporary files and notifies the lpd daemon that the file is ready to print.
The lpd Daemon Controls the Printing Process
The lpr command creates a data file in the spooling directory associated with the printer and a control file that contains information telling the lpd daemon how the file should be printed. This daemon process usually starts up when the system boots by commands found in one of the rc files. However, when troubleshooting printing problems, it’s often necessary to kill the lpd daemon process and restart it. The syntax for restarting the daemon is
lpd [-l] [-Llogfile] [port#]
The -l parameter tells the daemon to record valid network requests in a log file. The uppercase parameter -L is used to specify the name of the logfile. The port# parameter is used to specify the Internet port number the daemon will use for process-to-process communications.
When the daemon first starts, it reads the /etc/printcap file to obtain information about the printers it can use. If any print jobs are outstanding from the time it was last running, the daemon begins to print them after it reads the printcap file.
When it needs to actually print a file, the lpd daemon first checks to see whether another lpd daemon process is currently processing print jobs for that particular printer. If so, it passes the print job to that daemon. If not, the lpd daemon spawns a copy of itself for the printer destination, and that process continues to process jobs for the printer. The original lpd daemon that starts at boot time continues to listen for print requests and spawn new copies of itself when needed. A spawned copy of the daemon continues to run until there are no more files to print on the printer it was invoked to handle.
The lpd daemon and its spawned copies control the printing process but do not perform the mechanics needed to get the data to the printer. Instead, the lpd daemon runs a filter program that sends the data to the printer, and optionally does some formatting that is needed to make the data compatible with the specific printer.
Caution
In a multiuser environment a locking mechanism can be used to prevent multiple processes from trying to access the same resource at the same time. When a new lpd daemon is spawned to perform print-processing functions, it creates a lock file (by using the Unix system call flock) in the spooling directory. This lock file remains in the directory while this particular lpd daemon processes files to prevent other lpd daemons from being spawned for the particular directory. The lock file is a simple ASCII file that contains the process ID (PID) of the current lpd daemon and the name of the control file for the current print job.
When troubleshooting lpd daemons, you can examine the lock file to determine whether the daemon listed there is still running. In some versions of Unix, the second line of the lock file also shows the status of the current job as the daemon believes it to be. In some other versions, a file named status is used for this purpose.
The /etc/printcap Configuration File
When you set up printing on a Unix computer that uses lpr/lpd, you must create the /etc/printcap file. Keep a written log listing changes as you make them to this file so that if something suddenly goes wrong with a printer that has been working just fine, you can check the log to determine whether anyone has recently made a change to the entry in the printcap file for the troublesome printer. This file is not a user-friendly file. In many cases, the syntax for each entry is just a few lines, but for complicated setups, editing this file can become confusing if you make changes infrequently.
Tip
Because the printcap file is itself a simple ASCII text file, you can make recovering from configuration issues easier by simply printing the file itself each time you make a change (or copying to a different filename, such as printcap.sav). In this manner, you can keep track of modifications to the file and have a back-out plan. And, if you ever have a problem, you can look at the changes that have been made and then make the appropriate corrections to the printcap file.
Entries in this file specify the name used for a printer along with two-character symbol/value pairs (symbol=value) that define the characteristics for the printer. The printer can have multiple names (aliases), which are separated by a vertical-bar character. For example, an entry for a printer named laser could be as simple as this:
laser|laser1|lp|lp0|HP Laser Jet Accounting:
:sd=/var/spool/lpd/laser:
:lp=/dev/tty01:
The first line contains the name of the printer (laser), followed by several alias names that users can use to access the printer. The last alias on the first line shows a common technique used by many administrators: Describe the printer and/or its location. You also can put comments into the /etc/printcap file by using the pound-sign character (#) as the first character in the line. In this example, you also can see that the colon character (:) is used to separate the symbol/value pairs from each other. Although only one colon character is needed between each pair, it’s customary to put one at the beginning of a line and one at the end of the line when the entry spans multiple lines. The following two entries are equivalent:
:sd=/var/spool/lpd/laser1:br#9600:
:sd=/var/spool/lpd/laser1:
:br#9600:
Note that the backslash character () is used to indicate continuation of the entry across multiple lines. Also, some entries in the file do not have a value. For example, some are Boolean entries that have no associated value and are activated by their presence in the file.
In these examples, the sd symbol is followed by a directory path. This specifies the spooling directory that lpd will use to store files that are waiting to be printed. Multiple users can send files to the printer using the lpr command. Copies of the files to be printed are created by the lpd daemon in the spooling directory and remain there until they are printed. After a file has been printed, the lpd daemon deletes the control and data files used for it.
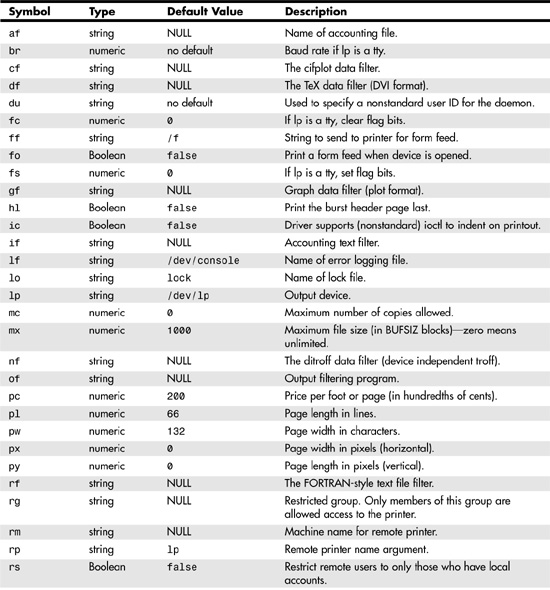
The lp symbol is used to indicate the special device file for the printer. In Unix, device files are used as a link to a physical device. The makdev command is used to create the device file just as for any other device attached to the computer. However, in the case of a remote printer, use the hostname/queue name on the remote system for this value instead of a device filename. Entries can be much more complex than in this simple example. Table 41.1 lists the symbols you can use to customize a printer.
Table 41.1. Symbols Used in the /etc/printcap File
Following is an example of a more complicated entry:
lp|lp0|Color Laser:
:af=/usr/adm/printer/clp.acct:
:br#9600:
:lf=/usr/adm/lpterror:
:lp=/dev/tty05:
:mx#0:
:sd=/var/spool/lpd:
This example defines the spooling directory for a printer, as well as the logfile and accounting file. The mx#0 entry means there is no maximum size limit for files that can print on this printer.
When specifying a printer device, you also can tell the lpd daemon to use a print queue that resides on another system. For example:
xprint|laser2|Manufacturing printer:
:lp=:
:rm=mfgunix:
:rp=lp:
:sd=/var/spool/lpd/xprint:
:mx#0:
In this example, the lp symbol is set to null. This indicates that the print device is not on this system. You still have to include the lp symbol so that the default value for it will not be substituted by the lpd daemon. The rm symbol is used to indicate the hostname of the remote computer, and the rp symbol is used to define the name of the printer on that system. Also, even though the actual printing is done on the remote computer, you must specify a spooling directory because files submitted to the queue still need to be temporarily stored before they are copied to the remote system.
Useful Commands: lpq, lprm, and lpc
From the user’s perspective, printing is a simple task. Just use the lpr command and wait for the paper to come out of the printer. As the administrator, you need commands that can help you manage print queues and track usage.
The lpq command shows information about jobs waiting in the print queue. The information this command shows you includes the following:
![]() The order of print jobs in the queue
The order of print jobs in the queue
![]() The name of the user who submitted the job to print
The name of the user who submitted the job to print
![]() The job identification number
The job identification number
![]() The names of files waiting to print
The names of files waiting to print
![]() The size of the print job (in bytes)
The size of the print job (in bytes)
Rank Owner Job Files Total Size
active ogletree 133 prm0d1x 31540 bytes
1st heywood 141 letter1 3423 bytes
2nd chasog 216 jandata 98465 bytes
3rd peter 323 twoinchtml 2342 bytes
4th menton 122 queulst 55432 bytes
You can use the -P parameter to specify the printer just like you can with the lpr command. Similarly, the Unix environment variable PRINTER determines the printer to display if you do not specify one. The syntax for the lpq command is as follows:
lpq [-Pprinter][-l][+[interval]][job#...][username...]
The -l parameter causes a “long” listing (more output, additional information) to be displayed. The plus sign (+) can be used by itself or with a numeric value, and it causes the command to continuously display the status until the print queue empties. If you follow the plus sign with a numeric value, it is used as the number of seconds between each refresh interval.
Use the job ID numbers or the user’s username when troubleshooting specific print jobs so that you won’t have to look through a long listing of all print jobs. The job ID number also can be used by other print-queue management commands, so it is common to use lpq to get a job’s ID number before executing other commands.
To remove a print job from the queue, you can use the lprm command. Its syntax is similar to the lpq command:
lprm [-Pprinter][-][job#...][username...]
Although any user can remove her own files that are pending in a print queue, only the superuser (root account) can remove other users’ files. You can specify the job ID number associated with a specific file, or you can specify a username to remove all print jobs currently pending in the queue for that user.
Note
To remove jobs from a print queue, the lprm command actually kills the current lpd daemon that is processing files for that queue. It then deletes the specific files from the print queue and restarts a new daemon process to continue processing the remaining files.
Examining a print queue and removing pending jobs can be useful for troubleshooting simple problems. For more control over the BSD printing system, you can use the lpc (line printer control) command. The syntax for this command is more complicated than that of the lpq and lprm commands because of the more complex functions it can perform. The syntax for lpc is as follows:
lpc [command [parameters...]]
These are the commands you can use with lpc:
![]()
abort [all | printer...]—Kills the active lpd daemon and then disables printing for the specified printers. Stops the print job that is currently printing. After this, lpr will not be able to create a new lpd daemon for the specified printers. Use this option when you need to quickly disable a printer.
![]()
clean [all | printer...]—Removes temporary files (including control and data files) from the specified printer’s spooling directory when the files do not form a complete print job. Useful for “cleaning up” a spool directory when something has gone wrong.
![]()
disable [all | printer...]—Prevents lpr from submitting new print jobs to this print queue. This command turns off printing for the specified queue.
![]()
down [all | printer...] message...—Turns off the print queue and disables printing. Message... text is entered into the status file for the printer so that lpq can report it.
![]()
enable [all | printer...]—Enables spooling on the printer(s) so that users can begin to use the lpr command to submit print jobs.
![]()
restart [all | printer...]—Starts a new daemon for the queue. When a printer daemon dies unexpectedly, you can use this command. The jobs currently existing in the queue are printed by the new daemon. You should perform this command when the lpq command gives you the no daemon present message.
![]()
start [all | printer...]—Enables printing and starts a spooling daemon for the printers specified. Changes the owner’s execute permission on the lock file to accomplish their tasks.
![]()
status [all | printer...]—Gets the status of printer daemons and queues. Shows whether the queue is enabled or disabled, or whether printing is enabled or disabled. Also shows the number of entries in the queue and the status of the printer’s lpd daemon.
![]()
stop [all | printer...]—Stops a spooling daemon and disables printing. The daemon stops after it finishes the current print job. Use the abort command if you want to stop the daemon and kill the current job that is printing.
![]()
topq printer [job#.. .][username...]—Moves print jobs to the top of the queue. Use this to bypass the normal first-in, first-out (FIFO) order of printing. Specify one or more job numbers as an argument to this command. Specify a username as the argument to move all jobs pending for that user to the top of the queue.
![]()
up [all | printer...]—Enables all printing and starts a new printer daemon. Opposite of the down command.
![]()
exit or quit—Causes the lpc program to exit (when in interactive mode).
![]()
? [command] or help [command]—Displays a short help text for each command. If no command is specified after the help command, a list of all commands that the lpc program recognizes is displayed.
Although the lpc program usually is used by an administrator (the root user account, sometimes referred to as the superuser account), ordinary users can use the restart and status commands.
The following is an example of using the lpc command to get the status of a printer named laser1. In this example, the queue is enabled and printing. Only one job is in the queue. When you use the command without command-line parameters, it prompts you in interactive mode:
% /usr/sbin/lpc
lpc> status laser2
laser1:
printer is on device '/dev/tty03' speed 9600
queuing is enabled
printing is enabled
1 entry in spool area
lpc>quit
In this next example, the lpd daemon for this queue has exited unexpectedly. Using the lpc command, you can detect this condition and fix the problem:
% /usr/sbin/lpc
lpc> status laser2
laser2:
printer is on device '/dev/tty03' speed 9600
queuing is enabled
printing is enabled
7 entries in spool area
no daemon present
lpc> restart laser2
lpc>quit
Examining Printing Statistics
Part of managing a network is gathering statistics. This is done for several reasons. First, historical data is nice to have when you are trying to determine the circumstances leading up to a problem. Second, statistical data can help you plan for enough capacity when you are deciding on expansion or reorganization. Another use for the information is user or department accountability. In environments where costs are charged back to a department, you can use the pac command to gather the data you need.
The syntax for this command is
pac [-Pprinter][-cmrs][-pprice][username]
As is the custom with other printing commands, the -P parameter allows you to specify a printer. If you do not, the value of PRINTER is used; otherwise, the system default printer is assumed. These are the other parameters you can use:
![]()
c—Sorts the report by cost instead of machine/username.
![]()
m—Groups charges by username with no regard to the hostname of the computer from which the job(s) were submitted.
![]()
r—Reverses the sort order for the report.
![]()
s—Summarizes the accounting data and writes it to a summary file. The summary file is usually in the form of printer.acct_sum.
![]()
pprice—Allows you to specify the cost per unit (foot or page) for print jobs. The default is two cents per unit.
![]()
username—If you supply usernames at the end of the command, only statistics for print jobs for those users are included in the report.
Tip
You can include the pac command in script files to create automated procedures to produce accounting reports. For example, you could use a script file to produce reports by user or department, and then email a copy of the report to a responsible person.
The following output shows the type of information you can get by using the pac command. The costs for each print job are just simple calculations based on the unit and the cost you supply to the command, as the following illustrates:
Login pages/feet runs price
atlunix1:harris 14.00 1 $ 0.28
atlunix1:brown 3.00 2 $ 0.06
pluto:ogletree 21.00 3 $ 0.42
The SVR4 Printing System
Another major type of Unix variant is the System V, Version 4 (SVR4) system. The SVR4 printing system uses the lp command and lpsched command to print and manage printer queues. Although an /etc/printcap file also is used, it doesn’t have to be edited manually. The lpadmin utility will do this for you.
Using lp, cancel, and lpstat
The lp command is used just like the lpr command. However, the lp command does more than just send files to a printer; it also can be used to modify print jobs. The cancel command is used to remove a job from the print queue. The syntax for the lp command comes in two different forms:
lp [-c][-m][-p][-s][-w][-d dest]
[-f form-name [-d any]][-H special-handling]
[-n number][-o option][-P page-list]
[-q priority-level][-S character-set][-d any]]
[-S print-wheel[-d any]][-t title]
[-T content-type][-r]][-y mode-list]
[filename...]
lp –i request-id ... [-c][-m][-p][-s][-w]
[-d dest][-f form-name[-d any]]
[-H special-handling][-n number][-o option]
[-P page-list][-q priority-level]
[-S character-set[-d any]]]
[-t title][-T content-type[-r]]
[-y mode-list]
The first version of this command is used to send files to print. The second version is used to modify a print request that is already pending. If you use the second version to modify a job that is already printing, it stops the job and restarts it with the changes you have made.
These are the parameters you can use with the lp command:
![]()
c—A copy of the file to be made before it is printed. The default action is to create a link to the file. If you use the -c parameter, you should not remove (delete) the file before it is printed. Any changes you make to the file after submitting the print request will not be reflected in the output if you use this parameter to create a copy of the file.
![]()
d dest—Specifies the destination printer or class for the print job.
![]()
f form-name—Specifies a form to be mounted on the printer to process the print request. If the printer does not support the form, the request is rejected. Note that if you use the -d any parameter with this one, the print request can be sent to any printer that supports the form.
![]()
H special-handling—Puts the print request on hold or resumes requests that are holding. If you are an LP administrator, this command causes the request to be the next one to print. The terms you use for special-handling are hold, resume, and immediate, respectively.
![]()
m—Send mail after the print job has finished.
![]()
n number—The number of copies to print.
![]()
o option—Specifies printer-dependent options. You can specify more than one option by using the -o parameter more than once. You also can include multiple options by enclosing them in quotes—for example, -o “option1 option2 ...”.
Terms you can use for the option are listed here:
![]()
nobanner—Do not print banner page.
![]()
nofilebreak—Do not insert a form-feed character between files when multiple files are printed.
![]()
length=scaled-decimal-number—Specifies the page length. You can specify lines, inches, or centimeters. Length=66 specifies 66 lines per page, and length=11I specifies 11 inches per page, for example.
![]()
width=scaled-decimal-number—Similar to the length option. Use this format to specify page width in columns, inches, or centimeters.
![]()
lpi=scaled-decimal-number—Like length and width. Use this to specify line pitch (lines per inch).
![]()
cpi=scaled-decimal-number—Like length and width. Use this to specify characters per inch. You also can use the terms pica (10 characters per inch), elite (12 characters per inch), or compressed (to allow the printer to fit as many characters on a line as it can).
![]()
stty='stty-option-list'—Specifies options for the stty command. Enclose the list with single quotes if it contains blank characters.
![]()
P page-list—If the filter can handle it, this causes only the pages specified by page-list to be printed. You can specify single pages or a range of pages.
![]()
p—Enable notification on completion of the print request.
![]()
q priority-level—Priority levels range from 0 (highest) to 39 (lowest). This parameter changes the print priority of a print request. Giving a request a lower priority causes it to print before requests with a higher priority.
![]()
s—Suppress messages from lp.
![]()
S character-set or S print-wheel—Used to select a character set or print wheel to be used on the printer for the request. If the character set or print wheel is not available, the request is rejected.
![]()
t title—Prints title on the banner page. Use quotes around the text if it contains blank spaces.
![]()
T content-type—Causes the request to be printed on a printer that supports content-type if available, or to use a filter to convert the content to the appropriate type. If you specify -r with this option, a filter will not be used. The request is rejected if no printer for this type is available and/or a filter cannot be used.
![]()
w—Sends a message to the user’s terminal after the print request completes. If the user is not currently logged in, a mail message is sent.
![]()
y mode-list—Use mode-list options to print. The allowed values for mode-list are locally defined and the job is rejected if there is no filter to handle the request.
If you need to simply stop a job from printing, you can use the cancel command. These are the syntax alternatives for the cancel command:
cancel [request-id...][printer...]
cancel –u login-ID-list [printer...]
The first syntax example can be used to remove a specific print job by specifying its ID number. The second example shows how to remove all print jobs for a particular user (or users). If you list multiple users on the command line, enclose the list in quotes and use a space between each ID name. Ordinary users can cancel only their own print requests. Administrators can cancel any print job.
To get the request-id of a print job, you need to use the lpstat command. This command can be used by ordinary users with no parameters and will return information about only their print jobs. However, the administrator can use this command to see data about the entire printing system. The syntax for lpstat is as follows:
lpstat [-d] [-r] [-R] [-s] [-t] [-a [list]]
[-c [list]] [-o [list]]
[-p [list]] [-P] [-s [list] [-l]]
[-u [login-ID-list]] [-v [list]]
In this example, list can be a comma-delimited list or a series of items separated by spaces and enclosed in quotes. You can omit a list or use the keyword all in most instances to get the status of all the requested objects. These are the parameters for this command:
![]()
a [list]—Shows whether print destinations (printers or printer classes) are accepting print requests.
![]()
c [list]—Displays the names of all classes and members of the class. You can identify specific classes using list.
![]()
d—Displays the system’s default print destination.
![]()
o [list]—Displays the status of output requests. The list value can specify either printers, class names, or request-ids.
![]()
p [list]—Displays the status of printers. Use list to specify printer names.
![]()
r—Displays the status of the print scheduler daemon (lpsched).
![]()
s—Displays summary information about the printing system.
![]()
t—Displays all the available status information about the printing system.
![]()
u [login-ID-list]—Displays the status of print requests for the users listed in login-ID-list.
![]()
v [list]—Displays pathnames of the output device files for printers indicated by list. For remote printers, this displays the name of the remote system.
Administering the System: lpadmin, lpsched, and lpshut
The lpadmin command performs a wide range of functions necessary to set up a printer on a Unix system. The command adds, removes, or modifies printers, and creates the necessary text files in the spooling directory for you so that you don’t have to edit them manually. This command also can be used to set up “alerts” when the printer experiences a fault condition. The syntax for this administrative command is
lpadmin -p printer-options
lpadmin -x dest
lpadmin -d [dest]
lpadmin -S print-wheel -A alert-type [-W minutes]
[-Q requests]
lpadmin -M -f form-name [-a [-o filebreak]
[-t tray-number]
The first line of this syntax example shows how to add a new printer. Use the -p option on the command line to specify the printer’s name and then list the printer’s characteristics. For example:
lpadmin –phplj5 –v/dev/tty03 –mdumb -cpr
This command performs the functions needed to create a printer named hplj5. Following the printer name, the options here indicate that the actual printer device is connected to a serial port that can be accessed through the Unix device file /dev/tty03. This printer uses a dumb interface (-m option) and is a member of a class of printers named pr (the -c option). As explained later, the –m option is used to specify an interface program used to interact with a particular printer model. In the preceding example, dumb refers to a generic line printer. The file /usr/spool/lp/model contains other model interface programs, and you can view this file to see which printer models are supported on your system.
Tip
After you set up a printer using lpadmin, it does not automatically allow users to print. Use the accept printer command to enable printing.
The man pages for your system give you a full list of the options you can use on the command line, and they vary depending on the flavor of Unix you have. However, the following list shows some of the more useful ones you’ll find on most systems:
![]()
A alert-type [-W minutes]—Sets up an alert action that is invoked when a printer fault occurs. The alert-type can be mail (sends an email) or write (puts a message on an administrator’s terminal). You also can use quiet to suppress alerts, showfault to execute a fault-handling procedure, or none to remove alerts. You also can specify a shell command to be executed.
![]()
c class—Specifies a class to which the printer will belong. If class does not exist, it will be created. The -r parameter can be used to remove a printer from a specific class.
![]()
D comment—Sets the text (comment) that is displayed when the user requests a full description of the printer.
![]()
e printername—Copies the interface program used by an existing printer (printername) for use with the printer you are creating. You quickly can clone entries when adding a printer of a type you already have, or when you are setting up a network that has many printers of the same type at the same time.
![]()
i interface—Specifies the interface program for the printer. See -e earlier in this list to copy an interface from an existing printer.
![]()
m model—Selects the model interface program that comes with the lp print service. You cannot use -e or -i with this option.
![]()
s system-name [!printer-name]—Creates a remote printer. A remote printer is a printer on another system that you want your users to be able to use as if it were local. The system-name is the name of the computer on which the printer resides, and !printer-name is the name the printer uses on the remote system. You can use a different printer name on your system than the name on the remote system.
Tip
Unix and Linux commands can be complex and difficult to remember. Both of these operating systems use “man” pages (which stands for manual) that are basically help files. You can consult them when you need help for a particular topic. For example, the command man lpadmin can be used to get the help text for the lpadmin command on the system so that you can see a full list of the options supported.
To remove a printer from the LP printing system, use the -x command-line parameter:
lpadmin –xhplj5
This command removes the hplj5 printer from the system. If this is the last printer in its class of printers, the printer class also is deleted.
In the /etc/init.d/lp file, you will find commands that can be used to start the print scheduler daemon at boot time. The syntax, in case you want to change the boot-time command, is
lpsched [-nofork][-debug][-nobsd]
You also can use this command to restart the daemon if you find it necessary to kill it when you are troubleshooting printer problems. The lpsched daemon works sort of like the lpr daemon—it creates a new copy of itself to handle print jobs. The original daemon remains free to respond to additional user requests.
Note
The -nofork parameter can be used to suppress the creation of a separate daemon process. This is recommended to be used during debugging. You also can use the -debug parameter to put the daemon into “verbose” mode. In this mode, more messages are displayed that can be useful when trying to solve printer problems.
The -nobsd parameter can be used to tell lpsched to ignore the BSD spooler’s well-known port. If you also are running an lpd daemon on the system and it is using the default port, use this option to change the port used by lpsched.
Tip
“Well-known ports” are IP port numbers from 0 to 1024. These are generally assigned to system processes that operate using privileges that the ordinary user does not have. A port is used by TCP and UDP to specify an endpoint that an application can use, along with an IP address. This combination of IP address and port number can uniquely identify both endpoints for exchanging data using the TCP/IP protocol suite. In essence, the IP address gets the network packets to the correct computer (or other hardware device), and the port number specifies a process (such as a background daemon process) that is listening for incoming requests that use the port number assigned to the process or daemon.
For example, the basic FTP protocol uses ports 20 and 21, and the basic Telnet daemon uses ports 23 and 24. Ports above 1024 have been assigned to various applications, many of which are now extinct. However, it is important that you understand that port numbers 1024 and below should be used only by applications or utilities that can perform actions an ordinary user cannot.
You can use several commands to shut down a printer, depending on just what you need to do:
![]()
lpshut—This command stops all printers. Jobs that are currently printing are stopped, but they are reprinted in their entirety when the printers are again started, as are other print jobs waiting in the spooler directory. The user can continue to submit to a printer that has been stopped using this command. Use lpsched when you want to start printers again.
![]()
reject [-r reason ] printer—This command stops a printer from printing, but users cannot continue to submit jobs to the printer for later printing. If you want the users to know what is happening with the printer, use the -r command and specify the text you want them to see. If the text contains blank characters (it’s more than one word), enclose the text in quotes. To restart the printer, use the accept printer command.
![]()
disable[-c | -W ] [ -r [ reason ] ] printer—This command can be used to disable a printer temporarily while still allowing users to submit jobs to the spooling directory that will print when the queue is restored to service. The -c and -W options are exclusive. Use -c to cancel the job that is currently printing and -W to have the printer stop after the current job finishes. Both of these parameters are ignored if the printer is on a remote system. Again, use -r to specify text to be displayed to users (when they use the lpstat -p command to check the printer’s status). Use the enable printer command to restart the printer.
If a printer will be out of service for a while, and you don’t want users to keep submitting jobs, use the reject command. If a printer is going to be taken out of service completely, use the lpadmin command to remove it.
If some major problem is plaguing your entire printing system, use the lpshut command to bring everything to a halt while you investigate the problem.
One last command that might be handy when performing troubleshooting or maintenance duties is the lpmove command. This command can move pending print requests from one printer to another. For example:
lpmove hplj5 –221 hplj5land –232 laser3
In this example, the print job identified by the request-id number 221 will be moved from the hplj5 printer to laser3. The print job identified by the request-id 232 waiting for hplj5land also will be moved to laser3.
Note
Common Unix Printing System (CUPS) is an open source Unix/Linux based printing solution. CUPS is a freely distributable collection of tools and drivers that allows host systems to control printer devices, manage print queues, and process print requests. CUPS provides a portable printing layer for UNIX-based operating systems. It has been developed by Easy Software Products to promote a standard printing solution for all UNIX vendors and users. CUPS provides the System V and Berkeley command-line interfaces.
For more information about CUPS, visit http://www.cups.org/
Configuring Windows Print Servers
Windows server and workstation/pro operating systems from Windows NT 4.0 through XP and Windows Server 2003 give you a flexible printing system that can be used to direct user print jobs to a printer that is directly connected to the server, to print queues on other hosts (such as Unix or Linux systems), or to printers that are directly attached to the network. Setup is performed using a wizard that creates a printer in just a few minutes.
Printers and Printing Devices
The terminology used by Windows Servers to refer to the actual physical printer is printing device. That HP LaserJet sitting down the hall is a printing device. The term printer is used to refer to a logical construct, or an interface to the print device. It might not be apparent why a distinction should be made between the printer and a printing device, but there are a number of good reasons. The main conceptual difference between the two is that they do not necessarily imply a one-to-one relationship. In Figure 41.1, you can see that several logical printers can be set up to send print jobs to the same printing device.
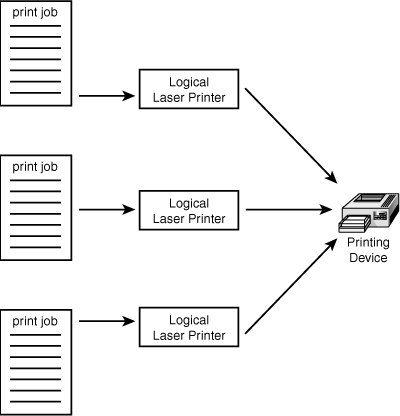
Figure 41.1. In Windows Servers, more than one logical printer can send print jobs to a single physical printing device.
Using this kind of setup, you easily can define several different logical printers for a printing device with each printer set up to take advantage of different characteristics of the physical printer. All the logical printers are then pointed to the same physical output device. For example, you might have one logical printer set up to print in a portrait orientation and then another set up to print in a landscape orientation. Users would send print jobs to the printer that matches the characteristics they need, without having to select the necessary configuration options themselves. Other possibilities include configuring multiple printers that select different paper trays or print in draft or letter-quality format. For example, you could create a printer that uses only a tray you keep loaded with letterhead paper.
Another good reason for keeping the printer object and the printing device separate is shown in Figure 41.2. This setup is sort of the opposite of that shown in the preceding figure.
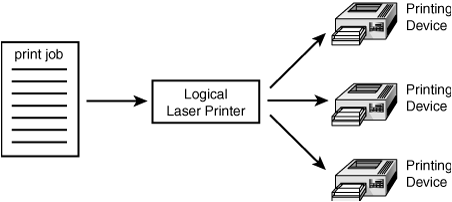
Figure 41.2. A printer pool allows a logical printer to distribute its load over several output devices.
This setup is usually called a printer pool. When high print volume is the norm, setting up a printer pool can provide a much faster throughput for end users, who will spend less time waiting for their printouts than if only a single printing device was used. It also eliminates the necessity of having to create and manage multiple logical printers. Using a printer pool makes it easier for you to add print devices without making users aware of it. One of the best features of using a printer pool is that it can be used to eliminate the physical print device as a single point of failure. If a printer begins to malfunction, it can be taken offline and print jobs can continue to be rendered into final format by other printers that are members of the printer pool.
When using printer pools, you must keep several things in mind:
![]() Each output printing device should be of the same type or be set up to emulate the same kind of device because the printer driver used by the logical printer is specific to a particular kind of printer.
Each output printing device should be of the same type or be set up to emulate the same kind of device because the printer driver used by the logical printer is specific to a particular kind of printer.
![]() When a job is submitted for printing to a printer that uses a printer pool, it’s printed on the first available device. As long as a printer is available, the user’s job doesn’t have to wait for another job to finish before it prints.
When a job is submitted for printing to a printer that uses a printer pool, it’s printed on the first available device. As long as a printer is available, the user’s job doesn’t have to wait for another job to finish before it prints.
![]() Locate all the printers that are part of the same printer pool in a single location. Users won’t be happy if they have to walk all over the office to find out where a print job ended up.
Locate all the printers that are part of the same printer pool in a single location. Users won’t be happy if they have to walk all over the office to find out where a print job ended up.
Installing and Configuring Printers on Windows Servers
All versions of Windows server operating systems support multiple printing protocols. In this section you will learn how to install and configure printers using Windows NT, Windows 2000, and Windows XP. Although Windows XP Professional is a client operating system, it is included here because it can provide print services in a small network (such as the SOHO environment) where a server operating system is not needed. Windows Server 2003 operating systems use similar or the same wizard dialog boxes as used by Windows 2000 computers.
Also, you’ll learn what some of the prompts mean and how you can improve printer performance on the network.
Windows NT 4.0
To begin adding a new printer, select Add Printer from the Printers folder that you find under My Computer. The Add Printer Wizard asks you a few simple questions.
Where Will the Printer Be Managed?
This first question can be confusing if you are not familiar with Windows NT 4.0 printing. These are the available choices:
![]() My Computer
My Computer
![]() Network Printer Server
Network Printer Server
The wizard is not asking you where the printer will be connected. For example, if you select My Computer, this does not mean that the physical printer device will be connected to the LPT1: port on your server (although it might be). Instead, the prompt is asking you where the printer will be managed. If you select My Computer, the necessary drivers for the printer are loaded on the local computer and are responsible for any settings or other management functions for the printer on this computer.
If you select Network Printer Server, the wizard enables you to connect to a printer that is already on the network or is being offered by another server (such as a Unix host). The wizard then prompts you to load a driver for the printer, unless one is already loaded on the server that hosts the printer. When you connect to a printer using this method, you can send print jobs to the printer but you cannot manage its properties.
Port Selection
If you chose My Computer as the place where the printer will be managed, the next wizard prompt asks for the name of the port to which the printer is attached. This can be a local port, such as LPT1:, LPT2:, or even COM1:, and so on. You can select to have the printer set up to send the print job to a file instead, although this is a feature more useful for tasks such as capturing the output from an application that doesn’t provide such a function.
If you want this logical printer to manage documents that are sent to a printer elsewhere on the network, select Add Port, and then supply the necessary configuration information that the wizard needs in order to create a port for the printer. The following kinds of ports are supported under Windows NT Server 4.0:
![]() Digital Equipment Corporation Network Port
Digital Equipment Corporation Network Port
![]() Hewlett-Packard Network Port
Hewlett-Packard Network Port
![]() Lexmark DLC Network Port
Lexmark DLC Network Port
![]() Lexmark TCP/IP Network Port
Lexmark TCP/IP Network Port
![]() LPR Port
LPR Port
Note
Not all the ports listed here will necessarily be displayed. For the Hewlett-Packard Network Port to appear, you must first install the DLC protocol. For the LPR Port option to appear, you must first install the Microsoft TCP/IP Printing service. Both can be installed by using the Network applet in the Control Panel, after which you will have to reboot the server.
Highlight the port you want to create, and then click the New Port button. Depending on the choice you make, a dialog box appears to prompt you for more information for the specific kind of port you want to create.
Fill in the name you want to give the port, and then select the 12-digit LAN (MAC) hardware address that corresponds to the address of the printer. You can get the address for the HP printer by printing a self-test page, or, if you’re really bored, by going through the printer’s I/O configuration menus. If no addresses appear on this dialog box, the printer might be powered off or there might be a network error preventing the server from obtaining it. If you click the Options or Timers button, you can customize this printer port further by specifying such things as the logging level that will be performed (information, warning, error) and values for timers associated with the DLC protocol.
Selecting Printer Drivers
After you complete the dialog box for the port you want to use and return to the main dialog box, click the Next button to bring up a dialog box from which you can specify the manufacturer and type of printer. This information is used to determine which drivers Windows NT needs to load for this printer. You also can click the Have Disk button if your printer is not listed and you have a driver from the manufacturer that you can use.
Because the purpose of a print server is to accept print jobs from clients, be sure to load drivers for each kind of operating-system client on the network that needs access to this printer. When the client prints the first time, it downloads the driver from the server so that the print job can be rendered into the correct format for the particular printer.
Giving the Printer a Name
Next, the wizard prompts you to enter a name to use for the printer. This name won’t be used as the printer share name; instead, it’s a descriptive name for the printer. Use the radio buttons at the bottom of the dialog box to set this printer as the default for this server if applicable. This does not set the printer as the default for users who connect to it over the network; it sets the printer as the default that shows up when you send print jobs from applications while you are logged in to this server locally.
Sharing the Printer on the Network
The last dialog box you see enables the printer to be offered as a printer share for network clients. In this dialog box you must select the Shared radio button, and then give the printer a name that will be displayed to users. Note that the Share Name field defaults to the type of printer and the first eight characters to be available to clients that have restrictions on the length of resource names, such as older MS-DOS clients. You can edit this field and use any name that makes sense to your users. It’s usually best to use a name that indicates both the location of the printer and the kind of printer.
This dialog box also can be used to load additional drivers for clients that connect to the printer over the network. For example, if you have Windows 95 clients on your network, you should select Windows 95 from the dialog box. When this type of client must send a print job to the printer, Windows NT Server downloads the driver to the client so that the print job is formatted correctly for the printer. If the driver you specify is not already loaded on the system (for another printer, for example), you are prompted for the location of the driver. When you have finished specifying a share name for the printer and have selected any additional printer drivers you want to load, click the Next button.
Another dialog box asks whether you want to print a test page. This step is highly recommended because if the test page doesn’t print, nothing else is going to print. If the test page does not print, review the selections you have made to be sure they are accurate. Or you might have a network problem that needs to be looked into. If this is a TCP/IP-networked printer, for example, you might try pinging the printer to determine whether it’s reachable on the network. If you are using another protocol, try printing from a different computer that is configured similarly and determine whether this succeeds. If not, a network problem (such as a router configuration) might need to be resolved.
Print Server Properties, Printer Properties, and Document Properties for Windows NT 4.0 Server
Windows NT 4.0 Server enables you to configure properties for the print server as a whole and configure properties that are specific to each printer you create. You can also configure default properties that are applied to documents printed on the server.
Print Server Properties
To bring up the properties sheet for the print server, choose File, Properties in the Printers folder.
There are three tabs on this properties sheet:
![]() Forms—Use this tab to define forms that are available to users who use printers on this server.
Forms—Use this tab to define forms that are available to users who use printers on this server.
![]() Ports—This tab enables you to add, delete, or reconfigure ports (it’s similar to the dialog box presented when you created a printer).
Ports—This tab enables you to add, delete, or reconfigure ports (it’s similar to the dialog box presented when you created a printer).
![]() Advanced—This tab enables you to set up logging and notifications for the print server, and specify the spooling directory.
Advanced—This tab enables you to set up logging and notifications for the print server, and specify the spooling directory.
Forms are used to define certain properties of the output page that will be printed, including the size of the paper and the margins. Windows NT Server comes with several standard forms already defined, including most standard paper sizes and envelopes. If you have a special form that you have created for your business, such as an invoice format, you can define a new form using the Forms tab.
If you plan to set up several printers but want to get some of the work out of the way beforehand, you can use the Ports tab to create the necessary ports. When you actually get around to creating the printers, you can select the appropriate port rather than create it. This also can be useful in an environment in which one administrator is responsible for network functions and another is responsible for printing. The network administrator who is aware of network addresses used by certain devices can create the ports and send a list to the printer administrator, who can then create and manage the printers that use the ports.
The Advanced tab is an important one to remember for troubleshooting purposes in which the more information you have, the better chance you have of solving your problem. You can enable the following notification and logging categories:
![]() Log Spooler Error Events
Log Spooler Error Events
![]() Log Spooler Warning Events
Log Spooler Warning Events
![]() Log Spooler Information Events
Log Spooler Information Events
![]() Beep on Errors of Remote Documents
Beep on Errors of Remote Documents
![]() Notify When Remote Documents Are Printed
Notify When Remote Documents Are Printed
The Log Spooler Error Events option sets a logging severity level for events that will be placed into the System Event Log. You can use the Event Viewer administrative tool to examine the logged events. If users are complaining that their print jobs are not being printed, enable all three of the Log Spooler check boxes and, after they have attempted to print, review the records found in the Event Log.
Note
Under Windows NT 4.0, the Event Log is made up of three separate log files: System, Security, and Application. The events you can enable on the Print Server Properties page show up in the System Event Log. Matters related to printer security, discussed later in this chapter, show up in the Security Event Log. If applications have been written to use the Windows NT Event Logging service, and if the administrator has enabled the logging of these kinds of events, they might create events in the Application Event Log.
The information recorded in the Event Log helps you determine why the users’ jobs are not printing. The Log Spooler Information Events check box also can be used to keep track of the pages printed by individual users.
It can be tedious to use the graphical interface provided by the Event Viewer to review each record. To overcome this obstacle, you can create a comma-delimited file that contains the information found in the file. However, to do this you need the Dump Event Log (DUMPEL.EXE) utility, which can be found in the Windows NT Server 4.0 Resource Kit.
Another useful thing you can do on this tab of the properties sheet is change the spooling directory used by the server. If performance is a problem with the server, you might want to locate the spooling directory on a disk by itself to speed up access. For a low-volume print server, this probably won’t be necessary.
Printer Properties
You can access the properties page for any printer by using either of the following:
![]() In the Printers folder, highlight the printer you want to work with and choose File, Properties.
In the Printers folder, highlight the printer you want to work with and choose File, Properties.
![]() In the Printers folder, double-click the printer you want to work with. From the dialog box that appears, select Printers, Properties.
In the Printers folder, double-click the printer you want to work with. From the dialog box that appears, select Printers, Properties.
The properties page for a printer is divided into six property sheets that enable you to control a wide variety of properties for each printer on an individual basis:
![]() Ports
Ports
![]() Scheduling
Scheduling
![]() Sharing
Sharing
![]() Security
Security
![]() Device Settings
Device Settings
The General tab enables you to modify informational text about the printer that users can view, such as the location of the printer. You also can use this tab to select an existing separator page or create a new separator page. Separator pages can be used to print a page before each user’s job so that it’s easy for an operator to separate each print job on a high-volume printer used by many users. Separator pages also can be used to send printer-specific codes to a printer that determines how it prints the document. Windows NT Server comes with three separator pages designed for this purpose:
![]() PSCRIPT.SEP—This separator page changes the printer into PostScript mode. No actual separator page is printed.
PSCRIPT.SEP—This separator page changes the printer into PostScript mode. No actual separator page is printed.
![]() SYSPRINT.SEP—This page also switches a printer into PostScript mode but does print a separator page.
SYSPRINT.SEP—This page also switches a printer into PostScript mode but does print a separator page.
![]() PCL.SEP—This page switches the printer into PCL mode (HP’s Printer Control Language) and prints a separator page.
PCL.SEP—This page switches the printer into PCL mode (HP’s Printer Control Language) and prints a separator page.
Note
You might not have to use a separator page to cause a printer to change between PostScript and PCL modes. Many newer printers can autosense the kind of print mode the job requires and make the change automatically. Refer to the documentation for the printer to determine whether you must use a separator page for this purpose.
You can design your own separator pages using escape codes to include information such as the user’s name, print job number, date, and any additional text you want on the page.
You also can print a test page from the General tab when troubleshooting the printer. Another useful feature on this page is the New Driver button, which you can use to load an updated printer driver. This might be necessary when a manufacturer releases a printer driver that is more current than the one found on the Windows NT Server source CDs.
The Ports tab is similar to the ports display that you see when you create a printer or when you view ports using the Print Server properties page. Here, however, you can change the port used by this printer, which comes in handy when a printer is moved to a new location and a new network connection is required. You don’t have to delete and re-create the printer; just go to the Ports tab and select or create the new port after the printer has been moved. Then, go back to the General tab and print a test page to determine whether the port has been successfully created.
The Scheduling tab enables you to set the time of day that a printer is available for use. Generally, a printer is available 24 hours per day, but you can use this tab to change that if you need to. Note that users can still send print jobs to a printer outside its available time range. Their documents are stored and then printed when the printer is available for use. If you allow users to schedule jobs to be printed later, you also must be aware of the disk space that will be used for spooling the documents that must wait. For large files, such as those containing complex graphics, you’ll need a lot of space.
This feature can be used to force certain print jobs, such as lengthy reports, to be delayed until after-hours when ordinary users no longer need the printer. For example, you can set up several logical printers. You can make one logical printer available to your normal workday users and set another to allow printing after hours. Applications that produce voluminous print jobs can send their documents to this latter printer, and users can retrieve their documents the next morning when they come into work.
The Scheduling tab enables you to specify several other configuration options:
![]() Spool Print Documents So the Program Finishes Printing Faster—This allows the application to send a print job quickly because the output is directed to a spooler file rather than directly to the physical printer. Generally, it takes longer to send a job directly to the printer unless it has enough memory to buffer the entire print job.
Spool Print Documents So the Program Finishes Printing Faster—This allows the application to send a print job quickly because the output is directed to a spooler file rather than directly to the physical printer. Generally, it takes longer to send a job directly to the printer unless it has enough memory to buffer the entire print job.
![]() Print Directly to the Printer—This is the opposite of the preceding option. An application can stall until the printer has finished receiving the entire print job from the user.
Print Directly to the Printer—This is the opposite of the preceding option. An application can stall until the printer has finished receiving the entire print job from the user.
![]() Hold Mismatched Documents—This option retains a print job that does not match the current printer settings instead of discarding it. You then can change the printer or disable this option to cause the document to print.
Hold Mismatched Documents—This option retains a print job that does not match the current printer settings instead of discarding it. You then can change the printer or disable this option to cause the document to print.
![]() Print Spooled Documents First—Generally a spooled print job begins to print before the document has been completely spooled to a temporary file. This option specifies that jobs already completely written to the spool file will print before those that are still spooling. This setting can override the priority of a spooling print job and allow a completely spooled lower priority job to print first.
Print Spooled Documents First—Generally a spooled print job begins to print before the document has been completely spooled to a temporary file. This option specifies that jobs already completely written to the spool file will print before those that are still spooling. This setting can override the priority of a spooling print job and allow a completely spooled lower priority job to print first.
![]() Keep Documents After They Have Printed—This setting causes spooled print jobs to remain in the spool directory after they have printed. This can be useful for troubleshooting print problems. You can look at the original print job and possibly send it to another printer to determine whether the original printer is exhibiting unusual behavior when trying to print.
Keep Documents After They Have Printed—This setting causes spooled print jobs to remain in the spool directory after they have printed. This can be useful for troubleshooting print problems. You can look at the original print job and possibly send it to another printer to determine whether the original printer is exhibiting unusual behavior when trying to print.
Normally, your documents must be spooled before they print so that users notice a faster response time. However, when troubleshooting, you might want to send documents directly to the printer, bypassing the spooling operation. Also, if space becomes a problem on the disk that holds the spooling directory, you can cause jobs to be sent directly to the printer to avoid using additional disk space. Because this option is selectable by printer, you can set up some printers to use the spool directory and others to send jobs directly to the printer.
The Sharing tab enables you to modify the selections you chose when you created the printer and to either allow or disallow the printer to be shared with network users. You also can use this tab to load additional client drivers when new clients are brought into the network, or to change the share name the printer uses on the network.
The Security tab enables you to set up permissions that control which users or groups can use this printer, and that control auditing features for the printer. Users can be denied access to the printer, be allowed to print and manage documents, or be given full control to the printer. Full control allows users to perform the following functions:
![]() Print
Print
![]() Change document settings
Change document settings
![]() Pause or restart the printer
Pause or restart the printer
![]() Delete print jobs
Delete print jobs
![]() Change the priority (printing order) of jobs
Change the priority (printing order) of jobs
![]() Change permissions for the printer
Change permissions for the printer
Usually, only print operators or network administrators are given full control over a printer. Most users need only the Print permission. This enables users to send print jobs and control their print jobs, but not those of other users. Auditing can help print operators and network administrators monitor printer usage to determine whether changes in permissions are necessary. The Auditing functions on the Security tab allow you to record events to the Event Log for later review.
![]() See Chapter 43, “Auditing and Other Monitoring Measures,” to learn more about auditing print events and using the Event Viewer to review the data captured.
See Chapter 43, “Auditing and Other Monitoring Measures,” to learn more about auditing print events and using the Event Viewer to review the data captured.
The Device Settings tab enables you to configure device-specific values for the printer. This includes information on tray selection, font cartridges, and so on, depending on the features available for the specific printer type.
Managing Printers
After you create a printer, users can connect to it and use it to print. The administrator, or other users who have the appropriate permissions, can view the status of documents waiting to print and can manage the printer. You can access this dialog box by double-clicking a printer in the Printers folder.
Documents that are currently being printed or waiting to print are displayed, showing the title of the document, the user, the size of the print job, the port the printer uses, and the date and time the job was submitted. You can use the Printer menu and the Document menu to manage the printer or any document. The Printer menu allows you to perform the following actions:
![]() Pause the printer
Pause the printer
![]() Set the printer to be the default on this computer
Set the printer to be the default on this computer
![]() Change the defaults for documents sent to this printer
Change the defaults for documents sent to this printer
![]() Change the sharing aspects of the printer
Change the sharing aspects of the printer
![]() Remove all documents from the printer
Remove all documents from the printer
![]() View or modify properties for the printer
View or modify properties for the printer
This menu is useful when you’re experiencing problems with a particular printer. You can pause the printer, which stops printing but keeps any documents waiting to print, to fix a minor problem and then resume printing after the trouble has been resolved. You also can remove all documents from the printer, which is handy when a user or an application has sent numerous documents to a printer by mistake. You can bring up the Properties page for the printer, discussed earlier in this chapter, and modify items as you see fit.
The Documents menu is used to individually pause, restart, or cancel print jobs. You can selectively highlight individual documents waiting to print and then cancel them.
This view of the printer is most often used by print operators who are responsible for managing printer resources on the network.
Windows 2000 Server
Again, Microsoft provides the Add Printer Wizard to guide you through installing a printer on a Windows 2000 Server. Earlier in this chapter, for Windows NT 4, you learned the basic steps for creating a printer using a TCP/IP port. Now, you’ll see the other possible choices you have for a Windows 2000 Server. To bring up the Add Printer Wizard, click Start, Settings, Printers and then double-click the Add Printer icon.
In the same manner as with the Windows NT 4.0 Wizard, you are prompted to create a printer for a local printer or a networked printer. Remember, this refers to where the printer will be managed. If you want to connect to a network printer so that the server can send documents to that printer, select the Network Printer check box. However, you won’t be able to manage this printer or offer it as a share to other computers. If you want to manage the printer locally (even if it is a printer on the network), select Local Printer and click the Next button.
In the next dialog box, titled Select the Printer Port (shown in Figure 41.3), you choose an existing port by selecting the Use the Following Port option button. The list should include the standard printer ports (that is, LPT1:), as well as any ports you might have created in the past. To connect to a networked printer, however, use the Create a New Port option button. This selection can also be used to create local ports.
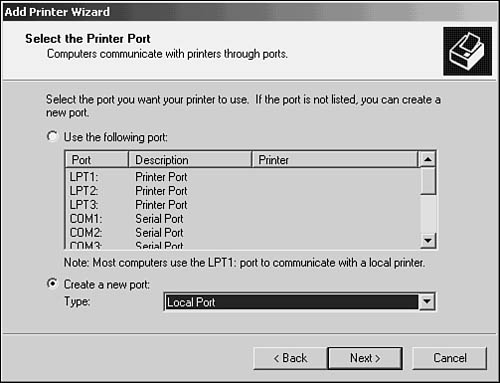
Figure 41.3. You can connect to a printer that is directly attached to the computer or one that resides on the network.
If you select Local Port as the new kind of port to create, you have the following options:
![]() Print to File—You can specify a path and filename to which output is directed when this printer is used by a client. The file is overwritten each time the printer is used.
Print to File—You can specify a path and filename to which output is directed when this printer is used by a client. The file is overwritten each time the printer is used.
![]() Print to File Share—You can enter the UNC (Universal Naming Convention) share name of a printer, for example.
Print to File Share—You can enter the UNC (Universal Naming Convention) share name of a printer, for example.
![]() The NUL Device—You can use this option to dump printer output into another dimension. Generally, you set up a printer for use with the NUL device to assist in troubleshooting printer connectivity problems without wasting paper.
The NUL Device—You can use this option to dump printer output into another dimension. Generally, you set up a printer for use with the NUL device to assist in troubleshooting printer connectivity problems without wasting paper.
![]() Infrared Port—This option is available if your computer supports an infrared port. Printers must meet specifications of the Infrared Data Association (IrDA).
Infrared Port—This option is available if your computer supports an infrared port. Printers must meet specifications of the Infrared Data Association (IrDA).
Note
Some ports won’t appear in your local port selection list, as was pointed out in the Infrared Port option. USB ports also won’t show up unless Windows 2000 has detected a printer attached. If they do show up, you can use the port to create additional printers, and manage them as if they were different physical devices with the output all going to the same physical printer.
In addition to using local ports, you can use the Create a New Port option to create ports for printers that reside on the network. The options that you’ll find depend on the protocols and services you’ve installed on Windows 2000 Server. The following additional ports can be created:
![]() Standard TCP/IP Port—This is probably the option you’ll use most of the time. Most printers today that support networking also support TCP/IP printing.
Standard TCP/IP Port—This is probably the option you’ll use most of the time. Most printers today that support networking also support TCP/IP printing.
![]() AppleTalk Printing Devices—This port type allows you to connect to printers that use the AppleTalk protocol. The AppleTalk protocol has to be installed first.
AppleTalk Printing Devices—This port type allows you to connect to printers that use the AppleTalk protocol. The AppleTalk protocol has to be installed first.
![]() Hewlett-Packard Network Port—Use this port type for older printers that support the Data Link Control (DLC) protocol. For all practical purposes, you shouldn’t have to use this older protocol. If you have a printer this old, it’s probably time to replace it! However, Windows 2000 Server still supports this kind of port, provided you install the DLC protocol.
Hewlett-Packard Network Port—Use this port type for older printers that support the Data Link Control (DLC) protocol. For all practical purposes, you shouldn’t have to use this older protocol. If you have a printer this old, it’s probably time to replace it! However, Windows 2000 Server still supports this kind of port, provided you install the DLC protocol.
![]() LPR Port—LPR (Line Printer Remote) is an older TCP/IP-based printing standard that was discussed in the preceding chapter. You can use this to connect to printers on Unix servers, or other servers that support the lpr/lpd printing system. First you’ll have to install Print Services for Unix.
LPR Port—LPR (Line Printer Remote) is an older TCP/IP-based printing standard that was discussed in the preceding chapter. You can use this to connect to printers on Unix servers, or other servers that support the lpr/lpd printing system. First you’ll have to install Print Services for Unix.
![]() Port for NetWare—You can use this port type to connect to NetWare printing resources. The NWLink protocol and Client Services for NetWare must be installed first.
Port for NetWare—You can use this port type to connect to NetWare printing resources. The NWLink protocol and Client Services for NetWare must be installed first.
In the preceding list, the most likely choice today is to create a standard TCP/IP port, because almost all printers and printing appliances support it. However, if you need to use one of the other port types, be sure to install the prerequisite protocols or services. For example, to install Print Services for Unix, you can add the component easily by clicking Start, Settings, Network, Dial-up Connections. Next, select Add Network Components. In Figure 41.4, you can see the dialog box that allows you to add networking components. Note that the last check box is Other Network File and Print Services.
Figure 41.4. You must first install the necessary protocols and services for some printers.
To choose which protocols to install, select the Other Network File and Print Services check box and click the Details button. In Figure 41.5, you see the additional printing services that can be installed on a Windows 2000 computer.
Figure 41.5. You can select which printing service to install from this dialog box.
You can install print services for Macintosh or Unix printers. After you make your selection, you are prompted for additional information, and the service is installed.
To install additional protocols, such as AppleTalk or DLC, use the following steps:
1. Select Start, Settings, Network, Dial-Up Connections.
2. Right-click your LAN connection and select Properties from the menu that pops up. The properties sheet is shown in Figure 41.6.
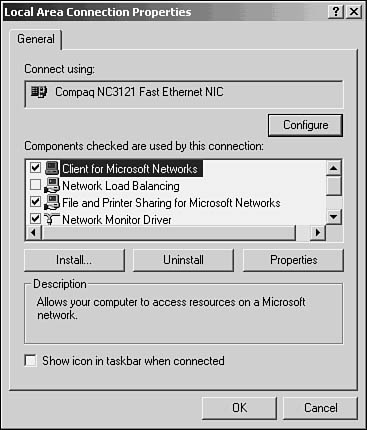
Figure 41.6. You can click the Install button to add additional network protocols to the Windows 2000 server.
3. Click the Install button. A small dialog box pops up and prompts you to install one of the following: a client, a service, or a protocol. Select Protocol and click the Add button.
4. The Select Network Protocol dialog box pops up and allows you to choose the network protocol to be added (see Figure 41.7).

Figure 41.7. You can choose the network protocol to install from this dialog box.
5. Continue to add protocols as needed. When you are done, close the properties page for the local connection, and the protocols should be ready for use.
After you have installed the necessary protocol(s) and service(s), you should see them as options when you elect to create a printer port on Windows 2000 Server. The remaining prompts displayed by the Add Printer Wizard depend on the protocol you’ve chosen. As with Windows NT 4.0, you also must select the printer manufacturer and the model of the printer. You are prompted to make the printer your default on the local computer and are asked whether you want to share it on the network. Finally, you get to print a test page, and then you’re done with the Add Printer Wizard.
Print Server Properties, Printer Properties, and Document Properties for Windows 2000 Server
Just as with Windows 4.0 Server, you can manage Windows 2000 Server print servers and individual printers. You can also set up default properties for documents. To begin, click Start, Settings, Printers to bring up the Printers window. Choose File, Server Properties. As you can see in Figure 41.8, Windows 2000 Server adds a Drivers tab to the Print Server Properties page.
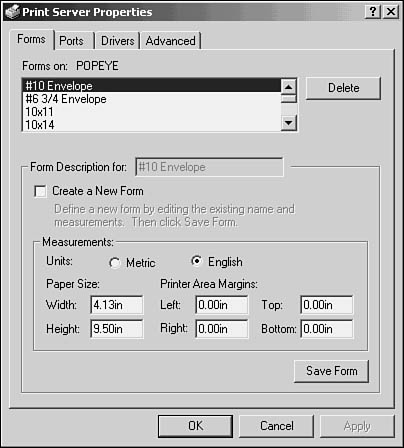
Figure 41.8. The Print Server Properties page allows you to manage global properties for the print server.
The other standard tabs are there, and work just like they did for Windows NT 4.0 Server. You can design forms, modify ports, and use the Advanced tab to set up logging and other notifications.
The Drivers tab, shown in Figure 41.9, allows you to load additional printer drivers for clients that will access the printer.
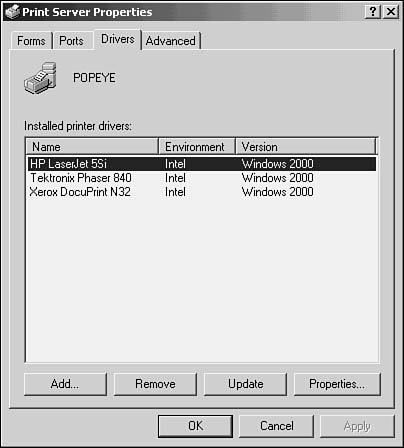
Figure 41.9. You can load additional printer drivers for clients on your network using the Drivers tab.
To add additional printer drivers, click the Add button. The Add Printer Wizard pops up again. Click Next to go back to the dialog box that allows you to choose a manufacturer and a printer model. Or you can use the Have Disk option to load a driver that is not part of the standard Windows 2000 Server distribution.
You also can remove drivers by highlighting them and clicking the Remove button. If you need to update a driver, use the Update button. This is a powerful function because, in this one place, you can update a driver that is used by multiple printers. The Properties button allows you to view properties pages specific to the driver you have highlighted. Casual users shouldn’t change items on a printer driver’s properties page. Make these changes only if you are thoroughly proficient in the printer workings and understand the changes you are making.
Printer Properties
Again, the properties page for a printer in Windows 2000 Server is similar to that used in Windows NT 4.0 Server, but with a few differences, as you can see in Figure 41.10.
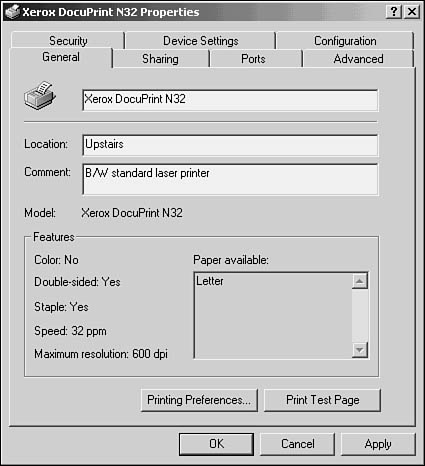
Figure 41.10. You can manage properties for each printer individually.
Note that the Scheduling tab no longer shows up. This function is now located on the new Advanced tab. In addition to the tabs that were available under the Windows NT 4.0 Server version, the following tabs now show up on a printer’s properties page:
![]() Configuration—This tab shows items specific to the printer model, such as additional trays that can be installed and whether a duplex (two-sided printing) module is installed. What you see here depends on the type of printer.
Configuration—This tab shows items specific to the printer model, such as additional trays that can be installed and whether a duplex (two-sided printing) module is installed. What you see here depends on the type of printer.
![]() Advanced—The scheduling functions have been moved to this tab. Other functions, as you can see in Figure 41.11, have also been moved to this page. For example, you use this tab now to select a separator page (this function used to reside on the General tab).
Advanced—The scheduling functions have been moved to this tab. Other functions, as you can see in Figure 41.11, have also been moved to this page. For example, you use this tab now to select a separator page (this function used to reside on the General tab).
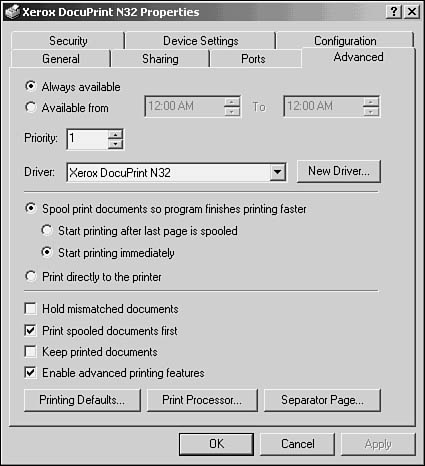
Figure 41.11. The Advanced tab contains functions that used to be on other tabs.
All the other functions found in Windows NT 4.0 are still here; you might have to spend just a minute or two looking through the various tabs to find them.
Managing Printer Properties
For day-to-day printer management, you double-click a printer icon in the Printers folder. You can start, stop, and pause the printer or a particular document. You can also purge the printer of all documents waiting to print or selectively cancel documents.
Publishing Printers in the Active Directory
The Active Directory can hold information about users, computers, and resources such as printers. First, you can publish a printer in the Active Directory if you are logged in to a domain that is part of the Active Directory (for either Windows 2000 Server or Windows Server 2003). To do so, follow these steps:
1. Bring up the properties for a printer by right-clicking on the printer icon (in the Printers folder).
2. Select the Sharing entry from the menu that appears. Note that a printer must be shared before if it is to be published in the Active Directory.
3. On the Sharing properties page that appears, select List in Directory.
4. To share a printer, on the Sharing tab click on Shared As and fill in the fields, such as the name you want the printer to appear as on the network.
If you want to share a printer that is not managed by a Windows 2000 Server or Windows Server 2003 computer, the process is a little different. First you must create the printer on the computer (such as a Windows NT Server). The printer share will then be accessible on the network using the Universal Naming Convention (UNC). For example, \zirahplj would indicate that a printer named hplj on the computer named zira is being offered to the network as a printer share.
Next, use the Active Directory Users and Computers utility to add the printer to the directory. For Windows 2000 Server, use Start, Programs, Administrative Tools, and then select the Active Directory Users and Computers utility. For Windows Server 2003, click on Start, Administrative Tools, and then Active Directory Users and Computers.
Choose the container object where you want to place the printer. This can be a domain, or a container object beneath a domain, or a container object that holds several domains.
![]() For more information about container objects and domains in the Active Directory, see Chapter 30, “Using the Active Directory.”
For more information about container objects and domains in the Active Directory, see Chapter 30, “Using the Active Directory.”
Right-click on the container object, and select New, Printer. In the dialog box that appears, enter the UNC name described previously for the printer you want to publish. Click OK.
Managing Printers Using the Internet Printing Protocol (IPP)
One new feature that Windows 2000 Server offers is support for the Internet Printing Protocol (IPP) that was discussed in the preceding chapter. In addition to allowing clients to use a browser to connect to a printer on a Windows 2000 Server print server, you can also use a browser to manage printers.
To use IPP, you must install Internet Information Services (IIS) on the print server as a prerequisite. This can be done during the initial operating-system installation. Or use the Add/Remove Programs icon in the Control Panel and select Add/Remove Windows Components to install IIS later. When you’ve installed IIS, you’ll find a new entry in the Administrative Tools folder: Internet Services Manager.
Managing Access to the Web-Based Printers Folder
As with the other administrative tools, the Internet Services Manager is written as a snap-in for the Microsoft Management Console (MMC). When you first launch the application, you’ll see the MMC console tree in the left pane, listing the IIS Web servers that are in your domain. Select a server by clicking it once, and then click the plus sign that appears next to the server to expand the tree. A list of Web sites for the server appears. In the example shown in Figure 41.12, you can see that the Default Web Site has been expanded to show the objects that fall beneath it in the tree. The Printers folder is at the bottom of the list.
Figure 41.12. You can manage printers using IPP from the Internet Services Manager application.
Right-click the Printers folder and select Properties. In Figure 41.13, you can see the properties page that appears, with the Virtual Directory tab selected.
Figure 41.13. You can manage printers via an Internet browser using Windows 2000 and IPP.
Note
When first presented with the Properties page for the Printers folder in the IIS MMC management application, some of the items don’t seem to relate to printing. That’s because, in general, they don’t. This is the properties page for managing how printers are presented as a Web page (using the Documents tab), how security is configured to allow or deny access to the printers, and so on. You’ll learn more about directly managing individual printers shortly.
For the most part, you can ignore most of this first tab and keep the defaults. If you are running a Web site using IIS, you might have reason to make changes here, but for ordinary printing tasks the defaults should suffice. Leave the virtual directory on the local computer so that information about printers will be stored on the print server. You’ll need to leave Read Access enabled so that users can browse for printers. The Log Visits check box can be useful for troubleshooting purposes later.
You can configure permissions to restrict access to this Web-printing management on the Directory Security tab (see Figure 41.14).
Figure 41.14. You can restrict access to printer management using the Directory Security tab.
If you click the Edit button under Anonymous Access and Authentication Control, you can select the kind of access allowed for managing printers. You can choose the authentication method for users wanting to connect to a printer from the following:
![]() Anonymous Access—This allows anyone to manage printers, without requiring any sort of authentication. You can also configure the account that is used with anonymous access. The default is the account created when IIS is installed:
Anonymous Access—This allows anyone to manage printers, without requiring any sort of authentication. You can also configure the account that is used with anonymous access. The default is the account created when IIS is installed: IUSR_servername.
![]() Basic Authentication—This method allows for a username/password exchange when connecting to the resource, but sends the information via clear text. For some non-Windows clients, this might be the only kind of authentication you can use. However, keep in mind that sending password information on the network as clear text can pose a security problem.
Basic Authentication—This method allows for a username/password exchange when connecting to the resource, but sends the information via clear text. For some non-Windows clients, this might be the only kind of authentication you can use. However, keep in mind that sending password information on the network as clear text can pose a security problem.
![]() Digest Authentication for Windows Domain Servers—This method uses a challenge/response mechanism to authenticate the user and is more secure than the basic authentication method. This method is new with IIS 5.0 and sends a hashed value over the network rather than the password.
Digest Authentication for Windows Domain Servers—This method uses a challenge/response mechanism to authenticate the user and is more secure than the basic authentication method. This method is new with IIS 5.0 and sends a hashed value over the network rather than the password.
![]() Integrated Windows Authentication—This last method uses a cryptographic exchange based on the Kerberos method.
Integrated Windows Authentication—This last method uses a cryptographic exchange based on the Kerberos method.
You can use the IP Address and Domain Name Restrictions section on the Directory Security tab to further control access. When you click the Edit button for this section, you’ll see a dialog box similar to that shown in Figure 41.15.
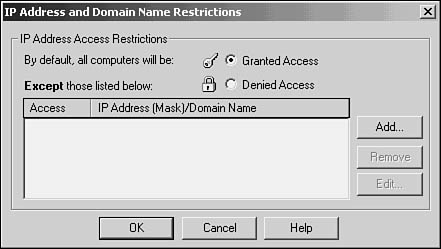
Figure 41.15. You can allow or deny access based on IP addresses.
You can choose to add records for IP addresses that are allowed to use the printer, or you can specify those addresses that are denied access.
To allow access to most users, and restrict just a few addresses, select the Granted Access option and use the Add button to add exclusions. This is the easiest method for granting access if the printer is to be available to most of your users. Alternatively, you can choose the Denied Access option and use the Add button to add IP addresses of those specific computers that are allowed to access the Printers folder on this server.
Figure 41.16 shows the dialog box that appears when you click the Add button. In this example, the Group of Computers option is selected, which is more efficient than entering individual IP addresses. Instead, you specify a network ID and the subnet mask for that network. Thus, you can allow or deny entire groups of computers based on their network address. This is helpful when using DHCP to configure client computers. In that situation, you know the network address for any particular subnet, but you don’t know which IP address will be assigned to any particular client. If your network is organized in a logical manner by department, for example, you can control access for different departments if they are each on a different subnet. Simply specify the subnet network address and address mask using this dialog box.
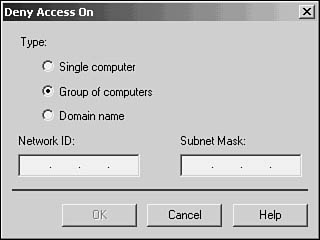
Figure 41.16. You can specify an individual address or a particular network using the Add Button dialog box.
Note also that you can use the Domain Name option in the Add Button dialog box, in which case you can control access based on a domain name. This method, however, requires additional overhead and can slow server performance.
Finally, the Directory Security tab allows you to require secure communications using a certificate server. You must have a certificate server on the network for this functionality to be available. This is the most secure form of communications you can choose for managing the Printers folder.
Managing Printers Using a Web Browser
To view the printers on a print server that has been IPP enabled by the installation of IIS, use the URL http://servername/printers. In Figure 41.17, you can see a listing of the printers that are shared on the print server Popeye. You can quickly check the status of printers using this URL.
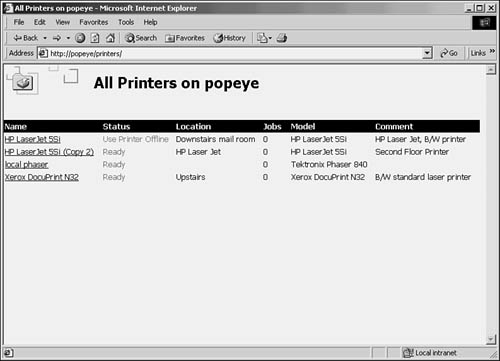
Figure 41.17. You can view all the printers shared by a Windows 2000 print server.
To see details about a particular printer, click the printer in this display. Figure 41.18 shows the page that is displayed for a single printer.
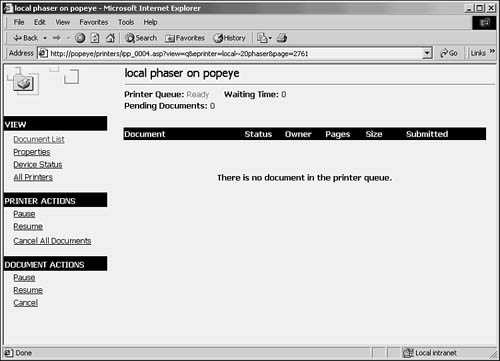
Figure 41.18. You can view information about each printer using a Web browser.
In this figure, the functions available are just about the same as you get when you double-click a printer icon in the Printers folder. However, the display is in Web-browser form instead of the traditional dialog boxes and windows used in the past.
Most of the display is used to show documents waiting to print and status information, such as the owner and when the print job was submitted. On the left side of the Web page, you’ll see three sections of options for management purposes:
![]() View—This section provides a listing of documents (the default). You can also choose to view the properties of the printer, view the status of the device, or return to the Web page that lists all printers on the server.
View—This section provides a listing of documents (the default). You can also choose to view the properties of the printer, view the status of the device, or return to the Web page that lists all printers on the server.
![]() Printer Actions—This section lets you do the normal management functions: pause the printer, resume the printer, or cancel all documents that are waiting to print.
Printer Actions—This section lets you do the normal management functions: pause the printer, resume the printer, or cancel all documents that are waiting to print.
![]() Document Actions—This section allows you to do the same functions on the document level instead of the printer level. Use these options to pause, resume, or cancel a particular document you’ve first highlighted in the document listing.
Document Actions—This section allows you to do the same functions on the document level instead of the printer level. Use these options to pause, resume, or cancel a particular document you’ve first highlighted in the document listing.
Figure 41.19 shows the Properties page for a printer. This is helpful when choosing a printer.
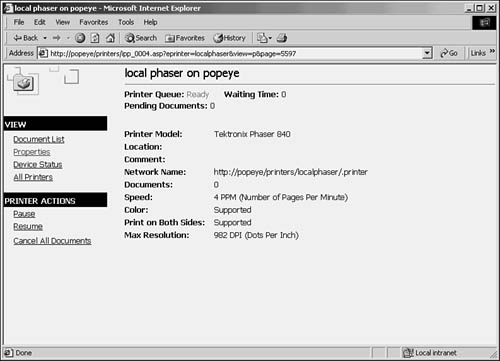
Figure 41.19. Use the Properties page for a printer when trying to decide which printer to use, based on the printer’s capabilities.
The Properties page for a printer can be used to determine a printer’s capabilities. The Comment and Location fields would have been nice to see in this figure. When this printer was created, the administrator was obviously in a hurry.
Finally, Figure 41.20 shows the Device Status page for a printer, which can be useful when troubleshooting. Note the other information you can see from this view, including information from the printer’s front panel display, the status of paper trays, and any error messages that might be outstanding for the printer.
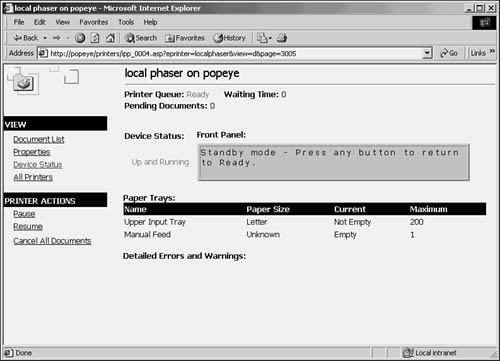
Figure 41.20. You can check the status of the device using this Web-based view.
Because IPP allows you to print to printers literally anywhere on the Internet, it will be more widely implemented in the near future as the standards committee finishes the next version of the specification. Although the usual Windows printer-management utilities allow you to manage printers remotely, by using a browser you can manage printers from just about anywhere, as long as you set up management user access securely.
Windows XP
Although Windows XP Professional is a client operating system, and not in the same class as Windows server operating systems, it is very popular in SOHO networks that contain just a few computers and do not require a more robust server operating system. If you are operating in the SOHO environment, Windows XP can be configured to share printer(s) as well as file shares. In this section you will find out how to configure a printer on Windows XP Professional—using TCP/IP—to enable it to share printers with other computers.
Windows XP Professional can share a printer that is directly connected to the computer via its physical ports (such as a parallel port, USB, or FireWire port). In addition, like Windows 2000, Windows XP Professional can be used to satisfy client print requests by sending print jobs to printers on other computers, or printers that have their own network connection. If you do not need to use the Windows XP computer as a print server, you can also let clients connect to any printer on the network. Thus, there are three ways you can set up a printer connection in a Windows SOHO network. Each client can make a connection directly to a networked printer (in which case the XP computer is not required to act as a server), a connection can be made directly to a printer physically connected to an XP computer, or a client can print to a shared printer on a Windows XP client that is redirected to a networked printer that the XP computer communicates with. In Figure 41.21 you can see an overview of the choices.
Figure 41.21. There are a few ways you can connect clients in a SOHO network to a printer that uses Windows XP Professional.
The first scenario demonstrates that network computers can connect to a printer that has its own network connection. This can be an easy solution in a small network where you do not need to control access to networked printers, but rather let clients connect directly to the printers they want to use.
In the second example, a Windows XP computer has a print device connected to one of its ports, and clients send print jobs to the Windows XP computer, which then sends the print job to the physical printer. By using this method, the Windows XP computer can act as a gateway controlling access to the computer. This means that you can create print shares on the Windows XP computer and grant or deny access to individual clients on the LAN.
In the third example, a Windows XP computer can establish connections to printers that are attached to the network. As with the second example, clients send their print requests to the Windows XP computer and it will make the connection to the networked printer. This example also allows the Windows XP computer to control access to the printer.
Note
In the third example shown in Figure 41.21, the Windows XP Professional computer is used to forward print jobs from clients to networked printers. If security is an important issue for your network (and it should be in today’s environment), then you should be aware that it may be possible to circumvent the Windows XP computer. If the user of a client computer knows the IP address of one or more networked printers, the user might just decide to side-step the Windows XP computer and create a direct network connection to a printer.
Tip
If you have a printer that uses Plug and Play, and if the printer uses a USB or FireWire (IEEE 1934) connection—or any other hot pluggable port—then you probably will not have to use the following steps to configure the printer. Instead, if the printer is one that Windows XP Professional recognizes and already has a driver for, you can simply plug in the printer and Windows XP Professional will automatically configure the printer for you. However, you can still use the steps outlined here if you want to bypass Plug and Play. For example, your printer may come with an updated driver and you might want to use the CD that contains the printer driver, and possibly other software, and install the printer manually.
Configuring a Printer Using Windows XP Professional
Use the following steps to easily configure Windows XP for printing:
1. Click on Start, Printers and Faxes.
2. In the Printers and Faxes window, look under Printer Tasks on the left side of the window and click on Add a Printer. The Add Printer Wizard pops up. Click Next.
3. In Figure 41.22 you can see the Wizard’s next dialog box. Here you can use the radio buttons to specify whether you are configuring a printer that is attached to the Windows XP computer, or whether you want to connect to a printer on the network or on another computer. For this example, a printer attached to the XP computer has been selected. In addition, the Automatically Detect and Install My Plug and Play Printer check box is selected. Click Next to continue.
Figure 41.22. This Add Printer dialog box lets you choose to configure a printer attached to the Windows XP computer, or to a printer on the network.
4. The New Printer Detection dialog box pops up and Windows XP tries to locate and install any plug-and-play printers connected to the computer. In Figure 41.23 you can see that Windows XP was successful in finding the printer and installing the printer driver. This dialog box also enables you to send a test page to the printer to ensure that the configuration is correct. Click on the Yes radio button and then the Next button to accomplish this.
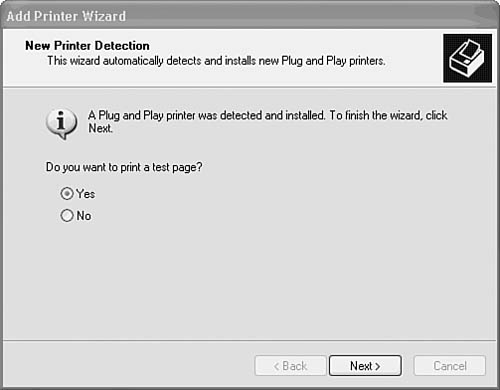
Figure 41.23. The Add Printer Wizard can automatically detect and configure plug-and-play printers that are attached to the computer.
Tip
It is a good idea to send a test page to the printer during the configuration process. If you do not, you cannot be sure that the configuration was properly completed until you send a print job to the printer. You might as well find out at the start if the configuration was successful. If not, you can backtrack and try to determine what went wrong.
5. When the next dialog box appears, click the Finish button. If you have selected the option to print a test page, a test page is then sent to the printer.
6. A small pop-up dialog box tells you that the test page has been sent to the printer. If the page has printed, click the OK button. If not, click the Troubleshoot button.
After you have configured the printer, you can use the Properties pages for the printer to enable sharing the printer with other computers.
Use the following steps to enable sharing the printer with other client computers on the network:
1. Click on Start, Printers and Faxes. In the Printers and Faxes window you will see a printer icon with a short description of the printer next to it. Right-click on the icon. A menu lets you select from many options, depending on the printer.
2. Click on the Sharing menu option, or click on Properties and then select the Sharing tab. In Figure 41.24 you can see the Sharing tab for the printer.
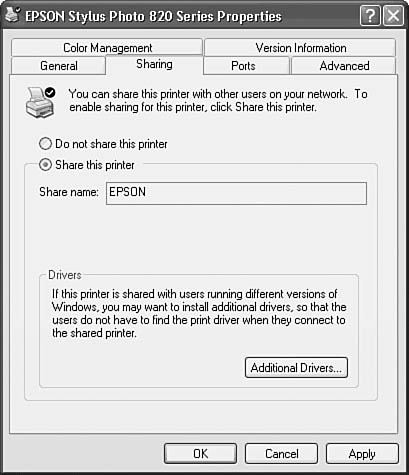
Figure 41.24. This property sheet can be used to enable sharing the printer on the network.
3. In Figure 41.24 you can select the radio button labeled Share This Printer if you want other clients on the network to be able to connect to and use your printer.
4. In the Share Name field enter a name that the printer will be known by on the network.
5. At the bottom of the property sheet shown in Figure 41.24, you can see a Drivers section. If your network uses only Windows XP computers, you can ignore this part of the property sheet. However, if you have other computers on the network, click on the Additional Drivers button. This will allow you to load drivers for other operating systems so that they can use this printer. The current selections include Windows operating systems from Windows 95 through Windows 2000 and Windows Me.
Tip
If you choose to load drivers for other operating systems, Windows XP will prompt you for the location for the drivers you want to install. If the manufacturer of your printer does not include drivers for other operating systems, check its Web site to determine whether a driver exists. In any case, a dialog box will ask you to enter the location for the additional drivers.
6. When you have finished loading other operating-system drivers (or not), click on the Apply button and then the OK button shown in Figure 41.24 to continue.
To ensure that the printer has been properly configured for sharing on the network, use another computer on the network to connect to the printer share and print a document.
In addition to the Sharing tab on the printer’s properties sheets, you will find other tabs, depending on the type of printer you have configured on the system. For example, a Color Management tab would be present for a color printer but not for a monochrome laser printer. You might want to check out all of these tabs that are created for your printer to determine whether there are other features you might want to configure.
Printing Under NetWare
Novell Directory Services uses objects in the directory database to represent the functional components of the printing system. As with Windows NT, Windows 2000, and Windows 2003, some terms must be defined:
![]() Printer—This is the physical printer, like the printer device under Windows NT.
Printer—This is the physical printer, like the printer device under Windows NT.
![]() Print queue—This is like the logical printer found in Windows NT. Unlike Windows NT, the term
Print queue—This is like the logical printer found in Windows NT. Unlike Windows NT, the term queue is used. Users send print jobs to a print queue, where they are retained until they print.
![]() Print server—This can be a software print server (such as NetWare’s PSERVER.NLM) loaded on a host computer on the network, or a physical print server device connected to the network.
Print server—This can be a software print server (such as NetWare’s PSERVER.NLM) loaded on a host computer on the network, or a physical print server device connected to the network.
When the administrator creates a Print Queue object in the database, a directory that will hold the spooled files is created automatically. The administrator then specifies the print server that will control the queue, and the printer (physical device) that will render the print job into a finished document. When configuring a NetWare client, you select a print queue. The user does not have to be bothered with other aspects of the system such as the printer or the print server.
Print queues hold jobs waiting to print. A queue can accept documents even if the printer is offline or out of service. The jobs wait in the queue until the printer is restored to service or another printer is assigned to the task. In a manner similar to Windows NT, NetWare print queues can send print jobs to multiple output print devices, and multiple print queues can be established to send output to the same printer.
These three entities—the printer, the print server, and the print queue—do not have to reside on the same host computer. However, to reduce network traffic, it’s a good idea in a high-volume printing environment to locate them on the same server. Or else, when a user submits a print job, network bandwidth is used, sending the data to the print queue. Then, more bandwidth is used to send the document from the print queue to the print server, and if the printer is a networked device, additional bandwidth is used to send the document from the print server to the printer.
To create the objects needed for printing in NetWare, you use either the NetWare Administrator or the PCONSOLE utility. The PCONSOLE utility is the recommended route because it has an option that provides a quick setup for all three objects. To use the PCONSOLE utility to set up printing on a server, follow these steps:
1. Log in as an Admin user or a user that has the create, delete, and browse privileges for the container that will hold the printing objects.
2. Run PCONSOLE.
3. Choose PCONSOLE, Change Context. Set your context to the container you want to use for the printing objects.
4. Choose Available Options, Print Queues.
5. Press the Insert (Ins) key to create a new object.
6. Enter the name you want to give to the Print Queue object.
7. A dialog box prompts you for the volume to use for the Print Queue object’s spooling directory. Enter an object or use the Insert key to browse for available volumes. When finished, press the Escape key to return to the PCONSOLE menu.
8. Next, create the Printer object. Choose Available Options, Printers.
9. Press the Insert key to create a new Printer object.
10. Enter a name for the Printer object when the dialog box prompts you.
11. Select the newly created Printer object from the Printers list.
12. In the Printer Configuration screen that appears, fill in the configuration information specific to the kind of printer the object represents—whether it uses a parallel or serial port, address restrictions, and so on.
13. While still in the Printer Configuration screen, select the queue you want to use from the Print Queues Assigned field. When finished, press the F10 key to save the information. Press the Escape key to return to the Available Options menu.
14. Select Print Servers to begin creating the new Print Server object. Press the Insert key to create a new object.
15. Enter a name for the new object when the screen prompts you. The object is created. Select it from the Print Servers list so that it can be configured.
16. Select the Printers option from the Print Server Information list. Press the Insert key.
17. A list of Printer objects appears. Select the Printer object you just created. You can continue to add other Print Server objects if you like. Press the Escape key until you reach the main menu of the PCONSOLE utility.
You also can use the Quick Setup feature of PCONSOLE. Choose Available Options, Quick Setup on the PCONSOLE menu. The Print Services Quick Setup screen appears and allows you to fill in the fields on this screen.
Tip
You can use the PUPGRADE utility to upgrade NetWare 3.x servers that are already configured as print servers. Select PUPGRADE, Upgrade Print Servers and Printers; then select the bindery print server you want to upgrade.
Print Queue Object Properties
The Print Queue object is a logical representation of a print queue. It uses a directory (created as a subdirectory under the /QUEUES directory) on a NetWare volume you select when you create the object to store files waiting to print. The following are significant properties of the Print Queue object:
![]() Volume—The volume selected to hold files that are waiting in the queue to print. Choose a volume that has adequate storage for the typical printing volume on the server.
Volume—The volume selected to hold files that are waiting in the queue to print. Choose a volume that has adequate storage for the typical printing volume on the server.
![]() Authorized Print Servers—A list of print servers that can use this print queue.
Authorized Print Servers—A list of print servers that can use this print queue.
![]() Printers Servicing Print Queue—A list of printers to which the print queue can send output.
Printers Servicing Print Queue—A list of printers to which the print queue can send output.
![]() Operators—The users allowed to perform management functions on the queue.
Operators—The users allowed to perform management functions on the queue.
![]() Users—The users allowed to send print jobs to the print queue. Instead of listing individual users for this property, it’s much easier to use container objects that include users to make administration tasks easier.
Users—The users allowed to send print jobs to the print queue. Instead of listing individual users for this property, it’s much easier to use container objects that include users to make administration tasks easier.
![]() Print Job List—A list of print jobs in the queue. It includes the sequence number for each job, the job ID, the current status of the print job, the form used, and the name of the file to be printed.
Print Job List—A list of print jobs in the queue. It includes the sequence number for each job, the job ID, the current status of the print job, the form used, and the name of the file to be printed.
Note that the Printers Servicing Print Queue property is used to link the Print Queue object to one or more Printer objects.
Printer Object Properties
The Printer object represents an actual physical printer that will accept print jobs from a print queue. The printer can be connected directly to the network, to a workstation, or to a server.
The properties of the Printer object include a name property, which is established when the Printer object is created. In addition, you can assign values to other descriptive properties:
![]() Other Names
Other Names
![]() Description
Description
![]() Location
Location
![]() Department
Department
![]() Organization
Organization
The following are more important properties that affect how the queue functions:
![]() Print Server—Shows the Print Server object to which the printer is assigned.
Print Server—Shows the Print Server object to which the printer is assigned.
![]() Print Queues—Lists the Print Queue objects that can send print jobs to the printer.
Print Queues—Lists the Print Queue objects that can send print jobs to the printer.
![]() Printer Features—Contains information such as the kind of printer language understood by the printer and the amount of memory installed. This is a useful feature because users can search Novell Directory Services (NDS) to find a printer that supports the features they need for a particular job.
Printer Features—Contains information such as the kind of printer language understood by the printer and the amount of memory installed. This is a useful feature because users can search Novell Directory Services (NDS) to find a printer that supports the features they need for a particular job.
![]() Printer Type—Indicates whether the printer is a parallel, serial, or other kind of printer, such as one accessed via AppleTalk or Unix.
Printer Type—Indicates whether the printer is a parallel, serial, or other kind of printer, such as one accessed via AppleTalk or Unix.
![]() Banner Type—Can be either text or PostScript.
Banner Type—Can be either text or PostScript.
![]() Service Interval—Defines how often the printer checks with the Print Queue object to see whether there are any jobs to print. The value can range from 1 to 255 seconds, with a default of 5 seconds.
Service Interval—Defines how often the printer checks with the Print Queue object to see whether there are any jobs to print. The value can range from 1 to 255 seconds, with a default of 5 seconds.
![]() Buffer Size in KB—Defines the size of the data segment sent to the printer. The value can range from 3KB to 255KB, with a default of 3KB.
Buffer Size in KB—Defines the size of the data segment sent to the printer. The value can range from 3KB to 255KB, with a default of 3KB.
![]() Network Address Restrictions—Specifies the network address of the printer’s network interface or the address of the host computer to which the printer is attached.
Network Address Restrictions—Specifies the network address of the printer’s network interface or the address of the host computer to which the printer is attached.
![]() Service Mode for Forms—Indicates the policy for changing forms and can be set to Starting Form or Service Mode for Forms. The Starting Form value is the identifying number of a form that the Print Server object expects to be loaded on the printer by default. The Service Mode for Forms is used to indicate whether the form can be changed, and how, or if only the currently mounted form should be used.
Service Mode for Forms—Indicates the policy for changing forms and can be set to Starting Form or Service Mode for Forms. The Starting Form value is the identifying number of a form that the Print Server object expects to be loaded on the printer by default. The Service Mode for Forms is used to indicate whether the form can be changed, and how, or if only the currently mounted form should be used.
![]() Notification—A list of users who are notified when a problem occurs on the printer, such as a paper-out condition.
Notification—A list of users who are notified when a problem occurs on the printer, such as a paper-out condition.
The Print Server property and the Print Queues property are used to link the three objects that make up the path from the user to the finished print job.
Print Server Object Properties
The Print Server object represents the print server program (PSERVER.NLM), which runs on a server to control the printing process. The only properties that are defined when the Print Server object is created are the Name property (common name) and the Advertising Name, which is used to advertise the service using the Service Advertising Protocol (SAP).
The Print Server object, like the Printer object, also enables you to define descriptive properties such as Department and Location. In addition, the Network Address field displays the address on the network of the print server when it is up and running. The Version property shows the version of PSERVER.NLM that is being used by the print server.
Other important properties include the following:
![]() Printers—Indicates the Printer objects that the Print Server can use to render a print job into its final output form.
Printers—Indicates the Printer objects that the Print Server can use to render a print job into its final output form.
![]() Operators—Specifies users who can perform management functions for the server. This can include users, groups, and user templates, as well as Organization or Organizational Unit container objects in the NDS tree.
Operators—Specifies users who can perform management functions for the server. This can include users, groups, and user templates, as well as Organization or Organizational Unit container objects in the NDS tree.
![]() Users—Specifies users who can use this print server. Again, the values here can also be container objects, so you don’t have to list each user individually. Although users only need to be listed as users for a print queue to print, if you list them here also, they can check the status of the print queue.
Users—Specifies users who can use this print server. Again, the values here can also be container objects, so you don’t have to list each user individually. Although users only need to be listed as users for a print queue to print, if you list them here also, they can check the status of the print queue.
![]() Password—Allows you to assign a password to this Print Server object so that it cannot be loaded (via
Password—Allows you to assign a password to this Print Server object so that it cannot be loaded (via LOAD PSERVER) by unauthorized users.
The properties for a print server are loaded into memory when the module PSERVER.NLM is loaded. If you make changes to the object after it is loaded, they do not take effect until the print server is unloaded and loaded again.
PSERVER.NLM and NPRINTER.NLM
On a host that is acting as a print server, the PSERVER.NLM module must be loaded. When it is loaded, the module activates any printers defined by Printer objects that are listed in its Printers property. NetWare allows for both local and remote printers. Local printers are attached to the host print server. Remote printers can be serviced by this Print server but reside on other computers. The NPRINTER.NLM module controls the printer and is automatically loaded for each locally attached printer. Because of this, these printers are called Autoload printers.
To load the PSERVER module, use the LOAD PSERVER command:
LOAD PSERVER <print server object name>
The PSERVER.NLM can support up to 256 printers, up to 5 of which can be connected locally to the server on which PSERVER.NLM is loaded.
The NPRINTER.NLM module must be manually loaded on remote servers (and the program NPRINTER.EXE for remote workstations). When multiple printers are hosted on a single remote server or workstation, NPRINTER must be loaded for each one. The syntax used depends on the computer on which the module will be loaded. For DOS machines, use this:
NPRINTER <name of print server object> <name of printer object>
For NetWare servers, use this:
LOAD NPRINTER <name of print server object> <name of printer object>
The NetWare 6.x iPrint Utility
NetWare 6.x introduced many new features that were as impressive as well as useful. Both iFolder and iPrint are among those new features. Because Novell is continuing to evolve its product line and break out some features as separate product offerings, you should be sure to visit its Web site to find out the latest information about any part of NetWare. iPrint, which was delivered with NetWare 6.x, uses both Novell Distributed Print Services and IPP to allow you to print to IPP-enabled printers (whether physically connected to a network or connected to an IPP-enabled server that offers printers to the network).
Although iPrint was introduced in NetWare 6.x, you can also run the software on NetWare 5.x networks if you install Support Pack 2 (or a newer support pack). Because most networks are upgraded to a newer version of the operating system for computers on the network, this backward compatibility enables you to use iPrint on your 5.x network while you contemplate whether to begin an upgrade to NetWare 6.x. Client computers that make use of iPrint need to use Windows NT 4.0/2000/XP, or Windows 95/98/Me—using Internet Explorer 5.x or above, or Netscape Navigator 4.7 or greater.
You can expect to see IPP offered on just about every operating system in the near future. This is because the Internet is becoming the de facto means of exchanging data with computers outside your network. Instead of sending a report, a catalog, or other documents to another company, you can simply establish a connection to a server that supports IPP and print directly to a printer managed by that server. Keep in mind, however, that the receiving end of this data transfer will need to grant access to the printer before you can use it.
Hardware-Based Print Servers—Print Server Appliances
You no longer have to dedicate a network host to act as a print server, either dedicated or otherwise, because it’s inexpensive to connect a printer directly to the network using a small hardware-based print server device. These devices range from a size that fits in your hand to larger boxes that look like hubs or routers. In some advertisements, you’ll see these referred to as printer appliances, or just print servers. Regardless, the function is the same: to consolidate a number of printers to a single network connection. The device buffers data as it passes between the network and the printer and keeps track of which print jobs are destined for ports attached to the device.
Think about how you will locate printers in relation to users when making purchase plans. How many printers will be located in a single place? For example, if you have a central print room where you keep multiple printers, copiers, and other similar equipment, it might be economical to purchase a more expensive model that supports several printers. If you are placing only one or two printers at strategic locations throughout the enterprise, it might be more economical to buy the small palmsized devices that can support one or two printers. You should also consider the following:
![]() Price—Especially consider the price per port. However, as these appliances have become more common, price is becoming much less of a factor.
Price—Especially consider the price per port. However, as these appliances have become more common, price is becoming much less of a factor.
![]() Number and kind of printer ports—You might want to plan for expansion and buy devices that leave an extra port available for future use.
Number and kind of printer ports—You might want to plan for expansion and buy devices that leave an extra port available for future use.
![]() Network connection type—Some models support one connector type, such as RJ-41 or BNC. Some have several types.
Network connection type—Some models support one connector type, such as RJ-41 or BNC. Some have several types.
![]() Management software and supported operating systems—This is an often-overlooked feature. Does the appliance support the Simple Network Management Protocol (SNMP) or Remote Monitoring (RMON)? Does it use a proprietary management command interface? Do you have to be physically located at the device to manage it via a port, or can you use Telnet to establish a session with the device to execute commands?
Management software and supported operating systems—This is an often-overlooked feature. Does the appliance support the Simple Network Management Protocol (SNMP) or Remote Monitoring (RMON)? Does it use a proprietary management command interface? Do you have to be physically located at the device to manage it via a port, or can you use Telnet to establish a session with the device to execute commands?
![]() Upgrade path—Don’t lock yourself in to a print server that can’t be upgraded, unless it is inexpensive and will perform the tasks you need for a while to come.
Upgrade path—Don’t lock yourself in to a print server that can’t be upgraded, unless it is inexpensive and will perform the tasks you need for a while to come.
Price might not be an important factor unless you are purchasing a lot of equipment. Take into consideration the number of printer ports that each device makes available. Some devices offer both serial and parallel ports, so be sure to check that the ports are compatible with the kind of printers you have or plan to purchase. Another useful feature for a serial port is the capability to attach a local console terminal for management functions. Although it’s preferable to remotely manage the print server from a workstation elsewhere on the network, the capability to attach a local console terminal is helpful when troubleshooting, especially when troubleshooting problems with network connectivity. Troubleshooting printer problems is common, as most network administrators will tell you.
Check to be sure that all ports on a model that offers multiple ports can be used at once. Hard as it might be to believe, some models offer two ports, but only one can be active at any time.
The type of network connection supported by the device is very important. Is it a standard 10Mbps Ethernet connection, a 100Mbps connection, or a Token-Ring adapter?
Note
The IPP is likely to be a major player in the future of network printing. Although the standard drafts for the next version of IPP, as proposed at this time, do not provide a full-featured set of functions that can be used to manage all aspects of the printing process, some print servers do implement some or all of the functions as they currently stand. Don’t let buzzwords such as IPP determine your decision when trying to select a print server at this time. Wait until the standard has been more completely defined before using it as a major purchase criterion. Instead, if this feature is important for you now, be sure that the print server has the capability to download new firmware when it becomes available from the manufacturer. Otherwise, use a Windows 2000 server that understands IPP to connect to the printer using another protocol (such as TCP/IP), and use the IPP capabilities of Windows 2000 or Windows 2003 servers IIS to manage the printer device.
Management software is another important factor you should carefully scrutinize when making a purchasing decision. Some print servers have only basic software that runs on a Windows platform. Newer models have the capability to present Web pages on the network so that you can manage them from any workstation that has a browser loaded on it. The information that the management software provides can vary widely from one product to another. The typical status information includes paper-out conditions and whether the printer is online or offline. More advanced management packages tell you whether the toner is low in a laser printer.
Another useful feature for any device on the network, much less a print server, is the capability to be updated with new functionality as technology develops. A print server that uses some kind of rewritable memory (for example, flash memory) that can be updated by downloading new software might save you money in the long run because you won’t have to purchase a new device when your needs change.
If you browse the Internet, you’ll find a large number of inexpensive print server appliances. You can even find these things in your local computer store. They are handy in an environment such as a small office/home office (SOHO). Typically in this environment, a small hub or switch is used, so available ports might be at a premium. By attaching a print server appliance to one port, you can use it to connect several printers that otherwise would have needed one of those scarce ports.
In larger networks, a print server can serve a similar function, providing a single place to plug in several printers that all reside in a printer room, for example.
Whichever you choose, using a print server appliance, or building a print server using a PC, become familiar with the performance aspects and management capabilities that you’ll need when something goes wrong.