
6
Source Editor
CERTIFICATION OBJECTIVES
• Modifying Behavior of the Source Editor
• Understanding Error Highlighting and Correction
Q&A Self Test
Today’s source code editors have enhanced features that allow for quick and efficient development and editing, especially with the Java language. The NetBeans Source Editor is no exception and has risen to the top of well-liked editors. Its popularity is due to its numerous features, many of which are integrated with the core IDE. Since developers spend most of their time in the Source Editor, features such as build integration and ease-of-use are important. Throughout this chapter, we’ll explore many of the features of the NetBeans IDE Source Editor
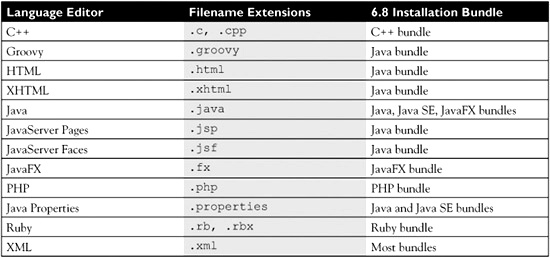
It’s important to note that the Source Editor is actually a collection of editors. Some of the more popular editors are shown in Table 6-1. Each editor is invoked and specialized relative to file types. The certification exam focuses on the Java editor.
TABLE 6-1 NetBeans Source Editors
This chapter helps prepare you for the exam by covering configuration of the Source Editor and three of the editor’s primary features:
![]() IDE diagnostic messages and correction
IDE diagnostic messages and correction
![]() Editor hints; how they are displayed and invoked
Editor hints; how they are displayed and invoked
![]() Code generation by use of code completion and code templates
Code generation by use of code completion and code templates
Once you complete the chapter, you’ll be familiar enough with the Source Editor to score well on the exam-related questions and to use the editor more effectively for your on-the-job needs.
CERTIFICATION OBJECTIVE: Modifying Behavior of the Source Editor
Exam Objective 5.2 Describe how to use the Options window to change the default appearance and behavior of the Source Editor.
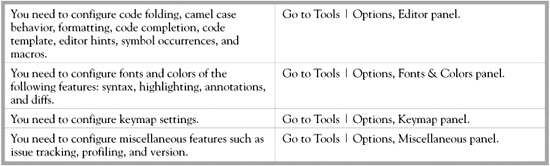
The appearance and general behavior of the Source Editor are configurable through the Options window. You can open the Options window by selecting Tools | Options from the main menu bar. For Mac OS X, you can open the Options window by selecting NetBeans | Preferences. When the Options window (for the Java bundle) opens, you see a set of at least five panel selectors (icons) at the top, with the first selector, General, available by default, as depicted in Figure 6-1. The remaining icons are Editor, Fonts & Colors, Keymap, and Miscellaneous. Icons vary depending upon installed bundles.
FIGURE 6-1 Panel selectors in the Options window

Clicking each icon displays different configuration options in the main portion of the dialog box—the main window below the icons. The General and Miscellaneous panels, covered in Chapter 1, are related to general configurations. This section/objective focuses on the three remaining icons/panels (Editor, Fonts & Colors, and Keymap) and associated configurations.
![]() Editor Panel Configurations
Editor Panel Configurations
![]() Fonts & Colors Panel Configurations
Fonts & Colors Panel Configurations
![]() Keymap Panel Configurations
Keymap Panel Configurations
Editor Panel Configurations
The Editor panel of the Options window provides several tabbed panels that allow for the configuration of the Source Editor and/or specific editors (for example, the Java source editor). When specific editors can be configured through a tabbed panel, a Language combo box at the top of the panel allows for the selection of the desired setting controls. Upon selection of the language from the combo box, the panel controls and contents change. The Editor panel includes the following tabs:
![]() General
General
![]() Formatting
Formatting
![]() Code Completion
Code Completion
![]() Code Templates
Code Templates
![]() Hints
Hints
![]() Mark Occurrences
Mark Occurrences
![]() Macros
Macros
General Tab
The General panel allows for configuration of code folding and camel case behavior, as shown in Figure 6-2.
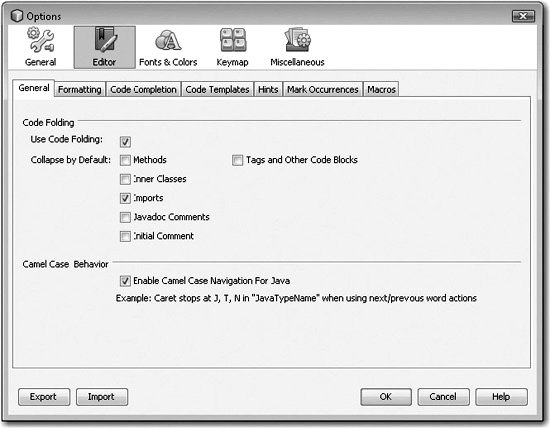
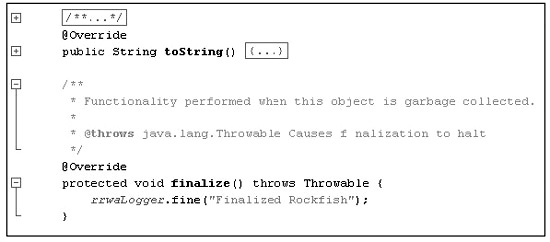
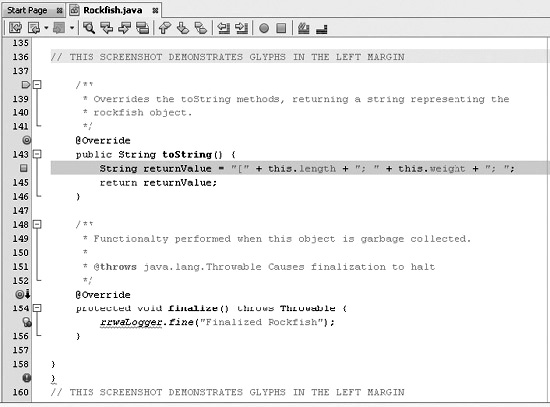
Code Folding Code folding is a Source Editor feature that selectively hides specialized text blocks such as Java imports and Javadoc comments. Code folding can be entirely enabled by the selection of the Use Code Folding checkbox in the General panel. When it’s enabled, a selectable code-folding graphic in the editor allows you to collapse or expand foldable elements. When the feature is disabled, the graphics are not present. The code-folding graphic is a box with an enclosed plus sign or minus sign relative to the information being shown or hidden, along with a line that extends to the end of the block. Figure 6-3 shows code folding for the comment and method of toString() and shows code expansion for the comment and method of finalize(). Code folding is available for methods, inner classes, imports, Javadoc comments, the initial comment, tags, and other code blocks.

The shortcut CTRL-SHIFT-MINUS collapses all code folds. The shortcut CTRL-SHIFT-PLUS expands all code folds.
Camel Case Navigation Camel case navigation is enabled by default in the Source Editor. With camel case navigation enabled, the cursor stops at the first word, and at all the nonconsecutive uppercase letters in words in an identifier when using next (CTRL-RIGHT) and previous (CTRL-LEFT) word actions. When camel case navigation is disabled, the word actions will skip over camel case characters in identifiers. When an identifier includes camel case characters but begins with a lowercase character, it is considered lower camel-case convention.
In camel case navigation, the cursor will stop before the letters A, I, O, O, and E in ArrayIndexOutOfBoundsException, when traversing to the right. The cursor will also stop before the “t” and “S” in toString when moving to the right. With camel case navigation disabled, all camel case characters will be ignored when traversing to the right, except the first character of the identifier. For example, for the identifier RockfishReports, the cursor will start before the first “R” and then move on to the next element in the source code, without stopping before the second “R.”
Formatting Tab
In the Formatting panel, the following TAB key behaviors are configurable for all languages. For the Java language, the following items are configurable:
![]() Tabs and indents
Tabs and indents
![]() Alignment
Alignment
![]() Brace placement
Brace placement
![]() Code wrapping
Code wrapping
![]() Blank lines
Blank lines
![]() Coding spacing
Coding spacing
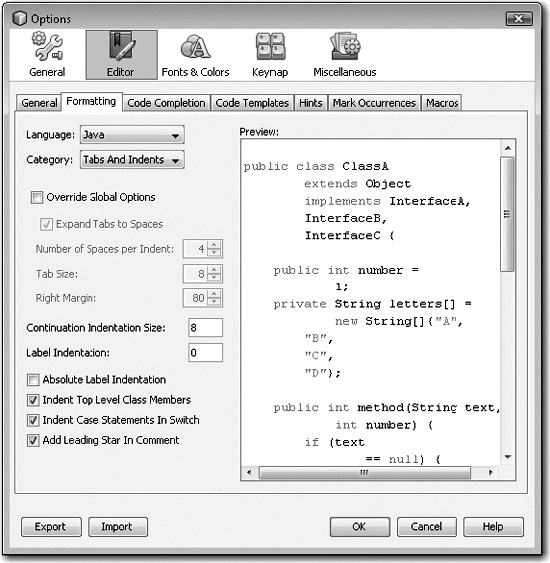
Figure 6-4 shows the Tabs And Indents panel for configuration with the Java source editor. As configuration changes are made, the source code example in the Preview area changes accordingly. Java formatting changes are self-explanatory upon viewing the panels related to the different categories. Take a few minutes to step through them all.
Code Completion Tab
In the Code Completion panel, the editor behavior that assists the user in automatically or manually completing partially inserted code is configurable. Checkboxes are provided for global settings when selecting All Languages from the Language combo box at the top of the Code Completion tab. The self-explanatory text accompanying these checkboxes includes the following:
![]() Auto Popup Completion Window
Auto Popup Completion Window
![]() Auto Popup Documentation Window
Auto Popup Documentation Window
![]() Display Documentation Next To Completion
Display Documentation Next To Completion
![]() Insert Single Proposal Automatically
Insert Single Proposal Automatically
![]() Case Sensitive Code Completion
Case Sensitive Code Completion
![]() Show Deprecated Members In Code Completion
Show Deprecated Members In Code Completion
![]() Insert Closing Brackets Automatically
Insert Closing Brackets Automatically
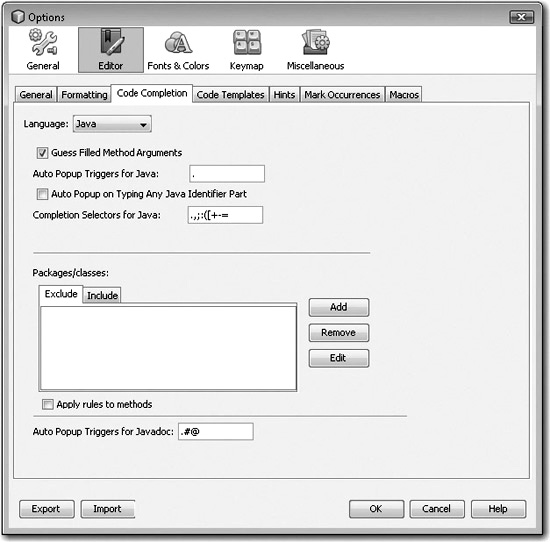
When selecting Java from the Language combo box, you can define triggers and related settings for code completion, as shown in Figure 6-5. Code completion is covered in detail later in this chapter.
FIGURE 6-5 Code Completion tab
Code Templates Tab
The Code Templates panel, shown in Figure 6-6, manages code templates. Code templates consist of three parts:

![]() Abbreviation The character sequence that is typed causes the “expanded text” to be substituted.
Abbreviation The character sequence that is typed causes the “expanded text” to be substituted.
![]() Expanded Text Text to be inserted when the abbreviation is typed. Expanded text may use special code template syntax to specify how the code template behaves. Code templates are covered later in this chapter.
Expanded Text Text to be inserted when the abbreviation is typed. Expanded text may use special code template syntax to specify how the code template behaves. Code templates are covered later in this chapter.
![]() Description Description of the abbreviation/expanded text.
Description Description of the abbreviation/expanded text.
The Expand Template On combo box defines the keystroke(s) used to invoke code completion. Options include Space, Shift-Space, Tab, or Enter. The Tab key is set by default to invoke code completion. See the bonus appendix entitled "NetBeans Code Templates," available for download from McGraw-Hill Professional's Media Center site (see Appendix E), for commonly used Java-related NetBeans Code Templates.
Hints Tab
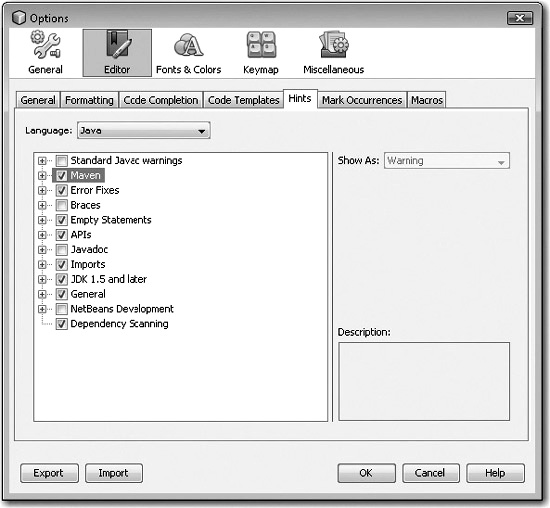
The Hints panel, as shown in Figure 6-7, customizes hints and tips that help you as you work in the Source Editor. The Hints panel has settings for Apache Maven POM files, Java, and JavaScript files.
Mark Occurrences Tab
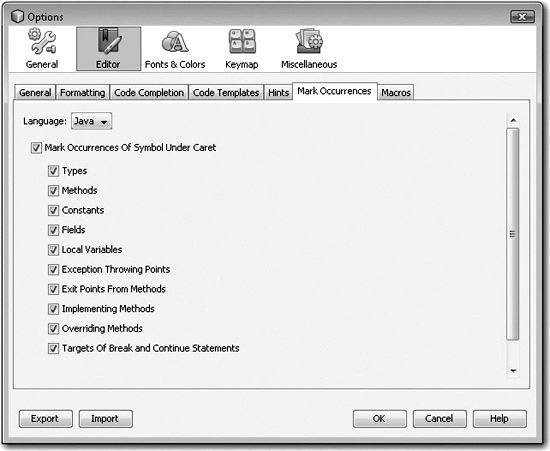
The Mark Occurrences panel, shown in Figure 6-8, enables you to specify which occurrences of Java keywords are marked when the cursor is on one of their instances. The only language currently supported for marking occurrences in the Java NetBeans bundle is Java.
FIGURE 6-8 Mark Occurrences tab
Macros Tab
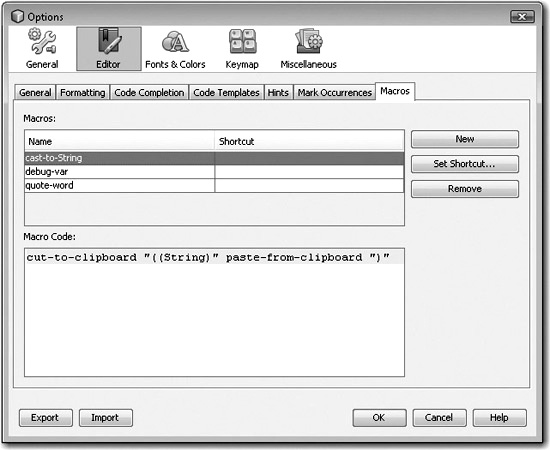
The Macros panel enables you to customize and create Source Editor macros and to set shortcuts for them, as shown in Figure 6-9. Clicking the New button allows you to set the name of a new macro through a dialog box and thereafter to set the macro code through the Macro Code text area. Creating a macro by using Edit | Start Macro Recording and Edit | Stop Macro Recording places a new recorded macro into the list. The details of creating and running macros are outside the scope of the exam.
Anonymous usage data can be sent to the NetBeans team to aid them in analyzing the most commonly used features of the IDE. This collected data includes IDE configuration information, project type information, and information on the use of web application frameworks, JDBC drivers, version control systems, servers, and productivity features (for example, the debugger). To enable this sharing of data, simply select the Usage Statistics checkbox in the Options window associated with the General icon. Even though information about passwords, class names, and source code is not collected, you may want to check with your boss and/or configuration management team before enabling this feature.
![]()
Remember that the exam targets NetBeans 6.1. This chapter uses NetBeans 6.8, which has many changes within the Options window including new features, layout restructuring, and refined functionality.
Fonts & Colors Panel Configurations
The Fonts & Colors panel of the Options window provides several tabbed panels that configure the display of attributes including highlighting and coloring. Tabs included in the Fonts & Colors panel are as follows:
![]() Syntax
Syntax
![]() Highlighting
Highlighting
![]() Annotations
Annotations
![]() Diff
Diff
Syntax Tab
The Syntax panel controls the configuration of syntax attributes for the Language selections listed in Table 6-2 as well as for the All Languages selection. All categories associated with the All Languages selection are considered parent settings. Individual language selection category elements that share the same name as an All Languages category element will inherit their settings by selecting Inherited in the corresponding combo box. For example, if you define the Background color for the Whitespace category of the Java Language as Inherited, it uses the Whitespace category background setting applied in the All Languages section. Syntax attributes that can be configured are fonts, foreground colors, background colors, as well as effects and their colors.
TABLE 6-2 Language Categories for Syntax Attributes
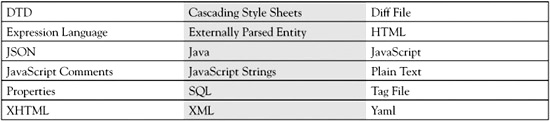
Figure 6-10 shows the Keyword category attributes for the Java language being inherited from the All Languages configuration. The Preview section displays examples of the category and updates when the attributes are changed. Once selected in the category list, the element shows a blinking underline three times in the Preview section for each occurrence. For example, the Keyword selection will have a blinking underline (three blinks) for all keywords in the sample code.

Highlighting Tab
The Highlighting panel has controls for setting the foreground and background colors of many IDE elements, as shown in Figure 6-11.
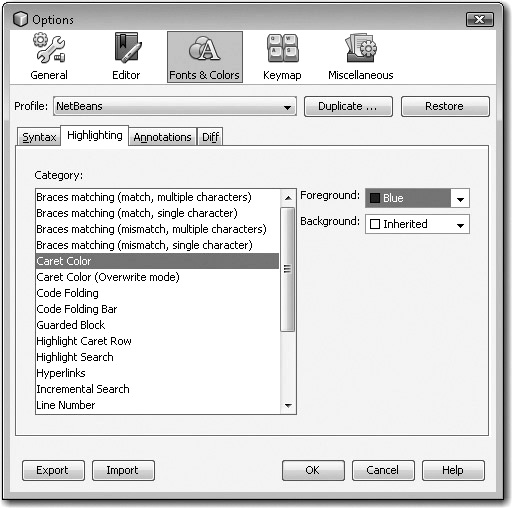
For those of you who are color blind, keep an eye on the proposed color-blindness profile request opened up in the issues database: https://netbeans.org/bugzilla/show_bug.cgi?id=179638.
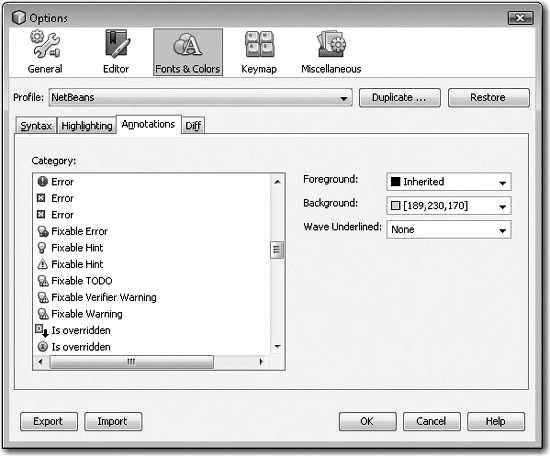
Annotations Tab
The Annotations panel lets you set foreground, background, and underlining attributes of elements related to annotation categories. For example, if a condition exists relative to a category such as a source code error, that line of source code would have the defined attributes as configured for the related category. Figure 6-12 shows the Annotations tab in the Fonts & Colors panel.
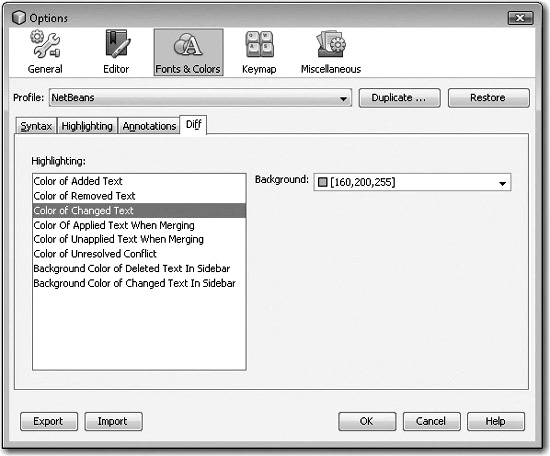
Diff Tab
The Diff panel enables you to set the background colors of highlighted elements of the diff tool, as shown in Figure 6-13. The background color can be modified for added, removed, and changed text, applied and unapplied text while merging, unresolved conflicts, as well as deleted and changed text in the sidebar.
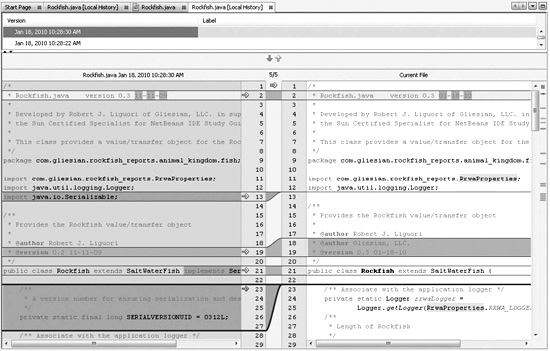
To illustrate color highlighting in the diff tool, we show (in Figure 6-14) the tool diffing Local History changes of the Rockfish class. To do this, right-click the Rockfish.java source file in the Projects window, and then choose Local History | Show Local History.
FIGURE 6-14 Highlighting illustrated by diffing Local History
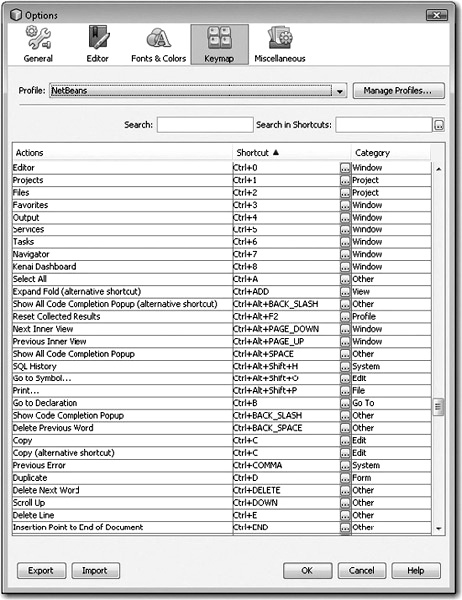
Keymap Panel Configurations
The Keymap panel configures keyboard shortcuts. Shortcuts are keystroke combinations that perform defined actions (for example, CTRL-R is the shortcut for the defined Renamed action). Groupings of shortcuts relate to profiles. NetBeans IDE 6.8 provides five profiles: Eclipse, Emacs, Idea, NetBeans, and NetBeans 5.5.
Figure 6-15 shows the Profile combo box in the Keymap panel. Each action has a defined shortcut and category. The ellipsis button next to the shortcut opens a popup with three options: Edit, Reset To Default, and Clear. If a shortcut already exists, a fourth option is included called Add Alternative. A detailed list of many shortcuts included in NetBeans 6.1 is available in Appendix C.
FIGURE 6-15 Profile table in the Keymap panel
Profiles can be managed by selecting the Manage Profiles button. A dialog box opens, allowing for the duplication, default restoration, deletion, exportation, and importation of Keymap profiles.
As we have seen, many features of the NetBeans IDE are configurable through the Options window. The Scenario & Solution explores the common items that are configured through Tools | Options.
SCENARIO & SOLUTION
EXERCISE 6-1 Changing Behavior of the Source Editor
This exercise changes the general behavior of features related to the Source Editor and/or IDE through configurations in the Options window.
1. From the Options window, change the background color for Java language source code lines that are in error.
2. From the Options window, change the number of spaces per indent, tab size, and right margin settings for Java files only.
3. From the Options window, deselect the Insert Closing Brackets Automatically feature.
4. From the Options window, change the background colors of all highlighting elements for the Diff feature.
5. From the Options window, change the Keymap profile.
6. From the Options window, deselect the Snapping Floating Windows feature.
7. From the Options window, add a Tasks pattern.
8. Export your new Options configurations to a ZIP file.
CERTIFICATION OBJECTIVE: Understanding Error Highlighting and Correction
Exam Objective 5.3 Describe the ways the IDE highlights errors in source code and the tools the IDE offers for correcting those errors.
The NetBeans IDE highlights errors in the source code by displaying diagnostic indicators. These indicators can be in the form of icons/glyphs, source code element highlighting/underlining, marks, and messages. These various indicators are present in various locations such as next to Projects window nodes and files, within the left margin of the Source Editor window, throughout the error stripe on the right of the Source Editor window, in the Source Editor relative to the specific element in question, and in the Output window. This section details these means of error highlighting relative to the IDE:
![]() Projects Window Diagnostic Icons
Projects Window Diagnostic Icons
![]() Source Editor Left Margin Annotation Diagnostic Glyphs
Source Editor Left Margin Annotation Diagnostic Glyphs
![]() Source Editor Diagnostic Highlighting
Source Editor Diagnostic Highlighting
![]() Error Stripe Diagnostic Marks
Error Stripe Diagnostic Marks
![]() Output Window Diagnostic Messages
Output Window Diagnostic Messages
Projects Window Diagnostic Icons
Diagnostic icons are displayed in the Projects window next to files with errors or warnings. Files with issues including errors and warnings have a wrench icon next to the filename in the Projects window as well as next to the filename in the tab within the Source Editor. In addition, files with errors have an error marker (exclamation mark on octagon) overlaid on the file type icon. This error marker propagates upward to all nodes relative to the file (that is, to package folders). Figure 6-16 demonstrates error and warning icons being represented in the Projects window.
FIGURE 6-16 Error and warning icons in the Projects window
Source Editor Left Margin Annotation Diagnostic Glyphs
Annotation glyphs (see Figure 6-17) appear in the left margin of the Source Editor to present the user with information regarding the related source code line(s). Glyphs exist for many conditions including errors, override indicators, bookmarks, and debugging breakpoints. A segmented down arrow is presented next to an indicator if more than one glyph is associated with the line. Clicking the multiple annotations indicator cycles through the glyph display. Hovering over glyphs provides popup descriptions of the condition.
FIGURE 6-17 Annotation glyphs in the left margin
Consider taking the time to commit to memory the different types of glyphs that can be seen in the glyph gutter and in other places in the IDE. A listing related to functional categories is shown in the Options window under the Annotations tab associated with the Fonts & Colors panel.
Source Editor Diagnostic Highlighting
When errors and warnings are discovered by the IDE or compiler, the elements under question will be underlined. Various elements can be configured to be underlined when certain conditions occur. Optionally, the Wave Underlined effect can be modified to just an underline, a strike-through, or no effect at all. The color of the underline as well as the foreground and background colors of the text can also be modified. This configuration is performed in the Options window under the Syntax tab of the Fonts & Colors panel. Figure 6-18 shows the entire statement being underlined due to the absence of the line terminator (semicolon).
EXERCISE 6-2 Highlighting Errors in Source Code and Related Files
This exercise demonstrates the way the IDE highlights errors in various types of files including Java, JSP, HTML, XML, and Ant. Doing the legwork yourself to produce the errors is slightly outside of the scope of the exam. However, findings ways to generate various errors helps you better understand the associated highlighting features. Let’s generate some errors!
1. Setup: Create or include source files for Java, JSP, HTML, XML, and Ant. In many cases of this exercise, you can consider using NetBeans sample projects because they have most of the elements you need (for example, JSP Examples project).
2. Generate three errors in the Java source file, and observe if and how the errors are highlighted.
3. Generate three errors in the JavaServer Pages source file, and observe if and how the errors are highlighted.
4. Generate three errors in the HTML source file, and observe if and how the errors are highlighted.
5. Generate three errors in the XML source file, and observe if and how the errors are highlighted.
6. Generate three errors in the Ant source file, and observe if and how the errors are highlighted.
Error Stripe Diagnostic Marks
Diagnostic marks are seen in the error stripe to the right of the Source Editor in relation to various conditions of the source code, as seen in Figure 6-19.
FIGURE 6-19 Error marks in the error stripe
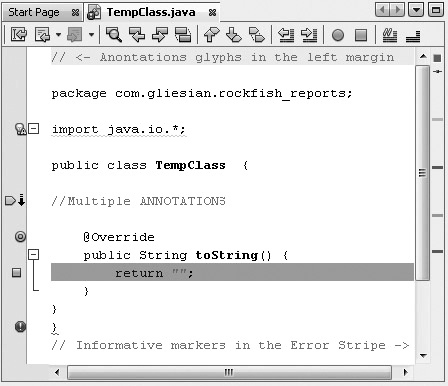
Table 6-3 details the colors of error marks and their meanings. These colors are not configurable.
TABLE 6-3 Error Marks: Colors and Meanings
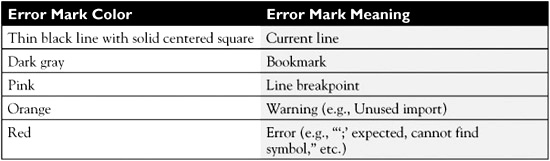
Hovering over the error mark reveals the meaning of the mark in a tooltip (for example, Bookmark). For errors, the tooltip shows a brief explanation of the problem (for example, “‘;’ expected, cannot find symbol,” and so on).
When you hover over the box at the top of the error stripe with your cursor, a tooltip says how many errors and warnings exist for the opened file in the Source Editor. A green box indicates no errors or warnings. An orange box means warnings but no errors. A red box means either errors, or errors and warnings.
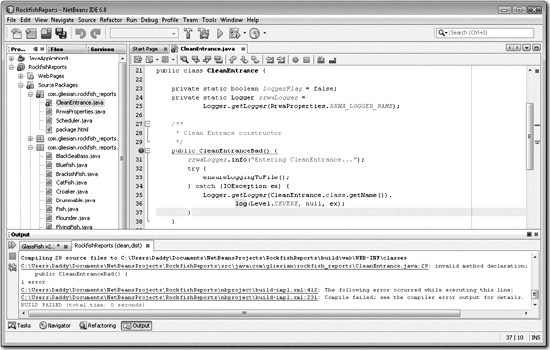
Output Window Diagnostic Messages
The Output window displays information, warnings, and error messages about the build and compilation processes. When errors are found, they may be linked to the source code via a hyperlink. Clicking the link opens the file in the Source Editor and brings the cursor to the line in question. Figure 6-20 displays the Output window at the bottom of the IDE with error messages.
FIGURE 6-20 Output window with error messages
CERTIFICATION OBJECTIVE: Using Editor Hints
Exam Objective 5.4 Demonstrate the ability to use editor hints, such as implementing all the methods for an implemented interface.
An illuminated light bulb is often used to represent a new idea. In NetBeans, you may have noticed a bulb appearing in the left margin of lines containing an error—for instance, if you have typed a class, but the class has not yet been imported. The light bulb not only flags errors and warnings, but also draws your attention to editor hints that may be invoked to help in code remediation. Hovering the cursor over the light bulb pops up a tooltip displaying text with a brief description of the problem. Clicking the light bulb or pressing ALT-ENTER while being on the associated line also shows the tooltip popup as well as another popup window with editor hints (suggested corrective actions). Selecting the editor hints performs the corrective action. This section discusses some of the solutions that can be generated from selected editor hints. Corrective actions covered are listed relative to the following hint types:
![]() Class Importing Hints
Class Importing Hints
![]() Missing Methods, Fields, and Variable Hints
Missing Methods, Fields, and Variable Hints
![]() Inherited Methods Implementation Hints
Inherited Methods Implementation Hints
Class Importing Hints
Class importing hints are provided for errors related to the existence or absence of necessary import statements. An annotation glyph appears as a light bulb if an import statement exists for a class that isn’t being used or if a class is being used without a corresponding import.
Unused Import Statement Removal
Import statements that include a class name, static member, or wildcard with no references in the source code are not needed. These statements are flagged with light bulb glyphs in the left margin. The glyphs can be clicked to display editor hints. When there is only one unused import, the Remove Unused Imports editor hint is displayed. When there are multiple unused imports, the Remove All Unused Imports editor hint also appears, as shown in Figure 6-21.
FIGURE 6-21 Import statement additions
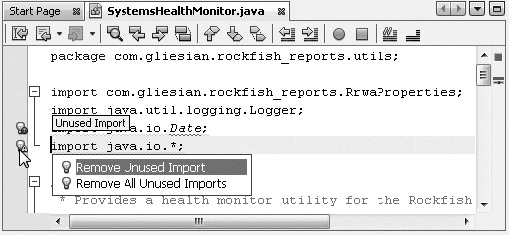
You can automatically remove all unused import statements by pressing CTRL-SHIFT-I from within the Source Editor.
Adding Import Statements
When you use classes from other packages, they must have corresponding import statements in your source code. If they do not have the imports, the statements with the classes depending on the imports are flagged with light bulb glyphs in the left margin. Clicking the glyphs displays the editor hints. Hints include “Add import for [package].[class_name]” and “Create class [class_name] in package [package].”
CTRL-SHIFT-I in this context opens a Fix All Imports dialog box. Figure 6-22 shows the dialog box when no import statement is present for the Timer class that is being used in the source code for this example. Pressing ALT-SHIFT-I performs fast import correction for a highlighted class.
FIGURE 6-22 Fix All Imports dialog box

NetBeans makes heavy use of tooltips. If you need a quick hint as to what a problem is or what a button does, just hover the mouse over the item, and wait to see if a tooltip comes up. These tips come in handy with the glyph gutter annotations and the markers in the error stripe.
Missing Methods, Fields, and Variable Hints
Editor hints are available for missing methods, fields, and variables.
Missing Methods
Suppose you call a method named generateReport() that does not exist. The IDE presents the light bulb in the left margin. Clicking the glyph shows the editor hint, “Create Method generateReport() in [package_name].[class_name].” Invoking this hint generates the method with filler information:
![]()
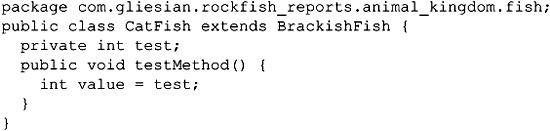
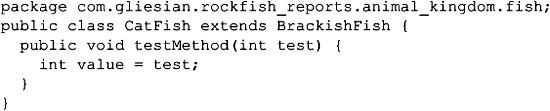
Missing Fields and Variable Hints
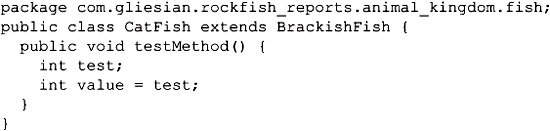
When Java identifiers are present but not declared, editor hints provide several means of correction. Figure 6-23 shows the use of the identifier test that does not have a declaration. Editor hints exist to declare the identifier as a field, method parameter, or local variable.
FIGURE 6-23 Editor hints for undeclared identifier

When the “Create Field test in com.gliesian.rockfish_reports.animal_kingdom.fish.CatFish” editor hint is selected, the field declaration is added for test:
When the Create Parameter test editor hint is selected, the method signature changes with test added as a parameter:
When the “Create Local Variable test” editor hint is selected, the method includes a local declaration for the test variable:
Consider adding your own editor hints to the IDE. The NetBeans Java Hint Module Tutorial provides instructions as to how to create Java hints: http://platform.netbeans.org/tutorials/nbm-java-hint.html.
Inherited Methods Implementation Hints
When you change the signature of a class to implement an interface, an editor hint is provided to create the methods for you.
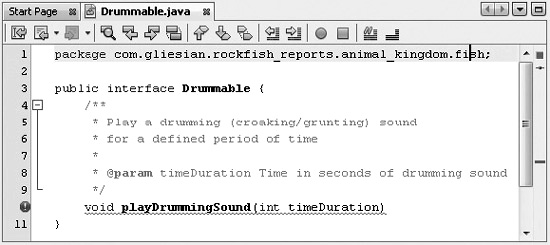
As an example, consider the signature public class Kingfish extends SaltWaterFish {} being changed to public class Kingfish extends SaltWaterFish implements Drummable {}. Selecting the editor hint, “Implement all abstract methods” adds the following code in the SaltWaterFish class:
![]()
EXERCISE 6-3 Inserting a Cast from an Editor Hint
This exercise is designed to use an editor hint to automate the creation of a cast.
1. Create a simple Java application (for example, HelloWorld).
2. Create a condition where a cast needs to be inserted.
3. Example:
![]()
4. Select the light bulb editor hint for insertion of a cast.
5. The code should now compile successfully.
EXERCISE 6-4 Producing Annotation Glyph Icons in the Left Margin
This exercise produces glyph icons by introducing coding mishaps. This exercise is intentionally challenging because you need to figure out how to create the errors in order to become very familiar with the annotation glyphs under various conditions. Also, by doing this exercise, you witness various ways the NetBeans IDE behaves based on your interactions with the Source Editor.
1. Create a simple Java application (for example, HelloWorld).
2. Introduce code that produces an Error icon with the tooltip, “Class, interface, or enum expected.”
3. Introduce code that produces an Error icon with the tooltip, “Illegal start of type.”
4. Introduce code that produces an Error icon with the tooltip, “‘{’ expected.”
5. Introduce code that produces a Fixable Error icon with the tooltip, “cannot find symbol.”
6. Introduce code that produces a Fixable Error icon with the tooltip, “Illegal character:[XX].”
7. Introduce code that produces a Fixable Warning icon with the tooltip, “Field hides another field.”
8. Introduce code that produces a Fixable Warning icon with the tooltip, “Unused Import.”
CERTIFICATION OBJECTIVE: Generating Code
Exam Objective 5.5 Demonstrate the ability to use live code templates such as automatic generation of constructors, try/catch loops, and getters and setters.
NetBeans provides tools to enhance the productivity of software developers. These tools include code completion, code templates, and live code templates. Code completion assists developers in filling in source code that they would have had to commit to memory or have researched from API documentation (for example, a method name of a class). Code templates allow for the expansion of text from a defined abbreviation using a defined shortcut. Live code templates are the same as simple code templates, except they include “live” editable fields upon code text expansion. We will look at the details of each of these individually.
![]() Code Completion
Code Completion
![]() Code Templates
Code Templates
![]() Live Code Templates
Live Code Templates
Code Completion
Code completion is automatic or prompted generation of code based on partial code, triggers, and popup command selections.
Code Completion Usage
Code completion can be used to complete Java elements such as package, method, and class names, method/constructor signatures and parameters, and closing brackets. Take, for example, the source code input of import jav followed by CTRL-SPACE. A code completion list box displays with “jav” being used as the beginning part of available package names (that is, java and javax). Select javax from the list and press Enter or the period key. All available package elements are listed. In this case there are over 30 elements. Select crypto from the list box and press Enter or the period key. You now see all available classes. The first class is highlighted by default in the displayed list box, with a second popup being opened with the associated Javadoc documentation. Press the semicolon key, and the associated class is added to the import statement, followed by a semicolon. This was a common-use case of code completion.
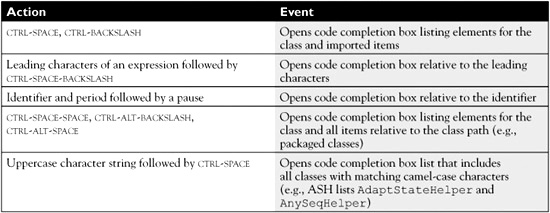
There are many ways to open code completion popups to help you with development, as detailed in Table 6-4.
TABLE 6-4 Means to Open the Code Completion Popup List Box
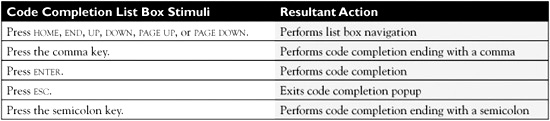
Once the code completion popup box has been opened, you have several ways to work with the elements presented in the list box, as shown in Table 6-5.
TABLE 6-5 Code Completion List Box Stimuli
Code completion is also supported by a code generation popup window. The popup is available by pressing ALT-INSERT. Menu options open various dialog boxes that include functionality for the generation of constructors, getters and setters, equals and hashCode methods, and properties.
Code Templates
Code templates in their simplest form expand abbreviations into expanded text. This expansion is performed with the assistance of a defined keystroke sequence, also known as an expander in this context. The expander may be SPACE, SHIFT-SPACE, TAB, or ENTER. The most commonly used expander shortcut is the TAB key. The expander is configurable in the Code Templates tab of the Options window and Editor panel. Code templates actually consist of three parts: an abbreviation, expanded text, and a description. Code templates can be created, modified, or deleted within the Code Templates tab. Code templates are grouped by languages. The most commonly used code templates of the Java programming language are presented in the bonus appendix entitled "NetBeans Code Templates" available for download from the Media Center.
The expanded text may use special code template syntax to affect how the code template behaves.
Code Template Usage
Let’s take a look at some commonly used code templates and their benefits. If you don’t use these already, you will probably start as soon as you put this book down.
St-TAB (type St and press TAB) expands to String. The benefit here is speed. String is represented almost as fast as you thought to type it.
twn-TAB expands to throw new. As you can see, the abbreviation can expand to multiple words.
Psfb-TAB expands to public static final boolean. That’s a savings of 22 keystrokes. Tally that up over the course of your career.
Special Code Templates Syntax
Special Code Templates Syntax allows for additional features besides just replacing an abbreviation with a longer piece of text such as cursor placement. Because of the special syntax, ${cursor}, as shown in Appendix D, the cursor automatically goes between the quotes upon expansion.
sout-TAB expands to System.out.println("[[CURSOR_GOES_HERE]]");. The clear benefit here is convenience, because you do not need to backspace and position the cursor between the quotes.
pvsm-TAB expands to the following code, creating the entire main method with cursor placement:

The other two special syntax constructs that are used heavily in “live” code templates are ${selection} and ${param_name [arg]}. Using ${selection} defines the position for pasting the content of the editor selection. Parameter constructs are the basis of editable fields. Reference the bonus appendix entitled "NetBeans Code Templates," available for download from the Media Center, for examples of these constructs.
NetBeans provides functionality for file templates. You can either create your own file templates, or use those provided by NetBeans. You will probably find yourself doing both. File templates are similar to code templates with the main difference being that file templates are relative to a file type, and code templates are representative of lines of code.
![]()
Code templates can only be expanded by what is configured in the Editor | Code Templates tab of the Options window. Expansion options include SPACE, SHIFT-SPACE, TAB, or ENTER. You are almost guaranteed to see a question related to the expansion of code templates on the exam.
EXERCISE 6-5 Creating a HelloWorld Project in 30 Seconds
This exercise lets you create a HelloWorld project, modify the main file, perform formatting, and run the application, all in 30 seconds or less. At the same time, you are using different NetBeans IDE features you have learned and some new ones. Ready, set, go!
1. Press CTRL-SHIFT-N to initiate the New Project wizard.
2. Use the arrow keys to select Java Category from the Categories list.
3. Press TAB.
4. Use the arrow keys to select Java Application Project from the Projects list.
5. Press ENTER to invoke the focused Next button.
6. Input HelloWorld for the Project Name field in the New Java Application window of the wizard.
7. Ensure the Create Main Class and Set As Main Project checkboxes are selected.
8. Press ENTER. The project is created and the Main.java class opens in the Source Editor.
9. Press CTRL-G, input 18 into the edit box, and press ENTER. The cursor goes to the TODO line we are replacing.
10. Press CTRL-E to delete the TODO line.
11. Type sout and press TAB. “sout” is expanded to System.out.println(""); with the cursor between the quotes. Note: TAB is the default expander.
12. Type Hello, World! between the quotes.
13. Press CTRL-A to select all the text.
14. Press ALT-SHIFT-F to format the selected text.
15. Press F6 to run the project.
16. Verify Hello, World! is printed to the Output window.
17. Take a breather and congratulate yourself.
Live Code Templates
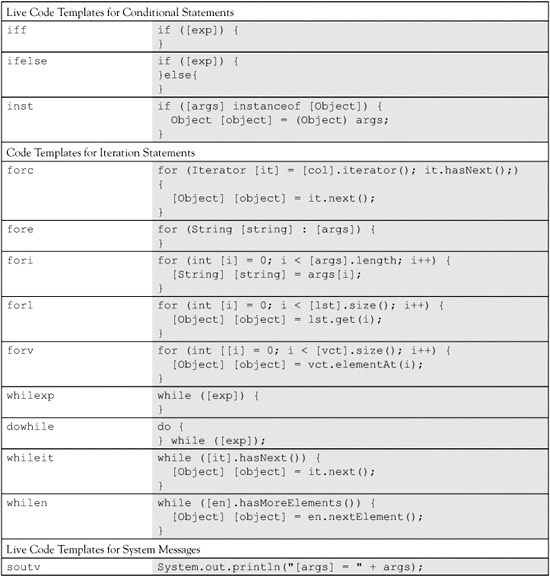
Live code templates are the same as code templates, but include “live” editable fields upon expansion. While constructor-related, try/catch loops, and getters and setters functionality can be related to live code templates as mentioned in the objective, their features are more prevalent in other areas of the IDE such as within code insertion popups, basic code templates, and refactoring commands. Actual live code templates that use special code syntax to give them “live” editable capabilities include those represented in Table 6-6. Items in box brackets are representative of “live” editable fields. These box brackets are for use in the table and are not seen in the actual templates. Editing the field and pressing ENTER changes the value and associated fields. Pressing TAB traverses to the next editable field. Pressing ESC exits the code template.
TABLE 6-6 Various Live Code Templates
Live Code Template Usage
Just like regular code templates, live code templates are created from expanding abbreviations. The main difference for live code templates is the use of code constructs that place the template into a live state with editable fields. The presence of parameter constructs can create live code templates. The general format for parameter constructs is simple with the inclusion of hints and values:
![]()
Available hints include default, editable, instanceof, array, iterable, type, iterableElementType, leftSideType, rightSideType, cast, and newVarName. Knowing the exact details of these hints is outside the scope of the exam, but you can find out more within the IDE’s help system.
As a general example, the live code template syntax for a basic assertion statement would be as follows:
![]()
Once expanded, the live code template would be created with the EXP field editable with the cursor:
![]()
Pressing TAB allows the string field to be edited. Press ENTER to leave the live code template once you are done.
Remember to use the -ea switch in your project configuration to enable assertions.
There are a few ways to invoke code generation from the Source Editor detailed in the Scenario & Solution.
SCENARIO & SOLUTION

EXERCISE 6-6 Writing Descriptions for Code Templates
As of NetBeans 6.8, the descriptions for Java Code Templates elements have yet to be completed. The absence of the information provides the perfect opportunity to complete the descriptions yourself. Once they’re completed, you should be a code templates expert with polished Java fundamental skills (for example, better keyword and statements understanding).
1. In the Options window, click the Editor icon, and select the Code Templates tab.
2. Ensure that the first Templates table row is selected for the En code template abbreviation.
3. Select the Description tab and provide a description for En. (For example, “An Enumeration class allows for the creation of enumeration types containing a fixed set of constants as fields.”)
4. Provide a description for each abbreviation.
CERTIFICATION SUMMARY
This chapter refined your expertise with the Source Editor. In doing so, we noted that the Source Editor is actually a collection of various editors. We also stated that the exam primarily focuses on the Java source editor. We moved on to provide ample coverage of the four Source Editor–related objectives. The objectives covered Source Editor configurations, error highlighting and correction, editor hints, and code generation.
In regard to configurations, we covered the settings features in the Editor, Fonts & Colors, and Keymap panels of the Options window. The exam may ask for specific information provided in these panels, so ensure you review the features as detailed in this chapter.
We then discussed the various ways the IDE highlights diagnostics in relationship to the Source Editor including Projects window icons, left margin annotation glyphs, Source Editor highlighting, error stripe marks, and Output window messages. Being able to visualize these different types of diagnostics helps you at test time.
We covered editor hints, when they are available, and how they can be invoked. Being comfortable with editor hints not only helps you on the exam, but also helps you greatly on the job with your productivity.
We covered the many ways that code can be generated in the Source Editor. We covered code completion, code templates, and live code templates. Generating code saves development teams time and money. Since code generation is such an important feature, you can likely expect at least a couple of related questions on the exam.
Completing this chapter, you have gained all of the knowledge needed to score well on questions related to the Source Editor.
 TWO-MINUTE DRILL
Modifying Behavior of the Source Editor
![]() The Source Editor is conceptualized as a collection of editors.
The Source Editor is conceptualized as a collection of editors.
![]() The editors provided by NetBeans include HTML, Java, JSP, and XML source editors.
The editors provided by NetBeans include HTML, Java, JSP, and XML source editors.
![]() The exam focuses on the Java editor. It is integrated with key IDE components such as the GUI Builder, the compiler, and the debugger.
The exam focuses on the Java editor. It is integrated with key IDE components such as the GUI Builder, the compiler, and the debugger.
![]() The Options window provides configuration options to change the default appearance and behavior of the IDE.
The Options window provides configuration options to change the default appearance and behavior of the IDE.
![]() The General panel in the Options window provides for selection of the default web browser, proxy settings configuration, and activation of Usage Statistics.
The General panel in the Options window provides for selection of the default web browser, proxy settings configuration, and activation of Usage Statistics.
![]() The Editor panel in the Options window provides for configuration of code folding, camel case behavior, source code formatting, code completion, code templates, hints, the marking of occurrences, and macros.
The Editor panel in the Options window provides for configuration of code folding, camel case behavior, source code formatting, code completion, code templates, hints, the marking of occurrences, and macros.
![]() The Fonts & Colors panel in the Options window provides for configuration of language syntax attributes, IDE component (for example, status bar) highlighting, annotation glyphs coloring, and background coloring of the diff tool components.
The Fonts & Colors panel in the Options window provides for configuration of language syntax attributes, IDE component (for example, status bar) highlighting, annotation glyphs coloring, and background coloring of the diff tool components.
![]() The Keymap panel in the Options window allows for the selection and management of Keymap Profiles.
The Keymap panel in the Options window allows for the selection and management of Keymap Profiles.
Understanding Error Highlighting and Correction
![]() The NetBeans IDE produces various diagnostics in the form of icons, glyphs, highlighting, marks, and messages.
The NetBeans IDE produces various diagnostics in the form of icons, glyphs, highlighting, marks, and messages.
![]() The Projects window displays icons next to various nodes in regard to existence of warnings, errors, and information diagnostics. The icon is generally the same as the icon under normal conditions, with an added symbol such as a wrench or an exclamation mark.
The Projects window displays icons next to various nodes in regard to existence of warnings, errors, and information diagnostics. The icon is generally the same as the icon under normal conditions, with an added symbol such as a wrench or an exclamation mark.
![]() The left margin of the Source Editor includes annotation diagnostic glyphs for errors, warnings, and fixable problems.
The left margin of the Source Editor includes annotation diagnostic glyphs for errors, warnings, and fixable problems.
![]() The Source Editor includes diagnostic highlighting of errors by the use of underlining.
The Source Editor includes diagnostic highlighting of errors by the use of underlining.
![]() The error stripe at the right of the Source Editor includes diagnostic marks as well as marks correlating to bookmarks and comments for the todo list.
The error stripe at the right of the Source Editor includes diagnostic marks as well as marks correlating to bookmarks and comments for the todo list.
![]() The Output window produces warning and error messages upon building the project. Errors have hyperlinks to the problems in the source code.
The Output window produces warning and error messages upon building the project. Errors have hyperlinks to the problems in the source code.
Using Editor Hints
![]() Light bulbs are displayed in the left margin of the Source Editor relative to fixable warnings and errors. Hovering over the light bulb opens a popup detailing the issue at hand.
Light bulbs are displayed in the left margin of the Source Editor relative to fixable warnings and errors. Hovering over the light bulb opens a popup detailing the issue at hand.
![]() Editor hints are invokable commands associated with fixable problems flagged by source code warnings and errors.
Editor hints are invokable commands associated with fixable problems flagged by source code warnings and errors.
![]() Editor hints are listed by selecting ALT-ENTER relative to the fixable code or by clicking the associated light bulb in the left margin. Clicking the desired editor hint invokes it.
Editor hints are listed by selecting ALT-ENTER relative to the fixable code or by clicking the associated light bulb in the left margin. Clicking the desired editor hint invokes it.
Generating Code
![]() Code completion consists of mechanisms that assist the user in automatically or manually completing partially inserted code.
Code completion consists of mechanisms that assist the user in automatically or manually completing partially inserted code.
![]() Code completion popup windows can be invoked by pressing CTRL-SPACE.
Code completion popup windows can be invoked by pressing CTRL-SPACE.
![]() Code completion popup windows associated with the entire classpath can be invoked by pressing CTRL-SPACE-SPACE, CTRL-ALT-BACKSLASH, or CTRL-ALT-SPACE.
Code completion popup windows associated with the entire classpath can be invoked by pressing CTRL-SPACE-SPACE, CTRL-ALT-BACKSLASH, or CTRL-ALT-SPACE.
![]() A code generation popup is available when pressing ALT-INSERT that allows you to automate code such as constructors, getters and setters, equals, and hashCode methods and properties.
A code generation popup is available when pressing ALT-INSERT that allows you to automate code such as constructors, getters and setters, equals, and hashCode methods and properties.
![]() Code templates consist of abbreviations designed to be expanded into fuller text upon a designated keystroke selection.
Code templates consist of abbreviations designed to be expanded into fuller text upon a designated keystroke selection.
![]() Code templates can be expanded by pressing SPACE, SHIFT-SPACE, TAB, or ENTER as defined in the Code Templates tab of the Editor panel in the Options window.
Code templates can be expanded by pressing SPACE, SHIFT-SPACE, TAB, or ENTER as defined in the Code Templates tab of the Editor panel in the Options window.
![]() Code templates can use special code templates syntax to affect how the code template behaves.
Code templates can use special code templates syntax to affect how the code template behaves.
![]() Live code templates are code templates that include editable fields within the “live” expanded text. Tabbing traverses the editable fields highlighted in blue. The ESC key terminates the editing mode.
Live code templates are code templates that include editable fields within the “live” expanded text. Tabbing traverses the editable fields highlighted in blue. The ESC key terminates the editing mode.
SELF TEST
The following questions will help you measure your understanding of the material presented in this chapter. Read all the choices carefully because there might be more than one correct answer. Choose all correct answers for each question.
Modifying Behavior of the Source Editor
1. Code folding is configurable under the General tab under which panel selection?
A. Tools | Options, General panel
B. Tools | Options, Editor panel
C. Tools | Options, Keymap panel
D. Tools | Options, Miscellaneous panel
2. Checkboxes are provided in the Options window for which Code Completion features? Select all that apply.
A. Auto Popup Completion Window
B. Insert Single Proposals Automatically
C. Case Sensitive Code Completion
D. Auto Comment Spellchecker
E. Auto Popup Documentation Window
3. If camel case navigation for Java is enabled through the Options window, the caret stops at which characters in SaltWaterFish when using Next (CTRL-RIGHT) / Previous (CTRL-LEFT) word actions?
A. The caret only stops at the first character S.
B. The caret stops at all nonconsecutive capital letters; S, W, and F.
C. The caret stops at the first and last camel-case characters, S and F.
D. The caret does not stop at any characters.
4. Which macros are supplied by NetBeans by default as listed in the Options window? Select all that apply.
A. cast-to-String
B. debug-var
C. quote-word
D. select-invalid-identifier
Understanding Error Highlighting and Correction
5. Which Fonts & Colors profile associated with the Options window has the color black associated with default color used for the left margin, default line colors, and so on?
A. Earth
B. NetBeans 5.5
C. Norway Today
D. City Lights
E. None of the above
6. What language categories exist for Syntax coloring configuration? Select all that apply.
A. DTD
B. HTML
C. JOVIAL
D. JSP
E. XML
7. What attributes are configurable for diff tool items being highlighted?
A. Background colors
B. Foreground colors
C. Background and foreground colors
D. None of the above
Using Editor Hints
8. What editor hints are listed for an unused import statement when pressing ALT-ENTER? Select all that apply.
A. Remove Unused Import
B. Generate Import Related Code
C. Refactor Imports
D. All of the above
9. Which statement will result in a light bulb with the editor hint “possible loss of precision required: short found: int”?
A. int x = 1; short y = 2; int z = x + y;
B. int x = 1; short y = 2; short z = x + y;
C. short x = 1; short y = 2; short z = (short) (x + y);
D. int x = 1; int y = 2; int z = x + y;
10. If there are multiple statements on one line with errors that have fixable hints, what is seen in the left margin?
A. A light bulb accompanied by an exclamation mark in a red octagon.
B. Three layered light bulbs accompanied by an exclamation mark in a red octagon.
C. Two separate light bulbs accompanied by an exclamation mark in a red octagon.
D. The word “Mult” in a red octagon.
11. Which corrective actions can be performed from editor hints?
A. Initializing variables
B. Inserting method parameters
C. Inserting casts
D. Managing missing and unused import statements
E. All of the above
Generating Code
12. Consider the following illustration:
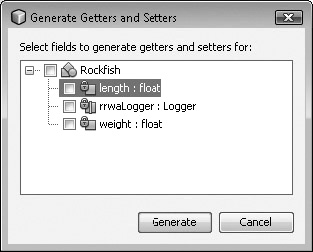
How would this Generate Getters And Setters dialog box be invoked?
A. In the Source Editor, right-click to open popup, and then choose Refactor | Encapsulate Fields.
B. Select the menu option Source | Insert Code | Getter And Setter.
C. In the Source Editor, right-click to open popup, and then choose Insert Code | Getter And Setter.
D. B and C.
E. All of the above.
SELF TEST ANSWERS
Modifying Behavior of the Source Editor
1. Code folding is configurable under the General tab under which panel selection?
A. Tools | Options, General panel
B. Tools | Options, Editor panel
C. Tools | Options, Keymap panel
D. Tools | Options, Miscellaneous panel
![]() B. Code folding is configurable on the General tab under the Tools | Options, Editor panel selection.
B. Code folding is configurable on the General tab under the Tools | Options, Editor panel selection.
![]() A, C, and D are incorrect. A is incorrect because code folding is not configurable relative to the Tools | Options, General panel selection. C is incorrect because code folding is not configurable relative to the Tools | Options, Keymap panel selection. D is incorrect because code folding is not configurable relative to the Tools | Options, Miscellaneous panel selection.
A, C, and D are incorrect. A is incorrect because code folding is not configurable relative to the Tools | Options, General panel selection. C is incorrect because code folding is not configurable relative to the Tools | Options, Keymap panel selection. D is incorrect because code folding is not configurable relative to the Tools | Options, Miscellaneous panel selection.
2. Checkboxes are provided in the Options window for which Code Completion features? Select all that apply.
A. Auto Popup Completion Window
B. Insert Single Proposals Automatically
C. Case Sensitive Code Completion
D. Auto Comment Spellchecker
E. Auto Popup Documentation Window
![]() A, B, C, and E. Checkboxes are provided in the Options window for the following Code Completion features: Auto Popup Completion Window, Insert Single Proposals Automatically, Case Sensitive Code Completion, Auto Popup Documentation Window.
A, B, C, and E. Checkboxes are provided in the Options window for the following Code Completion features: Auto Popup Completion Window, Insert Single Proposals Automatically, Case Sensitive Code Completion, Auto Popup Documentation Window.
![]() D is incorrect because there is no Auto Comment Spellchecker checkbox.
D is incorrect because there is no Auto Comment Spellchecker checkbox.
3. If camel case navigation for Java is enabled through the Options window, the caret stops at which characters in SaltWaterFish when using Next (CTRL-RIGHT) / Previous (CTRL-LEFT) word actions?
A. The caret only stops at the first character S.
B. The caret stops at all nonconsecutive capital letters; S, W, and F.
C. The caret stops at the first and last camel-case characters, S and F.
D. The caret does not stop at any characters.
![]() B. If camel case navigation for Java is enabled through the Options window, the caret stops at all nonconsecutive capital letters in SaltWaterFish when using Next (CTRL-RIGHT) / Previous (CTRL-LEFT) word actions. The letters are S, W, and F.
B. If camel case navigation for Java is enabled through the Options window, the caret stops at all nonconsecutive capital letters in SaltWaterFish when using Next (CTRL-RIGHT) / Previous (CTRL-LEFT) word actions. The letters are S, W, and F.
![]() A, C, and D are incorrect. A is incorrect because the caret stops on S, W, and F. C is incorrect because the caret stops on S, W, and F. D is incorrect because the caret stops on S, W, and F.
A, C, and D are incorrect. A is incorrect because the caret stops on S, W, and F. C is incorrect because the caret stops on S, W, and F. D is incorrect because the caret stops on S, W, and F.
4. Which macros are supplied by NetBeans by default as listed in the Options window? Select all that apply.
A. cast-to-String
B. debug-var
C. quote-word
D. select-invalid-identifier
![]() A, B, and C. The macros cast-to-String, debug-var, and quote-word are supplied by default in the Options window.
A, B, and C. The macros cast-to-String, debug-var, and quote-word are supplied by default in the Options window.
![]() D is incorrect because select-invalid-identifier is not a supplied macro.
D is incorrect because select-invalid-identifier is not a supplied macro.
Understanding Error Highlighting and Correction
5. Which Fonts & Colors profile associated with the Options window has the color black associated with default color used for the left margin, default line colors, and so on?
A. Earth
B. NetBeans 5.5
C. Norway Today
D. City Lights
E. None of the above
![]() D. The City Lights profile has black associated with the default line color, left margin, and other elements.
D. The City Lights profile has black associated with the default line color, left margin, and other elements.
![]() A, B, C, and E are incorrect. A is incorrect because the Earth profile has white associated with the default color. B is incorrect because the NetBeans 5.5 profile has white associated with the default color. C is incorrect because the Norway Today profile has a darker color [18,30,49] associated with the default color, but it is not black. E is incorrect because “None of the above” is an incorrect answer.
A, B, C, and E are incorrect. A is incorrect because the Earth profile has white associated with the default color. B is incorrect because the NetBeans 5.5 profile has white associated with the default color. C is incorrect because the Norway Today profile has a darker color [18,30,49] associated with the default color, but it is not black. E is incorrect because “None of the above” is an incorrect answer.
6. What language categories exist for Syntax coloring configuration? Select all that apply.
A. DTD
B. HTML
C. JOVIAL
D. JSP
E. XML
![]() A, B, D, and E. Syntax color configuration is available for the following categories/languages among others: DTD, HTML, JSP, and XML.
A, B, D, and E. Syntax color configuration is available for the following categories/languages among others: DTD, HTML, JSP, and XML.
![]() C is incorrect because JOVIAL is not available as a category for syntax color configuration.
C is incorrect because JOVIAL is not available as a category for syntax color configuration.
7. What attributes are configurable for diff tool items being highlighted?
A. Background colors
B. Foreground colors
C. Background and foreground colors
D. None of the above
![]() A. Background colors can be configured for the diff tool items being highlighted.
A. Background colors can be configured for the diff tool items being highlighted.
![]() B, C, and D are incorrect. B is incorrect because foreground colors are not configurable for diff tool items being highlighted. C is incorrect because foreground colors are not configurable for diff tool items being highlighted, but background colors are configurable. D is incorrect because the answer is not “None of the above.”
B, C, and D are incorrect. B is incorrect because foreground colors are not configurable for diff tool items being highlighted. C is incorrect because foreground colors are not configurable for diff tool items being highlighted, but background colors are configurable. D is incorrect because the answer is not “None of the above.”
Using Editor Hints
8. What editor hints are listed for an unused import statement when pressing ALT-ENTER? Select all that apply.
A. Remove Unused Import
B. Generate Import Related Code
C. Refactor Imports
D. All of the above
![]() A. The only editor hint provided for unused imports when pressing ALT-ENTER is “Remove Unused Import.”
A. The only editor hint provided for unused imports when pressing ALT-ENTER is “Remove Unused Import.”
![]() B, C, and D are incorrect. B is incorrect because there is no “Generate Import Related Code” editor hint. C is incorrect because there is no “Refactor Imports” editor hint. D is incorrect because only answer A is correct, not “All of the above.”
B, C, and D are incorrect. B is incorrect because there is no “Generate Import Related Code” editor hint. C is incorrect because there is no “Refactor Imports” editor hint. D is incorrect because only answer A is correct, not “All of the above.”
9. Which statement will result in a light bulb with the editor hint “possible loss of precision required: short found: int”?
A. int x = 1; short y = 2; int z = x + y;
B. int x = 1; short y = 2; short z = x + y;
C. short x = 1; short y = 2; short z = (short) (x + y);
D. int x = 1; int y = 2; int z = x + y;
![]() B. Variables x and y are implicitly casted to integers; therefore their sum does not fit into a short.
B. Variables x and y are implicitly casted to integers; therefore their sum does not fit into a short.
![]() A, C, and D are incorrect. A is incorrect because the statements are technically correct and will not cause a light bulb to be displayed. C is incorrect because the statements are technically correct and will not cause a light bulb to be displayed. D is incorrect because the statements are technically correct and will not cause a light bulb to be displayed.
A, C, and D are incorrect. A is incorrect because the statements are technically correct and will not cause a light bulb to be displayed. C is incorrect because the statements are technically correct and will not cause a light bulb to be displayed. D is incorrect because the statements are technically correct and will not cause a light bulb to be displayed.
10. If there are multiple statements on one line with errors that have fixable hints, what is seen in the left margin?
A. A light bulb accompanied by an exclamation mark in a red octagon.
B. Three layered light bulbs accompanied by an exclamation mark in a red octagon.
C. Two separate light bulbs accompanied by an exclamation mark in a red octagon.
D. The word “Mult” in a red octagon.
![]() A. When multiple statements are on one line with errors, only one light bulb accompanied by an exclamation mark in a red octagon is displayed.
A. When multiple statements are on one line with errors, only one light bulb accompanied by an exclamation mark in a red octagon is displayed.
![]() B, C, and D are incorrect. B is incorrect because there is no glyph with multiple light bulbs. C is incorrect because there can be only one glyph displayed at a time. D is incorrect because there is no glyph with the word “Mult” in a red octagon.
B, C, and D are incorrect. B is incorrect because there is no glyph with multiple light bulbs. C is incorrect because there can be only one glyph displayed at a time. D is incorrect because there is no glyph with the word “Mult” in a red octagon.
11. Which corrective actions can be performed from editor hints?
A. Initializing variables
B. Inserting method parameters
C. Inserting casts
D. Managing missing and unused import statements
E. All of the above
![]() E. All of the listed corrective actions can be performed from editor hints including initializing variables, inserting method parameters, inserting casts, and managing missing and unused import statement.
E. All of the listed corrective actions can be performed from editor hints including initializing variables, inserting method parameters, inserting casts, and managing missing and unused import statement.
Generating Code
12. Consider the following illustration:
How would this Generate Getters And Setters dialog box be invoked?
A. In the Source Editor, right-click to open popup, and then choose Refactor | Encapsulate Fields.
B. Select the menu option Source | Insert Code | Getter And Setter.
C. In the Source Editor, right-click to open popup, and then choose Insert Code | Getter And Setter.
D. B and C.
E. All of the above.
![]() D. D is correct because both answer B and C are valid. The Generate Getters And Setters dialog box can be invoked by first opening the appropriate source file and then selecting Source | Insert Code | Getter And Setter and by right-clicking the source file | Insert Code | Getter And Setter.
D. D is correct because both answer B and C are valid. The Generate Getters And Setters dialog box can be invoked by first opening the appropriate source file and then selecting Source | Insert Code | Getter And Setter and by right-clicking the source file | Insert Code | Getter And Setter.
![]() A, B (alone), C (alone), and E are incorrect. A is incorrect because the Generate Getters And Setters dialog box cannot be opened by right-clicking the Source Editor and selecting Refactor | Encapsulate Fields. Note that this was a tricky test question because you can encapsulate fields using the Refactor menu; it’s just that the dialog box is different. B and C are incorrect individually, as they both allow means to open the Generate Getters And Setters dialog box as represented in answer D. E is incorrect because “All of the above” answers are not correct.
A, B (alone), C (alone), and E are incorrect. A is incorrect because the Generate Getters And Setters dialog box cannot be opened by right-clicking the Source Editor and selecting Refactor | Encapsulate Fields. Note that this was a tricky test question because you can encapsulate fields using the Refactor menu; it’s just that the dialog box is different. B and C are incorrect individually, as they both allow means to open the Generate Getters And Setters dialog box as represented in answer D. E is incorrect because “All of the above” answers are not correct.