
Chapter 7
Working with Links
Key Skills & Concepts
• Add Links to Other Web Pages
• Add Links to Sections Within the Same Web Page
• Add Links to Email Addresses and Downloadable Files
• Recognize Effective Links
• Style Links
• Customize Links by Setting the Tab Order, Keyboard Shortcut, and Target Window
The crux of HTML is its capability to reference countless other pieces of information easily on the Internet. This is evident because the first two letters in the acronym HTML stand for hypertext, or text that is linked to other information.
HTML enables us to link to other web pages, as well as graphics, multimedia, email addresses, newsgroups, and downloadable files. Anything you can access through your browser can be linked to from within an HTML document. In fact, one of the easiest ways to identify the URL of a page you want to link to is to copy it from the location or address toolbar in your web browser. You can then paste it directly into your HTML file.
Add Links to Other Web Pages
You can add links to other web pages, whether they are part of your web site or someone else’s. To do so requires using the a element:
TIP
While adding a link to your favorite web site on your page is usually considered acceptable, it is never acceptable to copy someone else’s content without their permission. If you have any doubts, check with the site’s administrator whenever you’re linking to a site that isn’t your own.
The a element itself doesn’t serve much purpose without its attributes. The most common attribute is
href, which is short for hypertext reference: It tells the browser where to find the information to which you are linking. Other attributes are name, title, accesskey, tabindex, and target, all of which are discussed in this chapter.The text included in between the opening and closing a tags is what the person viewing your web page can click. In most cases, this text is highlighted as a different color from the surrounding text and is underlined, as shown in Figure 7-1.

Figure 7-1 This screen shows the browser view of the previous example code.
In deciding what to use as the value of your
href attribute, consider what type of link you want to use. The following are the two basic types of links:• Absolute
• Relative
Absolute Links
Absolute links are those that include the entire pathname. In most cases, you use absolute links when linking to pages or sites that are not part of your own web site. Absolute links must include the protocol (such as http://) at the beginning of the link. For example, if you are linking from your web site to Yahoo!, you type http://www.yahoo.com as your link.
Relative Links
Relative links are so called because you don’t include the entire pathname of the page to which you are linking. Instead, the pathname you use is relative to the current page. This is similar to saying, “I live in Summershade Court, about three miles from here,” which is relative to wherever “here” is. A more absolute way to say this might be “I live at 410 Summershade Court in Anytown, USA 55104.”
Relative links are most commonly used when you want to link from one page in your site to another. The following is an example of what a relative link might look like:
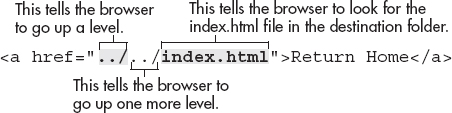
This link looks for the contactme.html file in the same folder that contains this page. If you were linking to a file in another folder below the current one, the value of your
href might look like the following:If you need to link to a file in a folder above the folder your page is in, you can add “../” for each directory up the tree. So, if the file you are linking to is two folders higher than the one you are in, you might use
Suppose you were building a web site for yourself and your family, using the following directory structure. You might remember something similar from Chapter 1, where we talked about file naming and the anatomy of a URL. Folders and files are indented to indicate that they are located on a different level.
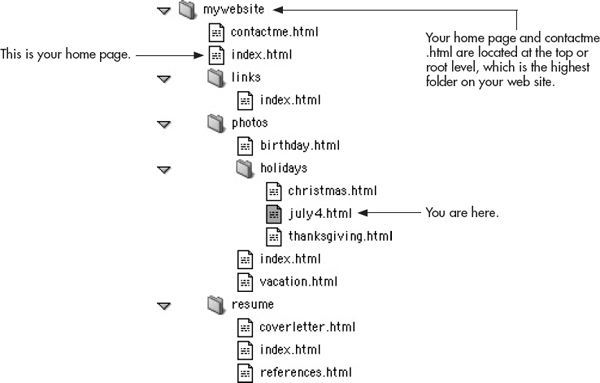
You are working on the highlighted file: july4.html. This file is located two folders below the home page (index.html) in a folder called holidays. If you want to link back to that home page from the july4.html page, you would include a relative link similar to this one:
Another way to tell the browser to return back to the root—or base—level is to simply use a single slash, like this:
The vast majority of servers are set up to recognize a single slash as a shortcut, so to speak, back to the home directory. This makes it easy to assign a single link “home,” for example, that works from any page on the web site.
NOTE
Remember that most servers consider index.html to be the index of a folder. This means a link to <a href=”holidays/”> would be the same as <a href=”holidays/index.html”>. If you don’t specify a filename, but only a folder name, the index page will be shown (provided it exists).
Now, suppose you are working on the birthday.html file and you want to link to the july4 .html page. Can you imagine how you would do that?

To link from birthday.html to july4.html, use the following code:
Because the july4.html file is one folder below the birthday.html file you are currently working on, you simply list the folder name followed by a forward slash and the filename (as shown in the preceding example).
Add Links to Sections Within the Same Web Page
When you link to a page, the browser knows what to look for because each page has a name. But sometimes you may want to link to a section of text within a page on your web site (see Figure 7-2 for an example). To link to a section of a web page, you must first give that section a name.

Figure 7-2 When you have multiple sections on a single page that you want to link to, you can use an anchor to name them.
Create an Anchor
An anchor is a place within a page that is given a special name, enabling you to link to it later. Without first naming a section, you cannot link to it. The following is an example of an anchor:

In this example, the phrase in between the opening and closing a tags is displayed in the web page and labels the anchor as “Section 1.” If you prefer not to include a label for your anchor, you can leave that space blank, as in the following example:
Here, you could use this invisible anchor at the top of your page, and then link to it from the bottom of your page. This would enable visitors to return to the top of a long page easily, with only one click and no scrolling (see Figure 7-3 for an example).
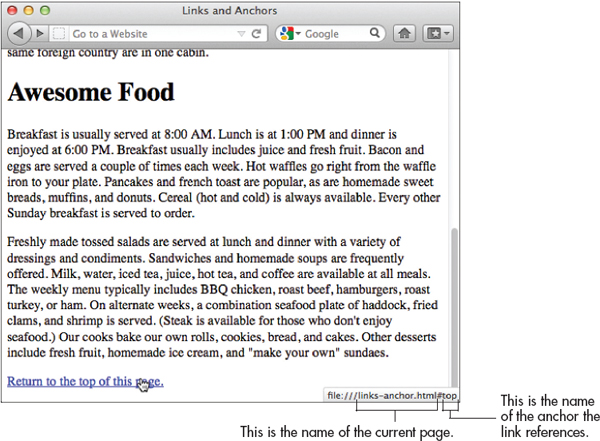
Figure 7-3 This browser view shows how an invisible anchor can be used to give visitors an easy link back to the top of the page.
Ask the Expert
Q: How do I know when to use relative or absolute pathnames?
A: Whenever you are linking to a page that is not contained within your web site, you will use an absolute pathname. For example, if you are working on a summer camp’s web site and you want to link to a national summer camp association, you need to use the full (absolute) pathname to do so.
However, if you are linking to a page on your own web site that contains information about that association, you could use a relative pathname.
Remember, if you do decide to use absolute pathnames to link to a page located in the same folder on your web site, this may cause problems for maintenance in the long run. If, at a later date, you decide to change the name of the folder these files are located in, you need to go back and change all the absolute links. If you used a relative link, though, you wouldn’t have to change anything.
Link to an Anchor
To create the link to an anchor, you also use the a element and the
href attribute, as you would when creating any other type of link. To finish the link, you need to include a hash symbol (#) and the anchor name as the value of the href attribute.
The following shows how it all might look when you code it in an HTML document:


As suggested, a good case for using anchors involves a long page with many small sections, such as the example shown in Figure 7-2. Whenever you do have long pages with an index and several sections, it’s nice to offer your visitors a “Back to Top” link to bring them back to the index easily. The following shows the HTML code used to create this page:


NOTE
If the anchor you are linking to is already visible on the screen (such as how the first section is already visible in Figure 7-2), then the browser may not jump to that anchor. Similarly, if the anchor being linked to is at the very bottom of the visible screen (such as the second section is in Figure 7-2), then the browser also may not jump to that anchor, according to your screen size.
If you need to create a link to a specific section with another page (not the one you are currently working on), then you use that page’s filename and the anchor name separated by a hash mark (#), as in the following example:
In this case, the browser will first look for genealogy.html and then locate an anchor named “intro” on that page.
Add Links to Email Addresses and Downloadable Files
Although links to and within web pages are the most common types of links you’ll create, you can also link to other types of content on the Internet.
Email Addresses
When you want to give someone easy access to your email address, you can include it on your page as a mailto link. This means instead of using
http:// in front of your link, you use the email protocol mailto: to preface your email address.
Clicking this link in a browser causes the visitor’s email program to launch. Then it opens a new email message and places your email address in the To: box of that message.
NOTE
For a mailto link to work, visitors to your web site must have an email program (such as Outlook or Mac Mail) set up on their computers. Email links like these may not work if the visitor uses only a web-based email service such as Gmail or Hotmail.
Customize the Email Message
Some browsers will even let you add content to the subject and cc fields in the email by entering additional text into the
href value. To do so, you add a question mark after the end of your email address, and type the word Subject followed by an equal sign (=), along with the word or phrase you’d like to use as your subject. This can be particularly useful in helping you distinguish mail sent through your web site from your other email.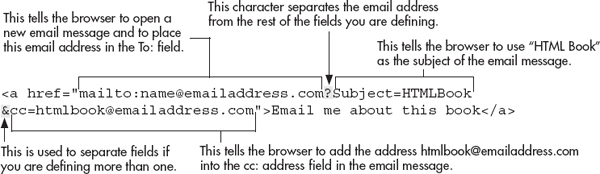
Remember, no spaces should be in the value of the
href attribute, unless they are part of the subject line.Spam-Proofing Your Email Links
Many people who send spam use programs called mail harvesters to search the Web looking for email addresses. This means any time your email address is listed, displayed, or otherwise included on a web page, you open yourself to potential spam.
What tips these harvesting programs off is the at symbol (@) in your email address, because we all know an email address can’t exist without one of those symbols. So the key to spam-proofing your email address is not to display it with an @ symbol.
Using [at] Instead of the @ Symbol A quick, pure-text way to avoid displaying your complete email address on a web page is to replace the @ symbol with something like [at] so that savvy visitors can still get your email address, but the harvesting programs miss it. This might make your email address look something like this:
me[at]mail.com
This only works if you merely display the email address and don’t link to it. For more on that, keep reading.
Using an Image to Replace the @ Symbol The second easiest way to spam-proof displayed email addresses is to replace the text @ symbol with a graphic @ symbol. This causes your site’s visitors to see the email address in its entirety, but fools email harvesters because they don’t read images.
However, this and the previous technique only work to hide email addresses that are merely displayed in the browser. If you’re linking your email address so people can click it to send an email, you must also hide the version of the email address embedded in the
a tag. To do so, try one of the following two tricks.Using Code to Replace the @ Symbol The problem with the first two ways to spam-proof your email address is that they only work if the email address is displayed and not linked. For example, consider the following:
While the email address is not displayed in the browser view, it’s still embedded in the code. When you include your actual email address in the code of a mailto link, harvesting programs reading the actual HTML will still find it!
One way to hide the email address in the mailto link is to replace the @ symbol and period with their decimal equivalents. This means [email protected] might look like:
Here,
@ is the decimal equivalent of the @ symbol and . is the equivalent of a period. The complete a tag using this technique looks like this:The vast majority of email programs recognize these decimal characters and will replace them with the appropriate equivalents when preparing the actual email.
Using JavaScript to Hide the Email Address Arguably the most effective way to avoid spammers and still include a mailto link is to hide the email address with some sort of scripting language or other type outside of HTML, such as JavaScript. The following sample script would be placed within your HTML code exactly where your
<a href="mailto:[email protected]"> should have been:
When displayed in a browser, this script prints “Email Me” and links it to [email protected], all the while never displaying the complete email address in a way spammers can interpret.
TIP
One of the best ways to avoid posting your email address for all to see (and harvest) is to create a web form for visitors to send you email. Refer to Chapters 12 and 13 for more information.
Ask the Expert
Q: What about linking to an RSS feed?
A: RSS—Really Simple Syndication—has grown so quickly in recent years that even though you might not have known what it meant, you’ve likely seen it referenced at one web site or another. Many news sites and web blogs include little orange or blue rectangular buttons near a story that is available for syndication by the general public. For example, visit www.foxnews.com/rss to see a list of the Fox News content available for syndication.
To “read” such syndicated content, you need to open the RSS feed in a news reader (also called an aggregator). Most email apps include news readers. Google RSS news reader if you’d like to find a stand-alone option.
Anyone can create his or her own RSS feeds. Refer to www.mnot.net/rss/tutorial for a great tutorial on doing just that. Once you’ve created your own syndicated content, you’ll need to put a link on your page to advertise that content (similar to those little orange buttons you’ve probably seen at other sites). Links to RSS feeds look very similar to other HTML links, with a few minor variations:
<a type="application/rss+xml"href="feed.rss">RSS feed for this page</a>.FTP and Downloadable Files
The Internet provides many companies with an easy way to transmit files to customers. For example, suppose you purchased a piece of software to protect your computer against viruses. Eventually, your software must be updated so that it can recognize new viruses. The quickest and easiest way to obtain such an update is to download it from the company’s web site.
When you download files from the Internet that cannot be displayed in your web browser (such as software applications and add-ons), you usually do so by accessing the company’s FTP site.
FTP, which stands for File Transfer Protocol, is a way in which you send and receive files over the Internet. Many companies have both HTTP servers, which house their web site, and FTP servers, which house their downloadable files.
To reference a file on an FTP site, you use an a tag and
href attribute with the FTP protocol, as in the following example:Although some FTP sites are anonymous and don’t require a password for access, most are private. Secure content is typically made available to a limited audience, which is given specific credentials for accessing the content. You won’t be able to access a private FTP site without a qualified username and password. If you are linking to a private FTP site, you should also consider providing a way for visitors to register or sign up to receive a username and password.
Of course, in some cases, you could have downloadable files located right on your web server with your web page. These might be movies, sounds, programs, or other documents you want to make available to your visitors. Or, they might be located on a file server like Dropbox. In either case, you can link to these just as you would any other web page, keeping the proper file extension in mind.
Recognize Effective Links
The Web is all about links. If users cannot find the links on your page and successfully use them, that linked content might as well be deleted. One of the problems with so many web pages is what’s commonly referred to as the “click here syndrome.”
NOTE
Even more than a decade after the first edition of this book was published, I continue to see web designers fall victim to the “click here syndrome.” For this reason, I feel compelled to add this note to further emphasize just how bad the phrase “click here” is! Please, please don’t ever underline (link) the words “click here” in your web pages. Instead, link words that describe what the user will actually find when they click the link!
Discussed briefly earlier, this occurs when the phrase click here is used as a link’s label text. Consider the following example:
Woolwich is a rural community on the east shore of the Kennebec River, opposite the historic city of Bath and approximately 12 miles from the Atlantic Ocean. First settled in the 1600s and incorporated in 1759, the town is named for Woolwich, England, which in like manner is situated on a large, navigable river. (Click here for information about Woolwich, England.)
The words click here that were underlined in the preceding example don’t shed any light on exactly what you would find if you clicked that link. A better example might be the following:
Woolwich is a rural community on the eastern shore of the Kennebec River, opposite the historic city of Bath and approximately 12 miles from the Atlantic Ocean. First settled in the 1600s and incorporated in 1759, the town is named for Woolwich, England, which in like manner is situated on a large, navigable river.
Now, when you scan the paragraph, the words Woolwich, England jump out and you know more information about that place can be found by clicking the linked words.
Another common pitfall is using entire sentences as link labels. Compare the two links in the next paragraph. The shorter link at the end is easier to spot because you have to read the entire first sentence to understand the content of the link.
Woolwich is a rural community on the east shore of the Kennebec River, opposite the historic city of Bath and approximately 12 miles from the Atlantic Ocean. First settled in the 1600s and incorporated in 1759, the town is named for Woolwich, England, which in like manner is situated on a large, navigable river.
If you needed to place multiple links within a paragraph of text, it might be better to convert the paragraph into a list, where each link is at the beginning of the list item.
Woolwich is a rural Maine community on the east shore of the Kennebec River.
Historic Bath is located opposite Woolwich
Atlantic Ocean is approximately 12 miles down river
First settled in the 1600s
Incorporated in 1759
Woolwich, England, gives the town its name
To summarize, it’s important to scan over your web pages from the user’s perspective to determine if your links are easy to spot and use. Short, meaningful words and phrases work better than lengthy marketing jargon.
| Try This 7-1 | Add Links |
Returning to the pages we’ve been completing for our practice site, let’s add some links. You can tailor the project to your particular needs. Goals for this project include
• Adding links to web pages
• Adding links to sections within a web page
• Adding links to email addresses
1. Open your text/HTML editor and load one of the pages saved from a previous chapter.
2. Add a link to a page describing the company/person’s services (services.html). Title the link something appropriate for the link’s content.
3. Save the file.
4. Create a new file using the name you just linked to: services.html. Include the basic elements of all web pages, and add a few paragraphs of content.
5. Add the phrase “email us” to the page. Specify an email address to which the messages should be sent, and specify a subject of Services.
6. Save this file.
7. Open your web browser and choose File | Open Page (or Open File or Open, depending on the browser you’re using). Locate the first file you just saved.
8. Click the link you added to ensure it works. The link should bring up the services.html page.
9. If you need to make changes, return to your text editor to do so. After making any changes, save the file and switch back to the browser. Choose Refresh or Reload to preview the changes you just made.
10. Return to the services.html file in your text editor.
11. Add sections for each of the services offered. Add anchors to each of the section headings, using the section name (without any spaces) as the anchor name.
12. Add links to each of the anchors you just created so that the category names near the top of the page become links to the actual category content below.
13. Add an anchor to the top of the page named top.
14. Add Back to Top links at the end of each section to enable a visitor to have easy access back to the category listing at the top of the page.
15. Save the file.
16. Return to your web browser and choose Refresh or Reload to confirm your changes.
TIP
Does your link work? If not, make sure the pathname is correct. Both the index.html and services.html pages should be located in the same folder. If they aren’t, you need to change the pathname to reflect the proper folder name. In addition, be sure to check your capitalization (or lack thereof). Remember, links like this are case-sensitive, so if you named a section “Intro” with a capital I, but linked to “intro” with a lowercase i, then your link won’t work. For more tips, see Appendix C.
The
a element enables you to add links to many types of information on the Internet. This project gives you practice using that element to link to another web page, an email address, and sections within the same web page.TIP
Do each of your target links work? If not, make sure the anchor name is correct. Remember, in most cases links are case-sensitive, so if you capitalized the anchor name, you need to capitalize it again when you link to it. In addition, check to see you have included a hash mark (#) before each anchor name when you link to it (that is,
href="#a"). For more tips, see Appendix C.Extra Credit
1. To prepare for the next project, switch from using an internal style sheet to an external style sheet. (Use the internal style sheet from index.html as the basis for your external style sheet.)
2. Name it styles.css and save it in the same folder as the other two files.
3. Add a link to your external style sheet from both index.html and services.html.
Style Links
We previously discussed changing the text and background colors for pages. As with other attributes that change color in HTML pages, you need to specify the color, whether by hexadecimal code, RGB values, or a predefined color name. (More information about how to find color values is listed in Chapter 3.)
You specify these colors with style sheets. As with any style declaration, you can specify the background, text, and link colors in an inline, internal, or external style sheet. The actual properties used to do so are the same, however, regardless of the type of style sheet you use.
You actually use the
a element to change link colors with style sheets, as in the following example:
While this specific style declaration changes the links on the entire page, you could also use classes to adjust only certain link colors. This is particularly handy if, for example, most of the links on your page are the default blue but the background of your navigation bar is also a deep blue. One way to take care of this is to create a class with a different color link, as I did in the following style sheet:

After you create these classes in your internal or external style sheet, you just need to apply it to the links you want affected. This is achieved by adding the
class attribute to the appropriate a elements, as in:If you placed all of your navigation links inside of a nav element, then there’s another way to easily change the colors of only those links. This is a perfect chance to use what is referred to as a descendant selector. In the following code example, we first tell the browser to look for the nav section, and then to adjust only the a elements that fall inside that section:

Default Link Colors
In most cases, the default link color for browsers is blue. The default visited link color is purple, and the active link color is red. Remember, as with many other features of web browsers, the user ultimately controls these default colors.
TIP
Although not required, and certainly not always possible, staying with a blue/purple/ red color scheme for your link/visited link/active link colors is nice. Visitors to your site may adjust to the navigation more quickly if the color scheme is similar to that of other web sites.
I recommend using the same link colors on all the pages in your web site to give a consistent look and feel across the pages. In addition, it’s wise to pick visited link colors that don’t stand out as much as your unvisited links. Both of these recommendations enable visitors to scan your page easily and identify which pages they’ve been to and which ones they haven’t visited.
Finally, remember to test your colors on a number of different computer systems to ensure they appear as you intend. I also recommend changing your monitor settings to black and white for a minute, just to make sure your links are visible in a grayscale environment.
Beyond Colors
If you ever changed link colors with older HTML tags, you know that there wasn’t much else you could do to links beyond changing their colors. With CSS, you can style your links to really stand out from the rest of the text on your page. In fact, you can format links in much the same way you learned to style regular text content in the previous chapter. This means you can substitute link colors, make links bold or italic, or even change the perpetual underline that comes with text links by default. Table 7-1 contains code to give you a few ideas.

Table 7-1 Explanation on Sample Code Used to Style Links
The only one of these properties we haven’t covered thus far is text-decoration. This is the CSS property used to specify whether your link underlines are visible. By default, all linked text is underlined with a single line beneath it, the same color as the linked text. With this property, you can switch to an overline, a line-through, or no line at all (none).
The possibilities are endless, so I encourage you to experiment with ways to creatively style your links. Having said that, I do have a few words of caution:
• Avoid using different size fonts in each link state, unless the size change in no way affects the surrounding content. (It can be very annoying to move your mouse across a web page and then not be able to read the page content because the links become large enough to block the text around them.)
• Avoid making any changes that cause text to move or jump around on the page when a link is activated.
• Make sure to pick colors that complement the rest of the page. While you want your links to be visible, you don’t want them to distract the reader.
Customize Links by Setting the Tab Order, Keyboard Shortcut, and Target Window
You can further customize the links on your page by setting the title, tab order, keyboard shortcuts, and target windows. Although many of these options have little effect on the outward display of the page, they provide added benefit to users, particularly those with disabilities (such as the hearing- or vision-impaired) and those viewing the site from web-enabled mobile devices.
Title
The
title attribute is actually pretty easy to use and understand, and goes a long way toward helping users navigate a web site. When you add it to a link (or any other page element), you’re giving the browser and user a little bit more detail regarding the content—in this case, of the linked file. What the browser does with the contents of your title attribute varies, but in most situations the text appears as a “tool tip” when the cursor is placed over the link.For example, in the following code snippet and illustration, the
title attribute serves to alert users to the fact that clicking the link will take them to another web site:
TIP
The W3C encourages you to add the
title attribute to as many page elements as you can—everything from images and links to paragraphs and sections of text—because the title attribute can also aid in style sheet development and general page usability.Tab Order
Frequent users of screen-based forms understand that pressing the TAB key advances your mouse pointer to the next available form field. Usually, the tab order of those fields is specified by the programmer who created the form.
In like manner, you can customize the tab order of links and form field elements on your web page by using the
tabindex attribute:
When a visitor uses the TAB key to navigate your web page, each link or clickable element on the page is, in turn, highlighted. If no order has been specified by the
tabindex attribute, the browser will make its best effort to use a reasonable tab order, usually from top to bottom of the code.After successfully using the TAB key to highlight the link the person wants to visit, he or she can press the RETURN or ENTER key to visit that link.
NOTE
You can use any number between 0 and 32,767 for the value of the
tabindex attribute, or use a negative number to exclude an element entirely from the tab order.Keyboard Shortcuts
Many computer users are familiar with some common keyboard shortcuts, such as copy (CTRL-C/Windows or COMMAND-C/Mac) and paste (CTRL-V/Windows or COMMAND-V/Mac). Similarly, you can assign keyboard shortcuts to links in your web page. To do so requires adding the
accesskey attribute to the a element:
A good idea is to include the keyboard shortcut next to your link; otherwise, visitors to your web page wouldn’t know it exists. Note that in some versions of IE on Windows, users must press ENTER after typing the
accesskey to actually visit the web page.TIP
Try to remember any universal keyboard shortcuts when you come up with your own. You wouldn’t want to disable someone’s ability to print, for example, in favor of a link in your web page.
Target Windows
Have you ever visited a web site and noticed that a second instance—either a new window or tab—of the web browser opened when you clicked a link? This happens when web developers use the
target attribute to load links in a browser window other than the one you’re currently using.For example, you may want to offer visitors to your site a link to search Yahoo!, but you don’t want to encourage them to leave your site. If you use
_blank as the value of the target attribute in your link to Yahoo!, the browser will launch a new browser window or tab (depending on the browser settings) to load http://www.yahoo.com.
Aside from targeting new windows, you can also target specific windows you have named. For instance, instead of using
_blank to launch a new window, you might use “cars” to launch a window that is named “cars.” Then, any time you have a link related to cars, you can add target="cars" to your link and all those links will load into the “cars” window. Table 7-2 lists three of the possible options for the target attribute.
Table 7-2 Commonly Used Values for the
target Attribute| Try This 7-2 | Customize Links |
This final project in Chapter 7 gives you practice customizing links by changing the default colors, tab order, keyboard shortcuts, and target windows. Goals for this project include
• Changing the link colors for a page
• Targeting a link to open in a new browser window
• Adding titles for all links on a page
1. Open your HTML editor and open both the index.html page and the services.html page saved from Try This 7-1.
2. Change the link colors on both pages to the color scheme of your choice. Save all files. (If you created styles.css in the Extra Credit for the previous project, you only need to change the link colors in that one file to alter them on both pages! Refer back to the end of Try This 7-1 if you missed it.)
3. Close index.html.
4. Switch to services.html and add a link to a related external web site somewhere on the page. Target a new browser window with this link.
5. Add titles to each link with the
title attribute.6. Save the file.
7. Open your web browser and choose File | Open Page (or Open File or Open, depending on the browser you’re using). Locate the file services.html you just saved.
Preview the page to check your work. If you need to make changes, return to your text editor to do so. After making any changes, save the file and switch back to the browser. Choose Refresh or Reload to preview the changes you just made.
Although users and browsers ultimately control the link colors on your pages, you can make recommendations in your style sheets. This project gives you practice changing those colors, as well as customizing the target windows for your links.
Chapter 7 Self Test
1. What does the
href attribute do?2. Which of these can be classified as a relative link?
A. 
B. 
C. 
D. 
3. What must be installed and activated on a user’s machine to take advantage of an email link in a web site?
4. How do you tell the browser to launch a link in a new window?
5. Which style sheet selector enables you to change the color of the links on your page after someone has clicked them?
6. In Windows, what must users type to highlight the following link?
7. Fill in the blank: After successfully using the TAB key to highlight a link, you must press the __________ key to actually visit that link.
8. Fix the following code:
9. Add the appropriate code so that this link enables users to email you at your personal email address.
10. Which tag links to a section within the current page?
A. 
B. 
C. 
D. 
11. Which common phrase should always be avoided when naming links?
12. Fill in the blank: By default, all linked text is ____________.
13. True/False: A dot-dot-slash tells the browser to go up a level in the directory structure before looking for a file.
14. Which links to a section named Intro within the web page named genealogy.html?
A. 
B. 
C. 
D. 
E. 
15. What does
_blank do when used as the value of the target attribute?..................Content has been hidden....................
You can't read the all page of ebook, please click here login for view all page.