Chapter 2
Selecting Elements in the Document
![]() The $() Function
The $() Function
![]() CSS Basics
CSS Basics
![]() Using CSS Selectors
Using CSS Selectors
![]() Using Extended jQuery Selectors
Using Extended jQuery Selectors
Element selection is a fundamental part of using jQuery. This chapter will cover the basics of selecting elements by covering the $() function, basic CSS, CSS selectors, and extended selectors. First, you will take a look at the $() function and how it works.
The $() Function
The $() function is used to select one or more elements in the document. It returns a collection of elements that match the specified selection. $() is actually an alias for the full function name, jQuery().
TIP
If you find that jQuery is in conflict with another JavaScript library that also uses the $() alias, you can use jQuery() in place of $() to fix the issue.
More technically, the $() function returns a jQuery object that points to all of the selected elements. When you call a jQuery method such as addClass(), it is run for all of the selected elements automatically, which keeps you from adding JavaScript loops to the code in order to run the method for each element. This is a very useful feature that keeps extra coding to a minimum and allows you to concentrate more on constructing the proper selectors and calling the jQuery methods you want to use.
jQuery uses CSS selector syntax and also has a number of extended selectors that can be passed to the $() function. To begin using CSS selectors, you will first want to understand the basics of CSS and how it is used to select elements.
NOTE
If you already know CSS, you may skip the “CSS Basics” section.
CSS Basics
While HTML is used to create the structure of a document, Cascading Style Sheets (CSS) is used to shape the presentation of a document. For example, recall the plain HTML code from the example page you have been using (index.html):
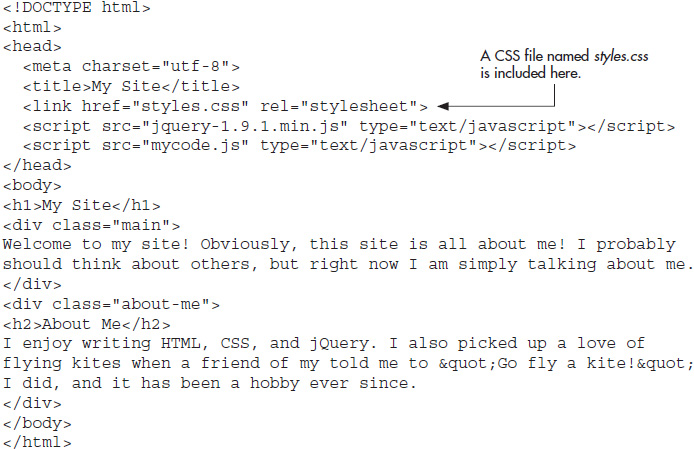
On its own, this would display as a plain page with very little design. The only presentation is based on the browser default settings for displaying particular HTML elements. Figure 2-1 shows how this plain page would look in a Web browser. To give the page a more interesting presentation and design, you can use CSS.

Figure 2-1 An HTML page with no CSS applied
Notice that the HTML code already includes a style sheet via the href attribute of the <link> tag (styles.css ). Updating the styles.css file will allow you to select elements in the HTML document and define how they should look and where they should appear. Including the same CSS file in each page of a site like this enables you to make numerous presentational changes for the entire Web site by simply editing that single CSS file. This makes CSS (and, by extension, jQuery) an especially helpful tool to use when designing and developing your Web sites.
Selecting Elements
In order to change the presentation of the document, you will need to select elements and give them style declarations. This is a basic building block that will be used as the selection syntax in jQuery, so once you know how to select elements in CSS, you can easily migrate that knowledge over to your jQuery scripts.
CSS has numerous methods that can be used to select elements. Since many of these techniques will be covered later in this chapter when discussing jQuery CSS selectors, you will simply learn some basic CSS selectors at this time.
First, suppose you want to alter the look of the <h1> element on the index.html page. An easy way to select this would be to use the element name (h1). You can then apply style definitions to this by including them within a set of curly braces, as shown in the following code:
![]()
In this case, the lone <h1> element is selected and the style definitions within the curly braces will be applied to that element. Had there been more than one <h1> element on the page, this would have selected and applied the styles to all of them.
As an example of this, you can select all of the <div> elements in the document by using the element name as the selector:
![]()
Add this code to your styles.css file, save it, and reload the index.html page in your Web browser. Notice that since there are two <div> elements in the HTML code, they are both affected by the style definition, which changes the font face to Verdana instead of the browser’s default font face (typically a serif face such as Times New Roman).
Figure 2-2 shows the result of opening the page in a Web browser after these changes have been made.
Figure 2-2 All text within all <div> elements uses the Verdana font.
Selecting Elements Using IDs and Classes
Another basic selection method is to use an id or class name to select elements. An id can only be attached to one element in a document, while a class can be applied to numerous elements to provide style information.
An id can be used if you know you need to select one particular element from the document, while a class can be used if you need to style more than one element (but can also be used on a single element if desired). In CSS, you select an id by preceding it with #, while a class name is preceded by a dot (.). For example, the following code shows both an id and a class name being selected:
![]()
As an example of this, you can refer back to the index.html page you have been using. It contains two classes: main and about-me. If you decide that any text with a class of main should use the Verdana font, you could simply use the following code in your CSS file:
![]()
Now that you know how to perform basic selections in CSS, you can now learn how to select elements in jQuery and how to use more advanced CSS selectors.
Ask the Expert
![]()
In CSS, the same selector can be used by simply removing the jQuery code around the selector, as shown in the following code:
![]()
You can then add any style declarations after the selector to complete the CSS for that selection, as demonstrated in the following code:
![]()
If you decide you want to learn CSS itself in more detail, you can go to an online CSS tutorial or grab a book on CSS. Some resources are listed here if you want to pursue them:
![]() www.w3.org/Style/Examples/011/firstcss
www.w3.org/Style/Examples/011/firstcss
![]() https://developer.mozilla.org/en-US/docs/Web/Guide/CSS/Getting_started
https://developer.mozilla.org/en-US/docs/Web/Guide/CSS/Getting_started
![]() Beginning CSS: Cascading Style Sheets for Web Design (Wrox, 2011)
Beginning CSS: Cascading Style Sheets for Web Design (Wrox, 2011)
Using CSS Selectors
Most of the selectors available in the CSS Level 3 Recommendation (www.w3.org/TR/css3-selectors/) are available for use in jQuery. This makes jQuery much easier to use than JavaScript for those who already are familiar with CSS syntax.
The official jQuery site lists all of its supported selectors at http://api.jquery.com/category/selectors/. Most of these are CSS selectors, but there are also a number of extended selectors available in jQuery that are not part of the CSS specification.
To begin, Table 2-1 lists the CSS selectors that can be used with the jQuery library. Extended selectors will be covered in the “Using Extended jQuery Selectors” section later in this chapter.


Table 2-1 CSS Selectors
Notably, there are numerous selectors from which you can choose. We will go over a number of the most used selectors in more detail here, but you can always make use of any of the others if the situation calls for it.
The All, Element, Class, and ID Selectors
The all, element, class, and id selectors provide some basic selections for you in jQuery (and CSS). For example, look at this code:
The most inclusive selector is the all selector, which selects all of the elements in the document, regardless of what they are or what class or id is used. This selector is not used often, since it does not select anything more specific—you will almost always want to select one element or a particular group of elements rather than every one of them.
The element selector simply selects all elements of the specified tag name. This means that $(“div”) will select all <div> elements, $(“a”) will select all <a> elements, and so on.
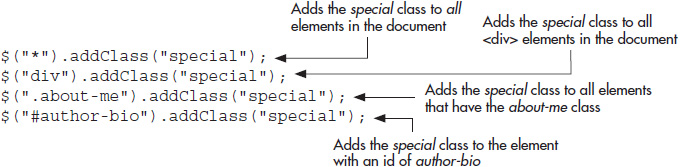
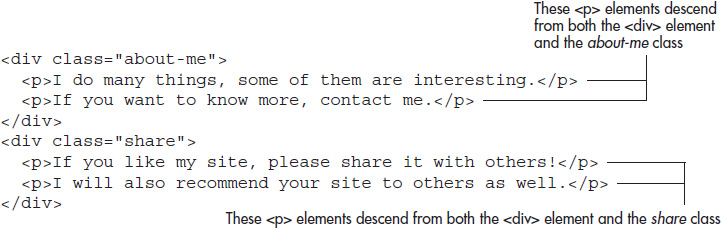
The class selector selects all elements that have the specified class name, regardless of the tag name. This means that $(“.about-me”) would select any of the elements shown in the following code:

Each element is different, but all of them have the about-me class. The <img> element has two classes, one of which is about-me. This will still be part of the selection, since it does indeed have the about-me class. As you get further into the selectors in this chapter, you will see how you can be more specific about which elements to select, rather than relying solely on an element or class name alone.
Finally, the id selector is used to select a single element in the document—the one with the specified id. Rather than selecting multiple elements like the others mentioned here, it very specifically selects a single element.
When you want to be sure only one element is selected for something, you can give it an id in your HTML code and select it using the id selector. Thus, $(“#author-bio”) will select only the element whose id is author-bio. The following code shows an example for you:

In this case, only the first <div> element will be selected. The second element is also a <div>, but does not have the correct id. The third element, even though it uses author-bio as a class name, will not be selected because it, too, does not have the correct id.
NOTE
Only one element can be assigned a given id. If more than one element uses the same id, then only one of them (typically the first one) will be recognized.
The Descendant Selector
One way to be more specific about which elements to select is through the use of the descendant selector. This can be used in conjunction with the element, class, and id selectors to find elements that descend from a particular selection.
As an example, consider the following HTML code snippet:
Any element within another element is a descendant of the outer element. In this case, all of the <p> elements are descendants of <div> elements. For instance, the following code shows three different collections of <p> elements that can be selected using the descendant selector.

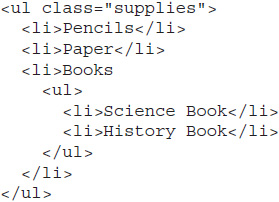
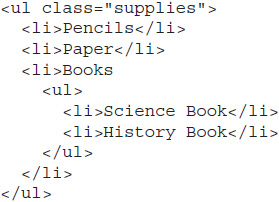
One thing you will need to watch when using the descendant selector is that it selects all descendants, regardless of nesting. This can lead to some unexpected results when dealing 0with nested lists, div elements, or other items. For example, consider the following HTML code:
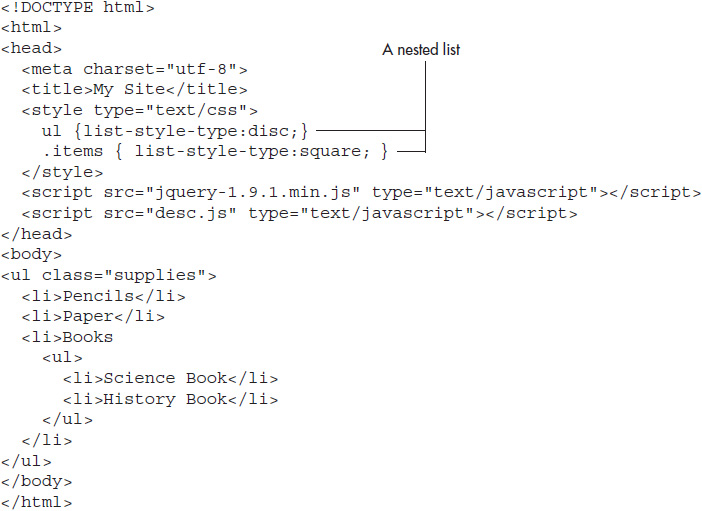
Save this file as desc.html. Notice that this list includes one nested list and a class named items within <style></style> tags that can be added to the list items using jQuery. You can use the descendant selector to add the class, as shown in the following code:

Save this file as desc.js and then open desc.html in your browser. Figure 2-3 shows what this page will look like.

Figure 2-3 The descendant selector affects all of the list items.
Notice that every list item uses a square marker, even the nested list items. This may be all you require, but you may decide later that you only want the items in the outer list to display the square marker. This can be done using the child selector, discussed next.
The Child Selector
The child selector selects all specified elements that are children of the given parent element. For example, review the code in your desc.html file. Suppose you want to select only the list items in the outer list and have them display a square marker. This can be done by changing your jQuery code in desc.js to the following:

Save the change to the desc.js file and then reload the desc.html file in your browser. Figure 2-4 shows the result of using the child selector on the list.
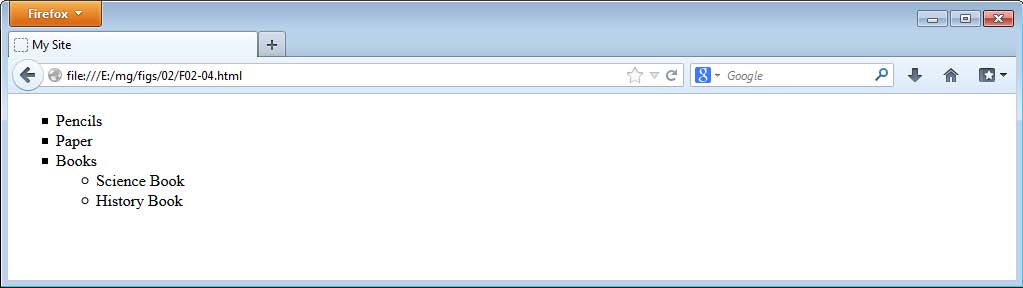
Figure 2-4 Using the child selector allows only the top-level list to use the square markers.
CAUTION
Some style rules, such as font colors, font weights, text decorations, and others, will still be inherited by the parent element’s grandchildren, great-grandchildren, and so on even though the child selector is used. For more about this, see www.stackoverflow.com/questions/14789094/does-child-combinator-css-affects-sibling-elements.
The First Child, Last Child, and Nth Child Selectors
The first child, last child, and nth child selectors allow you to select particular elements based on their location within the parent element.
The first-child Selector
Going back to the desc.html file you have been using, notice that the <li> elements are all children of <ul> elements. The relevant portion of the HTML is displayed again in the following code:
Suppose that you wanted any <li> element that is the first child of a <ul> element to have a square marker. In this case, that would select both the “Pencils” and “Science Book” list items, since they are first children of <ul> elements.
To make the selection, you can use the following code:
![]()
Notice the colon between li and first-child. Basically, this selection tells jQuery to look for all <li> elements that descend from <ul> elements, but only if the <li> element is a first child of the <ul> element. With this in place, you can alter the code in your desc.js file as follows:

Save these changes and reload the desc.html page in your browser. Figure 2-5 shows the result.

Figure 2-5 Only the first children of each unordered list are changed to have a square marker.
The last-child Selector
You can use the same process for last-child to select the last items in each list, which will be “Books” and “History Book” in this case. Simply change the selection to use last-child instead, as in the following code:
![]()
The nth-child Selector
When using nth-child, you will need to supply an index number for the element you are seeking. This is done in parentheses at the end, as in the following code (which selects all <li> elements that are the second child of <ul> elements):
![]()
In this case, you would be selecting the “Paper” and “History Book” list items. To see this in action, you can alter your desc.js file to use the following code:

Figure 2-6 shows the result of reloading the page in your browser. Notice that the second item in each list uses the square list marker.
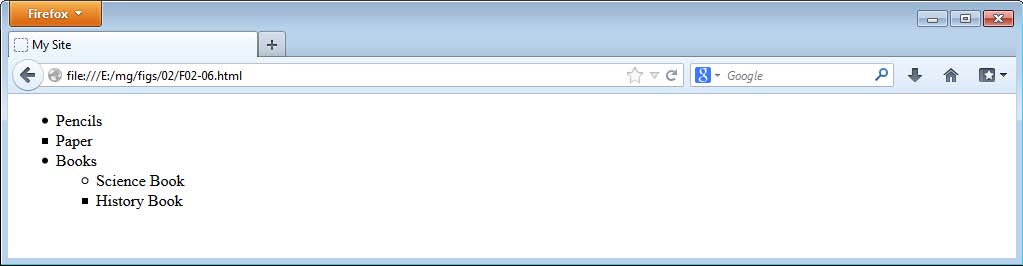
Figure 2-6 The use of nth-child allows the second item in each list to have a square marker.
The Not Selector
The not selector allows you to select elements that do not match a selection. For example, consider the following HTML code:
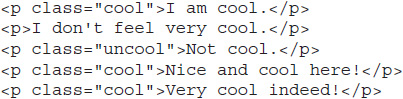
Notice that several of the <p> elements have a class of cool. There are two other <p> elements that are not part of that class: One has no class and the other has a class of uncool.
While you can easily select any element with a class of cool, it may not be so easy to find the remaining elements and select them. The use of not allows you to select those elements easily. For example, to select all of the <p> elements that do not have a class of cool, you can use the following selection:
![]()
Notice that you provide a selection within the parentheses. In this case, it eliminates any <p> elements that do not have the cool class.
Attribute Selectors
Attribute selectors allow you to select elements based on the value of a particular attribute (or whether an element actually has the specified attribute). This gives you another helpful tool to select the elements you need.
The Has Attribute Selector
First, you can select elements that have a particular attribute. For example, you may want to select all <p> elements that have a class attribute. You could do this using the following code:
![]()
Consider the following HTML code:

Here, $(“p[class]”) would select the first and the last paragraph, but would leave out the second, since there is no class attribute.
You can combine this with other selectors as well. By combining it with the not selector, you could build a quick jQuery script to highlight images that are missing an alt attribute. First, you will need an HTML page, so use the following code and save the page as noalt.html :
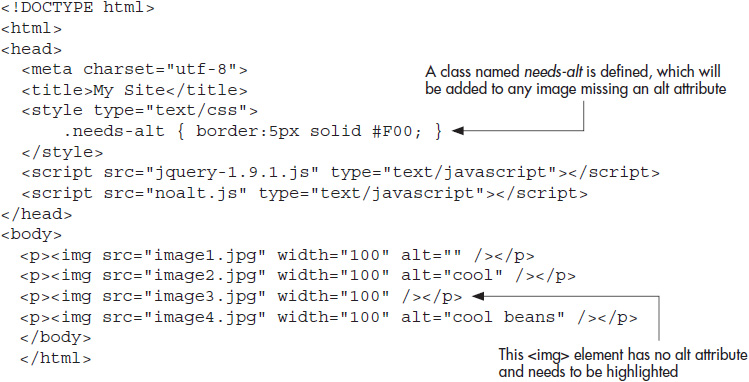
Next you will need to write your jQuery code. Use the following code and save the file as noalt.js :

Here, not is applied to the <img> elements to determine which ones are missing alt attributes. Any of them that are found will have the needs-alt class applied to them, which will place a 5-pixel colored border around any images missing an alt attribute. In this case, the third image should be highlighted once the noalt.html page is opened in your browser. Figure 2-7 shows how this looks when run.
Figure 2-7 The highlighted image needs an alt attribute!
The Attribute Equals Selector
The attribute equals selector will select all elements that have the attribute and its value is equal to a specified value. For example, to select all <img> elements that have an alt attribute with a value of cool, you could use the following code for the $() function:
![]()
Notice that you need to use quote marks around the value of the attribute. Since you already have double quotes around the selection, you cannot place another set of double quotes inside of it. You either need to use single quotes (as in the code example) or escape the inner set of double quotes using a backslash ().
When dealing with quotes, jQuery uses the same rules as JavaScript. If you have one set of quote marks within another set of quote marks, you need to alternate quote mark types (single quotes within double quotes, double quotes within single quotes) or escape the same quote mark type using the backslash character (which will be the only alternative if you have to go more than one level deep). In the case of this example, you can alternate the quote mark types as mentioned previously, or use the backslash to escape another set of double quotes, as shown in this code:
![]()
The attribute equals selector could be used with the code from the previous section (your noalt.html and noalt.js files), which had four images that needed alt attributes. Recall the original HTML code for the images, shown in the following code listing:

Since the last script located the image with no alt attribute (the third one), you can now fix it, as in the following code:

Suppose you now want to run a test to be sure that no images have a particular value for their alt attributes. You could change the code in your noalt.js file to the following:

Save the changes and then reload the noalt.html file in your browser. Notice that it will now highlight the second and third images, which both have alt values of cool. You now know that you will need to change these values if you want to use more meaningful text. Figure 2-8 shows the results when run in a browser.
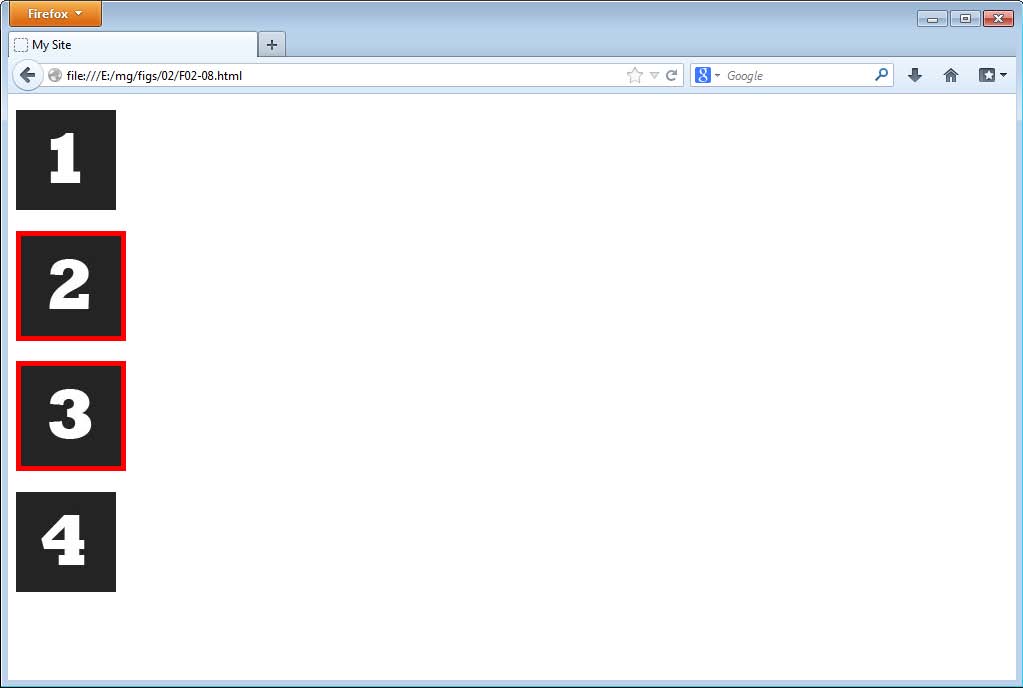
Figure 2-8 The second and third images have cool as the alternative text.
A script like this could save you quite a bit of time if you were to search a page with numerous images and wanted to eliminate generic alternative text such as “photo,” “pic,” “image,” and so on.
The Remaining CSS Selectors
The other selectors mentioned in the table are also available, but will not be covered in detail here. As they come up for use in the book, however, they will be explained at that time.
This section gave an overview of the most used selectors for those who need to dive in quickly, but it is a good idea to study CSS in more detail as you have time in order to become more familiar with the other selectors and what they do.
Try This 2-1
Add Another Class
![]()
This project allows you to practice using jQuery CSS selectors to select items and add a class to the selected items.
Step by Step
1. Place the following HTML code into your editor and save the file as pr02-01.html :
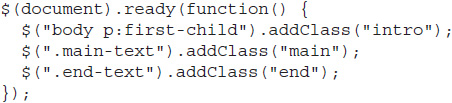
2. In the pr02-01.js file, add jQuery code that will add the intro class to the first <p> element within the <body> element.
3. Add the main class to any element in the document that has the main-text class.
4. Add the end class to any element that has the end-text class.
5. Save the file. When complete, the code should look like this:
6. Open the pr02-01.html file in your Web browser. You should see the first paragraph displaying in italic, Arial font. The second should display in an Arial font without italics. The last paragraph should display in a monospace font.
Try This Summary
In this project, you added classes to selected elements using the jQuery $() function and CSS selectors to select those elements. You were able to practice your selection techniques using the first-child and class selectors.
Using Extended jQuery Selectors
In addition to standard CSS selectors, jQuery offers its own extensions in order to provide additional methods for you to easily select elements. Table 2-2 lists the jQuery extended selectors.
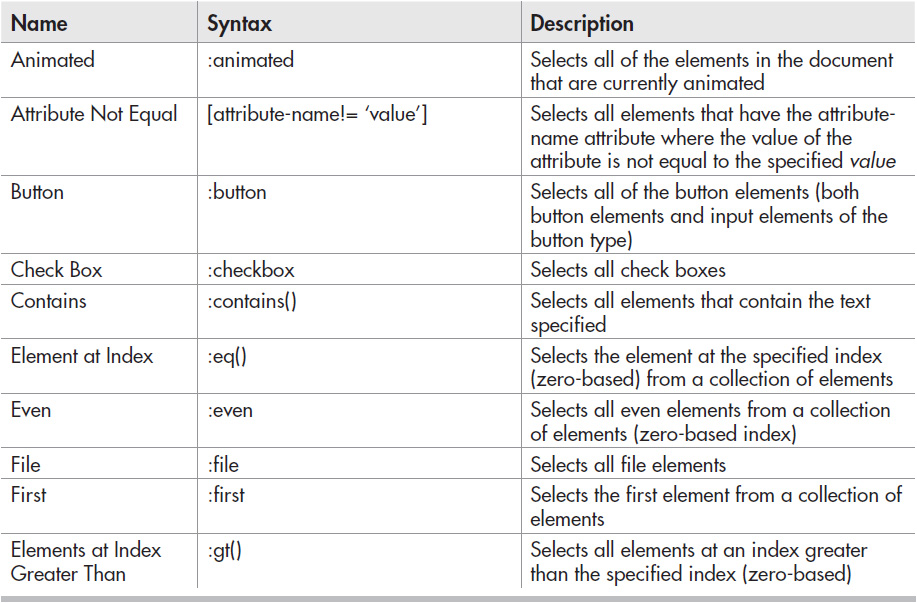
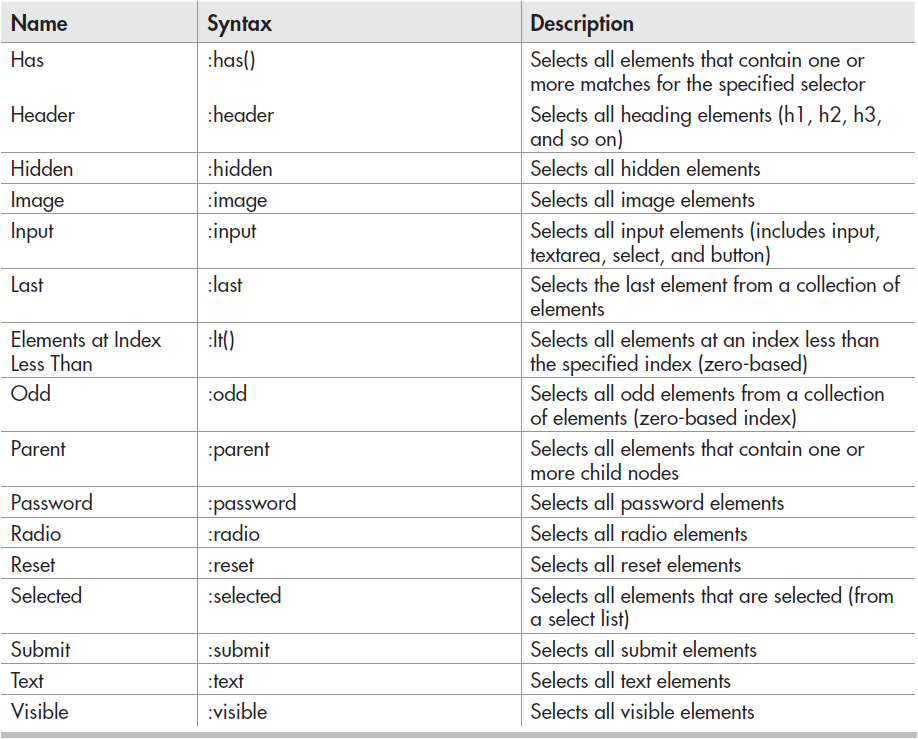
Table 2-2 Extended jQuery Selectors
You will now look at some of these in more detail to see how they can assist you in making selections in jQuery.
The Attribute Not Equal Selector
The attribute not equal selector provides you with a way to perform the opposite action of the CSS attribute equals selector: It will select all elements that have the attribute but where the value is not equal to the specified value.
In the example noalt.html and noalt.js files you have been using, you could use this selector to select any elements where the value of the alt attribute is not equal to cool. Recall the images in the HTML, which are shown in the following code:

Change your noalt.js file to use the following code:

Save your changes and reload the HTML file in your browser. It should now highlight the first and fourth images, which do not have cool as the alternative text. Figure 2-9 shows the results of this script.
Figure 2-9 The first and fourth images do not have cool as the alternative text.
The First, Last, and Element at Index Selectors
The first, last, and element at index selectors allow you to select a single element from a collection. This can be useful, for instance, when you simply want the first <li> element within a <ul> element rather than including all of the first children of all of its inner <ul> elements as well.
You will be using your desc.html and desc.js files from earlier in this chapter to look at how these selectors work. For reference, here is the relevant HTML code from the page:
Recall also that the CSS code included a class named items, which would make any selected list item use a square marker. You will alter the desc.js file as necessary in the examples in order to use the selectors.
The first Selector
The first selector will select the first element that matches a selection, based on the order the elements appear in the HTML code. For example, if you want to select the first list item from the supplies list in your desc.html file, alter your desc.js file to use the following code:

Rather than selecting all the first children the way the first-child selector does, first simply selects the first one—and that’s it. Figure 2-10 shows the result of this script when run in a browser. Notice that only the first list item (“Pencils” in this case) displays with the square list item marker.
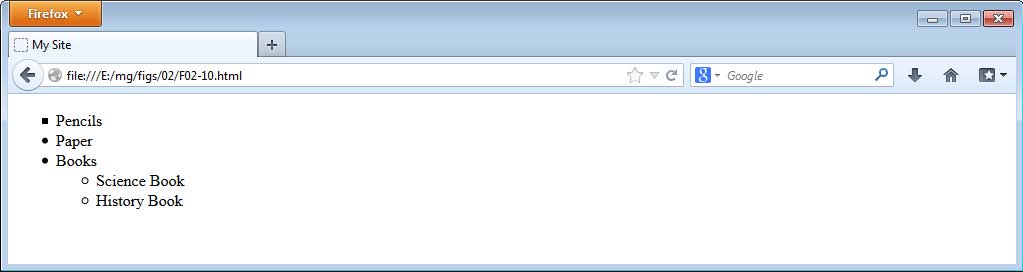
Figure 2-10 Only the first element is affected when using the first selector.
The last Selector
The last selector will select the last element that matches a selection. For example, you can alter your desc.js file to use the following code:

Save the updates and then reload desc.html in your Web browser. The last list item (“History Book”) will use the square marker. Notice that this element is within a child <ul>, but is still the last <li> element within the selected list and thus is the element that is selected when using last.
The Element at Index Selector
The element at index selector selects the element at a specified index within the matched elements. For example, suppose you want to select the second element from the supplies list (“Paper”). You can do this by changing your desc.js files to use the following code:

Notice that the syntax is eq(n), where n is the index of the element you want to select. However, this selector uses a zero-based index, meaning that it starts counting from zero rather than one. As a result, you will need to remember to specify the index number as one less than expected (if you are familiar with JavaScript arrays, this works the same way since they also use a zero-based index). Here, the second matched element is selected by specifying 1 as the index.
So, to select the first element, you would use zero as the index, as in the following code:

The Even and Odd Selectors
The even and odd selectors allow you to select either the even-numbered items or odd-numbered items within a collection of matched elements. Often, this is used for structures such as tables, where you may want to change the background color on every other row to make it easier to read. For example, consider the following code:
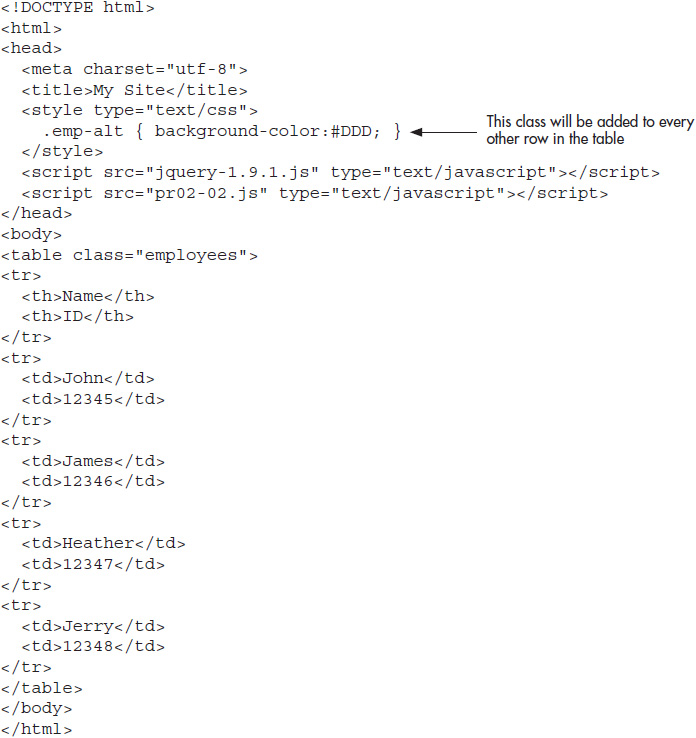
This creates a simple table to display employee names and id numbers. To make it easier to read, you could use the even selector to add the emp-alt class to each even row of the table. Note, however, that this uses a zero-based index, so the first row of the table will be row zero, and thus even.
The following code will add the class to the even rows:

This will make the first (index 0), third (index 2), and fifth (index 4) rows display with a light gray background, while the others continue to use the default background color. Figure 2-11 shows how this will look when viewed in a browser.
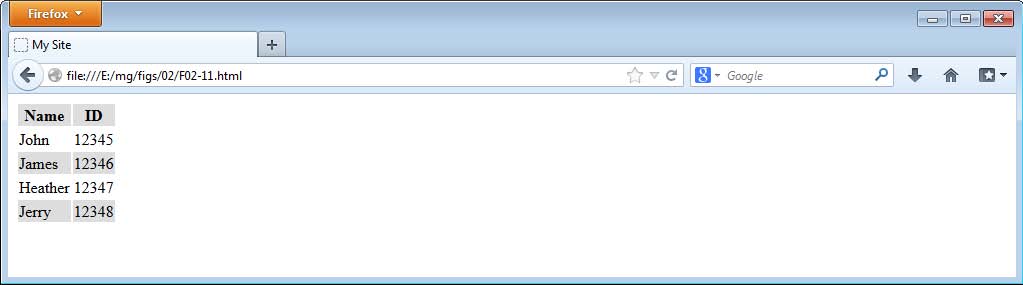
Figure 2-11 The table uses alternating row colors to make it easier to read.
Try This 2-2
More Selection Practice
![]()
This project allows you to practice selecting elements using the extended jQuery selectors in combination with CSS selectors so that you can create a data table with a unique heading row and alternate the color of each data row.
Step by Step
1. Insert the following HTML code into your editor and save the file as pr02-02.html :
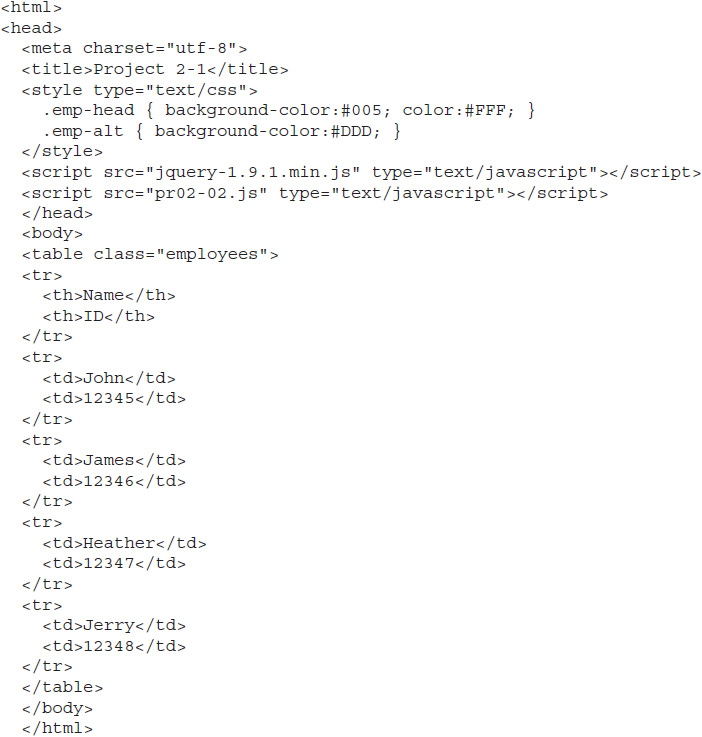
2. In the pr02-02.js file, add jQuery code that will add the emp-head class to the first table row element.
3. For every other row after the first, add the emp-alt class using the even selector. Hint: You can use the not selector to keep the first row from being affected.
4. Save the file. When complete, the code should look like this:

5. Open the pr02-02.html file in your Web browser. You should see the table display with a dark blue background and white text on the header row, and every other row after that should display with a light gray background.
Try This Summary
In this project, you used your knowledge of CSS and extended selectors to style a data table to be easier to read and have a unique header row. This allowed you to combine your skills from the CSS selectors and extended selectors sections in this chapter.
 Chapter 2 Self Test
1. The $() function returns a jQuery __________, which points to all of the selected elements.
2. In CSS, what encloses style definitions?
A. Square braces []
B. Curly braces {}
C. Quotation marks “ ”
D. Text editors
3. What is the # character used for in CSS?
A. It selects elements by id.
B. It selects elements by class name.
C. It separates rules and definitions.
D. It is not used at all.
4.The * selector will select __________ elements in a document.
A. h1
B. div
C. all
D. p
5. Using a tag name in the $() function will select all elements of that type.
A. True
B. False
6. Which of the following properly selects all elements that have a class named more in a document and adds the even-more class to them?
A. $(“.more”).addClass(“even”);
B. $(“.even-more”).addClass(“more”);
C. $(“.more”).addClass(“even-more”);
D. $(“#more”).addClass(“even-more”);
7. $(“#mydivs”) will select all <div> elements in a document.
A. True
B. False
8. Which of the following would properly select all <p> elements within a <div> element?
A. $(“div p”)
B. $(“p div”)
C. $(“div.p”)
D. $(“div#p”)
9. The _________ symbol is used to select all children of a specified parent element.
A. <
B. >
C. ,
D. |
10. Which of the following properly selects all <p> elements that do not have the about-me class?
A. $(“about-me:NOT(p)”)
B. $(“p:not(me)”)
C. $(“not about-me”)
D. $(“p:not(.about-me)”)
11. Which of the following would select all <img> elements that have an alt attribute?
A. $(p[alt])
B. $(“img[alt]”)
C. $(“p|alt”)
D. $(p:alt)
12. If you want to find all elements that have a particular value for an attribute, you can use the __________ selector.
A. attribute equals
B. attribute is
C. attribute not equal
D. attribute value is
13. Using :even will select all even elements within a collection, using a one-based index.
A. True
B. False
14. Using :last will select the last element in a collection.
A. True
B. False
15. The __________ selector selects the nth element within a collection using a zero-based index.
A. element at spot
B. element at index
C. indexOf
D. array