
Chapter 8
The DOM and Forms
![]() Form Element Values
Form Element Values
![]() Form Events
Form Events
![]() Regular Expressions
Regular Expressions
![]() Form Validation
Form Validation
The jQuery library offers a number of helpful tools for dealing with HTML forms. You can use jQuery to get the value of various form element inputs, make use of form events and methods, and put all of these together with techniques such as regular expressions and others that you have learned earlier to validate form input.
Form Element Values
The jQuery library provides a helpful method named val(), which allows you to get or set values for matched elements. You can also use various techniques to work with special elements such as check boxes, radio buttons, and select boxes.
The val() Method
The val() method allows you to get or set the values of form elements.
Getting Values
The val() method can get the value of the first matched element in a set of elements. This can be used with an id as the selector in order to obtain the value of a specific form element. For example, the following code can be used to get the value of an element with an id of textbox-name:
![]()
If the selection matches more than one element, then val() will only retrieve the value of the first matched element. Consider the following code:
![]()
The selection will be all of the text boxes on the page, but val() will only get the value of the first text box.
If instead you want to do something with the value of each of the text boxes, you can iterate over the collection using each(), as in the following code:

This will append each value to #my-element to be viewed on the page. You could do several things within the each() handling function, from validation to storing the values for later use. You’ll look at some of these options later in this chapter.
NOTE
If a text input field is left empty, its value will be an empty string (“”) and not “undefined”. Otherwise, the value will be the characters that were typed into the field in string format.
To see an example of val(), save the following HTML code as val.html:
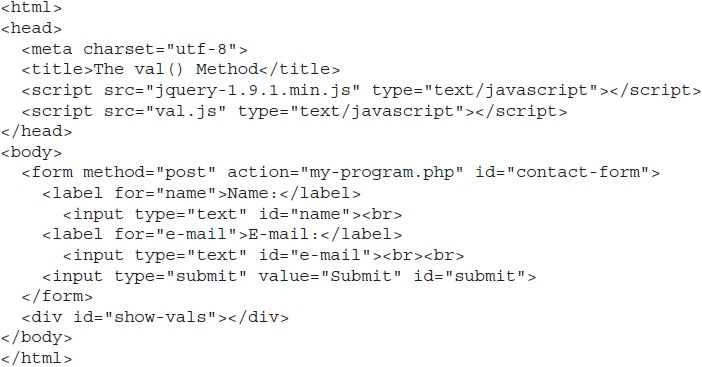
Next, save the following code as val.js:
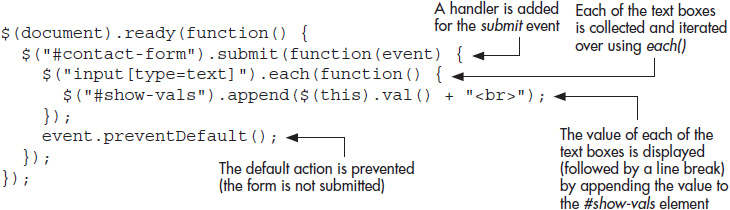
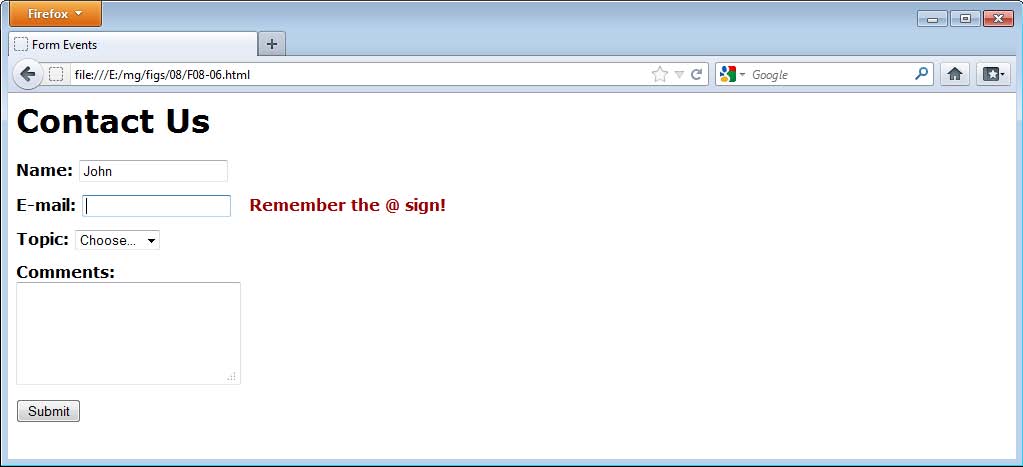
Figure 8-1 shows the initial page, and Figure 8-2 shows how the page would look after entering “John” for the name and “[email protected]” for the e-mail address and clicking the Submit button once.
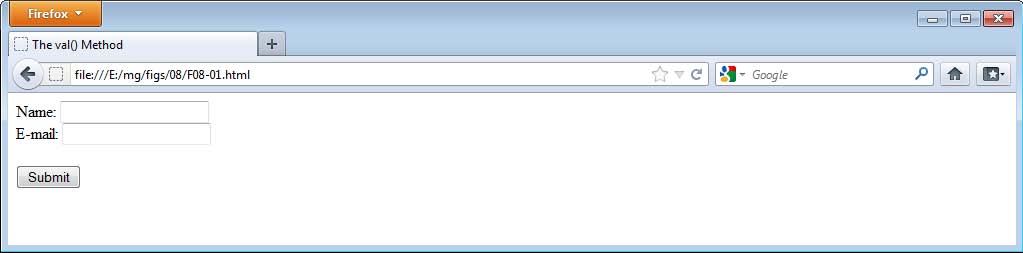
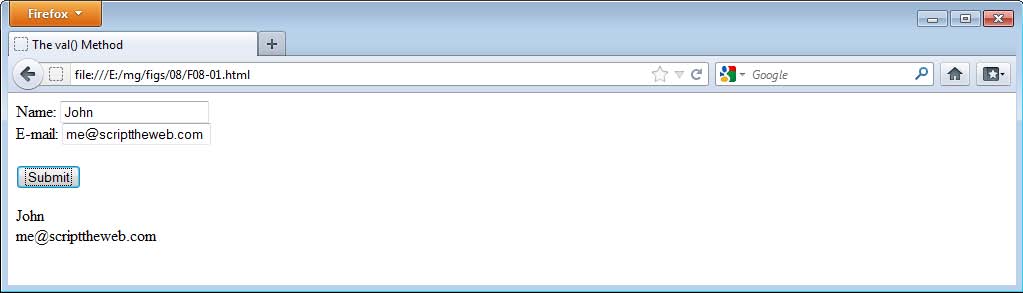
Figure 8-2 The page after the Submit button is clicked once.
Setting Values
The val() method can also be used to set the value for all matched elements. Using the same HTML code (val.html), edit the val.js file to use the following code and save it:

Notice that this works much like other jQuery methods that set values. This will set the value of all of the text boxes to have an initial value of “Enter Value”. Figure 8-3 shows the val.html file after being loaded in a browser.
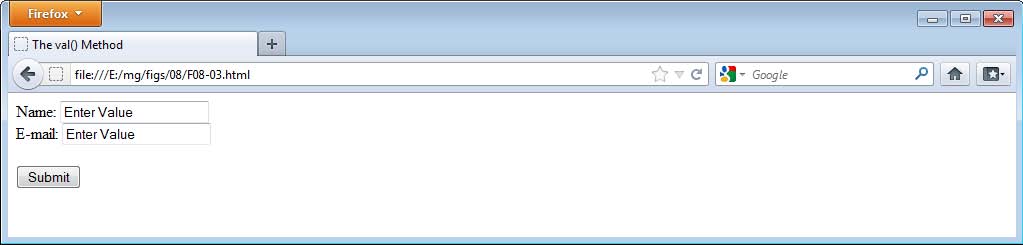
Figure 8-3 Both text boxes have their value set by the script.
Note that this isn’t all that helpful and forces the user to delete the initial text and type the new value. However, setting the value for each field individually could be more useful, especially if you had the user’s name and e-mail address stored (such as in a cookie or localStorage) and filled these in for the user so that the information does not need to be typed at all. As with other things, what will be most helpful for you and your visitors will depend on your specific situation.
Form Events
Form elements have a number of events that can be bound to them with their corresponding methods; these are listed in Table 8-1.
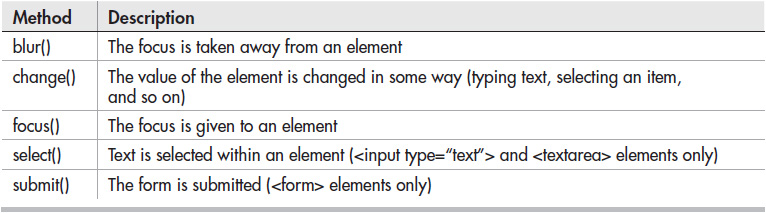
Table 8-1 Methods That Can Be Bound to Various Elements Within Forms
The blur() and focus() Methods
The blur event occurs when the focus is taken away from an element; for example, clicking outside the element or pressing the tab key to access another element. This can be used to test input in a field once the user leaves it. As an example, save the following HTML code as form-events.html:
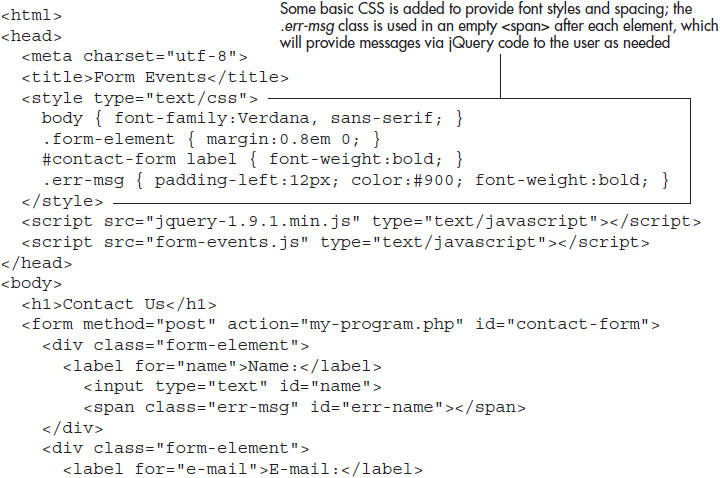
As you can see, there are two text boxes, a select box, and a text area. Suppose you want to ensure that a name is entered into the #name text box once the user removes focus from it. You can do this by using the blur() method on the #name element.
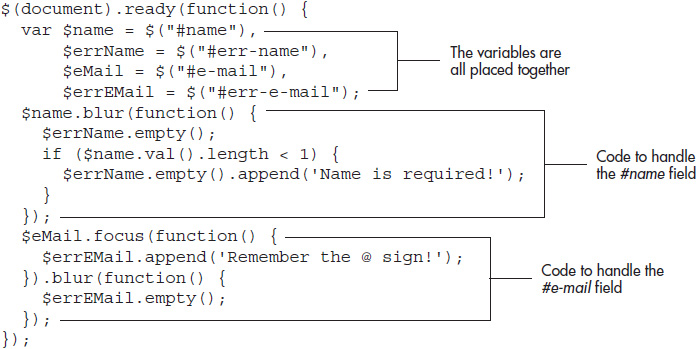
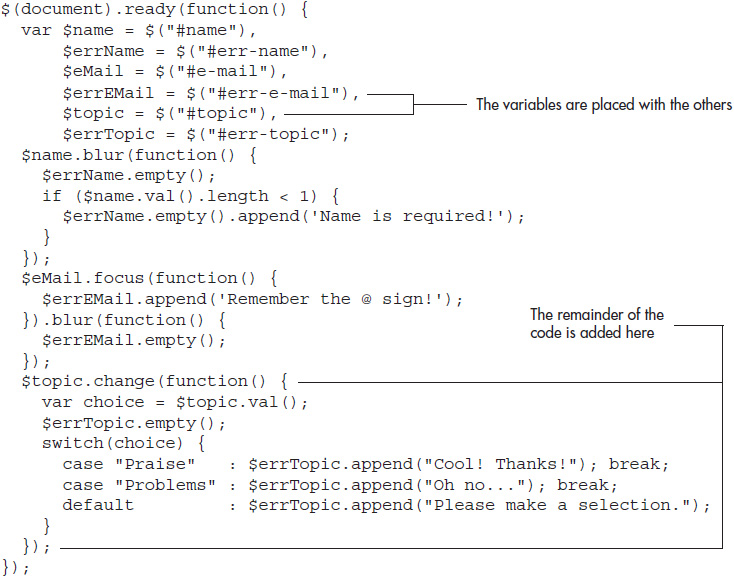
For example, you could use the following code (save as form-events.js):
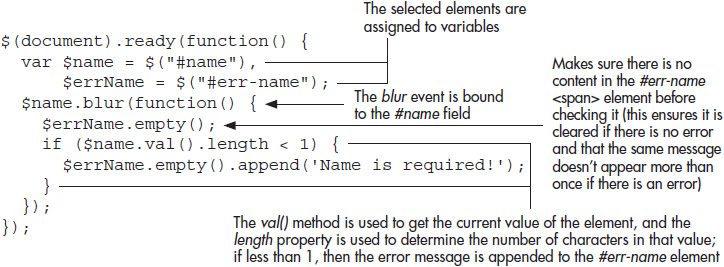
Binding the blur event to the #name element will cause the handling function to execute when the field loses focus (by clicking another element, tabbing, and so on). When this happens, the #err-name <span> element is cleared of any content by using empty(). This ensures that the <span> is empty before the message is appended, keeping the message from duplicating if the blur event occurs more than once before the error is fixed. The script then checks to see if the length of the element’s value is less than 1, which indicates nothing was entered in the field. If that is the case, the empty #err-name <span> element has an error message appended to it.
To try this out, load the form-events.html page in your browser. Click the “Name:” field, and then anywhere outside the field without entering any information. The error message should display after the field. To remove the error, go back and enter at least one character into the field and then remove the focus from it again. Figure 8-4 shows the initial page, and Figure 8-5 shows the page after the field loses focus without any text being entered.

Figure 8-4 The initial page
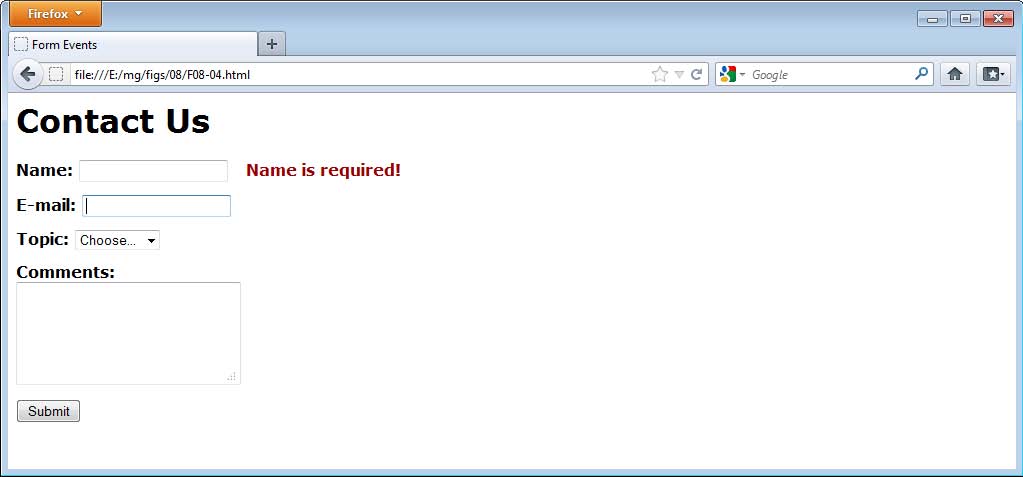
Figure 8-5 The page after the “Name:” field loses focus without any data being entered.
This is one method that can be used to validate fields as the user moves through the form, but you can also use the change() method, which will be discussed in the next section.
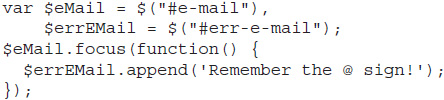
If you want to take the opposite approach—providing a helpful hint for the user when a field receives focus—then the focus() method is a good choice. For example, if you wanted to provide users with a message reminding them to include the @ symbol in their e-mail address, you could use the following code:
This is fairly straightforward, appending the message when the user clicks the field. However, it does not remove the message once the user leaves. This can be done by also attaching the blur() method, which you can do as part of the chain, as in the following code:
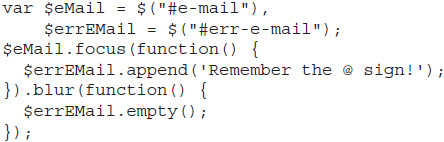
When the field loses focus, the message is now removed by using the empty() method. You can now update your form-events.js file to include this new code. Use the following code:
Save the form-events.js file and refresh the form-events.html file in your browser. Click the “E-mail” field and the hint will appear after it. Figure 8-6 shows the page once the hint has been displayed.
The change() Method
The change event occurs when a change is made to an element. For text boxes and text areas, this is when the user enters or deletes characters; for select boxes, when the user makes a different or additional selection; for radio buttons and check boxes, when one is checked or unchecked.
Working with your current form-events.html page, you can use the change() method for the select box. Suppose you want to provide a different response to each selection the user can make. Since the “Choose…” option is already selected, selecting it will do nothing unless you change it to something else first. The other options will all be available for scripting on the first change event.
The following code can be used to make this work:
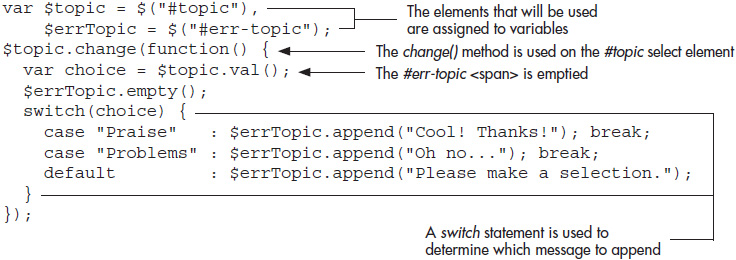
Here, the same process is followed, but a JavaScript switch statement is used to determine which message to append to the <span> element based on the value chosen in the select element.
The switch Statement
The switch statement can save you some time when you need to write multiple if/else statements based on the same value. In the example, the value selected by the user gets assigned to a variable named choice. Since there are multiple values that can be chosen and the list could be expanded in the future, a switch statement will help organize the code a bit.
A switch statement uses the following basic format:
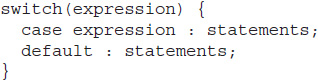
The expression within the parentheses can be any expression, but is most commonly a variable value, as with the example, which uses the choice variable. This is followed by one or more case statements, which evaluate whether the value is equal to the expression. In the example, you just used the first two possible selections (“Praise” and “Problems”). If the case returns true, then the statements following the colon are executed. If not, then it moves on to the next case, then the next, and so on. If none of the cases returns true, then the default case is used. In the example, the “Choose…” option that is a placeholder will go to the default case, which asks the user to make a valid selection.
Look at the example code again to see how it works:

You will see that if choice is equal to “Praise”, then the <span> will have the “Cool! Thanks!” message appended to it. This is followed by a break statement, which exits the switch statement.
The break statement is necessary in order to keep the case from “falling through” to the next one and executing those statements as well. For example, forgetting the break statement after the “Problems” case will result in both the “Oh no…” and “Please make a selection” messages being appended to the <span> element if “Problems” is selected, because this will cause the default case statements to be executed as well.
Adding the New Code to form-events.js
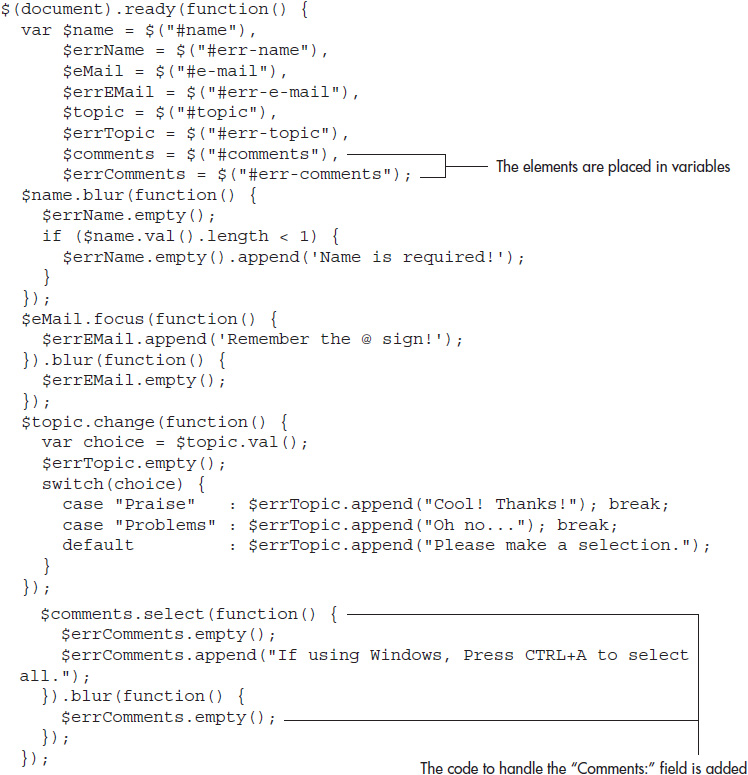
You can now add this to your form-events.js file, as shown in the following code:
Save the form-events.js file and reload the form-events.html page in your browser. Try selecting the various options to get the different messages. Figure 8-7 shows the result of selecting the “Problems” option.
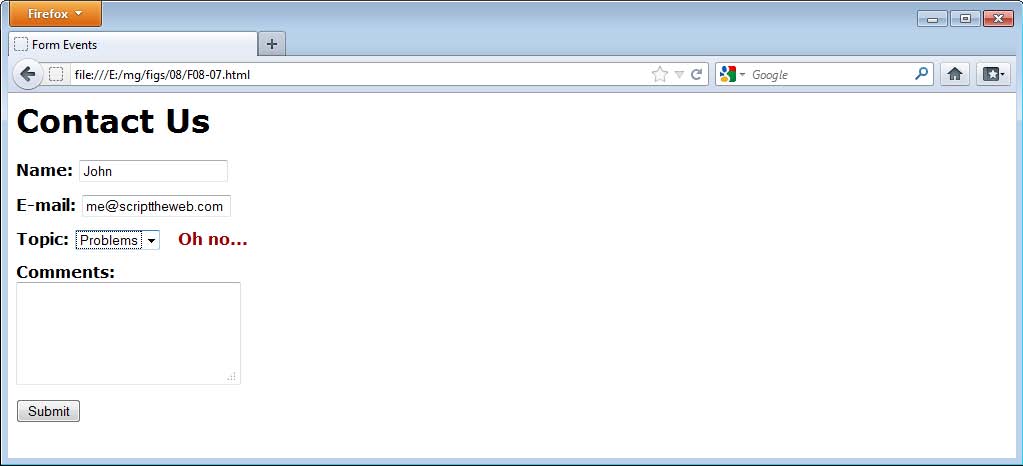
Figure 8-7 The message for selecting the “Problems” option is displayed.
The select() Method
The select event occurs when a user selects text within a text box or text area. For example, you could use the following code to offer a tip if the user selects some text:
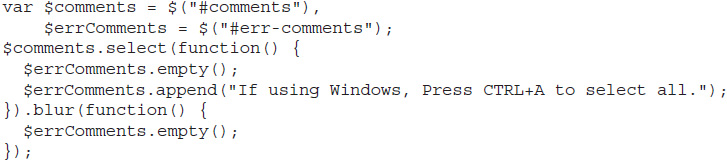
Just as with the other events, the contents of the associated <span> element are first emptied, then the message is appended. The additional blur() method is chained on to allow the message to be cleared again once the user leaves the field.
You can now add this to your code. Update the form-events.js file to use the following code:
Save the form-events.js file and reload the form-events.html file in your browser. Type some text into the “Comments:” field and then make a text selection. The “tip” will appear (which is only helpful to Windows users). Figure 8-8 shows the page after some text is selected.
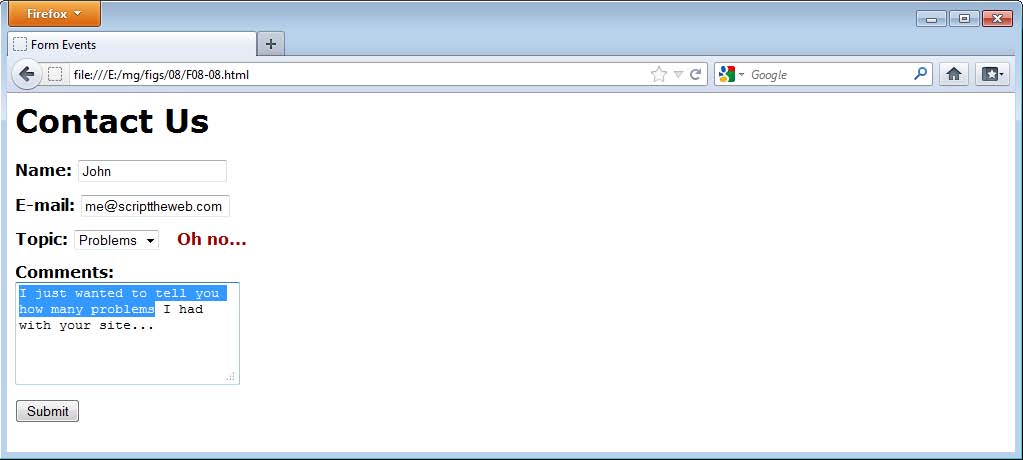
Figure 8-8 The “tip” is displayed when text is selected.
While this provides an example of the submit() method, you can create more useful scripts for text selection by using a jQuery plugin such as jQuery TextRange (http://plugins.jquery.com/textrange/), which will allow you to get, set, and replace selected text. Plugins will be discussed in more detail in Chapter 10.
The submit() Method
The submit event occurs when a form is submitted. You have already been using the submit() method to handle form submissions and perform various actions. Later in the chapter, you will see how it can be used to provide a final validation on the client side before you submit the form to a server-side program.
Regular Expressions
JavaScript includes regular expressions, which can give you more flexibility when you need to validate form fields for specific character patterns.
For example, you may want to know if a valid phone number or e-mail address was entered. Regular expressions can test the entered data against a pattern you provide to determine whether the data matches the pattern. This gives you the ability to more accurately validate some form fields.
It should be noted that HTML5 provides a means for validating common types of patterns, such as telephone numbers, dates, e-mail addresses, and fields that simply require input. Until this is widely implemented, you may wish to use JavaScript as a fallback for browsers that do not support the new elements and validation routines yet. However, you can also bypass the JavaScript fallback and allow the server-side program to validate the fields in older browsers.
Creating Regular Expressions
You need to create an instance of the JavaScript RegExp object or a RegExp literal in order to use a regular expression. In this chapter, you will simply use a RegExp literal, as it can use the methods needed to test the pattern. To create a RegExp literal, you can assign the regular expression to a variable. Instead of using quotation marks to surround the expression, you use forward (/) slashes, as shown here:
![]()
You replace your_pattern with a regular expression pattern.
NOTE
JavaScript uses forward slashes to let the browser know that a regular expression is between them, the same way quote marks are used to set off strings. Thus, if a forward slash is used within the regular expression, it must be escaped with a backslash in order to work properly. For instance, instead of writing /02/03/2009/, you would need to write /02/03/2009/.
For example, a simple regular expression pattern, which will match when a specific character sequence occurs anywhere within a string, can be created like this:
![]()
The preceding code creates a RegExp literal named myPattern. If you test the word our against the expression, it’s a match. If you test your, sour, pour, or pouring against the pattern, then it also returns a match. If you test cool, Our, OUR, or souR, then it won’t return a match, since none of these strings have “our” in them (capitalization matters unless the i flag is used, which is discussed later in this section).
Testing Strings Against Regular Expressions
You can use the test() method of the RegExp object to test a string against a regular expression. The basic syntax is as follows:
![]()
For instance, consider the following example:
![]()
This code will test the “pour” string against the regular expression named “tomatch.” The test() method returns true if there is a match and false if there is not a match. In this case, the value of isMatch will be true, since the test will return true (“our” is found within “pour”).
To create more specific patterns, you’ll need to learn additional characters that can be used within regular expressions to create those patterns. These characters are listed in Table 8-2.
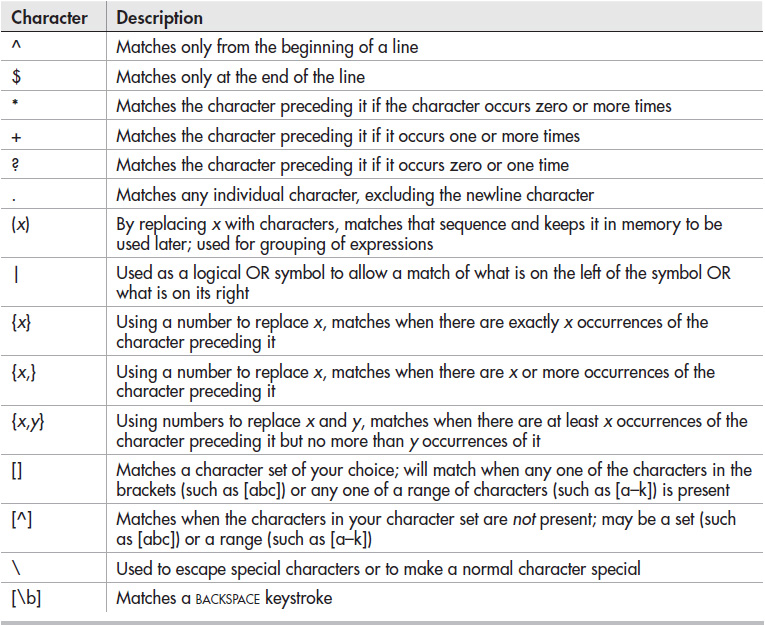
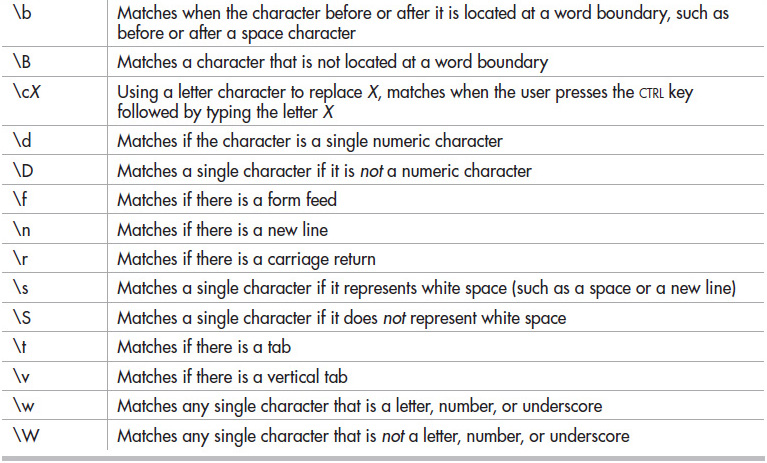
Table 8-2 Special Characters in Regular Expressions
As you can see, there is an extensive set of characters that can be used to create patterns. For example, /[a-z]/ would create a range that matches all lowercase letters between a and z. You can build on this by using /^[a-z]{3,5}$/, which would match all lowercase letters from a–z if any of the characters within the range occur in a sequence between three and five times from the start to the end of the string. In other words, strings such as “ace,” “cool,” and “bikes” would match, while strings such as “as” (valid characters but too short), “234” (invalid characters), “superfluous” (valid characters but too long), and “$me = 2” (invalid characters) would not. This type of pattern can be helpful when validating forms, since you can determine the type and number of characters a field will accept.
Using Flags
In addition to all of the characters, you can use flags after the ending forward slash (/) to further refine a regular expression pattern, as listed in Table 8-3.

Table 8-3 Flags That Can Be Added at the End of Regular Expressions
For example, if you want to make a pattern case insensitive, you can easily do so by adding i to the end of the regular expression, as in the following code:
![]()
This pattern now accepts all lowercase and all uppercase letters.
If you are interested in delving further into regular expressions, a more in-depth study of regular expressions can be found at www.regular-expressions.info/tutorial.html. For the purposes of this beginner’s book on jQuery, you will use some fairly straightforward patterns to assist in form validation, but you can learn much more on regular expressions if desired by visiting the referenced site.
Try This 8-1
Practice Using Regular Expressions
![]()
This project allows you to practice using regular expressions by applying one to a form input and validating that the data entered matches the regular expression pattern.
Step by Step
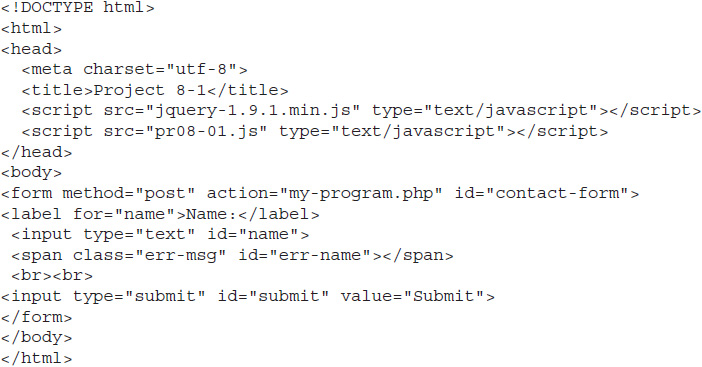
1. Place the following HTML code into your editor and save the file as pr08-01.html:
2. In the pr08-01.js file, add jQuery/JavaScript code that will check the value of the #name element when it loses focus to ensure that it matches the following regular expression:
![]()
If it does not match, display an error message that states “Only letters and spaces are allowed.” If it does match, the message should not display.
3. Save the file. When complete, the code should look like this:
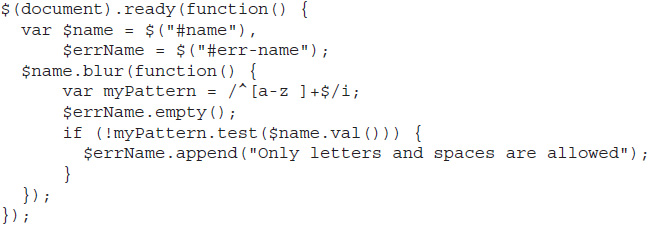
4. Open the pr08-01.html file in your Web browser. Try entering different types of data into the field. If the field contains anything other than letters and spaces, you should receive the error message when you leave the field.
Try This Summary
In this project, you used your knowledge of regular expressions and form events to validate a field once the user leaves it. This allowed you to ensure that the field contained only your predefined set of characters.
Form Validation
Form validation can be quite a task to undertake, since there are a number of tasks that must be accomplished to not only validate the form, but also to make the form as user-friendly as possible to assist those who are filling in the information.
The following is a list of some of the things you will need to consider while you are developing a form for users:
![]() What can be done to help the user in the HTML code? (Accessibility, helpful input types or attributes, and so on.)
What can be done to help the user in the HTML code? (Accessibility, helpful input types or attributes, and so on.)
![]() What can be done to help the user via client-side scripting? (Helpful hints or other indications.)
What can be done to help the user via client-side scripting? (Helpful hints or other indications.)
![]() What validation can be performed on the client side prior to the submission of the form to a server-side program? (Validate character patterns, whether required information is filled in, and so on.)
What validation can be performed on the client side prior to the submission of the form to a server-side program? (Validate character patterns, whether required information is filled in, and so on.)
![]() Everything must be validated on the server side to prevent security issues and allow as little bad data as possible to be entered.
Everything must be validated on the server side to prevent security issues and allow as little bad data as possible to be entered.
Since you are learning a client-side technology, you won’t need to deal with the final point at this time (though it is still very important). The remainder of the tasks can be taken care of on the “front end” (the server-side programming would be the “back end”).
To deal with the first three points, you will look at each in sequence while building a short contact form. First, you will look at what can be done with the HTML code, briefly covering accessibility and helpful HTML5 elements and attributes. Next, you will look at one method of adding helpful hints for the users as they move through the form. After that, you will perform a final client-side validation routine when the user clicks the “Submit” button.
Helpful HTML for Forms
With forms, there are helpful things you can do to make them accessible, as well as helpful new HTML5 input types and attributes that can enhance the experience for those who have the latest browsers. First, take a look at form accessibility.
Form Accessibility
The first thing you will want to do with a form is to make sure it is accessible to everyone who needs to be able to use it. If customers are filling out your form to purchase items, you certainly don’t want to lose any of them simply because they do not have the latest browser, don’t have JavaScript enabled, or use assistive technology to navigate your Web site.
While this book cannot go into great detail, there are a few basic things you can do to help ensure that your forms are usable for as many people as possible:
![]() Using proper element and label order
Using proper element and label order
![]() Using <label> elements
Using <label> elements
![]() Using <fieldset> elements
Using <fieldset> elements
![]() Marking required fields
Marking required fields
![]() Not assuming client-side scripting is available
Not assuming client-side scripting is available
Element and Label Order The order of form input elements and their label text can make a difference. In most cases (text boxes, text areas, select boxes, and so on), it is preferable to have the label text directly before the input field, as in the following code:
![]()
Most assistive technology can pick up that the label text is intended for the field directly following it, even if the <label> element is missing for some reason.
For radio buttons and check boxes, it is preferable to have the label text directly after the field, as in the following code:
![]()
Again, this helps assistive technologies to more easily determine which label text goes with which element, though the <label> element may be missing.
Using <label> Elements You can use the <label> element to specify what field the enclosed label text is intended to describe. This strengthens the tie between the two when they are already ordered as described previously, but can also help when the label text and input field are separated for some reason, such as being in different table cells or in an unexpected order.
To use the <label> element, you simply wrap the label text within it, and use the for attribute to point to the id of the form field it should describe, as in the following code:
![]()
As you can see, the value of the for attribute matches the value of the id attribute of the field it is describing.
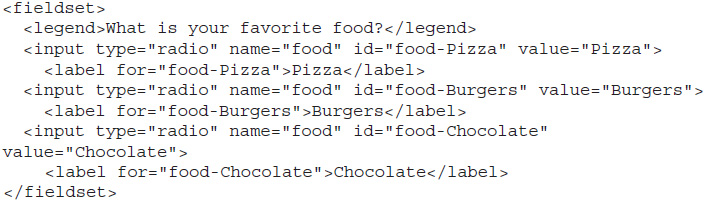
Using <fieldset> Elements The <fieldset> element can be used to group elements together in a logical way. While it can be used with any group of elements that are tied together by a common theme, <fieldset> is particularly helpful with radio buttons and check boxes, where the label text refers to each individual choice, rather than the overall request. For example, consider the following code:

Each label is tied to its individual radio button, which leaves the overall question on its own. To tie these together, you can wrap everything inside a <fieldset> element and the question within a <legend> element, as in the following code:
This helps to tie everything together for the user and assistive technology.
Most browsers implement some default styling for <fieldset> elements (many use a border), so you may need to adjust the styling in your CSS code to fit the needs of your form.
Marking Required Fields When a field is required, it is helpful for users to know this in advance so that they can be sure to fill in any necessary information. While marking a field in a different color, such as red, can be helpful, color should not be used as the only way of conveying essential information. Instead, marking required fields is often done either using an asterisk or by adding text to state the requirement.
For example, one way to add an asterisk is shown in the following code:
![]()
The asterisk is additionally wrapped in an element with a title attribute that states it is required.
Alternatively, you can explicitly state the requirement, as in the following code:
![]()
Either method can help the user determine what fields must contain information to proceed.
Not Assuming Client-Side Scripting In order to ensure that the form will be usable for all of your visitors, you will need to make sure that any actions the users need to take can be performed without client-side scripting like jQuery/JavaScript.
One example of this is when scripting is used in such a way that the user cannot submit the form without scripting enabled. Consider the following code:

Notice that a link is used rather than a standard submit button and that the destination of the link is to run some JavaScript code, which would then submit the form via the script. Unfortunately for users without JavaScript enabled, the form can be completely filled out, but the link will not do anything at all!
This can be avoided by using a standard submit button and performing any scripting via the submit event for the form. The following code changes the link to a submit button to fix this:

From here, you can perform any scripting you need to do, such as validation, by including a separate .js file and using the submit event to perform any scripting for those that have JavaScript enabled. Those that do not will still be able to submit the form to the server-side program for validation and completion.
Helping the User
With all of the previous information in mind, you can now do some additional things that can be helpful to the user and assist you in the validation process. First, you will take a look at some new HTML5 input types and attributes. You will then use your knowledge of form events to provide some messages to users as they move through your form to assist them in entering the information in the format you need.
New Input Types and Attributes in HTML5
HTML5 provides a number of new input types and attributes that can assist you and your users. The input types are new values that can be used for the type attribute of the <input> element. These new types offer more flexible input options for the user and can help you validate the information more easily. Table 8-4 shows the new input types available in HTML5.
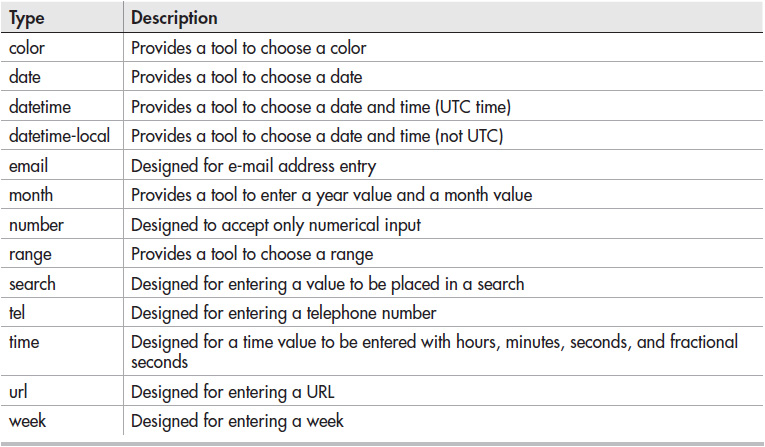
Table 8-4 New HTML5 Input Types
Each of the new input types can be helpful in browsers that support them. For example, the email type will validate that the entered e-mail address uses valid characters and contains the @ symbol. An example of using this is shown in the following code:
![]()
Figure 8-9 shows what happens in Firefox when an invalid e-mail address is entered into an email field.

Figure 8-9 An invalid e-mail address is highlighted by the browser.
In addition to the new input types, there are a number of new attributes that can be used with forms and/or form elements. These are listed in Table 8-5.
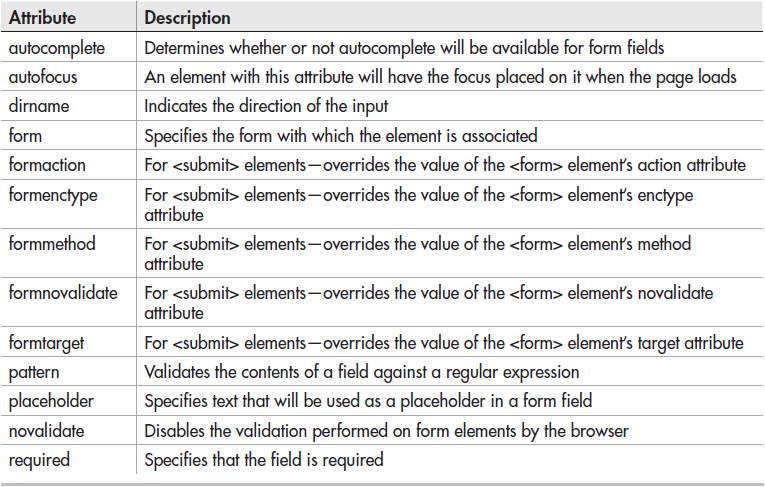
Table 8-5 New Attributes for Forms/Form Elements
For the purposes of this chapter, you will look at the required and pattern attributes. Further information on the remaining HTML5 form elements and attributes can be found at www.adobe.com/devnet/dreamweaver/articles/html5-forms-pt1.html in a helpful series from Adobe.
The required Attribute The required attribute tells the browser that the field must be completed to submit the form. If it is left blank, the browser will bring attention to the error. An example of this is shown here:
![]()
In supported browsers, leaving the field blank will cause an error that may be indicated once you leave the field, on a submission attempt, or both. This is a handy way to ensure that a necessary field does not get left blank in modern browsers.
The pattern Attribute The pattern attribute allows you to provide a regular expression that must be matched by the entered data in order to be valid for submission. An example of this is shown in the following code:
![]()
By default, the field will be optional (so a blank field will pass), but when pattern is used in tandem with the required attribute, the field will both be required and the data will have to match your specified pattern. The following code gives the field a pattern and also makes it required:
![]()
Thus, you can choose whether the pattern must be matched always, or whether the field is optional and only needs to match the pattern when filled in.
The regular expression used as the pattern does have some differences from the way you used them with JavaScript previously:
![]() The ^ and $ (to match the string from beginning to end) are automatically used, so the pattern must be fully matched to pass validation.
The ^ and $ (to match the string from beginning to end) are automatically used, so the pattern must be fully matched to pass validation.
![]() The forward slashes (//) are not used to enclose the pattern; only the regular expression characters are used.
The forward slashes (//) are not used to enclose the pattern; only the regular expression characters are used.
![]() Flags (such as i and g) cannot be used.
Flags (such as i and g) cannot be used.
The first two differences are fairly straightforward. If you use pattern, you will need to make sure your regular expression accounts for any additional allowed characters, since it will have to be a complete match rather than a partial match. Leaving off the slashes is not a problem, since they are just delimiters.
Being unable to use flags means that if you want the pattern to be case insensitive, you will have to specify that within the regular expression rather than placing an i afterward. So, rather than using /[a-z]/i as the regular expression, you would specify the additional character range of A–Z to allow for both lowercase and uppercase letters, as in the following code:
![]()
Both the required and pattern attributes are quite helpful in browsers that support them. In those that don’t, you can provide fallback validation using JavaScript/jQuery (as you will do later in this chapter) or simply send the data to the server-side program for validation.
Providing Inline Hints
With what you have learned so far, you are ready to create the example page that will be used throughout the remainder of the chapter. This will be similar to the form you created earlier, but will use some HTML5 code to provide initial validation in supported browsers.
Save the following HTML code as validation.html:
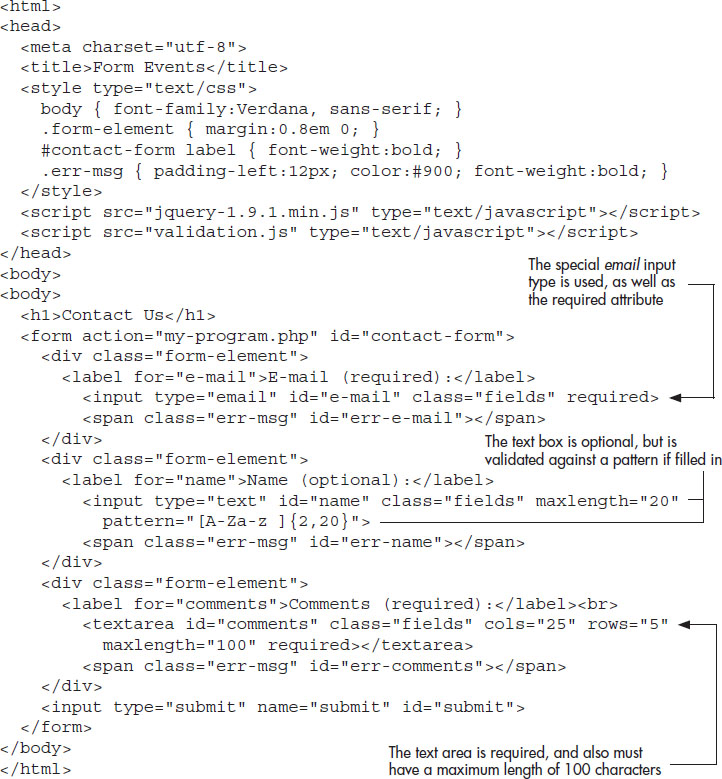
At this point, the only new thing to point out is the fact that HTML5 allows the maxlength attribute to be set on <textarea> elements as well as text boxes. This allows you to have the browser stop any further data from being entered in the field once the maximum length is reached, and is used for the “Comments” field in this form.
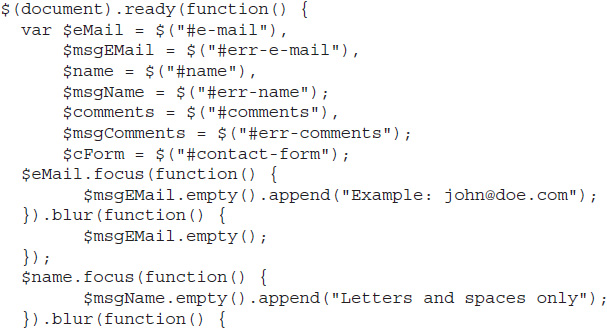
You also already know how to use the focus() and blur() methods to display and remove messages next to each form field. You will use this to provide users with helpful hints about what is expected in each field as they enter the field. Save the following code as validation.js:
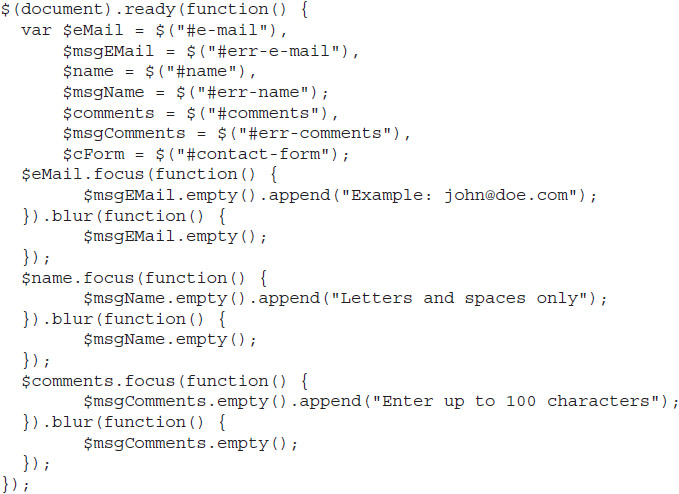
This will add helpful hints each time the user focuses on a field, and remove each one when the focus is removed. In addition to providing helpful information, this can assist the user in knowing which form field is currently in focus to be filled in. The last variable declaration ($cForm) assigns the <form> element to $cForm to be used later for the submit event.
The calls to empty() prior to appending the message will help when you add the error messages later, since you will want to clear (empty) those and show the hint again when the user returns to the field.
Open the validate.html file in your browser and move into the various fields. Each one should provide a helpful message to indicate what type of data should be entered. If you are using a supported browser, it will also indicate when entered data is not valid. Figure 8-10 shows how the page looks when the “Name” field is given focus.
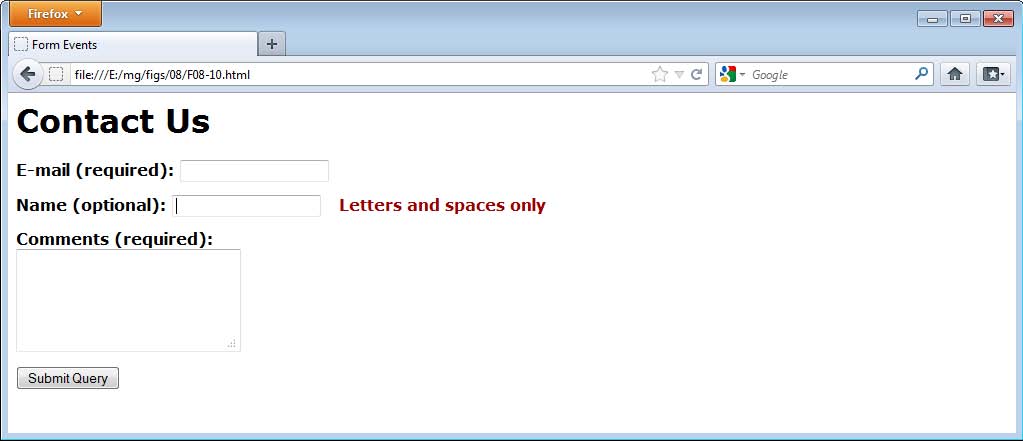
Figure 8-10 The hint for the “Name” field displays.
Validating the Form
Now that you have your hints and HTML5 initial validation in place, you can perform a final client-side validation of the data in the form before sending it to the server-side program. Basically, you will perform the same checks as the HTML5 validation, which will work as both a fallback and a way to provide any additional validation you may require before allowing the submission to proceed.
First, you have the “E-mail” field, which is required. Validation of an e-mail address can be done using a regular expression. Since the field is required, you can simply test the content of the field for a match, as in the following code:
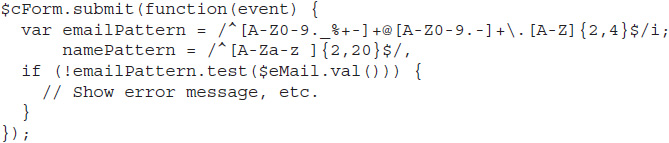
The regular expression pattern here is more in-depth than the validation used by the browser, so it may catch some additional errors the browser did not. More information on this regular expression and what it does can be found at www.regular-expressions.info/email.html.
When an error occurs on the submission, this script is going to do several things:
![]() Keep a count of errors and place a message at the top of the form if there is at least one error
Keep a count of errors and place a message at the top of the form if there is at least one error
![]() Clear any current “hint” messages next to the fields
Clear any current “hint” messages next to the fields
![]() Change the background color of any fields that have errors
Change the background color of any fields that have errors
![]() Write a message next to the fields that have errors
Write a message next to the fields that have errors
To do this, you first need to add a variable to count the number of errors, which will be increased by one each time an error is found. You will also add two variables to hold the default field color and the color of fields when they contain errors. The submit() handler will now look like this:
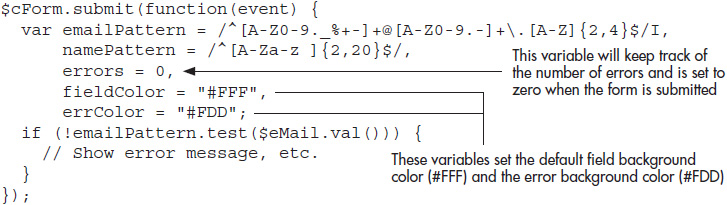
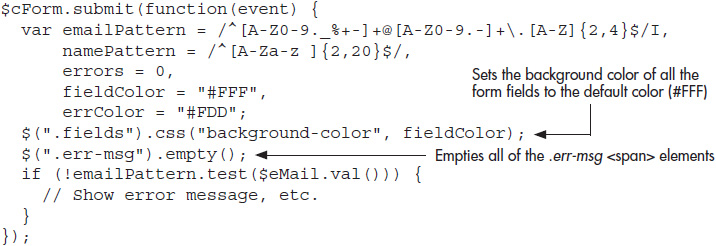
Notice that errors is initialized to 0. This will happen each time the form is submitted. The count will only go up if an error is found. You now need to make sure that both the default background color is reset each time and that any current messages are cleared from the .err-msg <span> elements. This can be done by adding two lines of code, as follows:
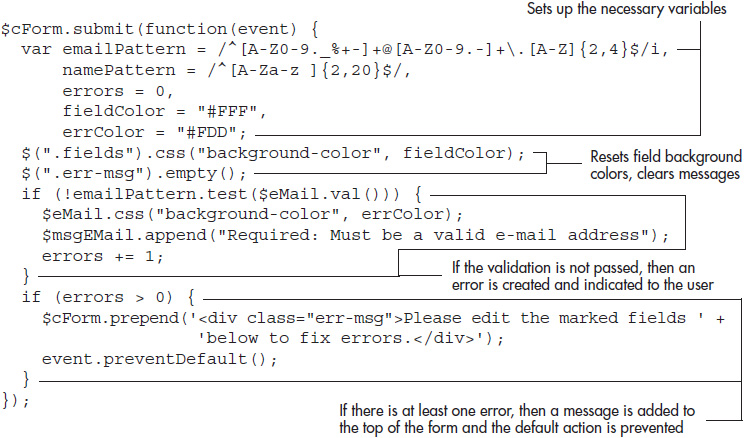
With this in place, you can now work on the e-mail validation. Since you have the test in place, you simply need to add the functionality. Here, if an error is found, you will change the background color of the field to the error color, append an error message to its corresponding <span> element, and add 1 to the errors variable. This is done with the following code:

As you can see, if the validation is not passed, then the necessary elements are selected, changes are made, and the errors variable is increased. Since you want nothing to happen if the validation does pass, no else statement is used.
Finally, before the form is sent on to the server-side program, you want to check to make sure no errors were encountered. If so, you want to write a message at the beginning of the form and prevent the default action. This is done by adding the following code:

This places a message at the top of the form alerting the user to the fact that there are errors and to update the marked fields. The submission to the server-side script is cancelled by using event.preventDefault().
When the submit handler code is all put together, it should look like the following:
With this done, there are two fields left to validate. The code shown for these fields will be added immediately prior to the final if statement: if (errors > 0).
The name field used a pattern for HTML5 validation, so that pattern will be used again (this is already placed in the namePattern variable in your code). Since it is an optional field, you will only check the pattern if the length of the data in the field is at least one character. If there is an error, you will perform the same tasks as you did with the “E-mail” field. The following code will be used for the name validation:
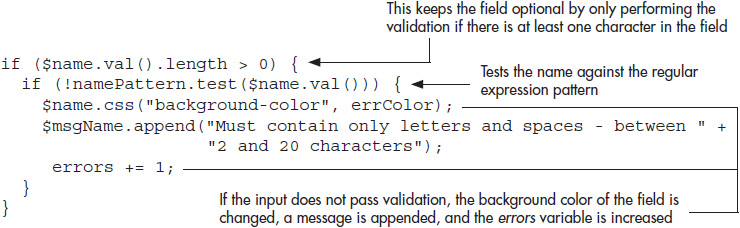
This is very much like the E-mail field, except that the validation is wrapped within another if statement, which ensures that it is OK if the field is left blank, making the field optional.
Next, you want to validate the “Comments” text area. This is required, but cannot be more than 100 characters. Thus, you need only check the length of the input, as in the following code:

This ensures that the field has between 1 and 100 characters. If not, then the same procedure is performed.
Finally, you can put all of the code together to finish up the JavaScript file. The final code for the validate.js file should look like this:
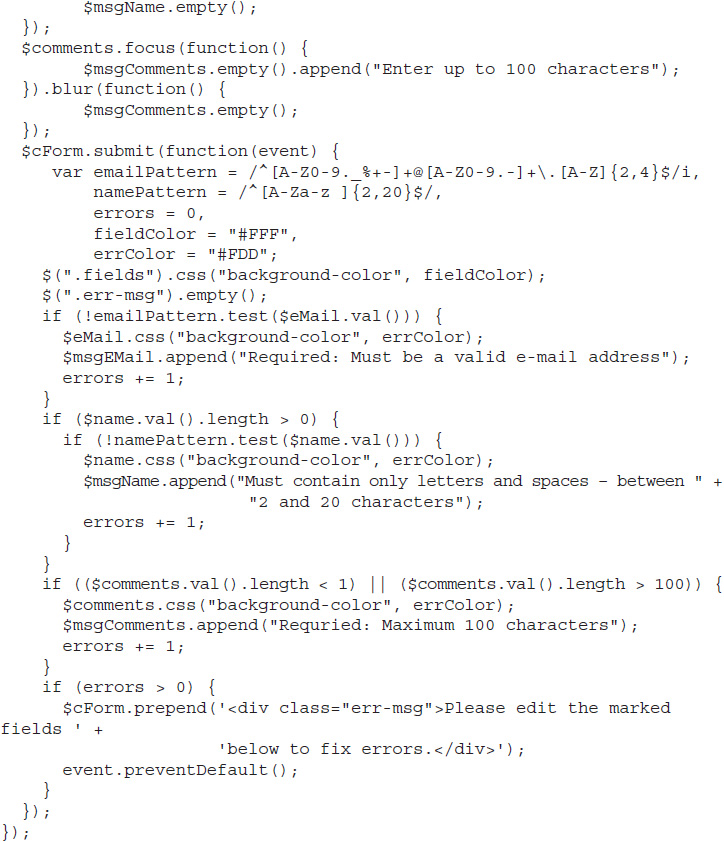
Save the file and open validate.js in your browser. You should now have the form and validation fully functioning, aside from an actual server-side program. Try out some different types of input or different browsers to see how the validation is handled (whether it is done in the browser via HTML5, done with jQuery, or sent to the server side with JavaScript off).
Try This 8-2
Practice Validation
![]()
This project allows you to practice using the validation techniques learned in this chapter. You will validate a form similar to the one you created (validate.js), except that it will use a different HTML5 input type (number) and won’t have a “Comments” field.
Step by Step
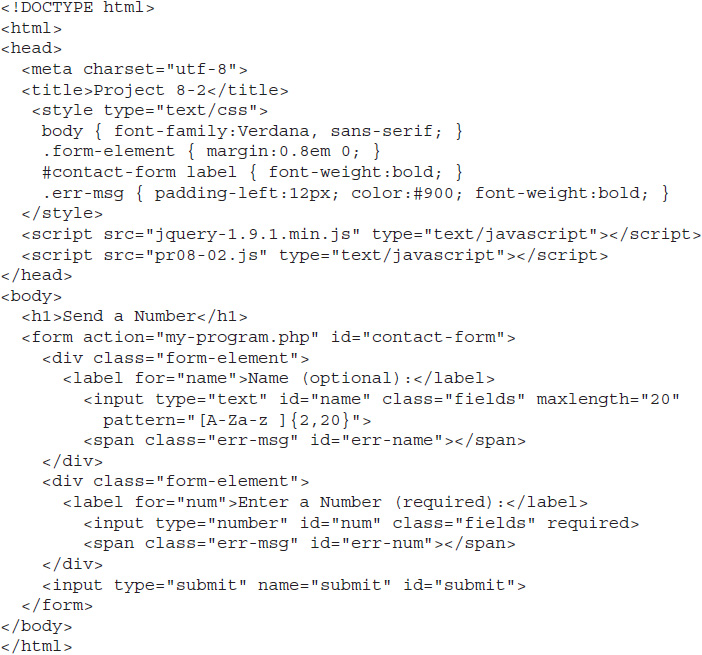
1. Insert the following HTML code into your editor and save the file as pr08-02.html:
2. Create a JavaScript file and save it as pr08-02.js. Add code that will add “hints” for each field. For the “Name” field, the hint should say “Letters and spaces only.” For the “Enter a Number” field, the hint should say “Digits 0-9 only.”
3. Add code to work as a fallback for the HTML5 methods already used to validate the input. If there are errors, place a message at the top of the form to alert the user. For each field, add an error message beside it and change the background color of the field if there is an error. For the “Name” field, the message should say “Must contain only letters and spaces—between 2 and 20 characters.” For the “Enter a Number” field, the message should say “Required: Must contain only digits—between 0 and 9.”
4. When complete, the code should look like this:
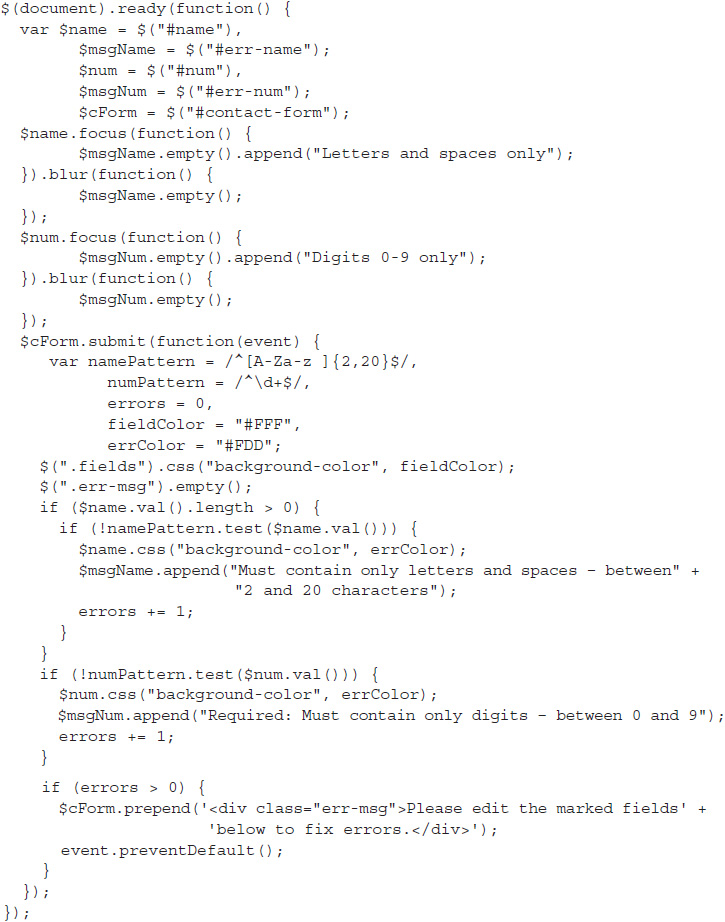
5. Open the pr08-02.html file in your Web browser. Try filling in the form elements and testing different scenarios to see how the form validation is handled.
Try This Summary
In this project, you used your knowledge of HTML5, jQuery, and JavaScript to create a form that assists the user in filling in the necessary information. This form validated a number using both the HTML5 number input type and using jQuery/JavaScript code as a fallback.
 Chapter 8 Self Test
1. The __________ method allows you to get or set values for matched elements.
2. Which of the following would get the value of a text box element with an id of #yourname?
A. $(“#name”).val();
B. $(“#yourname”).val();
C. $(“element”).val(“#yourname”);
D. $(“#yourname”).value();
3. Which of the following could be used to set the same value of “Enter Value” for all of the plain text boxes on a page (<input type=“text”> elements)?
A. $(“input[type=email]”).val(“Enter Value”);
B. $(“input[type=text]”).value(“Enter Value”);
C. $(“input”).val(“Enter Value”);
D. $(“input[type=text]”).val(“Enter Value”);
4. The __________ event occurs when focus is taken away from an element.
A. blur
B. focus
C. select
D. submit
5. The change event occurs when the user selects text within an input box.
A. True
B. False
6. The __________ method can be used to perform actions when focus is given to an element.
A. change()
B. blur()
C. focus()
D. select()
7. The break statement should be used at the end of each case within a switch statement to keep the case from “falling through” to the next case and executing those statements as well.
A. True
B. False
8. The ________ event occurs when a user selects text within a text box or text area.
A. change
B. textSelect
C. text
D. select
9. Given the regular expression pattern of /^[a-z]$/, which of the following strings would return a match?
A. “Very Cool”
B. “cool”
C. “2 cool”
D. “cool!”
10. You can use the __________ method of the RegExp object to test a string against a regular expression.
A. test()
B. regExTest()
C. preg_match()
D. eregi()
11. The __________ flag can be added to a regular expression to make it case insensitive.
A. m
B. g
C. i
D. c
12. In most cases (text boxes, text areas, select boxes, and so on), it is preferable to have the label text directly __________ the input field.
A. after
B. before
C. within
D. below
13. You can use the <label> element to specify what field the enclosed label text is intended to describe.
A. True
B. False
14. In order to ensure that the form will be usable for all of your visitors, you will need to make sure that any actions the users need to take can only be performed with client-side scripting, like jQuery/JavaScript, enabled.
A. True
B. False
15. The __________ attribute in HTML5 tells the browser that the field must be completed to submit the form.
A. necessary
B. obligatory
C. required
D. mandatory