
CHAPTER 2
LED Blinker Project
Now we start creating projects using the RasPi. However, I still have some preparatory steps to discuss and information to provide about the prototype board that will be used in this and other projects. I will also present a detailed discussion of the GPIO library, which is critical to making all of the projects work. The first project will consist of turning on an LED connected to a GPIO pin and then causing that LED to blink.
Prototype Board
Let’s focus on a piece of hardware that I will use to demonstrate how to blink an LED using the RasPi and some Python code. This section is entitled “Prototype Board” and that is exactly what I will be using. The board is called the Pi Plate and is available from Adafruit at https://www.adafruit.com/products/801. It comes as a kit of parts; however, a fully assembled Pi Plate mounted on a RasPi is shown in Fig. 2–1.
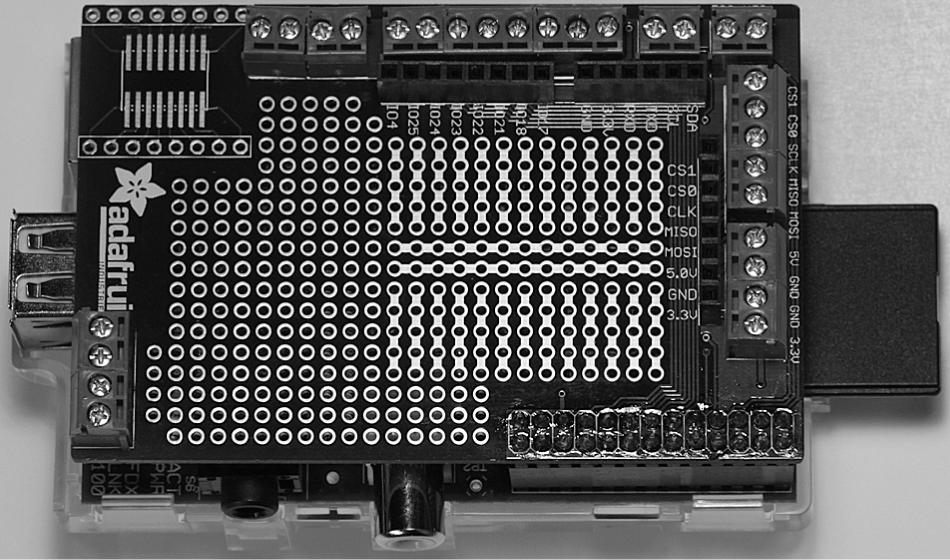
Figure 2–1 Pi Plate mounted on Raspberry Pi.
The Pi Plate attaches to the 26-pin GPIO connector, as you can see in the figure. All the active connections are brought out to the top of the Pi Plate, both to 0.1-inch, on-center, female header strips as well as to 3.5-mm screw clamp connectors. This makes for a very easy access to the GPIO pins. Please note that the pins on the Pi Plate are marked with both RasPi and BMC designations, which can be confusing. Please use Table 1–2, from Chap. 1, to cross-reference all the designations and ensure that you know what connection you are making.
CAUTION The Pi Plate does not provide any electrical buffers whatsoever, so be extremely careful and ensure that you do not accidently apply 5 V to any RasPi pin.
Soldering
I thought this would be an appropriate time to discuss soldering, since you will need to assemble the Pi Plate. The assembly operation is very straightforward, and Adafruit provides a step-by-step illustrated assembly guide at learn.adafruit.com/adafruit-prototyping-pi-plate. I have also included a photo of my trusty soldering station in Fig. 2–2.
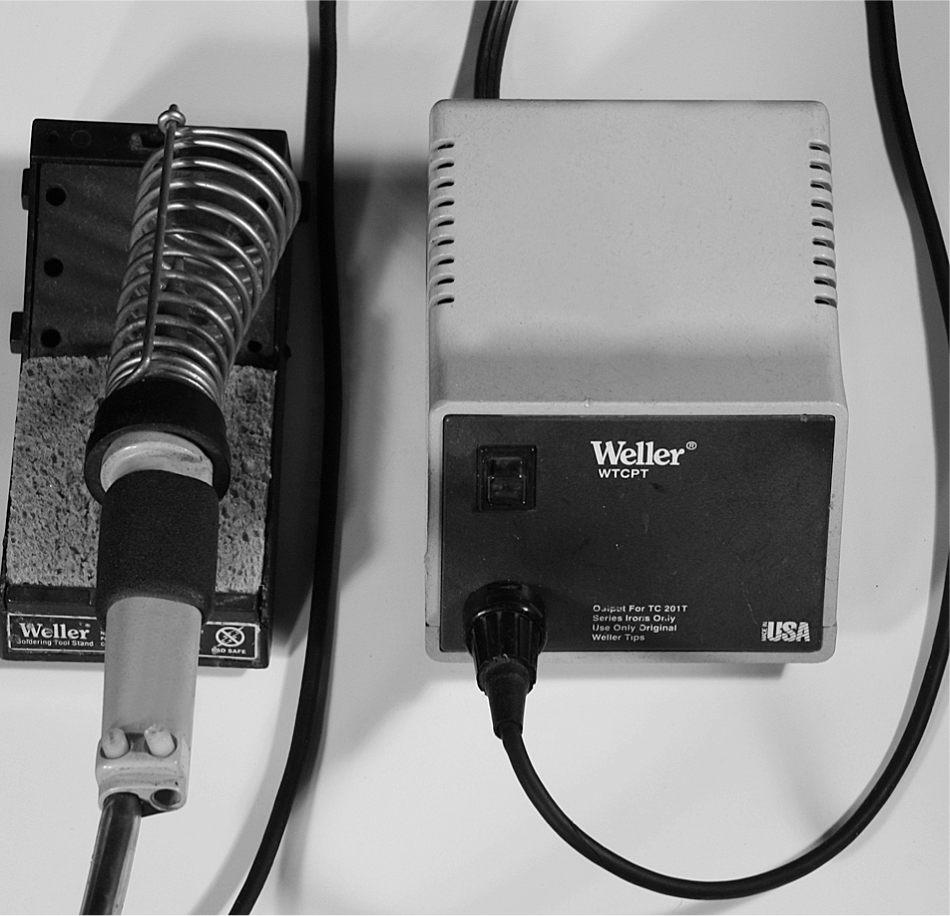
Figure 2–2 Trusty soldering station.
It’s not the prettiest or the snazziest station available, but it has served me well. The key to quality soldering work is to have good soldering technique, keep the soldering iron tip clean, and use the highest-quality solder available. Figure 2–3 shows the essence of good soldering technique. It is vital that the solder joint be hot enough for the solder to flow easily. It takes practice to apply just the right amount of solder; too little may result in a cold solder joint, and too much could lead to a short between closely spaced components.
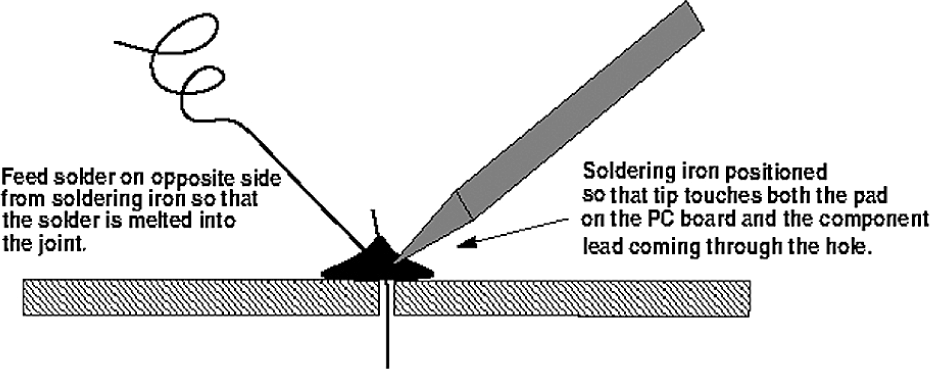
Figure 2–3 Good soldering technique.
Another issue regarding a good solder joint is the use of lead-free solder. Now, don’t get down on me; I am all about maintaining a healthful environment, but the elimination of lead from solder often produces poor solder joints unless some extra precautions are taken. The simplest and probably the best approach is to apply a high-quality, acid-free, solder flux to the joint prior to heating the joint with the iron. This will allow the lead-free solder to flow more freely and produce a better-soldered connection. Again, it takes practice to perfect soldering techniques.
One final thought that relates to solder joints as well as to other types of electrical connections is worth sharing. There is a long-running anecdotal observation that 90 percent of all electrical/electronic malfunctions are related to connection malfunctions. This makes a lot of a sense when you think about it. We live in an oxygen-rich atmosphere and oxygen is a great reduction agent; it wants to oxidize every element it can possibly chemically combine with. Metal oxides are reasonably good insulators because some of their free electrons have been “taken” up by oxygen molecules. This leads to higher and higher resistance being built up in a connection that will eventually cause a failure.
Of course, current flowing through a resistance produces heat, which in turn can cause a fire if the current is sufficiently high. So what is the solution? One expensive solution is to gold-plate electrical contact surfaces. Gold does not oxidize and is not subject to this type of failure. It is, of course, very expensive and not practical for large-scale connectors. Another solution that the power industry employs is what is known as gastight connections, which require the use of special components and specialized training to produce. For the type of projects that I work on, I can only ensure that the solder joints are sound from both a mechanical and an electrical perspective. I also inspect electrical connections for oxidation and foreign matter and take appropriate action to replace the compromised connection or component.
Accessing the GPIO Pins
The GPIO pins have to be made programmable in order to blink the LED. Being made programmable means that the pins are set to either sense an input voltage or set an output voltage. The pins are accessed by using a high-level name such as pin (18) that you can readily identify—in this case, GPIO pin number 18. We must use a software library that contains the required high-level abstractions and hardware associations to enable us to control the GPIO pins with a Python program. This library is named Rpi.GPIO-0.4.1a.tar.gz and is readily available as a Linux archived file from http://code.google.com/p/raspberry-gpio-python/downloads/list. Figure 2–4 shows this website.
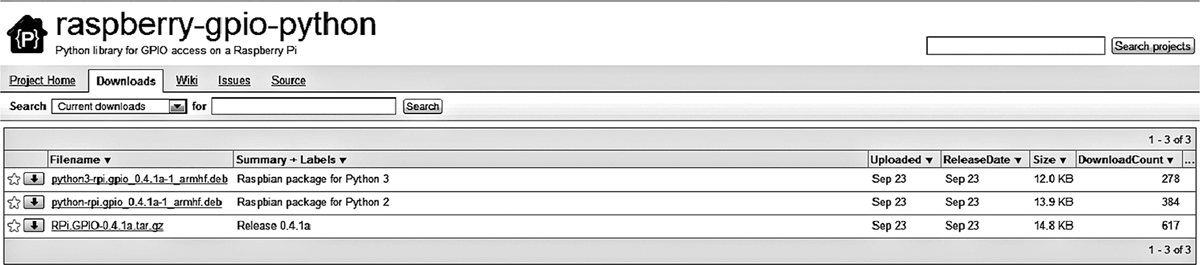
Figure 2–4 GPIO library download website.
The archived file must be downloaded, extracted, and stored in an appropriate directory. I would suggest creating a new directory named Python located in the pi parent directory.
Open an LXDE terminal window and type the following commands in the terminal window:
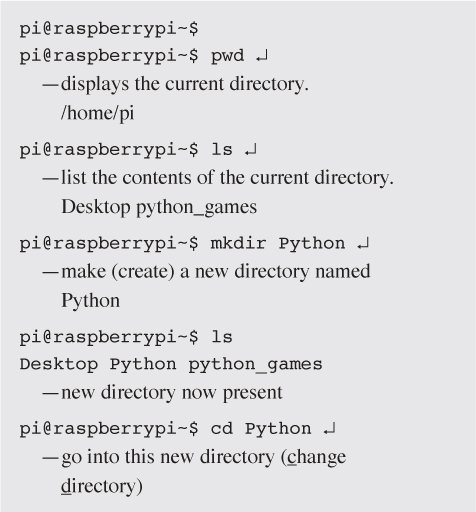
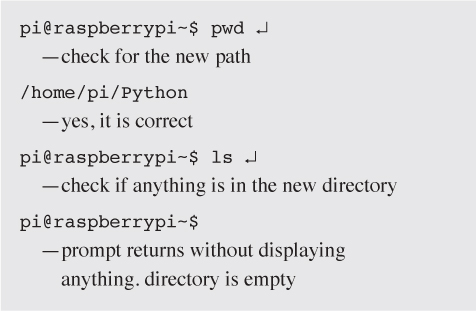
You should now be in your development directory, Python, ready to download the GPIO library archive. You have several choices on how to download the archive file. You can use a browser on the RasPi and just do a direct download, or you can use a PC and download it into a thumb drive, which you then carry over to the RasPi and transfer it using the File Manager app. I choose to do the latter as the PC download process is much faster. In days of “yore” this approach was called the “sneakernet”.
The archive must now be uncompressed and the contents extracted. Assuming you are still using a terminal window in the Python directory, type the following:

Ensure that you type in the exact name with uppercase and lowercase letters as shown. Linux is very picky in this regard and will throw an error message that it cannot find the file if you don’t enter the name exactly as it appears. The tar app will create a new directory named RPi.GPIO-0.4.1a, where you will find over a dozen files and directories newly created. Type the following to transfer into this directory.

Incidentally, I will no longer explicitly show these commands, as you should now be more comfortable using them. I will instead simply say cd into RPi.GPIO-0.4.1a, and you will instantly know what I mean.
Let’s test this newfound confidence! ls the RPi.GPIO-0.4.1a directory. You should now be looking at a list of all the files and subdirectories. One file should pique your interest; it is named INSTALL.txt. cat this file to read the contents. You could also double click on it to open it in a text editor, but I am feeling confident that you are starting to get the feel of how to operate quickly and efficiently at the command-line level, where the pros live. Back to the INSTALL.txt file. It contains important instructions regarding loading another module required to use the GPIO library. The key instruction is the following:

Please read the following section before you enter the above command.
apt-get Command
The acronym apt is short for advanced packaging tool. You almost always use the command in the form of apt-get for instructing the computer to “get” a package of software using the Internet. The key to making this all work is a list of repositories that apt refers to in order to retrieve the requested package. The repository list is located at /etc/apt/sources.list in the Linux distribution.
The apt-get command also wants to know what you want done with the software package once it has been retrieved. That’s the purpose of the install portion of the command. But apt has other neat features including the ability to update all the packages already installed in the computer. Simply type the following:

All available updates for installed packages will now be installed. Be patient; this will take a while, especially if there are many packages involved.
However, that’s not all apt is capable of doing on a “global” scale. You can upgrade all your installed packages, provided upgrades are available. Type the following:

Upgrades as the name implies are new versions of installed packages. You should always update prior to upgrading in order to lessen the chance that an inappropriate update will be applied to a newer version.
There is a great deal of information available on apt at www.debian.org/doc/user-manuals#apt-howto.
LED Project
I will now show you the LED project that ties together all the information that you have carefully studied so far . I will create a program to turn on an LED connected to pin 18 using the Pi Plate as a prototype aid. You will need a little information on how to connect the LED and limit the current flowing through the device. Figure 2–5 is a diagram showing the LED connections as well some physical descriptions that should be helpful to you in understanding the circuit.
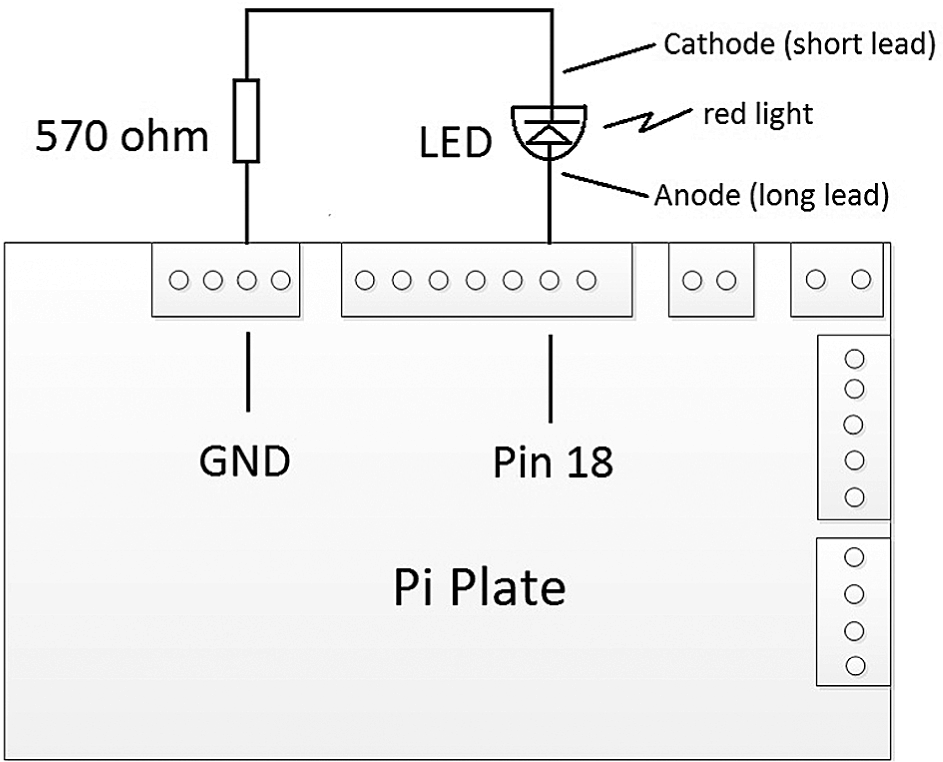
Figure 2–5 Diagram illustrating LED connection to the Pi Plate.
The LED anode has a longer lead that is connected to the pin 18 screw terminal. The LED’s shorter lead is the cathode, and it is connected to one lead of the 570-ohm (Ω) resistor. The other resistor lead is connected to the ground screw terminal. The resistor’s value was calculated as follows:
![]() Current range that a RasPi pin can handle is 2 mA to 16 mA. So, 5 mA was selected as a low- to mid-range value with just enough current to operate the LED with a dim red light. No sense in overstressing the RasPi.
Current range that a RasPi pin can handle is 2 mA to 16 mA. So, 5 mA was selected as a low- to mid-range value with just enough current to operate the LED with a dim red light. No sense in overstressing the RasPi.
![]() The high output voltage from pin 18 is 3.3 V. The LED has a nominal drop of 0.7 V. Therefore, 3.3 – 0.7 or 2.6 V must be dropped with a 5 mA current.
The high output voltage from pin 18 is 3.3 V. The LED has a nominal drop of 0.7 V. Therefore, 3.3 – 0.7 or 2.6 V must be dropped with a 5 mA current.
![]() Ohm’s law: R = E/I where R stands for the resistance of a conductor in ohms, E stands for the potential difference across a conductor in volts, and I stands for the current through a conductor in amperes . Plugging in the values for E and I, we get 2.6 V/(5 mA ÷ 1000) = 520 Ω resistance. Note that the 5 mA had to be converted to amperes by dividing by 1000.
Ohm’s law: R = E/I where R stands for the resistance of a conductor in ohms, E stands for the potential difference across a conductor in volts, and I stands for the current through a conductor in amperes . Plugging in the values for E and I, we get 2.6 V/(5 mA ÷ 1000) = 520 Ω resistance. Note that the 5 mA had to be converted to amperes by dividing by 1000.
![]() 570 Ω is the nearest standard value resistor to 520 Ω.
570 Ω is the nearest standard value resistor to 520 Ω.
Figure 2–6 shows the actual connections. I simply twisted the cathode lead to a resistor lead and soldered them to ensure a good connection.
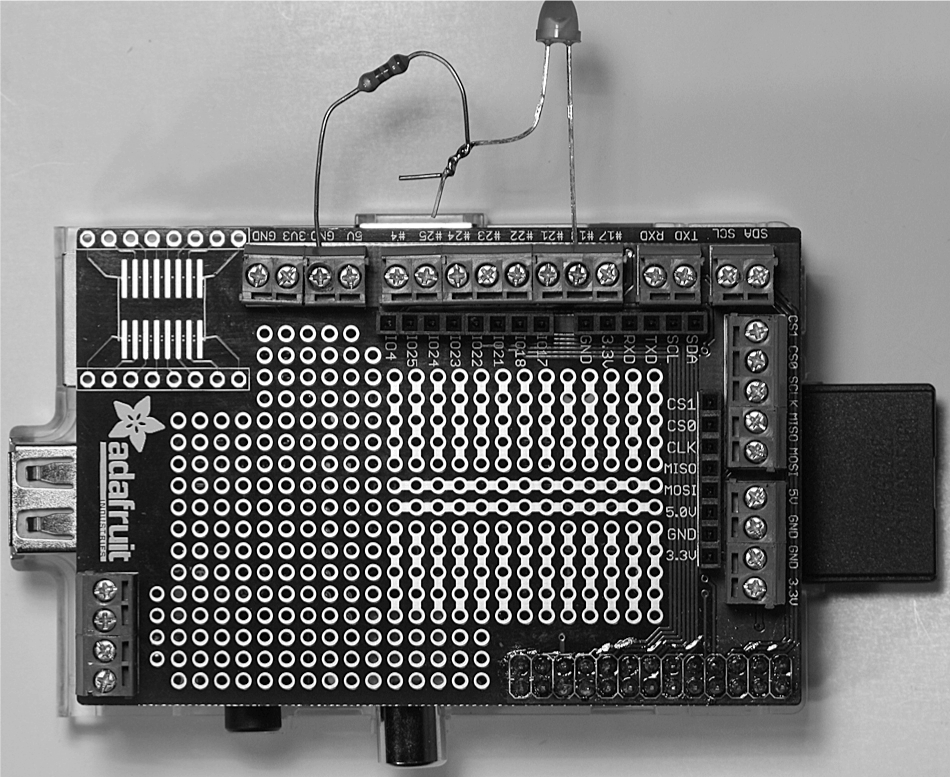
Figure 2–6 Actual LED connection.
Project Software
The program to turn on the LED is very straightforward. You should realize that when the RasPi is first powered on, all the GPIO pins are set to be in an input state, in other words, they will only sense or detect voltage not output a voltage. Therefore, we must change the state of the pin selected to be an output and then apply a high voltage to the pin. This is the fundamental logic behind the program.
Here is the program to be created using the nano editor. Comments are placed above each line to inform you what the following line is doing. Comments begin with the # symbol. All comments are ignored by the Python interpreter:

That’s it, just three lines of code not counting the import statement that is really part of the program initialization. You should create the code in the nano editor and save it with a name that makes sense. I saved mine as Pin18_Test.py. Remember to use the .py suffix, since IDLE checks it to ensure that it is a valid Python program.
You need to open and run this program in the Python shell. However, there is an important action that you need to take or Python will complain and not run the program. You must run IDLE at the root level, not at a “normal” user level. This is needed, I believe, because the GPIO library is accessing Linux functions or resources that can only be accessed as root. Do the following to run the IDLE Linux shell as root:
Open a terminal window and type:

That is all that’s needed, and you will be at the exact place where you can open and run your program, as discussed in a previous section. Running the program will turn on the LED; not very exciting so far, as our journey begins with small steps. The next section shows you how to blink the LED.
Blinking the LED
A variety of approaches can be taken to blink the LED. The approach I took was simple and direct. The logic was to turn on the LED; wait a set amount of time; turn off the LED; wait a set amount of time; and then continually repeat this process forever.
Waiting a set amount of time may be accomplished in several ways. The way I selected was to use a function named sleep(seconds) that is part of the time library. All you need do is provide the amount of time, in seconds, that you want the RasPi to do nothing—essentially spinning its wheels. The seconds argument, the value put in the parenthesis, is a real number, i.e., one with a decimal point. I used .5 second for my initial program. The modified program, with comments, is shown below.
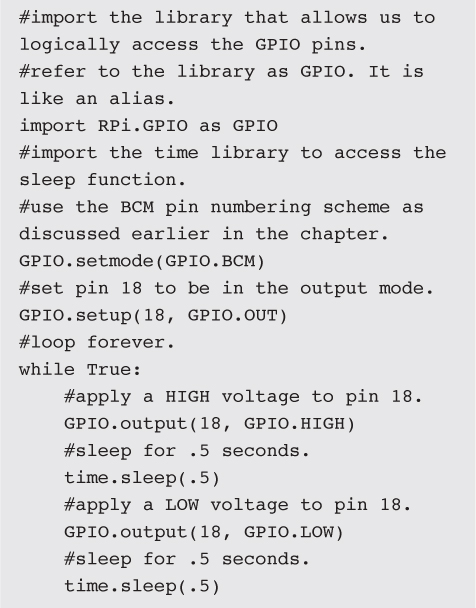
While you can make the modifications to the original program using the nano editor, I found it more convenient to use the shell editor, which displays the program when you first open it. This editor will allow you to save the program with the original or a new name.
There are a few items in the program that should be explained. The time library is accessed by using the import statement, the same way the GPIO library was accessed.
The looping behavior is imposed by two things; First, I used what is known as a conditional statement, while True. The while portion of this statement checks what immediately follows it, and if the expression evaluates to a logical True, will loop or repeat all statements below the conditional that are indented at least four spaces. The logical value of True that follows the while statement thus causes the looping to continue forever.
Pausing the program is a result of calling or invoking the sleep function, a part of the time library. The actual call is the statement time.sleep(.5). This is not the first time you have seen this call type; I used it several times in the original program, i.e., GPIO. setup(18, GPIO.OUT). The period in the statements represents a special operator known as the “member of” operator. Restating the time. sleep(.5) call with this operator translates to “call the sleep function that is a member of the time library with an argument of .5.” Don’t worry if this discussion is somewhat confusing; all I am trying to do is to gently introduce you to the concept of object-oriented programming, something that I will pursue in later chapters.
Now back to the Blinker program. Make the modifications to the original program and then run it. You should be rewarded with a blinking LED for all your efforts. Congratulations! Show all your family and friends!
Summary
I started this chapter with a discussion on the Pi Plate prototype plate that serves as an excellent project experimental platform. Next, I briefly mentioned some good soldering tips that have helped me over the years. Next, there was the discussion regarding the GPIO library that may have overwhelmed some of you a bit, but that was necessary in order to set the stage for the LED project. The good news is that we will simply use the GPIO library from this point on in various projects. That’s software reuse at its best. The last sections of this chapter focused on a real world project of first turning on an LED and then blinking that same LED.
Now we move on to bigger, better, and more interesting projects. And yes, you will still learn and gather a good education as you progress through the remaining projects.