
CHAPTER 3
MP3 Player Project
In this project, I will show you how to create a fairly simple, yet fully functional, MP3 audio player. I will also describe how to use the GPIO pins as inputs, which will allow the player to use some hardware push-button switches to select the MP3 songs it will play.
We will also explore the Advanced Linux Sound Architecture (ALSA) software package that drives the Linux sound production and provides some utilities essential to helping us complete this project.
Prototype Connector
Let’s first focus on a piece of hardware that I will use to connect the project hardware switches with the RasPi’s GPIO pins. This prototype aid is different from the Pi Plate introduced in the last chapter. Called the Pi Cobbler, it is shown in Fig. 3–1 without the interface ribbon connector in order to show all the pins clearly.

Figure 3–1 Pi Cobbler prototype connector.
Really just a direct extension of, or a breakout kit for, the GPIO connector, it allows all the pins to be connected to a solderless breadboard. It is available as a kit from a variety of sources, including Adafruit at www.adafruit.com/products/914. A fully assembled Pi Cobbler mounted on a breadboard and connected to a RasPi is shown in Fig. 3–2.
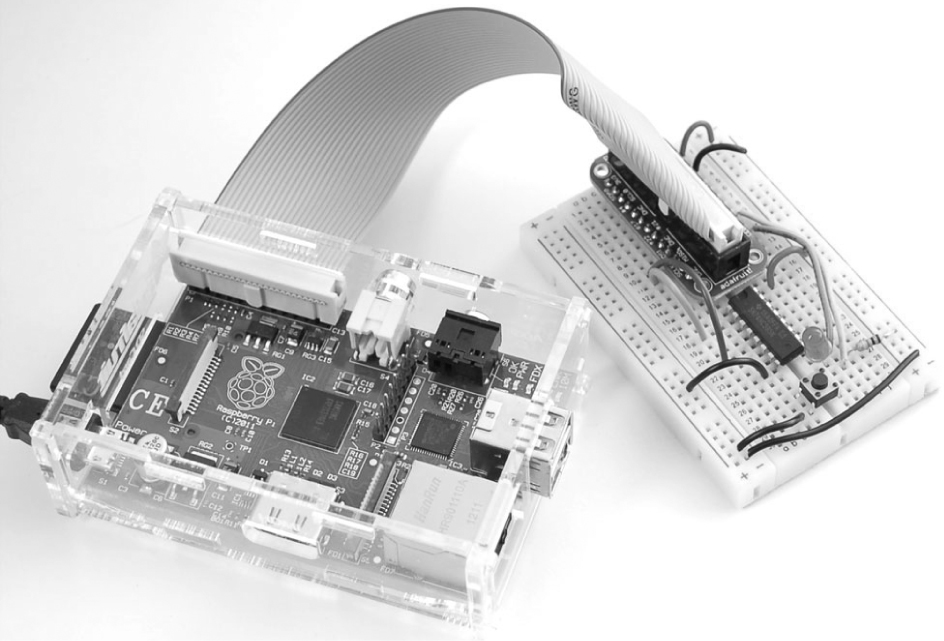
Figure 3–2 Pi Cobbler on a solderless breadboard connected to a Raspberry Pi.
Using the Pi Cobbler along with the breadboard will allow for rapid project construction and easy modifications to the existing project. It will help you to have a variety of prestripped wire available to use with the breadboard. You can either make your own using 22-gauge, solid pickup wire or purchase a package from your favorite electronics components supplier. Figure 3–3 shows a package that I bought for the book projects. These wires are actually stranded for flexibility and are also terminated with a solid, insulated pin connection. It is well worth the cost to buy a kit of these wires.

Figure 3–3 High-quality breadboard interconnect wires.
Portable Stereo Speaker
You will need a way to listen to the MP3 recordings. I use the very small and inexpensive stereo speaker device, the Veho360 (www.veho-uk.com) that is shown in Fig. 3–4.

Figure 3–4 Veho360 speaker.
This device has a 3.5-mm jack that you can plug into the RasPi audio-out connector. It also has a rechargeable battery that can be recharged by plugging it into any standard USB socket. However, I would not recommend using the RasPi USB sockets due to the current limitations that I discussed in Chap. 1. The volume control on the speaker will allow you to adjust the volume in only two steps. All in all, this powered speaker is fairly decent in reproducing audio; however, I would not get rid of my home theater system for it.
ALSA
Advanced Linux Sound Architecture (ALSA) is the principal sound driver that is used in most of the RasPi Linux distributions. It is very stable software that has been widely adopted for use in various Linux distributions. It is totally open source and is strongly supported at www.alsa-project.org. The eight packages that currently make up ALSA and a brief descriptions of each are listed in Table 3–1.
Table 3–1 ALSA Packages

Although the ALSA drivers should be preinstalled with the distribution, you should execute the following command in a terminal window to ensure that the drivers are in place:

The app modprobe loads Loadable Kernel Modules (LKM), which, in this case, is the ALSA compliant sound driver, snd-bcm2835. You should also check a file named modules located in the /etc directory for the presence of a snd-bcm2835 item. This file is checked at boot time for all the LKMs that are to be loaded.
You also need to install the alsa-utils package as that contains several apps that are important to get our project working. The installation uses the aptget command that was discussed in Chap. 1. Type the following command in a terminal window:

One more step is required to ensure that sound is produced at the analog audio jack. Type the following in a terminal window:

The app amixer is part of the alsa-utils package that allows us to select the desired audio output connector. The HDMI is the default audio output device when the RasPi is first booted. The audio output is redirected using the above command. The number at the end of the above command line represents the following:
0—auto
1—analog
2—HDMI
Testing the Analog Audio
Now, it is time to test the audio from the RasPi. Connect a powered speaker to the 3.5-mm jack and type the following in a terminal window:

You should now be hearing a rushing noise from the speaker. This is a pink-noise signal being created by the speaker-test app that is part of the ALSA package. (For a more detailed explanation of pink noise, see the following section on Analog Audio Frequency Response.) If you do not hear this noise, review the commands listed above and ensure that they were entered as shown. The speaker-test app has many more options than just producing a noise output. Go to http://manpages.ubuntu.com/manpages/natty/man1/speaker-test.1.html for more information.
Analog Audio Frequency Response
Having a pink noise output provides an unexpected opportunity to measure the frequency response of the RasPi analog audio system. I have had many years of experience as an acoustical engineer, and to me, this seemed a natural opportunity to assess the acoustic performance with this particular subsystem. First, let us delve into a bit of background information regarding pink noise and why it is so useful in determining a system’s frequency response. Noise, by its intrinsic nature is random, with energy spread uniformly across the observed frequency spectrum or bandwidth. This type of noise is also called white noise to point out the uniformity of the energy.
Frequency analysis for acoustical systems typically uses a set of filters known as one-third octaves that simulate to some extent the response of the human ear. This means that the filters are narrower at lower frequencies and become wider as the frequency increases. Applying white noise to this filter bank would result in an upward or positive sloped response. White noise is prefiltered (or predistorted if you may) such that the conditioned noise signal that comes out of the one-third-octave filters is a flat response. Any deviation from a flat response would, therefore, be caused by the system under test, not the applied noise signal. This preconditioned noise is called pink noise.
Figure 3–5 is a screenshot of an acoustical analysis program measuring the analog audio output producing pink noise from the speaker-test app.
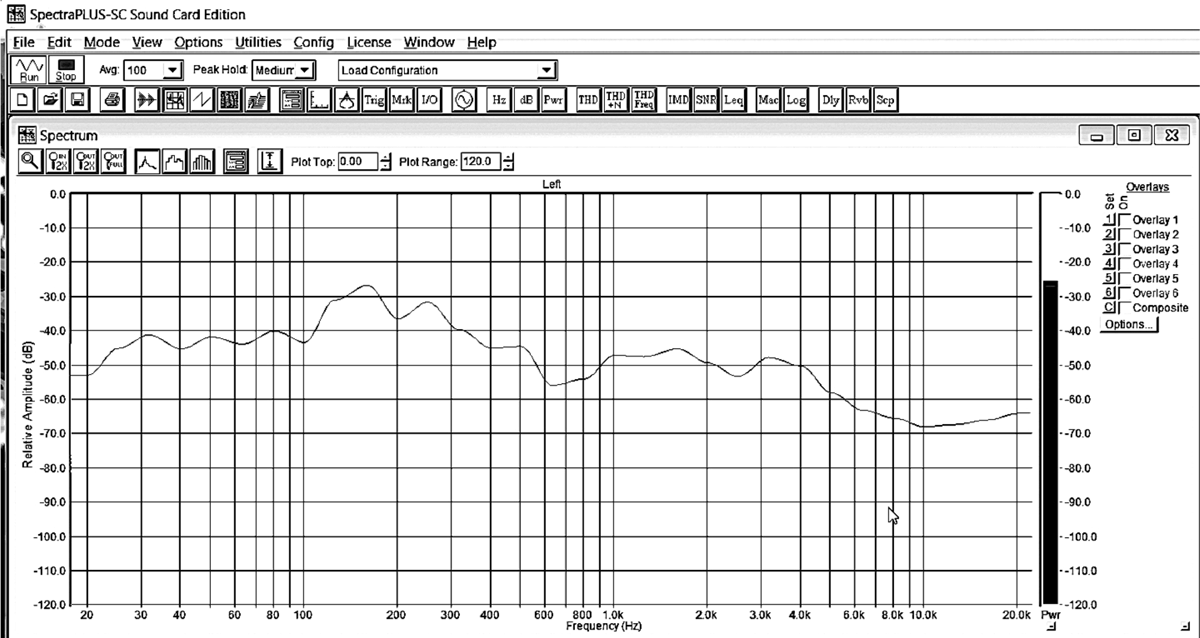
Figure 3–5 Raspberry Pi one-third-octave acoustic analysis.
The audio output is far from being flat as you can see from the irregular curve. The good news is the magnitude of these curves is not so severe as to appreciably distort the audio. Audio purists would probably use a multiband equalizer to compensate for these response deviations.
Audio File Formats
A brief discussion of the audio file formats will help you understand the pros and cons of using different formats when creating audio apps. There are three broad categories for audio file formats:
1. Uncompressed—An uncompressed storage uses the most storage of any format.
2. Lossless compression—Skips silent portions; stores audio content.
3. Lossy compression—Compresses everything; introduces a little distortion.
Table 3–2 lists some representative formats from each of these categories
Table 3–2 Audio File Formats

WAV versus MP3 Formats
I will further discuss these formats, since the project uses the MP3 format. However, I have also included a simple demonstration of the RasPi playing a Waveform Audio File Format (WAV) file. The WAV format provides the truest reproduction of the original audio content as is possible using digital technology. The source content is sampled at a high rate using a sufficiently large number to precisely record the amplitude of the digital sample. High sample rates and large data-storage numbers mean very large storage requirements. For instance, a three-minute symphonic musical score might take 30 MBs of storage. In comparison, an MP3 format of the same content might take about 2 MBs, a 15:1 compression ratio. Of course, the trade-off is the quality of the music reproduction. Most people find the MP3 format acceptable, especially if reproduced on a device, such as a smartphone or tablet computer. Furthermore, the RasPi audio reproduction is not the finest as previously discussed.
Playing a WAV File
It is quite easy to play a WAV file if you use another app contained in the alsa-utils package. This app is named aplay, and all you need do is call the app along with the name of the WAV file to be played. I have placed public domain WAV and MP3 files named class.wav and class.mp3 onto this book’s website, www.mhprofessional.com/raspi. Please download them into the pi directory. You will use class.mp3 in the next section.
Now, open a terminal window and type:

Ensure that your powered speaker is attached to the analog audio jack and that the jack is selected per the amixer command line shown on page 33. You should now be hearing the beautiful sounds of a Bach fugue. The musical score lasts for about 2.5 minutes. It can be stopped at any time by pressing ^c.
The MP3 version of the same music file is approximately 1.2 MB as compared to the WAV file that is over 25 MB in size. You will have an opportunity to play the MP3 version in the next section after I introduce you to a software MP3 player. That should give you an excellent opportunity to compare the sound quality of the uncompressed WAV versus the lossy compressed MP3.
Playing an MP3 File
There are many Linux-compatible apps available to play MP3 files. I have selected a file named mpg123, as it is very stable and is easily controlled from a command line, which is what we need for our RasPi MP3 player. Use apt-get to load this app as follows:

NOTE There is a clone of mpg123 available on the web named mpg321. I am sure that it works just fine; however, I prefer to stay with the original.
Now type this to play the MP3 file that you downloaded:

The MP3 will play for precisely the same amount of time as the WAV version and can be stopped at any time by pressing ^c, as was the case for the aplay app.
I could not detect any appreciable difference between the two formats, but you may; and it might also be fun to invite friends and family to see if they can detect differences between the audio file formats.
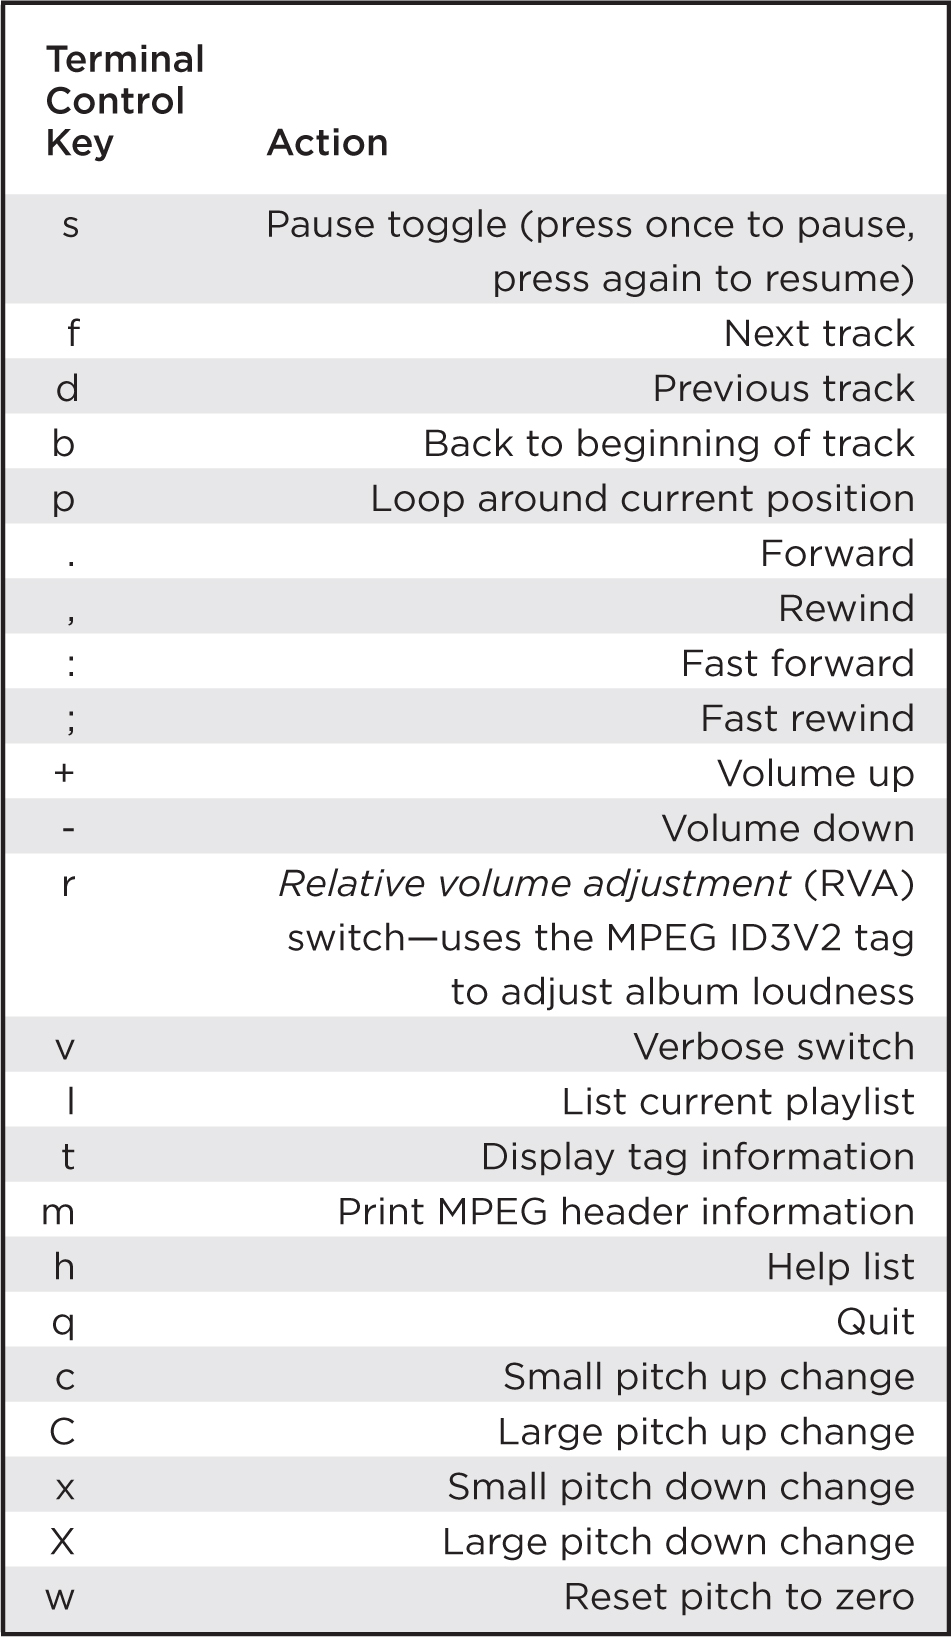
mpg123 is also known as a console player app, since you interact with it by using the keyboard and observing the app output on a terminal window. This is exactly what we need to create a RasPi-controlled MP3 player. It is important to see what terminal controls are available and what their respective functions are. This is easily accomplished by pressing the h key while the app is running. Figure 3–6 shows the result of pressing this key while an MP3 was playing.

Figure 3–6 mpg123 terminal control key list.
Table 3–3 is an easy-to-read list of these terminal control keys with additional explanations.
Table 3–3 mpg123 Terminal Control Keys
Incidentally, it is very easy to play all the MP3s in a directory by typing the following:

The v in the command line will provide a verbose output and the C puts the app into a full control mode where all the terminal control keys are made operational. The * in the command line is a wild card commanding the app to play all the MP3s it can find in the current directory. When all is said and done, this is a very powerful but fairly simple MP3 player app that will suit our purposes quite well. All we need now are some switches to select the songs and some Python code to automate it all.
Hardware Switch Inputs
Let’s take a break from the all the software discussions and focus on how to connect hardware switches to the RasPi and how to respond when a user depresses a switch. Recall from Chap. 2 that all GPIO connectors can be set into either an input or output mode. For the LED blinker, I set a pin 18 as an output. In this section, I will set pin 12 as an input and leave 18 as an output. The goal is to have the LED connected to the pin 18 light when a switch connected to pin 12 is pressed. I will be using the 3.3-V power supply to trigger pin 12; however, it is worth repeating the warning made in Chap. 1.
Caution All GPIO voltage levels are 3.3 V and are not 5 V tolerant. There is no overvoltage protection incorporated on the RasPi; and if you inadvertently subject a GPIO pin to 5 V, you will wreck your RasPi.
There is 5 V present on the Pi Cobbler, and it is not too difficult to inadvertently connect to that power supply instead of the 3.3-V power supply. Just be extra careful and recheck your connections twice before powering up.
Use the schematic in Fig. 3–7 as a guide to connecting the LED, the switch, and the associated resistors that make up the test circuit. Use a solderless breadboard, as it readily accommodates the Pi Cobbler and other components.

Figure 3–7 Test circuit for switch input.
Here is the Python code that will run this little circuit. This program is available on the book’s website as Test_Switch.py.
NOTE There are two equal signs required to do a comparison, i.e., GPIO.input(23) == False. If you make a mistake and put only one, it will become an assignment statement, which may or may not be evaluated to a logical state. An erroneous statement, GPIO. input(23) = False, would likely evaluate to False, since you cannot programmatically set an input. In any case, the program will run, but not operate as expected. This is called a logical error and is a common occurrence with beginning programming students.

I have used an if/else conditional statement in this program that checks if pin 23 is LOW or False, and if so, will set pin 18 to GPIO.HIGH. Otherwise, the conditional statement will go directly to the else portion where pin 18 is set to GPIO.LOW.
Run the program and observe that each time you press the switch the LED light turns on and continues to stay lit as long as the switch is pressed. Figure 3–8 shows the actual circuit on the breadboard with the RasPi connected with the flat ribbon cable to the Pi Cobbler.

Figure 3–8 Actual switch test setup.
Thinking in RasPi Time
You must always think about the operational speed of the RasPi when creating a new program. The while loop in this program repeats over a million times a second, meaning that all the commands in the loop are constantly being repeated. That’s the reason why I used an if/else conditional test statement to repeatedly set the pin value HIGH so that it matches the duration of the key press. If I had neglected to add the else portion, the first time the button was pressed, it would have lit the LED, but it would have remained on. Try deleting the else portion to confirm this behavior. But why does it stay on?
The answer is simple: without the else portion, there is no command to turn it off. The pin becomes latched so that it remains in the last state it was commanded to be in. That’s what I mean by thinking in RasPi time. I have found that it is possible for new (and sometimes, not-so-new) microprocessor programmers to become very confused regarding this real-time aspect of programming. Controlling actual hardware can be a challenge. I will attempt to point out these challenging program areas in the book projects to help avoid confusion on your part.
MP3 Project Requirements
The first step in any project is to specify the requirements that must be met to satisfy the project user. In this case, the project requirements are rather simple. They are listed below:
![]() Use the mpg123 app as the MP3 player
Use the mpg123 app as the MP3 player
![]() Play selected MP3 files (tracks) stored in a preset directory
Play selected MP3 files (tracks) stored in a preset directory
![]() Use the computer monitor to display file (track) data
Use the computer monitor to display file (track) data
![]() Use the 3.5-mm analog audio jack for output
Use the 3.5-mm analog audio jack for output
![]() Use the keyboard to enter commands to control the mpg123 app while it is playing a song
Use the keyboard to enter commands to control the mpg123 app while it is playing a song
![]() Use one of three push buttons to play a preselected song
Use one of three push buttons to play a preselected song
It is a straightforward process to build this project, as most of the component parts and software have already been discussed.
Writing the Program
The key issue is to start the mpg123 app from a Python program with all the needed arguments. Fortunately, Python provides a function named system() that allows us to do this quite easily. And, it is part of the OS package. The following Python program I created is named MP3_Player. py, and it is available for download from the book’s website.
MP3_Player.py


MP3 Player Schematic
All the pin and switch connections are shown in Fig. 3–9. You can simply add on the two additional push-button switches and resistors to the existing circuit that was built according to Fig. 3–7. You can also leave the LED connected, if you so desire, as it will not be incorporated into this circuit.

Figure 3–9 MP3 player circuit.
Figure 3–10 shows the actual circuit on the breadboard with the RasPi connected via the flat ribbon cable to the Pi Cobbler and the Veho360 connected to the analog output jack. The three push buttons that select one of three MP3 songs are placed on the right side of the solderless breadboard.

Figure 3–10 Actual MP3 player.
Testing the Project
Load the MP3_Player.py program into the pi directory. Then open a terminal window and type:

I found that trying to use a Python IDLE shell to run this program might cause unreliable operation because the mpg123 app requires a direct keyboard input that the shell may interrupt. All the keyboard commands shown in Table 3–3 are available for use once the program is started. You should experiment with the various commands to gain an appreciation of the depth of functionality that the mpg123 app possesses.
Figure 3–11 is a screenshot showing an MP3 player in operation. Its Moving Picture Experts Group (MPEG) header tag information and the runtime data are shown on the last line in the figure.

Figure 3–11 An MP3 playing.
Project Expansion
I have shown you a basic MP3 player that can be expanded in a variety of ways to meet future requirements. The display could be changed from a standard monitor to a multiple line serial liquid crystal display (LCD). For now, it is sufficient to focus on the simpler aspects of using the RasPi for project control.
Another aspect that you might have wondered about is the use of a separate push button dedicated to a specific function, such as skip to the next track. Right now, you simply press the f key to do this. Incorporating a unique button capability entails a lot of software rework because the mpg123 app expects control key input from what is logically known as the stdin or standard input device, i.e., the keyboard. Changing or paralleling the input device is not a trivial change, so I felt it was not suitable to include it in a beginning project book.
Adding MP3 songs to be played is rather easy; as all you need to do is copy them into the default directory using the RasPi’s USB port. The program does have to be changed to reflect the new song names. However, the program can be modified to list all the MP3 songs in the directory so that you can select the ones to be played, which is the essence of a play list.
Of course, you can connect a battery to power the RasPi that will make it completely portable, assuming you are using an LCD-type display for user interaction.
Summary
I started this chapter with a discussion of the Pi Cobbler prototyping aide, which is an invaluable tool that allows us to experiment with most of the GPIO pins that are available on the RasPi.
The Linux ALSA system discussion showed you how sound is handled by the RasPi OS. You must install ALSA in order to use the mpg123 app that forms the basis for the MP3 player project. I also introduced you to the principal audio file formats, including the MP3 format that is used to encode the music played in the project. There was also a brief detour to discuss the RasPi’s audio frequency response using a pink-noise stimulus.
I then showed you how to use push-button switches to signal the RasPi, using GPIO pins as inputs. These switches were also used as part of the MP3 player project.
We went through a thorough discussion of the mpg123 MP3 app including a detailed list of all the controls available for use with this versatile app.
I finished with a brief discussion on how to expand the MP3 player so that it might more readily resemble a modern portable player.