
CHAPTER 12
Robotic Car: Part 1
Introduction
This chapter is one of two that will show you how to build a RasPi controlled robotic car. I’ve spread the project over two chapters because of the build complexity and the software involved. The elements covered here in Part 1 include the mechanical construction and the hardware and software that control the drive system.
Developing the robotic car has been a very enjoyable experience, and the project has attracted a lot of interest among folks who are curious about what the Raspberry Pi is and how it can be used. There is nothing like a robotic car to stir up interest in this great little board. Now on to building the car!
Overview
I thought it would be a good idea to show you some pictures of the car all built and ready to run. Figures 12–1 to 12-3 show the final project with the optional thin-film transistor (TFT) display mounted.
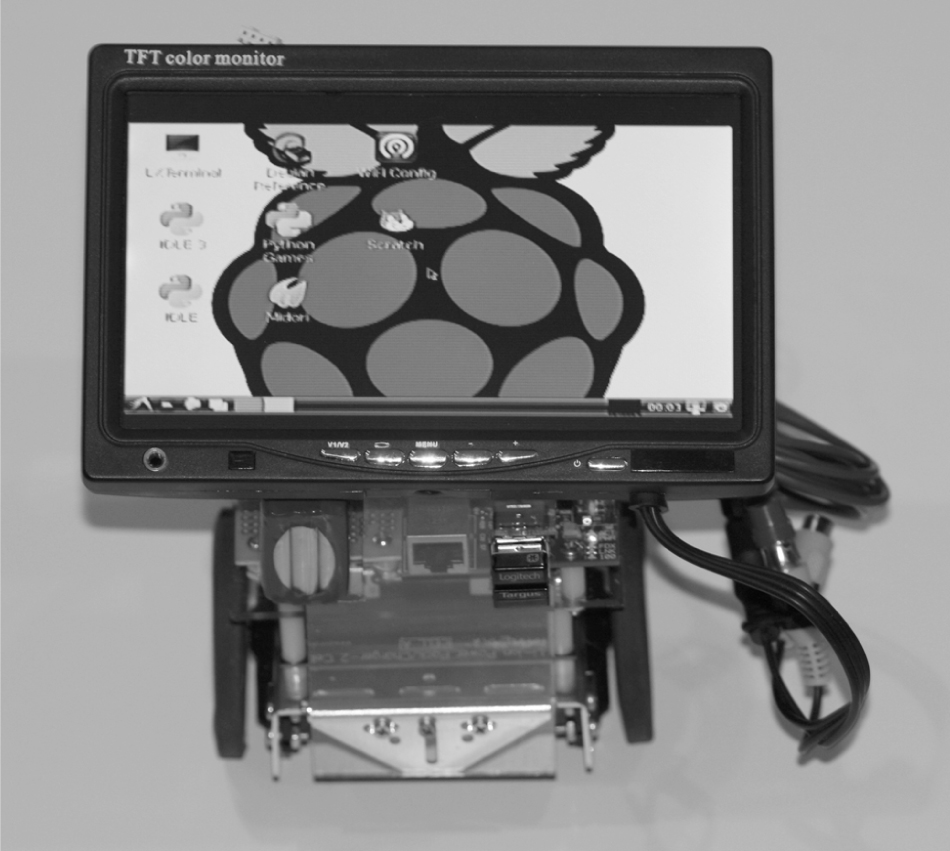
Figure 12–1 Raspberry Pi robotic car (front view).
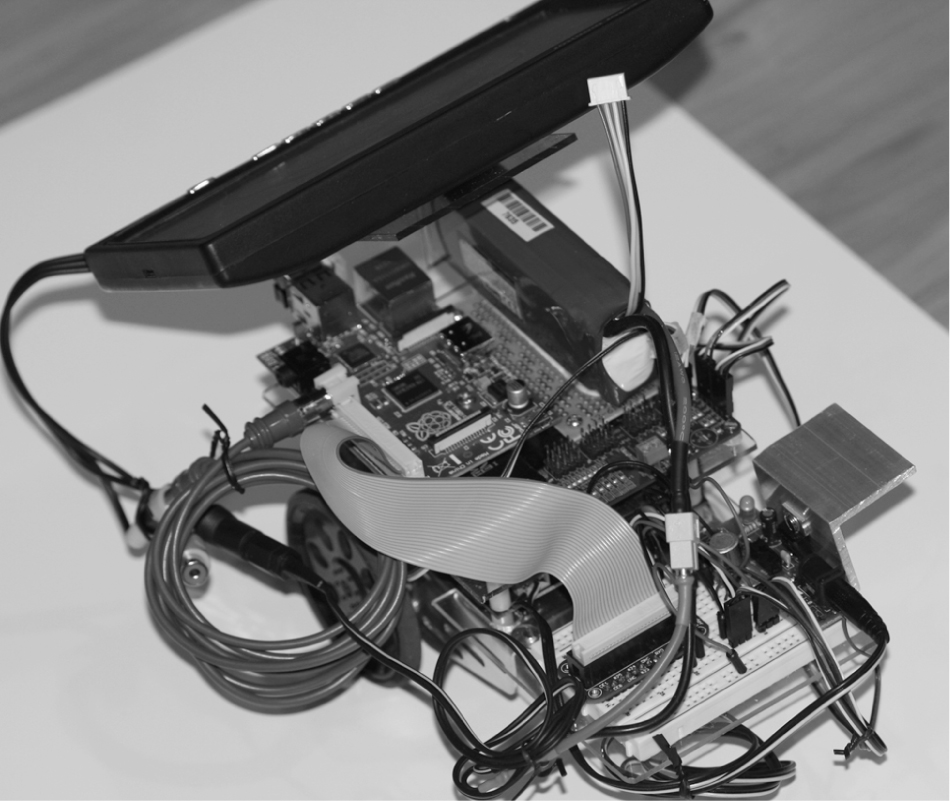
Figure 12–2 Raspberry Pi robotic car (left side view).
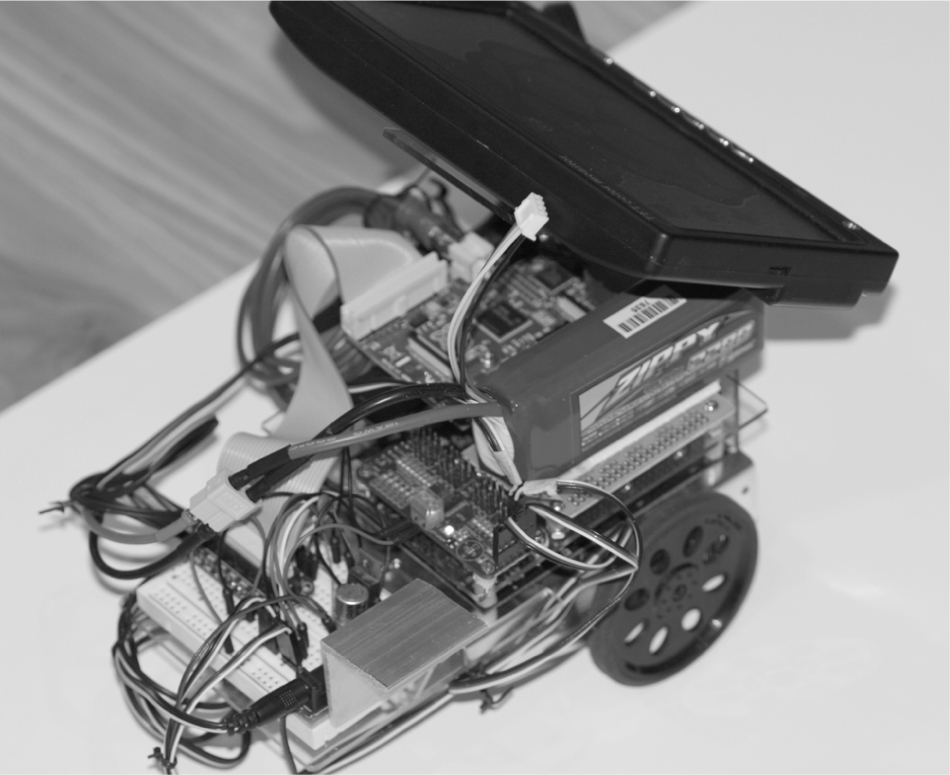
Figure 12–3 Raspberry Pi robotic car (right side view).
And yes, that is the Wheezy Linux desktop being displayed in Fig. 12–1. I use a wireless keyboard and mouse to interact with the RasPi just as I would normally when sitting at my desk. This is truly a portable computer on wheels.
The car, however, will not be controlled by keyboard or mouse commands but will instead be handled by a Wii remote control device (Wiimote), as shown in Fig. 12–4.
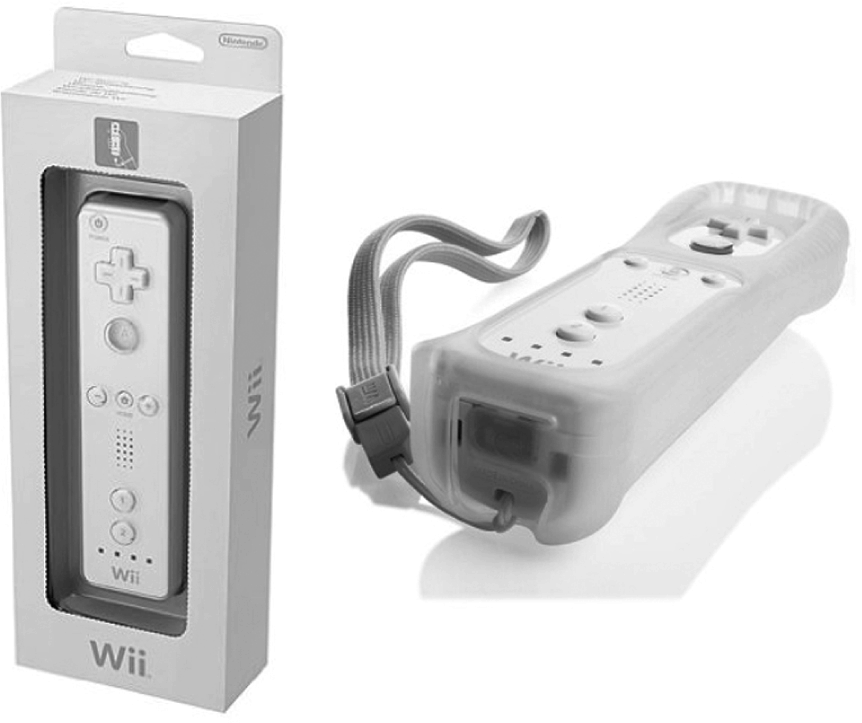
Figure 12–4 Wiimote.
The Wiimote uses Bluetooth, a wireless technology for data transfer over short distances, to communicate with the RasPi, which will be discussed in Chap. 13.
Chassis and Drive Motors
The car uses a simple tripod configuration of two powered wheels and a third one as a free rolling ball to provide stability and a very tight turning radius. All the chassis, drive, and power supply components are listed in Table 12–1 and are available from www.parallax.com
Table 12–1 Chassis, Drive, and Power Supply Components
A servo control board is also required for this project. It is the 16-Channel 12-bit Pulse Width Modulation (PWM) /Servo Driver I2C Interface board available from Adafruit Industries, part number 815.
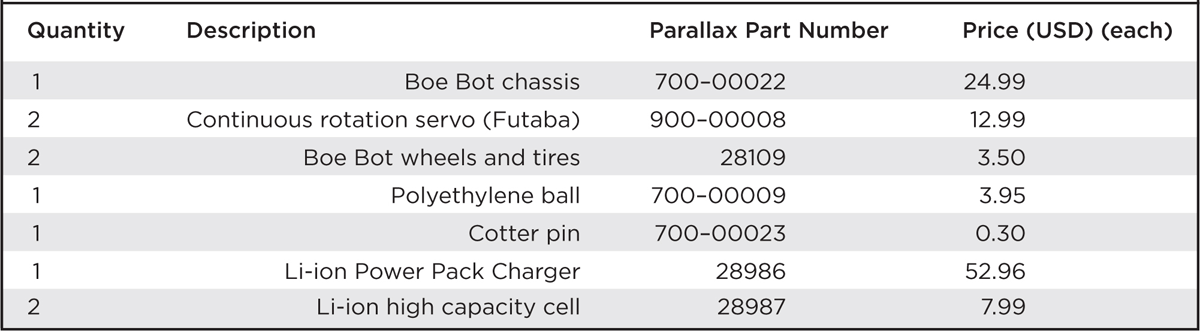
The Boe Bot chassis is made of 1.5 mm aluminum and is shown in Fig. 12–5.
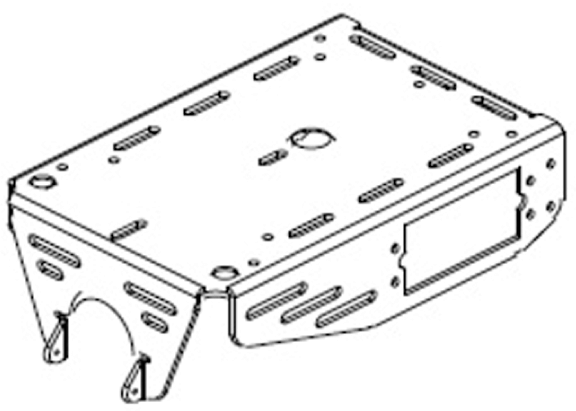
Figure 12–5 Car chassis.
A complete drawing showing all the dimensions is available on the Parallax website for readers who are able and willing to make their own chassis. Just use the part number to look it up.
The continuous rotation servos provide the driving force for the wheels. Figure 12–6 shows a servo, and Fig. 12–7 shows a wheel kit. Each wheel is attached to the drive servo with a 0.25-inch screw that is also provided with each servo.

Figure 12–6 Continuous rotation servo.
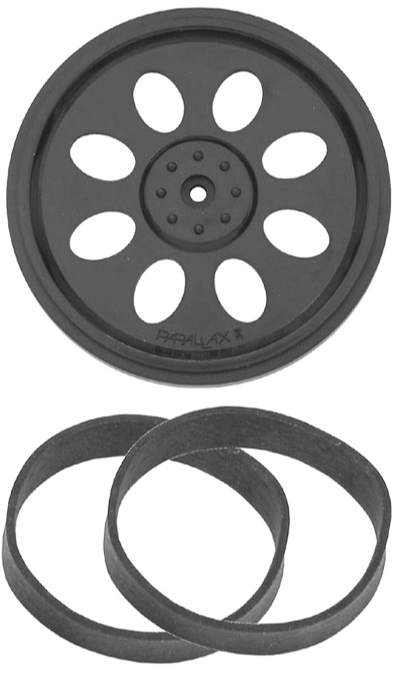
Figure 12–7 Wheel kit.
The polyethylene ball is shown in Fig. 12–8, and it is held in place with the cotter pin specified in the parts list.
Figure 12–8 Polyethylene ball.
Figure 12–9 illustrates the bottom side of all the assembled chassis parts. The servos are mounted through the cutouts in the aluminum chassis with 0.5-inch 4–40 machine screws and nuts. This generic hardware should be readily available at local hardware or home supply stores.
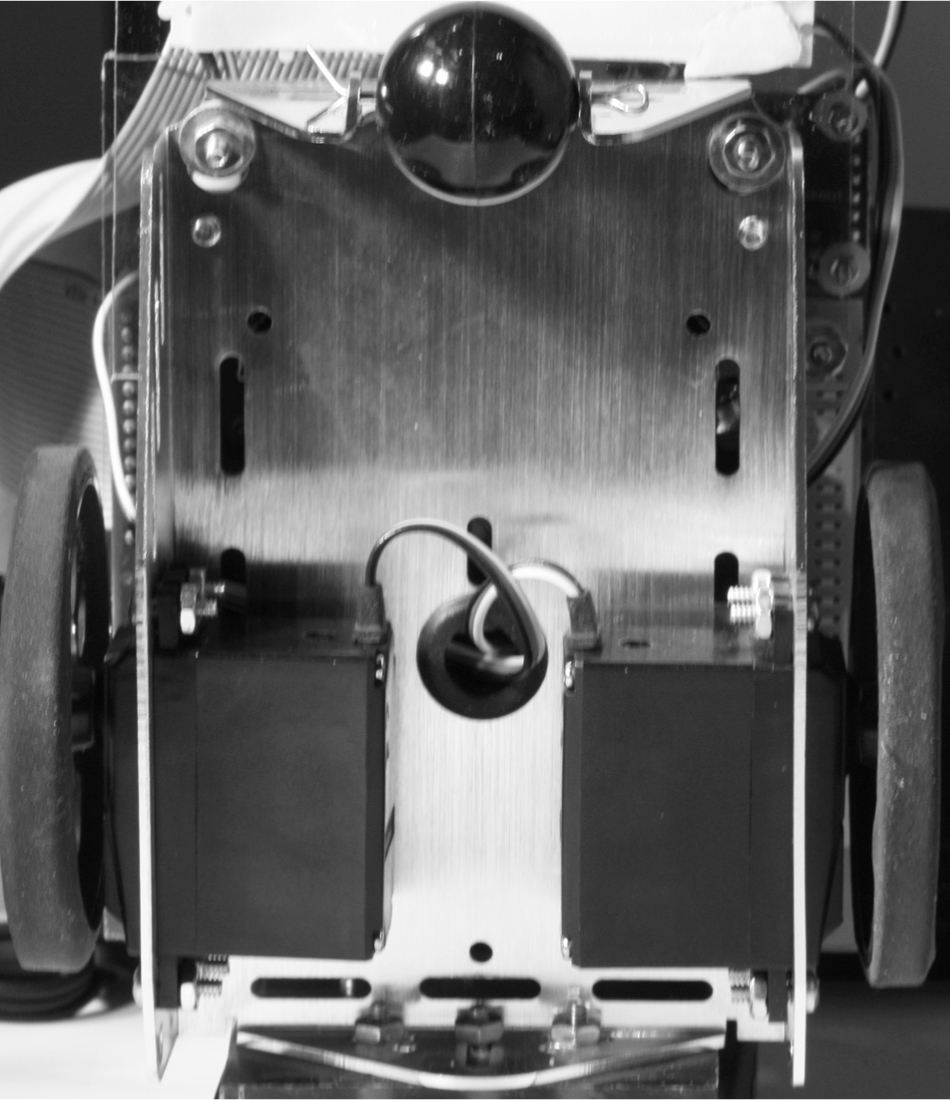
Figure 12–9 Bottom view of the assembled car chassis.
You can also see a hole conveniently placed in the middle of the chassis top that is used to thread the servo control wires to the servo control board. The chassis assembly should be a very quick and easy procedure if you have all the kit parts available. Parallax has Boe Bot assembly instructions available on its website if you find that you need additional guidance.
Mounting the power source is the next step in the assembly process. I chose to use a Parallax Li-ion power charger board because it has ample capability to power a robot car and it just happens that its form factor precisely matches the Boe Bot chassis including the mounting holes. Figure 12–10 shows the Li-ion charger board.
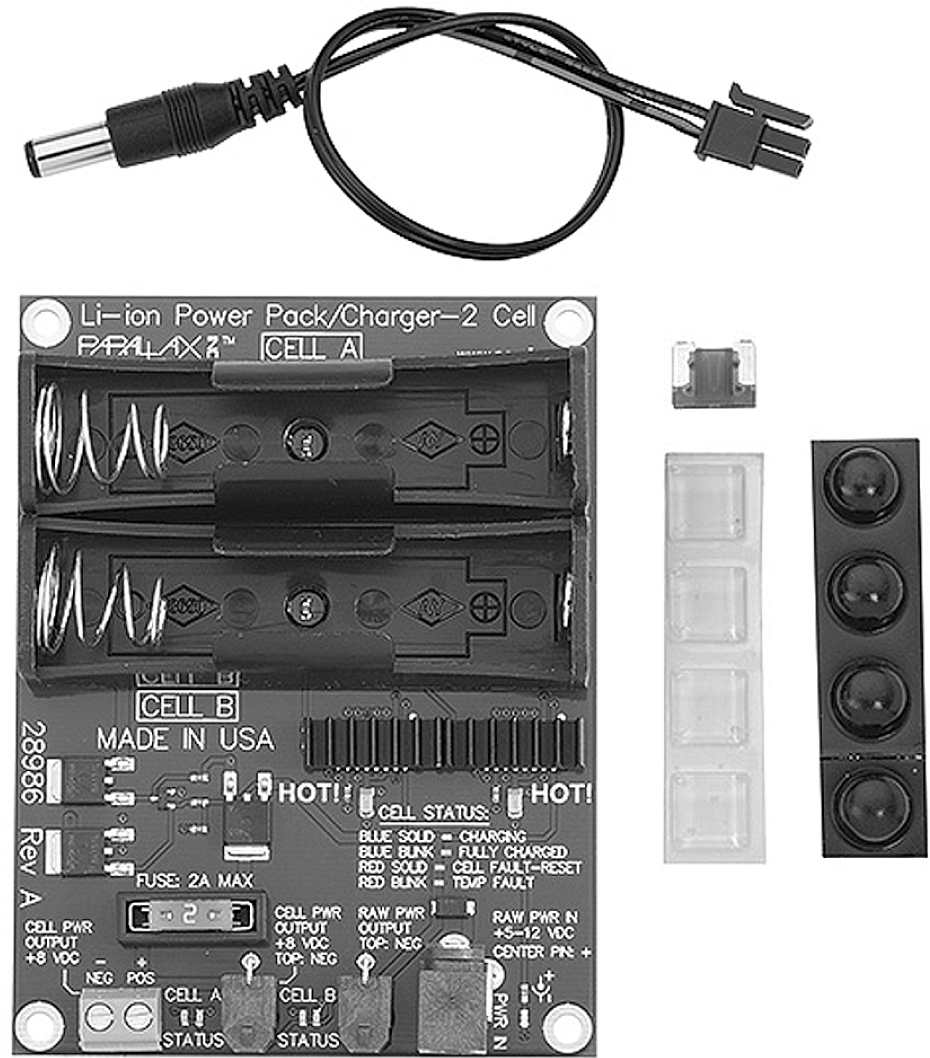
Figure 12–10 Li-ion charger board.
This board uses two high capacity Li-ion cells rated at 3.7 V DC and 2600 mAh. One cell is shown in Fig. 12–11. These cells conform to the 18650 form factor, which is a bit like an AA battery on steroids. Each cell also contains a protection circuit to help prevent overcharging, which could lead to a serious situation if the cell was left unprotected. Nonetheless, these cells should be charged only with an appropriate charger specifically designed for them, which is the main reason why I incorporated the complete charger into the car.

Figure 12–11 Li-ion cell.
NOTE The U.S. Postal Service will no longer ship items that contain lithium batteries to international destinations, including APO and FPO addresses.
The charger board and all the other boards, including the RasPi, are mounted in a stacked “sandwich” arrangement. Please note that you will need to assemble and disassemble the stack several times as you build the car. This is unavoidable because you will have to custom fit the parts to the various mounting boards. Figure 12–12 is a Sketchup (3D modeling software once owned by Google but now owned by Trimble) representation of the beginning of the stack with the charger board mounted on four 0.25-inch OD nylon spacers.
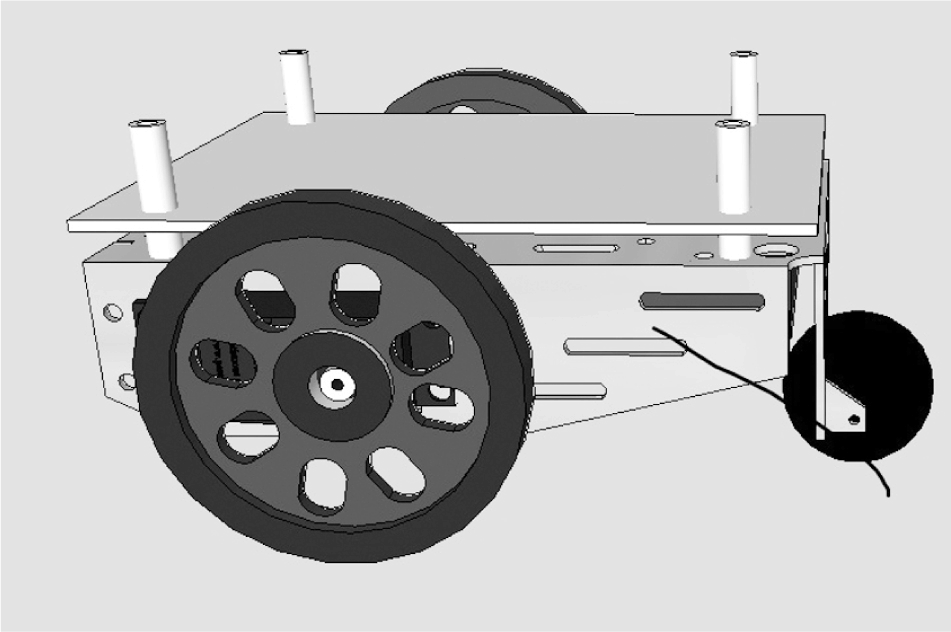
Figure 12–12 Charger board Sketchup mounting diagram.
Four 1-inch nylon spacers are mounted on top of the board to provide sufficient room between the top of the charger board and the bottom of the Lexan mounting board. Figure 12–13 shows a portion of the actual mounted charger board so that you will gain an understanding of this arrangement.

Figure 12–13 The charger board mounting.
I used a 2-mm 4- × 4.5-inch Lexan board as a mounting platform to support the RasPi and the servo control board. Figure 12–14 shows this board along with the charger board and the nylon spacers. The whole stack is held together by four 2.25-inch-long 6–32 machine screws that go through the Lexan board, hollow spacers, and the Li-ion charger board. I used a 6–32 tap to prethread the four matching holes on the Boe Bot chassis to make the installation a bit easier. You can choose to do this or to simply use a 6–32 nut and washer to lock down the screw. I believe you will need to slightly enlarge the chassis holes for clearance if you use screws and nuts.
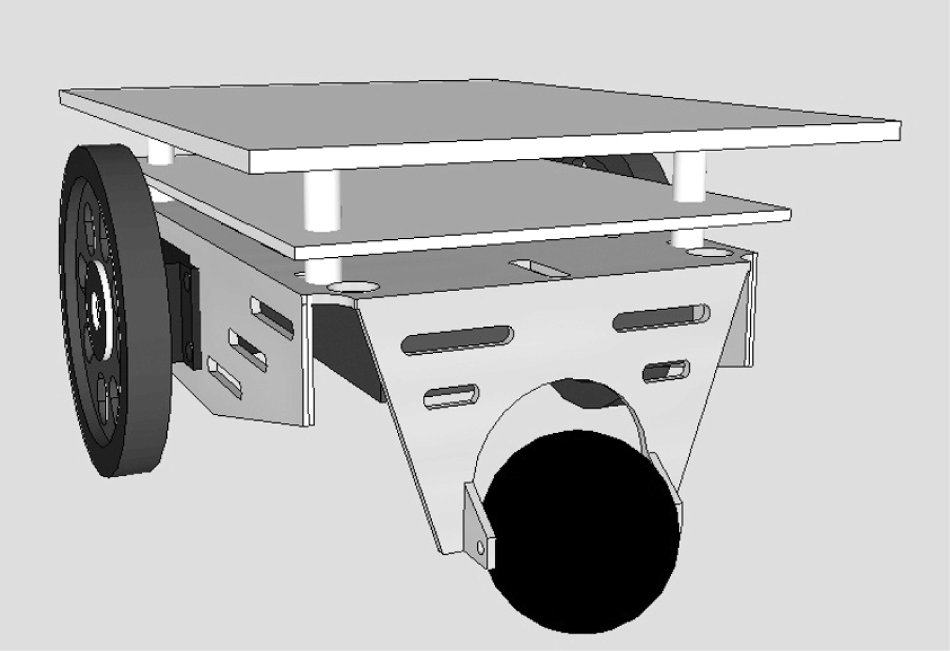
Figure 12–14 Lexan and charger boards mounting diagram.
I would also recommend using the charger board as a drill template for the Lexan mounting board. Just ensure that the Lexan board is mounted to have the 4-inch dimension between the wheels and the one edge flush with the charger board, as shown in Fig. 12–14. It is important to ensure that the optional monitor support can be installed without interference.
Next, disassemble the Lexan board to mount the RasPi and servo control board. I used two 0.75-inch 4–40 screws and nuts along with two 0.5-inch nylon spacers to mount the RasPi to the Lexan board. Use the two mounting holes on the RasPi as drill guides for locating the holes in the Lexan board. Ensure that the RasPi board edge lines up with the Lexan board edge, as shown in Fig. 12–15. The servo control board is mounted as shown in the diagram except that there are four mounting holes for that board. In addition, I used nylon washers to space the servo board from the Lexan board. The mounting holes are very tight, so you will need four very tiny machine screws and nuts.
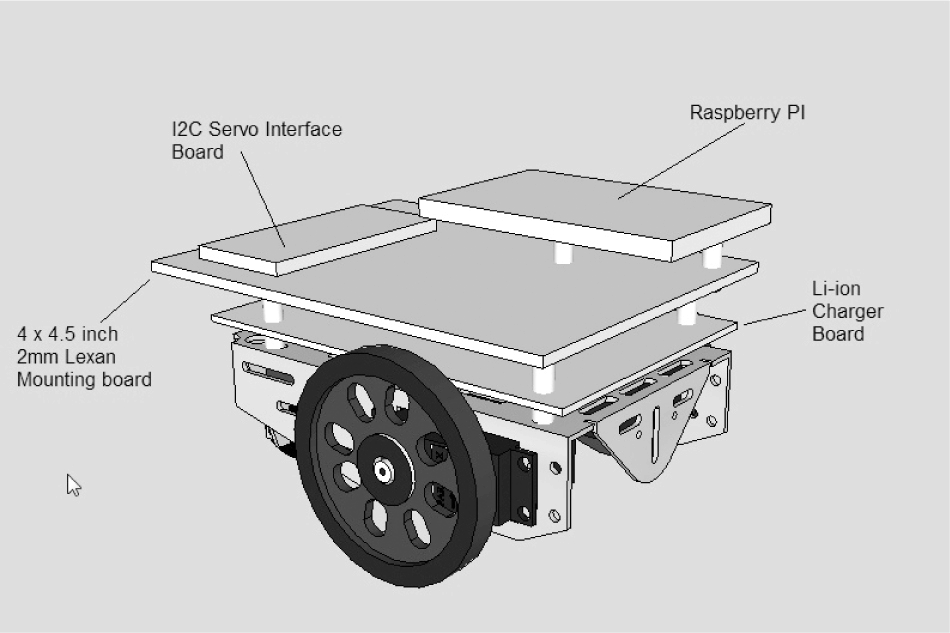
Figure 12–15 RasPi and servo boards mounted.
Another Lexan mounting board is needed to support the solderless breadboard used for the Pi Cobbler and other items that can be seen in Figs. 12–2 and 12-3. This additional Lexan board is 3.5 × 4 inches and is mounted at the back of the car directly to the chassis, as shown in Fig. 12–16. You will need to notch out the board to provide clearance for two spacers supporting the charger board. I drew the cutouts on the board’s Lexan protective paper and used a jig saw to make them. Also, mark three holes to be drilled in the Lexan board, using the chassis holes as a guide. These three holes are obvious when you fit the board to the chassis. I used three 0.5-inch 4–40 machine screws and nuts to hold this board to the chassis.

Figure 12–16 Lexan board supporting the solderless breadboard.
The solderless breadboard mounts to the Lexan board with an adhesive backing. You should carefully align the breadboard to the Lexan plate before pressing it on. It is just about impossible to remove the breadboard once it is attached.
The remaining mechanical piece is the Lexan support plate for the portable monitor, if you should so choose to install it. It is a fairly simple piece to install with the only tricky part being cutting clearance holes for the RasPi USB ports and the additional LiPo battery that is used to power the monitor. Figure 12–17 is a dimensioned sketch of the Lexan support that I used. Your support piece will likely vary a little from mine, since your RasPi placement may also vary from my installation.
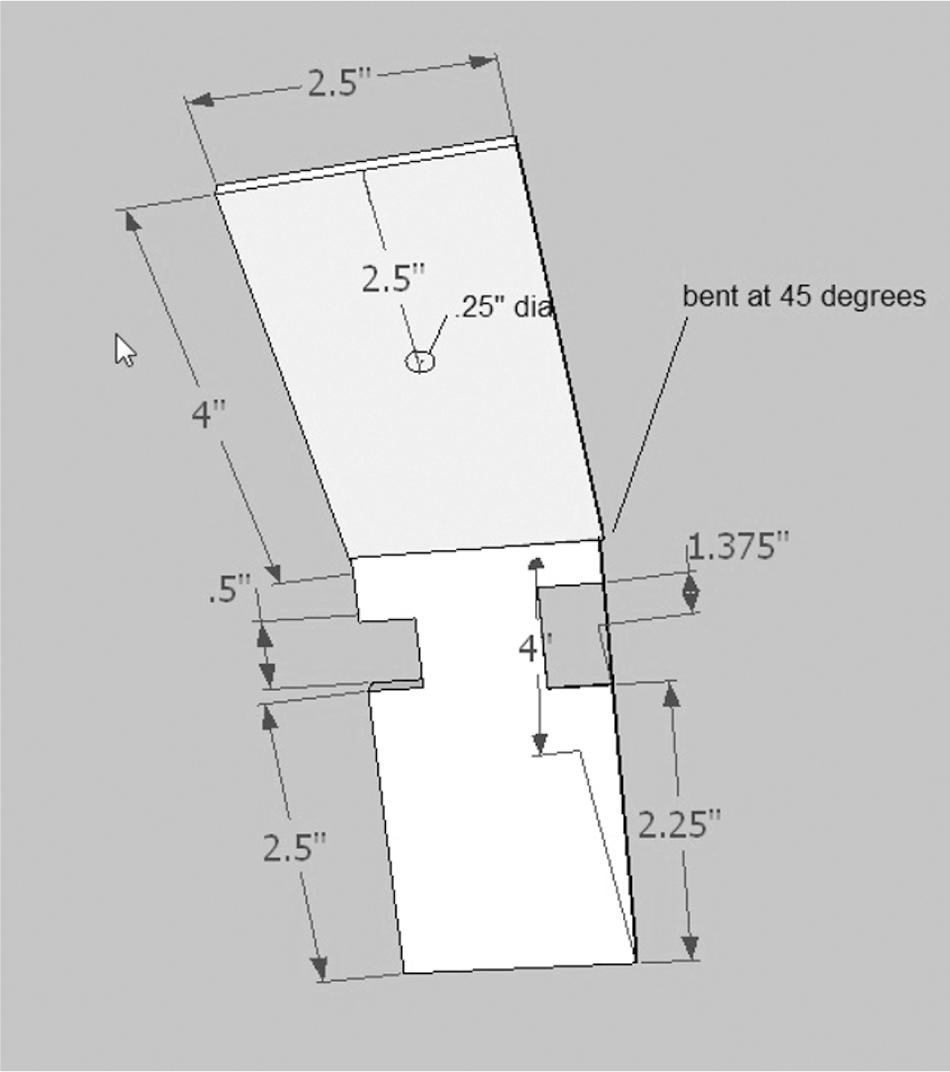
Figure 12–17 Lexan monitor support piece.
The support is made out of one 2.5- × 8-inch Lexan sheet bent at a 45° angle in the middle of the long dimension. I used a hot-air gun to soften the Lexan so that it could be easily shaped. The support is attached to the chassis front with three 0.5-inch 4–40 screws and nuts, as shown in Fig. 12–18.
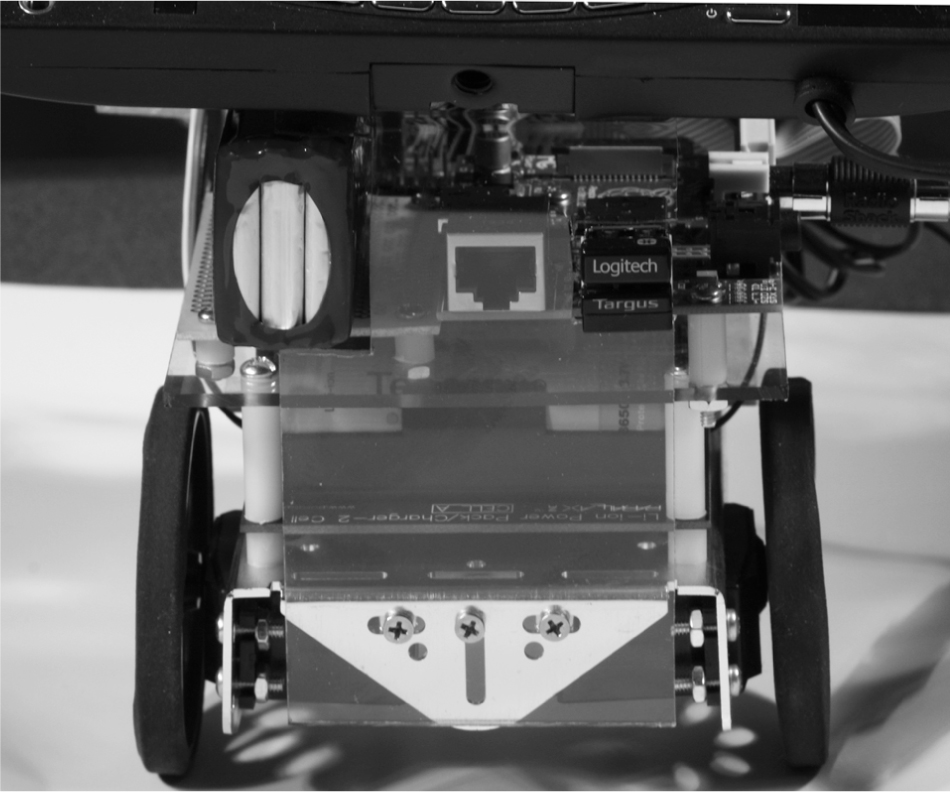
Figure 12–18 Monitor support plate attachment.
This last step completes the robot car mechanical construction phase. The electrical connections will be shown in Chap. 13.
You may, however, have an immediate issue if you have only one RasPi. You need to program the RasPi to run the car, which is very hard to do when it is installed in the car. I would remove it from the car and program it as you would normally and then reinstall it when everything is all set up. Obviously, if you have a second RasPi, you can use that one to do all the programming and then put the programmed SD card into the RasPi that is already mounted in the car.
The next sections are brief discussions on the servos and associated drive components.
Servos
Two analog continuous rotation servos drive the robot car. A servo differs from an ordinary motor in that it requires a specific digital pulse train to operate. Regular or non-continuous servos are designed to rotate a shaft a certain number of degrees based upon the pulse-width modulation (PWM) of the control signal. Continuous rotation servos are designed to maintain a certain angular velocity based upon the PWM control signal. In either case, the standard PWM signal frequency is set at a nominal 50Hz and operates at a nominal 5 V DC for a high level and 0 V DC for a low level. Figure 12–19 shows a typical PWM signal.
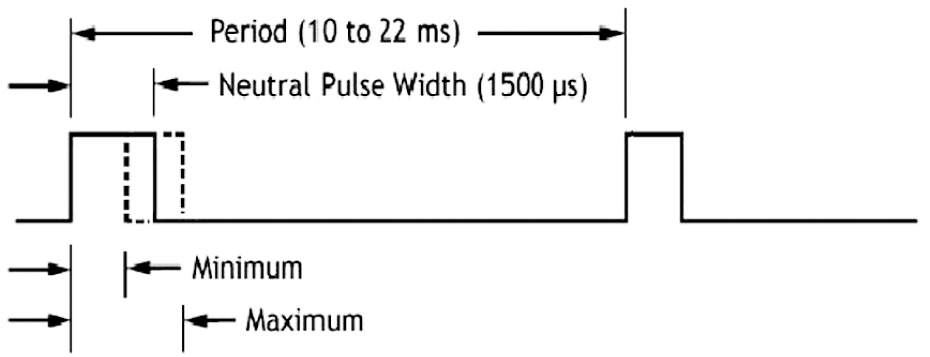
Figure 12–19 Typical PWM signal.
The neutral position, where neither a position nor a velocity is being commanded, is set to be a 1500 μs pulse width. The servo controller will increase or decrease the pulse width up to 500 μs depending upon the new desired position or velocity. The servo motor contains an electronic circuit that converts the PWM pulse train to the appropriate internal motor control signals that move the servo to the commanded position or angular velocity.
Table 12–2 shows some of the specifications for the Parallax servos used in this robot car.
Table 12–2 Servo Specifications

I2C and the Servo Controller
A servo controller board is required for this project because the RasPi only has one channel that can output PWM signals and the car needs two, one for each motor. I used the 16-channel, 12-bit PWM/Servo Driver I2C Interface Board available from Adafruit Industries. It is a bit of overkill for this application, but it is flawless in operation and very easy to set up.
I2C is another one of the serial protocols that was first introduced in Chap. 1. The servo control board uses I2C to communicate with the RasPi. However, the RasPi must first be configured to operate with the I2C protocol, which is not built into the Wheezy distribution (as of the date of this writing). It is part of the Occidentalis v.2, if you choose to use that version, and is not very hard to setup Wheezy with the I2C protocol.
At the command line prompt, enter the following:

Add the next two lines to the end of the file.

Reboot the RasPi for the changes to take effect.

Enter the following commands after booting the RasPi:

(Be patient, this could take a while.)
These commands ensure that the Wheezy distribution is current with all the latest changes. Next, enter:

These commands load some useful applications that, among other things, allow you to check the address of attached I2C modules. The i2c-tools package contains the i2cdetect application that will display all the I2C devices connected on the bus. Using it will confirm that the servo controller is being recognized by the RasPi.
The python-smbus package contains all the software needed to access I2C devices from Python. This library installation is critical to ensure that the robot control program works.
The next step may not be required. It depends upon the Wheezy distribution that you are running. Check if there is a file name /etc/modprobe.d/raspi_blacklist.conf installed. You do nothing if it doesn’t exist; otherwise comment out these lines:

Enter the command below to edit the file, and put a “#” symbol in front of the lines shown above:

I2C Initial Test
I would defer testing the I2C bus if you have only one RasPi and it is already installed in the car. However, if you are using a second RasPi for development, you might want to do the following test, using the temporary setup shown in Fig. 12–20, I2C test diagram.
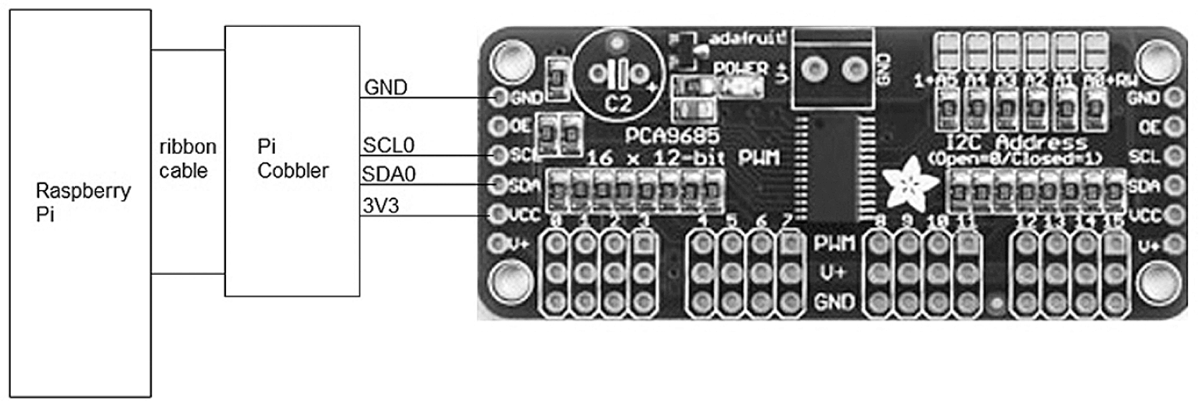
Figure 12–20 Temporary I2C test diagram.
Connect the servo controller board to the Pi Cobbler with four wires, as shown in the figure. I used the Cobbler’s 3.3-V power supply to power the servo controller board to ensure that 3.3 V was the maximum voltage that could appear on the I2C bus lines. However, I do believe that the controller itself limits the voltage to 3.3 V even if it is powered by a 5-V source, but I could not confirm it from any data sheet. Better safe than sorry, as the old adage goes.
CAUTION The servo control board has a two-screw terminal strip that routes power directly to the servos. This power source takes up to 6 V DC and is separate and distinct from the VCC supply that powers the board logic. Do not connect the servo supply to the VCC supply, or you will destroy the servo control board.
Enter the following at a terminal control prompt:

NOTE If you are using an early 256 MB RasPi model B, change the 1 to a 0 in the above command.
Figure 12–21 shows the result of this command. In the figure you will see that two I2C addresses were detected, one at 0 × 40 and the other at 0 × 70. The 0 × 40 is the default slave address preset into the PCA9685 chip that is the logic controller used in the servo board. I believe that 0 × 70 is another controller address that is generated during a power-on reset. In any case, 0 × 40 is the only address that will be used in the Python program. This address may be changed in hardware by connecting solder bridges located on the board. These bridges are easily seen on the upper right-hand side of the board, as shown in Fig. 12–20. Board addresses would have to be changed, if multiple servo controllers were used on the I2C bus, to prevent addressing conflicts.
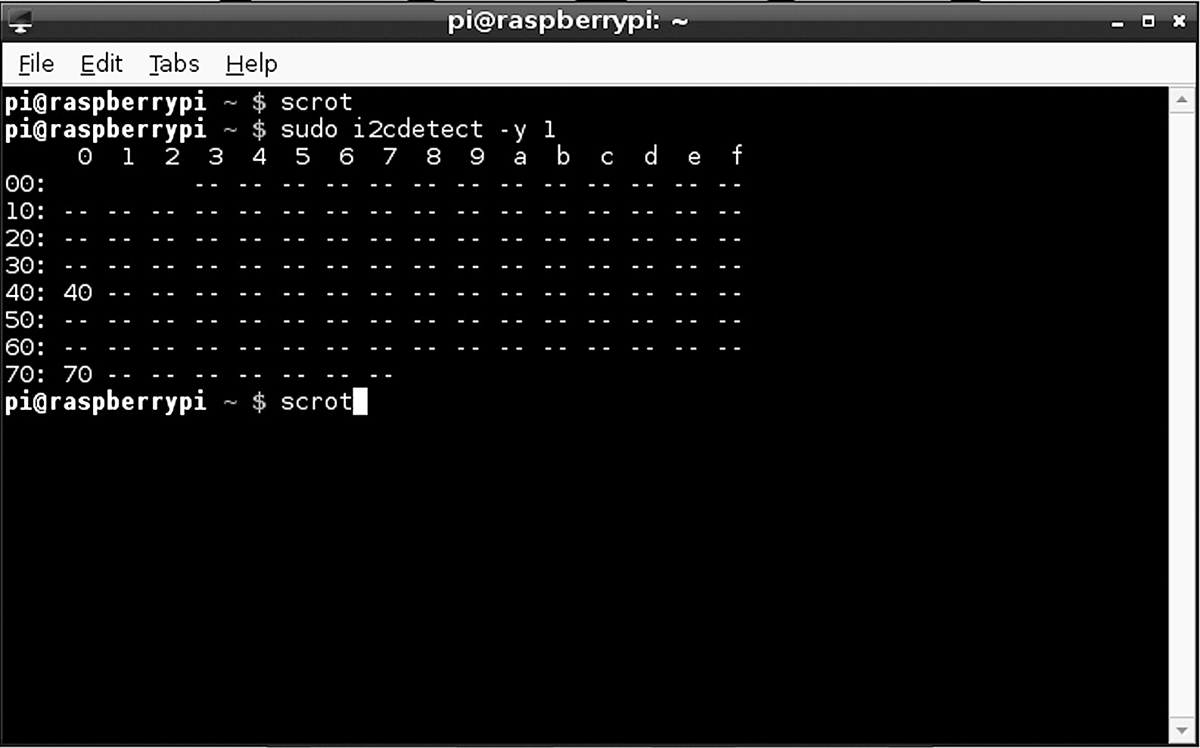
Figure 12–21 Detecting the I2C servo controller.
This chapter does not have a summary section, as the project is not yet complete. The next chapter shows how to wire the car and program it so that it can be controlled by a Wiimote.