
CHAPTER 16
Troubleshooting Networked AV Systems
In this chapter, you will learn about
• A proper troubleshooting methodology
• Common tools for troubleshooting networks
• How to troubleshoot using common TCP/IP utilities
• The importance of network maintenance
The line between AV and IT has been blurry for years. Many professionals are now comfortable wearing both hats (others wear neither)—that is, until something breaks. Then, as many of you might know, it’s no longer “our system” that needs troubleshooting. It’s either “your AV gear” or “your firewall” that’s causing the problem.
The truth is, when troubleshooting an AV system on an IT network, both AV and IT professionals have to make an effort to understand how each other’s systems work. It’s easy to blame the network for a problem if you don’t really understand how or why the problem occurs.
If AV professionals learn basic network troubleshooting skills, though, they will be far better equipped to identify which symptoms are caused by the network and which by the AV gear. If the problem does lie in the network, they’ll be able to offer their IT counterparts more useful information. This will allow everyone to solve the problem faster, ensuring users aren’t shut out for long from the AV systems they need to communicate.
Troubleshooting Methodology
No AV system works perfectly all the time, and AV systems that operate over networks are no exception. Whenever a system you’re responsible for experiences a major error or failure, you’ll have to troubleshoot it to find out where the issues are coming from, and chances are you’ll be working hand in hand with IT colleagues to do so.
Troubleshooting is a process for investigating, determining, and settling problems. It should never involve finger-pointing or assumptions. The troubleshooting process should never start off with an accusation such as, “The videoconferencing system isn’t working—must be something wrong with the firewall.”
When you begin an investigation thinking you already know what’s wrong, there’s a good chance you’ve made your first mistake. Instead, follow a systematic procedure to isolate and repair network issues. If you work with your IT counterparts to follow a logical troubleshooting process, you’ll be able to solve problems more quickly than if you play the blame game.
If you currently service AV systems, you probably have your own step-by-step process for troubleshooting. IT service technicians have their processes, too. These established practices shouldn’t stop you from putting your heads together when a problem straddles the AV and IT worlds. All troubleshooting methods span three basic stages:
1. Symptom recognition and elaboration
2. Listing and localizing faulty functions
3. Failure analysis
In the following sections, we’ll discuss these stages in more detail.
Symptom Recognition and Elaboration
The first step in a troubleshooting process is to identify exactly what’s wrong with the system in question. Sometimes it’s obvious. Other times it’s not. To troubleshoot a less-than-obvious problem, you need to
• Understand how the system is intended to work
• Clearly identify and understand the symptoms of the faulty system
• Isolate the defect or component failure and determine exactly how the system malfunctioned
In order to clearly identify the problem, you must be able to differentiate “normal” system performance from “abnormal” performance. Understanding what a system should do when it’s operating properly requires knowledge of its characteristics and design. If you decide a system is malfunctioning, you need to be able to recognize whether it’s truly a system problem or the result of user error.
Symptom Recognition Questions
Asking questions helps define “before” and “after” conditions so you can get a better picture of what the system did or didn’t do prior to the problem. Some questions you can use to help define the problem include
• When did it last work?
• When did it fail?
• Did any other equipment, service, or anything else related to the system change between the time it last worked and when it failed?
• Who was using it when it failed?
• What were they doing when it failed?
• What happened when it failed?
• Did it fail immediately or did it gradually fail over time?
• What does it look or sound like when everything is “normal”?
• Can the problem be reproduced?
• Does documentation exist for the system?
Symptom Elaboration Questions
The next step is to elaborate on the symptoms, by asking the following questions:
• Is it a system failure or a device failure?
• Are all the devices plugged in?
• Are all the devices powered on?
• Does the affected device have a fuse or reset button?
• Do the relevant electrical outlets have power?
• Can you reset the system or cycle the power?
Listing and Localizing Faulty Functions
After you’ve figured out what’s going wrong, you need to determine exactly what’s causing the problem. You accomplish this by first identifying which devices or services may be responsible, then systematically narrowing down the possibilities to the actual culprit.
If you are unable to create a detailed list of all the probable faulty functions, you can begin to analyze the system in your head. Given the symptoms, what would most likely cause the failure? If you are not sure, begin tracing the signal path from one end of the system to the other, for example, from a media server (source) to a digital signage screen (output). The principle here is the same for data as it is for analog signals (microphone to loudspeaker, for example), but the signal path may be more complex.
List the Probable Faulty Functions
First, identify the major functions and subsystems present within the system. What types of failures could occur within these functions and subsystems that would result in the identified symptoms? Next, make a list of where the problem could be occurring. These are the potential sources of the system fault. Finally, make a list of all the possible faulty devices or services from within those sources, focusing primarily on the devices or services that relate to the symptoms. This is the list you will use to start testing components to find out what’s working and what isn’t.
Localize the Faulty Function
Once you have your list of suspects, you can begin to narrow it down. Test the items on your list of potentially faulty devices/services to rule out those that are functioning properly. Tests can be simple (such as checking to see if cables are connected) or more complicated (such as using a multimeter or other network diagnostic tool).
It’s important to determine in what order you’re going to test the potential causes. You can base this order on a number of factors, including
• Testing services/devices that eliminate other possible faults first
• Performing tests that are easy to accomplish first
• Selecting a specific item to test based on prior experience with the system or component
Continue your tests until you can isolate the problem to a specific faulty configuration point. As you’re tracing signals or data through a system, don’t forget about the physical pathways. Check connectors and cables to ensure that they’re plugged in and undamaged. Look for bent or broken pins. If you notice damage to wires or connectors, replace them. If you can’t tell what is creating the problem, try using your ears and listening to the equipment. Do you hear anything out of the ordinary, such as clicks, hums, or buzzing? If you hear unusual sounds from a particular component, try to replace it first.
Failure Analysis
Once you’ve determined the problem, correct it, if possible, and turn your focus toward preventing it from happening again and relaying relevant information to the customer. (The remedies for all possible problems are too many and varied to go into here.) Your analysis of the problem may boil down to improper component selection, inadequate preventive maintenance, disruption in signal flow, inadequate training, or any number of other issues.
If you’ve analyzed the problem but it hasn’t been solved, you’ll need to implement a backup plan. Follow up with your client and apologize for the inconvenience. Explain how you plan to prevent this problem from occurring in the future. Tell the client only what he or she needs to know to understand what the problem is. Assure the client that the problem will be solved as soon as possible. Ask when he or she plans to use the equipment again and make sure it’s fixed before that date.
In a situation where the service request was left unresolved, think about what you might do differently to speed up the process next time. Consider these questions:
• What can you learn from the situation?
• What can you do to prevent it from happening again?
• When can you show the customers how the equipment works?
• Can you think of ways you could be better prepared for this situation?
• Do you understand the system’s physical topology? Do you know its logical topology?
• Is there documentation that can help you better understand the physical and/or logical topology?
• Have you created a log of past problems you or others have encountered?
• Is this a recurring problem? If so, what were some solutions you or others used in the past?
Take time to learn about the equipment. Use both your AV and IT colleagues as resources. Talk to them and find out if they’ve faced similar problems and, if so, how they responded.
Network Infrastructure Troubleshooting Tools
Though it’s tempting to think of networks only in terms of data, a lot of network troubleshooting takes place at the Physical Layer. Network hardware and cabling has to work if upper-layer protocols, such as TCP/IP, are going to function. Most errors observed at the Physical Layer are from damaged wiring, defective transceivers, or bad network interface cards (NICs) or switch ports. In most cases, a protocol analyzer can detect the presence of physical errors. However, it might not be able to determine which device is failing.
The more you work with networked AV systems, the more you may need to troubleshoot actual networks, including infrastructures. Sometimes it’s quicker to fire up one of the tools discussed in this section and figure out for yourself what’s going wrong than to ask IT to intervene. You may not be in a position to perform actual maintenance on network cables or components, but you can at least tell IT where you suspect the problem lies and get your customer’s system up and running more quickly.
Don’t forget, most modern network devices use LED indicator lights, which provide immediate feedback to a technician. Their colors and patterns often have a specific diagnostic meaning, so read the technical information provided by the manufacturer to translate the light colors and patterns into usable diagnostic information. If that doesn’t help, especially in this era of AV/IT convergence, AV professionals should consider adding a number of tools to their troubleshooting arsenal. Let’s take a closer look at the AV toolbox.
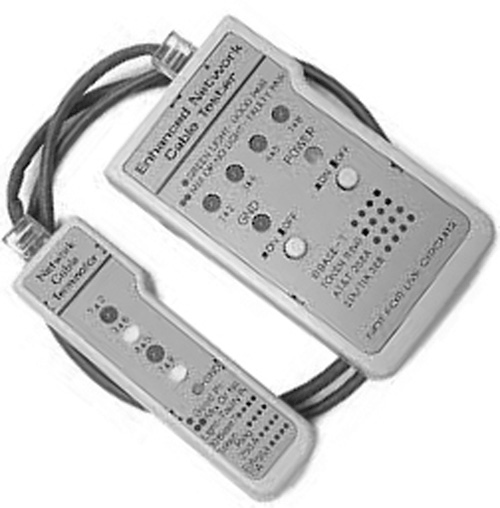
Network Cable Tester
Network cable testers are electronic tools used to verify correct Ethernet CAT cable installations. The cable tester requires two components: a sending unit and a receiving unit. Each unit is connected to one end of a network cable to assess its connectivity. Depending on the quality of the tester, it can test for simple connectivity, broken wires, crossed wires, and/or mismatched pairs. The tester can also identify attenuation—that is, it can tell you if the cable run is too long.
Tone Generator
If you don’t have proper physical topology documentation, a tone generator and tracker can help you trace a CAT cable running through a client’s site. The tone generator, which works in tandem with a probe, is attached to one end of a wire. It puts a signal on the wire, and the probe, or tracker, is then used to follow or locate the other end of the wire.

Optical Time-Domain Reflectometer
If your system uses fiber-optic instead of CAT cabling, you’ll need a different piece of equipment to test cable quality. An optical time-domain reflectometer (OTDR) is used to test fiber-optic cables. The OTDR can estimate the length of the fiber cable and overall attenuation. It uses pulses of light and detects the strength of the returning pulses to locate problems in the fiber path.
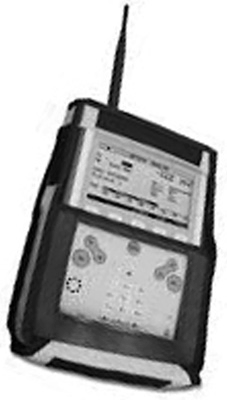
Wireless Network Tester/Analyzer
Not all network data is carried over wires or fiber. A wireless network tester is used to troubleshoot wireless networks. Early versions of wireless network analyzers were little more than field strength indicators, not unlike a hotspot finder. Modern wireless analyzers still report on field strength but also include the ability to gather additional information about the source of the signal. The analyzer reports the SSID and channel of the access point. It can determine the mode of the wireless device—ad hoc or infrastructure. The analyzer usually has a Ping function to check connectivity. Many of them support DHCP and wireless security.
NIC Loopback Tester
How can you tell if a device’s network interface card has failed? A loopback tester is a simple device that allows a technician to send a signal out the send port and receive the same signal on the receive port of a network card. The loopback test can determine if an individual node is communicating properly by simulating a complete communication path.
To test the NIC, plug the loopback tester into the physical network port. Start a network sniffer program such as Wireshark to monitor the outbound and inbound traffic separately. Then send a packet using a utility program, such as Ping. Watch the packet leave and return to the sending computer. Finally, compare the two packets in the sniffer. If the packets are the same, the test was successful.

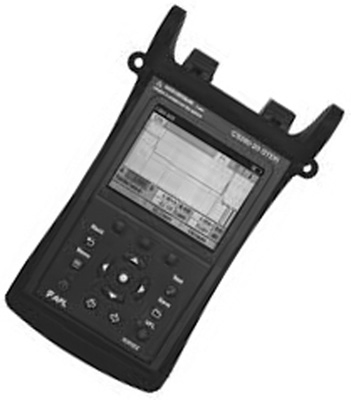
Network Protocol Analyzer
Network protocol analyzer software can be very useful in monitoring a system and tracing problems. However, you can’t always load protocol analyzer software onto an existing networked device, especially if you’re a guest in the system. In such cases, you may be able to use a hardware-based network protocol analyzer instead. A hardware-based system is a stand-alone device and does not require a host operating system. It performs the same duties as a software-based analyzer—troubleshoot and monitor communications on a LAN. The analyzer shows you what protocols are present on the network at all layers of the OSI model.
A protocol analyzer will always show a small percentage of errors at the Physical and Data Link layers, even if the network is working fine overall. Most of these errors will be malformed packets (i.e., packets that are too short or too long). Ethernet standards have defined a variable packet length between 64 and 1,518 bytes. Any packets not within those boundaries are considered errors. Troubleshooting malformed packets is difficult. Normally, you have to disconnect physical devices from the network until the problem device is located.
Troubleshooting with TCP/IP Utilities
The TCP/IP protocol stack has some built-in utilities to help you monitor a network and diagnose problems. The basis of many of these diagnostic tools is the Internet Control Message Protocol (ICMP). ICMP is a TCP/IP protocol defined in the IETF standard RFC 792. It falls under the Internet Layer of the TCP/IP protocol stack and the Network Layer of the OSI model.
ICMP sends error messages and carries other information for network diagnostic programs. As a messaging service, it’s used to diagnose connectivity issues. Because ICMP works at Layer 3 of the OSI stack, it’s not totally reliable. It can’t detect errors at the Transport Layer or higher. Still, it does provide valuable feedback about problems in the communication pathways.
ICMP was originally designed to report errors in processing datagrams. For example, when a packet exceeds its time to live (TTL), ICMP generates a “time to live exceeded” message and sends it back to the packet’s source to notify it that the transmission failed. ICMP also allows routers to notify the source of a datagram when they fail to forward it. Even if a packet arrives safely, the destination device may not be able to process it. This would also generate an error message. To avoid infinite loops, ICMP does not report on ICMP errors.
ICMP messages are encapsulated inside the data fields of IP packets. The function of an ICMP message is indicated by its header (see Figure 16-1). Though IPv4 and IPv6 implement ICMP slightly differently, the header format for both versions is the same:
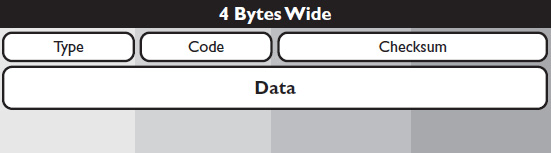
• Type identifies the basic function of a message.
• Code expands on the type, identifying the function of the message within the type.
• Checksum contains the results of a checksum of the entire ICMP message.
• Data contains information relating to the message’s function.
For example, in IPv4, an ICMP type 3, code 4 error message would mean that a packet couldn’t be delivered because it was too big. An ICMP type 3, code 13 error message would mean that a packet couldn’t be delivered because communication was administratively prohibited.
 NOTE ICMPv4 and ICMPv6 use different types and code numbers to identify ICMP messages. The types and codes for ICMPv4 messages are defined in RFC 792. The types and codes for ICMPv6 messages are defined in RFC 4443.
ICMP messages are useful in helping identify symptoms during the troubleshooting process, but on their own they won’t necessarily help you isolate or repair the problem. Devices receive ICMP error messages, but they may not do anything about them. It’s up to a network administrator to interpret the messages and address any problems that might be causing the failure. There are various TCP/IP-based utilities administrators can use to diagnose network issues. We review several in the following sections.
Ping
ICMP can send error messages, but it can also send out queries and information. One of the most commonly used network diagnostic tools—Ping—uses ICMP messages.
Ping, sometimes referred to (incorrectly, according to some) as packet Internet groper, is a command-line interface (CLI) tool. In IPv4, Ping uses type 8, code 0 ICMP messages to request a reply from another device—an echo request. If the Ping test is successful, the device responds with a type 0, code 0 ICMP message—an echo reply. If you have at least one device with a functioning network connection, you can use Ping to send echo requests to your other networked devices. This helps you ensure that those devices are connected to the network and are responding to their assigned IP addresses or DNS names.
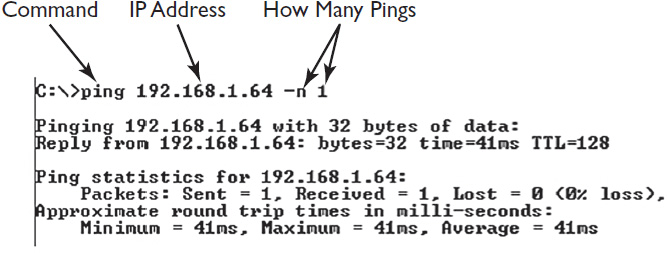
By default, when you send a Ping request from a Windows system, it issues five echo requests to the target system’s IP address. UNIX and UNIX-based systems will continue to ping the target system’s IP address until the command is terminated. In both Windows and UNIX, it is possible to control the number of echo requests sent to a target system. Figure 16-2 illustrates a typical Ping command.
The results of a Ping test show success, failure, and time in transit (see Figure 16-3). You can use this information to determine whether the target system is responding and, if so, how quickly, in milliseconds. Hopefully, the time it takes packets to go round-trip is within your customer’s latency requirements. Latency is a by-product of the distance packets must travel and the volume of all traffic on the network. Keep in mind, latency changes constantly. However, excessive latency can be a sign of network congestion and can wreak havoc on performance-intensive networked AV systems. When Ping fails to connect with a target system, it returns an error and shows a loss, as in Figure 16-4. Let the troubleshooting begin.
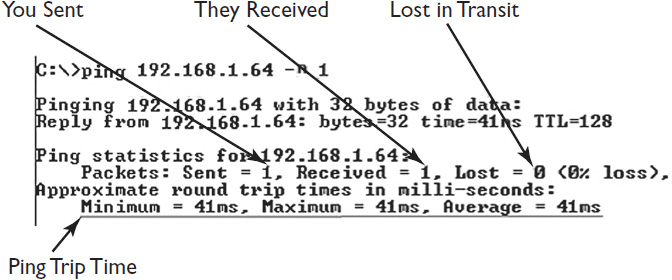
Figure 16-3 Ping test results.
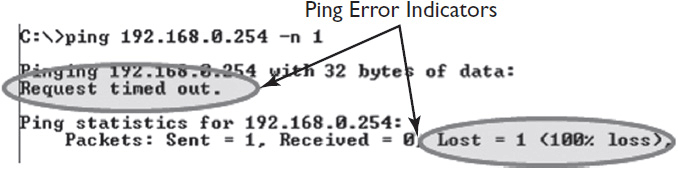
Figure 16-4 According to Ping, the data packet didn’t get through.
Traceroute
Traceroute (also known as Tracert in Microsoft Windows) is a diagnostic tool for checking the network path (the route) between two nodes. Traceroute uses ICMP echo requests to map each intermediate hop. It works by increasing the time to live (TTL) value of each ICMP request sent. The first ICMP request will have a TTL value of 1; the next will have a TTL value of 2; and so on. By default, each intermediate hop (such as a router) decreases the TTL. When a TTL hits zero, the receiving device returns an ICMP Time Exceeded error.
 TIP If you have a software-based network analyzer, such as Wireshark, installed on your system, you can capture and see the Traceroute packets. The correct Wireshark filter for analysis is “icmp.type == 8.” Filters for other network analyzers may differ. Refer to the developer’s manual for instructions on creating the appropriate filter.
Traceroute sends three ICMP packets to each location. The response received from each hop includes either an error or a time-in-transit value. Figure 16-5 shows an actual Traceroute test in action. Notice the error. This implies that the intermediate point is blocking the ICMP request. This is not an unusual response. There’s no real error unless the trace fails completely.
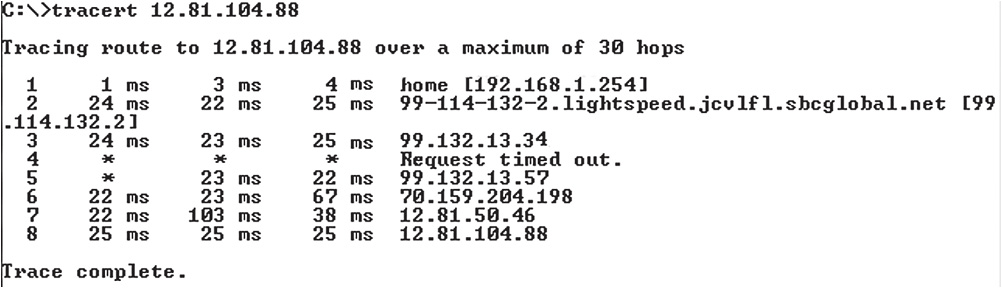
Figure 16-5 A Traceroute test.
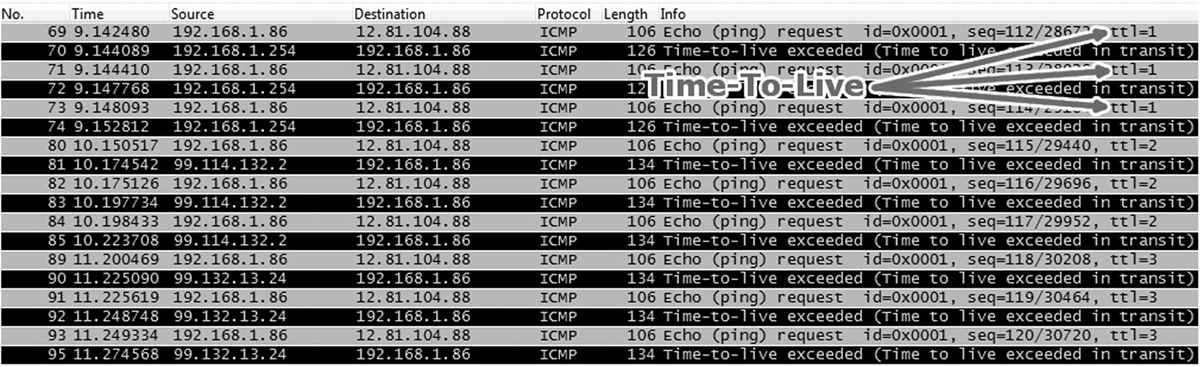
Figure 16-6 shows an actual packet capture from a Traceroute test, created with a network protocol analyzer. Notice the TTL; the first three are set to 1.
Netstat
Netstat is a network diagnostic tool used to identify incoming and outgoing network connections on a computer. Netstat determines what service is using the connections, along with the source and destination addresses.
Netstat is available on most modern operating systems. You can use Netstat to identify problems such as unauthorized open ports. It can also help you determine the amount of traffic on a network. Figure 16-7 shows the results of a Netstat test on a Windows 7–based system. Netstat has been instructed to find all active connections (a), identify the process using the connection (o), and use numbers instead of names (n). You can see the entire command is “netstat -aon.”
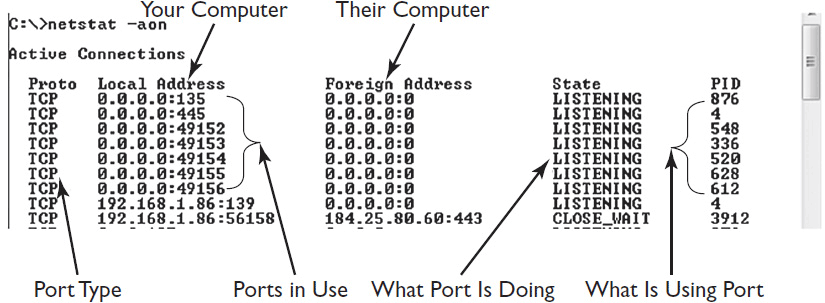
Figure 16-7 Netstat test.
Ipconfig and Ifconfig
Ipconfig and Ifconfig are similar tools used for diagnosing IP configuration issues. Ipconfig is a Windows tool and Ifconfig is a UNIX tool; they are both CLI tools. Each of these tools has additional features that can vary between operating systems. You can use them to reveal the DNS name, IP address(es), subnet mask, gateway, and so on, that a device is currently using.
Running Ipconfig from the CLI by itself turns up basic information about the IP configuration. (Ifconfig allows you to change the configuration.) Figure 16-8 shows the result of a simple Ipconfig command. This basic information tells you if the device has an IP address, the network it belongs to, and the gateway used for communication.

Figure 16-8 Ipconfig results.
By using an additional Ipconfig command switch (/all), you can get more information. As shown in Figure 16-9, typing the command ipconfig /all delivers the DHCP server, lease information, and more. This is called “verbose mode.” You can use this output to determine if the host node has an active IP address; to confirm that the IP address is in the correct network; and to determine if the IP address is statically or dynamically assigned. If the IP address is set to “dynamic” and has an IP address of 0.0.0.0 or 169.254.X.X, then you know that the host is not talking to the DHCP server.
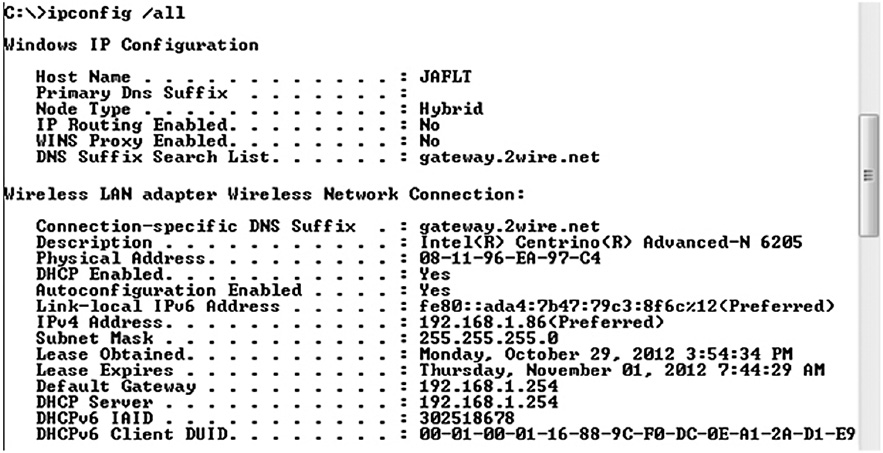
Figure 16-9 Ipconfig verbose mode.
Address Resolution Protocol Command Tool
The address resolution protocol (ARP) is the Data Link Layer protocol in the TCP/IP stack that resolves IP and Ethernet addresses (see Chapter 7 for a review of ARP). Every time a networked device talks to another device on a LAN, a new entry is made in the ARP cache. Every time a device talks on the network, it checks the ARP cache first.
ARP has an associated command-line tool: “arp.” You can use the arp CLI tool to display the contents of the ARP cache and/or define static entries in an ARP table. To display the contents of the ARP cache, type the command arp -a in the CLI, as shown in Figure 16-10.
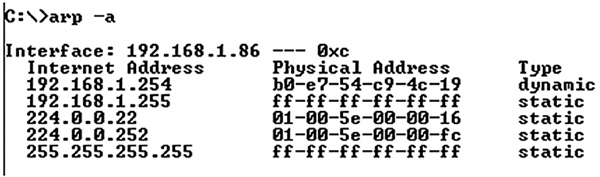
Figure 16-10 Results of an “arp -a” command.
When a datagram is sent, if the receiver’s address is not in the cache, a new ARP request is generated. You can force a new entry in the ARP cache by contacting the target device using any communication protocol. The simplest way is to use ICMP to ping to the target system. In Figure 16-11, a network administrator pings a target system, then checks the ARP cache.
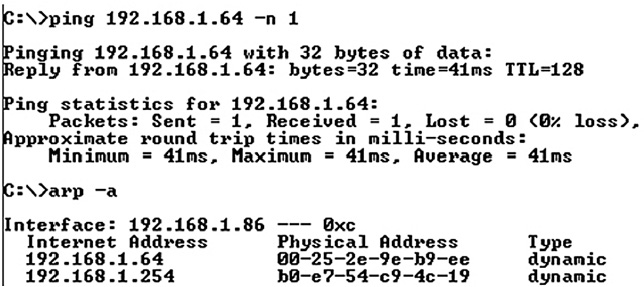
You can use the arp command to find all the functioning IP addresses on a network. A device running in “promiscuous mode” (also known as listen-only mode) does not respond to Ping requests but does respond to arp requests.
Network technicians often create scripts—small software programs—to check all addresses in the network. They then use the results of an “arp -a” request to verify that IP addresses align with MAC addresses.
Name Server Lookup
Name server lookup (Nslookup) is a CLI tool for querying DNS names and servers. Nslookup can also be used as a basic diagnostic tool to determine if DNS is resolving DNS names properly.
Using Nslookup, you can resolve DNS names or Internet Protocol (IP) addresses from the command prompt. In Figure 16-12, an Nslookup command has resolved www.google.com to several IP addresses. Choosing one of the IP addresses and reverse-resolving the address to a name will probably produce a different result than the DNS resolution. If Nslookup fails to find or resolve a common, well-known name such as www.google.com, you can assume there are issues with DNS resolution. Your IT counterparts can then conduct a further investigation to see if the DNS issue is local or not.
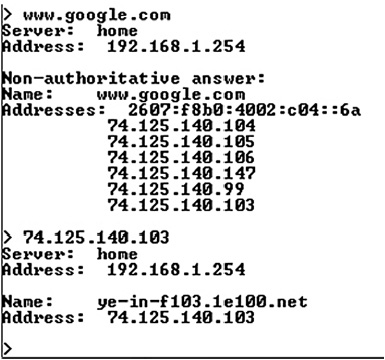
Figure 16-12 Nslookup in action.
Troubleshooting Windows NT and UNIX-Based Operating Systems
Windows and UNIX-based systems have access to many of the same TCP/IP utilities, a number of which we’ve discussed in this chapter. All of these tools can be helpful when troubleshooting networked AV systems, especially when it comes to identifying symptoms and elaborating on them.
In each of the two operating systems, the tools are accessed using slightly different CLI commands, so what follows is a summary of some of the most common TCP/IP utility commands for each operating system. Let’s first take a look at the Windows network diagnostic tools, which are not case sensitive:
• ARP: Used to view the ARP cache and make static ARP entries
• FINGER: Used to display information about a user on the system
• GETMAC: Used to display MAC for all network devices
• HOSTNAME: Used to identify the name of a system
• IPCONFIG: Used to determine IP address and network mask
• NBTSTAT: Used to examine Windows NetBIOS name resolution
• NETSTAT: Used to examine active network connections
• NSLOOKUP: Used to check DNS resolution
• PATHPING: Combines the utilities of Ping and Tracert into a single application
• PING: Used to check connectivity between two host nodes
• ROUTE: Used to display an operating system routing table
• RPCPING: Used to troubleshoot connection to an Exchange Mail server over the network
• TRACERT: Used to trace the route a packet takes to a destination
• WHOAMI: Used to display information for users currently logged on
The following are some of the most common TCP/IP utility commands for UNIX, Linux, and OSX network diagnostic tools, which are case sensitive:
• arp: Used to view the ARP cache and make static ARP entries
• finger: Used to display information about a user on the system
• ifconfig: Used to view or configure network devices
• ifdown: Used to bring down a network connection
• ifup: Used to bring up a network connection
• nethogs: Used to check which programs are using the network
• netstat: Used to examine active network connections
• nslookup: Used to check DNS resolution
• ping: Used to check connectivity between two host nodes
• tcpdump: Used to monitor network traffic
• traceroute: Used to track the route a packet takes to a destination
• who: Used to list users who are logged in
Network Maintenance
Troubleshooting comes into play when something goes wrong. But part of your job managing or operating a networked AV system should be maintaining the system so things don’t go wrong. Networks require ongoing maintenance to preserve the confidentiality, integrity, and availability of data and resources.
Network maintenance begins with establishing a baseline. You have to know what the network “normally” looks like so you can recognize if something abnormal is occurring. The baseline is a documented starting point used to compare a network’s performance between states of transition.
When a network is first built, a network engineer documents its configuration, logical topology, and physical layout. He or she also conducts a traffic trend analysis to show the type and volume of traffic crossing the network. The engineer may use this information to make changes to the network’s original configuration, optimizing its performance.
Once a network is fully operational with network devices, user nodes, and user activity, a baseline is captured. The network administrator will periodically capture baselines during both off-peak hours and peak business hours. He or she will also capture new baselines when new systems and/or hardware are added to the network.
In addition to benchmarking the network as a whole, it makes sense to capture baselines for individual systems. Like networks, servers transition between known states. Engineers use various tools to capture baselines for the network and its systems, including auditing tools, protocol analyzers, and more. Many network device manufacturers, such as Cisco Systems and Juniper Networks, sell monitoring tools that are specific to their product lines. Similar manufacturer-specific tools are available for operating systems.
Maintaining System Software
Software of all types must be kept up to date if systems are to remain functional and secure. We’re not just talking about enterprise software—control systems run on software, and so do videoconferencing platforms.
Every organization should have a policy for maintaining software on its systems. This policy should include software selection criteria, implementation procedures, and documentation requirements. Failure to have a policy in place for new software installation could cause legal and security problems for an enterprise.
Installing New Software
System administrators and network engineers should be responsible for most software installations on an enterprise network. The new software installation must first go through a rigorous selection and testing process. It is installed first on a nonproduction system to verify compatibility with existing software. Only after passing these tests can the software be implemented on live systems. At this point, it is documented and added to the baseline.
Patches, Upgrades, and Service Packs
You’re not done when the software is installed. It must be maintained with patches, service packs, and upgrades. Maintenance is typically scheduled during nonpeak operating hours. Patch management is a critical policy-driven component of maintaining a networked environment. In most environments, it can be automated.
Depending on your systems, patches are delivered periodically from vendors. As patches arrive, they should be tested prior to installation on production equipment. Larger organizations create a special test lab. Smaller organizations lack the resources to create dedicated test labs. They normally opt for stronger backup policies in conjunction with their upgrade policies.
Patching and upgrading can also have a negative impact on your systems. Because vendors are focused on their own products, they might not consider how a change might affect other software. Some systems are very sensitive to change and might not be able to tolerate upgrades. Take caution any time a system upgrade is made. Every plan must include a backup and recovery plan in case the implementation fails.
Maintaining System Hardware
Purchasing networked hardware is like buying a car. Most owners realize that if they drive their car long enough, it will require oil and service. System hardware, like a car, will fail if it is not properly maintained. Because enterprise network systems are used for business, policy and planning dictate how and when maintenance is scheduled. Contingency planning is also necessary. Even the best systems will break and require replacement, upgrades, or new components.
Major changes in network architecture happen infrequently. However, when they do, they can be very disruptive. For example, the transition to Internet Protocol version 6 has not been smooth. Policy and highly detailed planning are essential for successful migration to newer technologies.
The rate of technical advancement has far exceeded most organizations’ abilities to adjust and implement. Therefore, most organizations delay major updates until they are desperately needed. This is often practical—many organizations choose to wait for a technology to mature before they undertake a major update. As when new software is adopted, adopting new hardware entails a rigorous selection, testing, and documentation process before any new devices are added to the network.
Chapter Review
In this chapter, you learned the basics of troubleshooting network problems, including general troubleshooting methodology and useful troubleshooting tools. Hopefully, you’re inspired to add to your troubleshooting toolkit. You may have more gear to bring to the next jobsite, but many of the tools discussed in this chapter are both virtual and free.
Practice with the CLI tools described in this chapter. Talk to your IT colleagues about their procedures for troubleshooting common problems. You’ll be surprised how often these utilities and techniques come in handy on the job.
And remember: An important part of keeping networked AV systems up and running is performing regular maintenance. If a system isn’t working correctly, check to make sure all the software and hardware are up to date, and work with the customer to craft a schedule of maintenance activities.
Now that you’ve completed this chapter, you should be able to
• Ask appropriate questions during the troubleshooting process to isolate problems and prevent reoccurrence
• Identify the function and practical application of network infrastructure troubleshooting tools
• Use TCP/IP utility programs to test network connectivity and configuration
• Perform basic network troubleshooting
Review Questions
1. What is the first step in the troubleshooting process?
A. Localizing the failure to a particular device or subsystem
B. Outlining the testing procedure
C. Identifying the symptoms of system failure
D. Listing the components or functions that could have caused the system to fail
2. If you don’t have complete physical topology documentation, a(n) ______ can help you trace a CAT cable running through a building.
A. network protocol analyzer
B. tone generator and tracker
C. optical time-domain reflectometer (OTDR)
D. network cable tester
3. A(n) _______ allows you to test whether the network interface card (NIC) of a particular device has failed.
A. network protocol analyzer
B. tone generator and tracker
C. optical time-domain reflectometer (OTDR)
D. loopback tester
4. A(n) _______ can estimate the length of overall attenuation of a fiber-optic network cable.
A. optical time-domain reflectometer (OTDR)
B. network protocol analyzer
C. loopback tester
D. network cable tester
5. The results of a Ping test show _______.
A. the IP configuration of the sending and target devices
B. the route the echo request took to reach the target device
C. success or failure of the echo request(s) and time in transit
D. all ports the sending device is currently using
6. The _____ tool allows you to check what path data takes between two network nodes.
A. Netstat
B. Traceroute
C. Nslookup
D. Ping
7. If an intermediate hop in a Traceroute test returns a “timed out” error, the most likely reason is that ______.
A. the intermediate device is malfunctioning
B. the intermediate device is administratively blocking ICMP requests
C. the ICMP packets failed to reach the intermediate device
D. there is excessive network congestion on that hop
8. The ______ tool can be used to identify which ports are being used by a device to send or receive information.
A. Ping
B. Netstat
C. Nslookup
D. Traceroute
9. The _______ tool can be used to reveal a device’s current assigned DNS name, IP address, subnet mask, default gateway, and so on.
A. Netstat
B. Ping
C. Nslookup
D. Ipconfig
10. The address resolution protocol (ARP) command-line interface tool is used to _______.
A. manually configure name-to-address resolutions
B. set a static IP address for a given destination device
C. display the contents of the ARP cache
D. identify the IP addresses associated with all MAC addresses on the network
11. The _____ tool is used to identify problems with DNS name resolution.
A. Traceroute
B. ICMP
C. Netstat
D. Nslookup
Answers
1. C. Identifying the symptoms of a system failure is the first step in the troubleshooting process.
2. B. If you don’t have complete physical topology documentation, a tone generator and tracker can help you trace a CAT cable running through a building.
3. D. A loopback tester allows you to test whether the network interface card (NIC) of a particular device has failed.
4. A. An optical time-domain reflectometer (OTDR) can estimate the length of overall attenuation of a fiber-optic network cable.
5. C. The results of a Ping test show success or failure of the echo request(s) and time in transit.
6. B. The Traceroute tool allows you to check what path data takes between two network nodes.
7. B. If an intermediate hop in a Traceroute test returns a “timed out” error, the most likely reason is that the intermediate device is administratively blocking ICMP requests.
8. B. The Netstat tool can be used to identify which ports are being used by a device to send or receive information.
9. D. The Ipconfig tool can be used to reveal a device’s current assigned DNS name, IP address, subnet mask, default gateway, and so on.
10. C. The address resolution protocol (ARP) command-line interface tool is used to display the contents of the ARP cache.
11. D. The Nslookup tool is used to identify problems with DNS name resolution.