4. Customizing the Look and Feel of Your Blog
Objective: To customize your Blogger blog.
If a blog is a type of personal diary, you probably want to make your blog look and feel as personal as possible. To that end, Blogger offers various ways to customize your blog—by applying different templates, changing color schemes, even editing the blog’s underlying HTML code. With all these options, you can personalize your blog as much—or as little—as you want.
Choosing a Different Template
When you first created your blog, you got to choose from a handful of different templates, each with its own unique layout, colors, and fonts. These initial templates are nice, but there aren’t a lot to choose from.
Tell Me More: Media 4.1—Why Personalizing Your Blog Is Important

Want to learn more about why bloggers customize their blogs? Listen to the audio file titled “Why Personalizing Your Blog is Important” on the companion Using website, my.safaribooksonline.com/9780132119603/media.
Selecting a New Blogger Template
Fortunately, Blogger offers additional templates for your blog—more than 35 different templates, if you’re counting. With so many choices, it’s relatively easy to switch from one template to another until you find the one that matches the content of your blog.
Show Me: Media 4.2—How to Change Blogger Templates

To learn how to switch Blogger templates, see the video titled “How to Change Blogger Templates” on the companion Using website, my.safaribooksonline.com/9780132119603/media.
Changing Blogger Templates
Blogger makes it easy to change blog templates. When you switch to a different template, all your blog content remains—but adapts to the new look.
Here’s how to make the change:
- From the Blogger Dashboard, click the Layout link next to your blog name.
- When the Layout tab appears, select the Pick New Template subtab.
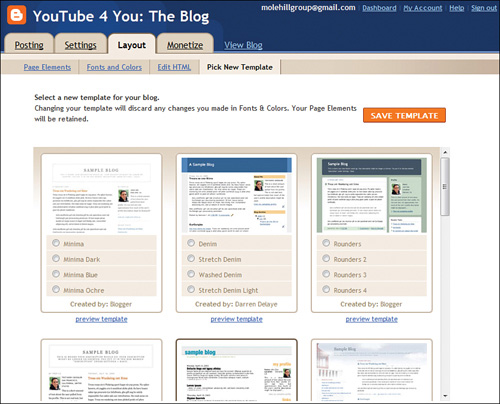
- All of Blogger’s templates are now displayed, as you can see in Figure 4.1. This is a larger selection of templates than was visible when you first created your blog; several template styles are available in different color variations. To preview how your blog will look with a given template, click the Preview Template link beneath that template.
Figure 4.1. Choosing a new template for your blog.
- To select a new template, check that template’s name.
- After you select a template, click the Save Template button.
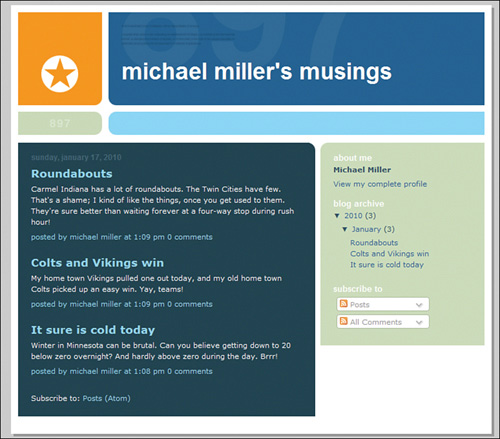
Figures 4.2 and 4.3 show the same blog with two different templates. As you can see, the template greatly affects the look and feel of the blog.
Figure 4.2. A blog with the Minima template.
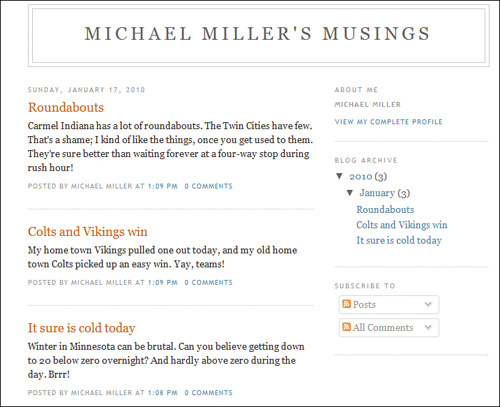
Figure 4.3. The same blog with the No. 897 template.
Finding Third-Party Templates
Many third-party developers have created additional templates for Blogger blogs. These templates can be downloaded from third-party websites and then uploaded to your Blogger blog as customized HTML code.
Some of the more popular third-party sources for Blogger templates include the following:
• Blog Crowds (www.blogcrowds.com/resources/blogger-templates/)
• Blogger Templates Blog (www.bloggertemplatesblog.com)
• BTemplates (www.btemplates.com)
• PYZAM (www.pyzam.com/bloggertemplates/)
Most of these sites offer their templates for free download as HTML code. Before you can install a template in Blogger, you must first download the third-party code to your computer’s hard drive and, if the code is in a ZIP file, unzip the file. You’ll then need to upload this HTML code as a new template in Blogger.
Show Me: Media 4.3—How to Install Third-Party Templates
To learn how to install third-party templates, see the video titled “How to Install Third-Party Templates” on the companion Using website, my.safaribooksonline.com/9780132119603/media.
 LET ME TRY IT
Using Third-Party Templates
To upload and install a third-party template to your blog, follow these steps:
- From the Blogger Dashboard, select the Layout link next to your blog name.
- When the Layout tab appears, select the Edit HTML subtab.
- When the Edit HTML page appears, click the Browse button in the Backup/Restore Template section, shown in Figure 4.4.
Figure 4.4. Uploading a third-party template.

- When the Open dialog box appears, navigate to and select the template file you’ve previously downloaded, then click the Open button.
- Click the Upload button.
- Click the Preview button to see how the new template looks; click the Save Template button to activate the new template.
Personalizing Fonts and Colors
You don’t have to settle for the stock templates that Blogger provides. Blogger also lets you customize the fonts and colors used in any template, with a few clicks of your mouse.
What can you change? Just about everything!
For starters, you can change the color of each of the following elements:
• Page background
• Text (blog body text)
• Link
• Blog title
• Blog description
• Post title
• Border
• Sidebar title
• Sidebar text
• Visited text
For any of these items, you can choose a default color from the current template, select a color from a color chooser, or enter the HTML hex code for the precise color you want.
And that’s just color. You can also change the font family, style (normal, bold, or italic), and size of the following elements:
• Text (blog body text)
• Sidebar title
• Blog title
• Post footer
Show Me: Media 4.4—How to Change Fonts and Colors
To learn how to change fonts and colors, see the video titled “How to Change Fonts and Colors” on the companion Using website, my.safaribooksonline.com/9780132119603/media.
LET ME TRY IT
Changing Fonts and Colors
To customize the look of individual elements in your blog template, follow these steps:
- From the Blogger Dashboard, click the Layout link next to your blog title.
- When the Layout tab appears, select the Fonts and Colors subtab.
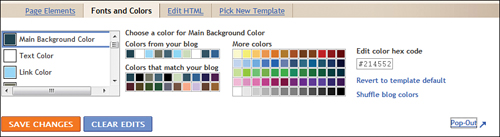
- The Fonts and Colors page is now displayed, as shown in Figure 4.5. To change the color of an element, select that element from the list and click the new color in the color picker.
Figure 4.5. Changing colors.
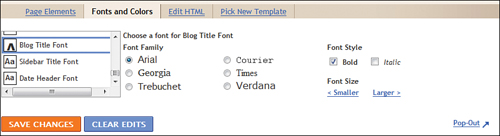
- To change the font of a text element, select that element from the list and choose a font family (Arial, Georgia, Trebuchet, Courier, Times, or Verdana), font style (normal, bold, or italic), and a font size (smaller or larger). Figure 4.6 shows these font options.
Figure 4.6. Changing fonts.
- The preview of your blog, at the bottom of the page, reflects your selections. Click the Save Changes button to register your changes.
Personalizing the Posts Section
The biggest part of any blog page is the posts section—that part of the page where your blog posts appear. It goes without saying that this is something you might want to customize.
What exactly can you change about your blog’s posts section? It’s a relatively long list, including the following:
• Number of posts on the main page
• Text for “jump” posts
• Date/time format (or not display at all)
• “Posted by” text
• “At time” text
• “Comments” text
• “Links to this post” text
• “Labels” text
• Show/hide quick editing icon
• Reactions buttons
• Show ads between posts
In addition to selecting which of these items to display (and with which text), you can also change the order for these items.
LET ME TRY IT
Customizing the Blog Posts Section
To customize the posts section of your blog, follow these steps:
- From the Blogger Dashboard, click the Layout link next to your blog title.
- When the Layout tab appears, select the Page Elements subtab.
- When the Page Elements page appears, click the Edit link for the Blog Posts element.
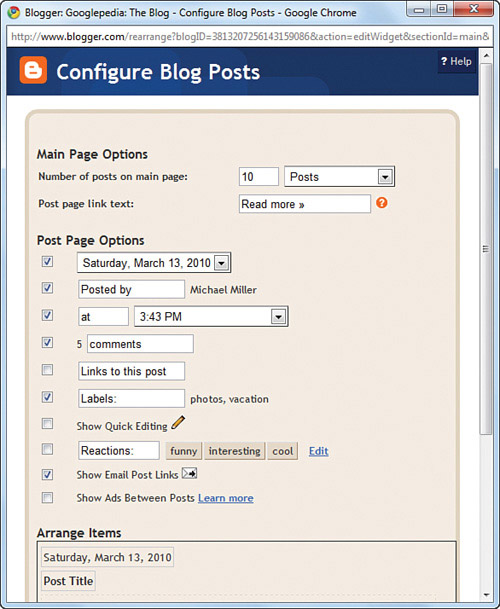
- When the Configure Blog Posts window appears, as shown in Figure 4.7, make the desired changes to the appropriate elements.
Figure 4.7. Configuring the elements in your blog’s posts section.
- To rearrange post elements, scroll to the Arrange Items section of the Configure Blog Posts dialog box, and use your mouse to drag an element to a new position.
- When you’re finishing customizing post elements, click the Save button.
Adding a Custom Image Header
If you really want to personalize your blog, consider adding a custom image at the top of your blog page. Most Blogger templates let you do this, by editing your blog’s header.
LET ME TRY IT
Customizing the Header
To customize your blog’s header to include a chosen image, follow these steps:
- From the Blogger Dashboard, click the Layout link next to your blog title.
- When the Layout tab appears, select the Page Elements subtab.
- When the Page Elements page appears, click the Edit link for the Header item.
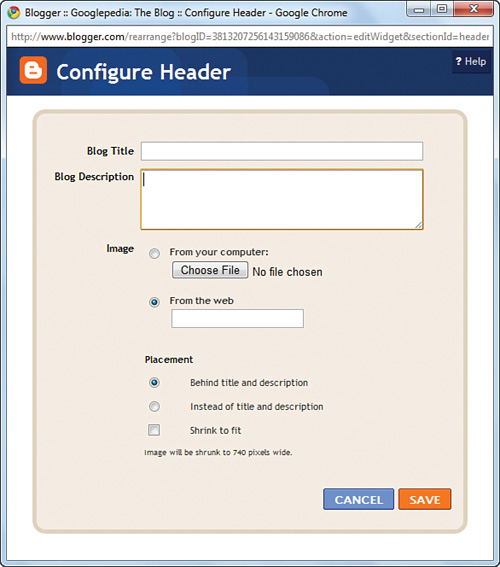
- When the Configure Header dialog box appears, as shown in Figure 4.8, go to the Image section and make sure the From Your Computer option is selected.
Figure 4.8. Adding an image to your blog’s header.
- Click the Choose File button.
- When the Open dialog box appears, navigate to and select the image file you want to use, and then click the Open button.
- Back in the Configure Header dialog box, go to the Placement section and select how you want the image displayed—behind the title and description or instead of the title and description.
- If the image is larger than the existing header, check the Shrink to Fit option.
- Click the Save button.
Advanced Customization: Editing Your Blogger Template with HTML and CSS
The ability to customize your Blogger blog doesn’t end with changing blog colors and fonts. If you know how to code in HTML, you can edit just about any piece of your blog page’s underlying HTML code. HTML editing is a powerful tool that lets you change anything on the page—providing you know what you’re doing, of course.
I won’t go into all the intricacies of HTML here; I’ll assume that if you’re editing code, you know what you’re doing. What I will do is point out some of the more important codes used to create Blogger pages.
First, know that Blogger uses Cascading Style Sheets (CSS), so most of the font and color information is set at the very top of the code. Look for the code that starts with the following line:
<style type="text/css">
Everything between this tag and the closing </style> tag defines all the elements used in the template’s style sheet. When you make changes to the definitions within this section, it affects the look of the entire style sheet.
The <div> tag denotes the various sections of your blog. For example, you’ll find <div> tags for the header (<div id='header-wrapper'>), main content (<div id='main-wrapper'>), and sidebar (<div id='sidebar-wrapper').
The sidebar is the part of the blog where you’ll probably do the most customization. There you can add new content or edit the attributes of the existing content and widgets. You can also edit universal font attributes in the Variable Definitions section at the very top of your template code.
I won’t go into a lot more detail about Blogger’s HTML code here because it’s quite involved. That said, it’s not that hard to figure out if you have any knowledge at all of HTML and CSS coding. You can find more information from Blogger online: www.google.com/support/blogger/bin/answer.py?answer=46870.
Show Me: Media 4.5—How to Edit Blogger’s HTML
To learn how to edit HTML code in Blogger, see the video titled “How to Edit Blogger’s HTML” on the companion Using website, my.safaribooksonline.com/9780132119603/media.
Editing Blogger’s HTML
If you want to edit the underlying HTML code for your Blogger page, here’s how to do it:
- From the Blogger Dashboard, click the Layout link next to your blog name.
- When the Layout tab appears, click the Edit HTML subtab.
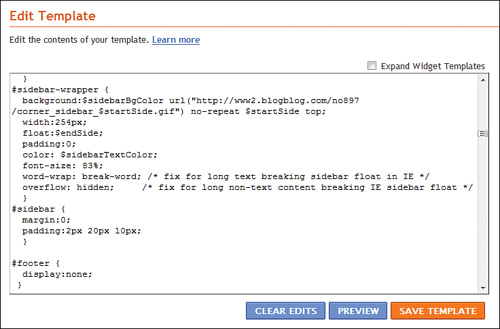
- This displays the Edit HTML page. The main text box in the Edit Template section displays the HTML code for your blog, as shown in Figure 4.9.
Figure 4.9. Editing your blog’s HTML code.
- By default, the code for your page’s gadgets is condensed within the main code. To display the complete code for all these modules, enable the Expand Widget Templates option.
- Edit the code within the main text box; preview your edits by clicking the Preview button.
- When you finish editing, click the Save Template button.