16. Looking Ahead with Blogger in Draft
Objective: To learn more about the constantly evolving Blogger program.
Blogger is a work in progress, and writing about Blogger is like shooting at a moving target; something is always changing. That’s a good thing, I think, as it means users get a continual stream of new features that make their blogs both more functional and easier to use.
Google previews many new features, before they’re implemented, in a special test version of Blogger dubbed Blogger in Draft. You can visit Blogger in Draft to see what new features are in the pipeline, or use Blogger in Draft (instead of the regular Blogger) to take advantage of those new features now rather than later.
What Is Blogger in Draft?
Think of Blogger in Draft as a beta version of the next version of Blogger. It’s where Google tries out upcoming features; a lot of what you see here will eventually migrate to the regular version of Blogger.
You access Blogger in Draft at http://draft.blogger.com. As you can see in Figure 16.1, Blogger in Draft looks pretty much like the regular Blogger—until you give it a closer inspection. When you start looking at the contents of the toolbar and the Settings pages, you notice a handful of items that aren’t present in the regular Blogger. These are the new features being previewed in Blogger in Draft.
Figure 16.1. The Blogger in Draft Dashboard—it looks pretty much like the regular Blogger Dashboard.
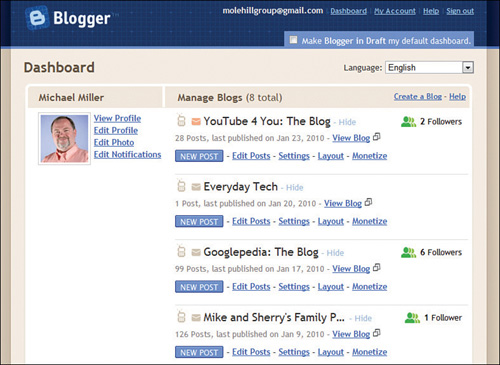
The reason Blogger in Draft exists is so Google can get a handle on whether proposed new features (a) work and (b) are truly useful. By getting a subset of Blogger users to test-drive these features before they’re rolled out to the general user base, Google can fix any bugs that pop up, fine-tune feature functionality, and weed out those proposed new features that really don’t add much to the mix.
To that end, the features you find in Blogger in Draft vary over time. Some Blogger in Draft features migrate to the main Blogger interface; some don’t. Some old features get dropped, while new features are constantly introduced. It’s a bit of a mixed bag, but always interesting.
The nice thing about Blogger in Draft is that it’s an open beta test. Anyone can use it; you don’t have to apply to a waiting list or be pre-approved or anything like that. All you have to do is access the Blogger in Draft page and start using it. The posts you create with Blogger in Draft go straight to your blog, the same as posts made from the regular Blogger interface.
To make Blogger in Draft your default blog editor, go to the Blogger in Draft Dashboard (http://draft.blogger.com) and check the Make Blogger in Draft My Default Dashboard option near the top of the page.
Tell Me More: Media 16.1—Should You Use Blogger in Draft?

To learn more about who should and shouldn’t use Blogger in Draft, listen to the audio clip titled “Should You Use Blogger in Draft?” on the companion Using website, my.safaribooksonline.com/9780132119603/media.
Examining New Blogger in Draft Features
So what features can you find on Blogger in Draft? It’s a fascinating bunch, if an ever-changing one. Given that the features available when you read this book may and probably will be different from the features I’m writing about, here’s a look at some of the more interesting things available in Blogger in Draft as of early 2010.
Blogger Pages
Here’s an interesting addition to Blogger’s functionality. Blogger Pages let you add standalone pages to your blog, in addition to your constantly changing blog post pages. These additional pages are great for displaying static information, such as information about you or your blog, contact information, maps and directions, and so forth.
Show Me: Media 16.2—How to Create a Blogger Page

To learn how to create a static Blogger Page, see the video titled “How to Create a Blogger Page” on the companion Using website, my.safaribooksonline.com/9780132119603/media.
 LET ME TRY IT
Creating a Blogger Page
To create a Blogger Page using Blogger in Draft, follow these steps:
- From the Blogger in Draft Dashboard, select the Edit Posts link for the blog you want to edit.
- From the Posting tab, select the Edit Pages subtab.
- When the Edit Pages page appears, click the New Page button.
- When the next page appears, as shown in Figure 16.2, enter a title for this page into the Page Title box.
Figure 16.2. Creating a new Blogger Page.
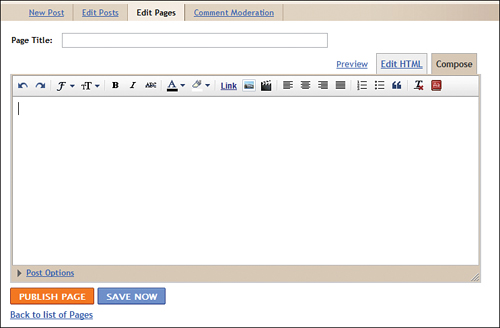
- Enter the content for the page into the main text box. Use the toolbar to format your text, add pictures and videos, and the like.
- Click the Preview link to view your page in progress, then click the Publish Page button when you’re finished.
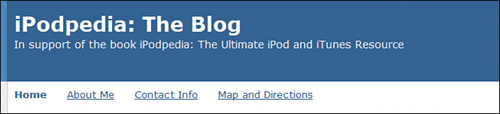
- To display your pages, Blogger must create a special Pages gadget. When the page shown in Figure 16.3 appears, select where you want the Pages gadget to appear—in your blog’s sidebar (shown in Figure 16.4) or along the top of the blog, as a series of tabs (shown in Figure 16.5). Make your selection and then click the Save and Publish button.
Figure 16.3. Creating the Pages gadget.
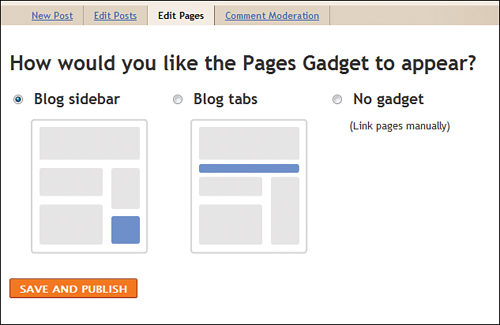
Figure 16.4. The Pages gadget in the blog’s sidebar.

Figure 16.5. Pages displayed as tabs along the top of the blog page.
Dictionary
If you’re ever at a loss for words, you’ll appreciate the new dictionary feature in the Blogger in Draft post editor. This feature displays dictionary definitions for any words you enter; it can also translate a word into a variety of different languages.
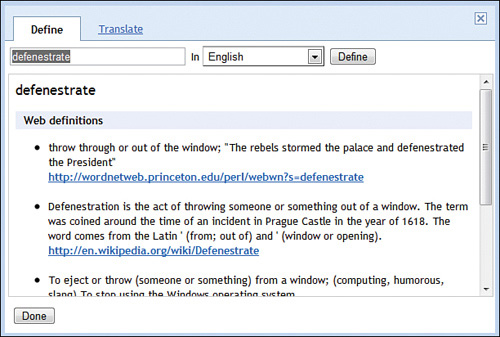
To use the dictionary, simply highlight a word and then click the Dictionary button in the formatting toolbar. As you can see in Figure 16.6, the dictionary displays definitions and synonyms for the selected word.
Figure 16.6. Looking up a definition in the Blogger in Draft dictionary.
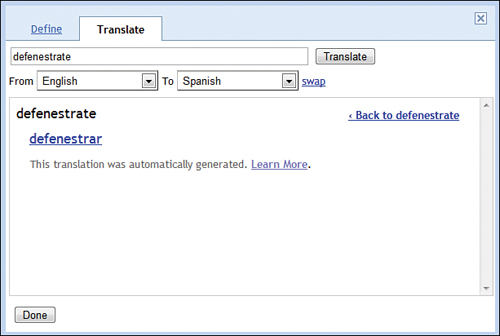
To translate the word, click the Translate link. The Translate tab, shown in Figure 16.7, lets you choose the From and To languages (from pull-down lists), with the translation(s) appearing below.
Figure 16.7. Translating a word from one language to another.
Geotagging
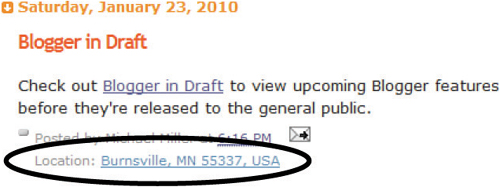
Blogger in Draft lets you geotag your blog posts. Geotagging adds location information to each post, as shown in Figure 16.8, so that readers can browse for posts near a specific location.
Figure 16.8. Location information in a geotagged blog post.
Show Me: Media 16.3—How to Geotag a Blog Post
To learn how to add geotagging to a blog post, see the video titled “How to Geotag a Blog Post” on the companion Using website, my.safaribooksonline.com/9780132119603/media.
LET ME TRY IT
Geotagging a Blog Post
To add geotagging information to a blog post in Blogger for Draft, follow these steps:
- From the Blogger in Draft Dashboard, select the New Post button for the selected blog.
- When the New Post page appears, click the Add Location link near the bottom of the post editor.
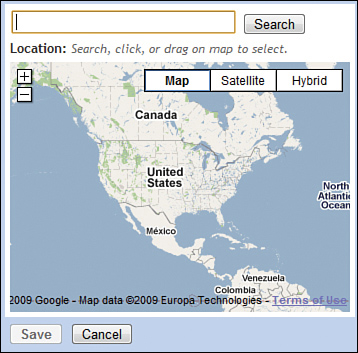
- This displays the Geotagging pane, as shown in Figure 16.9. Enter a location (city, state, ZIP code, and so forth) into the search box, or click the map to select a location.
Figure 16.9. Adding location information to a new blog post.
- Click the Save button.
- Continue editing the post as normal.
Reactions and Star Ratings
Blogger in Draft has added two new ways for readers to provide feedback on your blog posts, in addition to traditional comments.
The Reactions feature adds a series of reaction buttons beneath your post, like the ones shown in Figure 16.10. The default buttons are labeled Funny, Interesting, and Cool, although you can create any number of customized buttons. A reader can click a button to register how he feels about a post.
Figure 16.10. Reactions buttons and star ratings beneath a blog post.
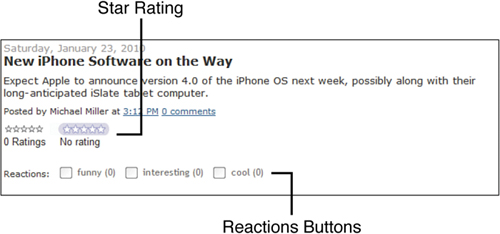
The star ratings feature enables readers to rate your posts on a five-star scale—the more stars, the better. The star ratings graphic appears beneath each blog post; readers click on the number of stars they want to assign to the post.
Show Me: Media 16.4—How to Enable Reactions and Star Ratings
To learn how to enable Reactions buttons and star ratings, see the video titled “How to Enable Reactions and Star Ratings” on the companion Using website, my.safaribooksonline.com/9780132119603/media.
LET ME TRY IT
Adding Reactions Buttons and Star Ratings
To add Reactions buttons and star ratings to a post, follow these steps:
- From the Blogger in Draft Dashboard, select the Layout link for the selected blog.
- When the Layout tab appears, make sure the Page elements subtab is selected.
- From the Page Elements subtab, click the Edit link for the main Blog Posts element.
- When the Configure Blog Posts window appears, as shown in Figure 16.11, check the Reactions option.
Figure 16.11. Configuring your blog posts to display Reactions buttons and star ratings.

- To change the Reactions buttons, click the Edit link and enter the button labels you prefer, separated by commas.
- Check the Show Star Ratings option.
- Click the Save button.
Template Designer
The latest Blogger in Draft feature helps you design your own custom Blogger templates. The Template Designer lets you choose custom backgrounds, layouts, text colors, and fonts for your blog, in an easy-to-use fashion.
LET ME TRY IT
Designing a Custom Template
To use Blogger in Draft’s new Template Designer, follow these steps:
- From the Blogger in Draft Dashboard, select the Layout link for the selected blog.
- From the Layout tab, select the Template Designer subtab. This displays the Template Designer pane at the top of the page.
- To apply an existing template to your blog, select the Templates tab on the left, as shown in Figure 16.12, and then click the template you want to apply.
Figure 16.12. Applying a new template with the Blogger Template Designer.

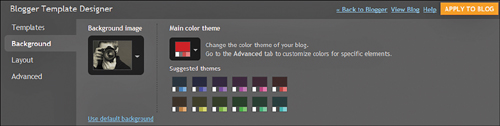
- To apply a background image to your blog, select the Background tab on the left, and then click the down-arrow next to the Background Image control, as shown in Figure 16.13. When the Select Background Image box appears, select a category, click the image you want to use, and then click the Done button.
Figure 16.13. Adding a background image and changing the blog color scheme.
- To change the color theme, select the Background tab, click the down arrow next to the Main Color Theme control, and then click the color theme you want for your blog.
- To change the layout of your blog, click the Layout tab on the left, select Body Layout, and then click the thumbnail for the layout you want, as shown in Figure 16.14. To change the layout of your blog’s footer, click Footer Layout and select a layout. To adjust the width of your blog, click Adjust Width and make the appropriate adjustments.
Figure 16.14. Changing the blog layout.

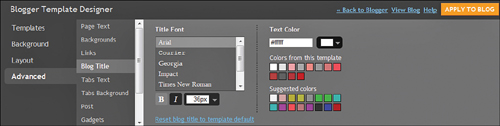
- To change text font and color, select the Advanced tab on the left, select the item you want to configure, and then select a new font family, size, and color, as shown in Figure 16.15.
Figure 16.15. Configuring text font, size, and color.
- When you’re finished making changes, click Apply to Blog.
And More to Come...
These are just a sampling of the new Blogger in Draft features available as of April 2010. By the time you read these words, it’s likely that some of these features will have migrated to the main Blogger interface, and that newer features will have been added to Blogger in Draft. That’s the way it works; there’s always something new.
To that end, it’s a good idea to subscribe to two official blogs that keep you up to date with new stuff happening in the Blogger universe. The Blogger in Draft blog (http://bloggerindraft.blogspot.com) informs you of new Blogger in Draft features, while the Blogger Buzz blog (http://buzz.blogger.com) is all about what’s new with the main Blogger site. They’re both must-reads for serious Blogger users.