14. Making Money from Your Blog
Objective: To use your blog to earn money.
Here’s something cool—and potentially profitable—about Blogger. Google lets you insert context-sensitive text advertisements into your blog, which (in theory) could generate a bit of income for you. Every time a visitor clicks on one of the ad links, you earn a small commission.
These context-sensitive ads are served by another part of the Google empire, dubbed Google AdSense. You can place AdSense ads on your main blog page, as well as in your blog’s RSS feed. Many bloggers find that they can generate significant revenue by placing these types of ads on their blogs and feeds.
How AdSense Works
When you want to generate revenue from your blog, you have to display advertisements on your blog pages. Since you’re not an advertising agency (at least, I don’t think you are), you need to avail yourself of some sort of online ad broker or network to place those ads on your blog for you.
The biggest such ad network is Google AdSense. Google’s AdSense for Content program places pay-per-click (PPC) advertising on individual websites and blogs. The way PPC advertising works is that advertisers pay only when someone clicks their ads. It also means you only get paid when someone clicks an ad on your blog. It’s the way most ads are placed on the Internet today.
Tell Me More: Media 14.1—How to Make Money from Your Blog

To learn more about making money from your blog site, listen to the audio clip titled “How to Make Money from Your Blog” on the companion Using website, my.safaribooksonline.com/9780132119603/media.
It Starts with One Little (Key) Word...
PPC ads are different from other types of ads in that they’re highly relevant to the pages on which they appear. That is, Google AdSense won’t display any old ad on your blog; instead, it tries to serve up the right ads for the right potential customers—your blog’s visitors, that is.
It all starts when an advertiser purchases a particular keyword or phrase from Google’s PPC ad network, Google AdWords. More precisely, the advertiser purchases ad space that appears on participating websites and blogs that relate to the keywords in question. The ads may also appear on Google’s search results pages when someone searches for a particular keyword.
The keywords purchased determine where the ad is displayed. An ad is placed on specific web pages that have content that relates to the purchased keyword. These are typically text-only ads that include a title, two lines of text, and the advertiser’s URL. These ads are typically placed in your blog’s sidebar, but can also be placed at the bottom of your blog page. You determine where the ads appear.
So, for example, if you have a blog that talks about computer repair, AdSense might display ads for computer-related products and services. If your blog discusses politics, AdSense might display ads pointing to other politically related websites.
Placing Ads in Context
The neat thing about AdSense is that Google uses advanced search technology to serve these content-focused ads—that is, ads that relate to the underlying content of the host web pages. And an ad that is somehow related to the content of a web page reaches a more targeted audience than a more broadly focused banner ad—and, theoretically, generates more and better traffic.
This context sensitivity benefits Google’s advertisers, of course, but also host sites like yours. If, for example, you host a blog about country music, only ads somehow related to country music will appear on your blog. You won’t see ads for dental supplies or baby shoes or radar detectors; your blog’s visitors will only see ads that are related to the main content of your blog. This makes the ads a little less annoying—and more likely to be clicked.
How does Google serve up these relevant ads? Well, to determine the content of pages for sites that participate in its advertising program, Google uses the same sophisticated algorithms that it uses to create its search index. Google analyzes the keywords that appear on a web page, as well as the word frequency, font size, and overall link structure to figure out, as closely as possible, what a page is all about. Then it finds ads that closely match that page’s content, and feeds those ads to the page.
Paying by the Click
The reason it’s called pay-per-click advertising is that an advertiser pays Google only when customers click on the link in an ad. (The link typically points to the advertiser’s website.) If no one clicks, the advertiser doesn’t pay anyone anything. The more clicks that are registered, the more the advertiser pays.
Ad rates are calculated on a cost-per-click (CPC) basis. That is, the advertiser is charged a specific fee for each click—anywhere from a few pennies to tens of dollars. The actual CPC rate is determined by the popularity of and competition for the keyword purchased, as well as the quality and quantity of traffic going to the site hosting the ad. As you can imagine, popular keywords have a higher CPC, while less popular keywords can be had for less.
Sharing Ad Revenues
And here’s the thing you’re bound to like about the AdSense program: revenues from these PPC ads get shared between the ad network and the hosting website—which is you. That’s right, any blog or website where an ad appears gets a cut of the ad revenues paid by the advertiser. Google collects the revenues from the advertisers and then passes your share on to you.
Here’s the process, in a nutshell:
- An advertiser creates an advertisement and contracts with Google AdWords to place that ad on the Internet.
- Google AdSense serves the ad in question to your blog, if the ad’s content matches your blog’s content.
- An interested customer sees the ad on your blog and clicks the link in the ad to receive more information.
- The advertiser pays Google, based on the CPC advertising rate.
- Google pays you a small percentage of the advertising fee paid.
Remember, nobody pays anything until someone actually clicks on the ad. If no one clicks an ad, the advertiser pays nothing—and you generate no revenue. That’s why PPC ads are context sensitive, the better to entice visitors to click on the ads, thus generating traffic for the advertiser and revenue for the host sites.
Adding AdSense Ads to Your Blog
Let’s start by examining how to place PPC ads on your main blog page. Since Google runs both Blogger and AdSense, the company makes sure that its two services work smoothly together.
Adding AdSense Ads to Your Blog
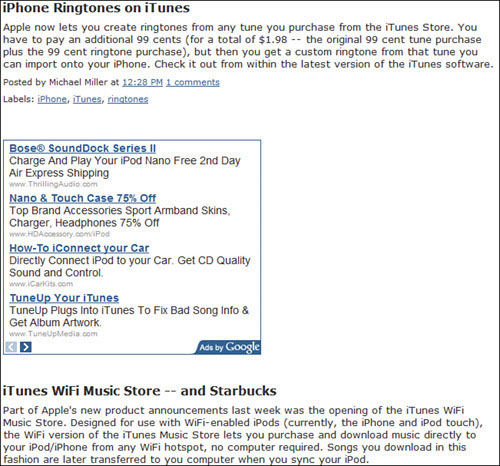
If you have a Blogger blog, it’s quite easy to add AdSense ads to your main blog page. You can insert ads in the blog’s sidebar, as shown in Figure 14.1; at the bottom of your blog, as shown in Figure 14.2; or between every blog post, as shown in Figure 14.3. Here’s how to do it:
Figure 14.1. A blog with AdSense ads in the sidebar.
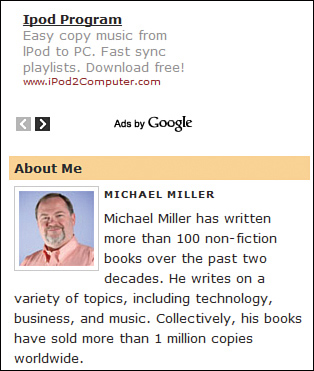
Figure 14.2. A blog with AdSense ads at the bottom of the page.
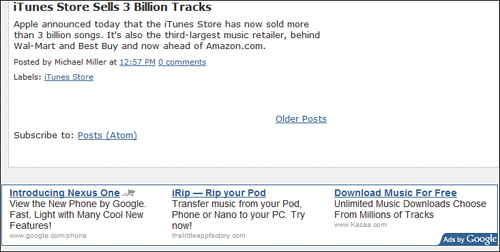
Figure 14.3. A blog with AdSense ads between blog posts.
Show Me: Media 14.2—How to Add AdSense Ads to Your Blog: The Easy Way

To learn how to easily place AdSense ads on your blog, see the video titled “How to Add AdSense Ads to Your Blog: The Easy Way” on the companion Using website, my.safaribooksonline.com/9780132119603/media.
 LET ME TRY IT
Activating AdSense: The Easy Way
- From within Blogger, open the Blogger Dashboard and click the Monetize link next to the selected blog.
- When the Make Money with AdSense page appears, as shown in Figure 14.4, select where you want ads to appear. You can opt to display ads in the sidebar and below each post; in the sidebar only; or below each post only.
Figure 14.4. Activating AdSense ads for a Blogger blog.
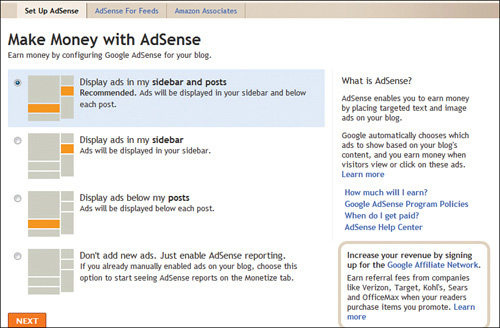
- Click Next.
That’s it; AdSense is now activated for your blog, and ads will appear where you specified.
Show Me: Media 14.3—How to Add AdSense Ads with Custom Placement
To learn how to place AdSense ads in custom spots on your blog, see the video titled “How to Add AdSense Ads with Custom Placement” on the companion Using website, my.safaribooksonline.com/9780132119603/media.
LET ME TRY IT
Activating AdSense: Custom Placement
There’s another way to add AdSense ads to your blog, however, that enables more targeted ad placement. With this method, you can display ads at the bottom of your blog, as well as multiple places within the sidebar. Just follow these steps:
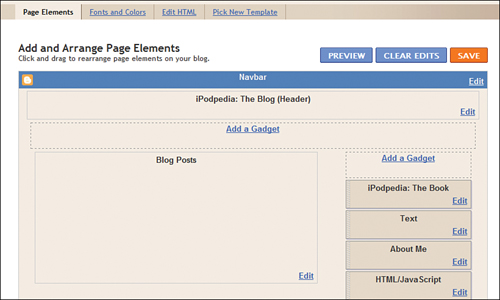
- From the Blogger Dashboard, click the Layout link next to the blog name.
- When the Layout page appears, as shown in Figure 14.5, select the Page Elements tab then click the Add a Gadget link in the sidebar or in the space at the bottom of the blog.
Figure 14.5. Customizing the placement of your AdSense ads.
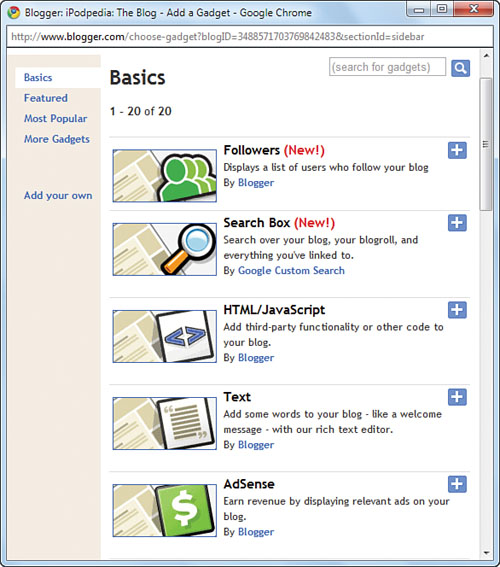
- When the Add a Gadget window appears, as shown in Figure 14.6, click the + button next to the AdSense item.
Figure 14.6. Adding a new AdSense gadget.
- When the Configure AdSense window appears, as shown in Figure 14.7, select a format for the ads, and determine whether you want to display text-only ads or both text and image ads.
Figure 14.7. Configuring an AdSense gadget for your blog.
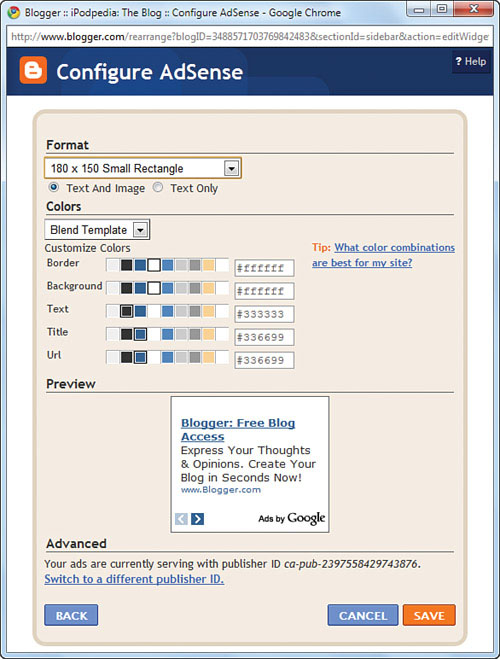
- Still in the Configure AdSense window, select a color template or custom colors for the ads, then click the Save button.
An AdSense module is now added to the sidebar or below your blog. To reposition an ad within the sidebar, simply click and drag it to a new position.
Adding AdSense Ads to Your Site Feeds
When you add an AdSense module to your blog, the ads appear only on your blog—not in the syndicated blog feed. Obviously, the more exposure for the ads, the more revenue you can generate, so it’s probably a good idea to include AdSense ads within your site feed. This isn’t hard to do, thanks to Google’s AdSense for Feeds program.
Show Me: Media 14.4—How to Add AdSense Ads to Your Site Feed
To learn how to put AdSense ads into your site feed, see the video titled “How to Add AdSense Ads to Your Site Feed” on the companion Using website, my.safaribooksonline.com/9780132119603/media.
Activating AdSense for Feeds
To add advertising to your site feed, you first need to have an AdSense account established. You then follow these steps:
- Log in to your AdSense account and select the AdSense Setup tab.
- Click the AdSense for Feeds link.
- When the AdSense For Feeds page appears, as shown in Figure 14.8, go to the Ad Type field and determine the type of ad you want—text ads only, image ads only, or both text and image ads.
Figure 14.8. Enabling AdSense for Feeds.

- In the Frequency field, determine how frequently you want the ads to appear—after each feed item or after every second, third, or fourth item.
- In the Post Length field, select the length of posts for which you want ads selected. The default is for posts of any length, but other options are available.
- In the Position field, select where you want the ads to appear—at the bottom or the top of each feed item.
- Click the Next button.
AdSense will now display ads on the selected blog feeds, in the manner specified.
Tracking AdSense Performance
After you’ve activated AdSense for your blog, you can view your ad activity in the standard AdSense console (www.google.com/adsense). This console tracks your click-through activity; you can also select the AdSense Setup and My Account tabs to manage the details of your account and ads.
Displaying Overview Information
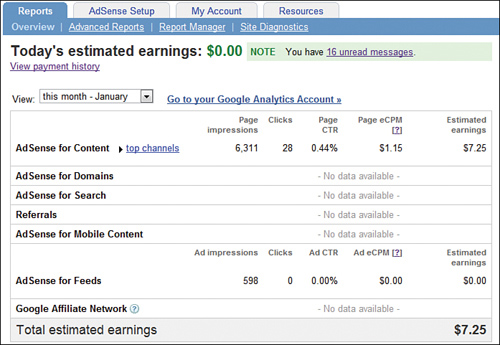
The most basic—and, for many users, the most useful—reports are found on the Overview subtab of the Reports tab. The primary overview, shown in Figure 14.9, details a variety of performance-related information for all your AdSense programs—including both AdSense for Content (for your main blog content) and AdSense for Feeds. It also details your total earnings for any selected period.
Figure 14.9. Viewing an overview of your AdSense performance.
Show Me: Media 14.5—How to Display AdSense Overview Information
To learn how to display an overview of your AdSense programs, see the video titled “How to Display AdSense Overview Information” on the companion Using website, my.safaribooksonline.com/9780132119603/media
The information presented includes the following:
• Page impressions—The number of people who have viewed your web pages. This doesn’t measure anything about the ads on your pages, just the number of visitors your pages receive.
• Clicks—The actual number of clicks that the ads on your pages receive. Each click represents a source of revenue.
• Page CTR—The click-through-rate per page. This measures the number of ad clicks divided by the number of impressions per page—in other words, what percentage of people who visit your pages click on the AdSense ads. Naturally, the higher the CTR the better, as it means that more of your visitors are clicking on the ads—and generating revenue for you.
• Page eCPM—The effective cost-per-thousand impressions per page. This represents your estimated earnings for every 1,000 impressions you receive; it doesn’t represent what you’ve actually earned. This metric is derived by dividing your total estimated earnings by total page impressions.
• Estimated earnings—This final column details the actual money you’ve earned for the selected period.
By default, this information is displayed for the current day only. You can, however, view data for other time periods—Yesterday, Last 7 Days, This Month, Last Month, and Since Last Payment. Just pull down the View list and select the desired time frame.
What’s the most important information in this overview? The earnings number is important, of course, as that’s the amount of money the ads on your site have generated for the given period. But I also find the click-through rate (CTR) valuable, as it tells you just how effective those ads are; it describes the percent of visitors who click on the ads. A low CTR indicates that the ads just aren’t work-ing—possibly because they’re not as targeted or relevant as they should be. This is a sign that you may need to tighten the focus of your blog, to help AdSense better target the ads it serves.
Generating Quick Reports
The Overview sub-tab also lets you generate a series of quick reports that show ad performance on a day-to-day basis for specific periods. You can then customize, to some degree, these quick reports to display more specific information.
Show Me: Media 14.6—How to Generate Quick Reports
To learn how to create AdSense quick reports, see the video titled “How to Generate Quick Reports” on the companion Using website, my.safaribooksonline.com/9780132119603/media.
Let’s start with the quick reports themselves. Scroll down to the Quick Reports section of the Overview subtab, as shown in Figure 14.10, and you see the following automatically generated reports:
• This month, by day
• This month, by channel & day
• Last month, by day
• Last month, by channel & day
• Since last payment, by day
• Since last payment, by channel & day
Figure 14.10. Available AdSense quick reports.
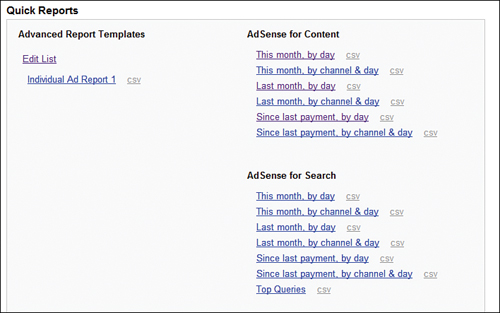
Click any link to display that quick report. If you’d rather download the raw data to work with in Microsoft Excel, click the CSV link instead; this downloads the data as a comma-separated value file, which imports cleanly into an Excel spreadsheet.
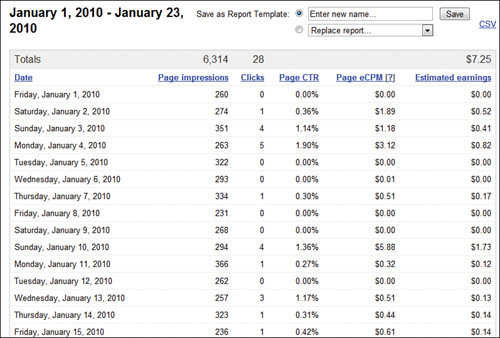
Figure 14.11 shows a typical “by day” report. Each day of the reporting period gets its own row, while you see the by-now familiar columns for Page Impressions, Clicks, Page CTR, Page eCPM, and Estimated Earnings. Click the link at the top of any column to re-sort the data by that metric.
Figure 14.11. Viewing a “by day” quick report.